Week 1: Principles and Practices, Project management
This week focuses on setting up the foundations for the Fab Academy course. This includes understanding the structure of the program, setting up my personal documentation website, learning basic HTML, and configuring version control using Git and GitLab. The work from this week establishes the workflow that will be followed throughout the rest of the course. Our instructors for this week were Saheen and Midlaj.
Final Project Ideations
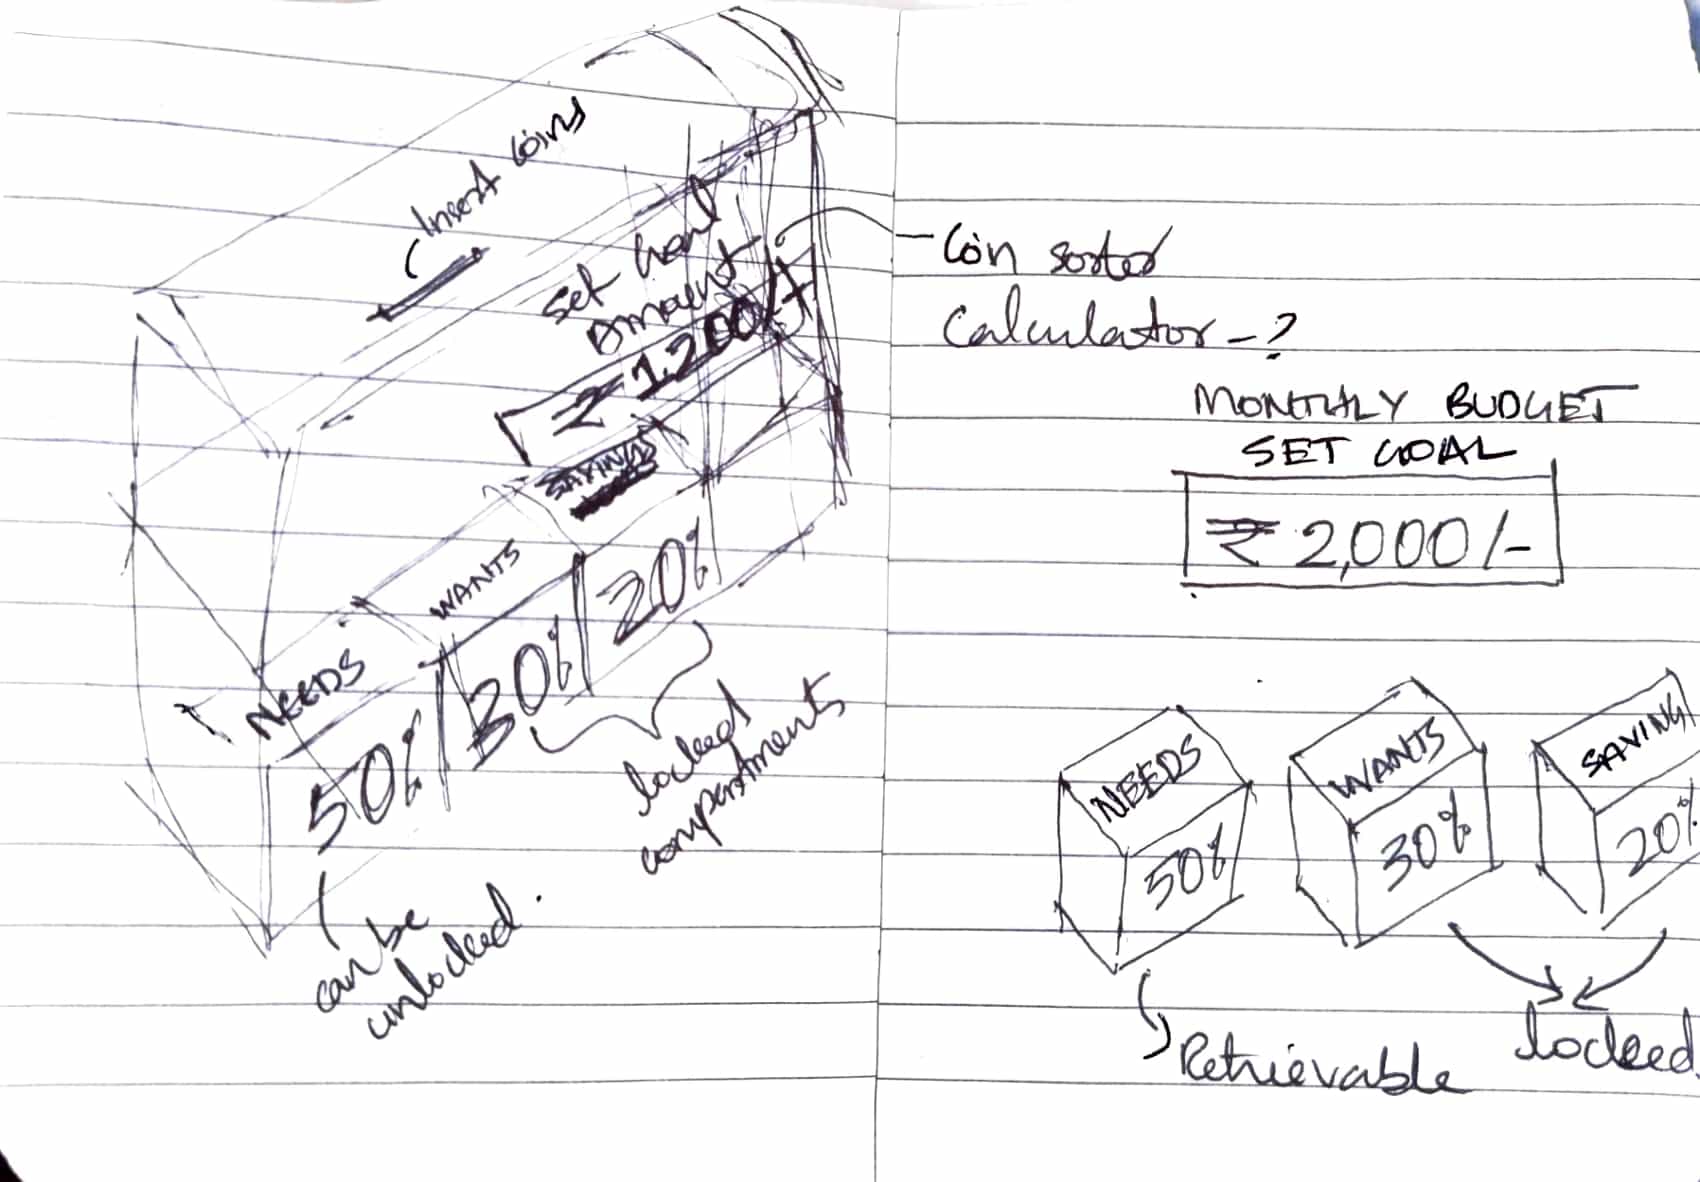
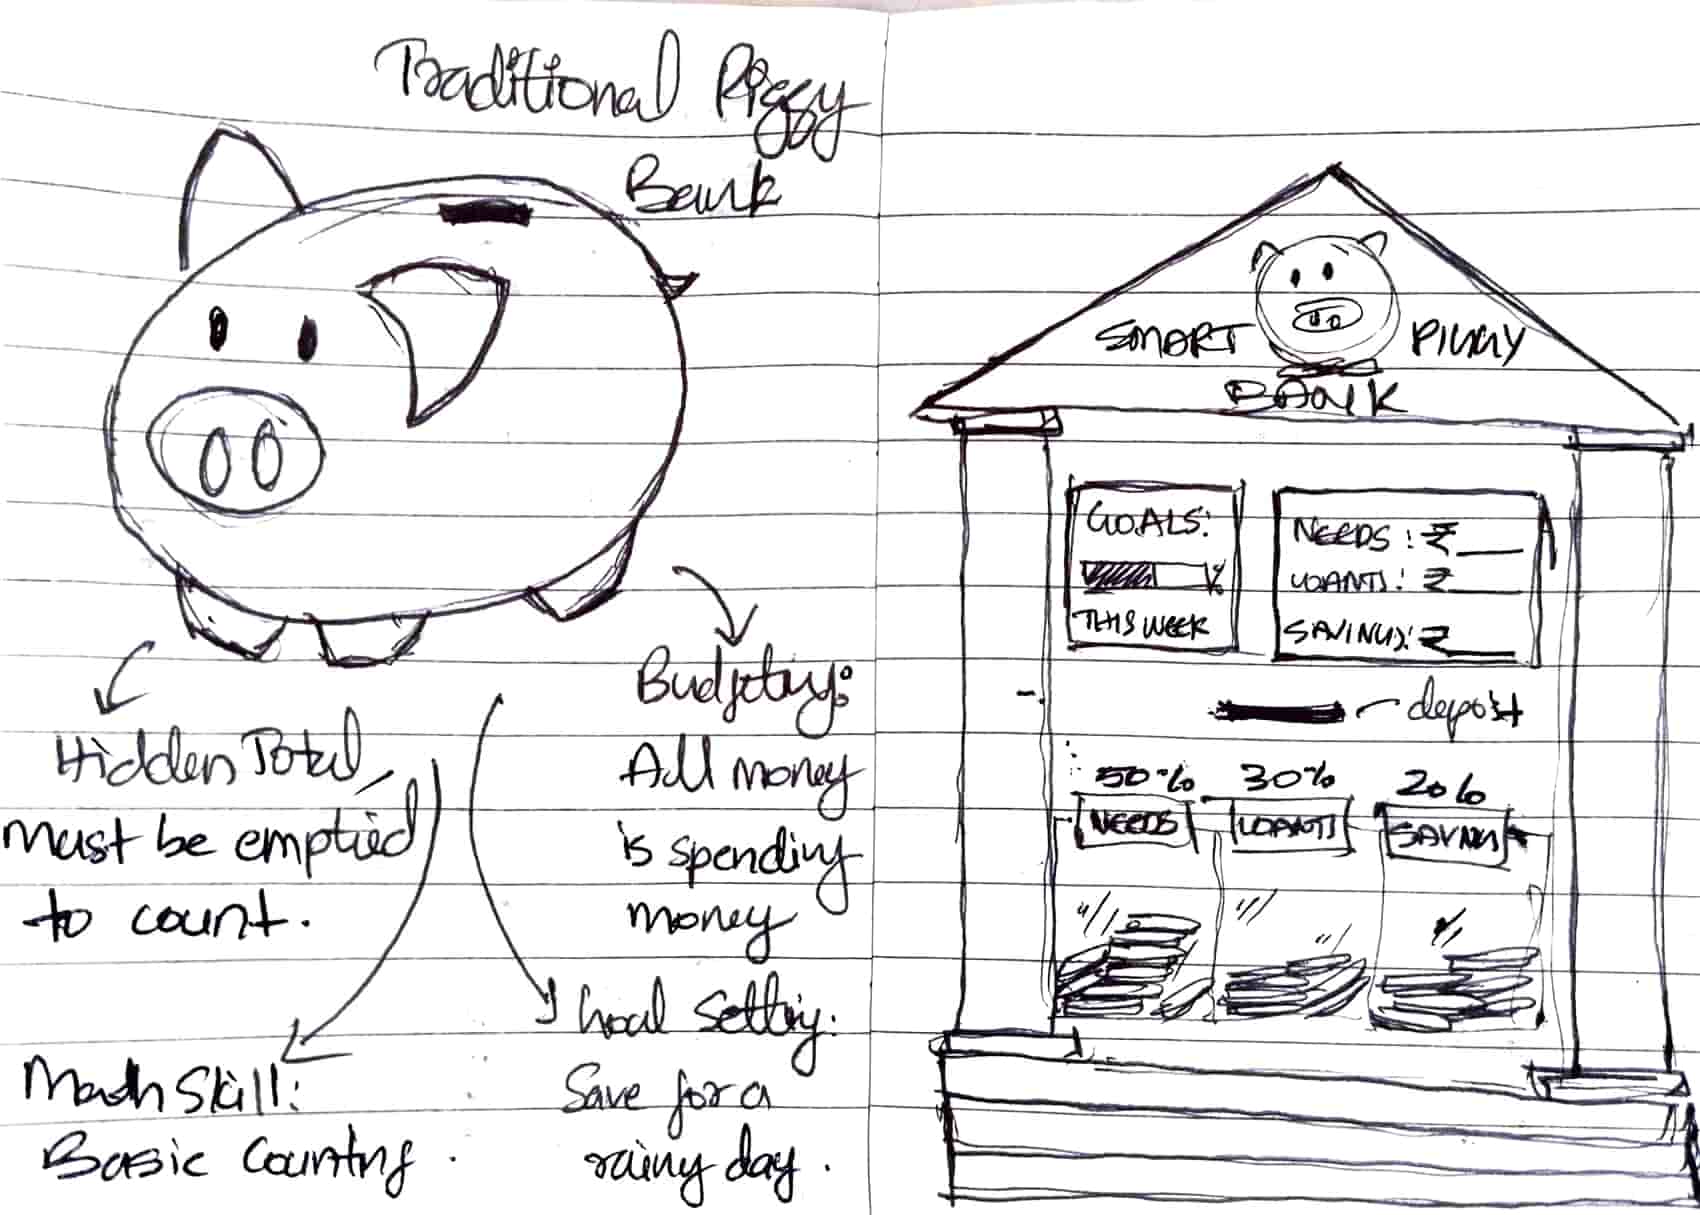
1. Smart Piggy Bank: Learning to Save with Purpose (Educational Toy)
This project explores a smart piggy bank designed to help children learn to save money with a clear goal in mind. While traditional piggy banks encourage collecting coins, they rarely help children understand the purpose behind saving or how small contributions gradually lead to achieving something meaningful. This project aims to turn saving into a more engaging learning experience.
Inspired by how children learn basic arithmetic through everyday activities such as counting coins or calculating change, the piggy bank becomes an interactive tool rather than a passive container. Children begin by setting a savings goal, such as buying a toy or book. As coins are deposited, the system tracks their progress and helps them visualize how close they are to reaching that goal.
The piggy bank acknowledges effort, encourages consistent saving, and celebrates milestones along the way. By combining goal setting, progress visualization, and positive reinforcement, the system helps children develop an early understanding of patience, planning, and purposeful saving.
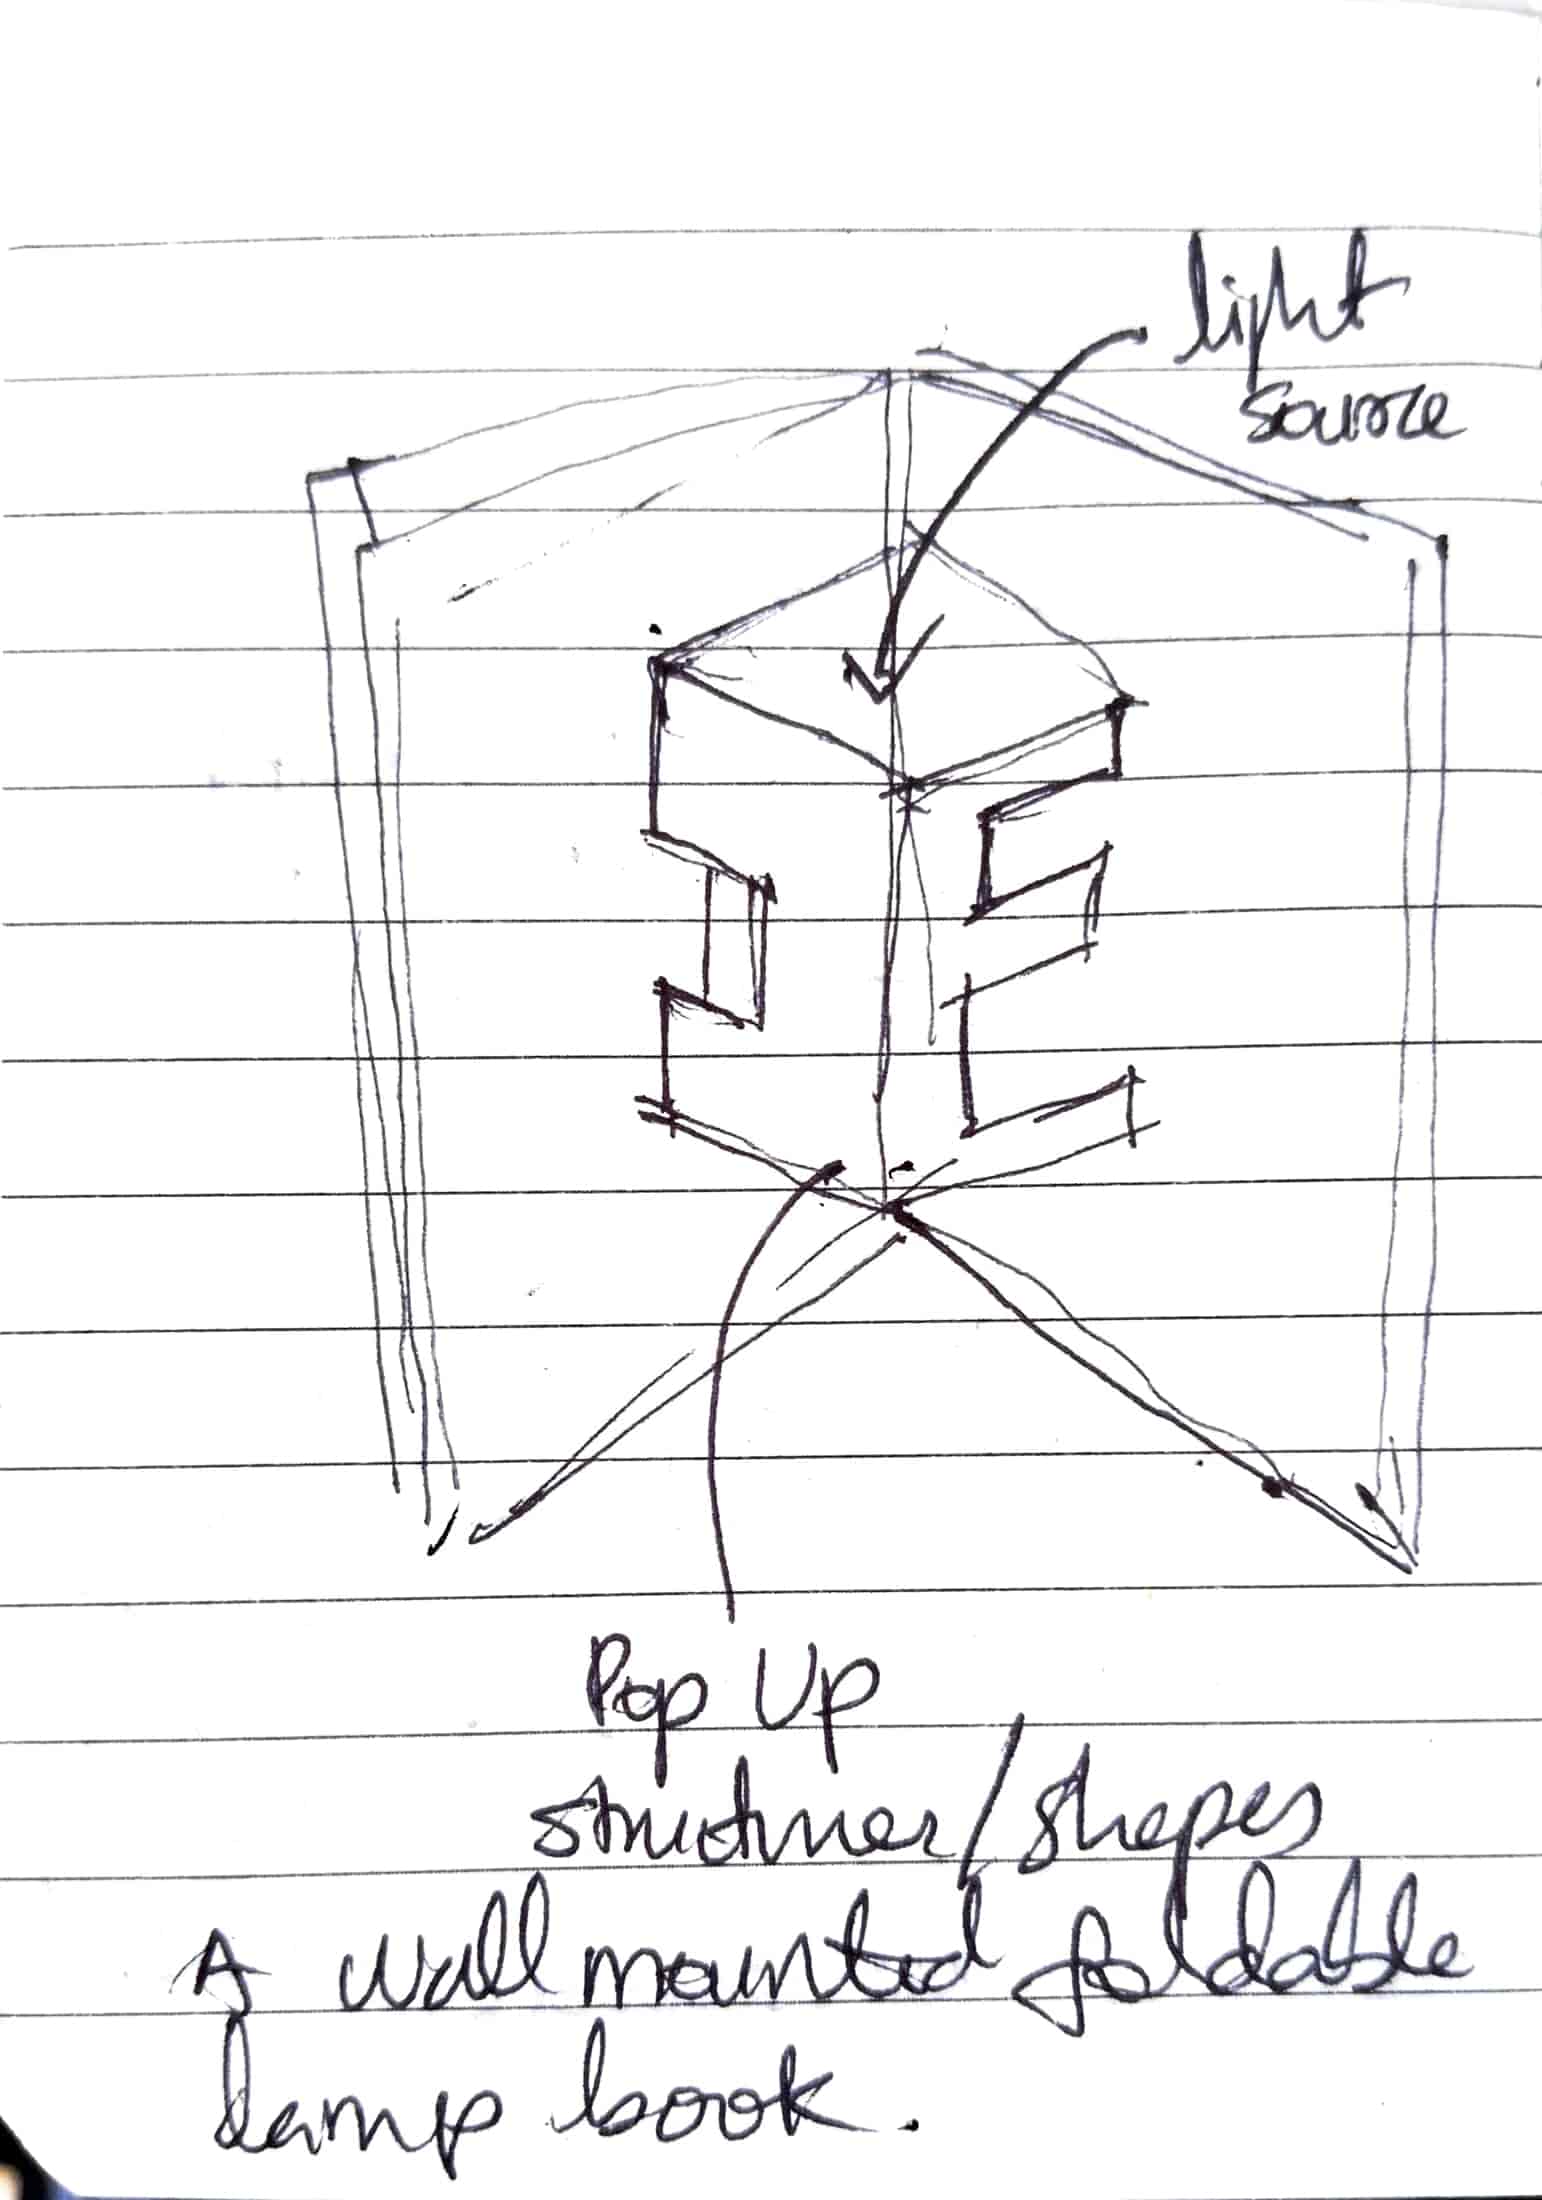
2. Pop-Up Folding Lamp Book (Transformative Objects)
This project is about exploring a lamp that changes form like a book. Each page has a different folded geometry, and when the pages are flipped mechanically, the lamp slowly transforms. Even though the form keeps changing, there is only one common light source, which creates many different spatial and lighting effects. The folds will be designed using kirigami principles, where cutting and folding the surface controls how light passes through it, how it spreads, diffuses, or gets directed in different ways. The light itself can be adjusted in terms of brightness or quality, but the main idea is to see how geometry alone can change the way light behaves, without changing the source. Through this project, I am trying to understand folding not just as a visual element, but as both a structural and optical system, where light and form work together to turn a static object into a series of different spatial experiences.
3. A Modular Folding Facade that Responds to Sunlight (Transformative Objects)
Mechanism: If light increases, it should open slowly. If light decreases, then it closes slowly. Inspired by how flowers naturally respond to sunlight - unfolds during dawn and folds back during dusk. When repeated, it can become a modular facade or a wall that can provide shade and visually communicate the environmental change. Uses principles of tessellation and origami.
4. Tangram Based Learning Board (Educational Toy)
This concept explores a modular tangram puzzle system designed to support spatial thinking and basic geometry learning through play. The board uses interchangeable puzzle sheets with geometric outlines, allowing children to complete forms using a common set of pieces. Light is used as a guiding element to highlight shapes and boundaries, encouraging accuracy and exploration rather than correctness. The project focuses on learning geometry through hands-on interaction, where problem-solving emerges from observation, trial, and spatial reasoning
5. A Smart Portable Calendar (Office Stationary)
This concept explores a folded desktop calendar that brings digital scheduling into a physical form. Designed as a triangular prism, it displays the month and dates on one face and a daily or weekly schedule on another, allowing updates through a phone while remaining visibly present on the desk. The project looks at how a familiar folded object can act as a physical anchor for planning, combining digital flexibility with the calm, tangible presence of a desk calendar.
Arriving at My Final Project
After exploring several possible directions, I decided to move forward with the Smart Piggy Bank concept. Many of the other ideas, especially those involving folding systems such as the lamp book or responsive facade, are closely related to areas I am already comfortable with, including origami, folding geometries, and spatial transformations. While those ideas are exciting, they largely sit within my existing skill set.
I wanted my final project to push me beyond that comfort zone and make full use of the opportunities offered by Fab Academy. Since I have very little background in electronics, developing a small smart system felt like a meaningful challenge. Building an interactive piggy bank requires integrating sensors, microcontrollers, and feedback mechanisms, which allows me to learn electronics through a tangible and purposeful object.
The project feels both challenging and achievable. It stretches my knowledge while remaining feasible within the time frame of the program. At the same time, the idea connects with education and behavior, exploring how a simple object can encourage children to think about saving with intention. For these reasons, the Smart Piggy Bank became the most compelling direction for my final project.
Orientation and Global Class
We began our 2026 Fab Academy journey with ten students at Super Fab Lab, Kochi . Wednesdays include a global class, where we got an overview of how Fab Academy is structured over the next six months and the kinds of projects students usually work on. We saw documentation and final projects from previous batches and were introduced to instructors and FabLabs from around the world. The session went on till around 10 p.m. (IST) and, while exciting, it was also quite overwhelming due to the amount of new information shared.
Working through a Git tutorial
Git is a free and open source distributed version control system designed to handle everything from small to very large projects with speed and efficiency. Git is lightning fast and has a huge ecosystem of GUIs, hosting services, and command-line tools.
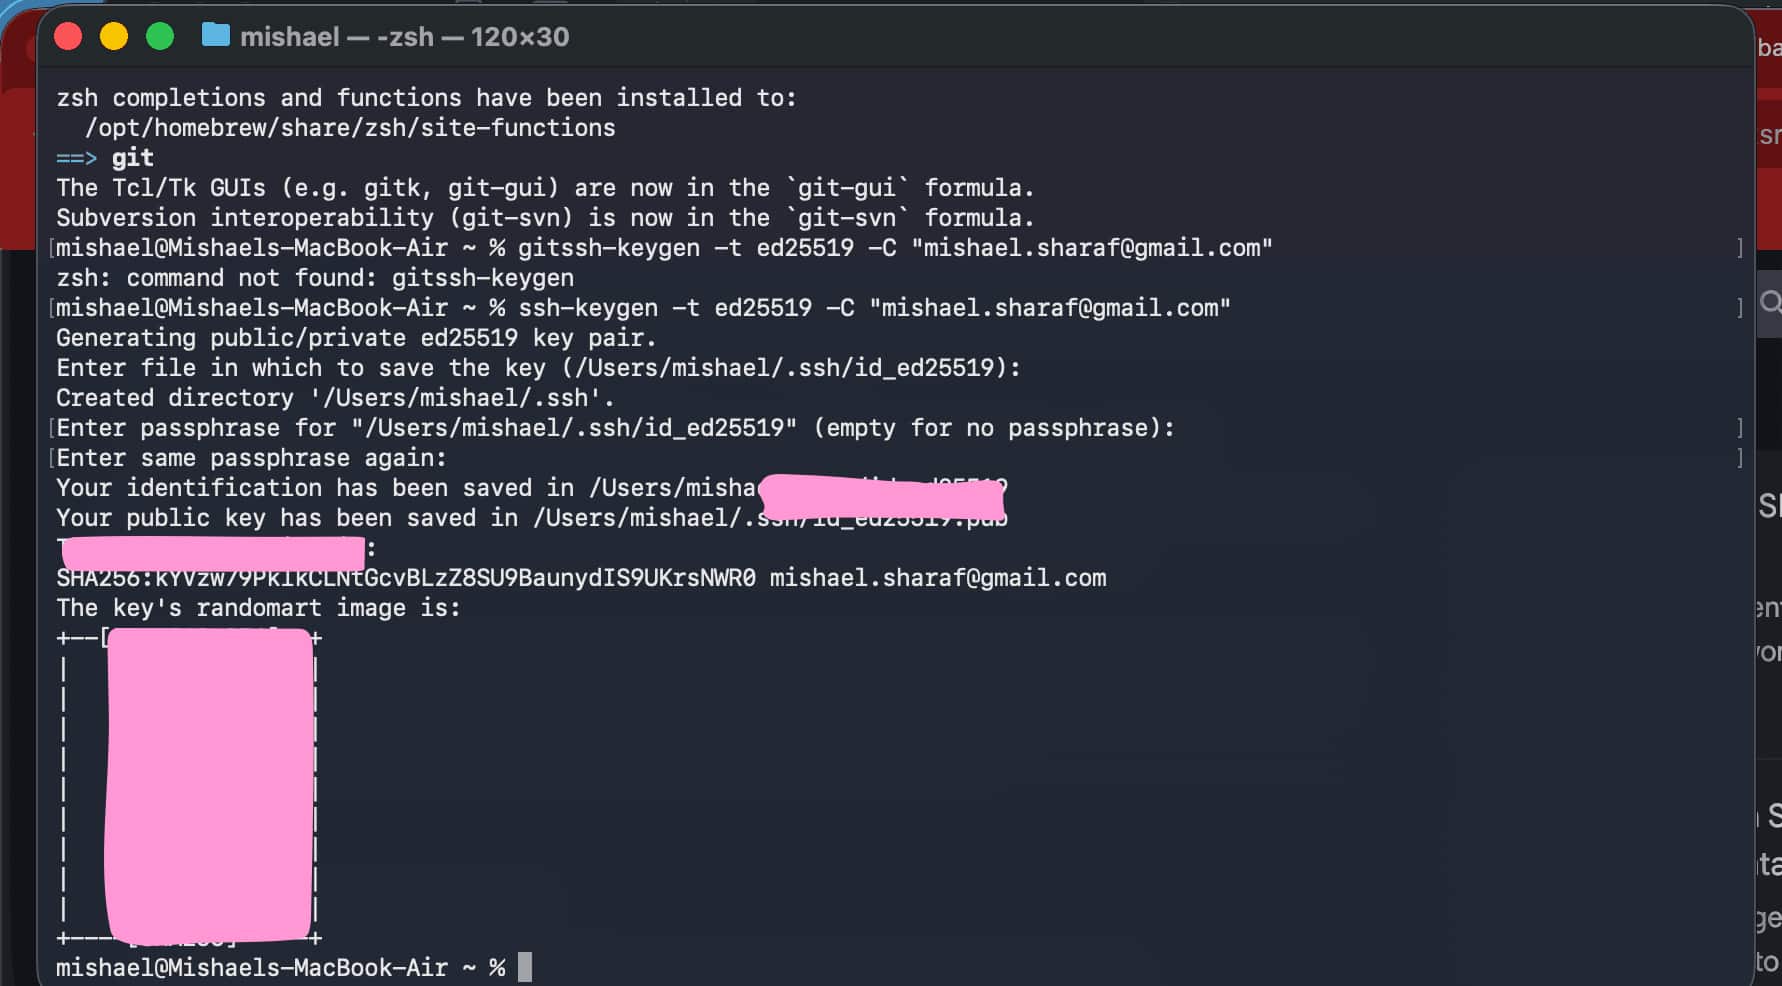
I had to first install homebrew through the terminal on my system - Macbook Air, to run Git, after which we added an SSH key to GitLab. Once Git is installed, we need to generate a SSH Key for files uploading.
Git Configuration
It is a good idea to introduce yourself to Git with your name and public email address before doing any operation. The easiest way to do so is:
Configure Name: git config --global user.name “Your Name”
Configure Email: git config --global user.email “your_email@example.com”
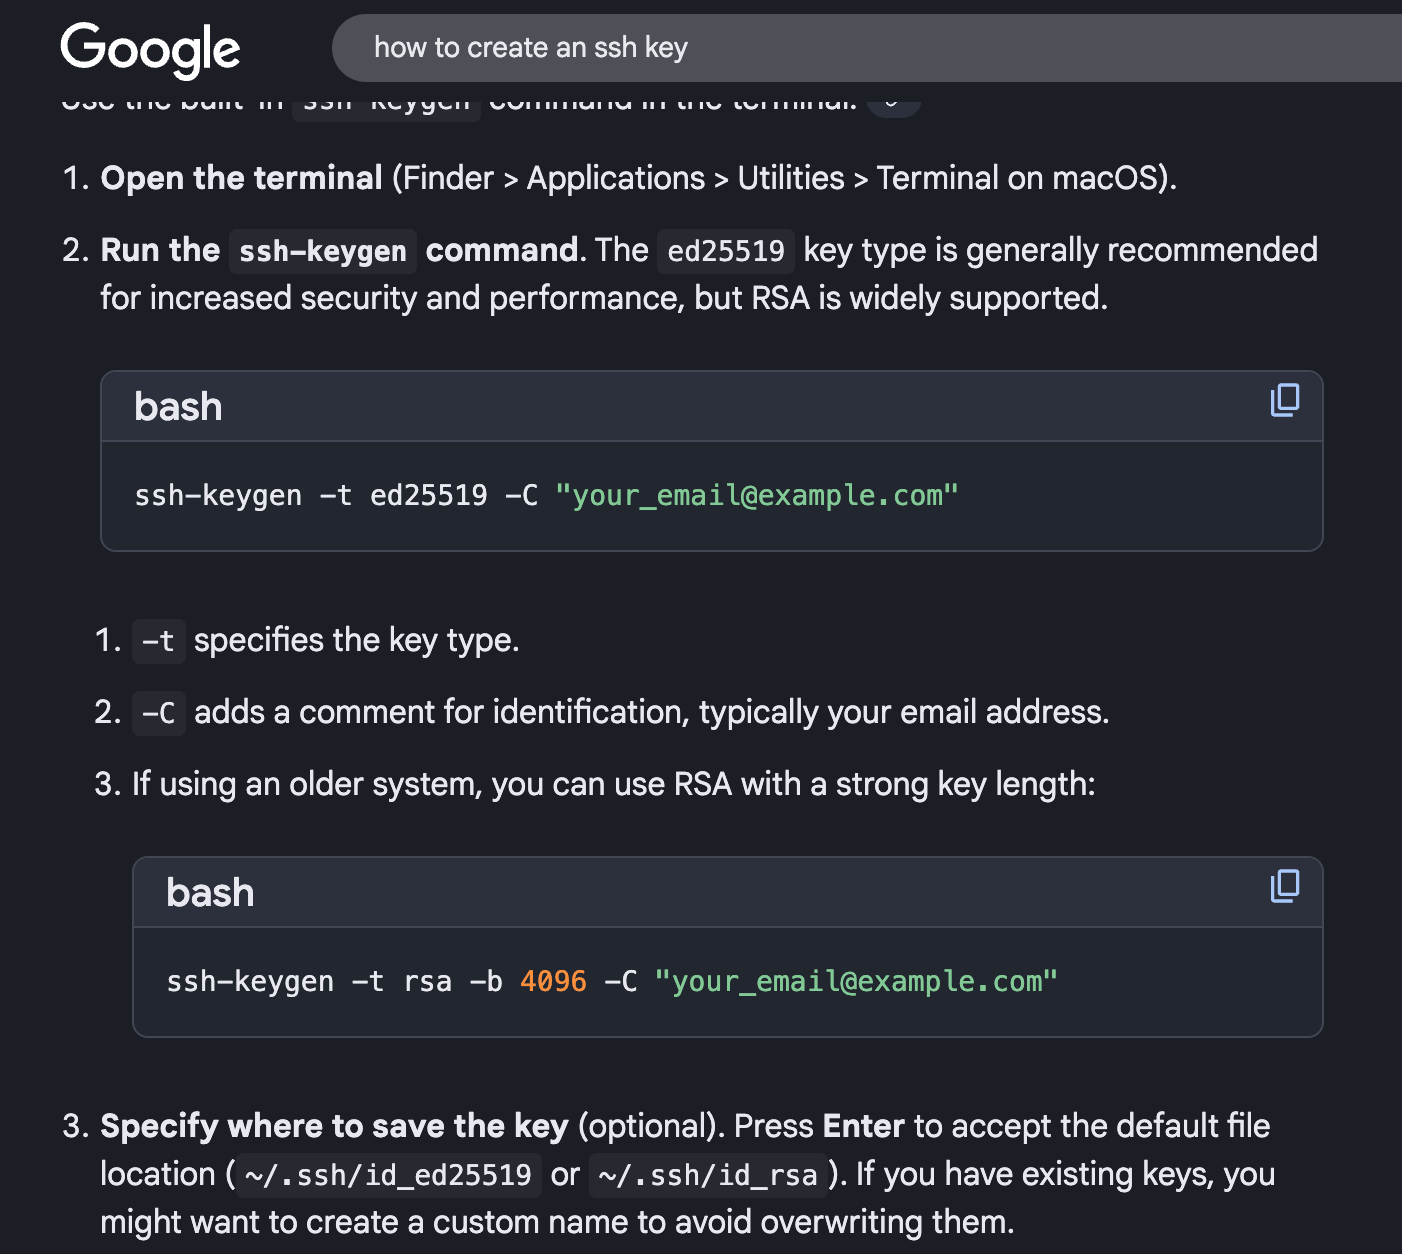
Generating SSH key
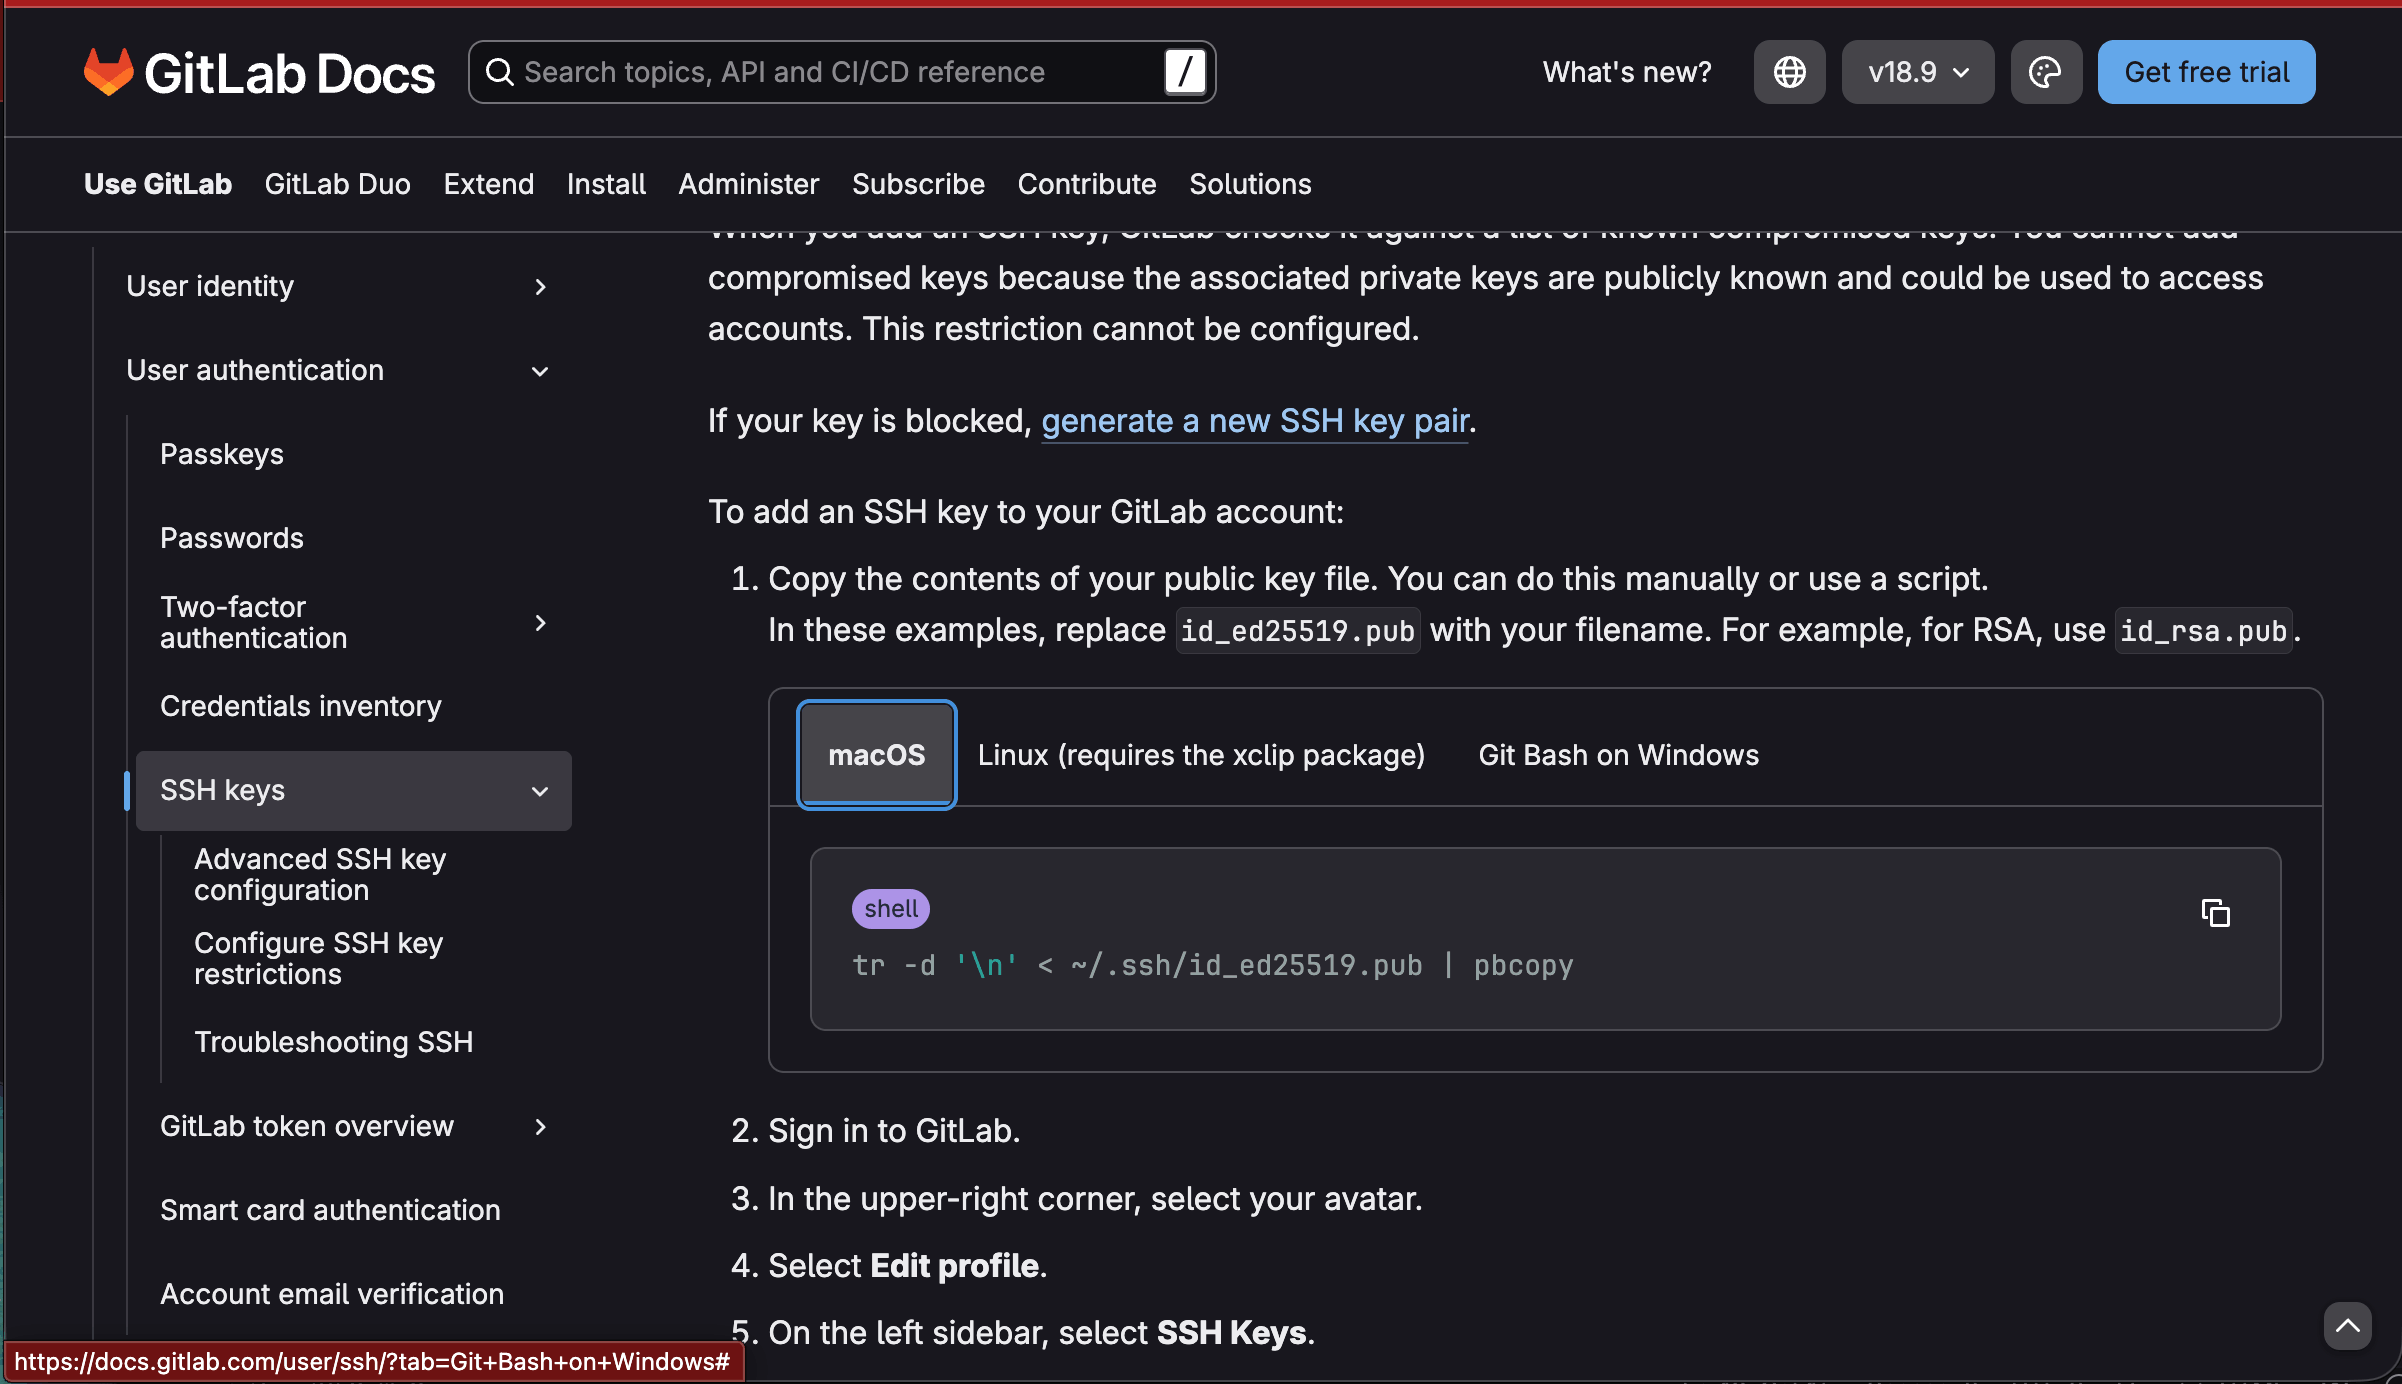
Download page of the Git and Gitlab docsI searched on Google on how to create an SSH key and the AI result showed the below image with command. The steps were followed on Terminal. Then to securely authenticate with GitLab, generate an SSH key.
Adding SSH key to GitLab
After adding the key, we can clone GIT repository locally to our computer.
Clone the Repository
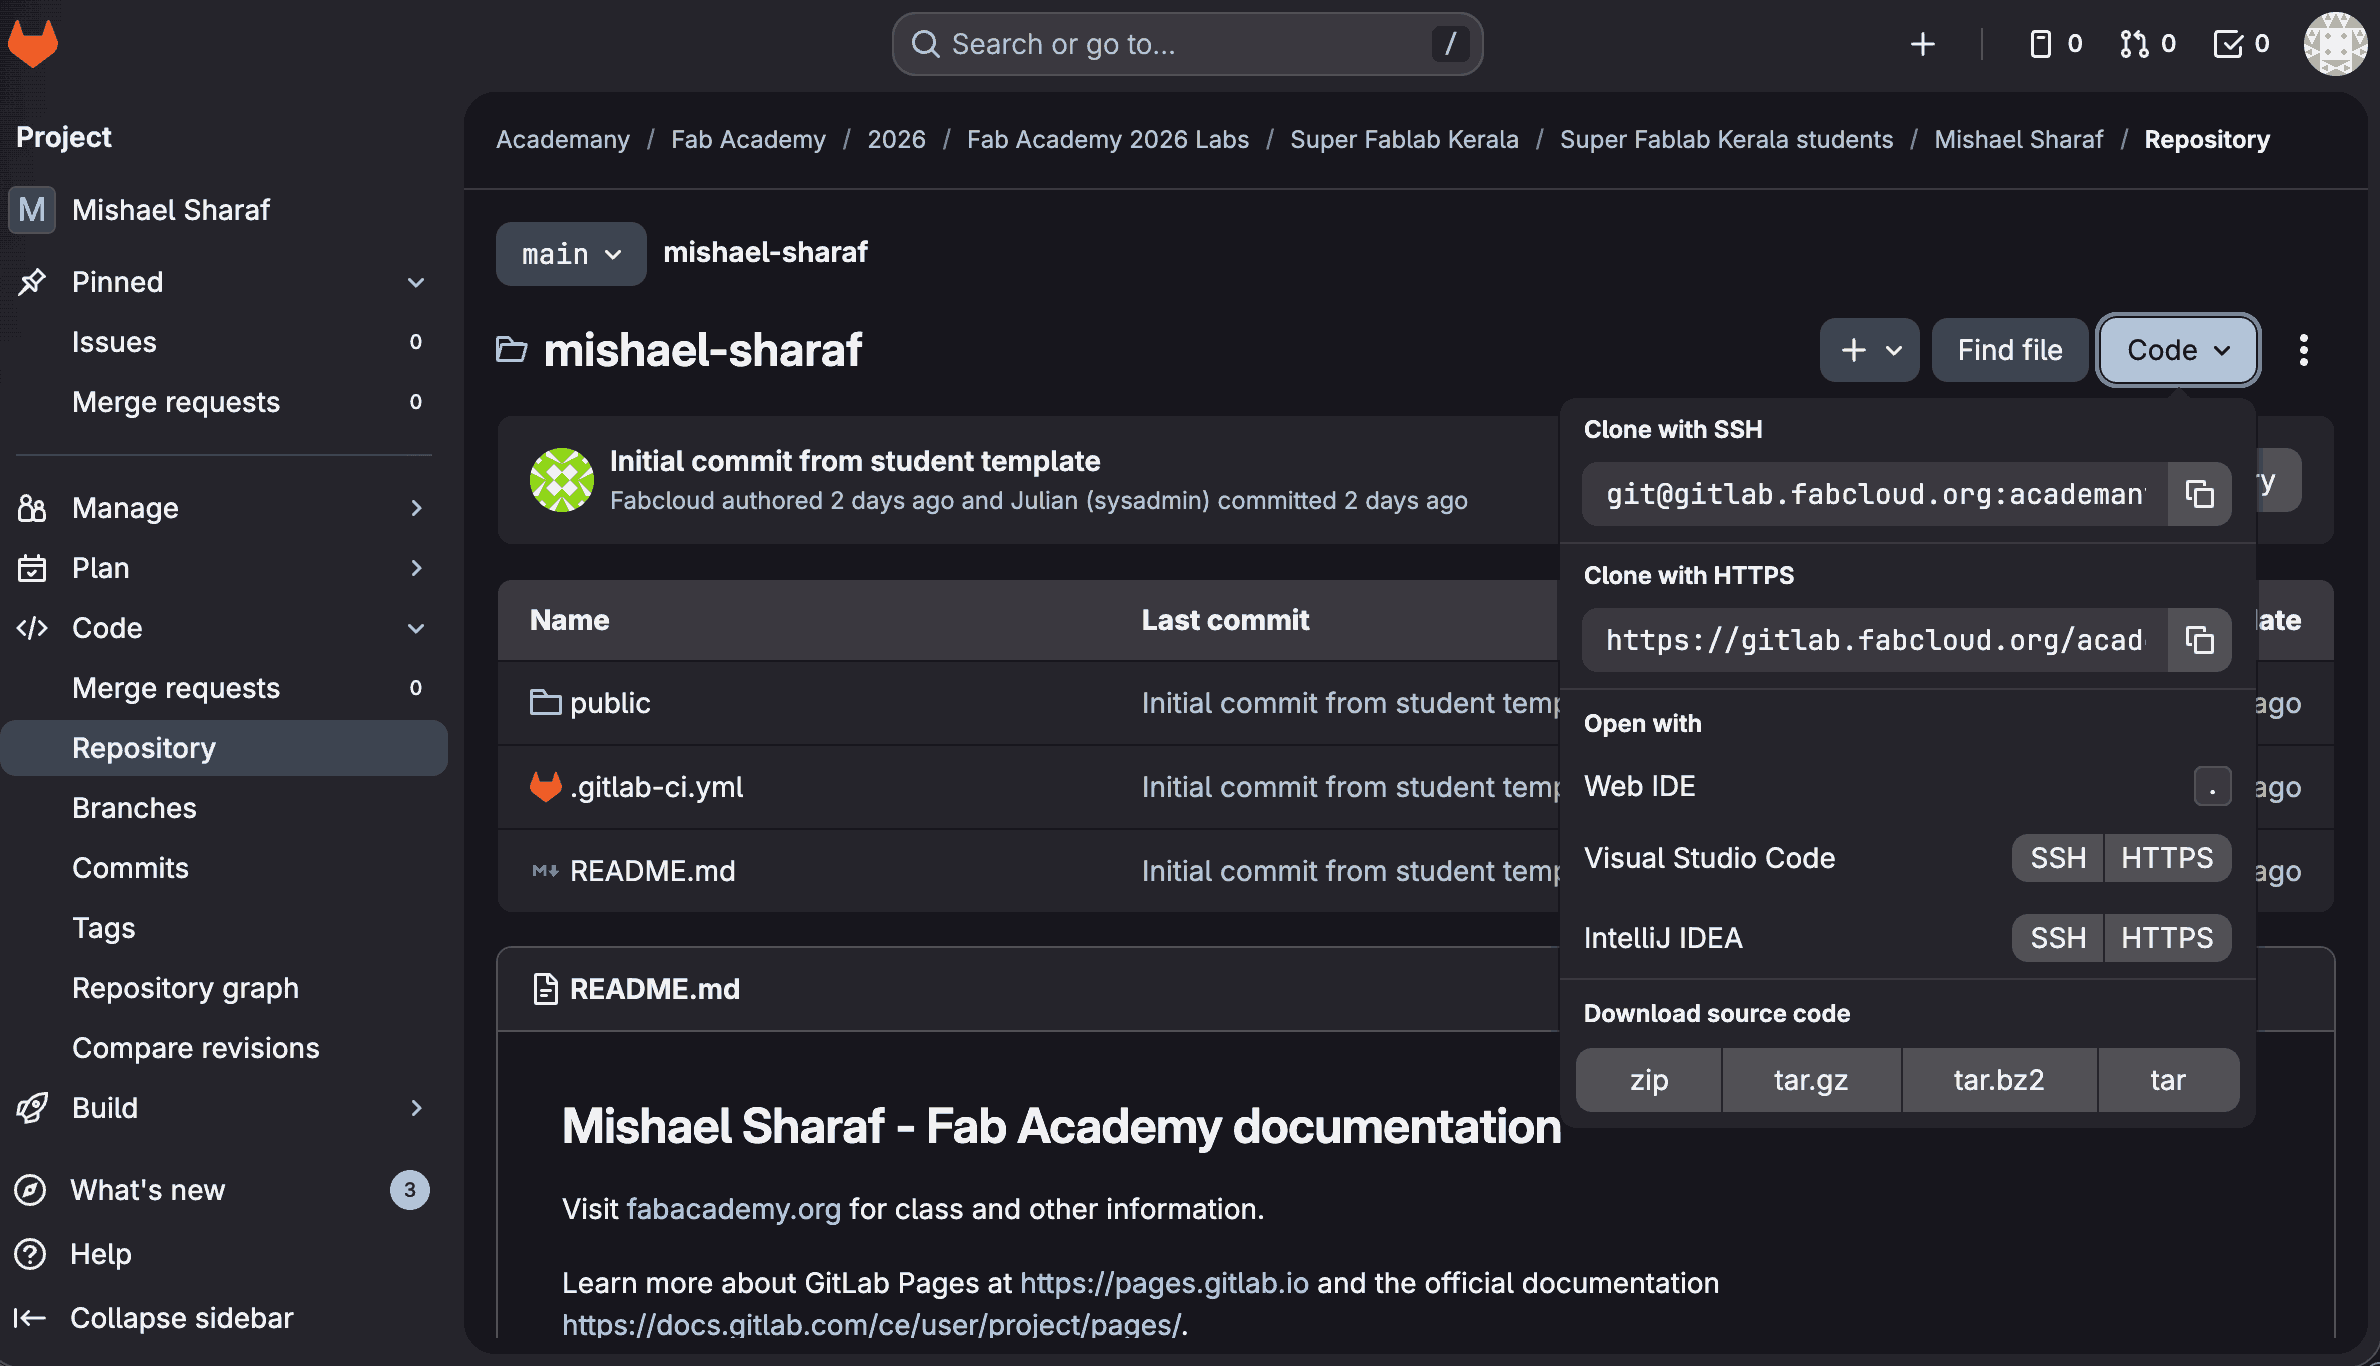
To securely clone the repository, I first navigated to the folder where I wanted it to be saved. In the terminal, I entered ls(space) - this is to list the folders, followed by cd mishael-sharaf to move into the correct directory. After reaching the intended location, I executed the clone command using the SSH URL of the repository: git clone git@gitlab.fabcloud.org:academany/fabacademy/2026/your-repo-name.git. The final portion of the URL should be replaced with the specific repository path as shown in GitLab. Because this was the first time connecting to gitlab.fabcloud.org from the computer via SSH, the terminal displayed a host authenticity warning asking whether I wanted to continue connecting. To proceed, I typed yes and pressed Enter. This action saved the server’s identity to the known hosts file, ensuring that the confirmation prompt would not appear again in future connections.
Git and Website Linking
Once we installed Git on our respective operating systems, we then moved on to basic documentation practices, including attaching screenshots, mentioning sources, and blurring sensitive information. We were introduced to the basic Git workflow used to update our websites: adding changes, committing them, and pushing them so the updates reflect on GitLab.
git add .
Add all newly altered files to the staging area (index). You can wait for your changes in the staging area.
git commit -a -m "commit"
Adds a message along with a snapshot of the staged changes to the repository history. What you did should be described in the message.
git push
Uploads your local commits to a global repository.
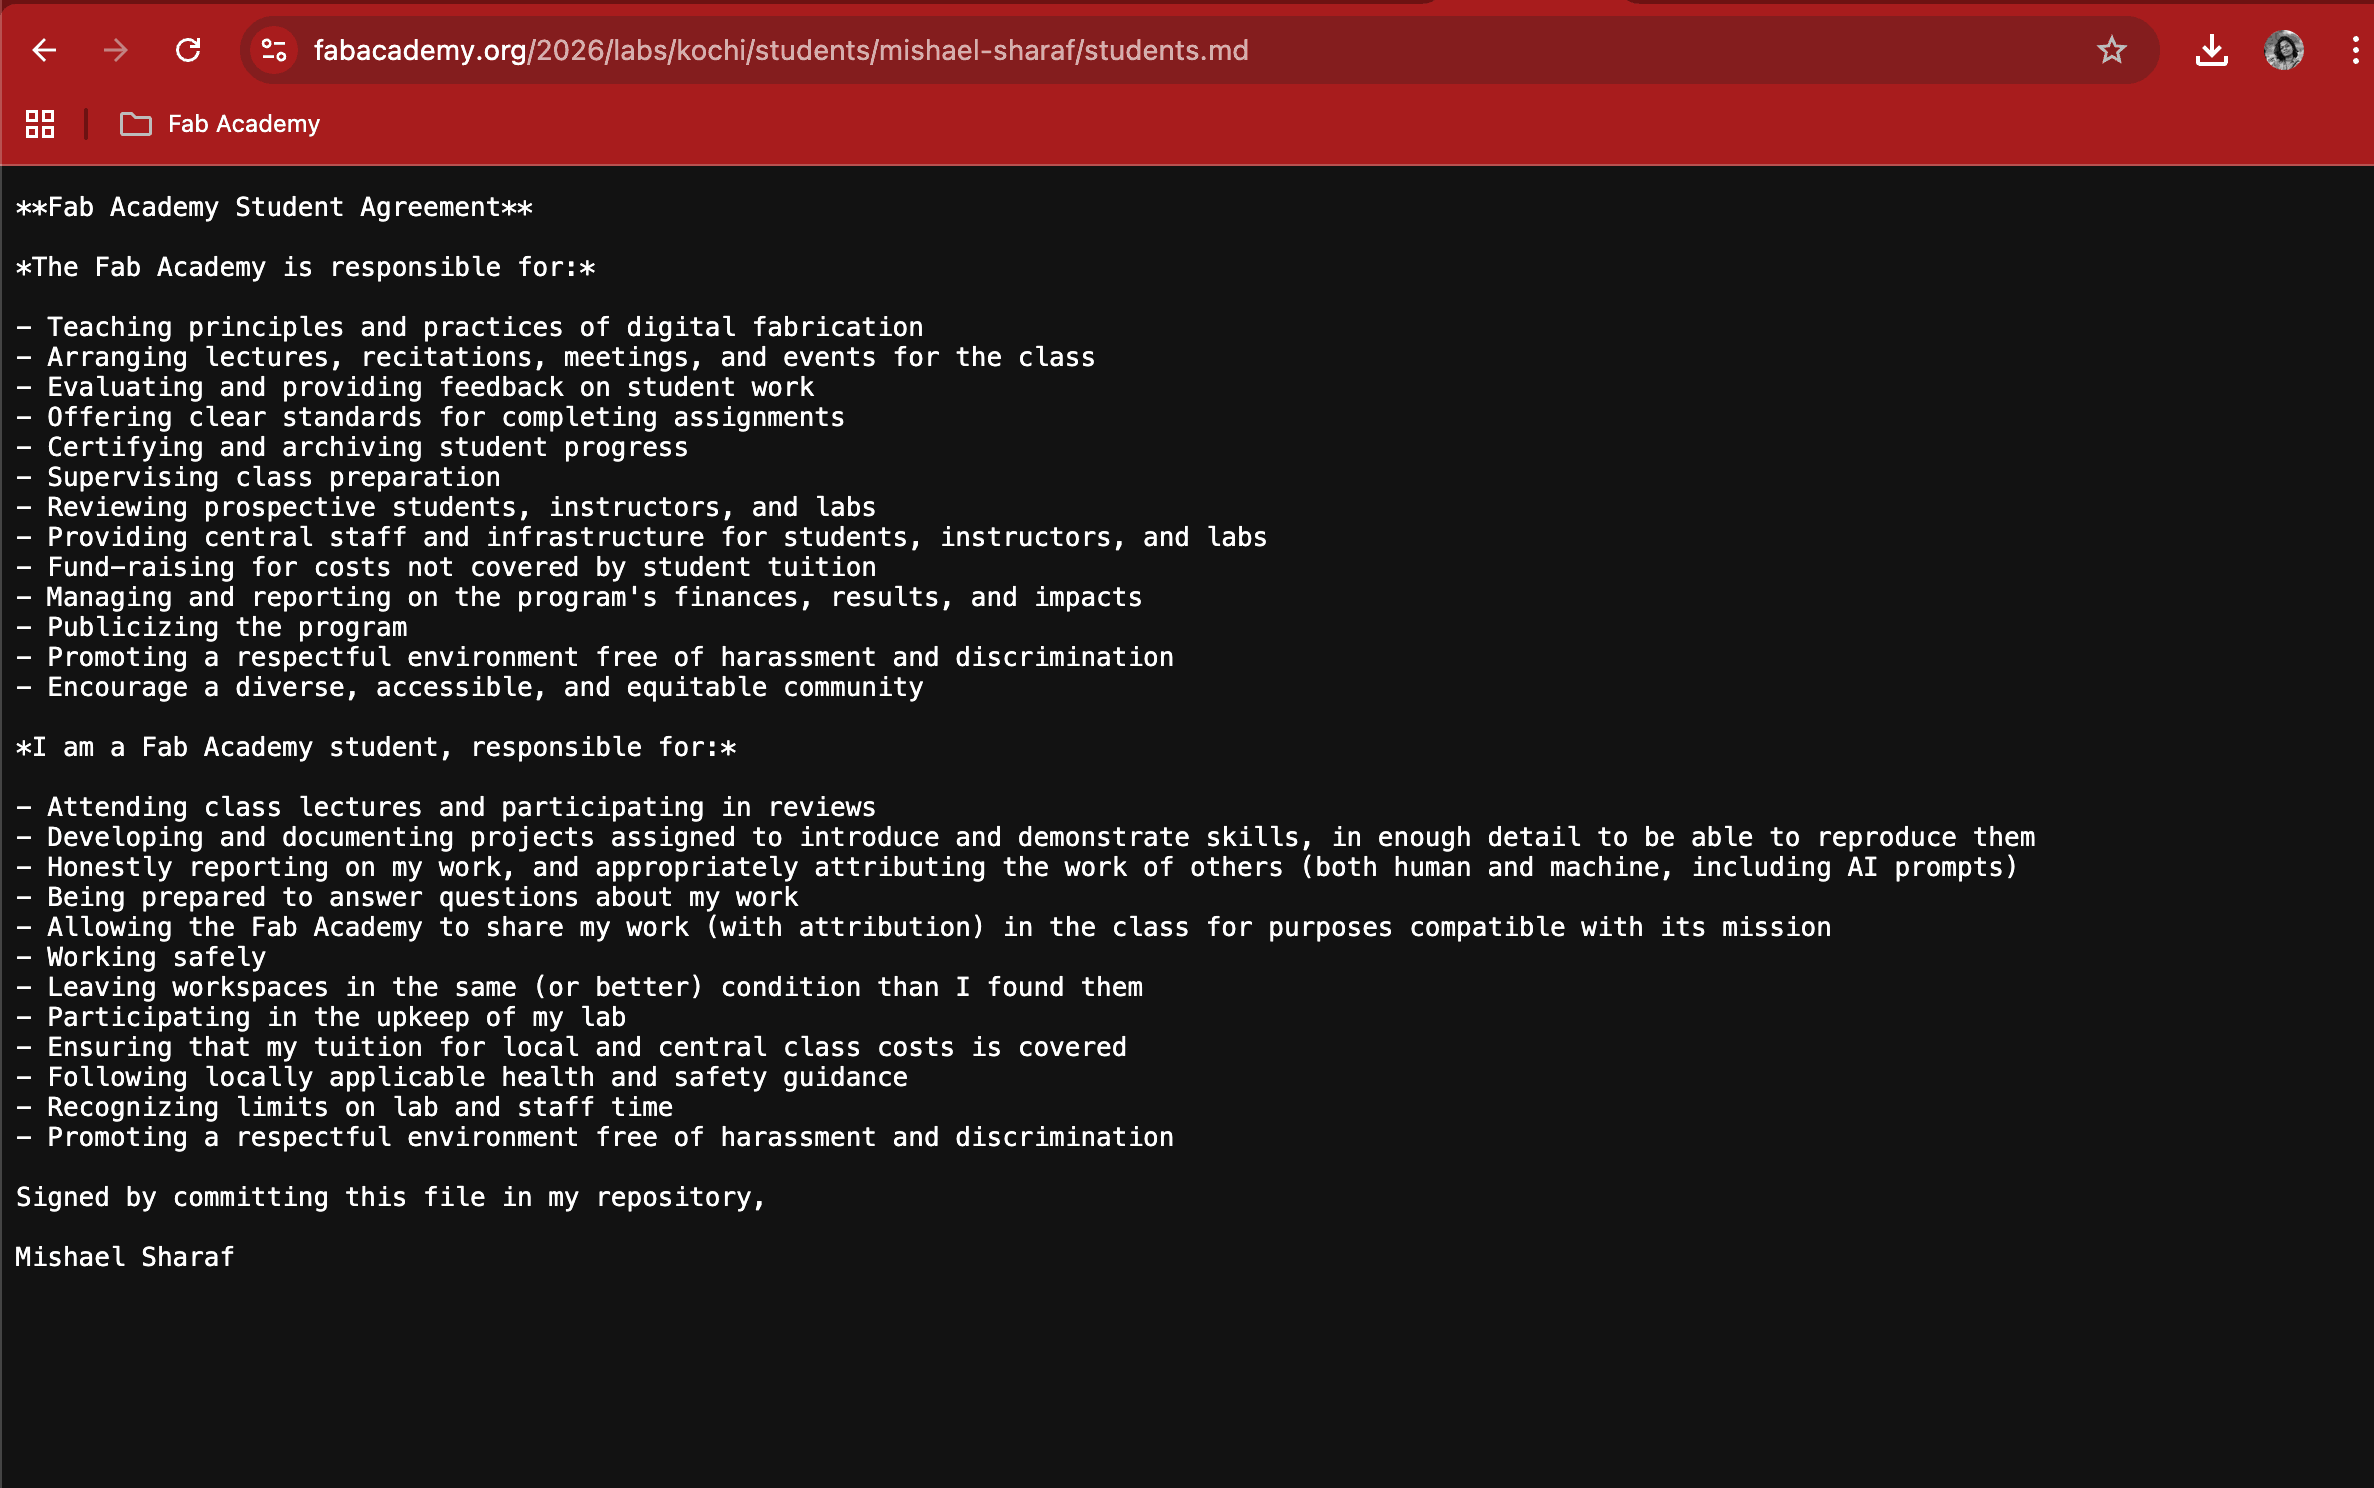
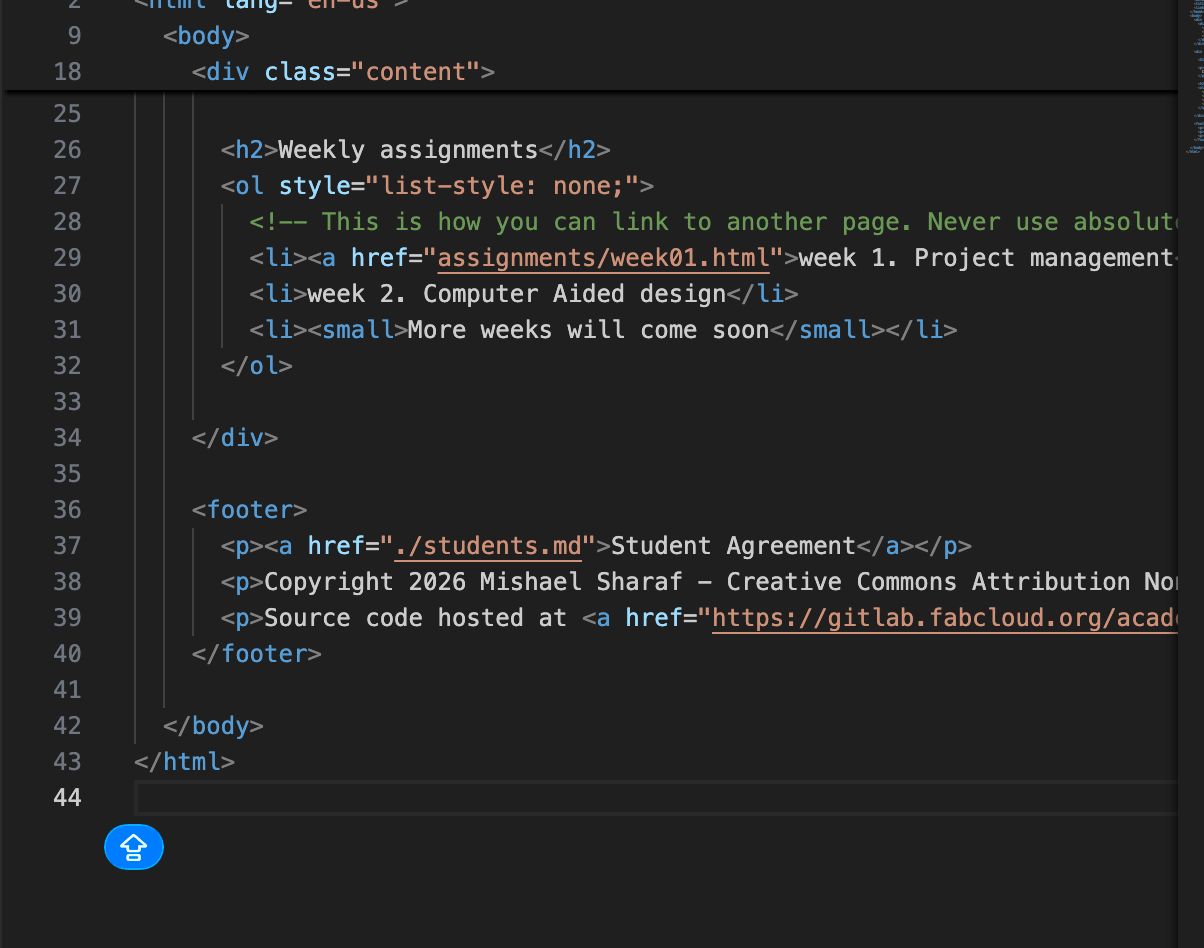
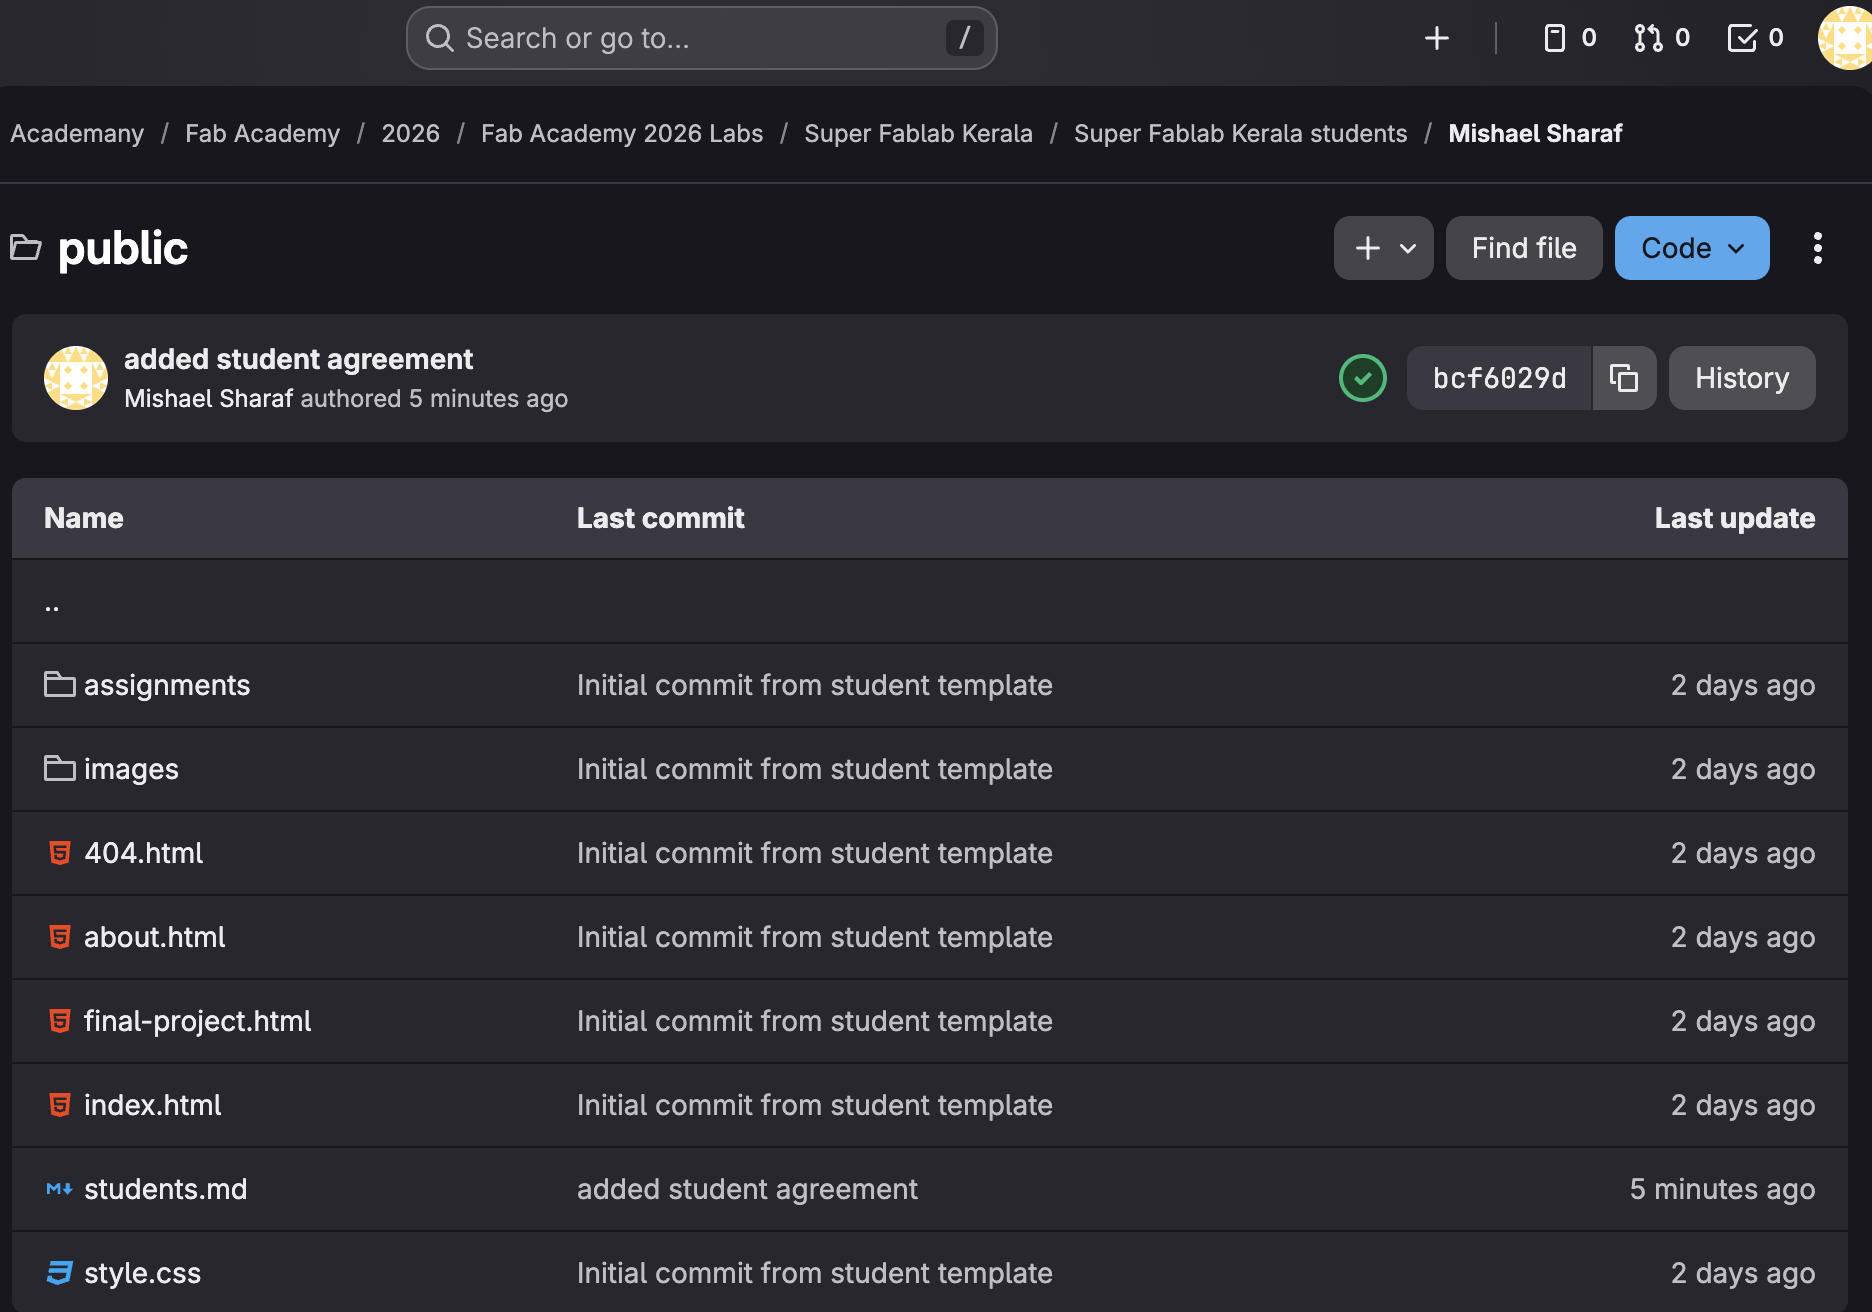
We then added the Student Agreement file to our folder. In Visual Studio Code, open the students' agreement (/students.md), read it, and sign it with your name. Additionally, confirm that the file type is in the MD file (.markdown file) format. Next, use an anchor tag to add it to the footer section and link it to the website:
Website Setup and HTML Basics
As part of the 18-week Fab Academy course, our first assignment was to set up a personal website to document weekly work and the final project. A basic template was provided to get started. Our instructors, Saheen and Midlaj, introduced us to the basics of HTML using Visual Studio Code. We explored how headings, paragraphs, images, and basic styling work, with support from the W3Schools website. I experimented with the template by resizing images, changing text colors using style commands, and editing the content to reflect my profile. Over the coming days, we are expected to set up an index page, an about page, and an assignment page for detailed documentation.
The above screenshot was taken from W3Schools website.
Setting Up About Me Page
In order to set up this page, I first added my profile image and a brief description, followed by previous experiences. Then I added a few images which were already a part of my portfolio to this page. You can access this page Here About Me
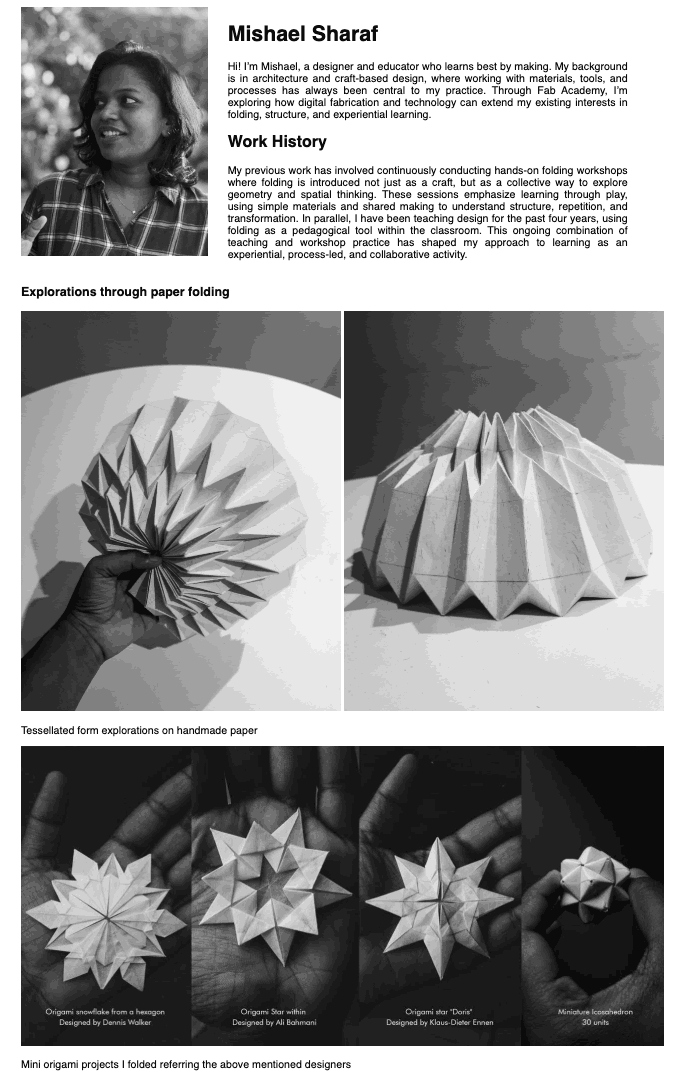
I used an image compressor to resize all images, including screenshots, to under 100 kb. I also used an Aspect Ratio Calculator to plan image placement and layout.
CSS exploration
I experimented with a few CSS styling options to understand how changes affect the appearance of my website. At first, I was not always sure how the modifications would reflect on the page, so I relied mostly on trial and error. I also referred to the W3Schools website for tutorials and guidance while exploring different properties. For example, I learned how to change the hover color of the navigation bar using the following code:
.navbar a:hover {
  color: #c3d409;
}
Similarly, I experimented with rounding the corners of images by adjusting the border radius:
img {
  border-radius: 20px;
}
I did not attempt many of these changes during the first week because I was very new to web development and was worried about accidentally breaking the setup. A week later, I felt more confident and started introducing small modifications one at a time. These gradual changes are more visible in my later documentation pages.
I noticed that many of my batchmates were doing an excellent job with their website interfaces, while mine felt quite amateur in comparison. Although there was an option to use a template, I decided not to rely on one because I felt it might limit my freedom to experiment with layout and structure. Instead, I chose to learn progressively by building and modifying the site myself.
My focus has been on documenting the work clearly while slowly improving how it is presented. Each week reflects something new that I tried or learned while working on the site. Over time, I hope this process will show a visible progression. By the end of the program, I may have a more refined interface, but more importantly, I will have learned a great deal along the way.
Reflection
This week felt both exciting and overwhelming. A lot of new ideas, tools, and expectations were introduced in a short span of time. Many things were explained and demonstrated, and while it was fascinating, some parts still felt a bit blurry by the end of the week. I especially found myself getting stuck while documenting because I was unsure about the sequence of events, what happened first, and how certain steps connected. Since I was also new to web development, setting up and organizing the documentation added another layer of challenge.
At the same time, the week was very motivating. We received an overview of the upcoming weeks, and the scope of what we will learn sounds incredibly exciting. There are many machines to explore, new skills to develop, and a variety of assignments that will push us to experiment and build. Being surrounded by a group of enthusiastic people also makes the experience feel even more engaging.
Although the week felt intense and slightly confusing at times, it gave a glimpse of what lies ahead. With time and practice, I expect the process of making, learning, and documenting to become clearer and more structured along the way.