Tools Explored
1. Inkscape 2. Photopea 3. Fusion 360 4. Blender 5. Affinity
1. Inkscape 2. Photopea 3. Fusion 360 4. Blender 5. Affinity
Raster Images
Raster images are made by many pixels which are the smallest addressable elements of a raster images. Each pixel emits a specific color by mixing different ratios of red, green, & blue (RGB).
.jpg)
Vector Images
Vector images are made by saving data as mathematical equations that create a particular shape, which means there are no specific pixels and the equations can be multiplied to scale without any loss in quality.
Applications of Vector and Raster Images
Raster images are used in printers and display devices. Hence, vector images need to be converted to raster images before being printed or displayed.
Vector images are used for digital illustrations like logos that are to be used in different sizes and formats.
Raster images are used in printers and display devices. Hence, vector images need to be converted to raster images before being printed or displayed.
Vector images are used for digital illustrations like logos that are to be used in different sizes and formats.
2D design - Vector (Inkscape)
I used Inkscape for creating 2D vector designs. First, I learned the basic tools and workflows.
Freestyle: Select a shape tool (rectangle, circle, etc.) and simply click and drag on the canvas to create the shape in any proportion.
Proportional with Control: Hold the Ctrl key while dragging. This constrains the shape, for example, making a perfect square or a perfect circle so that length = breadth.
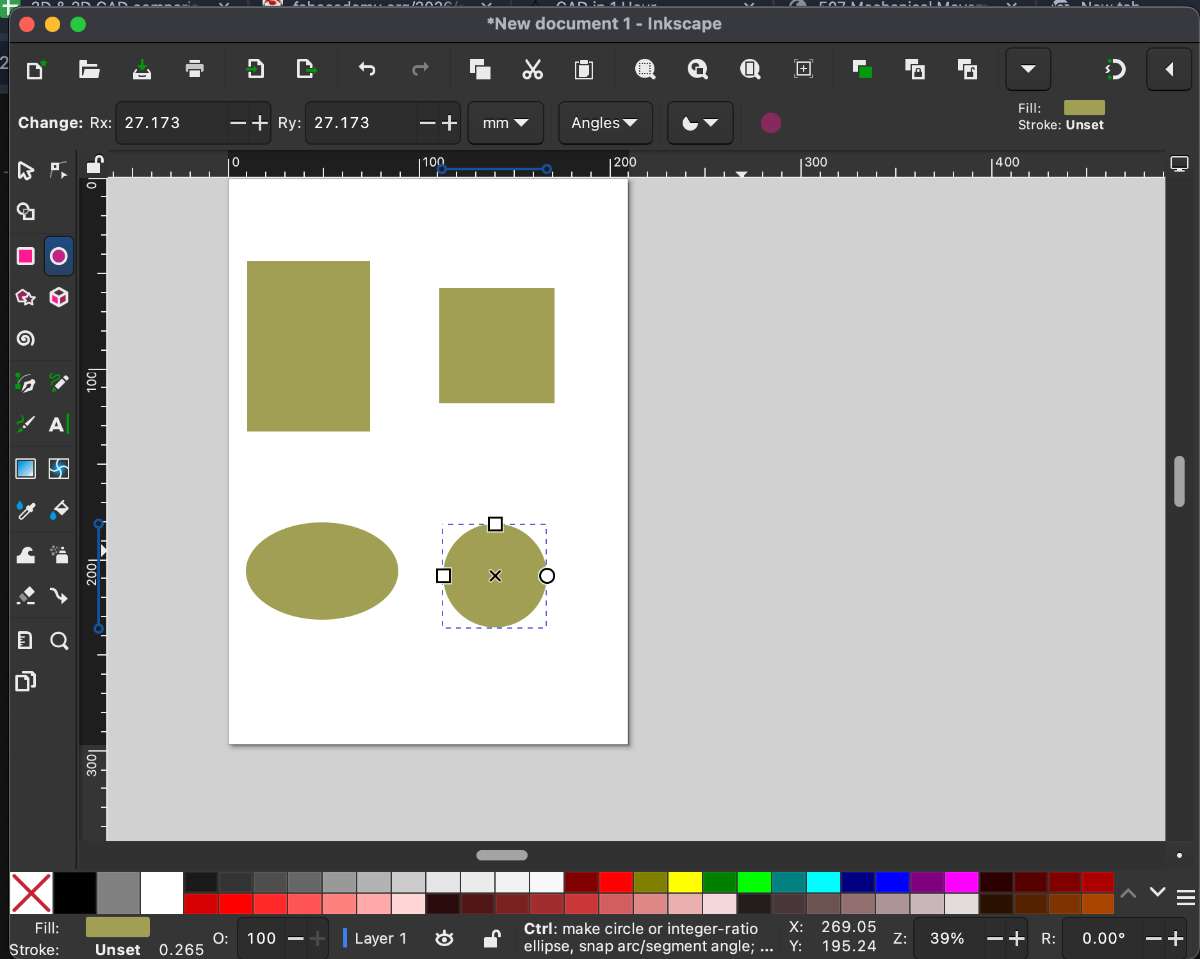
Filling and Coloring Shapes
To fill shapes with color:
1.Click on the Fill and Stroke icon in the top bar.
2.Select the object (shape) you want to color.
3.Choose the fill color and, if needed, adjust the stroke color and thickness.
 copy.jpg)
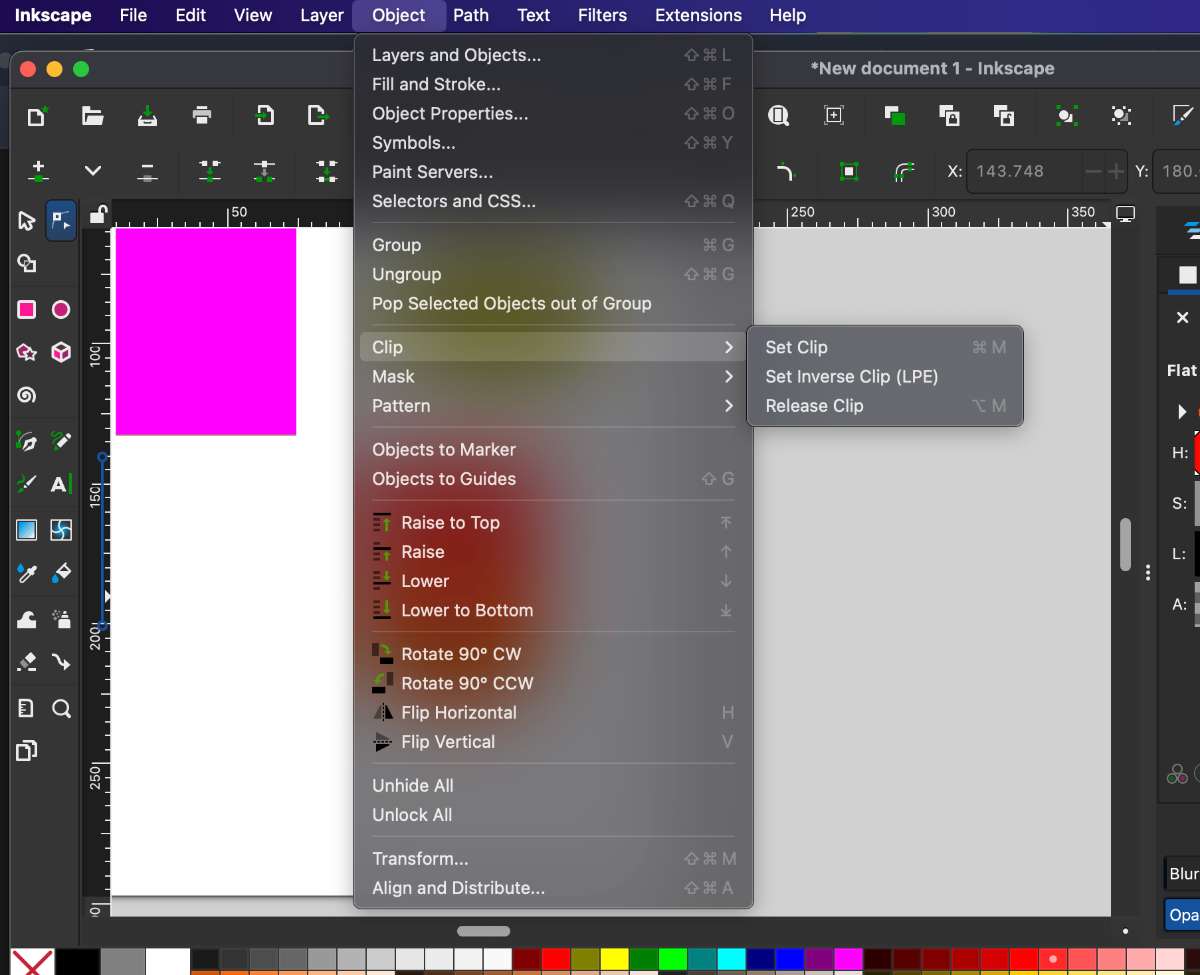
Clipping Shapes
Clipping allows you to use one object to mask another, showing only certain parts of an image.
Steps: Select the two objects or images you want to work with. Use Ctrl + A to select all, and Ctrl + G to group them if needed. Go to Object → Clip → Set Inverse to create an inverse clip, which hides the area inside the clipping path and shows the outside. Result: You get an inverse cut-out effect. Go to Object → Clip → Set (without inverse) to create a regular clip. Result: Only the part inside the clipping path is visible. Objects→ Clip→ Set inverse , this is what you get:
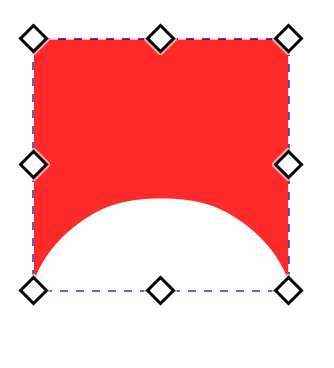
Objects→Clip→Set, this is what you get:
 copy 2.jpg)
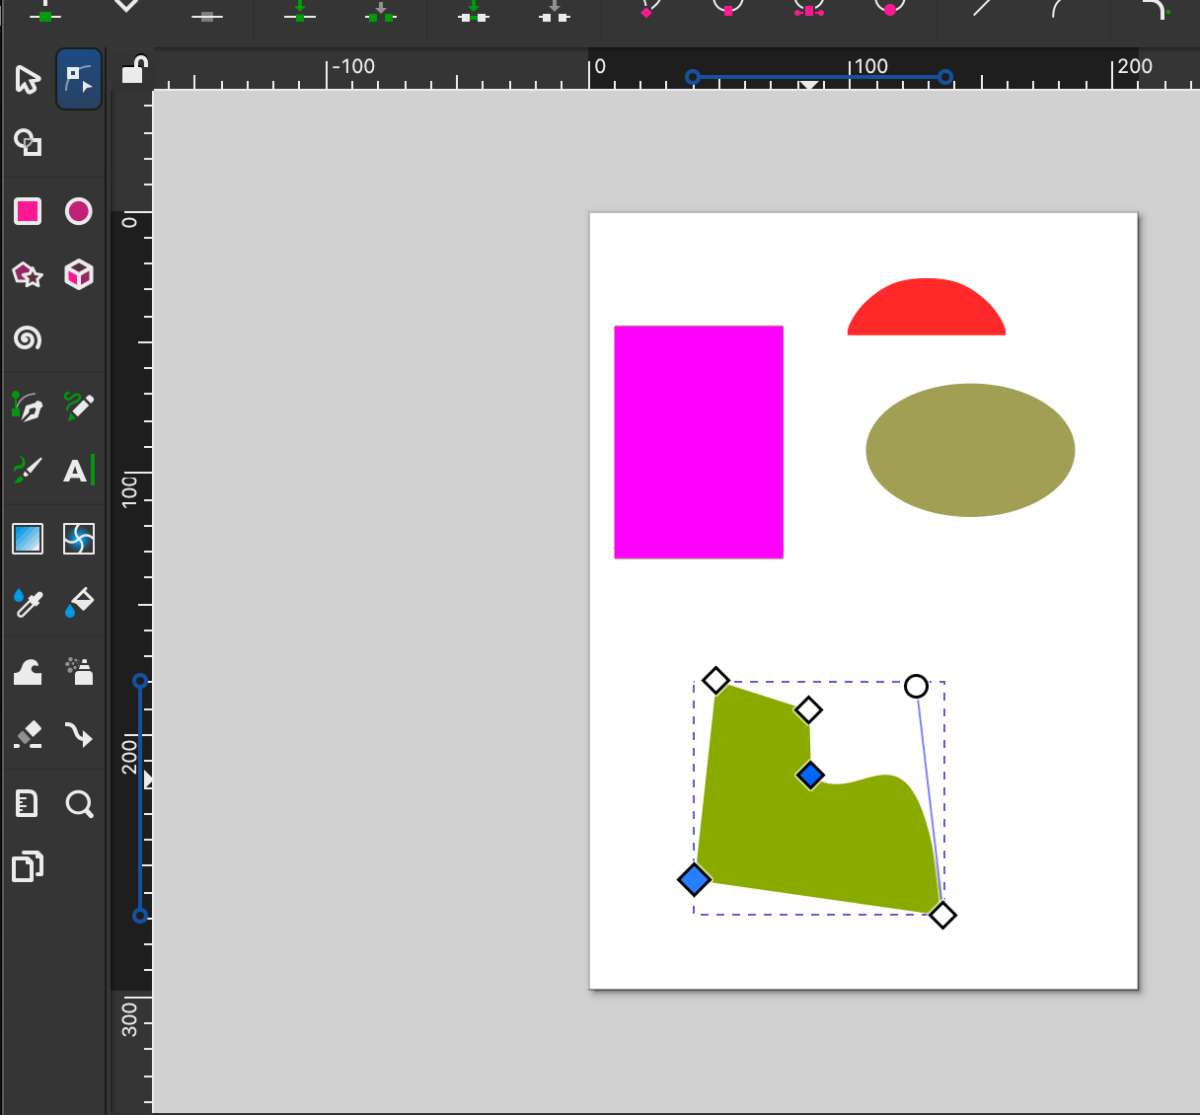
Pen tool helps you to manipuate your image as you like. you can draw random shapes
and use “node tool” to manipulate it further.
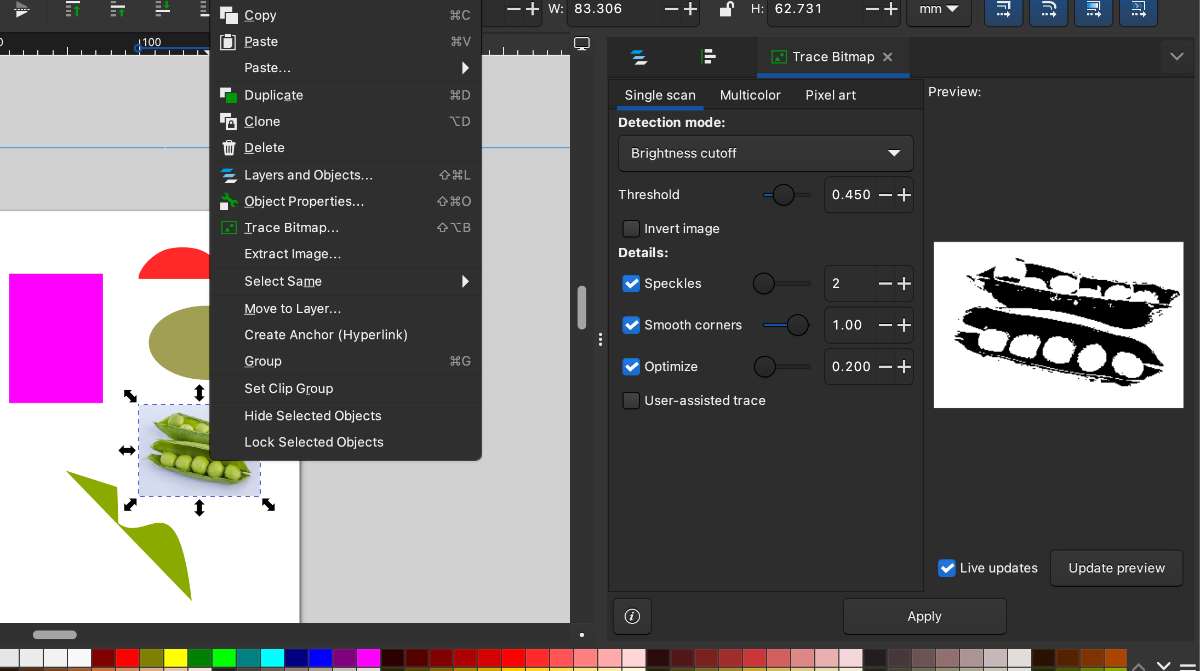
Bitmap Tracing
Bitmap tracing lets you convert a raster image (like a JPEG or PNG) into a vector.
Steps:
1.Copy and paste an image into Inkscape.
2.Right-click on the image and choose Trace Bitmap.
3.Adjust the tracing settings as needed and apply.
This creates a vector version of the image that can be edited like other vector shapes.
c
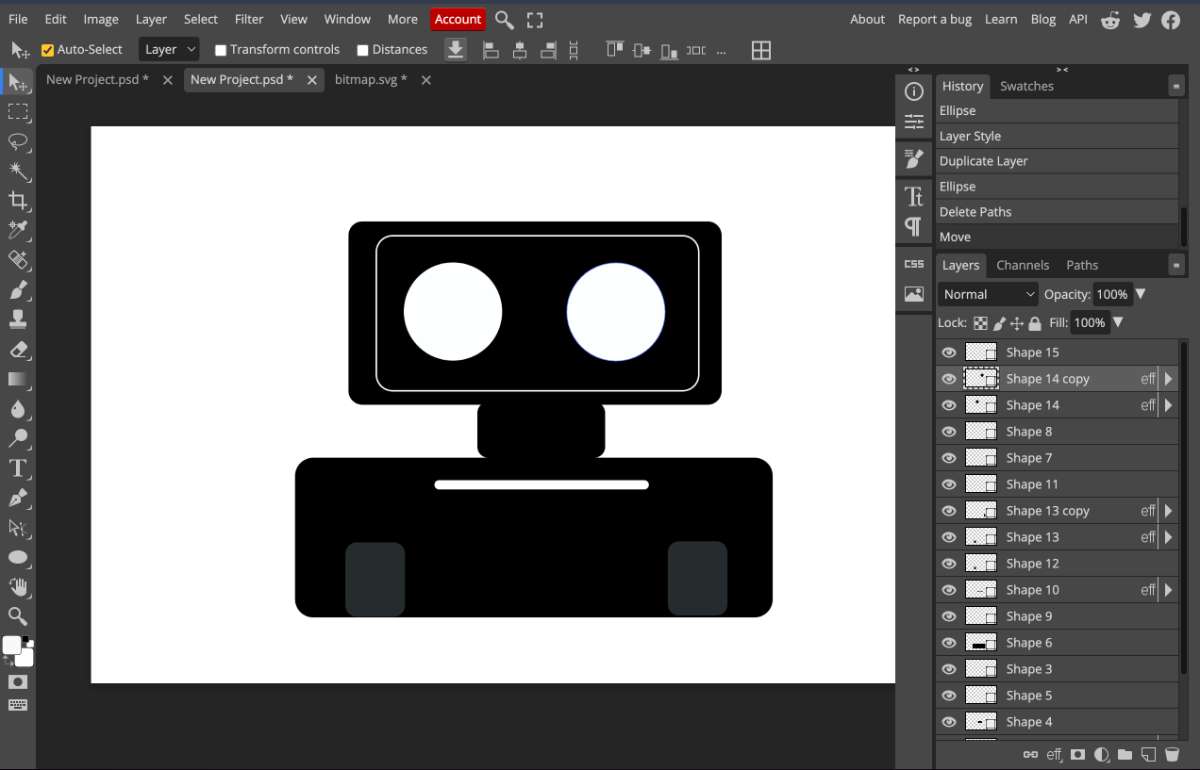
After practicing these tools, I moved on to creating the 2D layout for my final project in Inkscape. The SVG file of this layout is attached at the bottom of the page.
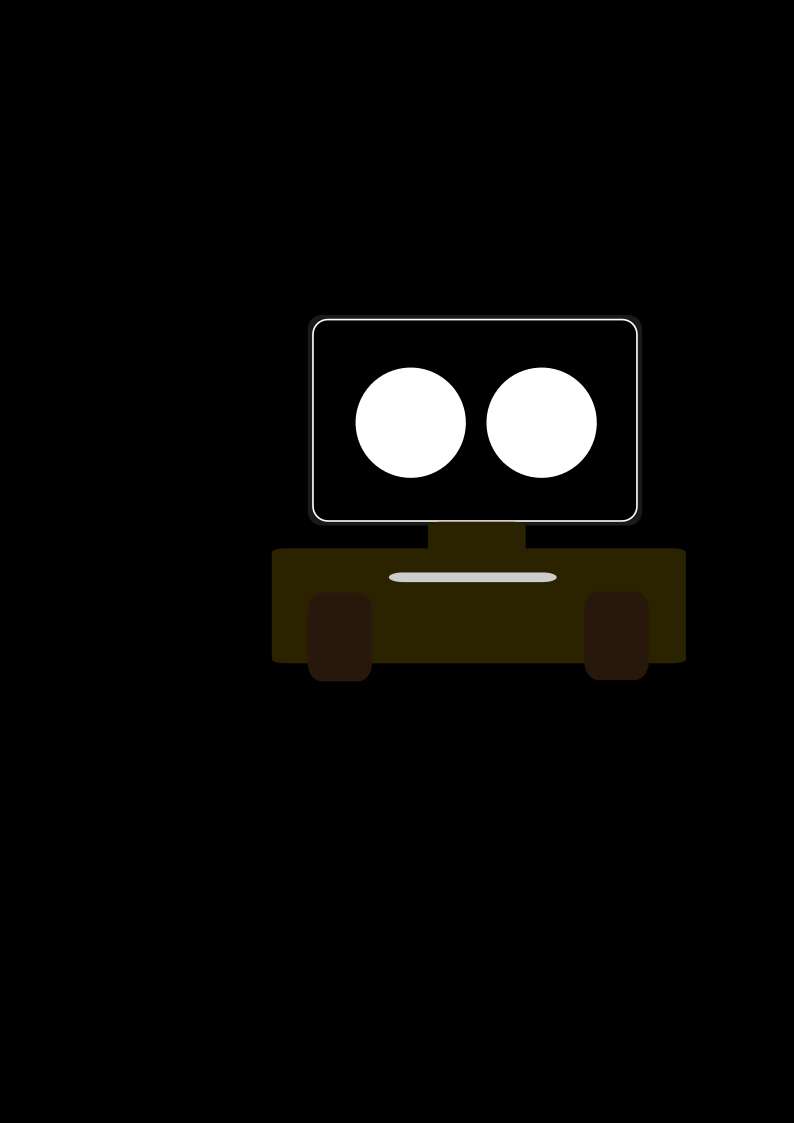
Remove and Change Background
Steps:
1.Open the image in Photopea.
2.Use selection tools to remove the existing background.
3.Once the background is removed, add a new background by importing other images as layers.
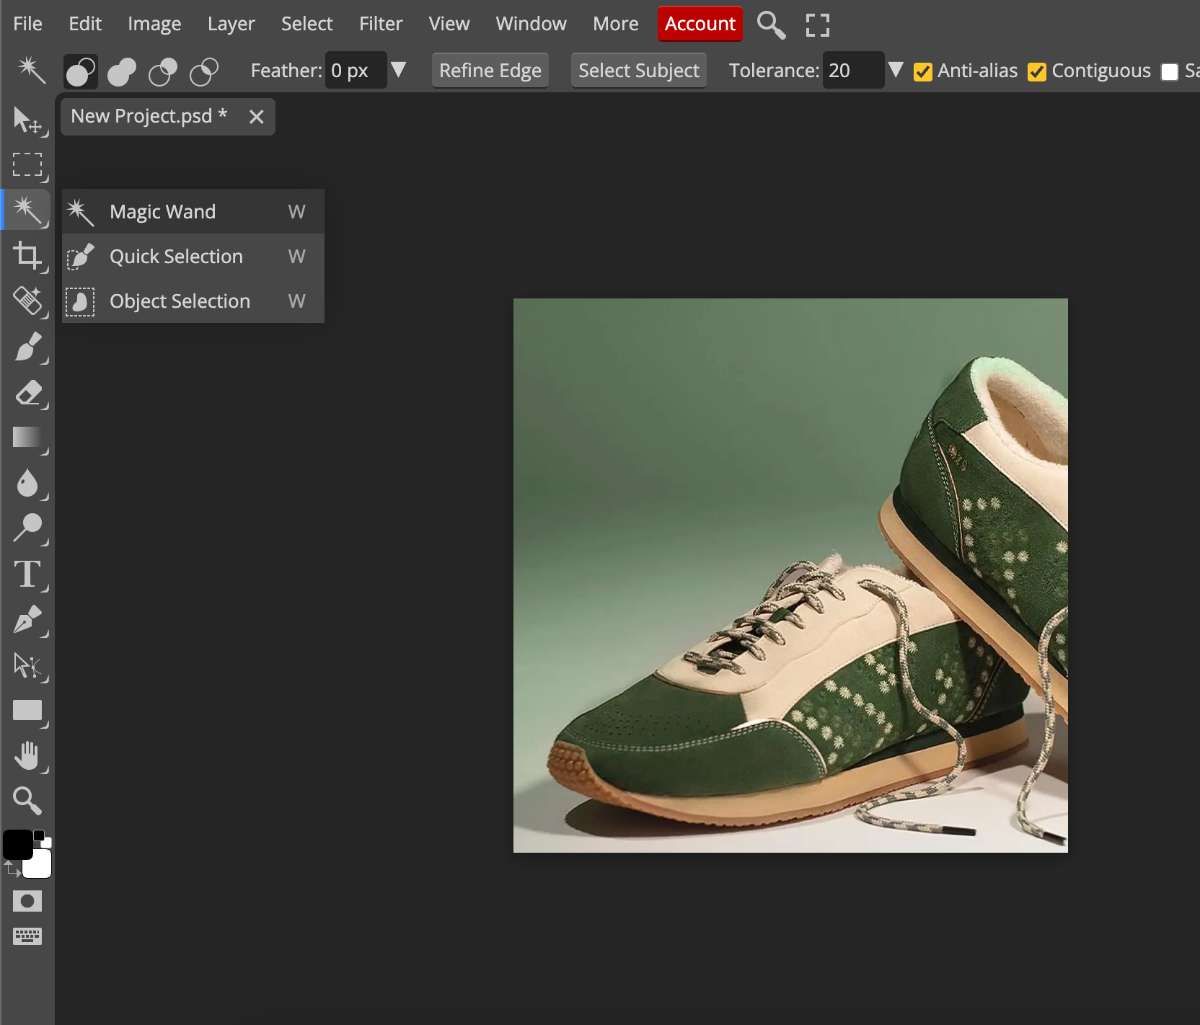
The background is removed.

Now we need to add a new background

Here I added 2 background images, both from Freepik.
and arranged it layer by layer
Now, Following is the model of my final project.
Fusion 360 is a cloud-based 3D CAD, CAM, and CAE software by Autodesk used for designing, modeling, simulating, and manufacturing products in one integrated platform. It allows users to create precise 3D models, test designs, and prepare them for manufacturing using tools like sketching, extrusion, simulation, and CNC workflows.
Learning Constraints
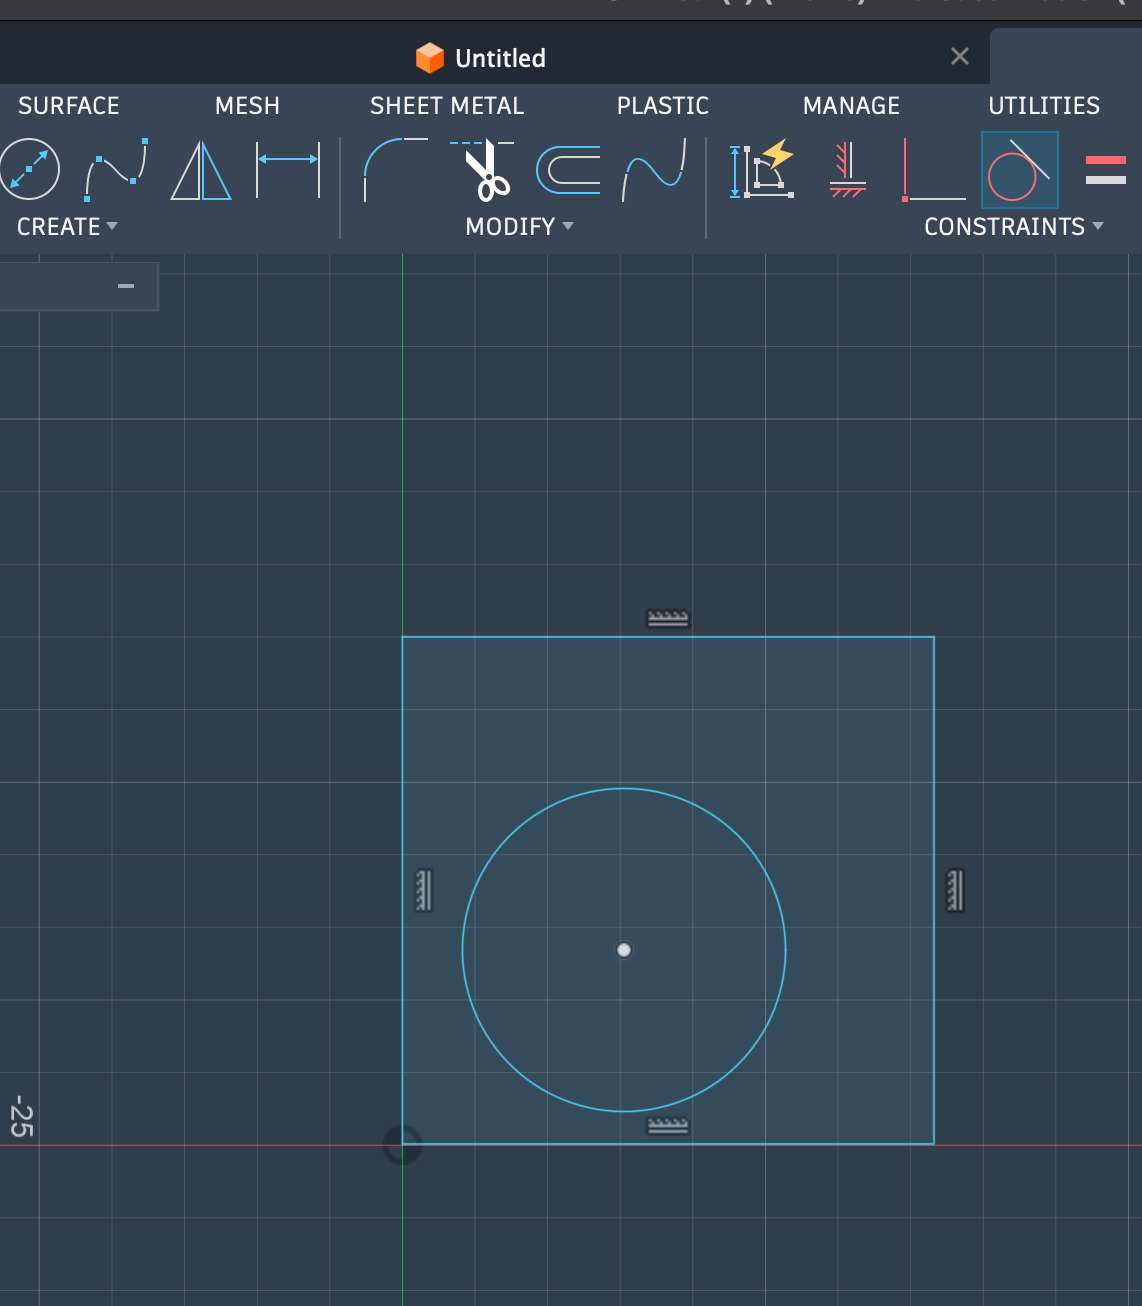
I explored different sketch constraints in Fusion 360 to understand how they affect geometry.
For example:
Tangent constraint: This constraint keeps a line and a circle (or arc) touching at exactly one point. Once applied, the line will always remain tangent to the circle, even if you move or resize elements. Understanding constraints helps create sketches that are more controlled, predictable, and parametric.
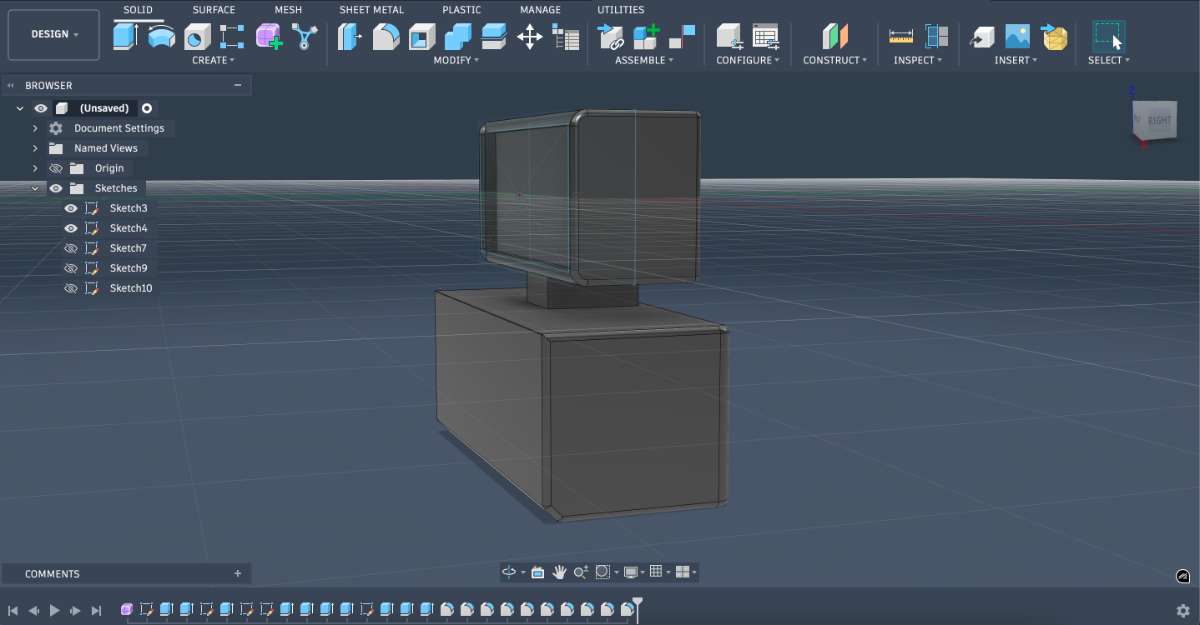
Now, moving on to making my final project's 3D model.
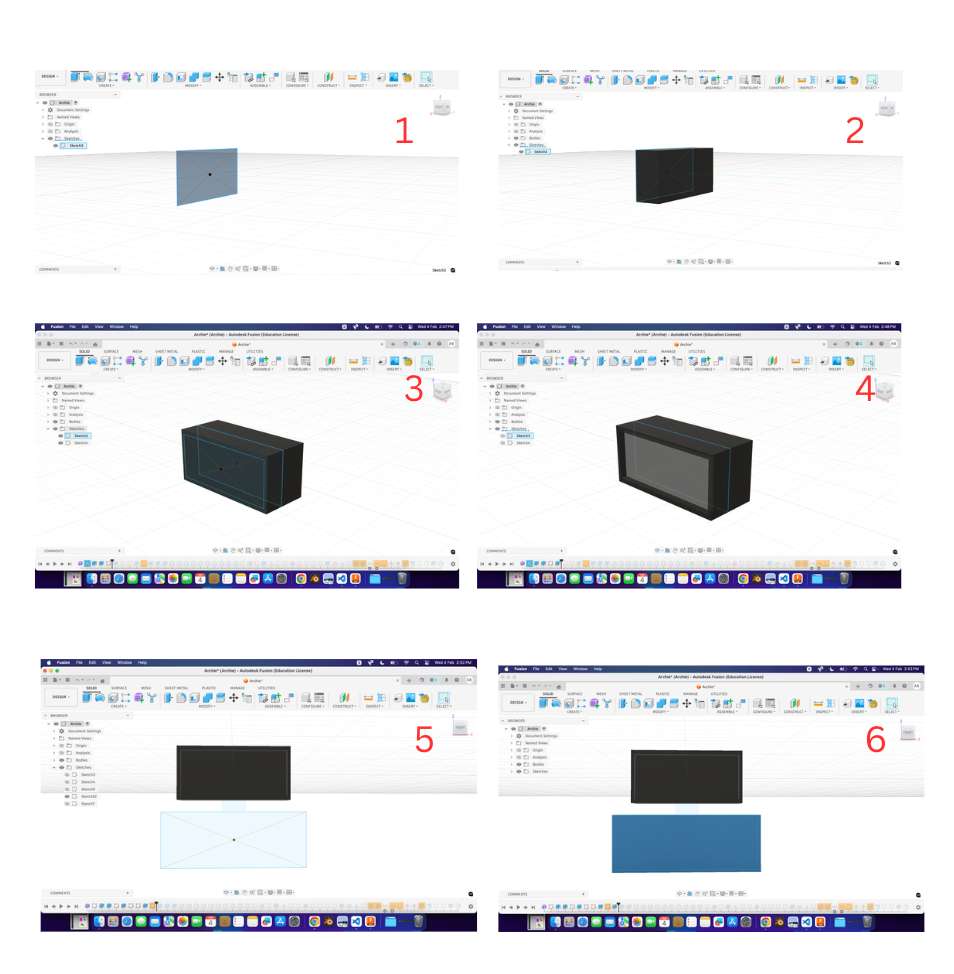
Summarised steps:
1.Created a rectangle sketch on a vertical plane to define the front profile.
2.Extruded the sketch to form the main rectangular solid.
3.Sketched a smaller rectangle on the front face for the inner feature.
4.Cut-extruded the inner sketch to create a recessed area.
5.Created a rectangle sketch on the bottom plane for the base.
6.Extruded the bottom sketch to complete the final model.
Adding Fillet to my Product:
To soften sharp edges and improve the appearance:
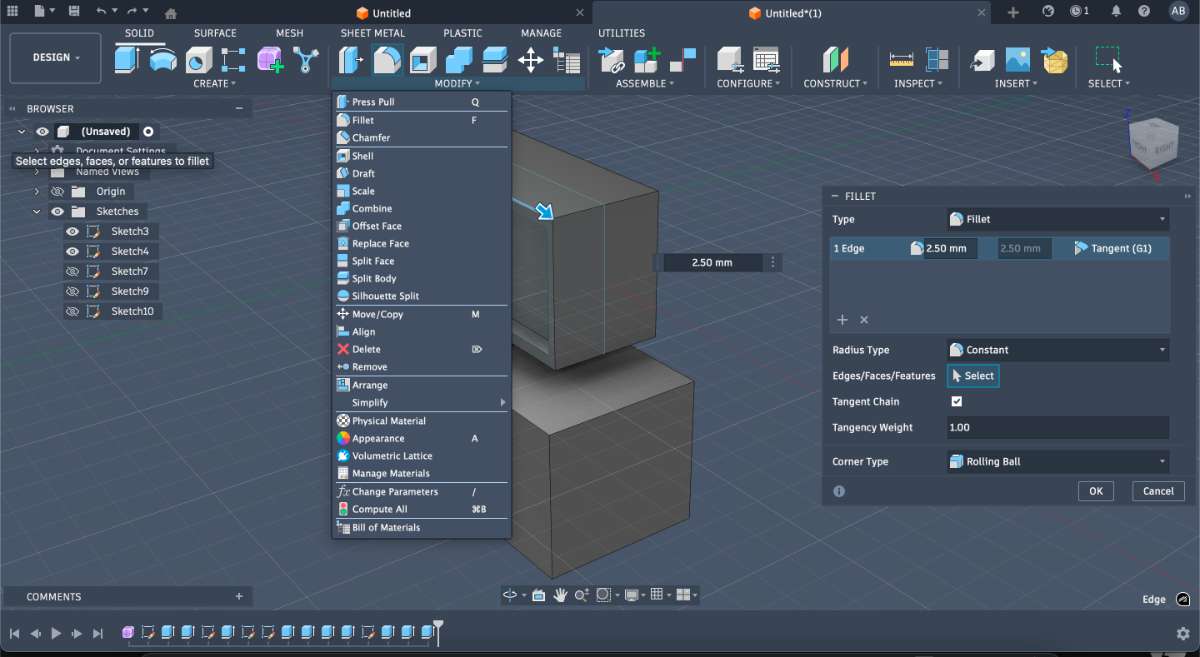
Steps:
1.Go to Modify → Fillet.
2.Select the edge, face, or vertex where you want the fillet.
3.Enter a fillet radius value or drag the cursor to adjust it.
4.In my case, I used a radius value of 1.
The result is a smoother, more refined product design.
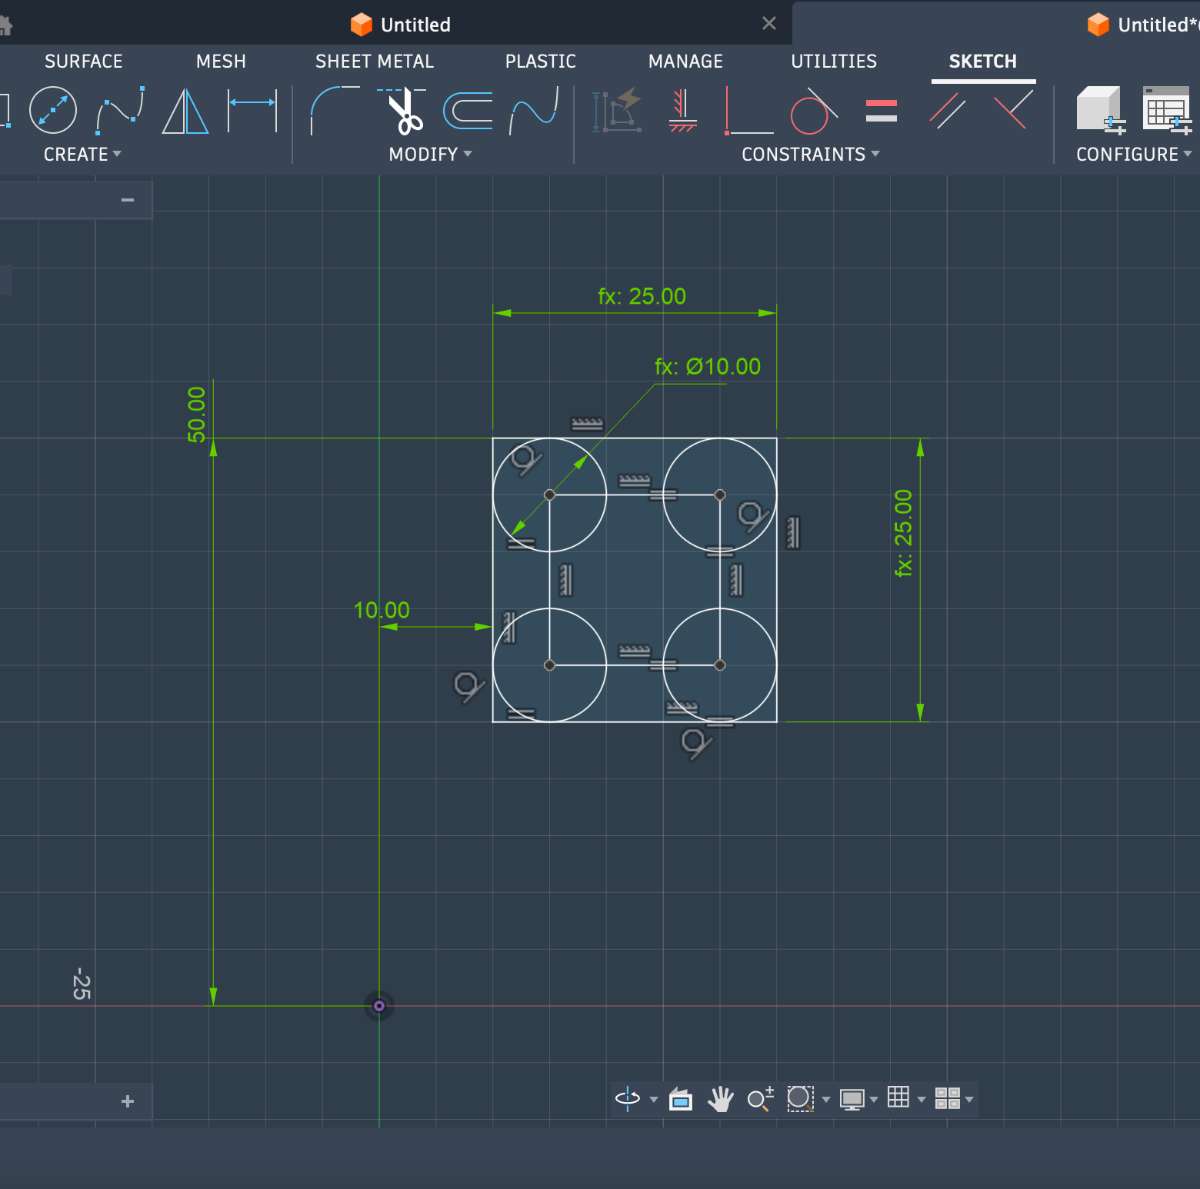
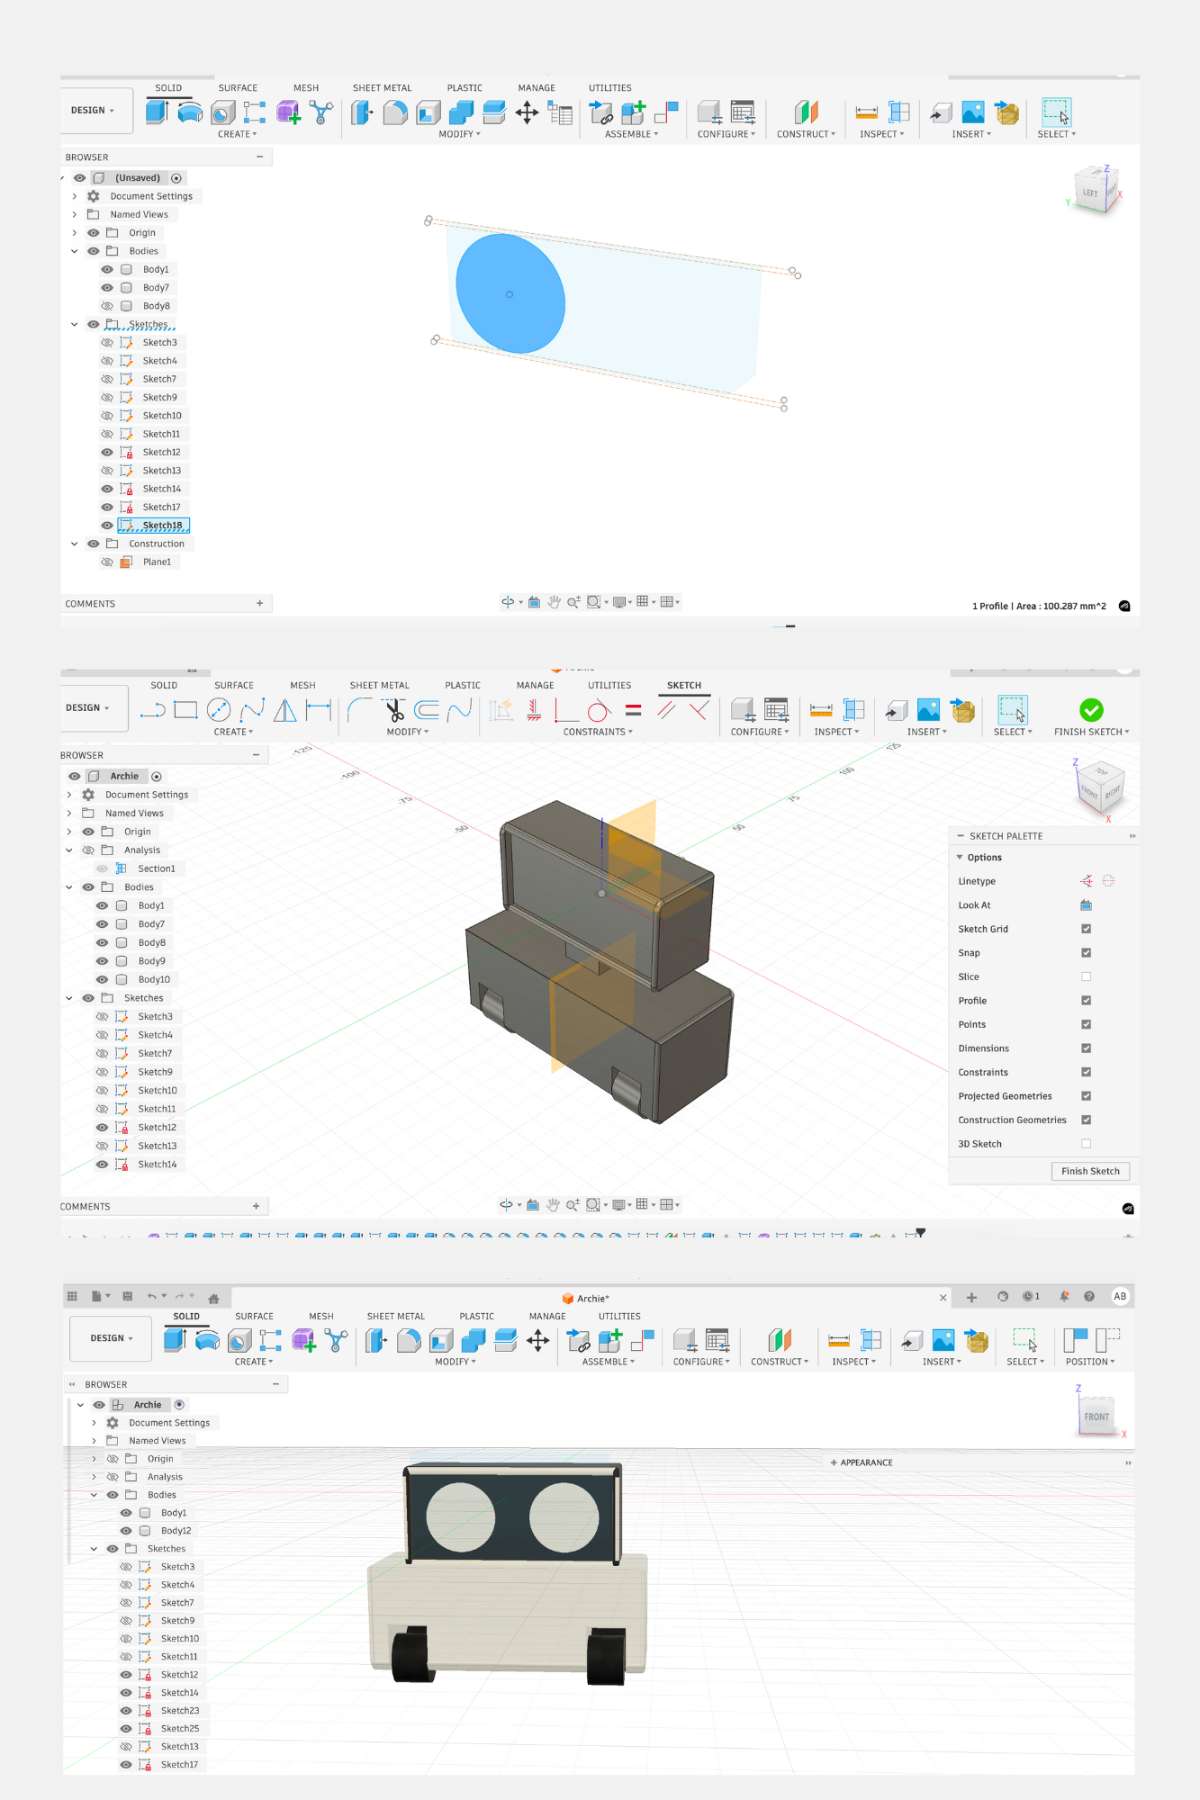
Creating Spaces for Wheels
I added spaces/holes in the design to attach wheels:
1.Constructed an offset plane parallel to the side face where I wanted the wheel holes.
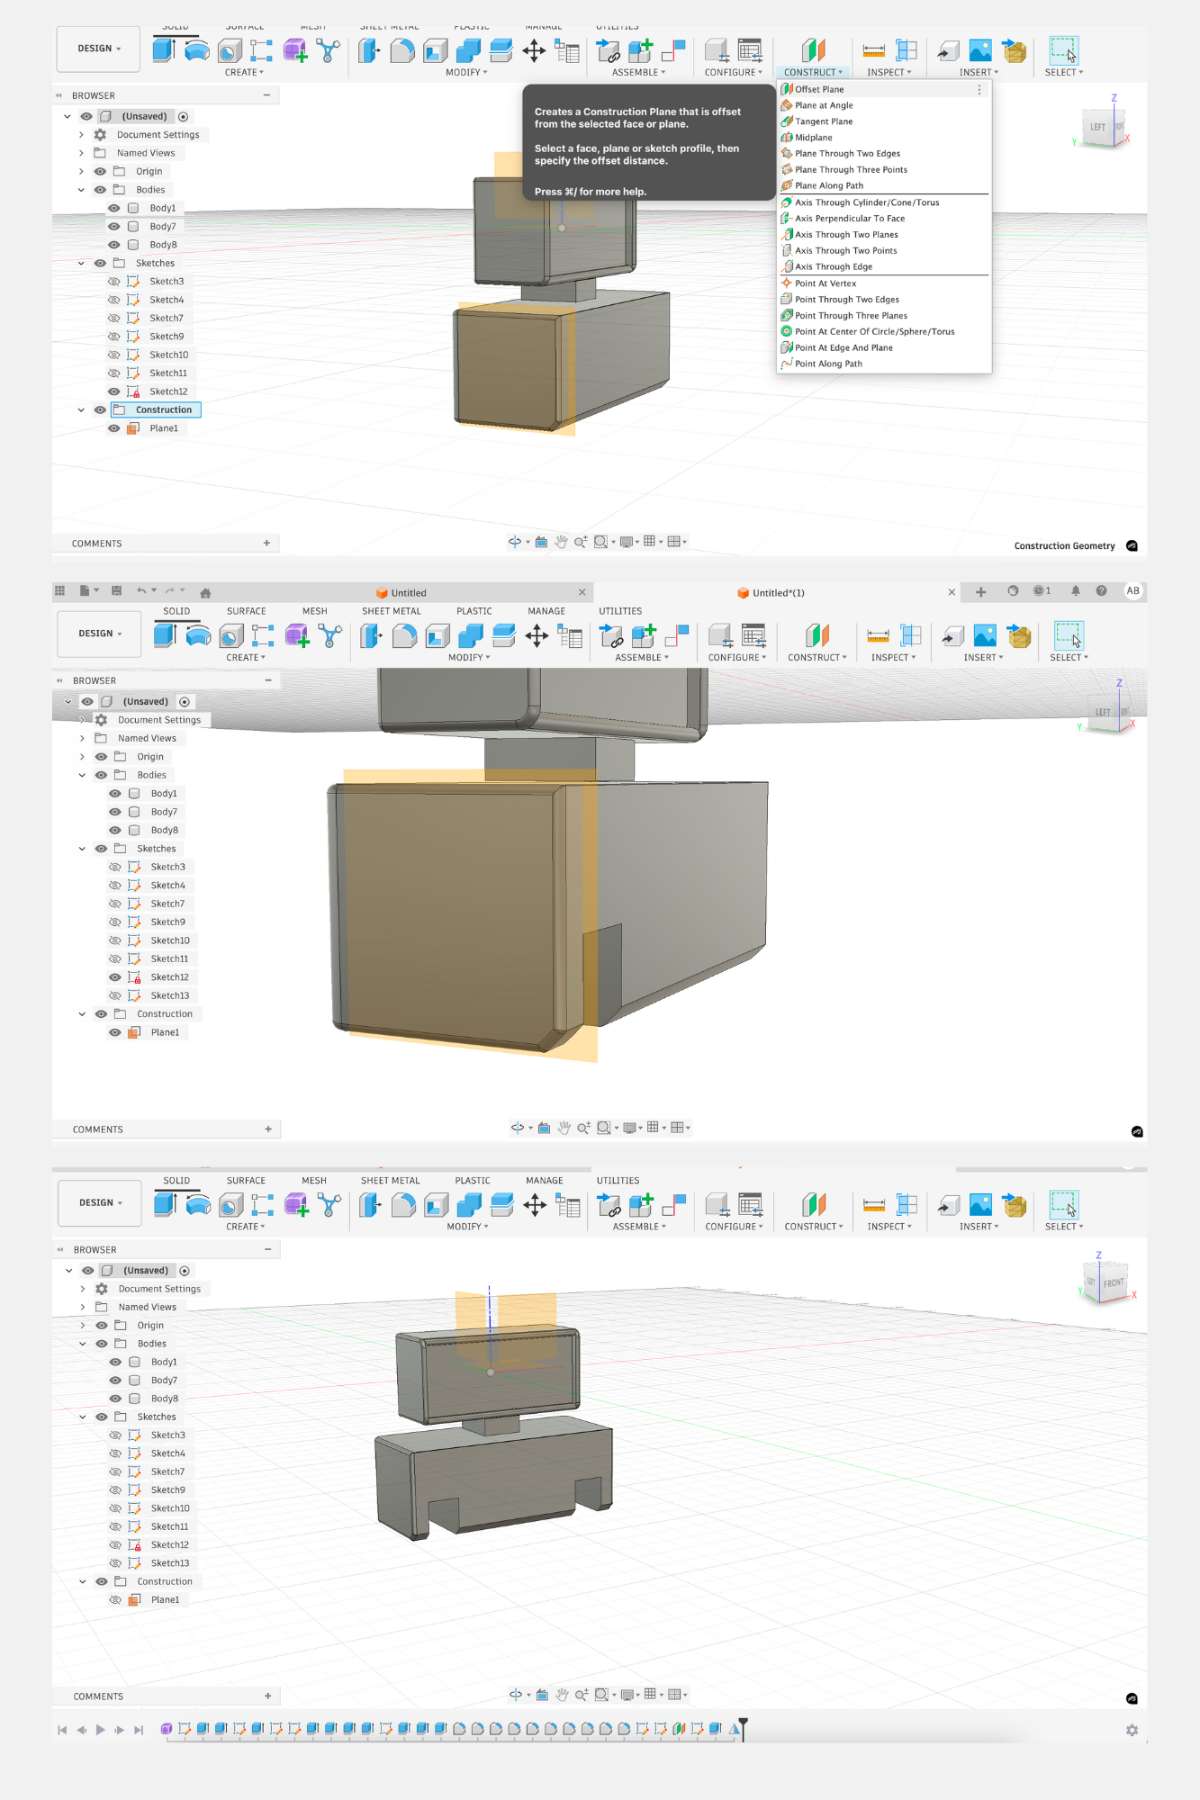
2.Sketched circles or profiles on this plane and cut-extruded them to create openings.
3.Created the wheels by using a mid-plane and the mirror feature to duplicate geometry symmetrically.
Overview of how i did it:
1.Creating basic sketches.
2.Using extrude and cut operations.
3.Applying fillets to smooth edges.
4.Constructing additional planes.
5.Adding wheel spaces and mirroring components.

Rendering :
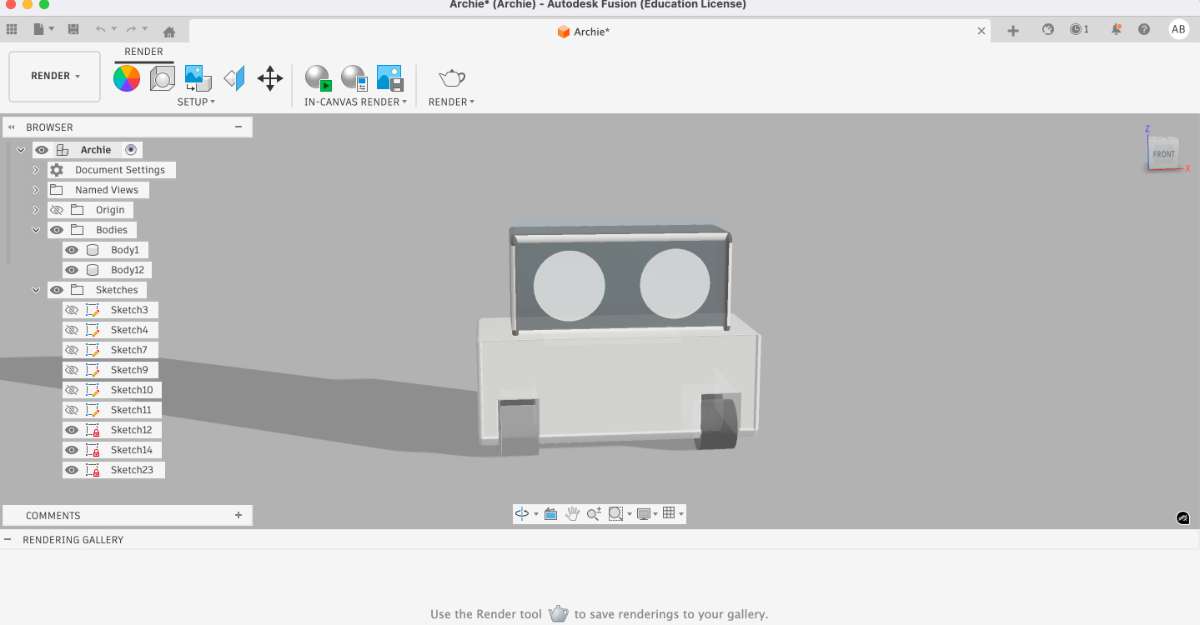
Animated video:
Blender Animation
Blender is the free and open source 3D creation suite. It supports the entirety of the 3D pipeline—modeling, rigging, animation, simulation, rendering, compositing and motion tracking, even video editing and game creation. Advanced users employ Blender’s API for Python scripting to customize the application and write specialized tools; often these are included in Blender’s future releases. Blender is well suited to individuals and small studios who benefit from its unified pipeline and responsive development process. Examples from many Blender-based projects are available in the showcase. Here I used blender to animate my idea was to animate a simple product animation
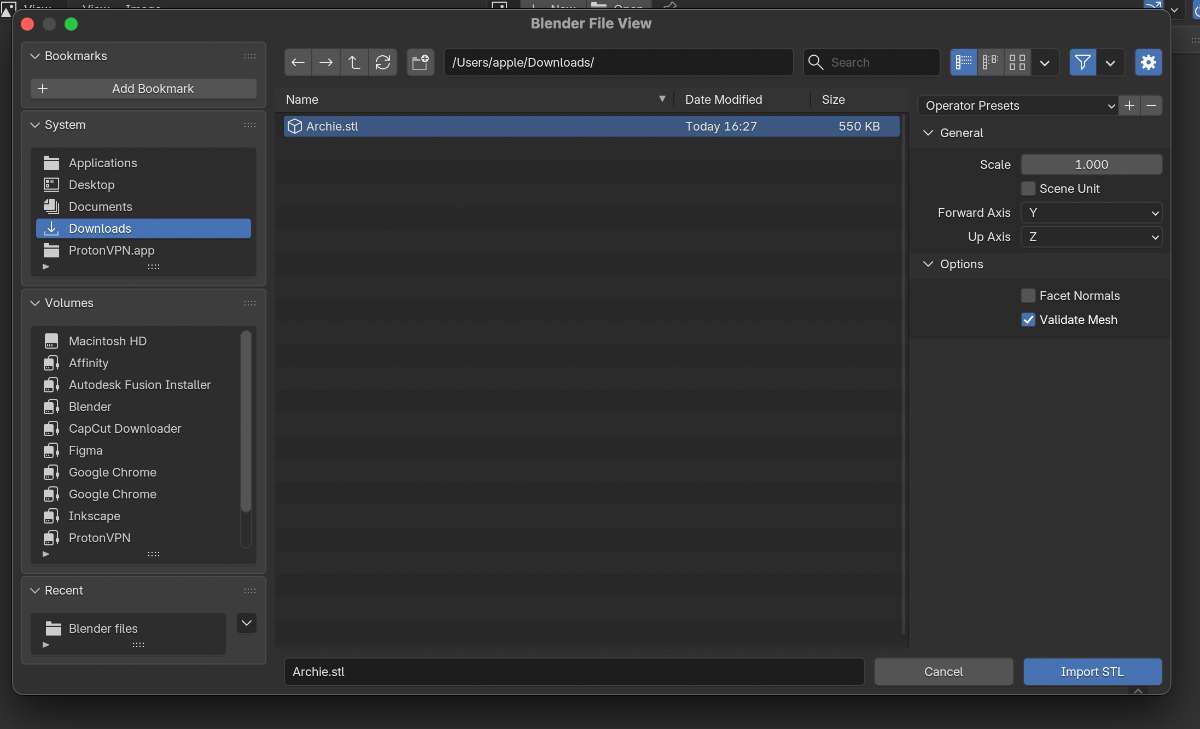
First import a the file obj to blender
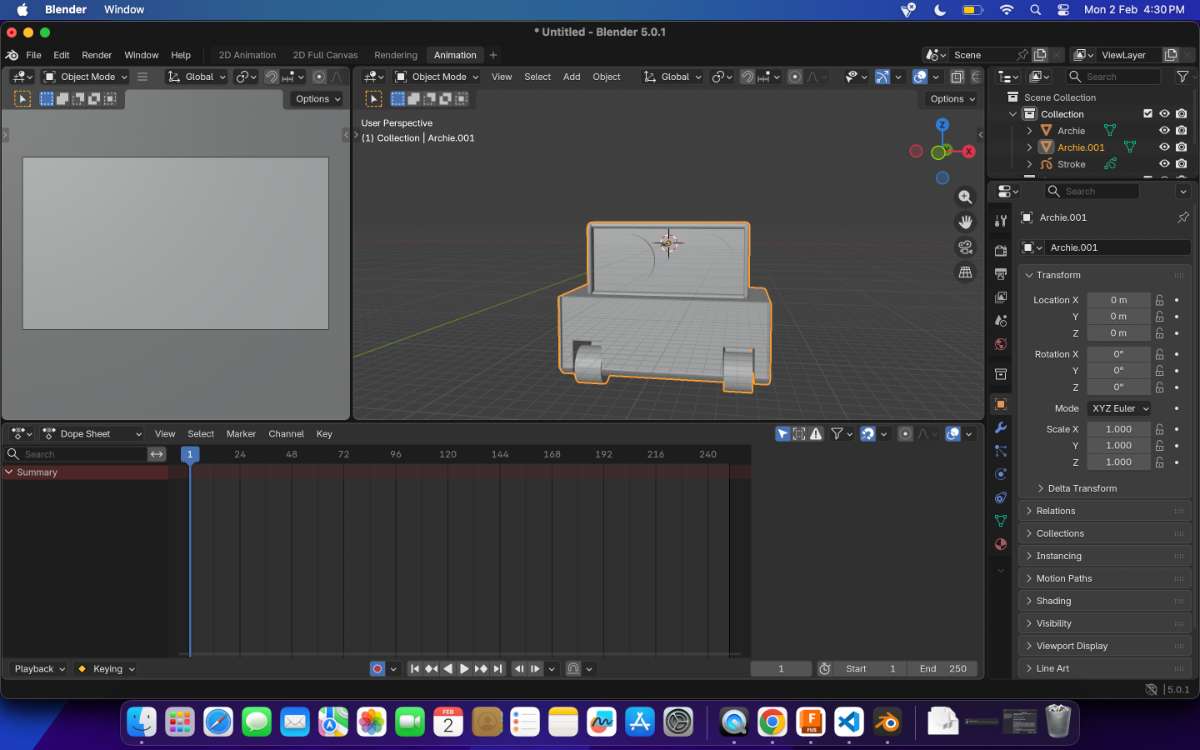
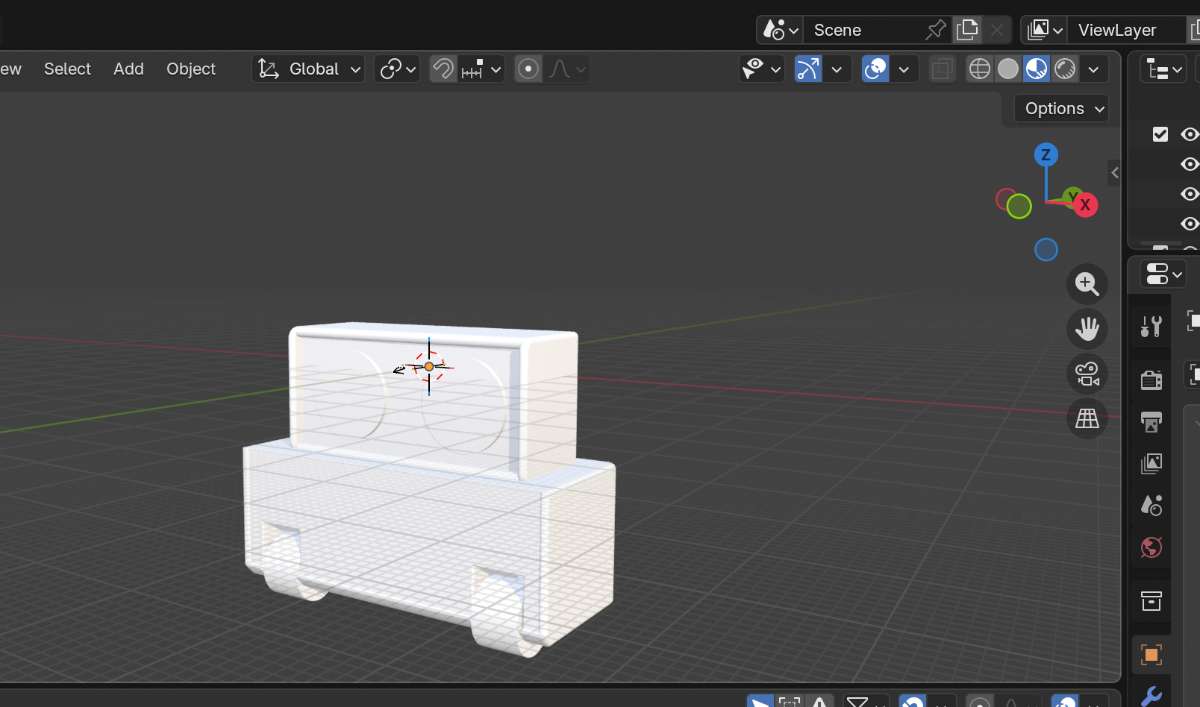
After import, I checked the model orientation, scale, and positioning in the 3D viewport.
I used Blender kits add-in for adding texture
Go the link and download the zip file and follow the instruction to install the add in to blender:
BlenderKit | FREE 3D models, textures and other Blender assets
Then from the top search bar select the texture drand and drop to the body where you want to add the texture
So, for some reason i was not able to give texture color, maybe it was because of the imported file. i am not sure so i thought of making a new design for my project. same features, different body.
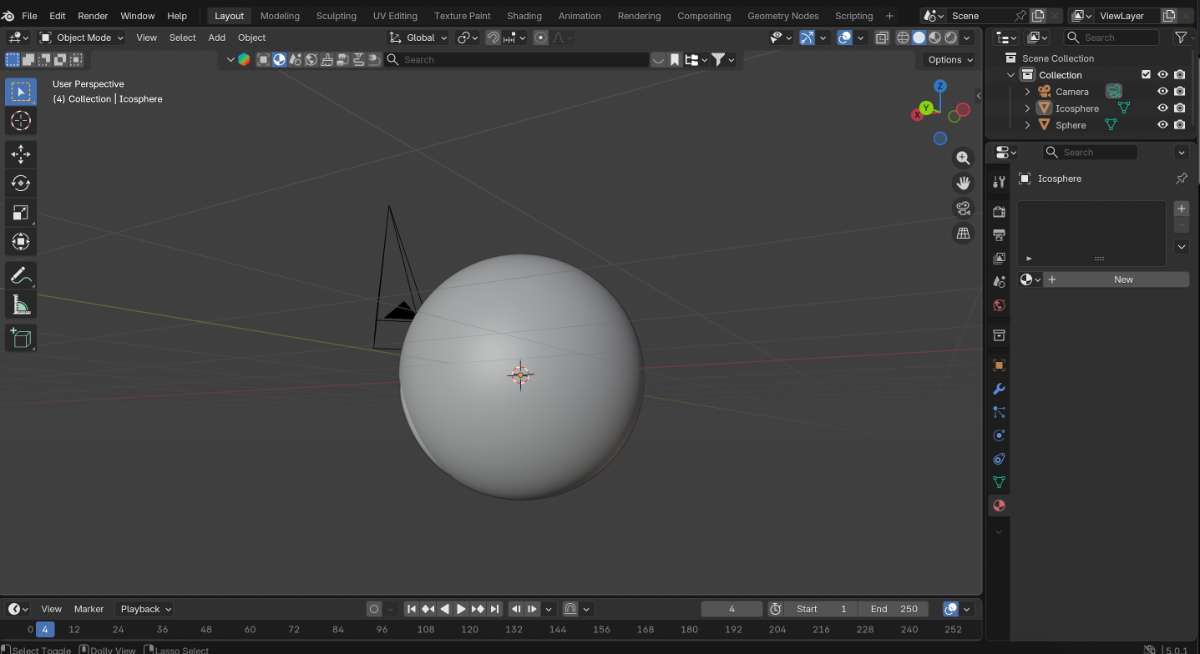
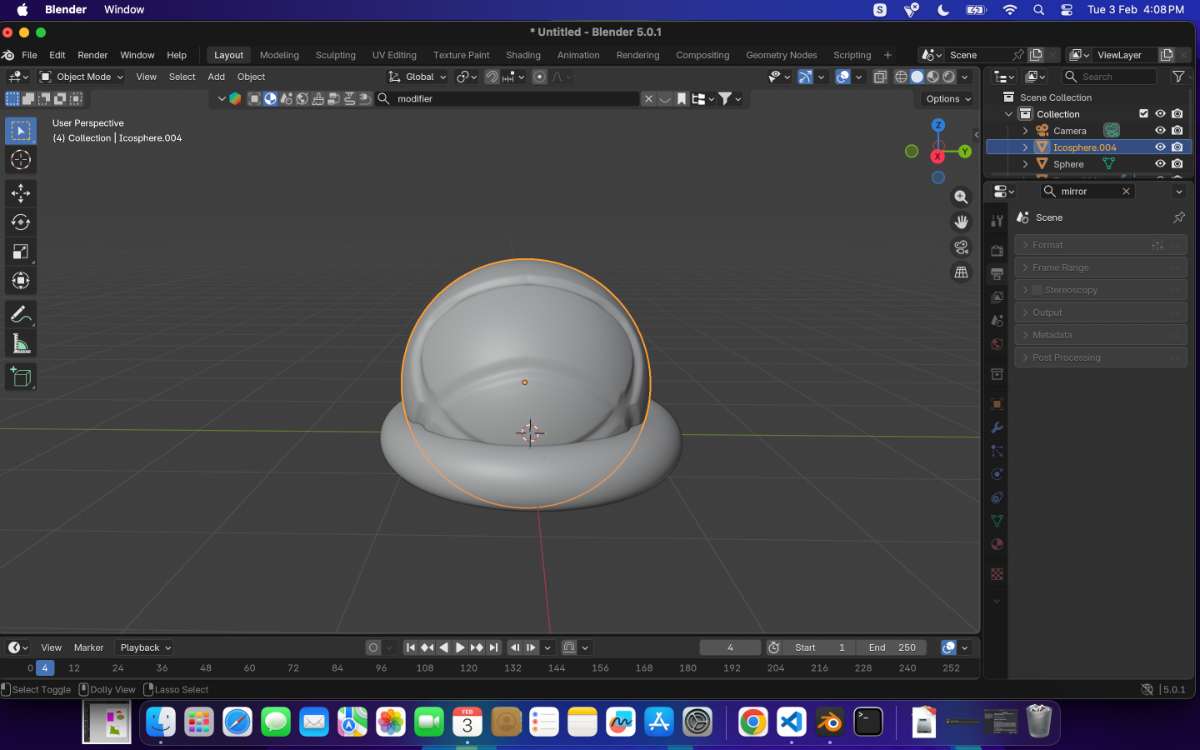
I went for a sphere shaped theme this time, and added a ring on the bottom so it can stay put on a table.
To refine the organic shape, I switched to Sculpting mode from the top toolbar.
Steps:
Selected the sphere object.
Entered Sculpting mode to begin shaping the mesh.
Used different sculpting brushes to try to form additional details.
Referred Video:
Click Here
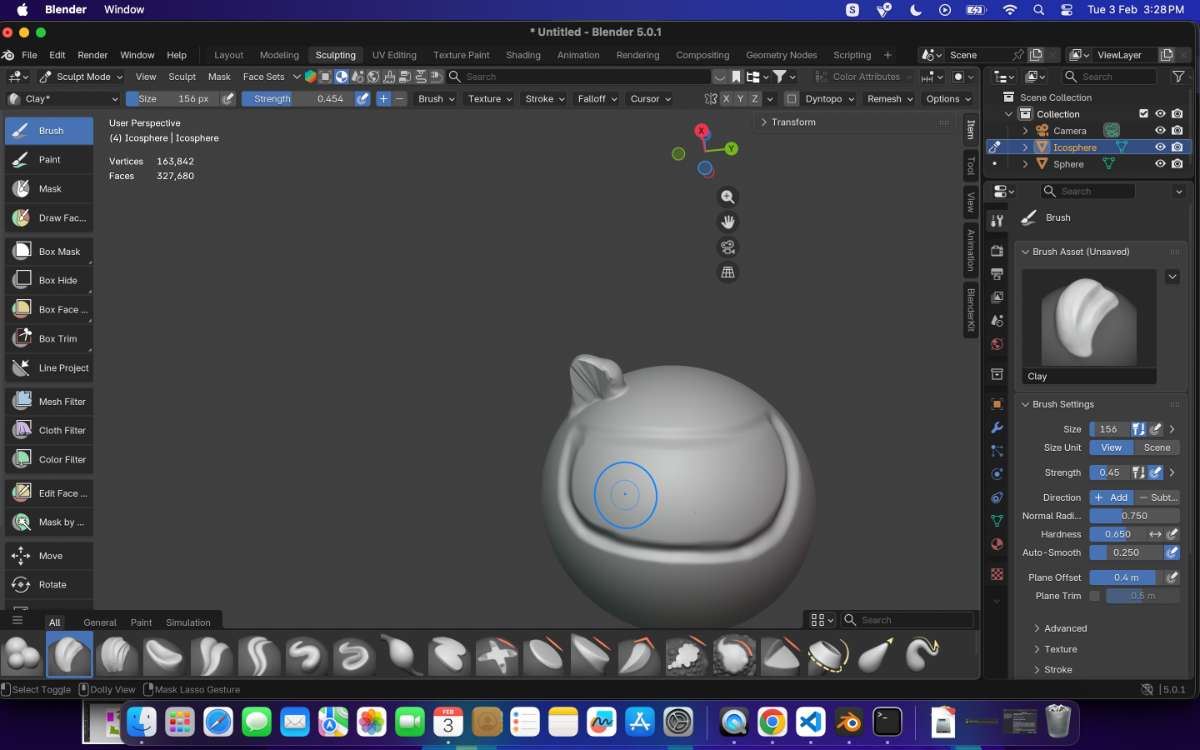
Tried to Sculpt what is supposedly an ear on the sphere object, but was unsuccesful, tried to mirror the not so great ear and again was not successful.
So, i stuck to my inital plan of just the ring holder.
Animation in Blender
To animate in blender i referred a short video : Youtube_Video
What i did was a rigid body collide animation,
- select objects you want to collide
- then move on to the physics tab on the right tool bar
select the body you want to collide into
- change settings to passive
- then go change shape to mesh
This is the output :
Affinity Designer is a professional graphic design software used to create posters, layouts, and visual compositions using vector tools, layers, and colour control.
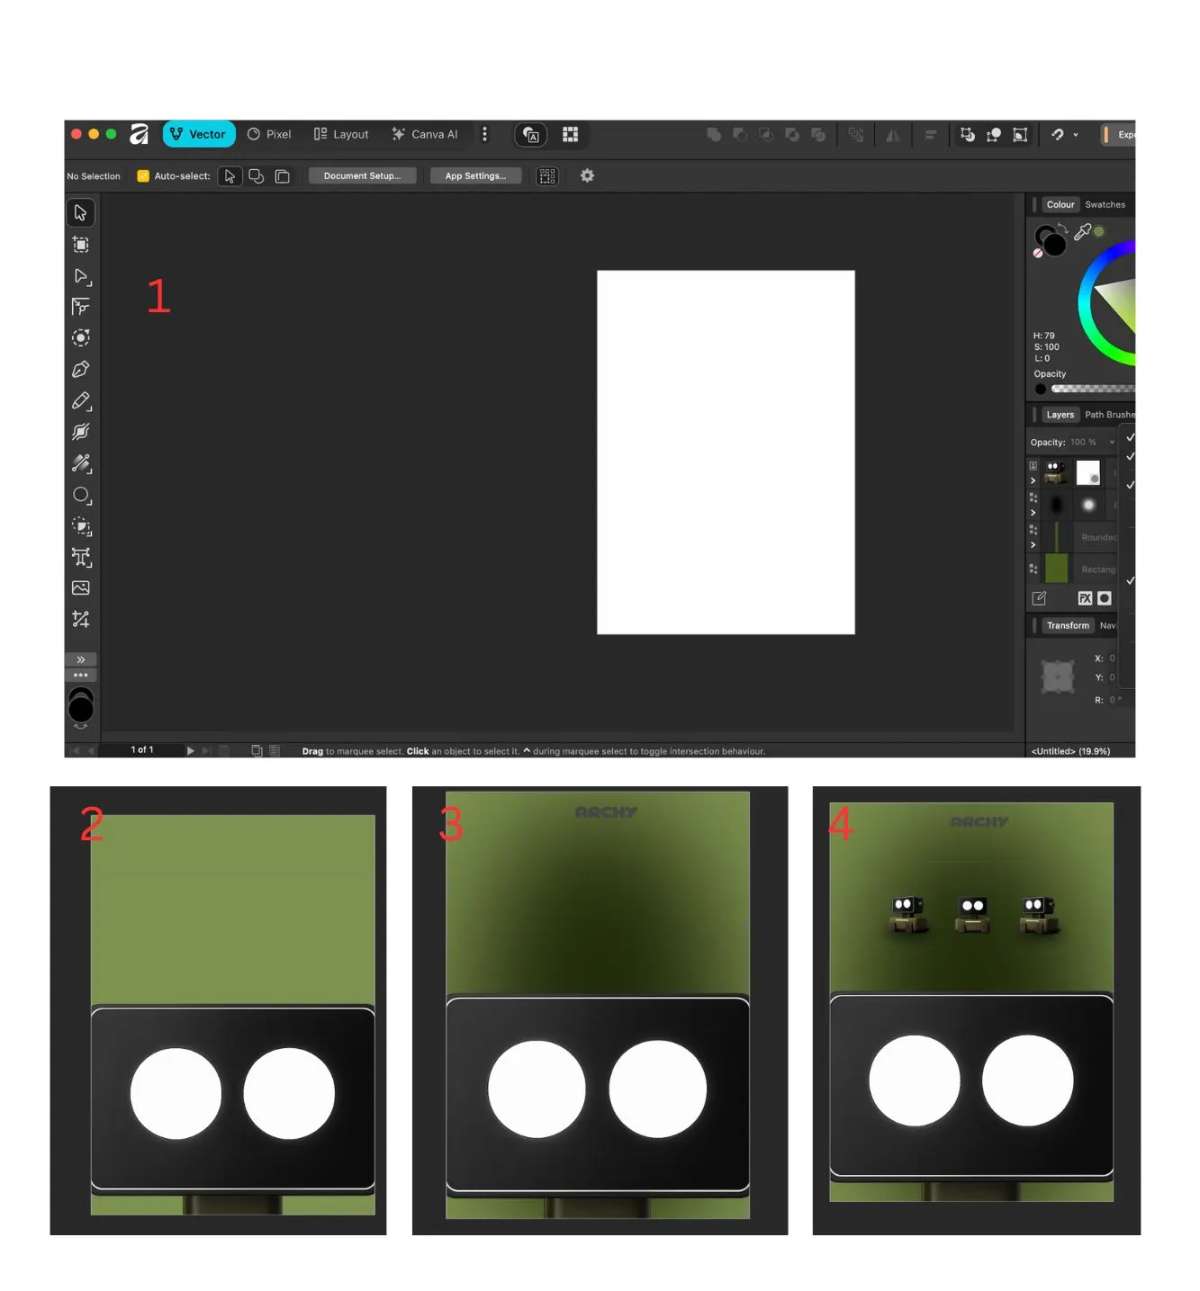
1.I set up an A4 artboard in Affinity Designer to establish the poster layout.
2.I added a solid background colour and refined it with subtle shading for depth.
3.I imported the product render, scaled and positioned it, and used masking to keep the edges clean.
4.I adjusted spacing, alignment, and visual balance to finalise the poster composition.
Final Look:
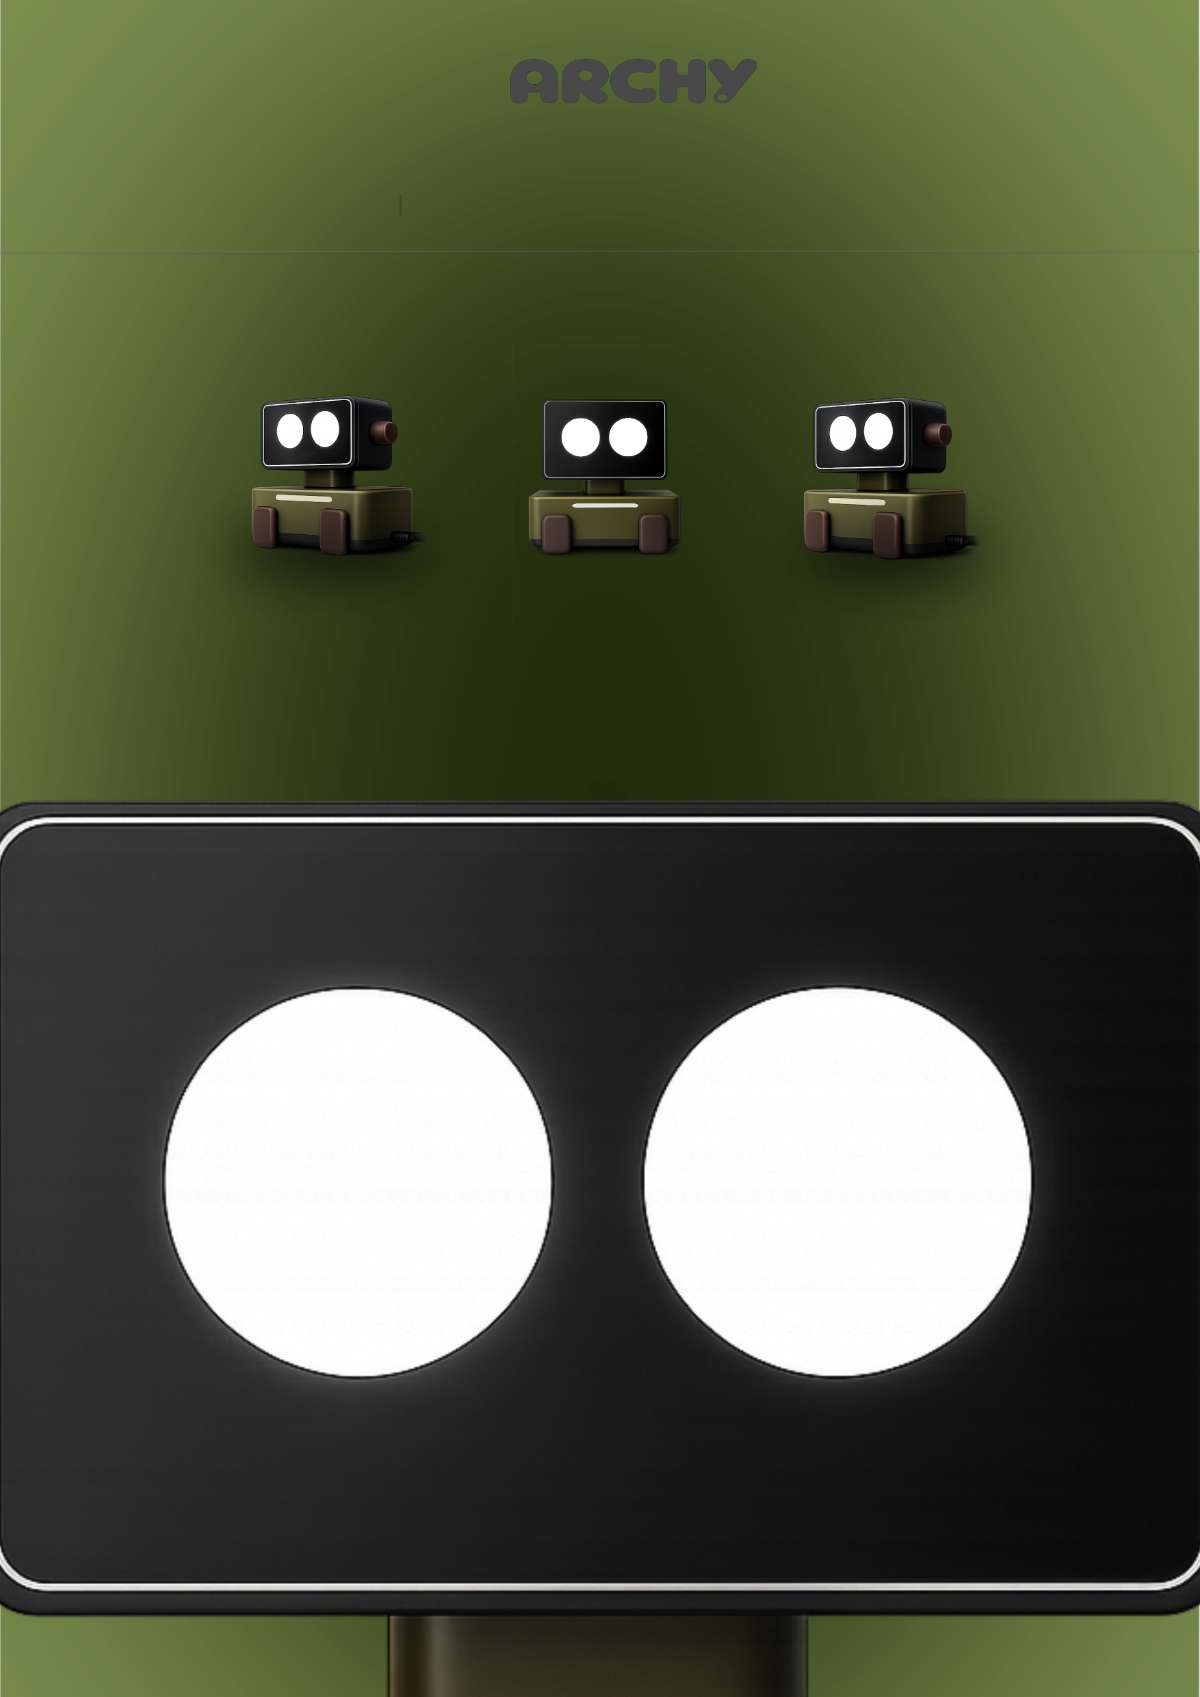
source: the archy images and the font logo is ChatGPT generated.
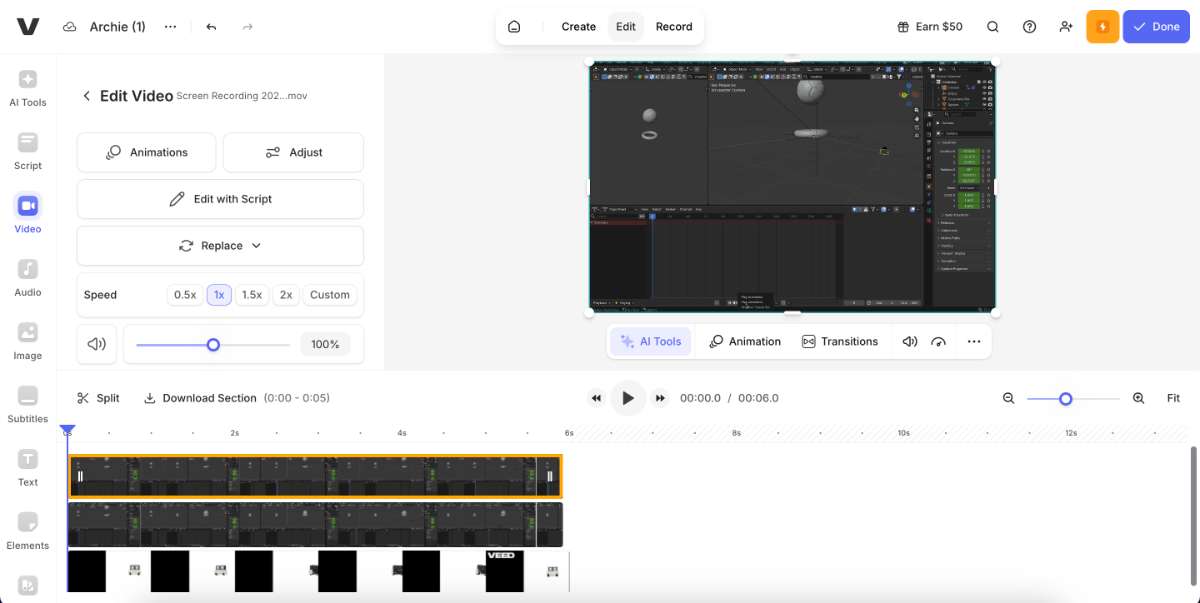
For Compressing Video's,VEED is the video compressing tool that i use
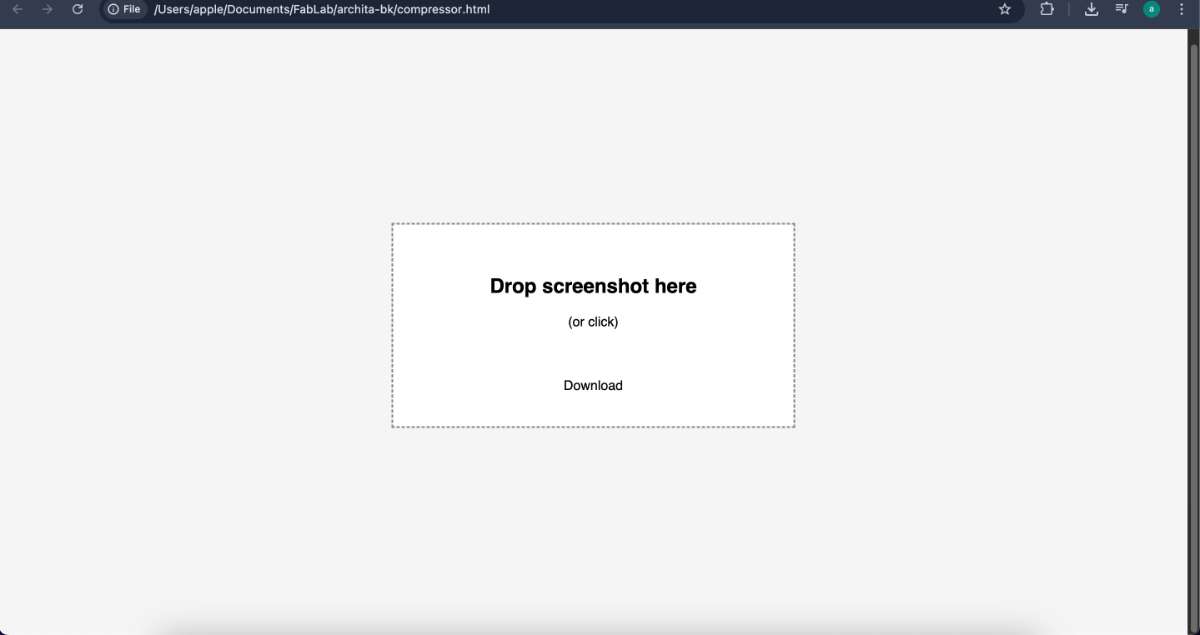
For compressing images,I made an image compressor, it runs on my local host, you can drag and drop or select the image you want to compress and compress it.
Click For Code
I found myself going back to Affinity Designer for most 2D work because it’s simple and gets the job done without overthinking. Photopea was super convenient for quick edits—nothing fancy, but fast and accessible.
For 3D, Fusion 360 stood out the most. It felt structured and reliable, especially for designs that need to actually be made. It was a bit overwhelming at first, but once it clicked, it made a lot of sense. On the other hand, Blender felt powerful but slightly chaotic—I liked the possibilities, but not always the control.
Inkscape was not really something i would use, personally found it confusing and not so easy on the eyes, I didn’t rely on it as much.
If I had to pick:
I’d use Affinity + Fusion 360 for making things, and the rest mainly for support and presentation.
Photpea : Rastor File
Inkscape: Vector File
Affinity: Poster SVG File
Fusion 360: 3D file
Blender: Animation File
Bitmap Tracing
Bitmap tracing lets you convert a raster image (like a JPEG or PNG) into a vector.
Steps:
1.Copy and paste an image into Inkscape.
2.Right-click on the image and choose Trace Bitmap.
3.Adjust the tracing settings as needed and apply.
This creates a vector version of the image that can be edited like other vector shapes.
c
After practicing these tools, I moved on to creating the 2D layout for my final project in Inkscape. The SVG file of this layout is attached at the bottom of the page.
Raster mockup - Photopea
Photopea is a free web-based software, a better and free alternative for photoshop. It supports PSD files and offers features similar to Photoshop, such as layers, masks, filters, and text tools, making it useful for image editing, digital design, and quick graphic work.Remove and Change Background
Steps:
1.Open the image in Photopea.
2.Use selection tools to remove the existing background.
3.Once the background is removed, add a new background by importing other images as layers.
The background is removed.
Now we need to add a new background
Here I added 2 background images, both from Freepik.
and arranged it layer by layer
Now, Following is the model of my final project.
3D Parametric Design – Fusion 360
Fusion 360 is a cloud-based 3D CAD, CAM, and CAE software by Autodesk used for designing, modeling, simulating, and manufacturing products in one integrated platform. It allows users to create precise 3D models, test designs, and prepare them for manufacturing using tools like sketching, extrusion, simulation, and CNC workflows.
Learning Constraints
I explored different sketch constraints in Fusion 360 to understand how they affect geometry.
For example:
Tangent constraint: This constraint keeps a line and a circle (or arc) touching at exactly one point. Once applied, the line will always remain tangent to the circle, even if you move or resize elements. Understanding constraints helps create sketches that are more controlled, predictable, and parametric.
Now, moving on to making my final project's 3D model.
Summarised steps:
1.Created a rectangle sketch on a vertical plane to define the front profile.
2.Extruded the sketch to form the main rectangular solid.
3.Sketched a smaller rectangle on the front face for the inner feature.
4.Cut-extruded the inner sketch to create a recessed area.
5.Created a rectangle sketch on the bottom plane for the base.
6.Extruded the bottom sketch to complete the final model.
Adding Fillet to my Product:
To soften sharp edges and improve the appearance:
Steps:
1.Go to Modify → Fillet.
2.Select the edge, face, or vertex where you want the fillet.
3.Enter a fillet radius value or drag the cursor to adjust it.
4.In my case, I used a radius value of 1.
The result is a smoother, more refined product design.
Creating Spaces for Wheels
I added spaces/holes in the design to attach wheels:
1.Constructed an offset plane parallel to the side face where I wanted the wheel holes.
2.Sketched circles or profiles on this plane and cut-extruded them to create openings.
3.Created the wheels by using a mid-plane and the mirror feature to duplicate geometry symmetrically.
Overview of how i did it:
1.Creating basic sketches.
2.Using extrude and cut operations.
3.Applying fillets to smooth edges.
4.Constructing additional planes.
5.Adding wheel spaces and mirroring components.
Rendering :
Animated video:
Blender Animation
Blender is the free and open source 3D creation suite. It supports the entirety of the 3D pipeline—modeling, rigging, animation, simulation, rendering, compositing and motion tracking, even video editing and game creation. Advanced users employ Blender’s API for Python scripting to customize the application and write specialized tools; often these are included in Blender’s future releases. Blender is well suited to individuals and small studios who benefit from its unified pipeline and responsive development process. Examples from many Blender-based projects are available in the showcase. Here I used blender to animate my idea was to animate a simple product animation
First import a the file obj to blender
After import, I checked the model orientation, scale, and positioning in the 3D viewport.
I used Blender kits add-in for adding texture
Go the link and download the zip file and follow the instruction to install the add in to blender:
BlenderKit | FREE 3D models, textures and other Blender assets
Then from the top search bar select the texture drand and drop to the body where you want to add the texture
So, for some reason i was not able to give texture color, maybe it was because of the imported file. i am not sure so i thought of making a new design for my project. same features, different body.
I went for a sphere shaped theme this time, and added a ring on the bottom so it can stay put on a table.
To refine the organic shape, I switched to Sculpting mode from the top toolbar.
Steps:
Selected the sphere object.
Entered Sculpting mode to begin shaping the mesh.
Used different sculpting brushes to try to form additional details.
Referred Video:
Click Here
Tried to Sculpt what is supposedly an ear on the sphere object, but was unsuccesful, tried to mirror the not so great ear and again was not successful.
So, i stuck to my inital plan of just the ring holder.
Animation in Blender
To animate in blender i referred a short video : Youtube_Video
What i did was a rigid body collide animation,
- select objects you want to collide
- then move on to the physics tab on the right tool bar
select the body you want to collide into
- change settings to passive
- then go change shape to mesh
This is the output :
Affinity
Affinity Designer is a professional graphic design software used to create posters, layouts, and visual compositions using vector tools, layers, and colour control.
1.I set up an A4 artboard in Affinity Designer to establish the poster layout.
2.I added a solid background colour and refined it with subtle shading for depth.
3.I imported the product render, scaled and positioned it, and used masking to keep the edges clean.
4.I adjusted spacing, alignment, and visual balance to finalise the poster composition.
Final Look:
source: the archy images and the font logo is ChatGPT generated.
Image & Video Compressor
For Compressing Video's,VEED is the video compressing tool that i use
For compressing images,I made an image compressor, it runs on my local host, you can drag and drop or select the image you want to compress and compress it.
Click For Code
Conclusion
This week felt less like “choosing one software” and more like figuring out what each tool is good at.I found myself going back to Affinity Designer for most 2D work because it’s simple and gets the job done without overthinking. Photopea was super convenient for quick edits—nothing fancy, but fast and accessible.
For 3D, Fusion 360 stood out the most. It felt structured and reliable, especially for designs that need to actually be made. It was a bit overwhelming at first, but once it clicked, it made a lot of sense. On the other hand, Blender felt powerful but slightly chaotic—I liked the possibilities, but not always the control.
Inkscape was not really something i would use, personally found it confusing and not so easy on the eyes, I didn’t rely on it as much.
If I had to pick:
I’d use Affinity + Fusion 360 for making things, and the rest mainly for support and presentation.
Final Files
The following links contain the final project files produced for this project using the respective software tools.Photpea : Rastor File
Inkscape: Vector File
Affinity: Poster SVG File
Fusion 360: 3D file
Blender: Animation File