Week 16 – System Integration
This week is about combining different subsystems, components, or applications into a unified functioning system..
The objective is to finalize User Workflow, Electrical Diagram, Flow-Chart, System-Diagram and finally make a Mock-up of my final project.
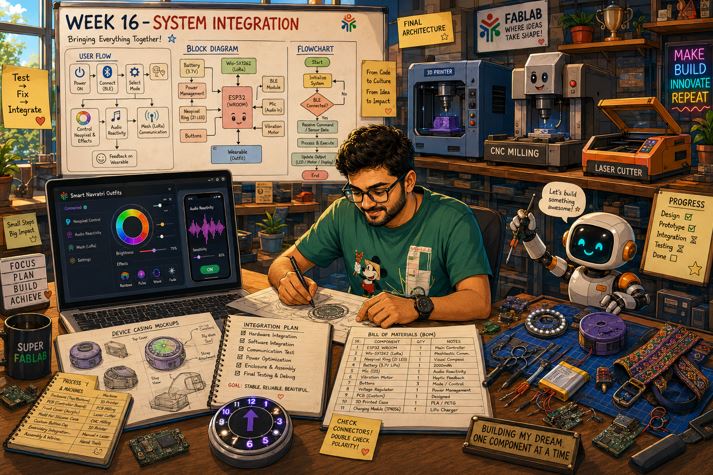
AI prompt ChatGPT: "Please give an animated avatar of my self working on user flow diagram, block diagram, flow-chart of my project and doing mock up for my device casing fixing the components and fixing Bill of material and finalizing what process I will follow which machine I will use to make particular part of my project. please give landscape image. "
Assignment Overview
- Design and document the system integration for your final project.
| Day | Activity | Status |
|---|---|---|
| Thursday | Class - Interface and Application Programming | Completed |
| Friday | Public Holiday , Worked on previous pending Documentation 📝 | Completed |
| Saturday | Final Project - Components list, Possible production process | Completed |
| 3D design 📐 - Mold for Wayfinding - A 21-LED circular "Badge" | Completed | |
| Sunday | Final Project Requirement Document 📝 | Completed |
| Firmware and Mobile Application Development with BLE | Completed | |
| Monday | Integrating Meshtashtic in Mobile Application | Completed |
| Tuesday | Regional Review 👨🏫💬 | Completed |
| Milling the Mold Final Project 🛠 | Completed | |
| Wednesday | Casting 🛠 | Completed |
| Documentation 📝 | Completed |
Contextualization
The Cultural Context : Navratri is a high-energy, multi-day Indian folk festival centered around folk dance steps. Participants wear vibrant, traditional attire and move in synchronized circles to rhythmic music. The Bheru outfit digitizes this tradition. It turns the garment into a "living" part of the performance that reacts to the music and helps people stay connected in a crowd.
The Technological Context : The Project sits at the intersection of Electronic Textiles and Wireless Communication.
- Interactive Aura : I2S Microphone and Embroidered Neopixels for audio-reactive vibrant outfit.
- BLE Control (Mobile App) : giving the user personal control
- Friend-Finder (GPS + LoRa) : helps people stay connected in a crowd or find a new fried using Long Range (LoRa) radio for large-scale outdoor festivals where mobile networks often crash.
Project Development Plan
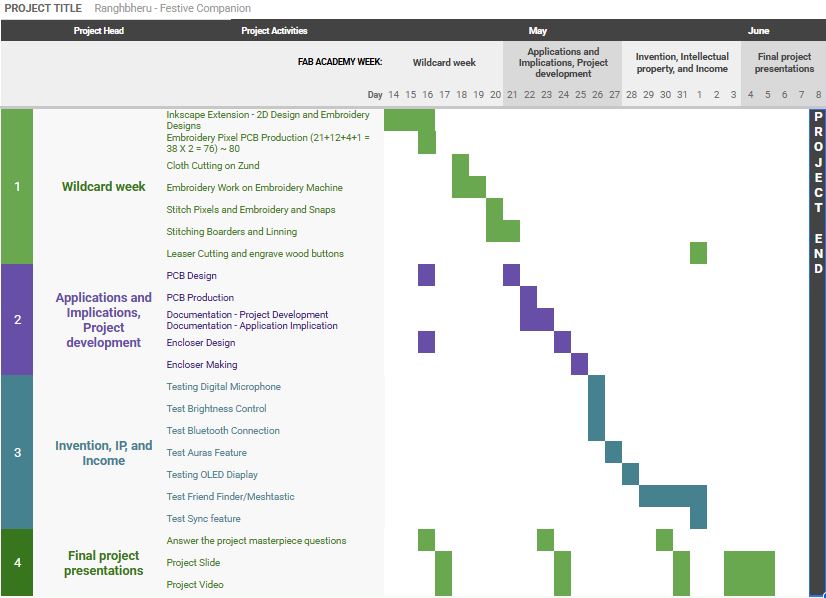
Below is plan is made in away that the activities align with the remaining assignment weeks activity. The wildcard week I aligned with using embroidery activity of my final project, making 40 Neopixels modules on Carvara machine, and Fabric Cutting on Zund machine.
CMF (Colour Material Finish)
| Component | Color | Material | Finish | Process |
|---|---|---|---|---|
| Main Board Casing | Orange / Geen | PLA | Smooth | 3D Printing |
| Flex PCB | Copper | Copper | laminated | Color Print X-Tools Vinyl Cutter |
| Buttons | Multicolor | MDF | Multicolor Wooden | laser cut |
| Outfit 1 | While background Multicolor |
Cotton (with linning, Fusing) |
Fabric Cutting, Embroidery Work, Stitching | Zund Machine, Embroidery Machine |
| Outfit 2 | Perple background Multicolor |
Cotton (with linning, Fusing) |
Fabric Cutting, Embroidery Work, Stitching | Zund Machine, Embroidery Machine |
Sketching (Form & Function)
Below sketch with white background and purple background is to have feel and visualization of various color on that particular background.
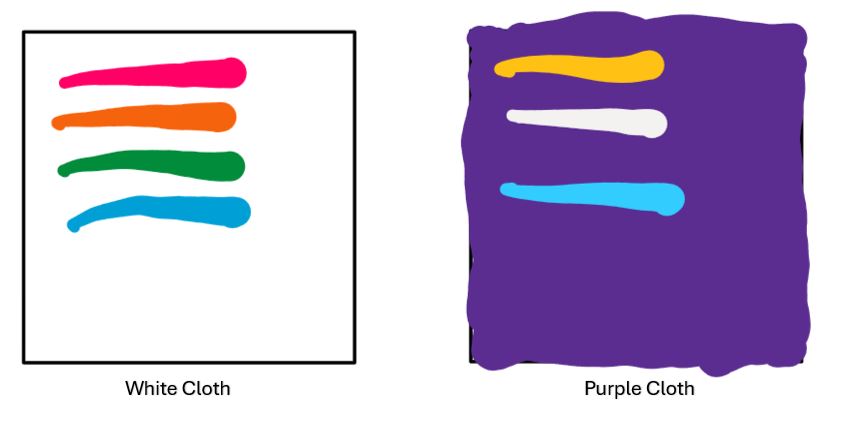
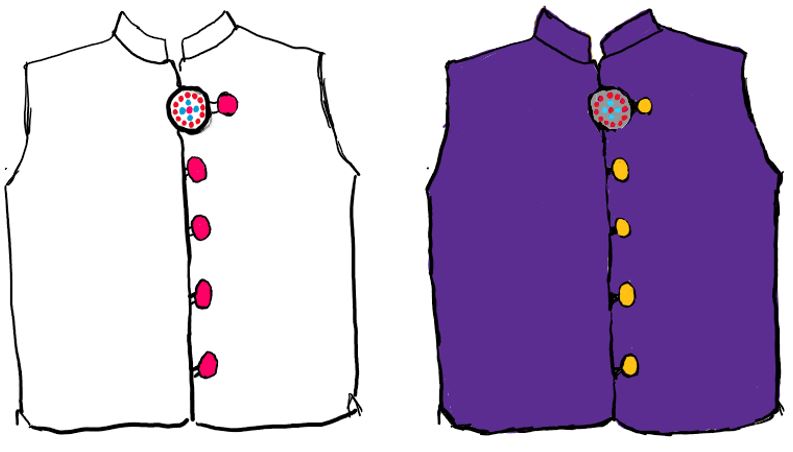
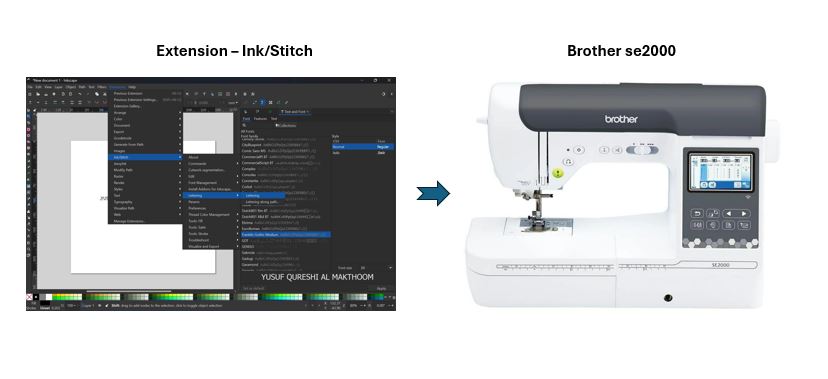
I plan to used Zund machine to cut the cotton cloth ans then use Brother SE2000 machine for doing embroidery and stitching on waist.
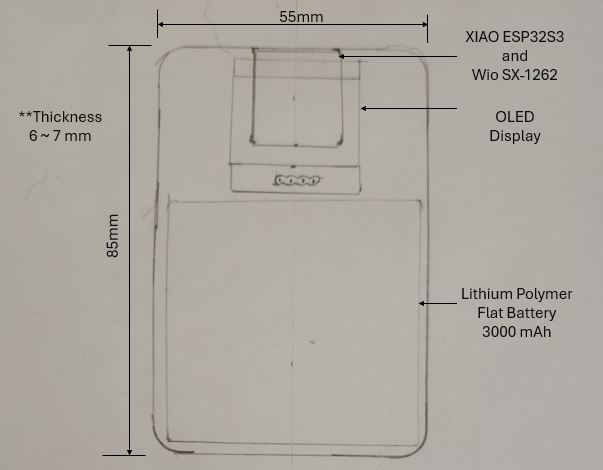
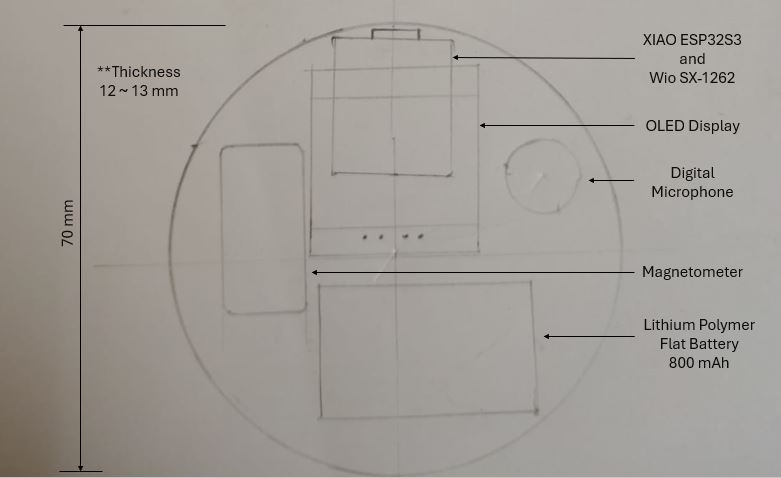
I sketched two different possible encloser sketches, the sketches are drawn at actual scale to have accurate judgement for the form of the Device.
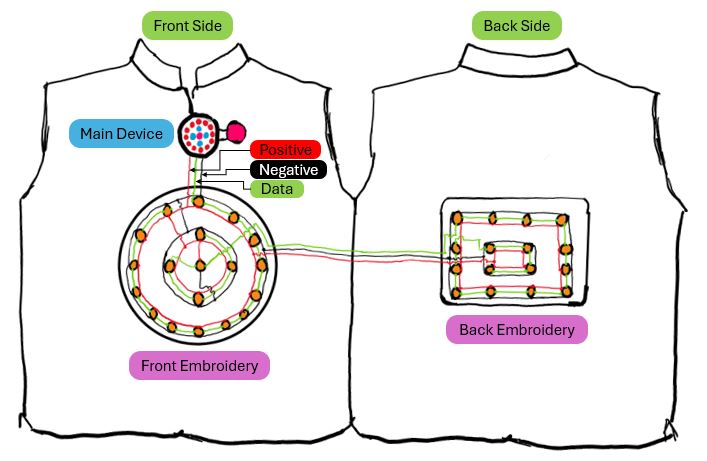
Snapping system
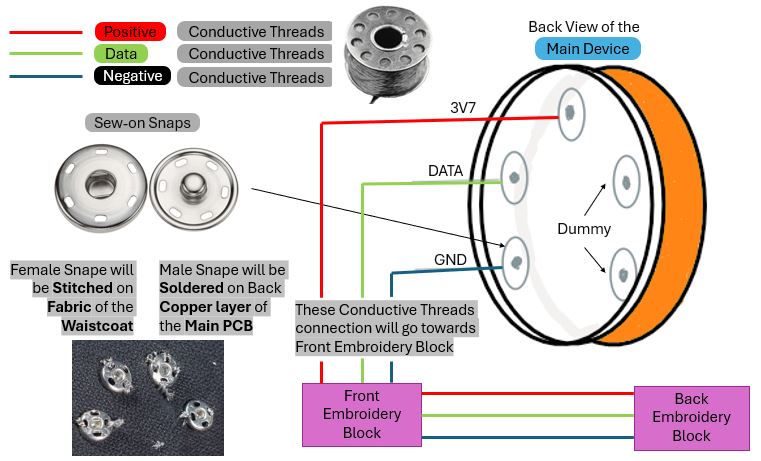
Below is the Snapping system, with sewable snaps buttons that will electrically connect and also hold the device with the fabric.
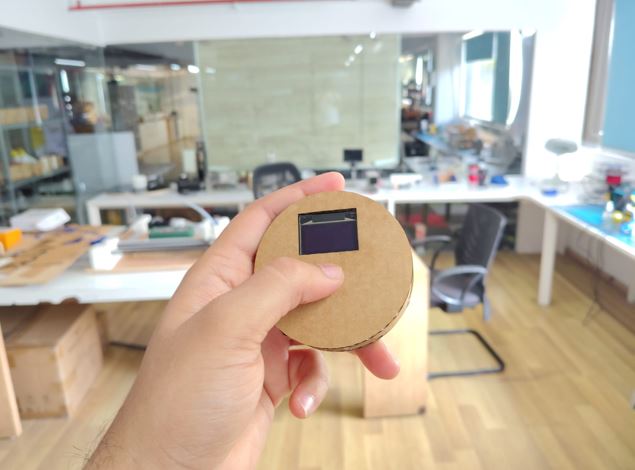
Mock ups (Cardboard and Glue)
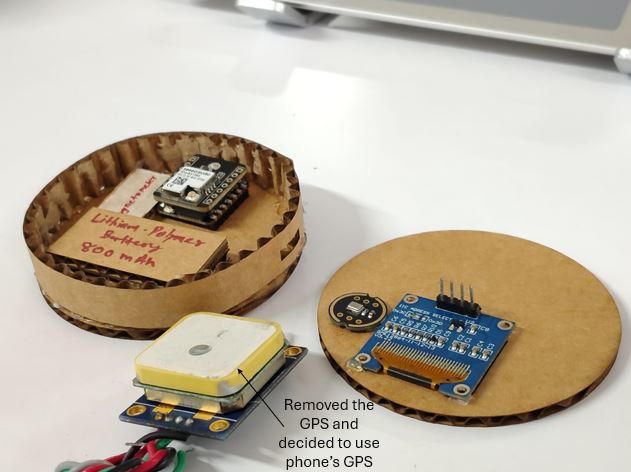
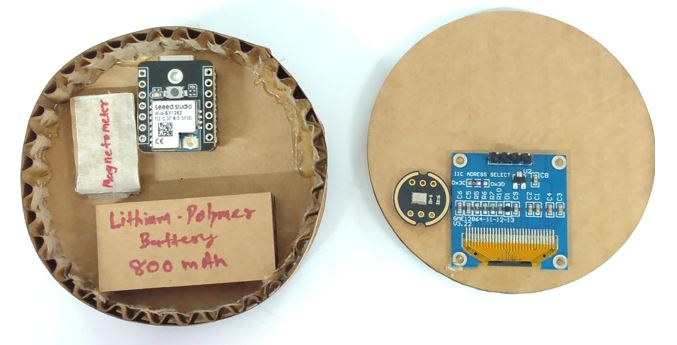
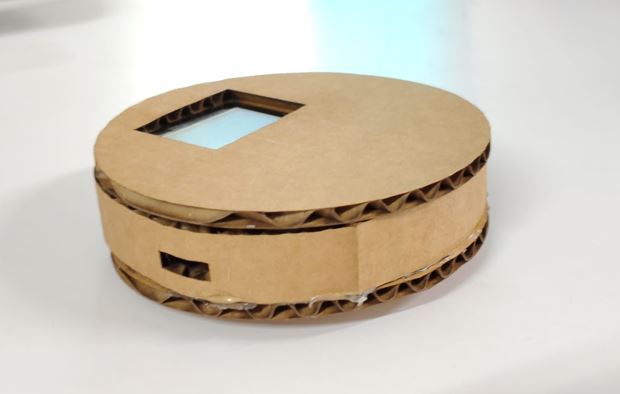
The mock up is done at proportion of actual scale / actual component dimensions and using cardboard and glue.
System Diagrams
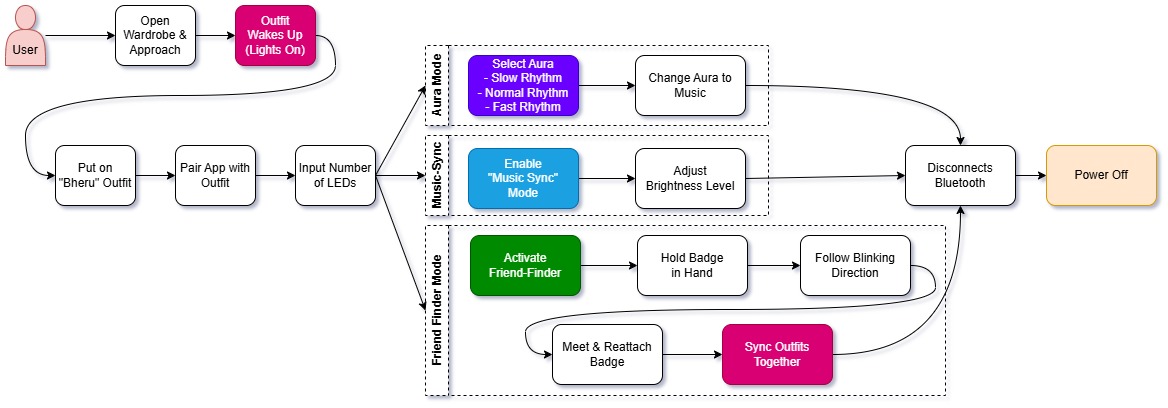
User FLow Diagram : below diagram is step-by-step map showing how a user interacts with my product, app, or device.
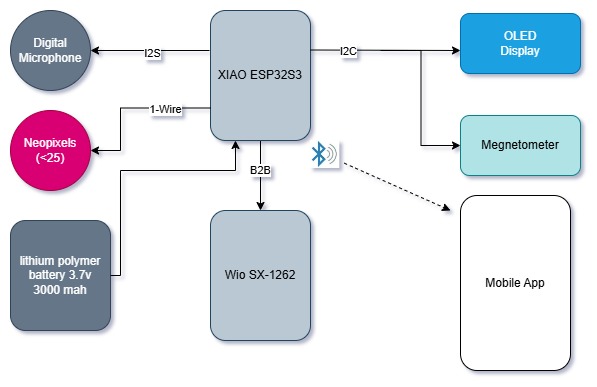
Functional Block Diagram : below diagram shows the major parts of a system and how does information flow between them.
System Diagram : below is a big-picture view of my entire project, it shows major parts of my system, and how are they connected together.
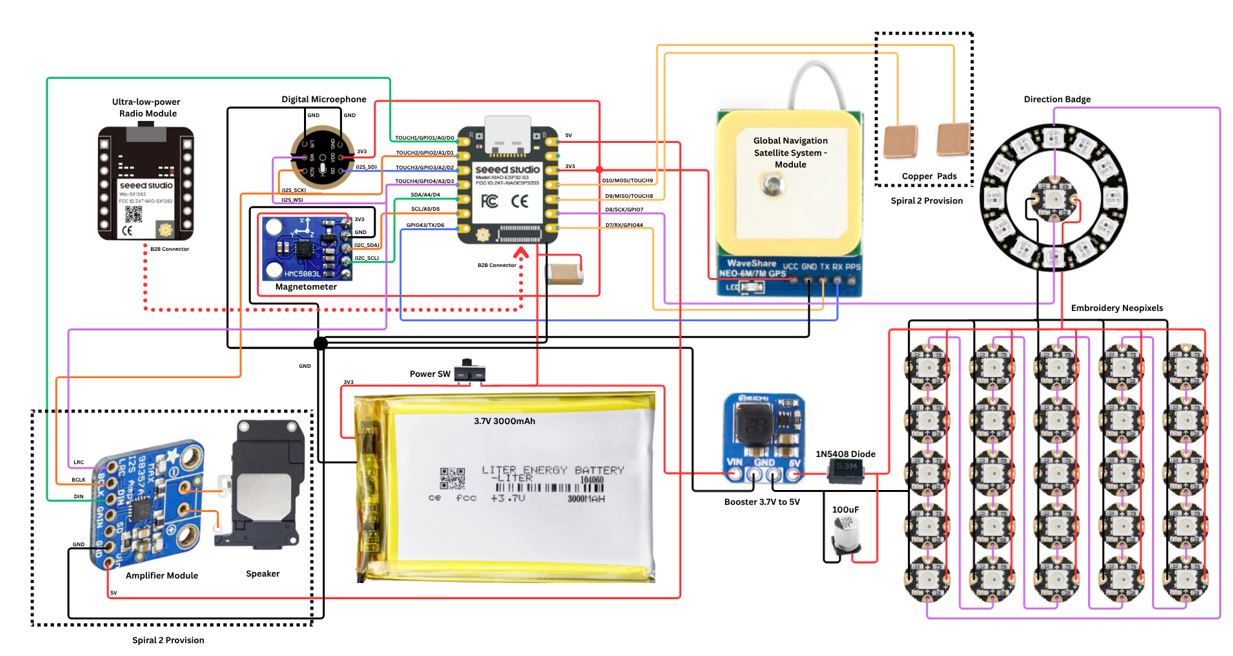
Note : Considering the compact design of the device, I need reduce the complexity, and consider the spiral development for some features such Copper touch pads, Voice Module, I decide to implement in spiral 2 of my project. And, we also decide to remove GPS module due to space constraints of compact device and instead plan to use GPS of Mobile. Thus below is the received / updated System Diagram.
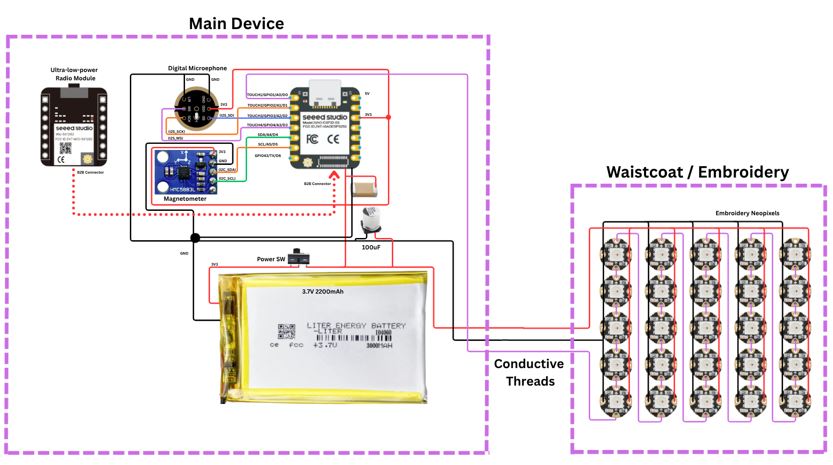
Battery and Charging System
- A 3.7V 2200mAh Li-Po battery is an optimal choice for a compact wearable.
- A battery size of approximately 50 mm × 30 mm is much easier to integrate into clothing than larger battery packs.
- 2200mAh provides a good balance between runtime, weight, and physical size.
- NeoPixels will not be ON at full brightness all the time. Since your animations involve blinking, fading, and audio-reactive effects, the average current consumption is much lower than the worst-case specification.
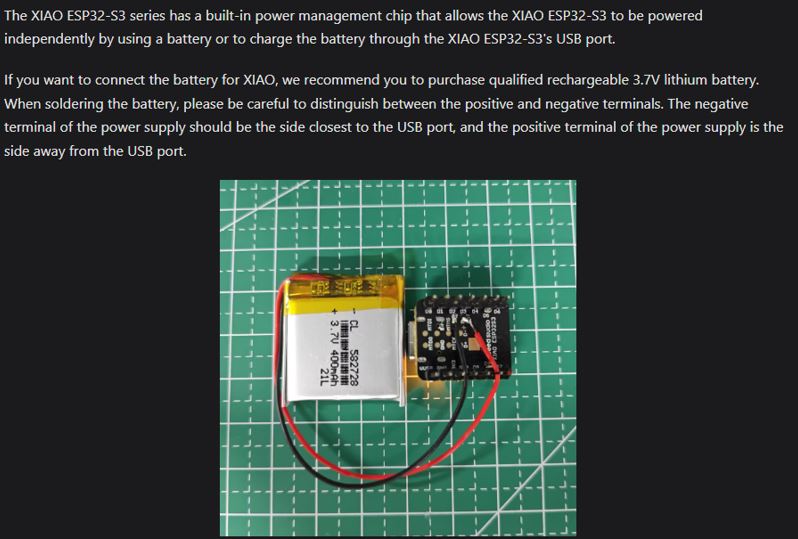
The Seeed Studio XIAO ESP32S3 includes an onboard Lithium battery charging management circuit, allowing the board to operate and charge a battery at the same time.
- Battery Terminals: Connect the battery to the dedicated BAT+ and BAT− solder pads located on the back of the XIAO ESP32S3.
- Supported Battery: Use only a 3.7V (nominal) single-cell LiPo or Li-ion rechargeable battery.
- Charging: The battery is automatically charged whenever the board is connected to a USB Type-C power source.
- Power Supply: The battery can directly power the XIAO ESP32S3, making it an ideal solution for my applications.
Bill of Material (BOM)
A BOM stands for Bill of Materials, it contains all the parts, components, materials, and quantities needed to build your project.
| Sr No | Item | Item Description | Quantity | Components / Material | Cost (INR) | Cost (USD) | Lab Inventory / Purchased | Point of Contact |
|---|---|---|---|---|---|---|---|---|
| 1 | XIAOESP32S3 Wio-SX1262 | Microconteoller with LoRa module | 1 | Electronics | ₹2,000 | $21.28 | Purchased | Link |
| 2 | 3.7V 2200 mAh | Li-Po Battery | 1 | Electronics | ₹237.00 | $2.52 | Purchased | Link |
| 3 | HMC5883L | Megnetometer | 1 | Electronics | ₹189.00 | $2.01 | Purchased | Link |
| 4 | INMP441 | Digital Microphone | 1 | Electronics | ₹146.00 | $1.55 | LabInventory | LInk |
| 5 | TPS61023 | Boost Converter | 1 | Electronics | ₹87.00 | $0.93 | Purchased | Link |
| 6 | Sliding S/W | Mini Switch | 1 | Electronics | ₹6.00 | $0.06 | LabInventory | Link |
| 7 | O.1uF Cap. | Decoupling cap. | 40 | Electronics | ₹200.00 | $2.13 | LabInventory | Link |
| 8 | 100uF Cap. | Decoupling cap. | 1 | Electronics | ₹0.00 | $0.00 | LabInventory | Link |
| 9 | S3MBF Diode | Voltage drop diode | 1 | Electronics | ₹4.96 | $0.05 | Purchased | LInk |
| 10 | LEDs | NeoPixels 5050 | 40 | Electronics | ₹200.00 | $2.13 | LabInventory | Link |
| 11 | OLED Display | 0.96 Inch | 1 | Electronics | ₹0.00 | $0.00 | LabInventory | Link |
| 12 | Buzzer | Piezo Buzzer | 1 | Electronics | ₹18.00 | $0.19 | Purchased | Link |
| 13 | Cloth | Cotton Fabric | 2m | Cotton | ₹400.00 | $4.26 | Purchased | Shop |
| 14 | Lining Cloth | Cotton Fabric | 3m | Cotton | ₹150.00 | $1.60 | Purchased | Shop |
| 15 | Fusing | Compressed Cotton | 2 | Cotton Sheet | ₹50.00 | $0.53 | Purchased | Shop |
| 16 | Sweable Snaps | 7mm | 24 | Stainless steel | ₹25.00 | $0.27 | Purchased | Shop |
| 17 | Threads | Conductive | 2m | Composite | ₹148.00 | $1.57 | Purchased | Link |
| 18 | Threads | Embroidery Threads | 8 | Cotton Fiber | ₹200.00 | $2.13 | Purchased | Shop |
| Total | ₹4,060.96 | $43.20 | ||||||
Mobile Application
Mobile App : A mobile application provides a user-friendly interface for controlling, configuring, and interacting with the Rangbheru wearable system via BLE.
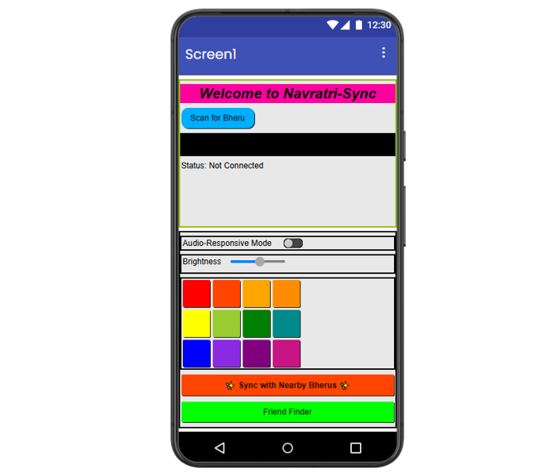
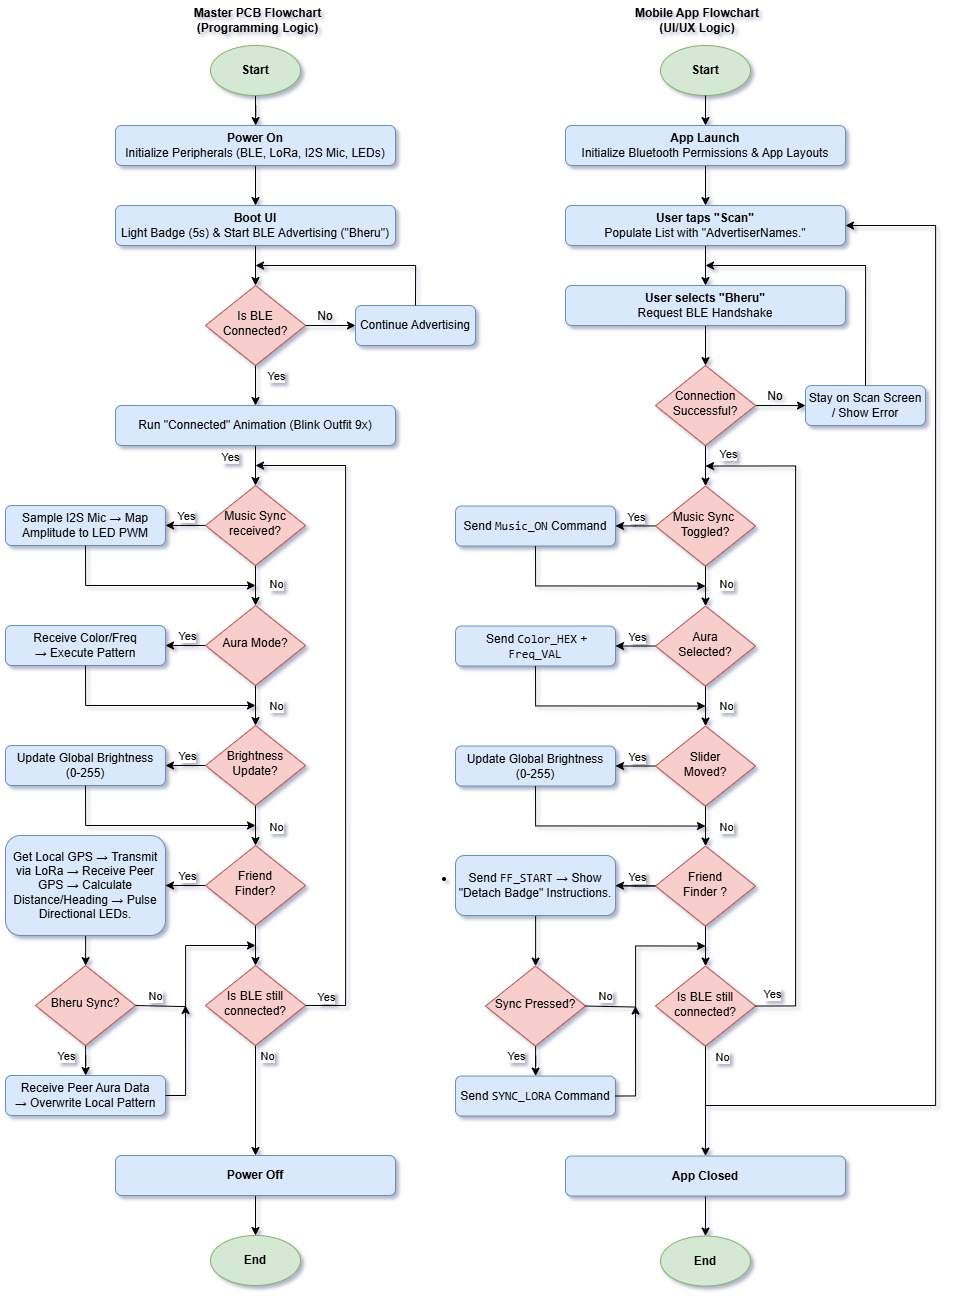
Programming Logic
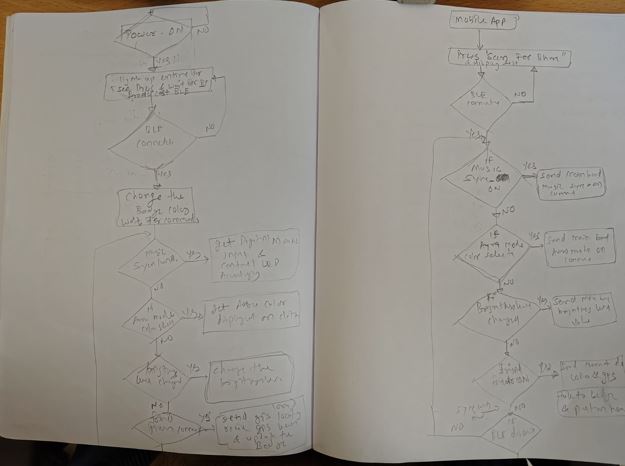
My system needs two firmware one for mobile application dn another for hardware device, and both has to work with each other seamlessly, communicate and execute actions. Thus, for my Project I made two Logic flow diagram one for mobile app and next to it is of Hardware device firmware. First, I drew it in my notebook and then used draw.io to make digital version of it.
Packaging
Encloser will be 3D printed, it will have PCB mounting, piezo buzzer mounting, battery placement space and antenna. The bac cover and the top cover will be screw to each other.
Electronics Packaging - the main PCB will have digital microphone module and magnetometer soldered on it, battery will be connected via JST to pin connector with main PCB, and the Neopixels will be stitched to fabric using conductive threads.
Wiring management - The male sew-on snaps will be soldered on the MAIN PCB and female sew-on snap will be stitched with fabric using conductive threads and further connections will be done using conductive threads.
Testing methods
Functionality Test
The first thing is to perform functionally check, below are functions that I plan to implement in my project, thus once the waist is made I plan to execute below functional test step-by-step.
- Establish BLE Connect between Device and Mobile App
- Validate Controls of Neopixel Color Change
- Validate Brightness Control
- Validate Sound Responsive Control On/Off
- Validate Sound Responsive Sensitivity
- Validate Friend Finder Feature
Power Consumption Test
This is to measure how long a fully charge battery lasts.
- Charge the battery to 4.2 Voltage level.
- Enable the Neopixel Color control feature and Log the time duration.
- Enable the sound response mode and Log the time duration.
Washing and Sweat Test
For Spiral 2: This I plan to perform with the next version of my prototype iteration. This is more real world usage testing, most of the user will be exception the waist to withstand sweat during Navratri.
Expected failures
- Microphone Placement: Determining whether the microphone should be mounted inside the enclosure or exposed to the environment for improved sound capture and audio-reactive functionality.
- Magnetometer Integration: Identifying the optimal PCB location and orientation of the magnetometer to minimize magnetic interference and ensure accurate heading measurements.
- NeoPixel Power and Signal Compatibility: Evaluating the use of a 3.7V-to-5V boost converter and protection diode to power NeoPixels while maintaining reliable 3.3V logic communication with the microcontroller.
- GPS Module Packaging Constraints: Initial plans included an onboard GPS module; however, due to size and thickness constraints, the design was revised to utilize the smartphone's GPS data via Bluetooth.
- Wearability and Weight Distribution: Assessing the overall weight of the electronics package to ensure the wearable remains comfortable and does not sag or detach during use.
- Capacitive Touch Interface: The concept of integrating copper touch sensors within the garment or wearable badge was evaluated but ultimately removed to reduce complexity and improve system reliability.
lifecycle
Repairability / Right to repair : the waist will have opening on its lining fabric layer so that the conductive threads connection can be assessed and can be diagnose for any loose connection or dis-function. It can be re-thread and repair.
Reuse The Hardware device is modular and can be use will different cloths not just one waist. Thus, a user can have one hardware device and multiple waist. The Hardware device and outfit will have universal standard connection so that it snaps with all waist or outfit. The Neopixel can be reuse in new cloth design in another fabric.
End of life for outfit will be when user feels it is out of fashion or user needs latest designed Navratri outfit. However, for hardware device user only need to replace the rechargeable battery not the whole device.
Design Files Download Links
Other Files
- User Workflow Draw.io file
- Electrical Design Draw.io file
- FlowChart Draw.io file