15 Interface and application programming
Assignment
- Group assignment:
- Compare as many tool options as possible.
- Document your work on the group work page and reflect on your individual page what you learned.
- Individual assignment:
- Write an application for the embedded board that you made that interfaces a user with an input and/or output device(s).
Overview
This week I further integrated my earlier networking and output-device experiments into a browser-based LED control interface. The system consisted of three parts: the board-side firmware running on XIAO ESP32-C3, a local webpage served through Python, and a browser UI built with HTML / CSS / JavaScript. Together, they formed a complete path from webpage interaction to physical LED response.
The goal of this week was not simply to make a webpage, but to build a usable interaction layer for my final project. Compared with testing light behavior only from the embedded side, a browser interface is easier to extend and closer to how a real user would interact with the system.
During this process, I also clarified the role of each tool more clearly: VS Code was used to edit files locally, Codex helped generate and revise UI code, Arduino IDE was used to upload the firmware, Python only launched the local webpage, and the actual interface still ran in the browser through HTML / CSS / JavaScript. After that, the browser communicated with the board through its IP address to control the LED output.
Group Assignment
Link:
For the group assignment, we compared different interface options for connecting a user interface with an embedded system. What I learned: From the group assignment, I learned that choosing an interface tool depends on both the user experience and the way the application communicates with the embedded board. By comparing different interface and application programming options, I understood that a good interface should not only look clear, but also make the board's input or output behavior easy to control, test, and debug. This connects with my own work because I wanted to build a simple interface for controlling my board, so the group comparison helped me explain why a browser-based or lightweight interface was suitable for my project: it is easy to access, easy to update, and makes the communication between the user, the application, and the microcontroller more visible.
| Interface Option | Tools / Method | Advantages | Limitations |
|---|---|---|---|
| Serial Monitor | Arduino Serial Monitor | Simple and reliable for debugging | Not suitable as a user-facing interface |
| Python Script | Python + serial communication | Useful for local testing and data reading | Still more like a development tool than a final interface |
| Browser Interface | HTML / CSS / JavaScript + HTTP API | Easy to open, no app installation, works well for quick UI testing | Needs Wi-Fi connection and correct CORS handling |
| WebSocket Interface | Browser + WebSocket server | Better for real-time interaction | More complex than simple HTTP requests |
| Mobile App | App-based control through Bluetooth or Wi-Fi | More product-like and portable | Higher development cost and more setup |
| HMI / Screen Interface | Dedicated screen module | Self-contained and does not need a computer | Requires extra hardware and has less flexibility |
From this comparison, I decided to use a browser-based interface with HTTP API for my individual assignment.
This was the most suitable option for my current stage because I needed a fast and flexible way to test the LED behavior. The browser interface allowed me to control the ESP32-C3 without building a full mobile app. It also helped me see the relationship between the webpage, HTTP requests, the board IP address, and the physical LED output.
The group comparison also helped me understand that different interface tools are useful at different stages. Serial Monitor and Python are good for debugging, but they are not real user interfaces. A mobile app or HMI screen may be better for a finished product, but for this week and my final project prototype, the browser interface was the most practical choice.
Individual assignment
Browser-Based LED Control Interface
This interface was not a standalone mini exercise, but part of the user interaction layer in my final project. The goal was to let the user control the lighting system directly from a browser instead of changing parameters only in code.
From the project perspective, this week completed the first integration of the UI layer + communication layer + output layer. Although the interface is still a prototype, the core interaction logic is already in place.
System Structure
1. Browser UI ➡ 2. Local webpage ➡ 3. Board connected to AP / Wi-Fi ➡ 4. HTTP API on ESP32-C3 ➡ 5. WS2812 LED strip
Figure 1. Browser interface, local webpage, network connection, and LED output working as one control flow.
Bill of Materials (BOM)
| No. | Component | Qty | Function |
|---|---|---|---|
| ① | XIAO ESP32-C3 |
1 | Main controller board |
| ② | WS2812 LED strip |
1 | Visual output |
| ③ | USB cable | 1 | Power and upload |
| ④ | 2.4 GHz AP / Wi-Fi |
1 | Network access for board communication |
| ⑤ | Computer with browser | 1 | Run the UI |
| ⑥ | Local Python server |
1 | Serve the webpage |
Wiring / Electronics
WS2812data pin →D1 / GPIO3- LED strip power →
5V - LED strip
GND→ boardGND - LED count in code →
30
⚠️ Caution / Feedback:
- In this prototype, I powered the WS2812 LED strip from the
5Vpin on theXIAO ESP32-C3board. - This setup worked for my current test because the LED brightness was controlled and I did not use full-white, full-brightness output for a long time.
- However, this is not the most robust power solution for a larger or brighter LED setup.
- A strip with
30WS2812 LEDs can require much more current at high brightness, especially in full-white mode. - In the next version, I will use an additional power module / external regulated
5Vpower supply to drive the LED strip more safely. - The LED strip and the
XIAO ESP32-C3will still shareGND, while the XIAO mainly provides the data signal.
Network Setup: AP and Wi-Fi Connection
Besides the interface itself, network connection was also a core part of this week. The browser did not control the LED strip directly. Instead, it reached the board through the HTTP API provided over the local network.
The connection logic was:
- the board first connected to the local
AP / Wi-Fi - the serial monitor returned the board
IPaddress - after the local webpage started, I entered this address in the browser
- the browser sent requests to the board through that address
- the board received the requests and updated the LED output
So the AP / Wi-Fi was not an extra detail, but the communication foundation between the webpage and the embedded board. Without joining the network and receiving a valid address, the UI could not continue to the control stage.
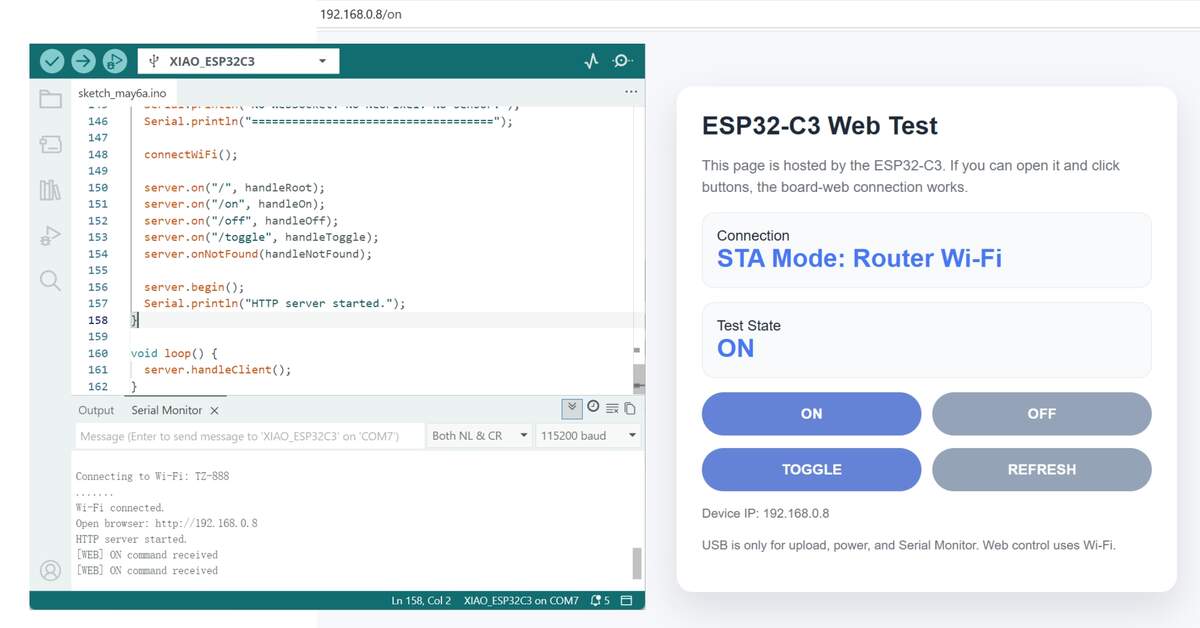
Summary: The board had to connect to the local AP / Wi-Fi and return a valid IP address before the browser UI could communicate with it.
File:
Development Workflow and Tool Roles
This week involved two different layers: development tools and the runtime system.
Development tools
VS Code: local editing and file managementCodex: assistance with generating and revising UI codeArduino IDE: uploading firmware to theESP32-C3
Runtime system
server.py: launches the local webpage serviceindex.html: the actual browser-side UI- Board firmware: handles AP / Wi-Fi, API, and LED control
- Board IP: the address used by the browser to send requests
So the real workflow of this week was:
1. Use VS Code / Codex to build UI ➡ 2. Upload firmware with Arduino IDE ➡ 3. Connect the board to AP / Wi-Fi ➡ 4. Get the board IP ➡ 5. Start server.py ➡ 6. Open index.html in browser ➡ 7. Enter board address ➡ 8. Control LED through browser
Summary:
VS CodeandCodexwere development tools,Pythononly served the webpage,HTML / CSS / JavaScriptformed the actual browser UI, and theESP32-C3firmware handled AP / Wi-Fi connection, API communication, and LED control.
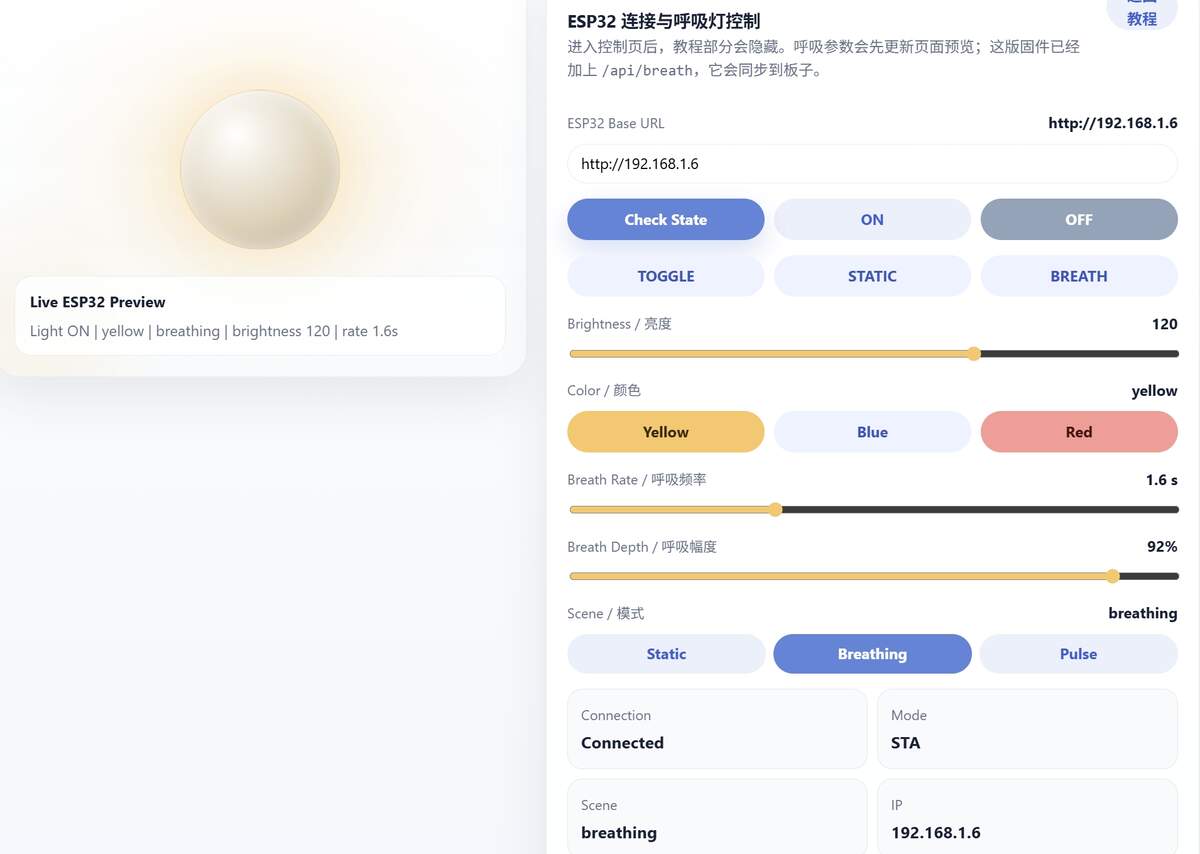
Interface Design
The current webpage was divided into two areas:
- tutorial / instruction area
- control area
The control area currently included:
Base URLinputCheck StateON / OFF / TOGGLE- Brightness slider
- Color buttons
SceneswitchingBreath Rate / Breath Depth
This structure worked well for development because it let me test buttons, sliders, and API mapping step by step.
Software / Logic
The browser sent fetch() requests to the board-side HTTP API.
After completing the AP / Wi-Fi connection and getting its IP address, the board received those requests and updated LED brightness, color, and mode.
API Endpoints
/api/state
/api/on
/api/off
/api/toggle
/api/brightness
/api/color
/api/scene
/api/breath
Code Understanding & Key Logic
Instead of only copying example code, I tried to understand how the browser, HTTP server, and LED rendering logic worked together.
The system can be divided into four main layers:
Browser UI
↓
HTTP Requests
↓
ESP32-C3 API Server
↓
LED Rendering Logic
The browser sends requests, the ESP32-C3 parses the API route, updates internal variables, and then refreshes the LED strip.
1. HTTP Route Handling
One important thing I learned was that the ESP32 does not automatically understand user actions.
The browser only sends an address such as /api/on or /api/brightness.
The firmware must manually bind each route to a function.
server.on("/api/on", HTTP_GET, handleOn);
server.on("/api/off", HTTP_GET, handleOff);
server.on("/api/brightness", HTTP_GET, handleBrightness);
2. Shared State Variables
Another key concept was "state". The LED strip behavior is controlled by variables stored inside the ESP32.
bool lightOn = false;
int brightnessValue = 100;
String colorName = "yellow";
String currentScene = "breathing";
The browser changes these values through API requests.
Then the rendering function reads the current values and updates the LEDs.
The webpage is not controlling LEDs directly.
It is modifying the internal state of the embedded system.
3. Non-blocking Animation Logic
At first, I used delay() inside the breathing animation.
This caused the HTTP server to become unresponsive during animation playback.
The browser could not update the LED state smoothly.
I later changed the logic to use millis() timing.
if (millis() - lastAnimationFrameAt >= ANIMATION_FRAME_MS) {
    lastAnimationFrameAt = millis();
    renderLight();
}
This allowed the ESP32-C3 to continue processing network requests while animations were running.
4. Sine Wave Breathing Animation
The breathing effect is generated mathematically using the sin() function.
float wave = (sin(progress * TWO_PI) + 1.0f) * 0.5f;
The sine wave continuously moves between 0 and 1. That value is then multiplied by the brightness level. This creates a smooth breathing effect instead of sudden brightness jumps. I learned that animation behavior can be created through mathematical functions instead of hardcoded steps.
5. JSON Communication
The ESP32-C3 sends JSON data back to the browser after every request.
json += "\"brightness\":" + String(brightnessValue) + ",";
json += "\"scene\":\"" + currentScene + "\",";
The browser then updates the interface using the returned state.
This is closer to state synchronization than a digital twin. In this project, the webpage does not simulate the hardware, store long-term historical data, or predict future behavior. It mainly reads the JSON state returned by the ESP32-C3 and updates the browser display to match the current hardware status.
The webpage is always trying to reflect the real embedded system state through API responses.
6. CORS Handling
During testing, the ESP32-C3 received the browser request, but the webpage still showed a network error. The problem was CORS. The local webpage and the ESP32-C3 IP address are treated as different origins by the browser. To solve this, I added CORS headers in the ESP32-C3 firmware.
server.sendHeader("Access-Control-Allow-Origin", "*");
server.sendHeader("Access-Control-Allow-Methods", "GET, POST, OPTIONS");
server.sendHeader("Access-Control-Allow-Headers", "*");
After adding these headers, the browser could read the JSON response from the ESP32-C3 correctly.
This helped me understand that interface programming is not only about sending commands.
Browser security rules also affect whether the interface can communicate with the board.
What I Learned
- HTTP requests can become a control layer for physical devices.
- APIs separate the interface from the hardware logic.
- State variables help the ESP32-C3 remember the current LED behavior.
millis()is more suitable thandelay()for responsive systems.- JSON allows synchronization between browser and hardware.
- CORS is necessary when a local webpage communicates with an ESP32 IP address.
- Mathematical functions like
sin()can generate natural animation behavior.
AI-Assisted Development
During the browser UI development, I used Codex to help generate and organize the interface code. The AI-supported part mainly included page structure, control layout, and the basic frontend logic for calling the API.
Before asking Codex to generate the UI, I first provided the actual system constraints, including hardware, software, network connection method, and required functions.
Hardware / Software / Language Context Given to Codex
| Category | Details |
|---|---|
| Hardware | XIAO ESP32-C3, WS2812, LED count = 30, data pin = D1 / GPIO3, 5V, shared GND, 2.4 GHz AP / Wi-Fi |
| Embedded-side software | Arduino IDE |
| UI-side software | Local webpage served by Python |
| Languages / Technologies | HTML, CSS, JavaScript, fetch(), HTTP API |
| Functions required | ON / OFF / TOGGLE, brightness, color, scene, breathing mode, state checking |
Example Prompts Given to AI
I used AI mainly to generate the first version of the local webpage interface and to debug the browser-to-board communication problem. I gave the AI the real hardware setup and the API routes first, instead of asking it to design a generic webpage.
Create a clean local web interface for an ESP32-C3 LED controller. The page should use plain HTML, CSS, and JavaScript, and send HTTP GET requests to /api/on, /api/off, /api/toggle, /api/brightness, /api/color, /api/scene, /api/breath, and /api/state. The hardware is a XIAO ESP32-C3 controlling a 30-LED WS2812 strip through D1 / GPIO3. The interface should include a base URL input, ON/OFF buttons, brightness slider, color buttons, breathing mode controls, and a status panel.
What Codex Helped With
- Building the initial UI structure
- Organizing buttons, sliders, and input layout
- Mapping frontend controls to
/api/... - Speeding up the
HTML / CSS / JavaScriptprototype
What I Defined and Verified Myself
- Provided the real hardware platform and wiring conditions
- Uploaded the board firmware and completed AP / Wi-Fi connection
- Retrieved the board communication address
- Started the local webpage and tested the interaction flow
- Verified that the webpage actually controlled the physical LED strip
- Corrected the LED count and the embedded-side breathing logic
Summary: Codex accelerated the UI prototyping process, but the final result still depended on hardware setup, AP / Wi-Fi connection, API integration, and real-device testing completed by myself.
File:
Testing
1. AP / Wi-Fi Connection Test
I first checked whether the board could connect to the local AP / Wi-Fi and return an IP address.
The board connected reliably to
2.4 GHzand returned a usable address for browser access;5 GHzdid not work.
2. Local Webpage Test
After starting server.py, I opened the local webpage in the browser and checked whether the interface loaded correctly.
The local webpage launched correctly and worked as the browser-side control interface.
3. Browser-to-Board Communication Test
I entered the board address in the webpage and tested whether buttons and sliders could trigger the board API correctly.
ON,OFF, brightness, and color control could already be executed through the browser.
4. LED Output Test
After changing the LED count from 12 to the actual 30, I tested the whole strip again.
After correcting the parameter, the full LED strip responded properly.
5. Breathing Mode Test
At first, breathing mode only changed the webpage state, so I later added the embedded-side logic.
Breathing mode can now be synchronized to the physical LED output.
Problems & Solutions
| Problem | Solution |
|---|---|
The board could not connect to 5 GHz Wi-Fi |
I switched to 2.4 GHz AP / Wi-Fi. |
| The browser showed a network error | I added CORS headers in the ESP32-C3 firmware. |
| Only part of the LED strip responded | I changed NUM_LEDS to 30. |
| Breathing mode only changed the webpage state at first | I added breathing animation logic on the ESP32-C3 side. |
| The workflow was easy to confuse | I separated the development tools from the runtime system. |
Reflection
This week I tested a browser-based interface for controlling the ESP32-C3 and LED strip.
AI and Codex helped me quickly generate a visually clean webpage, which was useful for early testing. I could focus on checking whether the buttons, sliders, API routes, and LED output worked.
At the same time, I noticed that the generated webpage code became quite large. It worked for this stage, but it may be difficult to maintain if I keep adding more functions directly.
For the next version, I need to simplify the structure and separate the main parts more clearly: API communication, UI controls, state display, and final project behavior.
This test gave me a working browser-to-hardware control layer. Next, I can connect it with the pressure sensor input and the 24V COB LED strip system.