Week 02: Computer-Aided Design
Assignment
- Model (raster, vector, 2D, 3D, render, animate, simulate, ...) a possible final project.
- Compress images and videos used in the project.
- Upload a description along with the design files.
Things to Complete This Week
- Understand the difference between raster and vector graphics
- Design experimental objects or parts of the final project in 2D and 3D software
- Show the process using text, images, and screenshots
- Include original design files!
I have updated my schedule for the week.
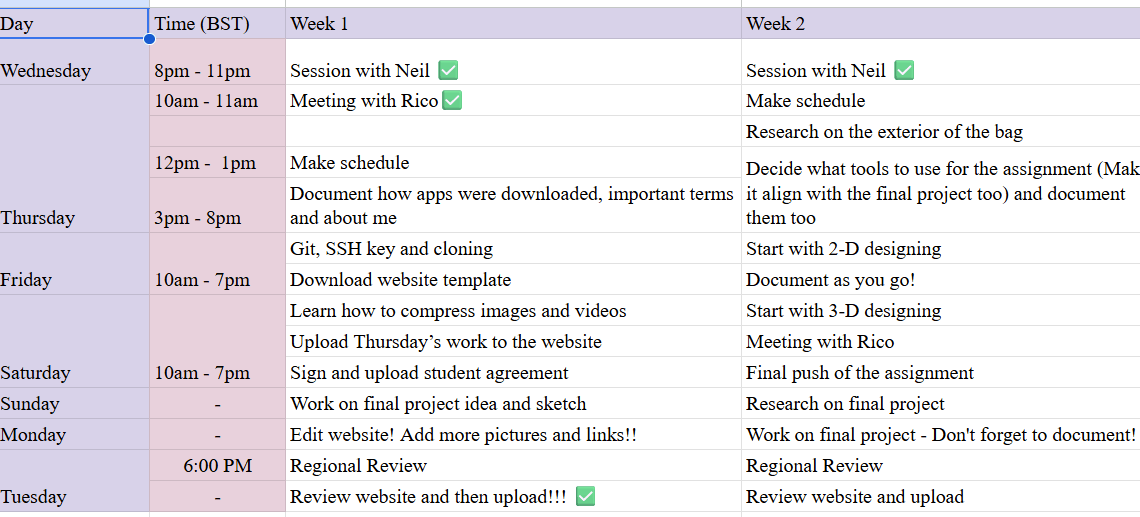
Here is the link to my schedule
2D Design
I started the week by understanding the difference between raster and vector images.

Raster images are made of pixels. When you zoom in too much, they become blurry. Some examples include JPEG, PNG, and WEBP.
Vector images are made using lines and shapes (math-based). You can zoom in as much as you want and they stay sharp. Some examples are SVG and EPS.
Note: For every software tool that I've worked with, I've included more information on the software and terminology page.
GIMP
Here is the link to download GIMP
I used GIMP to erase image backgrounds and swap them with different ones.
Here is the tutorial that I referred to.
1. I started by opening the image that I'll be removing the background from.

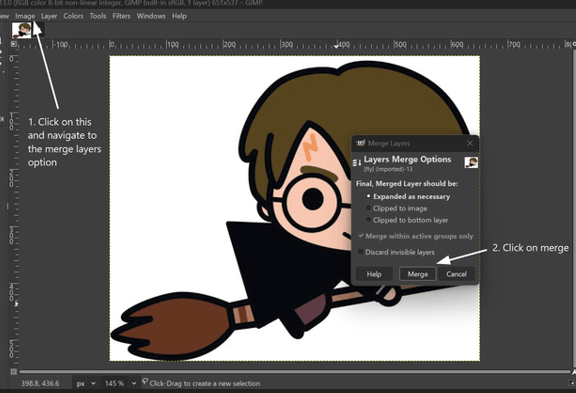
2. Then I created a new layer and made sure that the fill with option was set to transparency.
3. After that, I merged the layers.

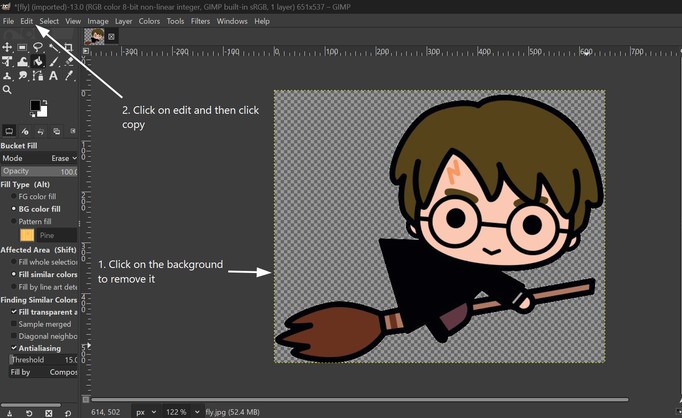
4. I used the bucket fill tool for the background.
5. I removed the background and copied the image.

6. I opened the image that I wanted as the background and then pasted the earlier one as a new single layer.
 (1).png)
Next I scaled the image based on my own preference. Here is the final look!!!😀
 (1).jpg)
Image credits:
For Harry
For the background
Inkscape
To download Inkscape, go to the official website, and then navigate to the downloads section.
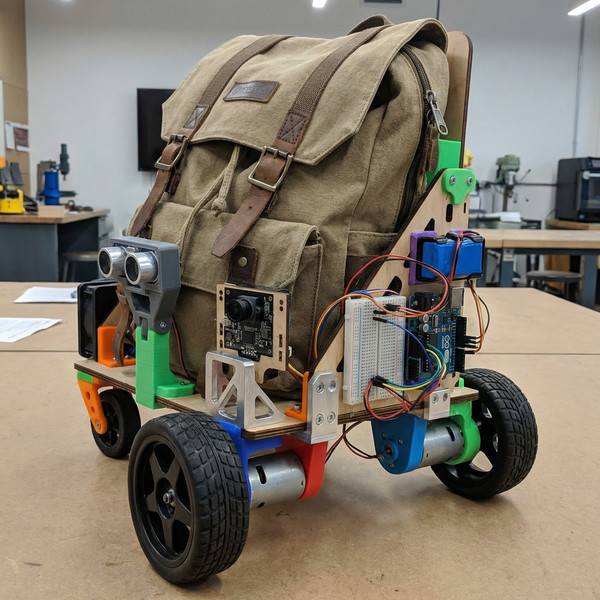
I have used Inkscape to make a simple logo of the SmartFollow backpack (my final project).
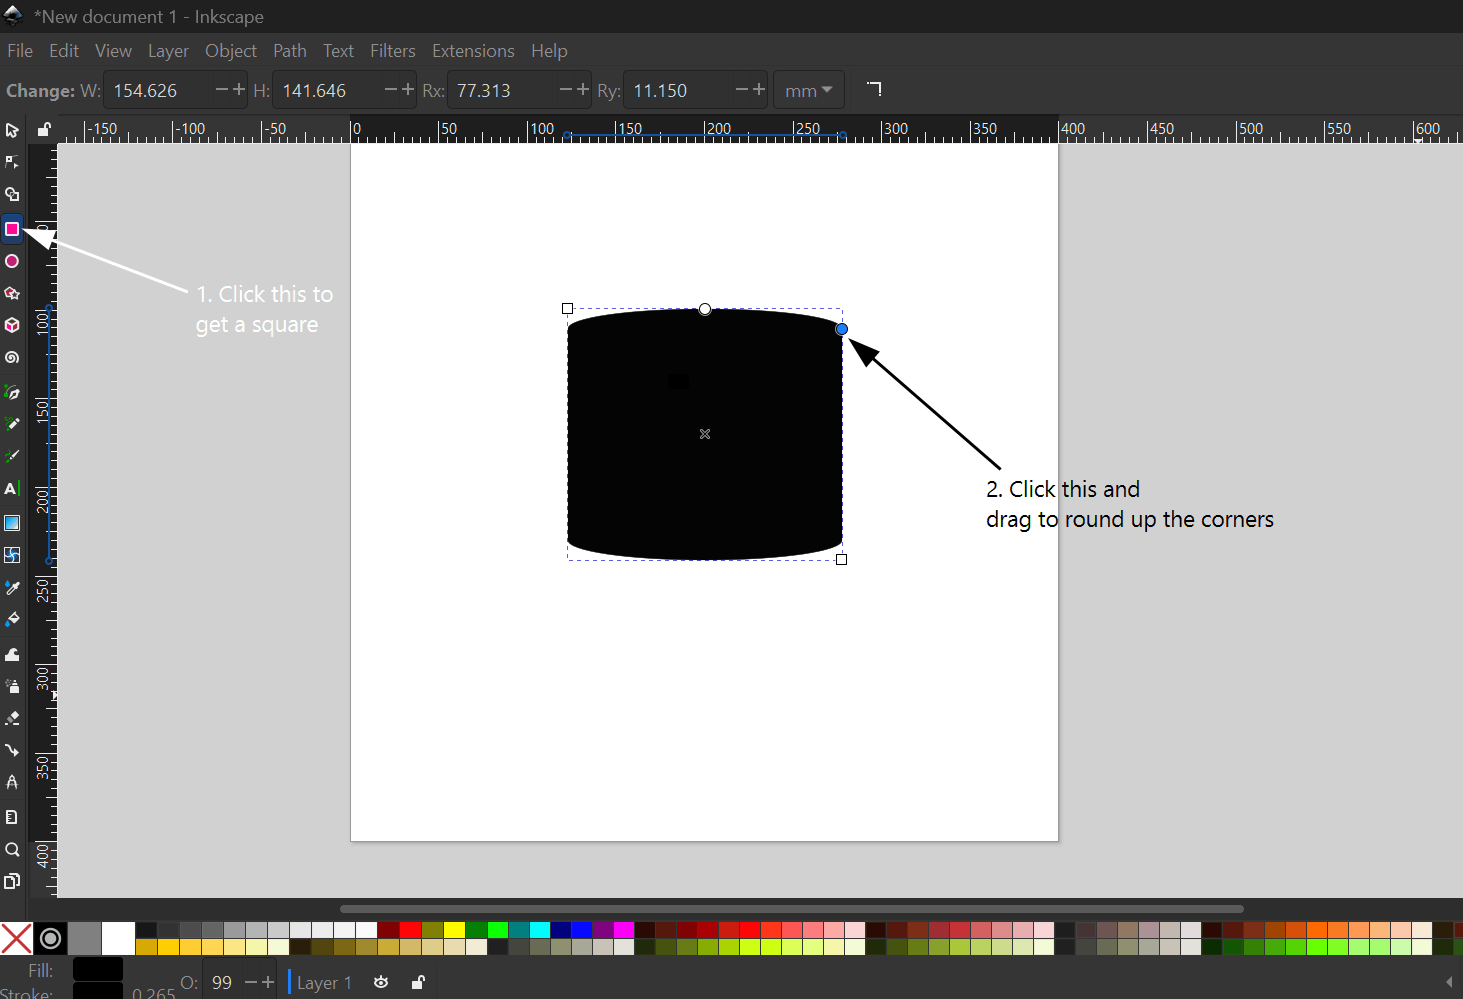
1. I started by adjusting the canvas size.

2. I made a square and rounded up the vertices.
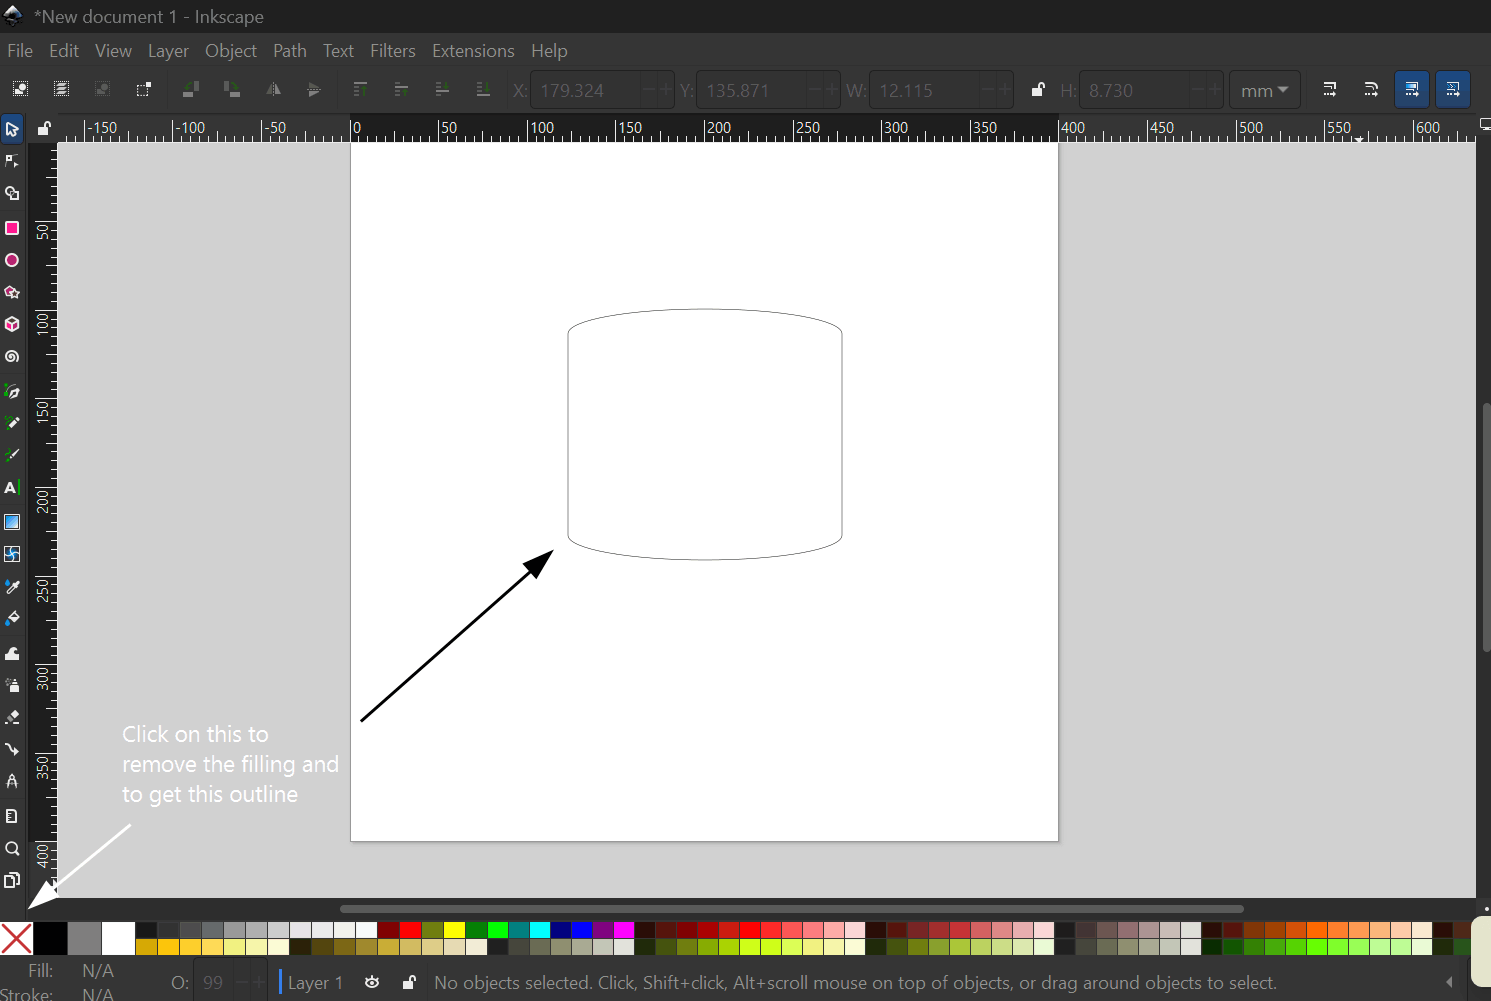
3. After that, I created an outline of the shape.
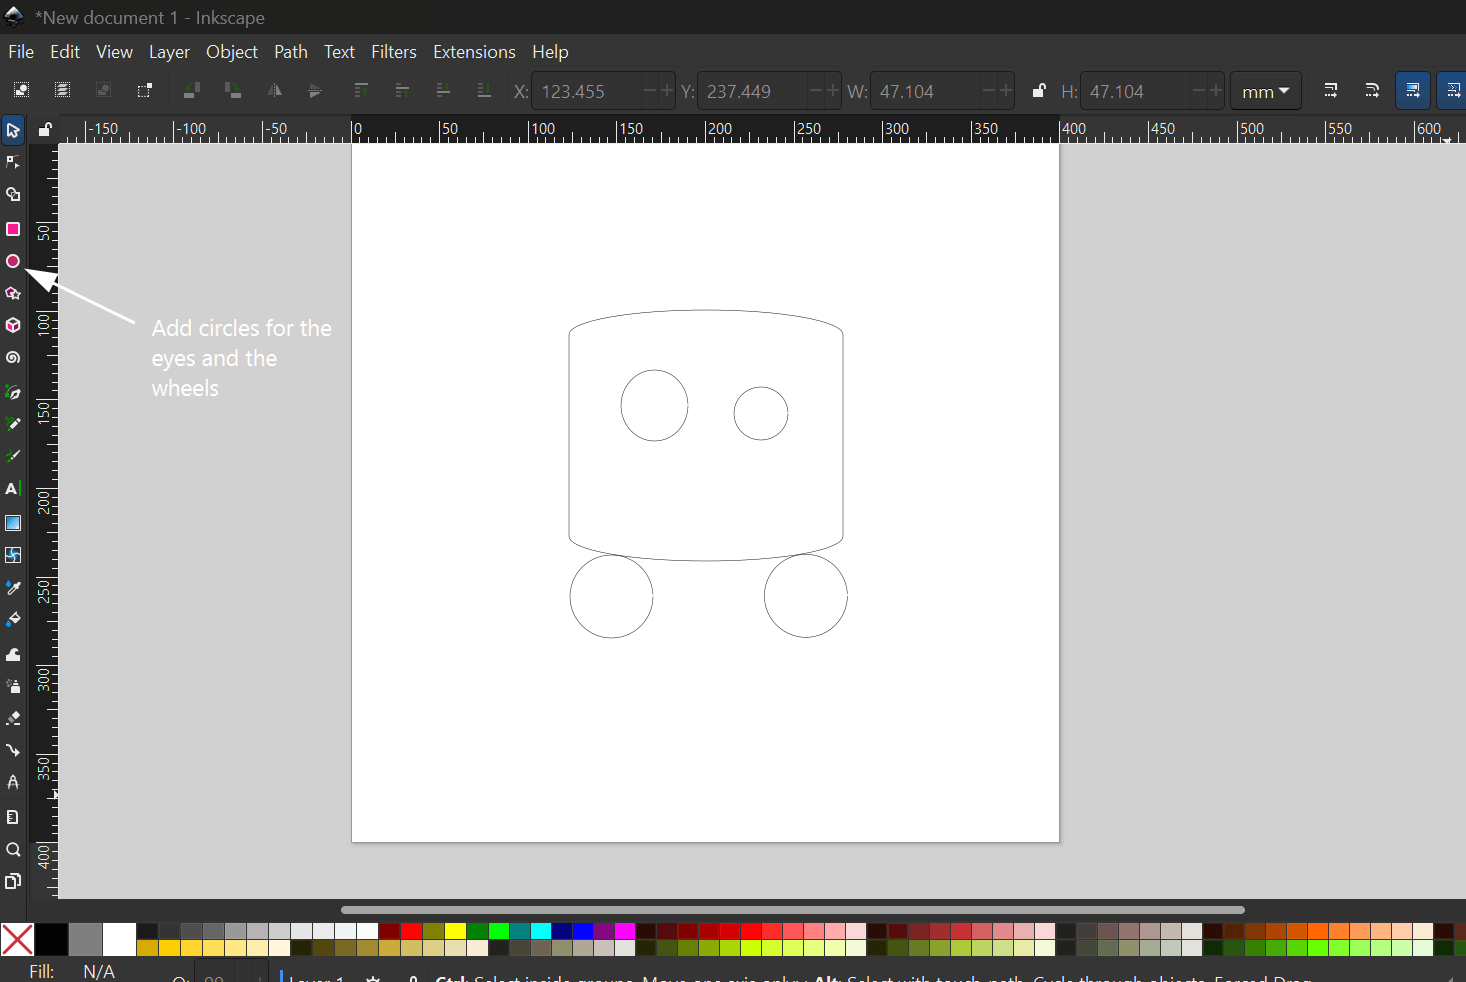
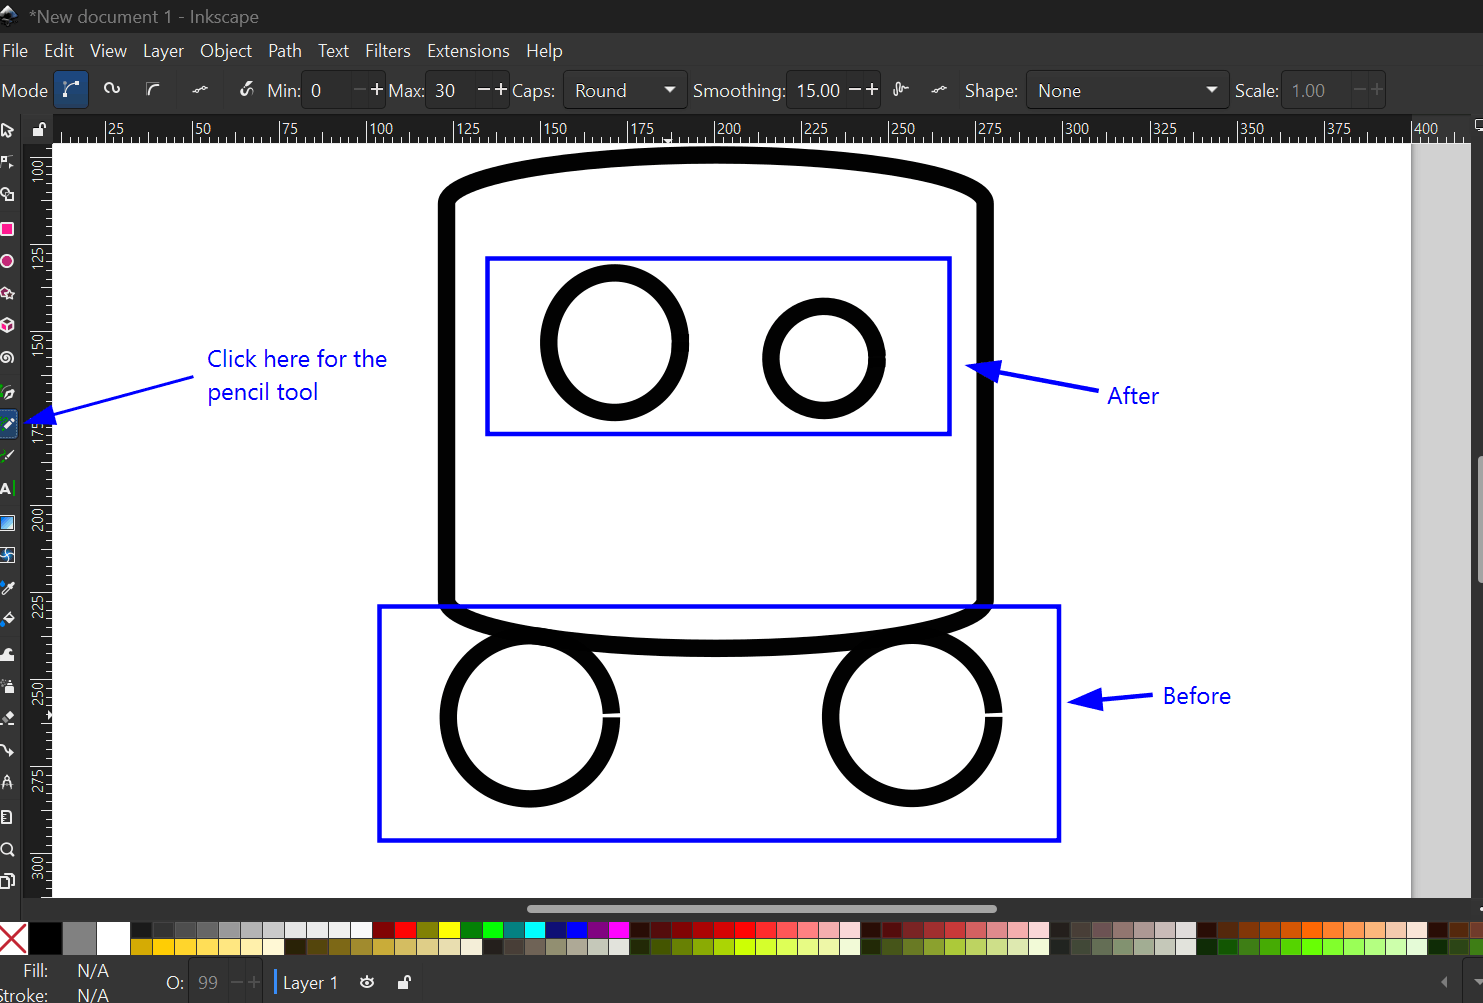
4. I added a few circles for the eyes and the wheels.
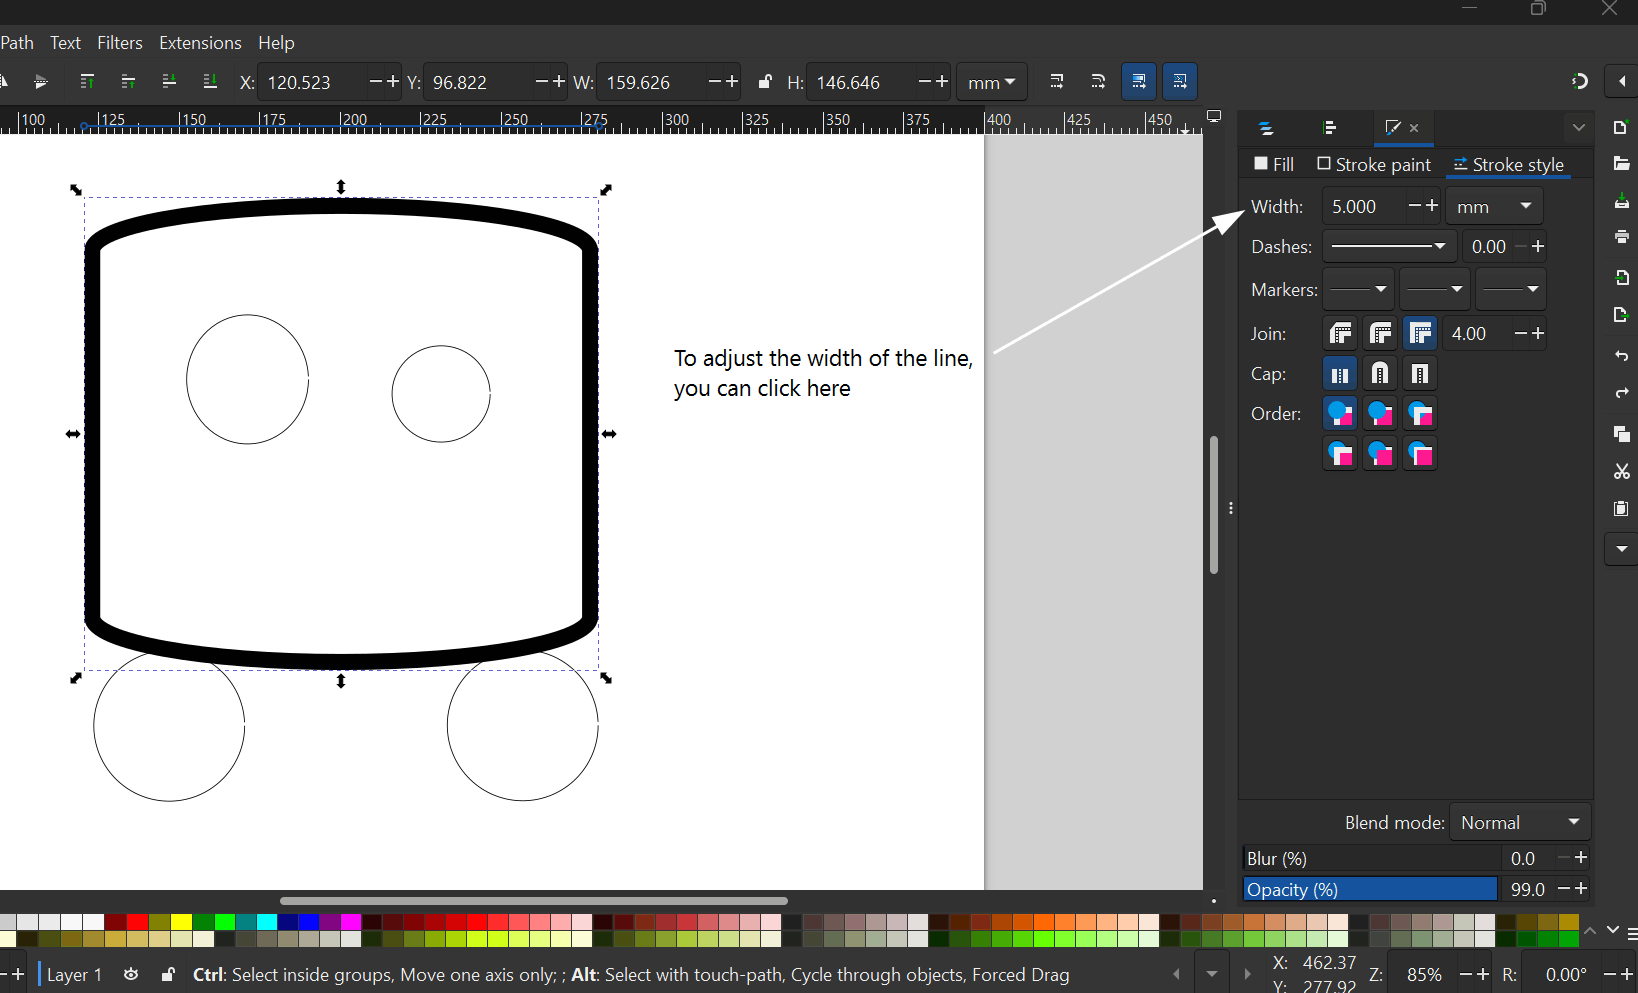
5. Then I made the outline a little thicker.
6. For some reason, the circles I created had little gaps in them. To sort that out, I made use of the pencil tool. 😉
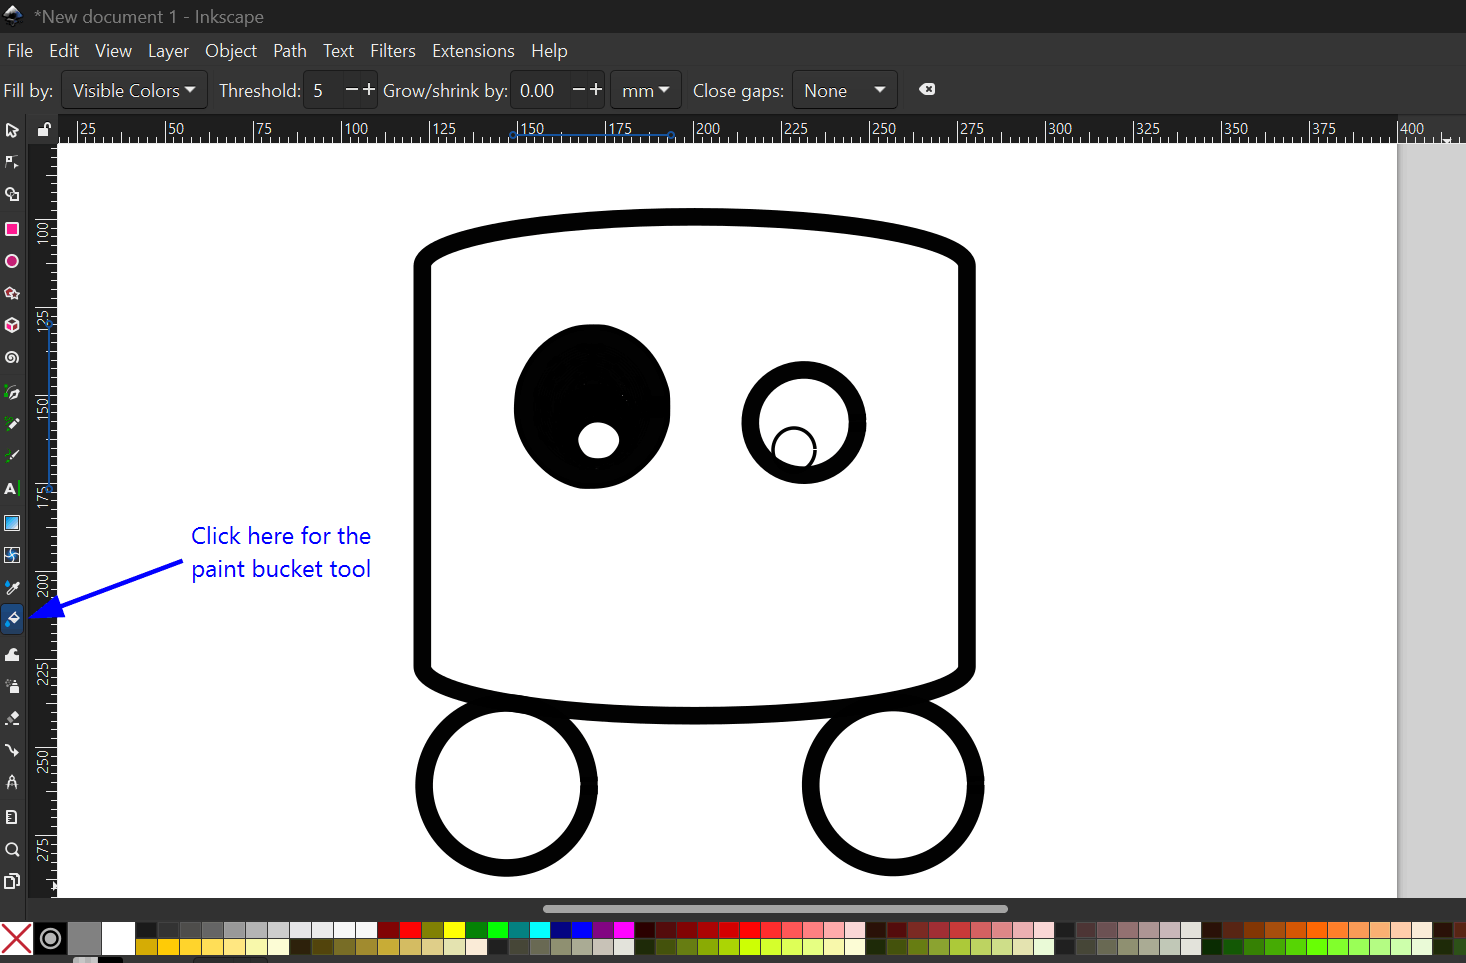
7. To fill up the enclosed areas with color, I used the paint bucket tool.
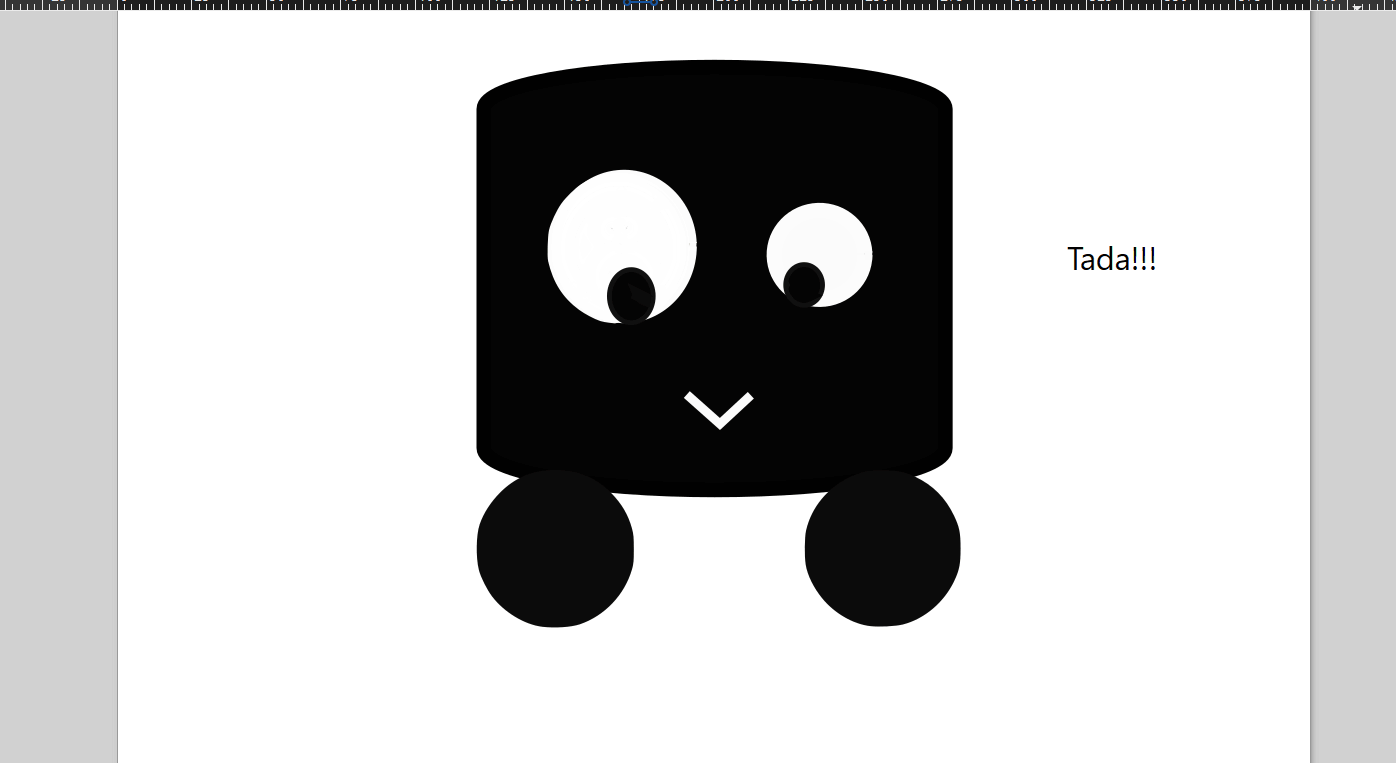
8. I added a small smile and adjusted the colors slightly to make it better suited for a vinyl cutter.
3D Design
Fusion 360
I have used Fusion a couple of times before, so it was already installed on my laptop. You can download it using this link. I have used Fusion to create a prototype of the SmartFollow backpack (my final project).
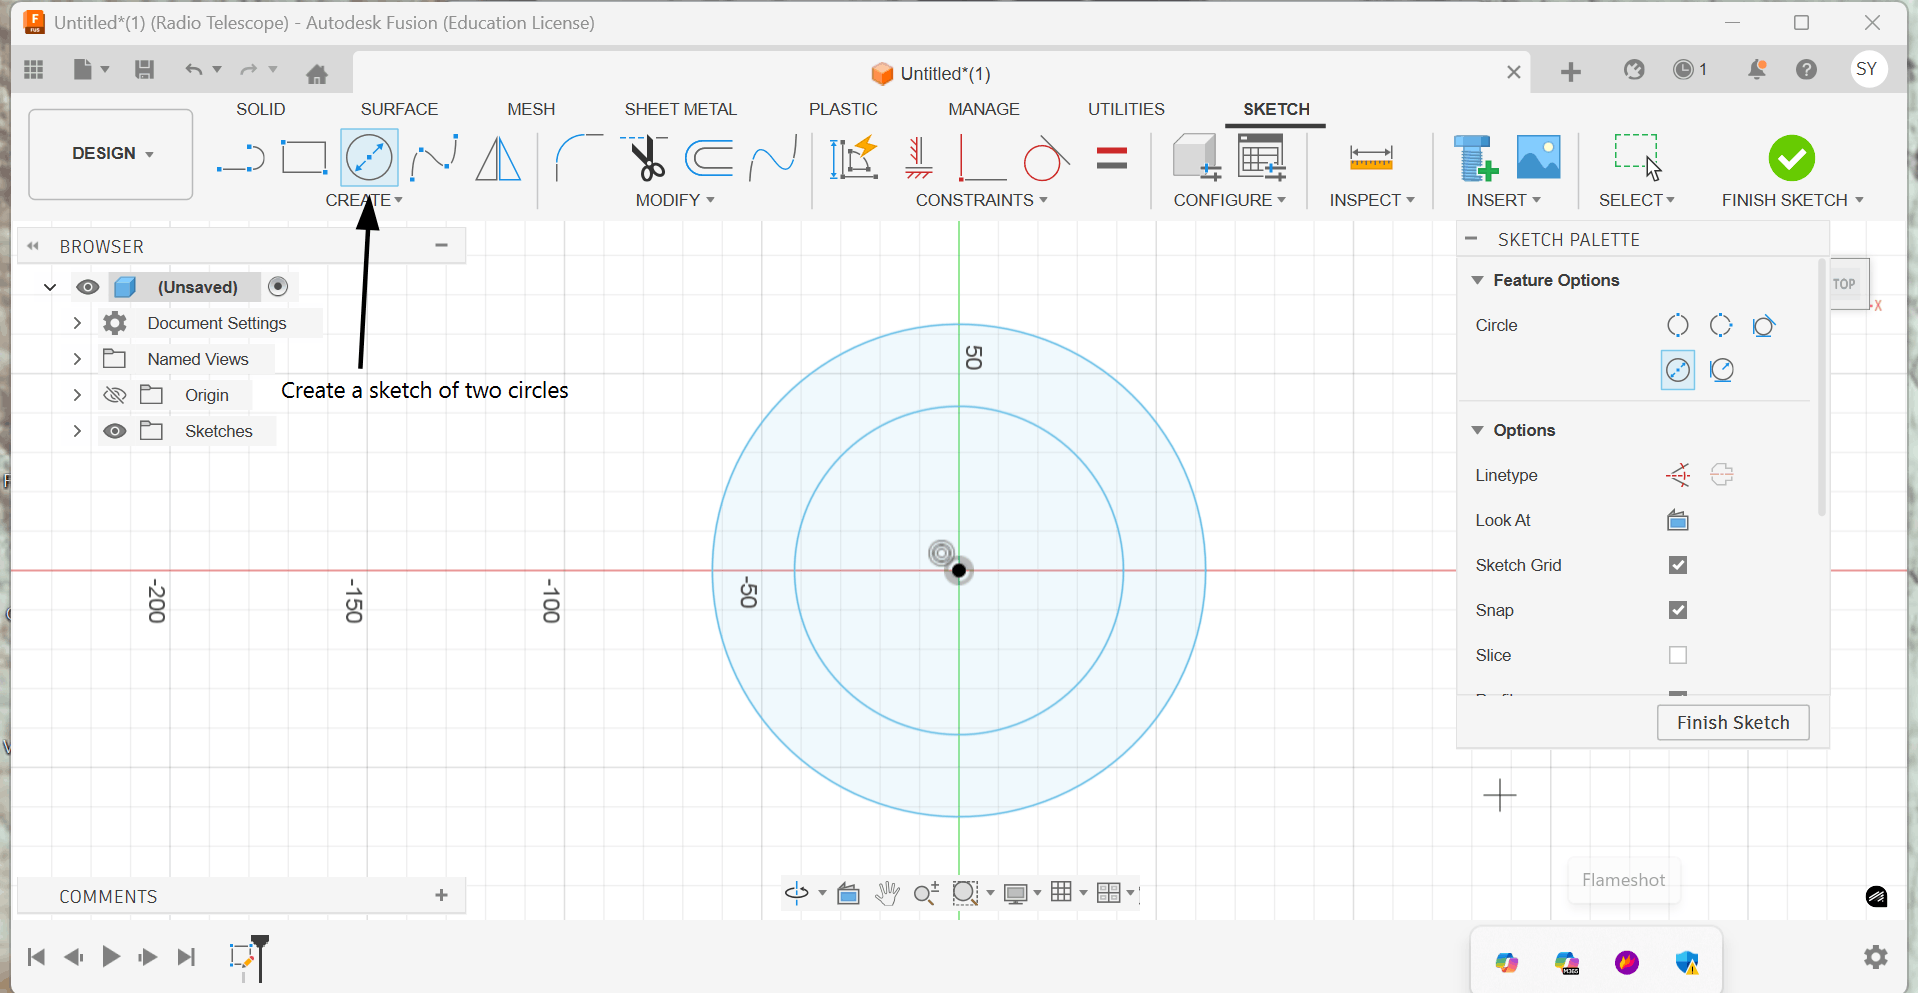
For the wheels, I referred to this tutorial.
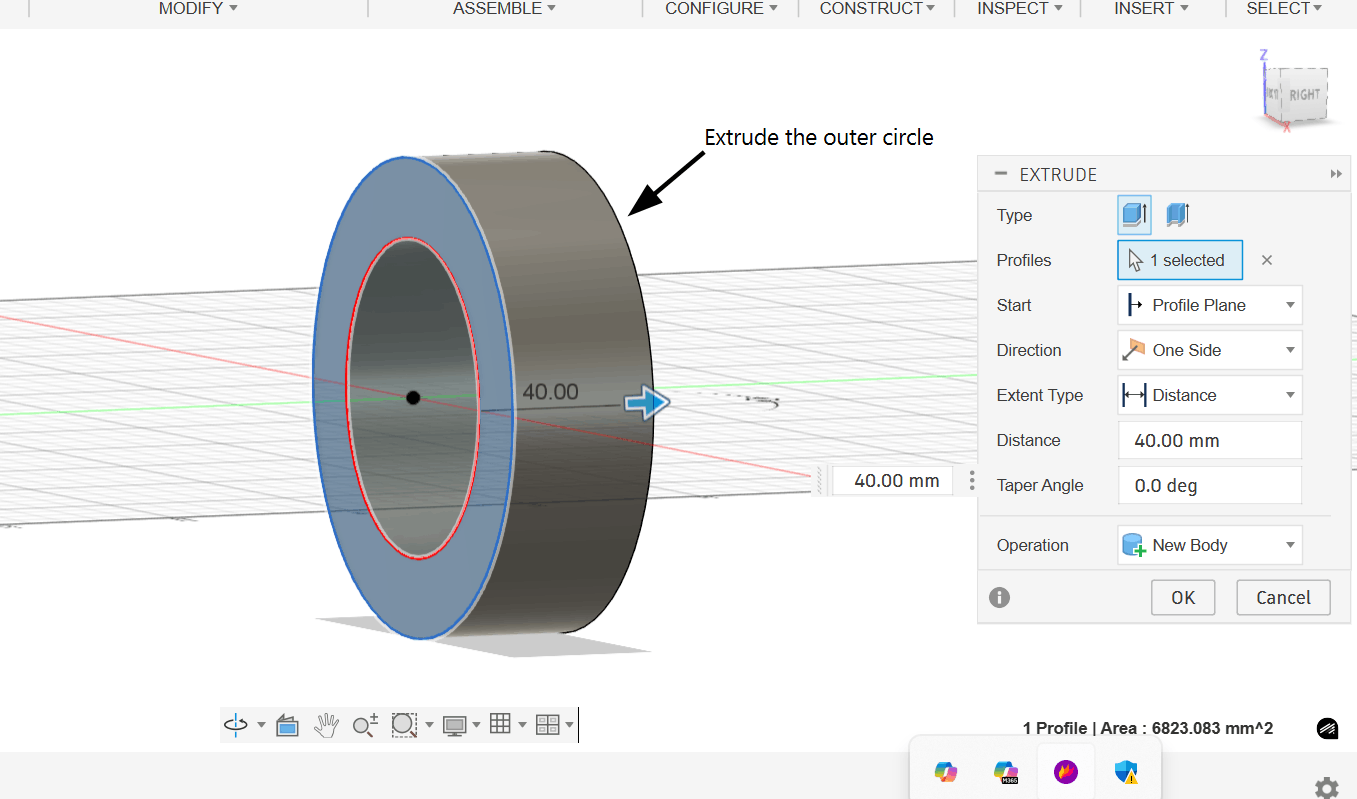
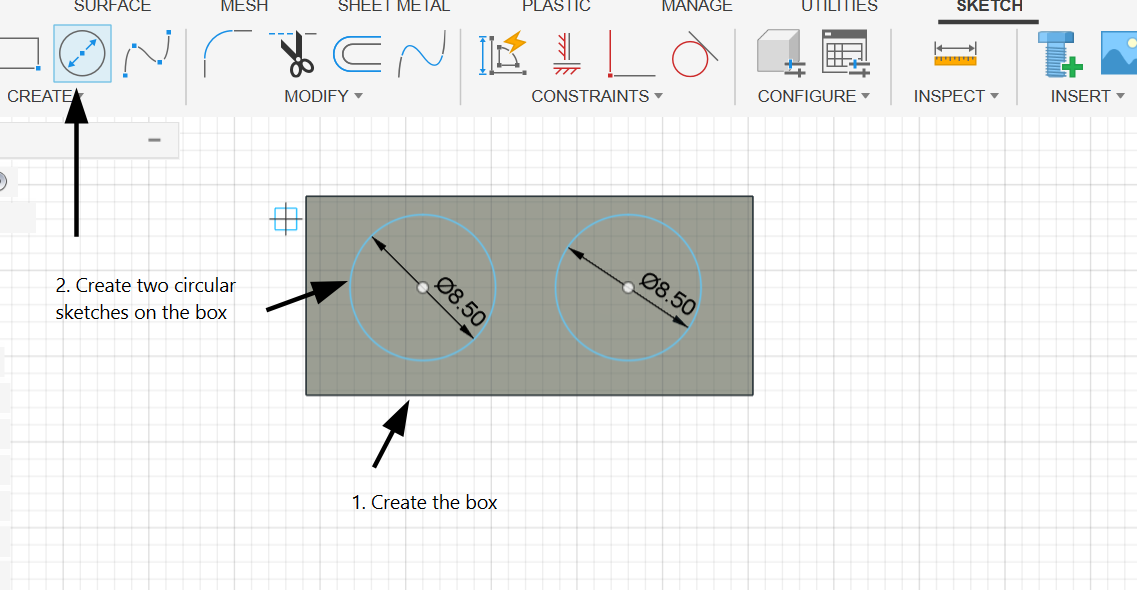
1. I began by designing the wheels, starting with a sketch of two circles.
2. I then extruded the outer circle by 40mm.
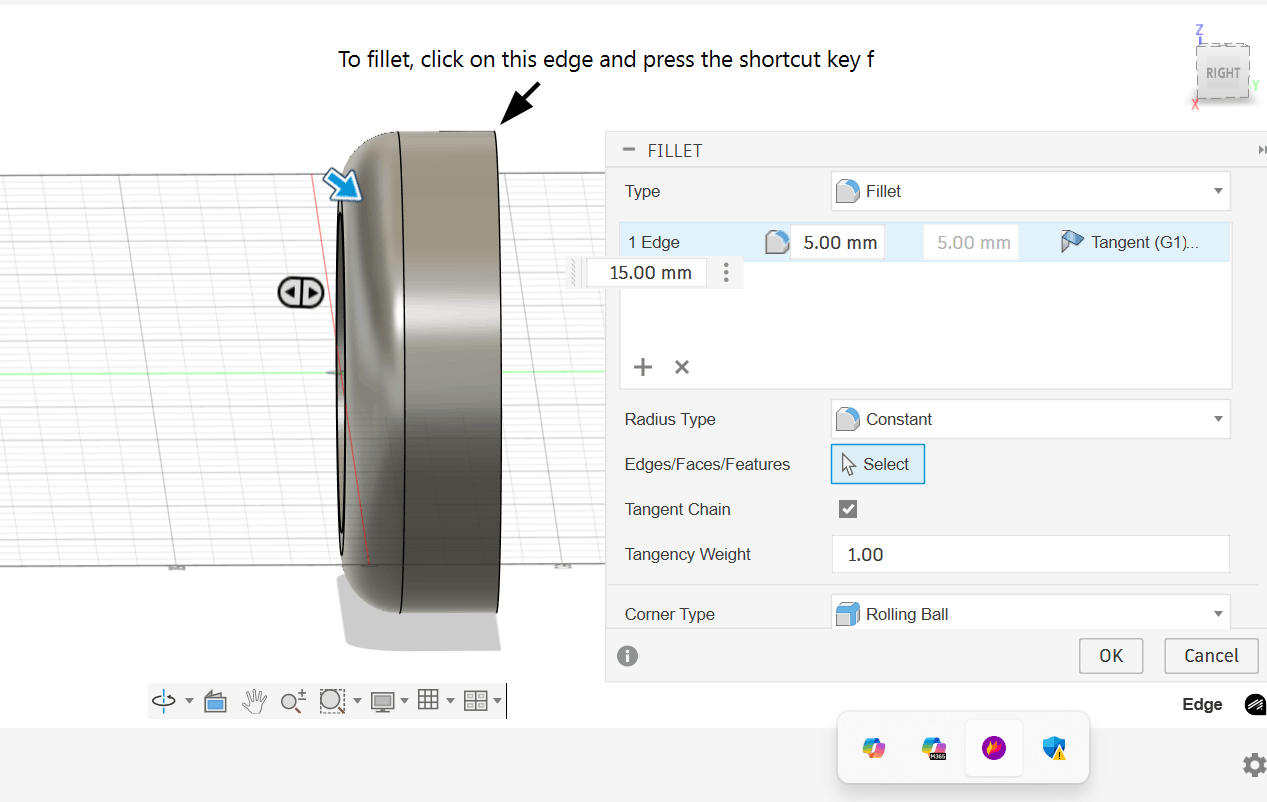
3. To create a curve along the edge, I used the fillet tool and added a 15mm fillet to the edge. You can use it by pressing the shortcut key F.
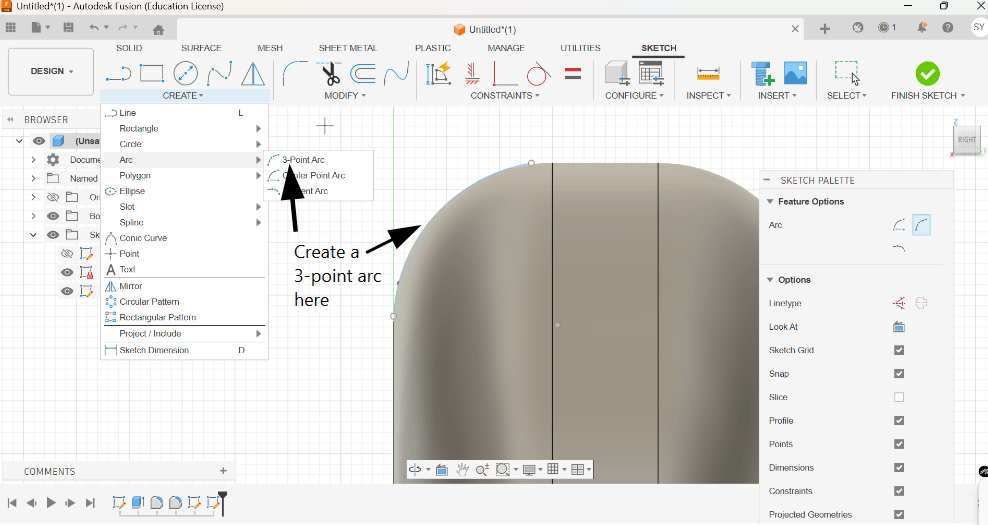
4. After that, I created a 3-point arc along the curve. The arc should look like a blue line.
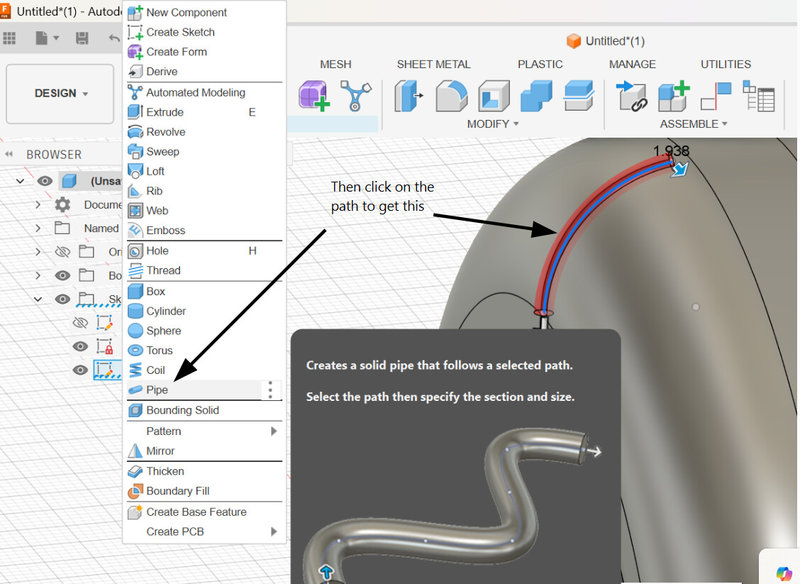
5. Using the 3-point arc, I formed a pipe.
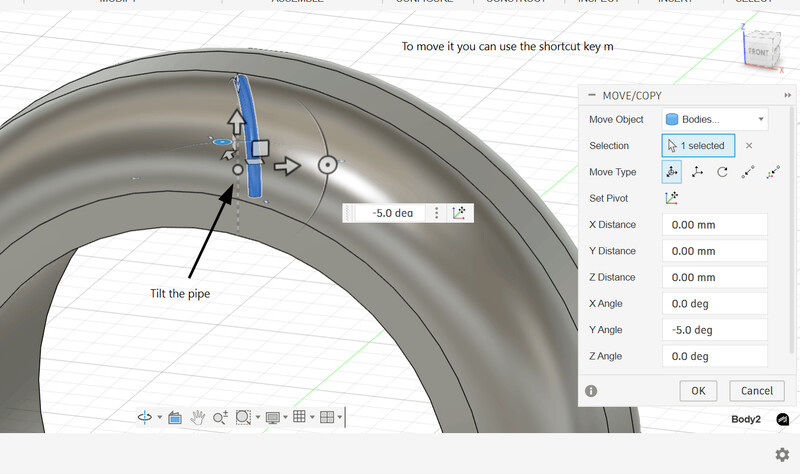
6. I pressed the shortcut key M to tilt the pipe.
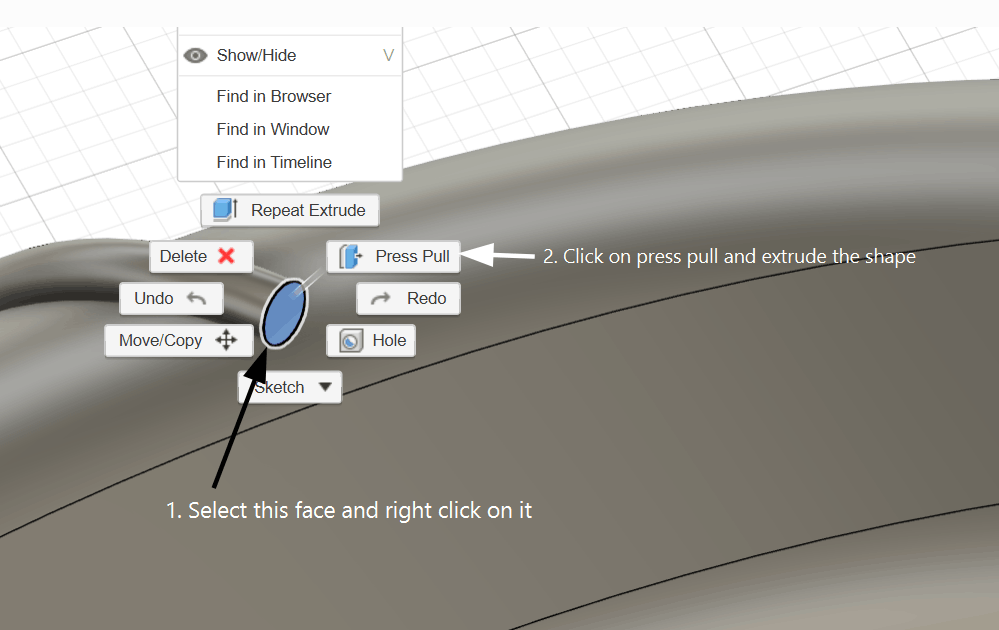
7. I made the pipe a little longer by using the press pull tool.
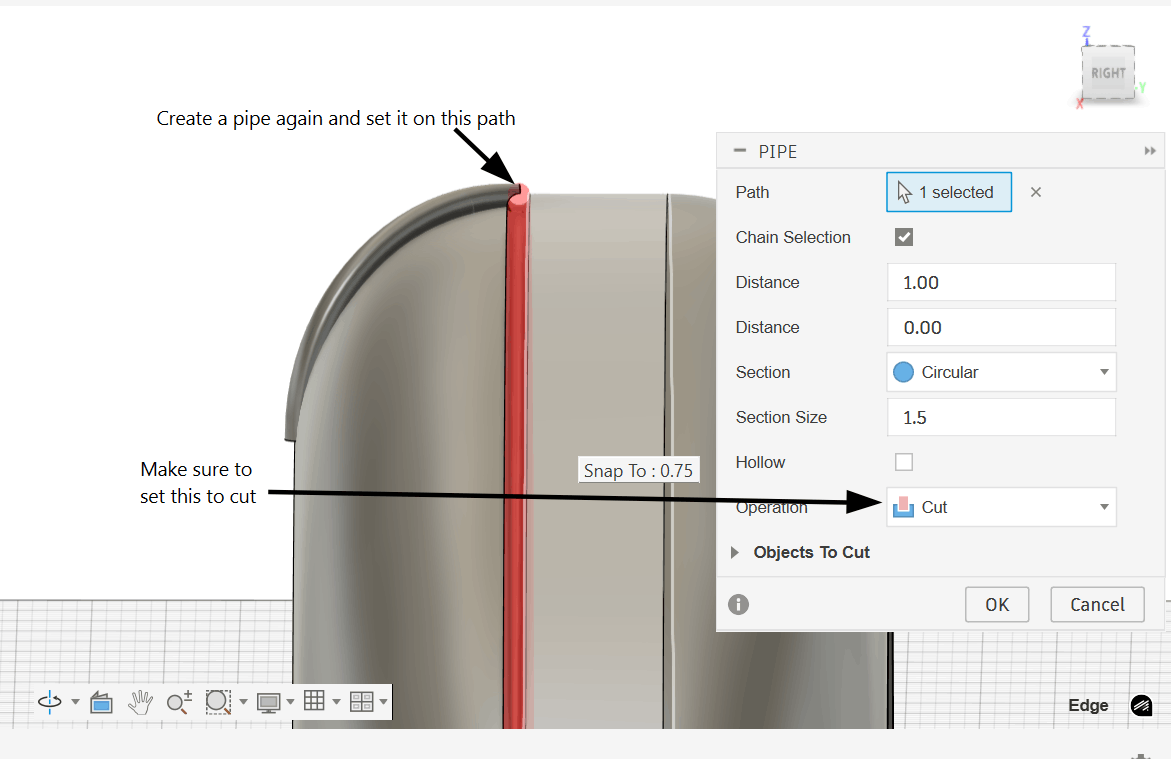
8. I created another pipe along this axis to add more detail to the wheel.
9. I used the circular pattern tool to create multiple copies of the pipe along the axis.

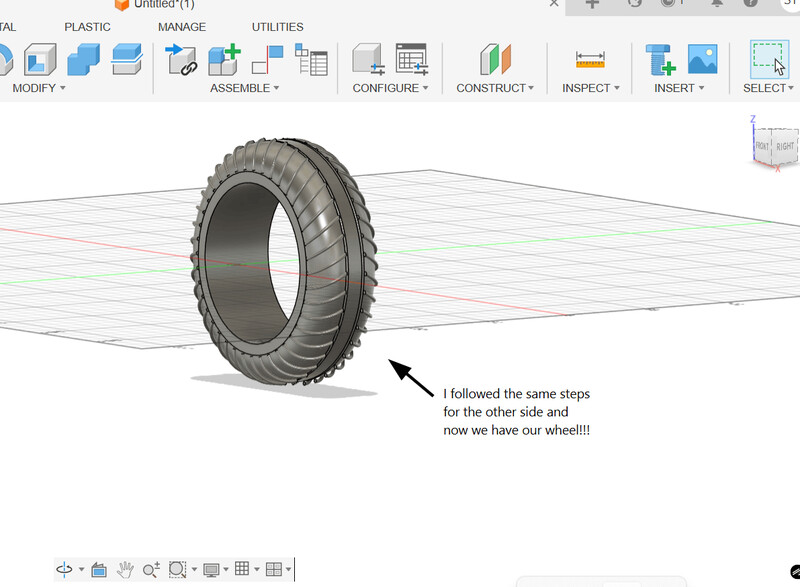
10. I applied the same steps on the other side as well. Now we have our wheel!😁
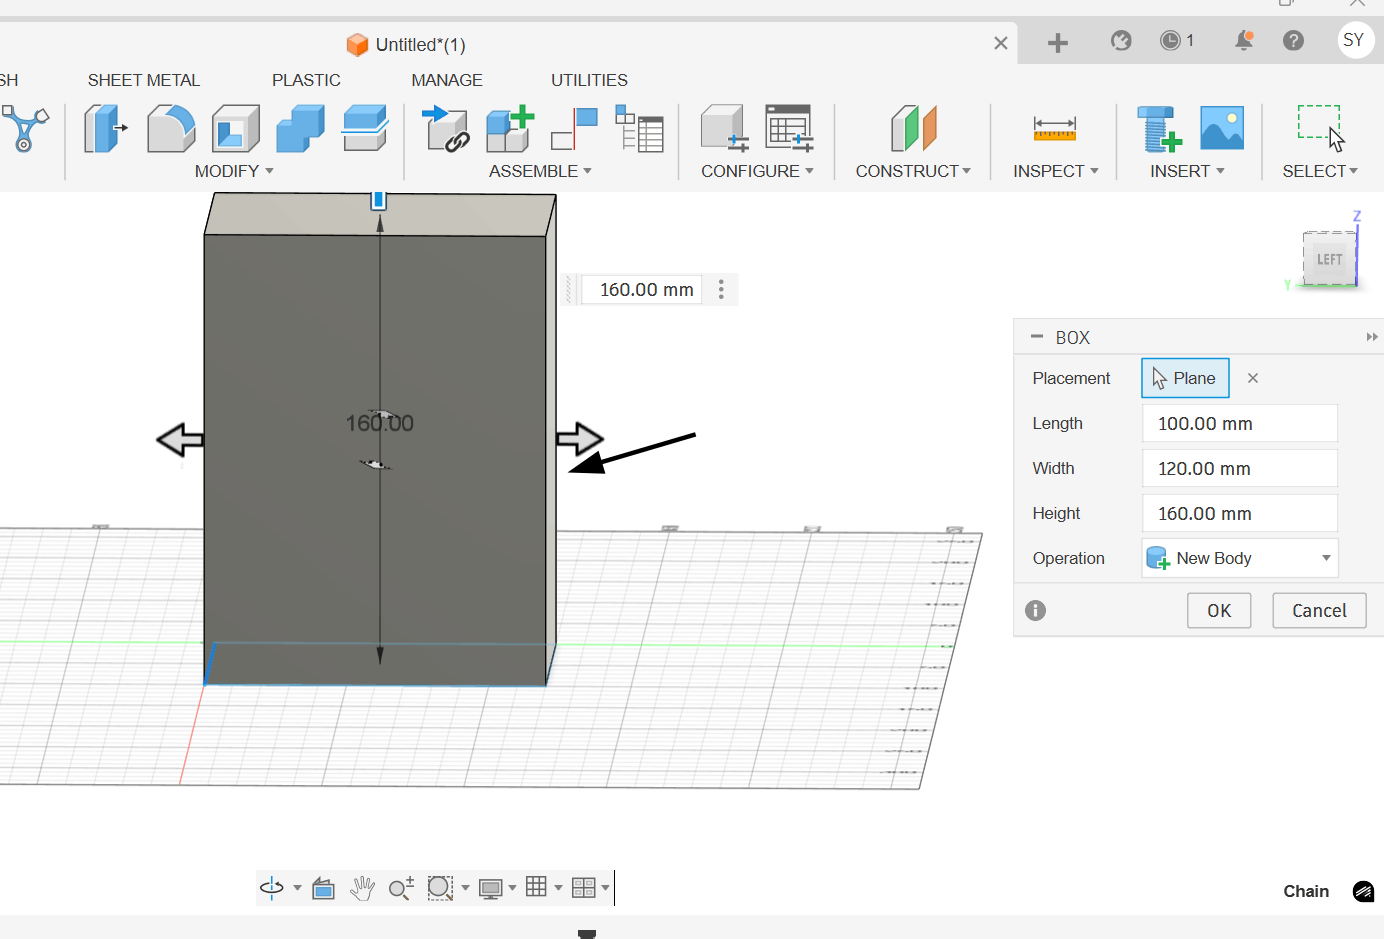
11. Moving on, I created a box as the backpack's main frame.
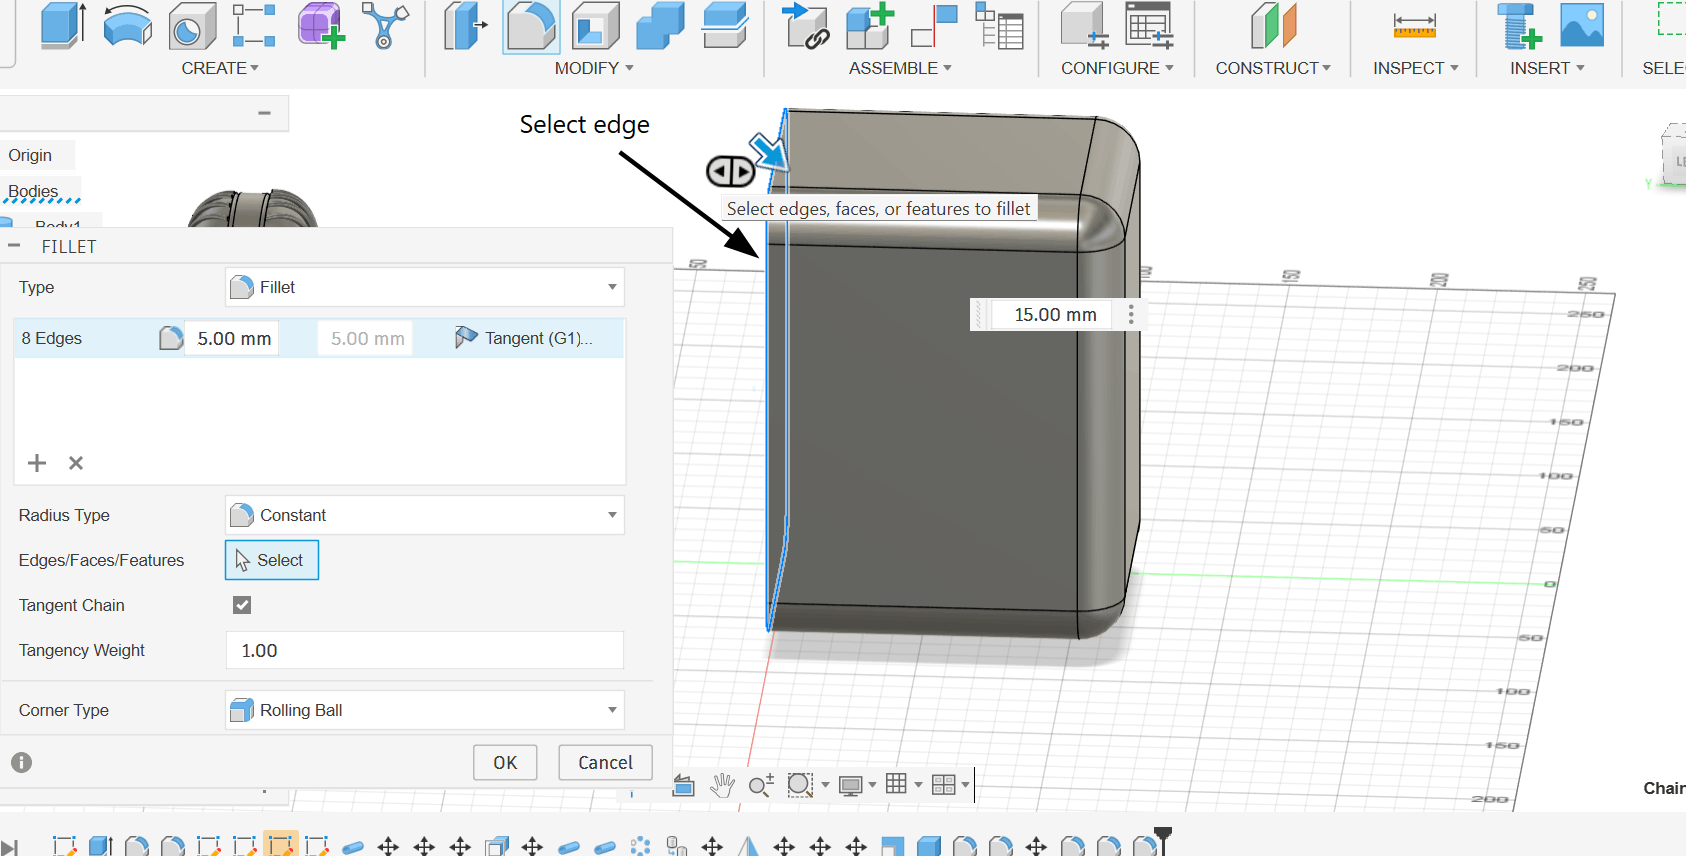
12. I once again used the fillet tool to create curves along the edges and applied a 15mm fillet to every edge.
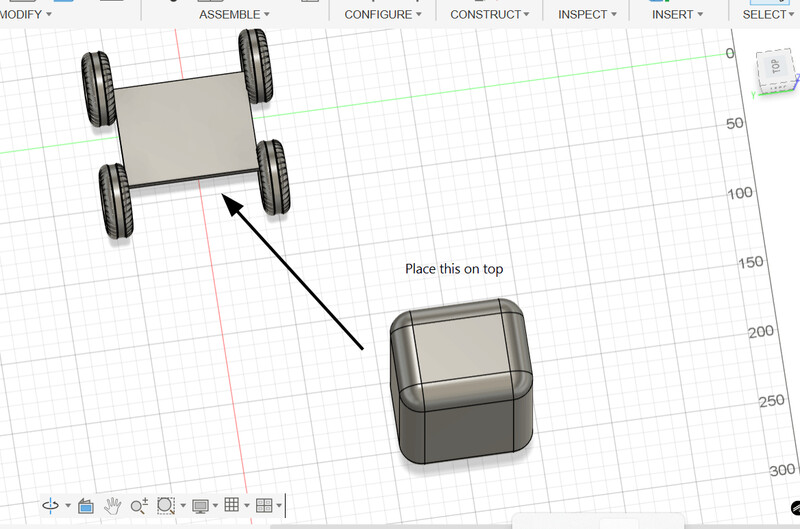
13. I created another flat box, made 3 more copies of the wheel and arranged them in this formation. Then I positioned the backpack on the frame.
14. Just to get a clearer idea of how the backpack will look like, I built the outer shell for the ultrasonic sensor that I'll be using in my final project.
15. I extruded the outer part to a lower level to give it this look.
.png)
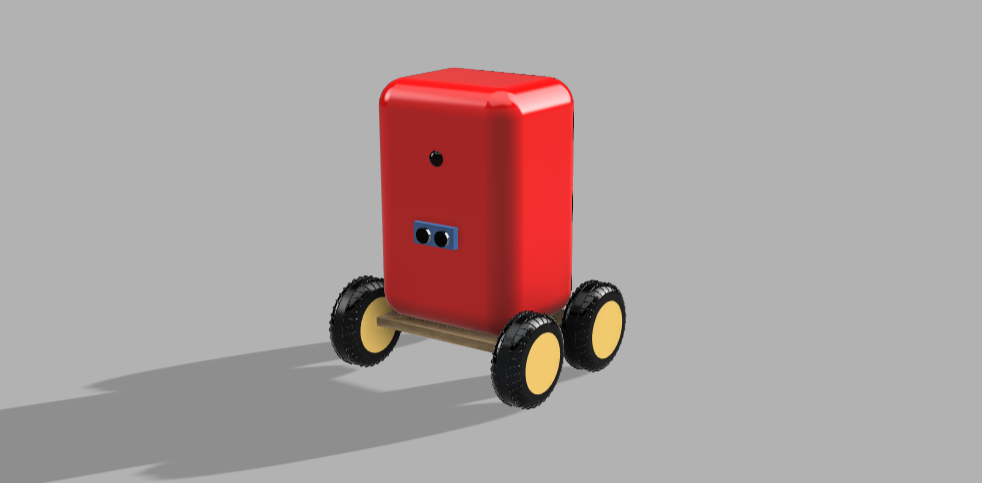
16. I made the camera by creating a sphere and cutting it in half. Then, I adjusted the colors through Modify > Appearance. Here is the rendered image of my final design!!! ƪ(˘⌣˘)ʃ
Blender
You can download Blender by clicking on this link
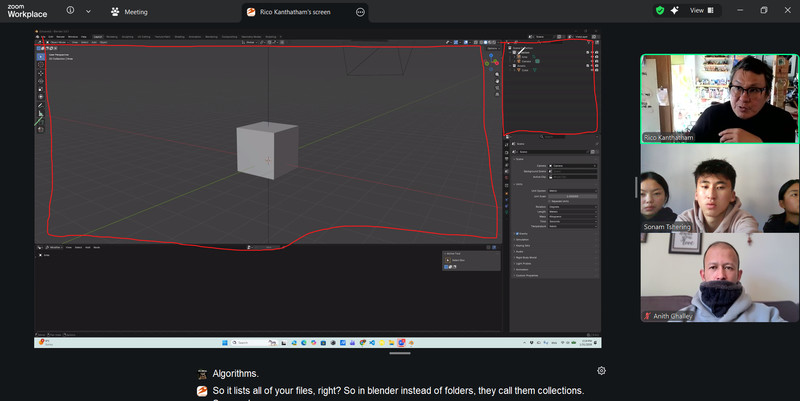
Even though I’d worked with Blender before (for the Eyantra Virtual Museum Competition), I’d forgotten a lot of it so I had to spend some time relearning and exploring on my own before I could start designing. In addition, Sir Rico walked us through the key features of Blender. Thank you Sir! 😄
This week, I used Blender to convert a 2D image into a 3D model.
Here is the tutorial that I referred to.
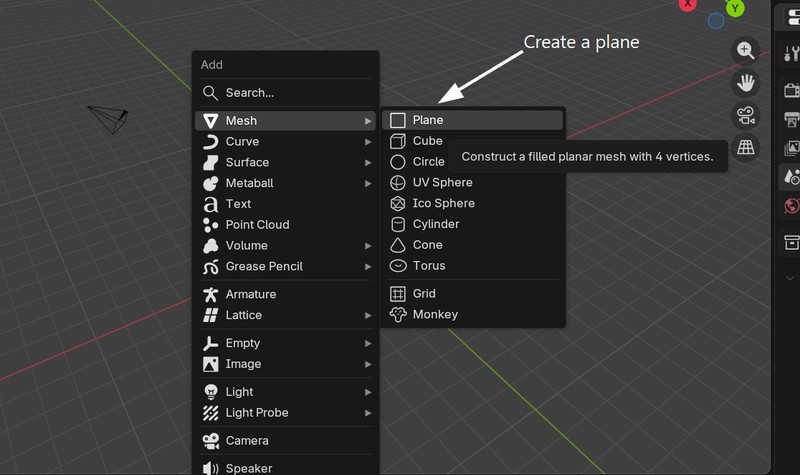
1. I used the shortcut Shift + A to add a plane.
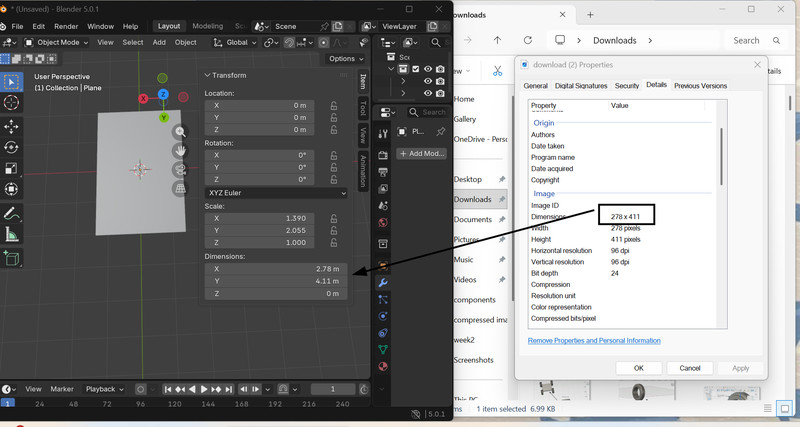
2. Then I pressed N and clicked on Item to enter the dimensions of the image that I will be working with.
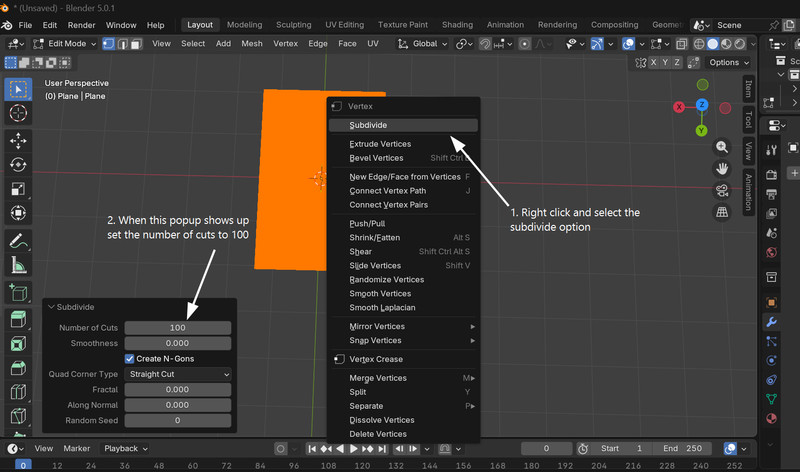
3. After that, I switched to Edit Mode. To do that, you can use the shortcut ctrl + tab and select Edit Mode. In Edit Mode, I pressed ctrl + E and selected the subdivide option. The next step was to set the number of cuts to the maximum value, which is 100.
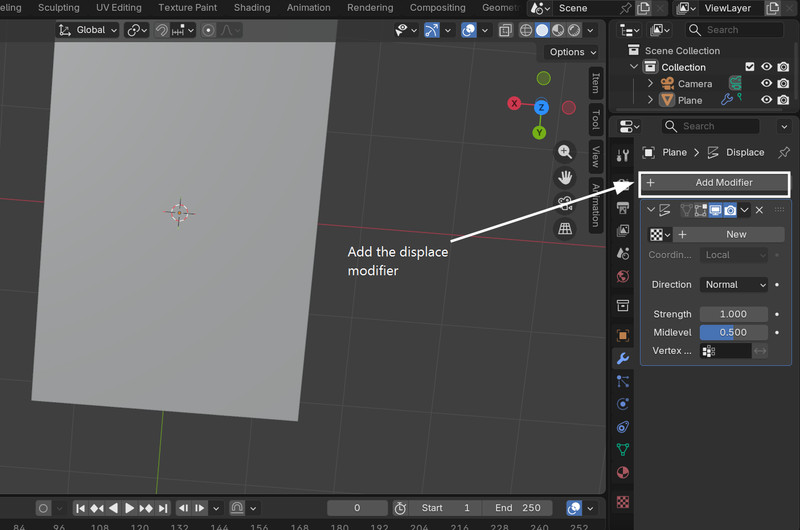
4. After exiting the Edit Mode by pressing the tab key, I added a displace modifier.
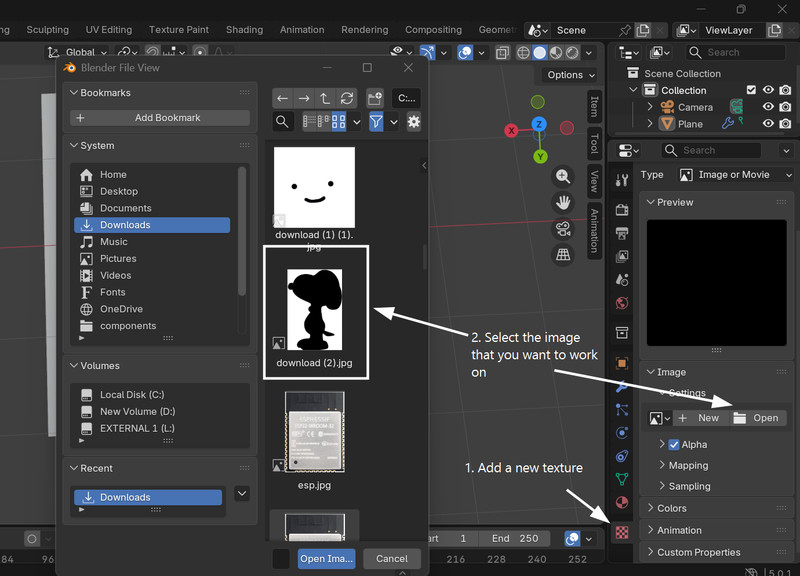
5. I then added the image of my preference.
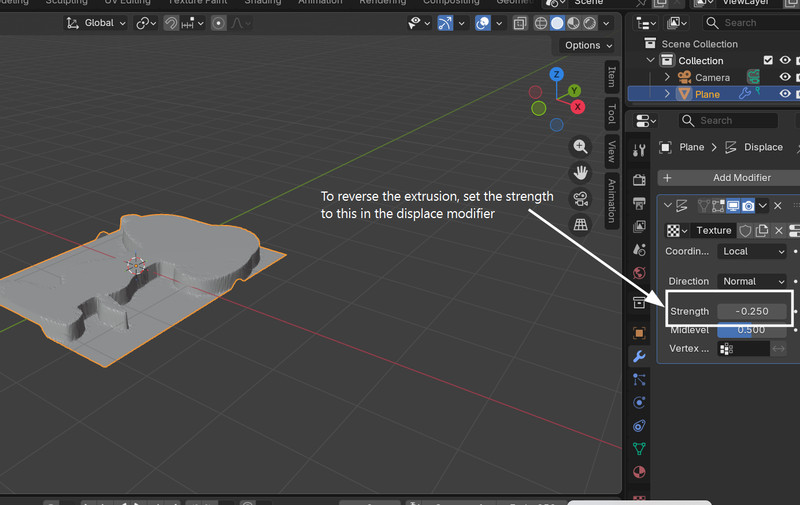
6. In the displace modifier, I changed the strength value to -0.25 to reverse the extrusion.
7. I switched forms from solid to wireframe with the Z shortcut.

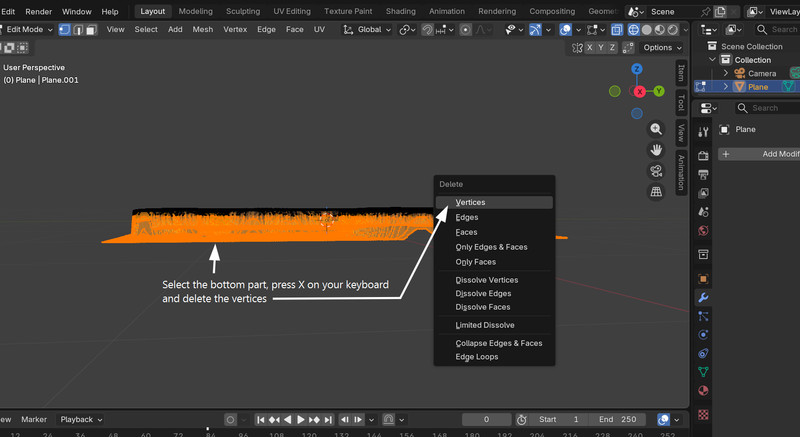
8. Next, I deleted the bottom part of the element. I didn't realise that I had to go into Edit Mode to do that, so it took me a good 20 minutes to figure it out. 🥹
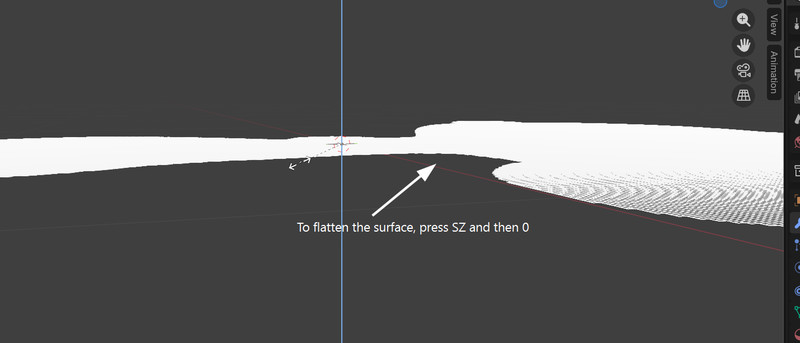
9. Since the surface was uneven, I leveled it by scaling along the Z-axis to zero. (Press S, Z, 0)
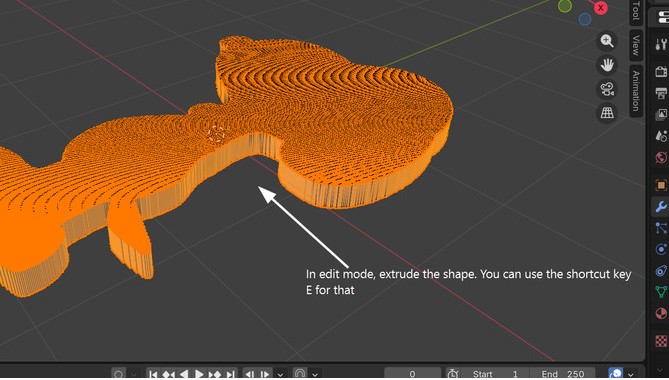
10. Then I extruded the shape using the shortcut E.
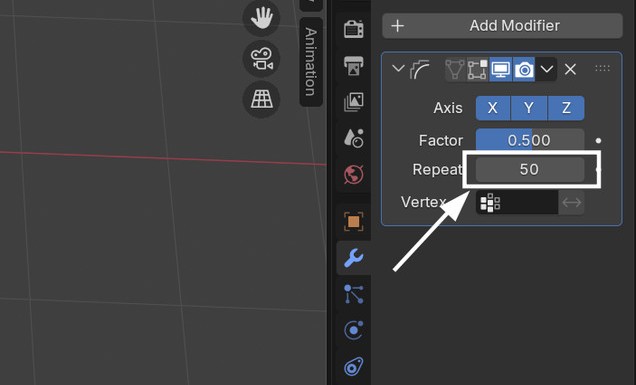
11. To get rid of the uneven edges, I added a smooth modifier and set the value of Repeat to 50.
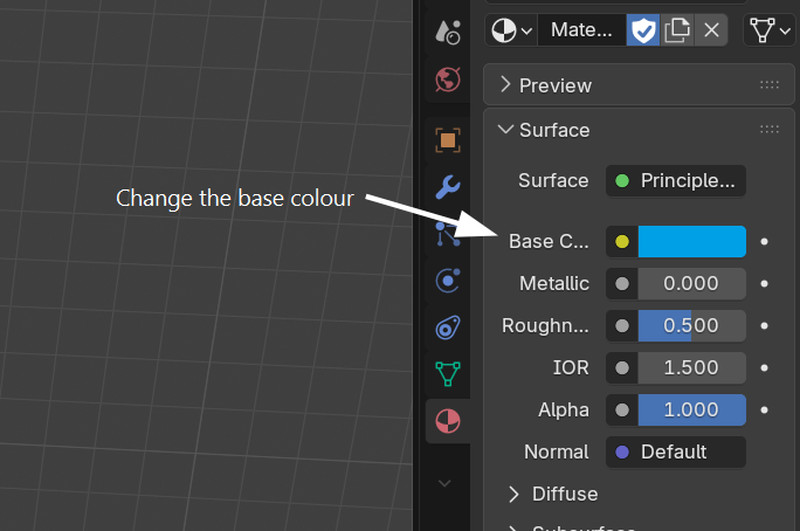
12. I switched the base colour to blue.
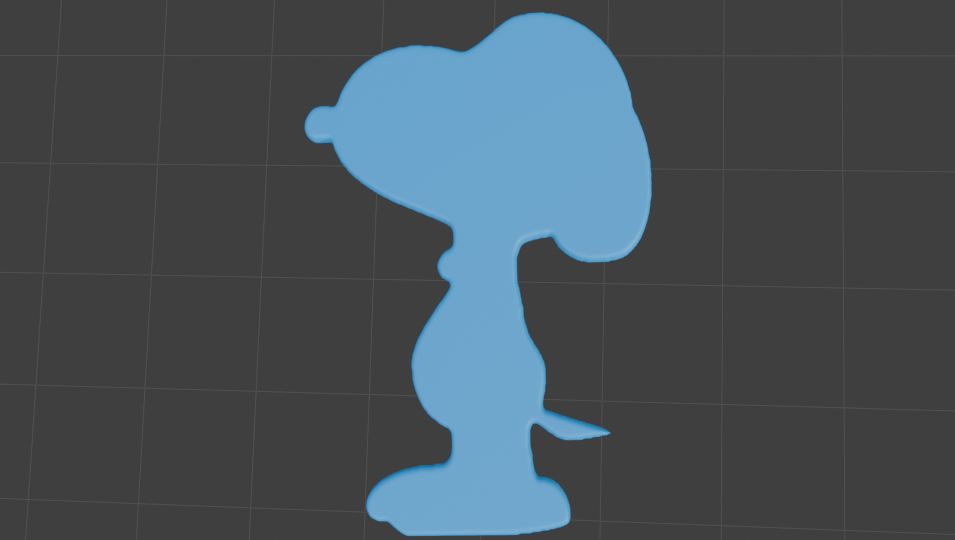
13. Then I clicked on Material Preview.
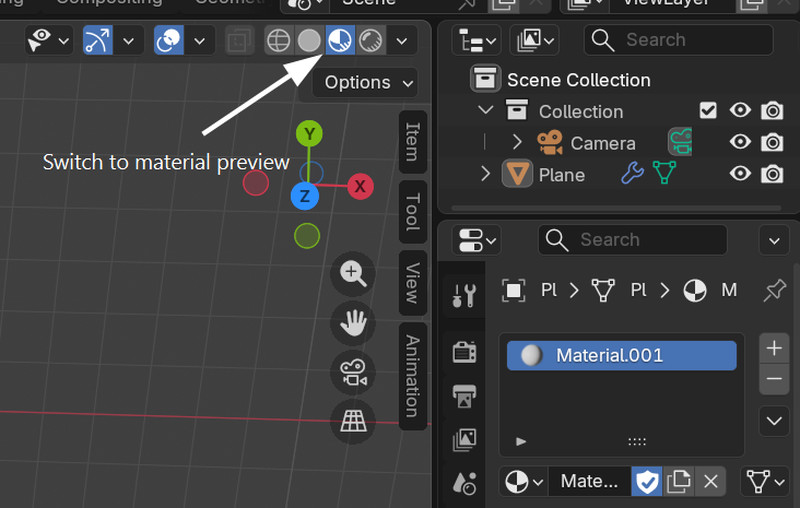
Here is how it finally looks!!^_^
Onshape
Onshape is a web-based platform, so you need to sign up for an account to start designing.
You can do so by clicking on this link
I used Onshape to create a box. I will be using the box as a case for the components in my final project.
Here is the tutorial that I referred to.
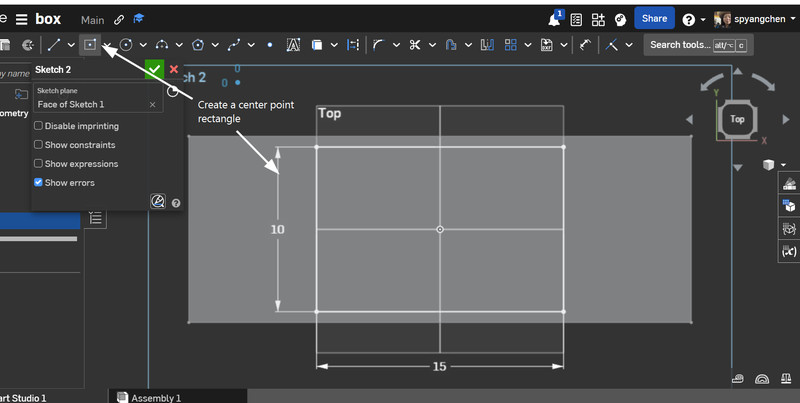
1. I started by creating a sketch of a center point rectangle measuring 10cm long and 15cm wide.
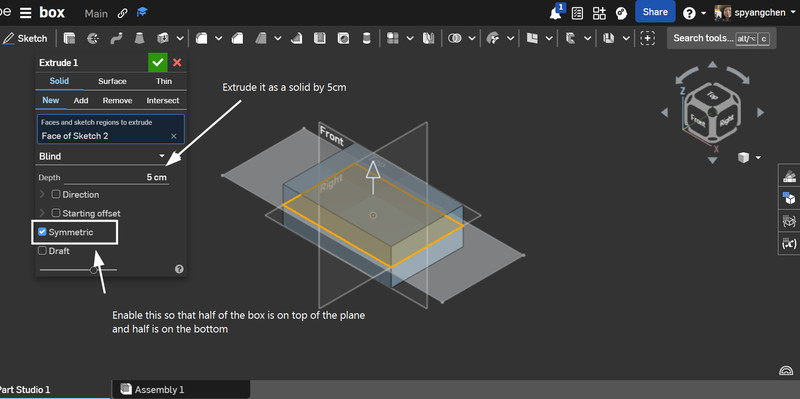
2. Then I extruded the sketch as a solid.
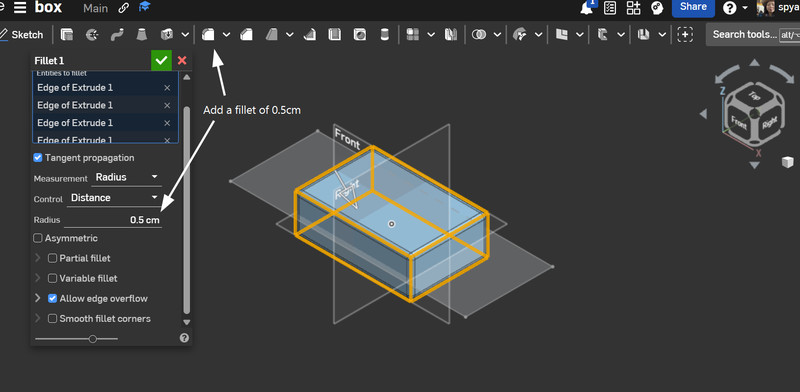
3. After that, I added a fillet of 0.5cm to the box.
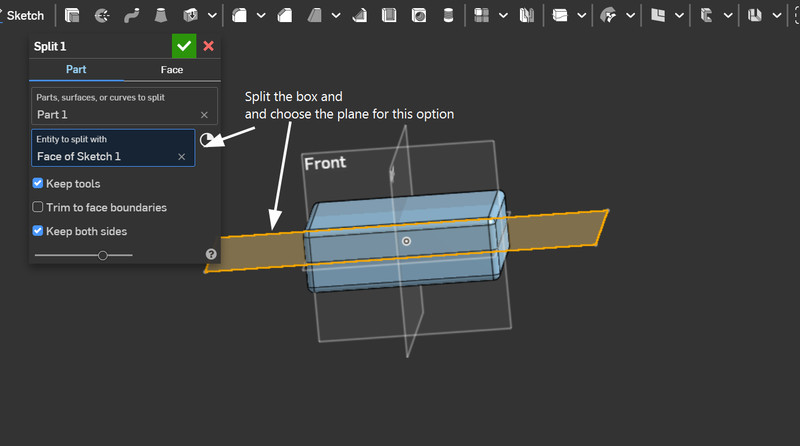
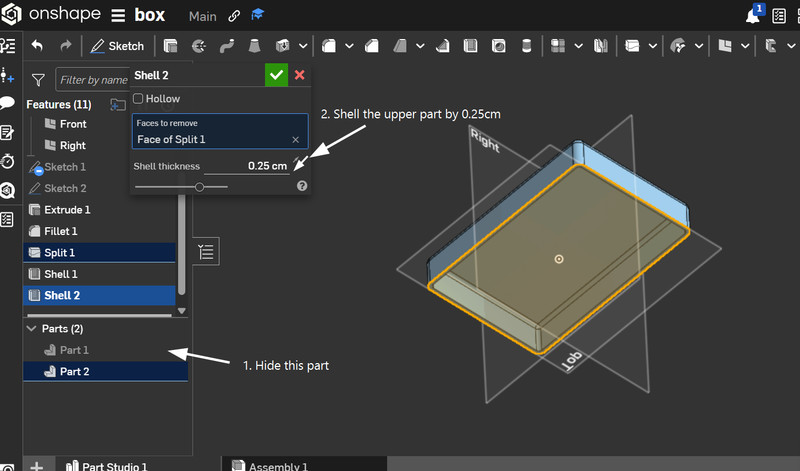
4. I split the box into two, using the top plane as the splitting tool.
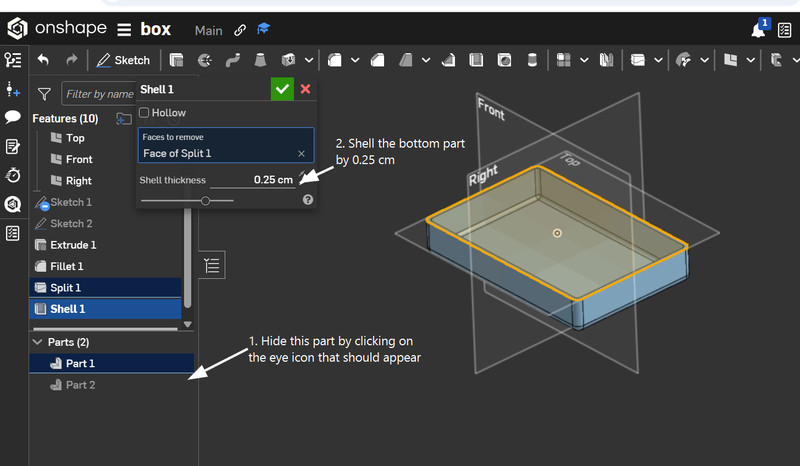
5. Next, I made only one part of the box visible and used the shell tool. I set the shell thickness to 0.25cm.
6. I followed the same steps for the top part as well.
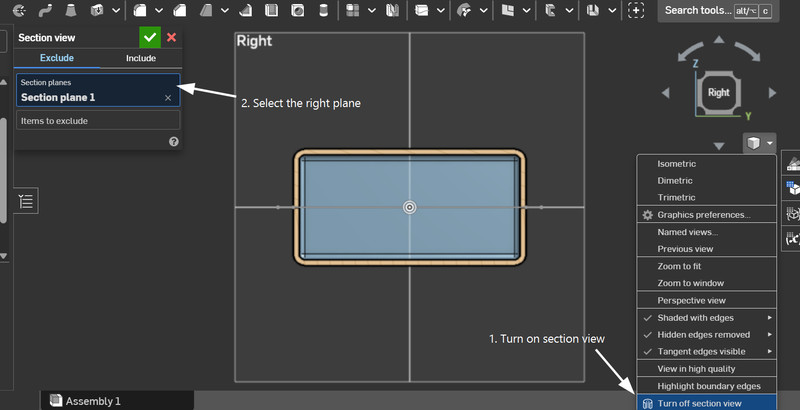
7. I turned on section view and set the right plane as the section plane.
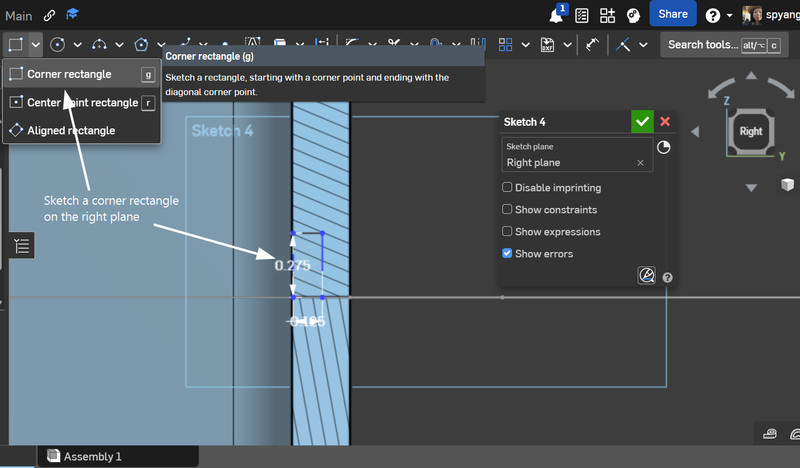
8. Then I created a sketch of a corner rectangle (0.275cm long and 0.125cm wide) on the top part of the box.
9. After turning off sketch view and hiding the bottom part, I used the sweep tool to create the joint. Using the sweep tool, I removed the edges.
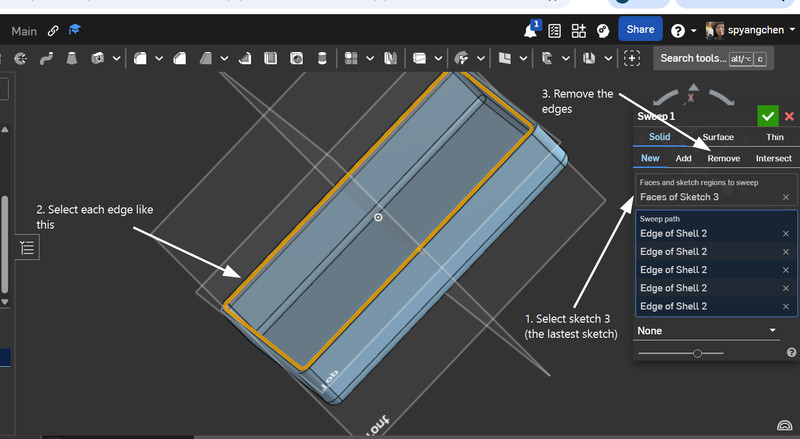
10. I did the same for the bottom part as well but in this case, I added the edges.
11. When I turned on section view, this is how the joint looked like it had been successfully made.

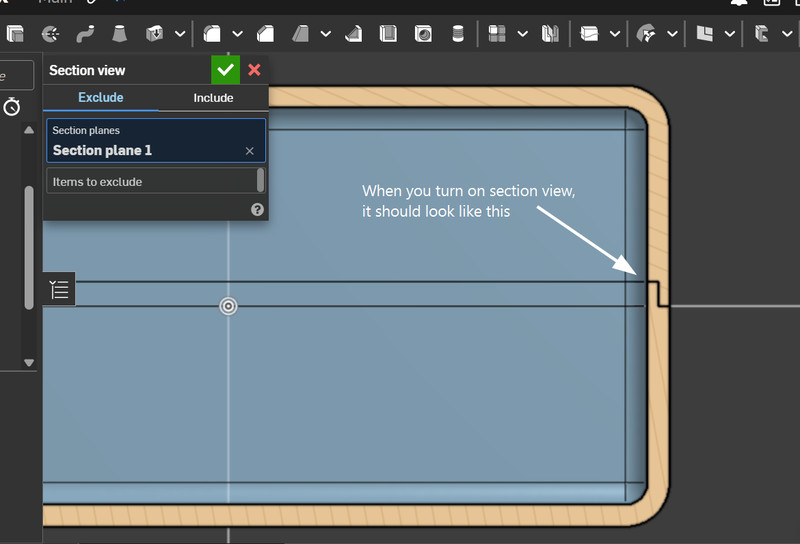
12. This is the final look!! 😁
.png)
AI-powered design tools for image generation
I used three AI software tools to generate an image of the SmartFollow Backpack. I gave all of them the same prompt.

Note: I have used AI (ChatGPT) to generate accurate descriptions of what each AI can do.
Craiyon
Craiyon is an AI tool that creates images from text descriptions. It generates quick, creative sketches based on your prompts.
To use Craiyon, click this link.
.webp)
The design generated by Craiyon really stood out to me, and I’d like to use something like it in my final project. 😄
ARTA AI
Arta AI is an AI-powered tool that generates realistic 3D human models from photos or text prompts. It helps create detailed digital characters quickly for design and animation.
To use ARTA AI, click this link.
.jpg)
I feel like the image that ARTA AI generated was pretty decent, although it wasn't really what I had in mind. 🧐
Artlist
Artlist.io is an AI-powered tool that helps generate unique, high-quality digital art and designs. It uses AI to assist creators in producing creative visuals quickly and easily.
To use Artlist, click this link.
The image looks realistic is all I have to say for this one. 😅 Edit: After taking a closer look at the image, I realized that the motor mount looks really good and could be included in my final project.
Here are my design files:
- Download GIMP File
- Fusion 360
- Download Blender ZIP
- Onshape
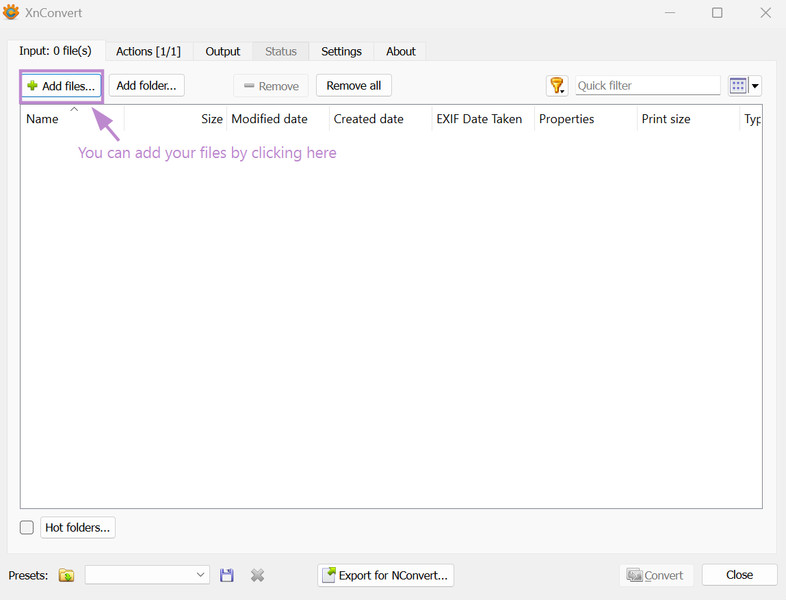
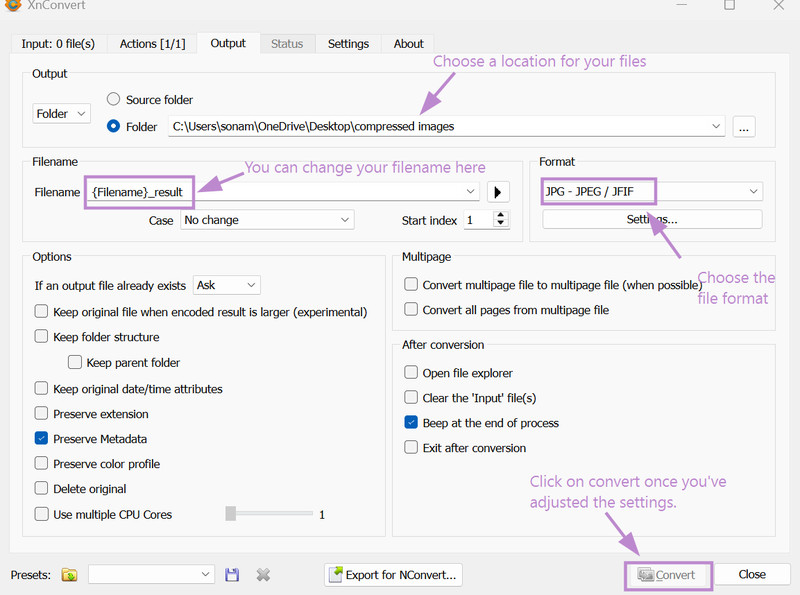
Image and Video Compression
For compressing my images, I use XnConvert, which is a simple tool that helps you to quickly resize, convert, and compress images without losing much quality. You can download it from this link.
For compressing my videos, I use FFmpeg, which is a powerful tool that helps reduce video file size, convert formats, and process video and audio efficiently. You can download it from this link.
After downloading FFmpeg, I extracted (unzipped) the folder. Then I opened the bin folder, where the ffmpeg.exe file is located. Next, I opened the terminal in that folder and ran the following command to compress the video:
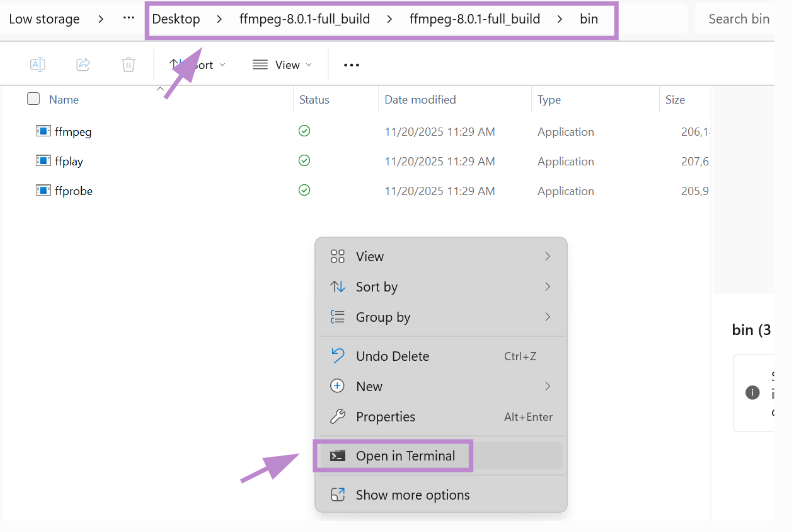
.\ffmpeg.exe -i "..\..\..\uncompressed videos\video_name.mov" -vf scale=640:360 -c:v libx264 -crf 28 -preset slow "..\..\..\compressed videos\video_name.mp4"This command reduces the video resolution, compresses the file, and saves the output in a separate folder.
This week, I had a lot of fun exploring different tools and was also able to gain a lot of skills. Even so, I wasn't able to dedicate as much time as I would have wanted to my final project. 😔
That is all for this week.