
Software and Terminology
WEEK 01
Flameshot is what I use to take screenshots. It is super easy to use and makes capturing images quick and convenient.

Link to download flameshot:
Visual Studio Code is the open-source tool that I’ll be using to build my website and keep track of my work.

Link to download Visual Studio Code:
To compress my images, I used a combination of these two software tools. Both are very user-friendly and reduce image sizes by a considerable amount.

Link to use Optimizilla:

Link to download XnConvert:
Here are some new terms that I came across this week:
Definitions of certain words have been AI generated (ChatGPT) for clear and concise definitions. This was the prompt that I used:

Note: For all the other weeks also, I used the same prompt with different terms 😉😁.
Local repository - The git project that is on your computer.
Remote repository - The same git project that is stored online.
Version Control - A system that keeps track of changes to your files.
Branch - A separate version of the code where changes are made.
Commit - A saved snapshot of code changes.
Pipeline - Automated steps that build, test, and deploy code.
CI/CD - Continuous Integration and Continuous Deployment is a practice that automates the building, testing, and deployment of software to ensure faster and reliable delivery.
.gitlab-ci.yml - A file that configures the pipeline.
Here are some basic git commands that I learnt this week.
This was the prompt that I gave ChatGPT:
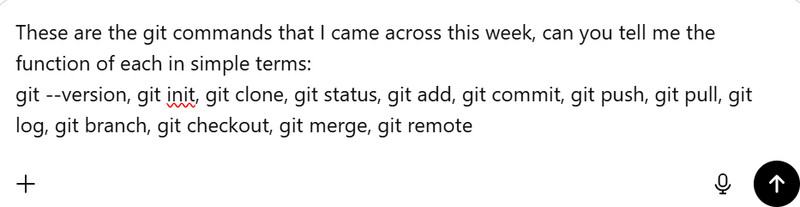
git --version
Shows the version of Git installed.
git init
Starts a new repository.
git clone <repo-url>
Copies a repository.
git status
Shows file changes.
git add .
Stages changes.
git commit -m "message"
Saves changes.
git push
Uploads changes.
git pull
Gets updates.
git log
Shows history.
git branch
Lists branches.
git checkout <branch-name>
Switches branch.
git merge <branch-name>
Combines changes.
git remote -v
Shows remotes.
Week 02
Gimp stands for GNU Image Manupilation Program. GIMP is a free computer program that allows you to edit and change pictures. I personally had a lot of fun exploring Gimp this week.

Link to download Gimp.
Inkscape is a free tool for making and adjusting vector graphics. At first, it was a bit tricky to use, but soon it became quite user-friendly.

To download Inkscape, go to the official website, and then navigate to the downloads section.
This tutorial helped me a lot.
Fusion 360 is a computer program used to design and build 3D models of objects. For me, fusion was a huge challenge in the beginning, but it got easier with practice.
Link to download Fusion.
Blender is a free software that lets you create 3D models, animations, and realistic images on a computer. It’s mostly used for designing objects, games, and visual effects.

Link to download Blender.
Onshape is a web-based design software used to create 2D sketches and 3D models directly in your browser. It’s commonly used for engineering and 3D design projects. Compared to Fusion and Blender, Onshape was relatively easier to use.

Link to use Onshape.
For compressing my videos, I have used FFmpeg. FFmpeg is a free, open-source software that works with video and audio files. It works through the command line.

Link to download FFmpeg.
Week 03
Here are some important terms that I learnt this week:
Kerf - The tiny amount of material that the laser burns away when it cuts.
Raster / Engrave - The laser moves back and forth to etch or shade the surface instead of cutting through.
Vector Cut - The laser follows a line to cut all the way through the material.
Power - How strong the laser is; higher power makes deeper or darker cuts.
Speed – Refers to how fast the laser head (the nozzle that moves and directs the laser beam) travels across the material. The laser itself does not move on its own and is guided by the moving head. When the speed is slow, the laser stays longer on one spot, making the cut deeper or the engraving darker. When the speed is fast, it spends less time on each spot, resulting in lighter or marks.
Resolution - How detailed an engraving is; higher resolution gives sharper details.
Calibrate - Adjusting the laser so it cuts and engraves accurately.
Exhaust - Removes smoke and fumes while cutting.
Compressor - Blows air at the laser tip to keep cuts clean and reduce burning.
Press-fit joint - A joint where parts are pushed together tightly and are held in place by friction, without fasteners or glue.
Week 04
This week, there were a lot of terms that I came across.
Note:
I used Chat GPT for certain words to get clear and concise definitions. 😁
Microcontroller Unit (MCU) - A small computer on a chip that runs programs and controls hardware.
Processor (CPU) - The part of the MCU that executes instructions and makes decisions.
Development Board - A circuit board that holds an MCU and extra parts to make programming and testing easier.
Firmware - The program stored inside the MCU that tells it how to work.
Bootloader - A small program already on the development board that helps receive the code.
Peripherals - Built-in or external hardware that adds features like communication, timers, or sensors.
Power Pins - Pins that supply power to the board (such as GND, 3.3V, or 5V).
GPIO (General Purpose Input/Output) Pins - Pins that can be used as inputs or outputs.
Digital Pins - Pins that work with two states: HIGH or LOW.
Analog Pins (A0, A1, etc.) - Pins that read varying voltage values from sensors.
PWM (Pulse Width Modulation) - A way to simulate analog output using digital signals.
I2S Pins - Pins used for sending and receiving digital audio data.
Reset Button - Restarts the MCU and runs the program again from the beginning.
Port Multiplexer - Allows one pin to be used for different functions depending on settings.
IDE (Integrated Development Environment) - Software used to write, compile, and upload code to a board.
Arduino Language - A simplified programming language based on C/C++.
C Programming - A fast and efficient programming language used for low-level control.
Library - Pre-written code that makes it easier to use hardware features.
Function - A block of code that performs a specific task.
Variable - A named place to store data in a program.
Serial Monitor - A tool used to view messages sent from the MCU for debugging.
Write - Sending data to a pin, device, or memory.
Read - Receiving data from a pin, sensor, or memory.
Breadboard - A tool for building circuits without soldering.
Voltage (V) - The electrical force that pushes current through a circuit.
Current (A) - The flow of electricity.
Resistance (Ω) - How much a material resists the flow of current.
Ohm’s Law - Voltage equals current times resistance (V = IR).
Power Regulator - Keeps the voltage at a safe and stable level.
Resistor - Limits the amount of current in a circuit.
Capacitor - Stores and releases electrical energy.
Diode - Allows current to flow in only one direction.
Transistor - Acts as a switch or amplifier.
ADC (Analog-to-Digital Converter) - Converts analog signals into digital values.
DAC (Digital-to-Analog Converter) - Converts digital values into analog signals.
AC (Alternating Current) - Electricity that changes direction periodically.
Oscillator - Generates a clock signal that controls the MCU’s speed.
Registers - Very fast, small memory locations inside the processor.
Flip-Flop - A basic memory element that stores one bit (0 or 1).
Interrupt - A signal that pauses the program to handle an important event.
Instruction Execution Timing - How long the MCU takes to run instructions.
Address - A specific location in memory or a device.
Fuses (Configuration) - Special settings that control how the MCU behaves at a hardware level.
Arduino Ide is a tool that lets you write, test, and upload code onto a board so that it can control motors, sensors, LEDs, etc.

Link to download Arduino Ide.
Week 05
Here are some important terms that I learnt this week:
3D Printer - A machine that creates physical objects layer by layer from a digital design.
Filament - The material (usually plastic) used for 3D printing; it’s like the “ink” for your printer.
PLA Filament - A common, easy-to-use 3D printing plastic made from renewable resources like corn starch.
PETG Filament - A strong, flexible plastic that is more heat-resistant than PLA.
Build Plate - The surface where the 3D print is built; it acts as the foundation for your object.
Extruder - The part of the printer that melts filament and deposits it layer by layer.
Layer Height - The thickness of each printed layer; smaller layers give more detail but take longer.
Supports - Temporary structures that help print overhangs or complex shapes.
Infill - How solid or hollow the inside of a 3D print is; higher infill means stronger prints.
3D Scanner - A device that captures the shape and details of real objects to create digital models.
LIDAR - A laser-based technology that measures distances precisely, often used in 3D scanning.
SLA (Stereolithography) - A 3D printing method that uses a laser to cure liquid resin into solid layers.
DLP (Digital Light Processing) - Uses a projector to cure each layer of resin in a single shot.
MSLA (Masked Stereolithography) - Uses an LCD screen to selectively cure resin layer by layer.
Stereolithography - The original resin 3D printing technique using light to harden liquid resin.
Photopolymerization - The process of turning liquid resin into solid plastic using light.
PrusaSlicer is a slicing software used to convert a 3D model into G-code by setting print parameters so it can be accurately fabricated on an FFF 3D printer.

Link to download PrusaSlicer.
KIRI Engine is a mobile app that turns real-world objects into 3D models using your phone’s camera.

How to install:
- Visit the App Store or Google Play Store on your device (iOS or Android).
- Search for “Kiri Engine”.
- Click Download or Install.
- Open the app once the installation is complete.
Week 06
These are the important terms that I came across this week:
Development Board – A pre-made PCB with a microcontroller and extra features that makes prototyping and testing circuits easier.
Active Components – Components that can control or amplify electrical signals, like microcontrollers, transistors, or LEDs.
Passive Components – Components that cannot amplify signals and store or dissipate energy, like resistors, capacitors, and inductors.
Electronic Design Automation (EDA) – Software tools used to design, simulate, and test electronic circuits, e.g., KiCad, Altium, Eagle.
Milling – A process where a rotating cutting tool removes material from a workpiece, used for shaping objects or making PCBs.
Soldering – Joining metal parts together by melting solder onto the joint.
Copper Traces – Conductive paths on a PCB that connect components like wires.
Symbols – Graphical representations of components in a schematic showing electrical connections.
Footprints – Physical layouts of components showing pads and holes for placement on a PCB.
Annotate – The process of assigning unique identifiers (like R1, C2, U1) to each component in a schematic.
Net – A net in is an electrical connection between pins that don't carry current themselves but show which pins are electrically connected.
Kicad is an open-source electronic design automation (EDA) software used to create electronic schematics and design printed circuit boards (PCBs).

Link to download Kicad.
MODS CE is a web-based software used to prepare and convert design files into machine instructions for digital fabrication machines.
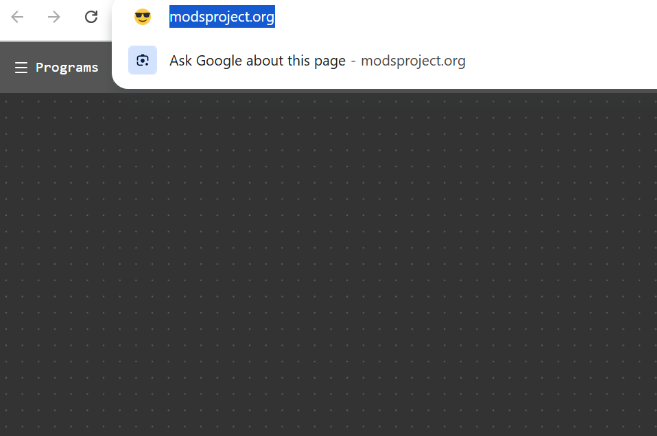
Link to use MODS CE.
Week 07
These are the important terms that I learnt this week:
CNC – A machine that is controlled by a computer to cut or shape materials automatically. It can perform tasks like drilling, milling, and cutting with high precision.
End Mill – A cutting tool used in CNC machines to remove material. It has sharp edges on the sides and bottom to cut and shape the material.
Toolpath – The path or route that the cutting tool follows while the CNC machine is operating.
Fixture – A holder or support that keeps the material firmly in place so it does not move while being cut.
Tabs – Small pieces of material intentionally left uncut to hold the part in place during CNC cutting. They are removed after the cutting process.
Dog Bones – Small rounded cuts added to inside corners of a design so parts can fit together properly. They are needed because CNC cutting tools are round and cannot create perfectly sharp inside corners.
DXF (Drawing Exchange Format) – A file format used to share 2D or 3D design drawings between different design and CNC software.
RML File – A file type used by Roland milling machines that contains instructions telling the machine how to move and cut the design.
VCarve is a software that is used to create toolpaths for CNC machines. It converts a design into instructions that tell the machine how and where to cut or carve the material.
Link to download VCarve.
ShopBot 3 is the control software for a ShopBot CNC machine. It works like the machine’s control panel, letting the user load cutting files, move the machine, and set the X, Y, and Z axes so the machine knows the correct starting position before cutting. It then runs the file and controls how the machine moves to cut or carve the material.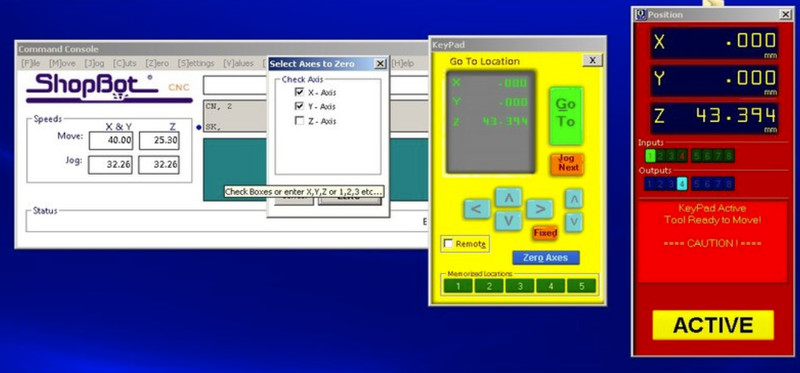
Link to download ShopBot 3.
Week 08
Here are the important terms that I learnt this week:
Filler Metal – The stuff (like solder) you melt to stick two electronic parts together.
Soldering – Using heat to join components with that melted filler metal.
Plunge Rate – How fast your milling tool goes down into the material (too fast = ouch, too slow = wasting time).
Relay Module – A tiny switch that lets a small signal control bigger power stuff safely.
Input Pull-up Resistor – A built-in helper in microcontrollers that keeps a pin reading “HIGH” when nothing is connected.
Debugging – Hunting for problems in your circuit or code and fixing them.
Feed Rate – How fast your milling tool moves across the material (not down, across).
Spindle Speed – How fast the milling tool spins while cutting.
End Mill – The cutting tool that actually removes material from your board.
Deburring – Cleaning up rough edges after milling so things fit nicely.
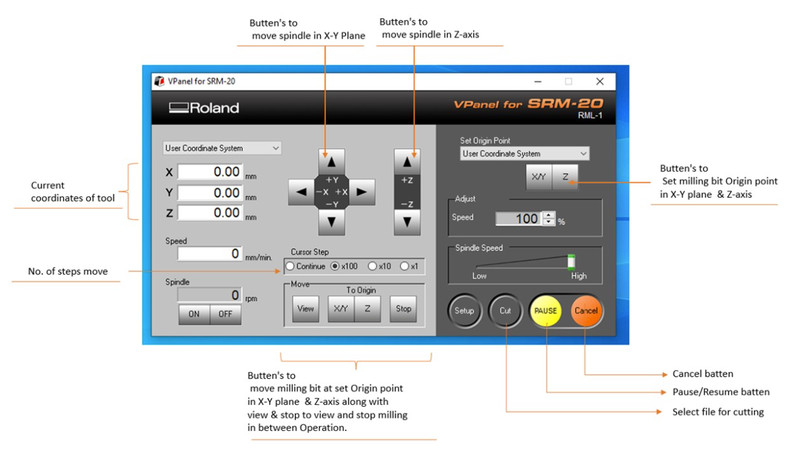
Guide to download VPanel.
Week 09
Here are the important terms that I learnt this week:
Input Device – Hardware used to receive information from the environment (like sensors) that can be read by a microcontroller.
Sensor – A device that detects physical properties such as temperature, light, motion, or sound, and provides measurable data to a microcontroller.
Actuator – Though technically output, sometimes paired with input devices to respond to sensor data.
Analog Signal – A continuous signal representing physical quantities (e.g., temperature, light intensity) that often needs conversion to digital signals.
Digital Signal – A discrete signal with two states (HIGH/LOW, ON/OFF) used for binary processing in microcontrollers.
Threshold Voltage – The voltage level at which a digital input pin switches from LOW to HIGH.
Pull-Up / Pull-Down Resistor – Resistors used to ensure a stable HIGH or LOW reading when no input is present.
Example Code / Test Sketch – Pre-written code used to verify that an input device or sensor is functioning correctly.
Interfacing – The process of connecting sensors or input devices to a microcontroller so they can communicate effectively.
Communication Failure – When a sensor or input device fails to send accurate data to the microcontroller, often due to wiring, code, or hardware problems.
Debouncing – Technique to stabilize readings from mechanical switches or buttons to avoid multiple triggers from a single press.
Serial Monitor – A tool in Arduino IDE or similar environments that displays output or debug messages from the microcontroller.
Debugging – The process of identifying and fixing errors in hardware connections, software code, or input readings.
Sampling Rate – How frequently a microcontroller reads data from an input device.
Noise / Signal Interference – Unwanted fluctuations in sensor readings caused by electrical interference.
Calibration – Adjusting an input device or sensor to ensure accurate readings.
Week 10
These are all the important terms that I came across this week:
Interfacing – Connecting output devices like LEDs, motors, or displays to a microcontroller so they can be controlled.
Power Consumption – The amount of electrical power an output device uses while operating.
Error Handling – Identifying and fixing problems that occur in code or while controlling output devices.
Output Device – A component that produces a physical result from a signal, like light, sound, or movement (e.g., LED, buzzer, motor).
GPIO (General Purpose Input/Output) – Pins on a microcontroller used to send signals to control output devices.
Digital Output – A signal that is either HIGH (ON) or LOW (OFF), used to control simple devices like LEDs.
PWM (Pulse Width Modulation) – A technique used to control the brightness or speed of output devices by varying signal timing.
Current – The flow of electricity through a circuit, which powers output devices.
Voltage – The electrical force that pushes current through an output device.
Driver Circuit – A circuit used to control high-power output devices safely using a microcontroller.
Week 11
Here's a list of all the terms I learnt this week:
Node – Any device connected to a network that can send or receive data.
Binary – A system that uses only two values (0 and 1) to represent data in digital electronics.
Protocol – A set of rules that defines how devices send and receive data.
Wired Communication – Sending data through physical connections like cables (e.g., UART, I2C, SPI).
Data Packet – A small unit of data sent over a network from one device to another.
Clock Pulse – A regular timing signal that helps coordinate data transfer between devices.
Networking – Connecting multiple devices so they can communicate and share data.
Addressing – Assigning unique IDs to devices so data reaches the correct destination.
Wireless Communication – Sending data without wires using signals like Wi-Fi or Bluetooth.
Baud Rate – The speed at which data is transmitted, usually measured in bits per second (bps).
Bus – A shared communication line that connects multiple devices for data transfer.
Synchronous – Communication where devices use a shared clock signal to stay in sync.
Communication – The exchange of information between devices like microcontrollers, sensors, or computers.
Encryption – Protecting data by converting it into a secure format that only authorized devices can read.
Week 13
These are some terms I learnt this week:
Mold - A shaped cavity that holds liquid material until it hardens into a specific form.
Casting - The process of pouring liquid material into a mold to make a solid object.
Roughing Pass - The first CNC cutting step that quickly removes large amounts of material.
Finishing Pass - The final CNC cutting step that smooths and refines the surface.
Modela Player 4 - Software that generates toolpaths for Roland CNC machines.
G-code - A set of instructions that tells CNC machines how to move and cut.
Demolding - Removing the hardened material from its mold.
Silicone rubber (LSR 110) - A liquid material that cures into a flexible mold after mixing two parts.
Smooth-Cast 305 - A liquid plastic that hardens into a solid cast after mixing.
Surface finish - The final smoothness or texture of a manufactured surface.
Mix ratio (1A:1B) - The required proportion of two parts of a material that must be mixed equally or in a set ratio.
Pot life - The limited time after mixing when a material remains usable before it starts hardening.
Cure time - The total time needed for a material to fully harden and reach final strength.
Week 14
Here are the most important terms I came across this week!
Interface - A way for two systems (human, software, or hardware) to communicate with each other.
Application Programming - Creating software that connects users to devices, data, or services.
Programming Language - A structured way to give instructions to a computer.
Compiler - A tool that converts code into machine-readable instructions.
Debugging - Finding and fixing errors in a program.
Operating System Interface - The layer that allows software to use hardware resources.
Hardware Interface - The connection between software and physical devices like sensors or motors.
Data Communication - The transfer of information between devices or systems.
Input/Output System - The way a system receives data (input) and sends results (output).
Web Interface - A system that allows users to control or view data through a browser.
Automation - Using code to make systems perform tasks automatically without human control.
System Integration - Connecting different parts (software + hardware) so they work together as one system.
User Interface (UI) - The part of a system that humans interact with directly.
Feedback Loop - When a system uses output information to adjust its next action.