Week 18
Check List
This week's project requirements:- Plan a final project masterpiece that integrates the range of units covered, answering:
- What will it do?
- Who's done what beforehand?
- What sources will you use?
- What will you design?
- What materials and components will be used?
- Where will come from?
- How much will they cost?
- What parts and systems will be made?
- What processes will be used?
- What questions need to be answered?
- How will it be evaluated?
- Your project should incorporate:
- 2D and 3D design
- Additive and subtractive fabrication processes
- Electronics design and production,
- Embedded microcontroller design, interfacing, and programming,
- System integration and packaging
- Note: Where possible, you should make rather than buy the parts of your project
- Note: Projects can be separate or joint, but need to show individual mastery of the skills, and be independently operable
Images/Files:
- Include your original design files
- Properly compress or use a zip folder if needed
- Include hero shots of your results
Individual Assignment:
Resources and Helpful Links
Learning Outcomes
- Demonstrate workflows used in network design
- Implement and interpret networking protocols and/or communication protocols
Introduction
This week we were tasked with an individual set of activities. For our individual activities this week we were tasked with planing our final project. Our project needs to integrate a range of units covered during FabAcademy such as: 2D and 3D design, additive and subtractive fabrication processes, electronics design and production, embedded microcontroller interfacing and programming and system integration and packaging.
This week, we are also tasked with preparing final drafts of our final project summary slide and our video clip.
Project Development Question 1
What will it do?
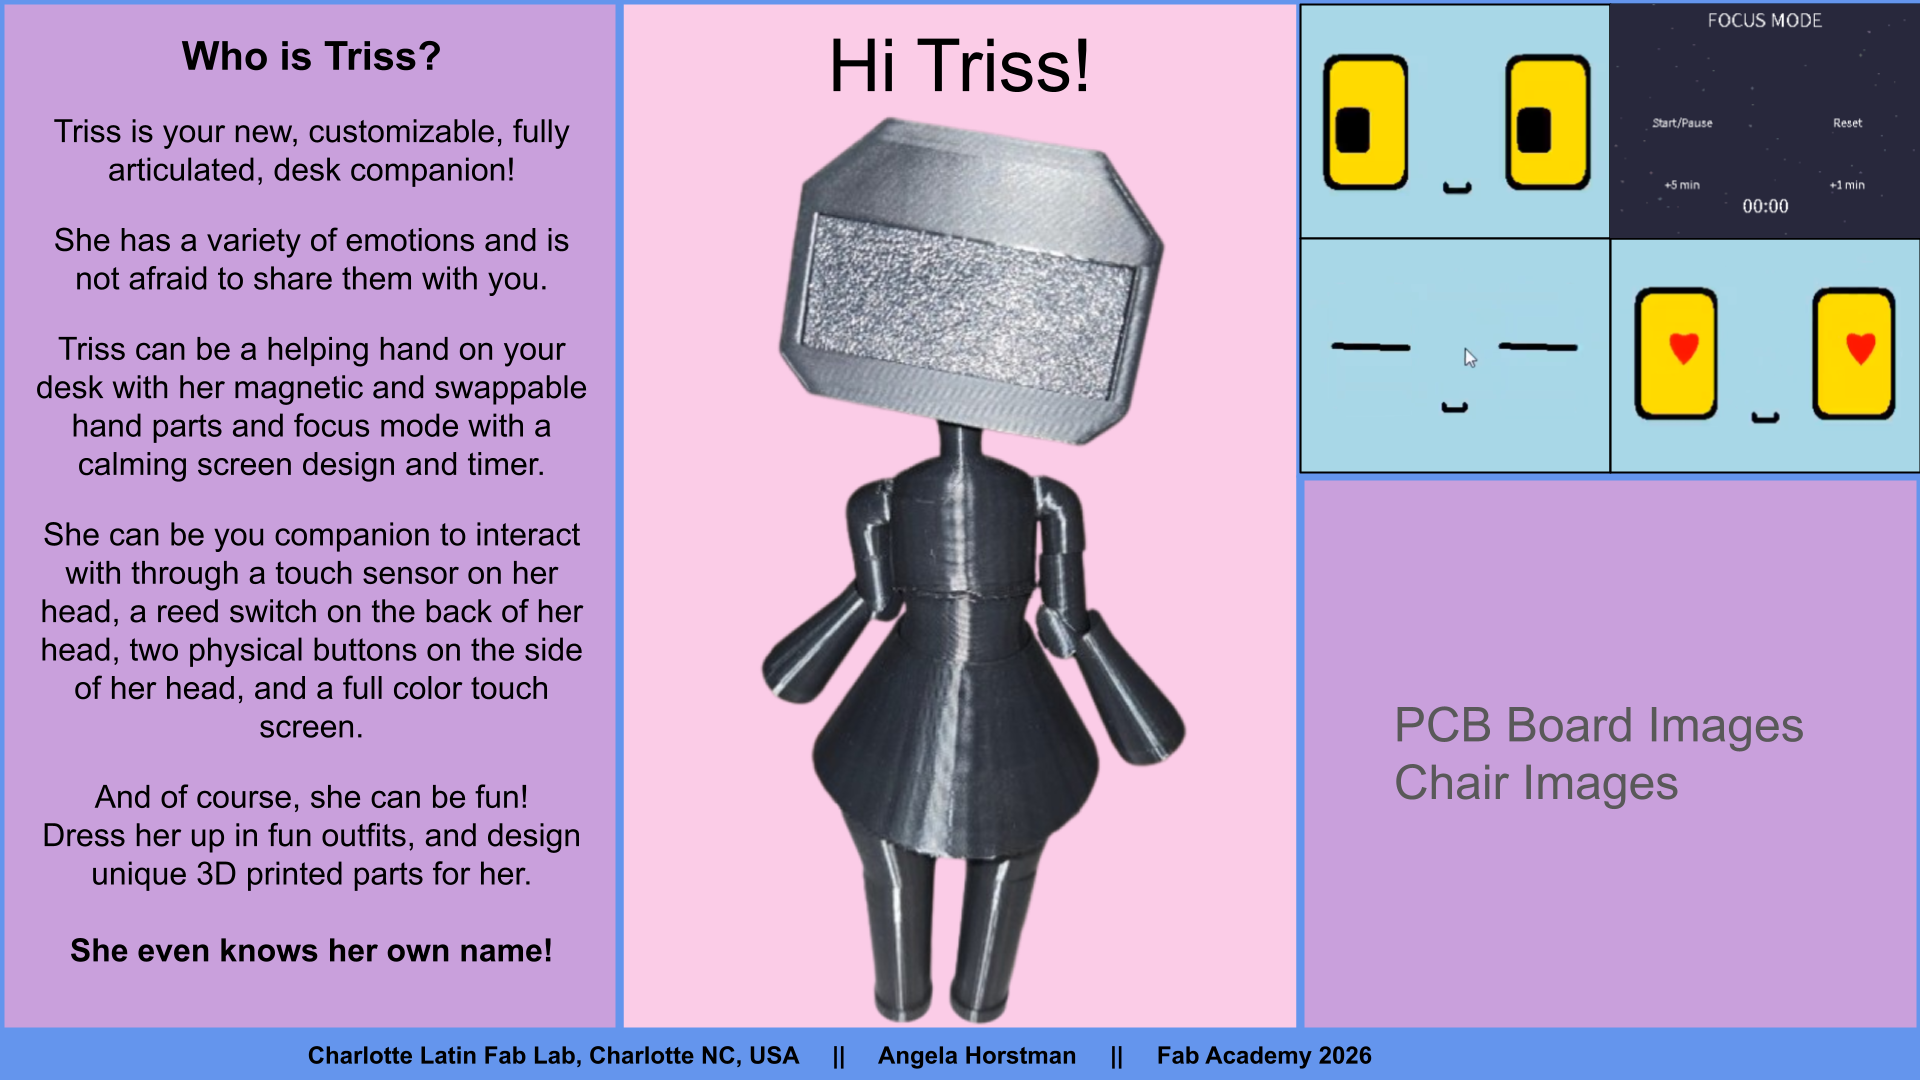
This is a ball jointed doll that incorporates a brain system in the head portion of the doll. The doll includes a variety of input devices such as touch sensors, magnetic sensors, microphone, time of flight, etc. The doll also includes a variety of output devices such as an LCD/OLED screen and a speaker. With the combination of these sensors and devices alongside a custom virtual assistant setup, my traditional art doll becomes a true desk buddy who can sit, stand, and interact with myself and the world around her.Project Development Question 2
Who has done what beforehand?
Articulated dolls have been around since 200BCE. The modern ball jointed doll was popularized in the 19th century. The modernized Asian Ball Jointed Doll, which my doll design is based off of, was popularized in 1999 by Volks with the Super Dollfie Line. The modern ball jointed doll is a collectable art doll with prices ranging from hundreds to thousands of dollars. My doll is based off of the ⅙ barbie scale size which equates to about ⅙ standard human size or around 12inches in height. Commonly ball jointed dolls would be made of resin or porcelain and hand crafted then mold and casted. There are currently no ball jointed style dolls which integrate electronics or circuits to truly bring them to life as a desk companion. In the doll world, the closest similarities to my project would be interactive play dolls with speakers and buttons, the 1990’s Furbies by Hasbro, the mind 2000’s internet connected My Friend Cayla/Teddy Doll by Genesis Dolls, and the new Hello Barbie AI integrated play doll. In the robot and desk pet world, the closest similarities to my project would be a standard desk pet companion like Eilike by Energizer Labs, EMO by Living AI, and Ortomi.Project Development Question 3
What sources will you use?
I used a variety of resources throughout this program to assist me with different parts of my project. Some examples of sources I used were youtube videos, blogs, and people. Each week at the top of my weekly page is a section called Resources and Helpful Links. This section shows all of the resources and tools I have used throuhghout Fab Academy 2026. Their is also an additional resources section on my Final Project page that are resources and helpful links specific to my final project.Project Development Question 4
What will you design?
In my project, I designed a custom 3D printed doll body based off a traditional ball jointed doll design. I added a robot theme to the body sculpt and incorporated a movable heart into the torso while being able to maintain the elastic stringing system needed to assemble the ball jointed doll. I also designed a custom pcb using a microcontroller and my connected input and output devices to act as the “brain” for my doll. This is encased in the slightly oversized head of my doll. In addition to the doll and the custom electronics, I created a wireless charging system integrated in the doll and a custom chair for the doll to sit in for charging. Hidden inside the chair is also a raspberry pi, which has a custom server set up, using Home Assistant, that communicates with my microcontroller to act as a custom virtual assistant robot. I trained my robot to have a custom wake up command using my robot's name: Triss.Project Development Questions 5, 6, and 7
5. What materials and components will be used?
6. Where will they come from?
7. How much will they cost?
Project Development Question 8
- The Doll Body
- The Doll Head
- The Doll Brain Board
- The Input and Sensor Boards
- The Wooden Charging Chair
- The Dolls Emotion and Animation System for the Screen
- The Pogo Style Magnetic Charging System
What parts and systems will be made?
Project Development Question 9
- 3D Printing/CAD - Doll Head and Body
- Electronics Design and Production - PCB Design of Brain and Sensor Boards
- Laser Cutting - Charging Chair
- Networking - Brain Board, Sensor Boards, and Screen Board communication
- Embedded Programming - Emotion and Animation System, Custom WakeWord Training and Detection
What processes will be used?
Project Development Question 10
- What features is Triss missing to make her feel more alive?
- Is Triss more desirable in the Ball Jointed Community as just the BJD or with the embedded electronics?
- Will I have time in the future to add in the other features I envisioned?
- Can I fit a rechargable battery of some sort into the chest cavity to make her more portable?
- What is next for Triss?
- Should I add sound effects or a speach system?
- What other inputs can I add to make Triss more interactable?
- How do I get rid of the screen flicker in the eyes!?
- What emotions or effects should I add next?
- Does my Pogo pin connection work reliably?
- Can I make her better balanced?
- Should I print a version of her using Resin printing since that is closer to traditional BJD material?
What questions need to be answered?
Project Development Question 11
- Does the heart or sparkle animation appear on wakeword detection?
-
I will speak the wakewords "Hi Triss" into the Hi.Triss.detection.py program.
This should send a signal through serial connection to the brain board telling it that the wake word has been detected.
The brain board should then send the screen board through UART conenction the wake word command of either heart or sparkle.
The screen board should recieve the heart or sparkle command run either the heart emotion or the sparkle animation.
- Does the emotion system properly work based off of touch and button sensors?
-
I will test a single push button which should send a signal to the brain board that a button has been pressed.
The brain board should then send the screen board the one button signal.
The screen board should recieve one button signal and run the blink effect.
If the button is held, the brain board will recieve the hold command to send to the screen which should make blink affect turn into a happy rocking blink effect.
Finally, if two buttons are pressed, the brain board will recieve the angry command to send to the screen which should run the angry eye emotion. - Is the magnetic pogo power system stable?
-
I will seat Triss on the charging chair and hope she turns on and stays on.
-
Final Overall evaluation: Am I happy with how she looks and interacts?
If the answer is yes, than I am good.
I designed her for me, and in the end my opinion is the one that matters the most.
How will it be evaluated?
Functionality Testing
Summary Slide Placeholder