
Software & Tools


Theoretical Idea
Git is an open-source version control system designed to track changes in files and coordinate work across projects. It allows files to be stored locally, changes to be recorded over time, and different versions of a project to be managed efficiently. Git is especially well-suited for collaborative and iterative development workflows.
GitLab is a web-based platform built around Git that provides remote hosting for Git repositories. In addition to version control, GitLab offers features such as issue tracking, continuous integration, and automated deployment, making it a comprehensive development and documentation platform.
A repository (repo) is a structured storage location for project files and their complete version history. Within a repository, files can be added, modified, or removed while Git keeps track of every change. For the Fab Academy, GitLab hosts individual student repositories that contain the full website documentation.
The Fab Academy documentation website is automatically published using GitLab Pages. This process is controlled through a configuration file called .gitlab-ci.yml, which defines a continuous integration pipeline. Whenever changes are pushed to the repository, this pipeline builds and deploys the website, making it publicly accessible without requiring a separate web server.
To access the repository from a local computer, Git must be used through a command-line interface such as Git Bash. In addition to Git itself, a secure authentication method is required. One common and reliable solution is the use of SSH keys, which enable encrypted communication between the local machine and GitLab.
An SSH setup consists of a private key, which remains securely stored on the local computer, and a public key, which is uploaded to GitLab. This method avoids repeated password authentication and is widely used across professional development environments. When multiple SSH keys are in use, an SSH configuration file can be created to specify which key should be used for a given host, such as gitlab.com or other GitLab instances.
Once secure communication with the repository is established, the provided example repository can be cloned to the local machine. This creates a local copy of the entire project structure. The example website is then replaced with custom documentation content. Finally, all changes are pushed back to the remote repository, triggering the GitLab Pages pipeline and updating the published website.
Installing Git
Windows
On Windows, Git can be installed by downloading the standalone installer from the official Git website and running the installation. The default installation options are sufficient and can be accepted without modification.
Alternatively, Git can be installed via the command line using winget in PowerShell:
#This method requires winget to be installed and available on the system.
winget install --id Git.Git -e --source winget
After the installation is complete, Git Bash can be opened and used as the primary interface for working with Git. There is also a GUI (Graphical User Interface) but we will be working with the command line.

On macOS and Linux, the installation process differs depending on the operating system and distribution. The official installation instructions provided on the Git website should be followed for these platforms.
Verify Installation and Configure Git
Once Git is installed, the installation can be verified by checking the installed version:
git --version
To properly associate future commits with an identity, Git requires a user name and email address. These can be configured globally using the following commands:
git config --global user.name your name
git config --global user.email "your-email@example.com"
These settings will be applied to all Git repositories on the system and are required for creating commits.
Generate and Configure an SSH Key
To securely authenticate with GitLab from a local machine, SSH keys are used. SSH provides encrypted communication and avoids the need for repeated password authentication.
Generate a New SSH Key
A new ED25519 SSH key is generated using the following command:
ssh-keygen -t ed25519 -f ~/.ssh/id_ed25519_gitlab_fab -C "fabacademy"

# -t ed25519 specifies a modern and secure key type
# -f defines a custom file name, allowing multiple SSH keys to coexist
# -C adds a comment for identification purposes
During this process, a passphrase can be set.

The passphrase encrypts the private key on the local machine. Even if the private key file were to be accessed by an unauthorized person, it could not be used without the passphrase. While optional, using a passphrase is strongly recommended for security reasons.
The private key never leaves the local computer. Only the public key is shared with GitLab.
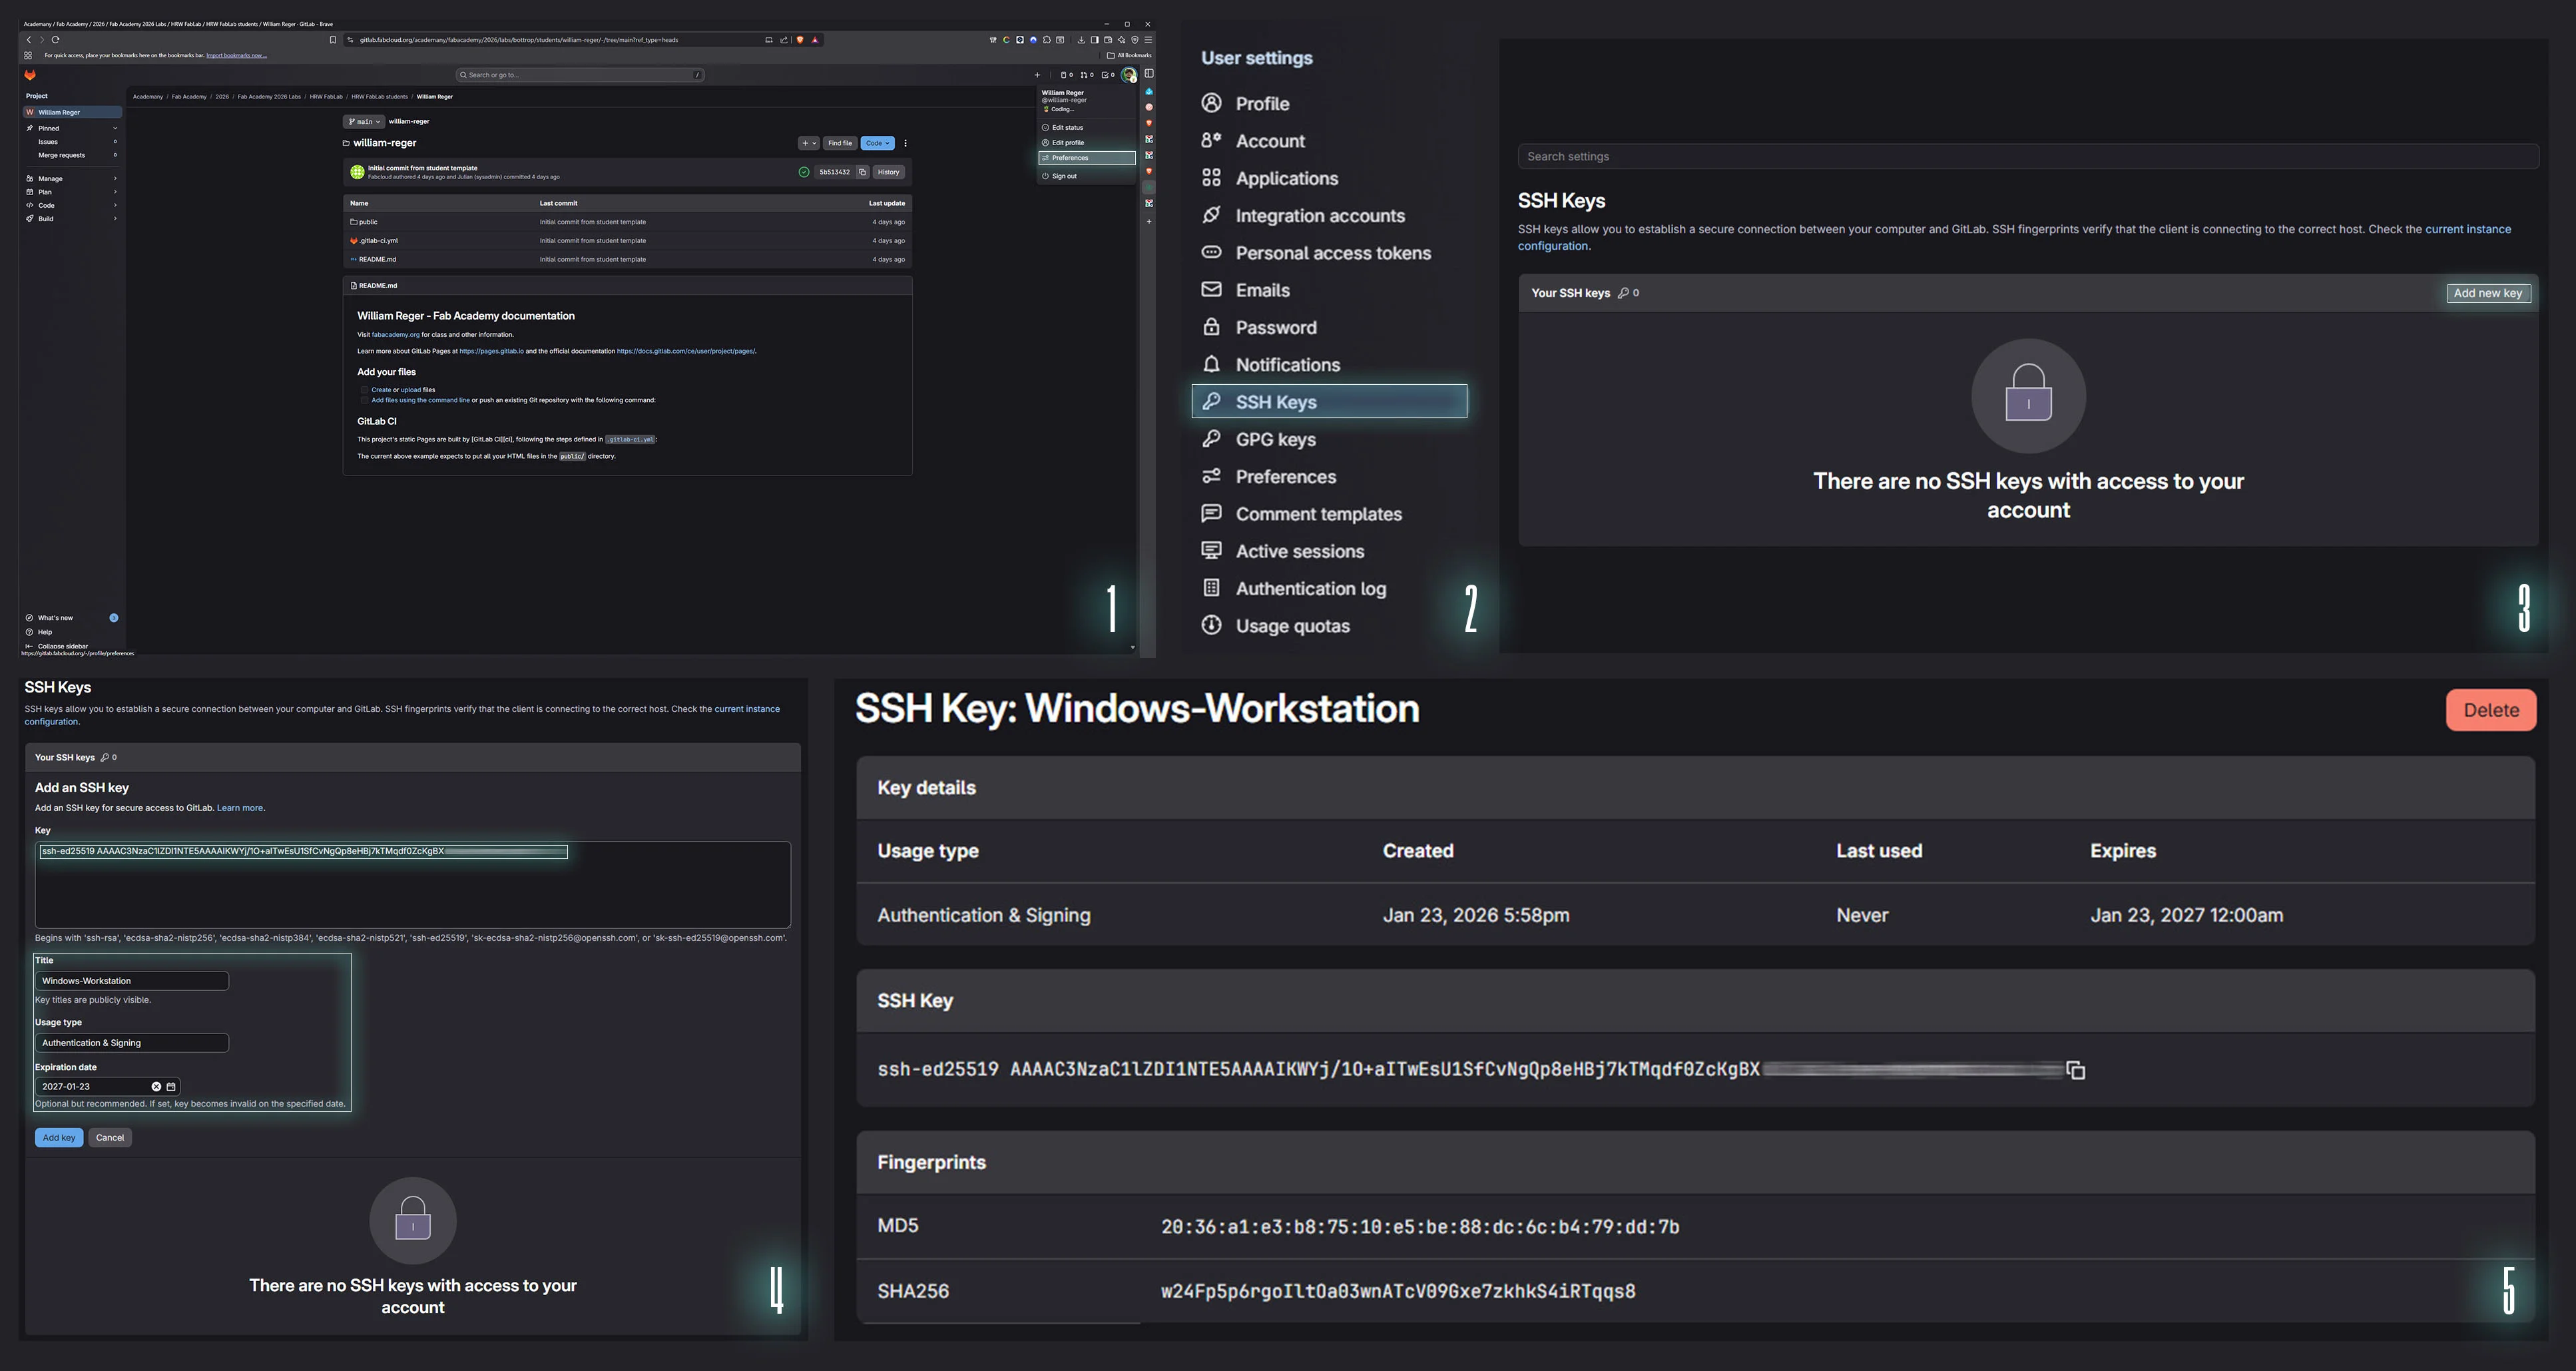
Display the Public Key
After creation, the public key can be displayed using:
cat ~/.ssh/id_ed25519_gitlab_fab.pub
This public key must be added to the GitLab account under SSH Keys.
Start SSH Agent and Add the Key
To avoid entering the passphrase for every connection, the SSH agent can be used:
eval "$(ssh-agent -s)"
ssh-add ~/.ssh/id_ed25519_gitlab_fab
The SSH agent temporarily stores the decrypted private key in memory for the current session.
Configure SSH for Multiple GitLab Accounts
When multiple SSH keys are used (for example, personal GitLab and Fab Academy GitLab), an SSH configuration file helps ensure the correct key is used for each host.
If you are not using multiple SSH keys and do not plan to, you can simply skip this step.
Create or edit the config file. You will most likely find your SSH keys under C:\Users\USERNAME\.ssh
When no file named config exists, you may create one. This file does not need a file extension; it's simply called config.
Example Config Setup
# GitLab University
 Host gitlab-uni
     HostName gitlab.com
     User git
     IdentityFile ~/.ssh/id_rsa_gitlab_uni
     IdentitiesOnly yes # ensures only the specified key is offered during authentication, avoids common authentication failures


# GitLab FabAcademy
 Host gitlab-fab
     HostName gitlab.fabcloud.org
     User git
     IdentityFile ~/.ssh/id_ed25519_gitlab_fab
     IdentitiesOnly yes
Fab Academy uses gitlab.fabcloud.org, not gitlab.com
Using the wrong domain will result in connection errors such as Could not resolve hostname.
It definitely caught me out for a while...
Test the SSH Connection
To verify that the SSH connection is correctly configured, the following command can be used:
ssh -T git@gitlab-fab
When connecting [to a GitLab server] via SSH for the first time, a message may appear asking to confirm the server’s host key fingerprint. This is a normal security mechanism of SSH. The fingerprint is a cryptographic identifier of the server. By verifying it, SSH ensures that the connection is being made to the correct server and not to an impostor.
During the first connection, SSH may display a message similar to:
The authenticity of host 'gitlab.fabcloud.org' can't be established.
ED25519 key fingerprint is SHA256:...
Are you sure you want to continue connecting (yes/no)?
Typing yes confirms the fingerprint and adds the host to the known hosts list.
Clone the Repository and Push Changes
Once SSH authentication is correctly configured, the remote repository can be accessed from the local machine.
Navigate to the Target Directory
Before cloning the repository, it is important to navigate to the directory where the local project folder should be created. Git will create a new folder for the repository inside the currently active directory. The current location in the file system can be checked with:
pwd # to check the current location in the file system
cd path/to/target/folder # to move into a specific directory (cd = change directory)
# for example cd Documents/FabAcademy
If you installed Git with standard settings you can also dive into your desired folder, right click and select Open Git Bash here.
Clone the Fab Academy Repository
To download the provided Fab Academy example repository to the local computer, first log in to GitLab.
After logging in to GitLab and opening the desired project repository, the clone address can be found at the top of the project page under the Code button. GitLab provides multiple clone options — for SSH-based authentication, the part Clone with SSH must be copied.
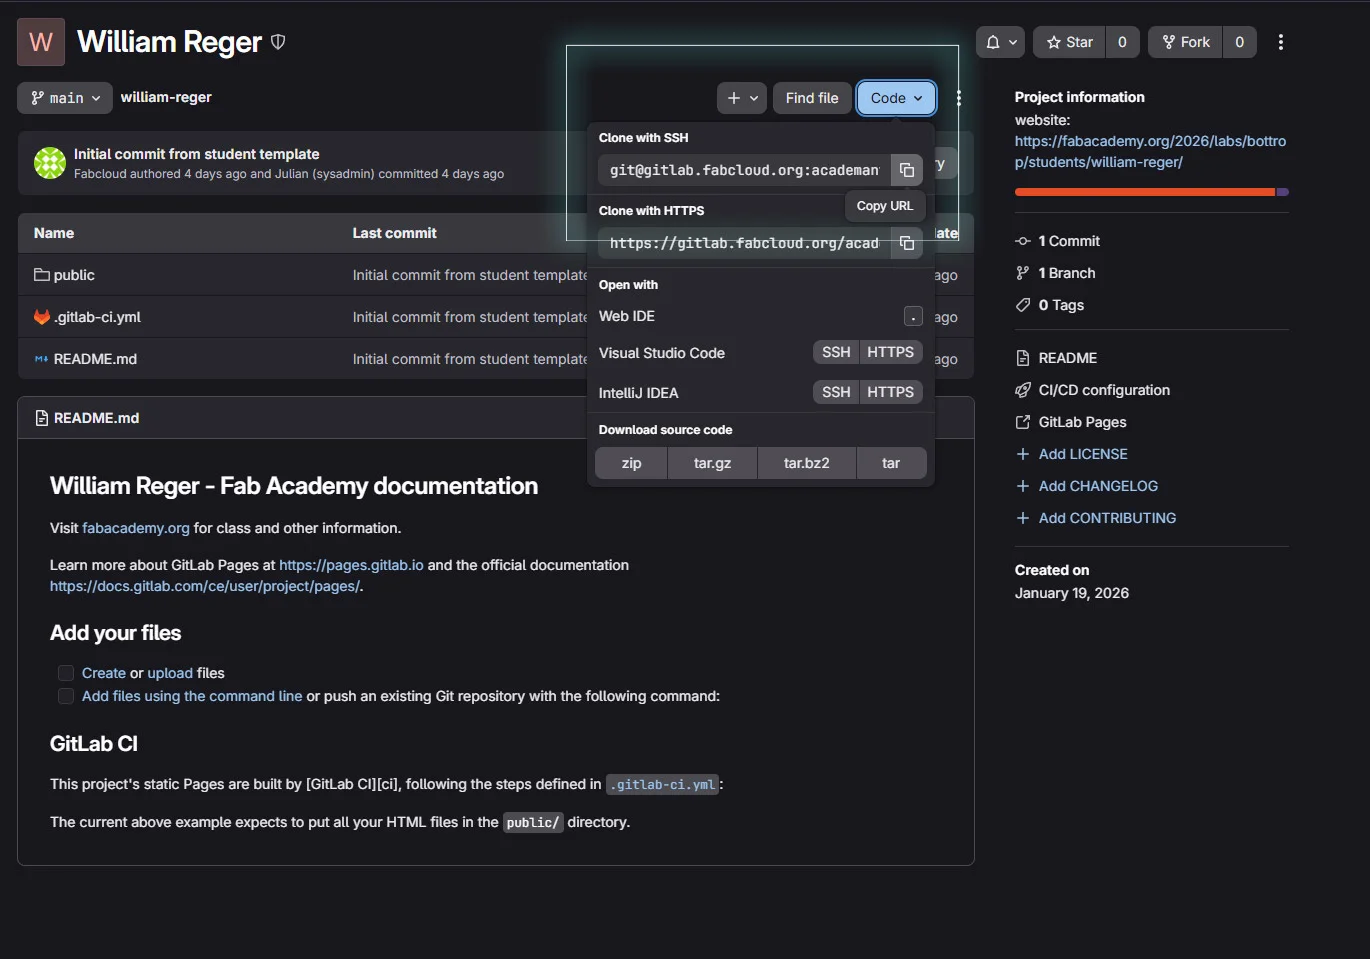
Finally you can enter the following to clone the repository to your local machine.
git clone git@gitlab-fab:academany/fabacademy/YEAR/labs/YOURLAB/students/STUDENT-NAME.git
# gitlab-fab refers to the name you set up in the config file above and might have to be changed from the copied part
Check Repository Status
Before making changes, the current state of the repository can be inspected:
git status
This command shows modified files, untracked files, and the current branch status.
Add, Commit, and Push Changes
After replacing the example website with custom documentation files, the changes are prepared and uploaded step by step.
git add .  # 1. Add all modified and new files to the staging area

git commit -m  "Documentation Update"  # 2. Create a commit [snapshot of the current state of the project] with a descriptive message

git push  # 3. Finally, upload the committed changes to the remote GitLab repository
Pushing the changes triggers the GitLab Pages pipeline defined in .gitlab-ci.yml, which automatically updates the publicly hosted documentation website.
Website Creation and File Structure
File Structure
My documentation website is built with HTML, CSS, and JavaScript. This setup keeps the site lightweight, easy to host on GitLab Pages, and simple to extend over time.
The project follows a top-level structure.
|
--/assets  globally used assets like CSS styles, icons, images and so on
|
--/projects  all projects, each separated in its own folder
     |
     /project-management  for example, week 1: project management
         |--/assets  assets only used for the specific project
         |
         |--index.html   the project-management website / HTML code
     |
     /final-project
         |--/assets
         |
         |--index.html
|
--index.html  home page / landing page
|
--about.html  about page
|
--projects.html  project list with links to individual projects
|
--404.html  404 error page
You can also view the project structure on GitLab
Shared resources are stored in a global /assets directory, which contains files used across the entire website, such as:
- CSS stylesheets
- JavaScript files
- Images
- SVG Icons
- Videos
- Other Media and Resources
The documentation content is organized in a dedicated /projects folder structure. Each week (or project) is stored in its own directory (e.g., /Week_Name_Folder) and contains:
- index.html file as the webpage for that week
- Its own /assets folder primarily for local media content (usually /img, /video, sometimes /glb)
This separation makes it easy to maintain consistent styling and behavior across all pages.
Additional local CSS or JavaScript is rarely necessary and is typically only used for special cases — mainly my final project, where more custom interactions or styling is required.
The structure is designed to stay readable and scalable over time as more weekly projects are added.
Because the site is plain HTML/CSS/JS, it can be opened and tested locally in a browser at any time, enabling an efficient step-by-step workflow: build locally, verify changes, then publish updates through Git.
Content Planning and Workflow
Since I wanted my documentation site to reflect exactly the way I envisioned it, I decided not to use any pre-made template. Instead, I aimed to build the entire design system from scratch. To achieve this, I first considered the type of content I would be adding in the future and defined a set of essential elements that the site would need:
- code blocks
- 3D viewers
- quotations
- material bills
- software and tool cards
- links
These elements were intended to function as reusable building blocks throughout the documentation, allowing me to minimize repetitive work while still maintaining full control over the visual design. Based on this list, I started by sketching the visual style I had in mind in Adobe Illustrator, and then translated those designs into simple HTML and CSS components.
I refined and iterated on these components until I was satisfied with the result. Once complete, these modules were reused across the site by copying them as standardized blocks, ensuring both visual consistency and a faster page creation workflow.
AI-Assisted Content Creation
Since building a completely custom HTML website is very time-consuming, especially when filling it with large amounts of content, I used Codex as additional support to populate the site efficiently and correctly. Codex can run on local files, read them, and modify them automatically.
As I copied my individual elements like code blocks or info blocks throughout the documentation pages, this often resulted in messy structures, non-indented HTML, incorrect alt texts, and various other issues that commonly occur when repeatedly copying and pasting components. To address these problems, I prompted the AI to scan my site and fix these errors.
"You are a web expert.
Run over [projects\principles-and-practices-project-management\index.html]
and fix the code to have correct code indents.
Also look for any missing anchors, wrong alts or dead links.
Make a report about your changes in the end.""You are a spellchecker.
Run over [projects\principles-and-practices-project-management\index.html]
and check for any grammar and spelling issues.
Change spelling errors and create a report on potential grammar issues.""Run over [projects\principles-and-practices-project-management\index.html]
and check for <i> tags.
Important elements like filetypes, software, concepts and steps should be marked.
Just mark the first occurrence.
Report the count of insertions in the end."Afterwards, I set up several AI agents, or skills depending on how you call it, to assist with these maintenance tasks. This lets you easily reuse the prompts shown above by simply activating the agent or skill, which then runs over the linked files.
Once the basic framework of the website was established, only the core content and rough layout had to be added manually. From that point, the AI-assisted workflow described above then handled code indentation, spelling and grammar checks, as well as the detection of broken or incorrect links, missing anchors, and other page errors.
This approach significantly sped up documentation while maintaining structure, readability, and code quality. Without it, a custom-made website would have led to a massive amount of manual fixing, leaving less time to focus on the weekly projects.
Despite the original idea and its benefits, the documentation still takes up a considerable amount of time, approximately 8-12 hours per week. Additionally, letting AI work on your HTML/CSS can also introduce new issues: sometimes it does not recognize the correct style and inserts a new one, or modifies styles slightly when it should not. It is more convenient, and it works faster, but the resulting code quality is not as clean as I initially hoped. It works and saves time, but it is definitely not the cleanest solution, and certainly not ideal for manual maintenance.