
Software & Tools
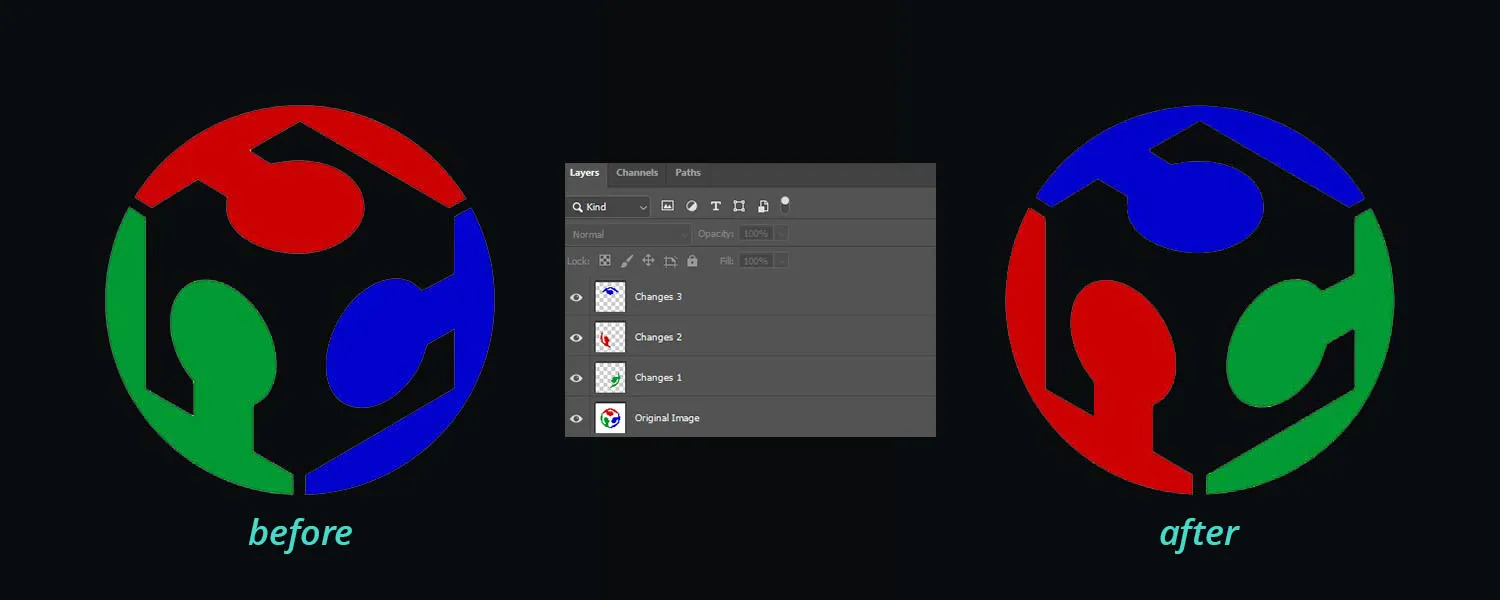
Adobe Photoshop
Image Editing, Compositing, Digital Painting
Version 27.2
Adobe Creative Cloud Subscription


Adobe Illustrator
Vector Illustration, Layout, Typography
Version 30.1
Adobe Creative Cloud Subscription
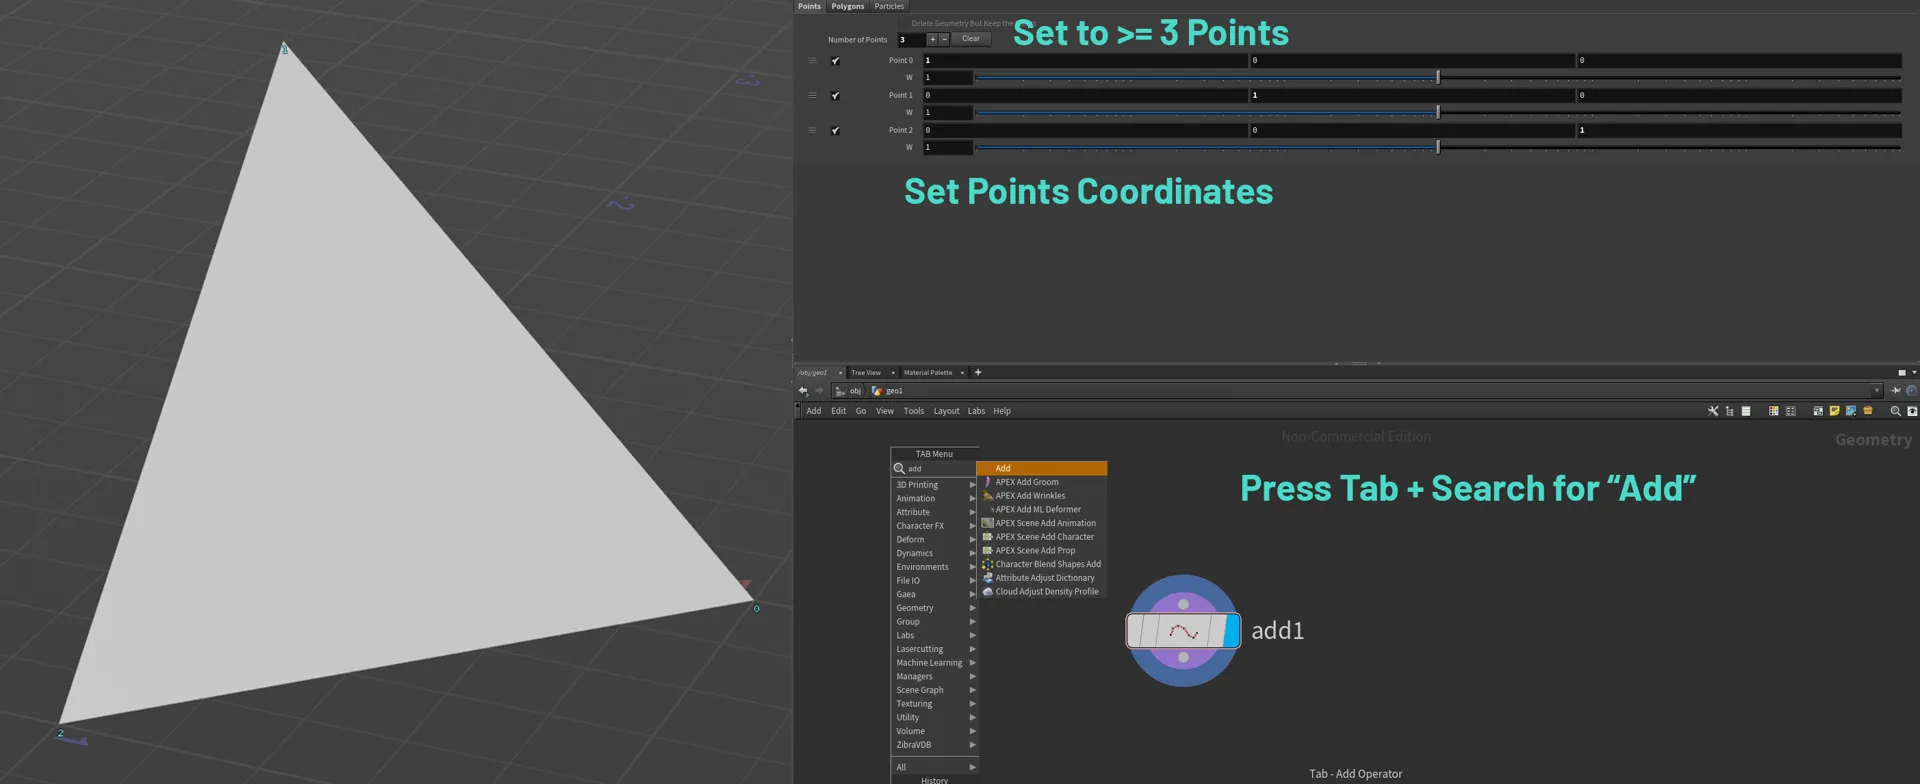
Houdini
Procedural Modeling, Simulation, Rendering
Build 21.0.440
Houdini Apprentice

Fusion360
Parametric CAD, CAM, Simulation
Build 2606.1.22
Fusion Education
SolidWorks
Mechanical Design, Assemblies, Drawings
Version 2026 SP0.0
SolidWorks for Makers
FFmpeg
Encoding, Transcoding, Video Utilities
Version 8.0.1
GNU General Public License Version 3
Raster Graphics
Photoshop, Affinity Photo, GIMP, Paint
At its core, every digital image displayed on screens is made up of pixels—individual cells, each assigned a specific color. For example, a typical 16:9 Full HD monitor displays 1920 of these "boxes" (pixels) horizontally and 1080 vertically. Images captured by digital cameras or smartphones also convert the real world into pixels, with light and surroundings being mapped onto a grid of fixed points by the camera's sensor.
Programs like Photoshop allow you to control the color of each pixel precisely, and these images can later be modified or adjusted as needed. These tools offer a broad range of functions, from color adjustments to replacing elements and even advanced AI interactions that select and alter specific parts of an image.
Most raster programs work with layers, meaning a photo can be placed underneath and edited without altering the original image itself. This enables later adjustments to be made without losing the integrity of the underlying image. For this reason, it's recommended to work with layers from the outset, ensuring that the final image creation process remains non-destructive.
One major limitation of raster graphics is that their resolution is fixed. For example, taking a Full HD (2K) 1920x1080 image and rendering it in 4K (3840x2160) does not simply work as a scale-up. While there are tools designed to upscale images, much of the original information is lost in the process, resulting in a less detailed version. Additionally, AI upscaling methods have emerged, but as with AI-generated content, the results can never be guaranteed to be exactly the same and may lead to changes in the output.
Therefore, when creating raster graphics, it's crucial to define the final resolution early in the process, understanding that it will remain fixed. Using too low a resolution for web or print applications can result in pixelated images, which are often caused by selecting an inappropriate resolution. Conversely, reducing resolution will typically work better, but details are inevitably lost due to fewer pixels being available to represent the same level of detail.
Despite these limitations, raster graphics are essential and should not be seen as a simpler file format compared to vector graphics. Complex images (such as photographs) can only be represented as pixel graphics. For quick modifications to existing images, or for conceptualizing complex final visuals, the programs listed above (each with its own set of features) are perfect for the task.
Personally, I predominantly use Photoshop because I find its extensive functionality and workflow style (partly due to familiarity) to be the most suitable. There's no feature I feel is missing from my daily use, making it my go-to program. However, I’ve also worked with Affinity Photo and GIMP, which both offer a wide array of features. While Photoshop is available only via subscription, Affinity Photo is a one-time purchase, and GIMP is free and open source.


Vector Graphics
Illustrator, Affinity Designer, Inkscape
Vector graphics are also images, but unlike raster images, they are not made up of individual pixels. Instead, they are mathematically defined. Imagine a coordinate system where lines are drawn. These lines have a starting and ending point, giving them a precise position. Multiple lines can then form an area, like a 2D polygon.
This area can be filled with colors, or alternatively, the lines themselves can be colored and given thickness. Essentially, a vector file consists of numerous lines, or "vectors," that describe an image.
The main advantage here is that the points are clearly defined, making vector graphics ideal for machines (such as laser cutters), as they provide a specific mathematical path. It's also worth mentioning that raster images can be converted into vector files using tools like "Image Trace" or "Live Trace." This process typically relies on contrast, so the results can vary depending on the image, sometimes producing better results or, conversely, worse ones depending on the settings. Logos in black and white are relatively easy to convert, while colorful images are often problematic. Additionally, the shapes created in this way often have more points than necessary, as individual pixels tend to make the image appear more angular than it really is. So while this conversion can serve as a backup or an option, it's usually not a reliable workflow.
In addition, unlike raster images, vector files usually require less storage space, as they only need to store a few points, rather than a value for each individual pixel (for example, 2,073,600 values for a Full HD image). However, vector images do have their limits. A real image cannot simply be converted into a vector file. Due to the large number of colors and details, it would require too many points, making vector graphics inefficient and impractical. Furthermore, vector programs are not designed to handle such complexity, and the file size would become too large to work with effectively.
Therefore, the optimal use of vector graphics is for logos, graphics, or detailed illustrations, where the simplicity and precision of vectors shine.
The software programs mentioned above allow for the creation of such shapes—don't worry, you don't need mathematical knowledge for this. Each software has its own set of tools, but overall, they provide the same functionality. You can draw lines and shapes, combine or split them, and fill them with color. Personally, I mostly use Adobe Illustrator, as I appreciate its functionality, the seamless integration with other Adobe programs, and I don’t feel like anything is missing in my daily work. The only occasional issue I encounter is with exporting measurements in millimeters, which can lead to some problems. That said, I’ve also worked with the other two programs, and after some adjustment or getting used to their interface, I haven’t found any dealbreakers.
CAD Modeling
Houdini, Cinema4D, Blender, 3Ds Max, Fusion360, SolidWorks
The fundamental goal of 3D modeling is to create objects in three-dimensional space. These objects can be used for visualization, planning, or actual production.
Typically, this is done by placing points—similar to vector graphics—and connecting them with lines. A minimum of three points and three lines form a triangle, which is known as a "polygon." However, these points are not limited to just the X and Y axes but also extend along the Z axis. By connecting three of these triangles, we can create a simple 3D object. With the help of various tools, we can modify the faces (polygons) of meshes (3D objects) and create more complex shapes.
Much like with vector graphics, 3D models can be combined through union, intersection, and subtraction techniques. Once the object is digitally constructed, it can be exported in formats such as STL for 3D printing or as a rendered graphic. In the rendering process, a virtual camera is set up to simulate real-world lighting conditions. The more advanced the rendering engine, the more physically accurate the result will generally be. In this sense, digital rendering and photography share many similarities.
3D software is arguably the most versatile among the three types discussed. The range of functions and applications in 3D software spans various industries, including film & television, gaming, architecture, design, and manufacturing. Accordingly, different software solutions excel in different areas.
The list of 3D software is long, and as much as I would have loved to test every program over the course of the week, time was limited. However, I can share this:
Animation: Cinema4D / Maya
Architecture & Visualization: 3Ds Max
Design & Manufacturing: Fusion360, Rhino, SolidWorks, and others
Modeling: Blender
And what if you need everything ? My personal opinion: Houdini.
I’ve worked with all of the programs mentioned above at least briefly, and each has its own strengths, weaknesses, and unique features. However, no other software is as flexible as Houdini.
Non-destructive workflows? Yes.
Powerful rendering? Yes.
Flexible modeling? Yes.
Missing features? I can code or set them up myself.
So Houdini will be my tool of choice to fall back on when time runs out. That said, Houdini doesn’t do everything that other, more manufacturing-focused software can do. Therefore, I’ll continue to explore Fusion360 and SolidWorks during the Fab Academy and will add my experiences to this section at the end.

Compressing Videos & Images
So far, I’ve focused on keeping images and videos as small as possible while balancing file size and quality. Here’s how I approached it:
Images
For images, I’ve primarily used JPG whenever possible, avoiding PNGs except when alpha transparency was needed. I made sure to shrink images down as much as I could, even sacrificing some resolution and quality to maintain smaller file sizes. When exporting, I typically aimed for a quality level between 6-7 on a 0-10 scale (0 being poor quality and 10 being lossless). For resizing, I used Windows PowerToys Image Resizer, which provided a quick way to reduce image dimensions without compromising too much on clarity.
Videos
For videos, I also reduced the frame rate to as low as 15 FPS, aiming for a quality rating of 6-7, while removing audio and chapters entirely. I used the H.264 codec for encoding. Despite these optimizations, the file sizes remained large, and the quality still didn’t meet my expectations. I’ve been using HandBrake for video compression, but unfortunately, I couldn’t get much more reduction in file size or quality improvement.
New Findings and Improved Workflow
After researching further for this week, I found that WebP is an excellent solution for images, and FFmpeg is a powerful tool for video compression. I installed FFmpeg via winget, using the following command:
winget install ffmpeg
Since then, I’ve (re)created some of my images and videos in higher resolutions, then converted the images to WebP format with a quality setting of 0.8. This has significantly reduced the file sizes—sometimes more than four times smaller, or in some cases, even half the size of previous files. For videos, I’ve also used FFmpeg to compress them further, and although they are still in MP4 format with the H.264 codec, I’ve managed to reduce their sizes by more than 10 times compared to earlier versions, without really feeling the loss of much quality.
Another great thing about FFmpeg is its ability to handle batch processing via command line. This makes it incredibly efficient for compressing large numbers of files at once. FFmpeg also supports a wide range of codecs and file types, allowing you to format both videos and images. This flexibility makes the workflow much easier and more streamlined.
FFmpeg – For Image Compression and Conversion
ffmpeg -i "input.jpg" -c:v libwebp -q:v 85 "output.webp"
Parameter Explanation:
-i "input.jpg" Specifies the input file to be converted (in this case, a JPEG image).
-c:v libwebp Sets the video codec to libwebp, which tells FFmpeg to use the WebP format for the output image. This codec is used for encoding images into WebP format, which supports both lossy and lossless compression.
-q:v 85 Controls the quality of the output WebP image. This value is between 0 and 100:
0 – worst quality, maximum compression.
100 – best quality, minimal compression (largest file size).
85 – is typically a good balance between quality and file size, providing high-quality images with significantly smaller file sizes compared to formats like JPEG.
Optional Parameters:
-lossless 1 If you want a lossless WebP conversion (no quality loss), you can add this option.
-vf "scale=width:height" If you need to resize the image during the conversion, you can specify the new dimensions. Fill -1 to keep the aspect ratio.
FFmpeg – A Powerful Tool for Video Compression
ffmpeg -i input.mp4 -c:v libx264 -preset veryfast -crf 23 -tune fastdecode -c:a aac -b:a 128k -movflags +faststart output.mp4
Parameter Explanation:
-i input.mp4 Specifies the input file to be compressed.
-c:v libx264 Sets the video codec to H.264 (libx264), ideal for web videos.
-preset veryfast: Optimizes encoding speed. Other options:
ultrafast – quickest encoding, but larger file size.
fast, medium, slow, veryslow – slower encoding but better compression and smaller file size.
-crf 23 Sets the CRF (Constant Rate Factor) for quality. Common values:
18 – almost lossless. 23 – default, good balance. 28 – smaller file, good for web applications.
-tune fastdecode Optimizes video for faster decoding in browsers and devices.
-c:a aac Sets the audio codec to AAC, a standard codec for web videos and streaming.
-b:a 128k Sets audio bitrate to 128 kbps. For better audio quality
192k or 256k – increases audio quality at the cost of file size.
-movflags +faststart Moves the video header to the beginning for faster web playback (important for streaming).
Many parameters for images also work for videos, and vice versa. For more information, you can find the FFmpeg Documentation with all the parameters here.
Future Workflow & Key Benefits of WebP and FFmpeg
Moving forward, I'll use WebP and FFmpeg to handle all image and video content for my documentation, as they provide significant file size reduction with minimal loss of quality. WebP supports transparency, making it a powerful alternative to PNG, especially for images with transparent backgrounds. It can also handle animated images like GIFs but with much smaller file sizes. Plus, it's easy to embed WebP animations directly in an <img> tag in HTML, eliminating the need for an external player.

