

Software & Tools
Houdini
Procedural Modeling, Simulation, Rendering
Build 21.0.440
Free Non-Commercial License (Apprentice)


Bambu Studio
Slicer workflow for print profiles, supports, and machine-ready G-code generation.
Desktop Slicer
Open Source (AGPL)
NFC Tools
App for reading, writing, and managing NFC tag records across mobile and desktop platforms.
Version 2.35
WAKDEV EULA (licensed, not sold) • Free + optional Pro

Polycam
3D scanning app for LiDAR capture, photogrammetry, and quick mesh generation from mobile devices.
iOS Version 5.2.6 (App Store)
Proprietary • Free + In-App Purchases (Freemium)
Gallery
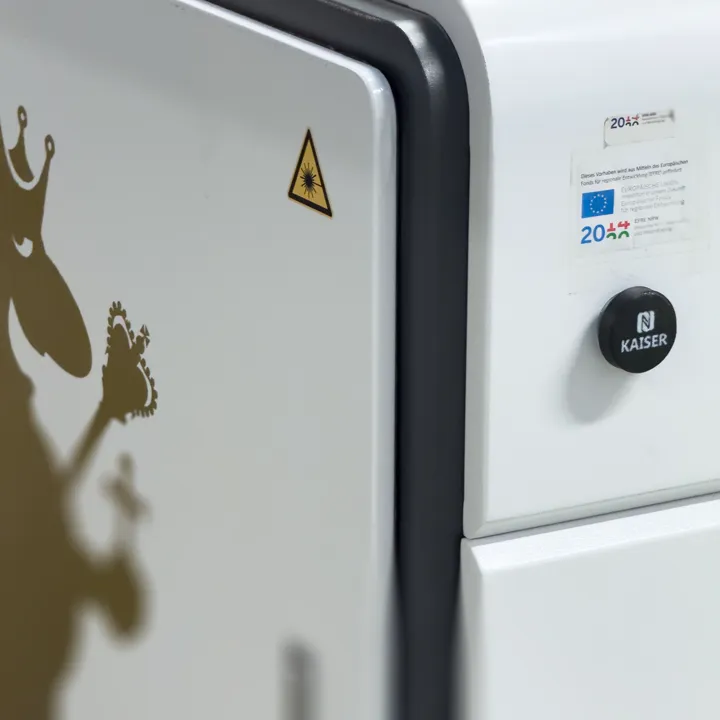
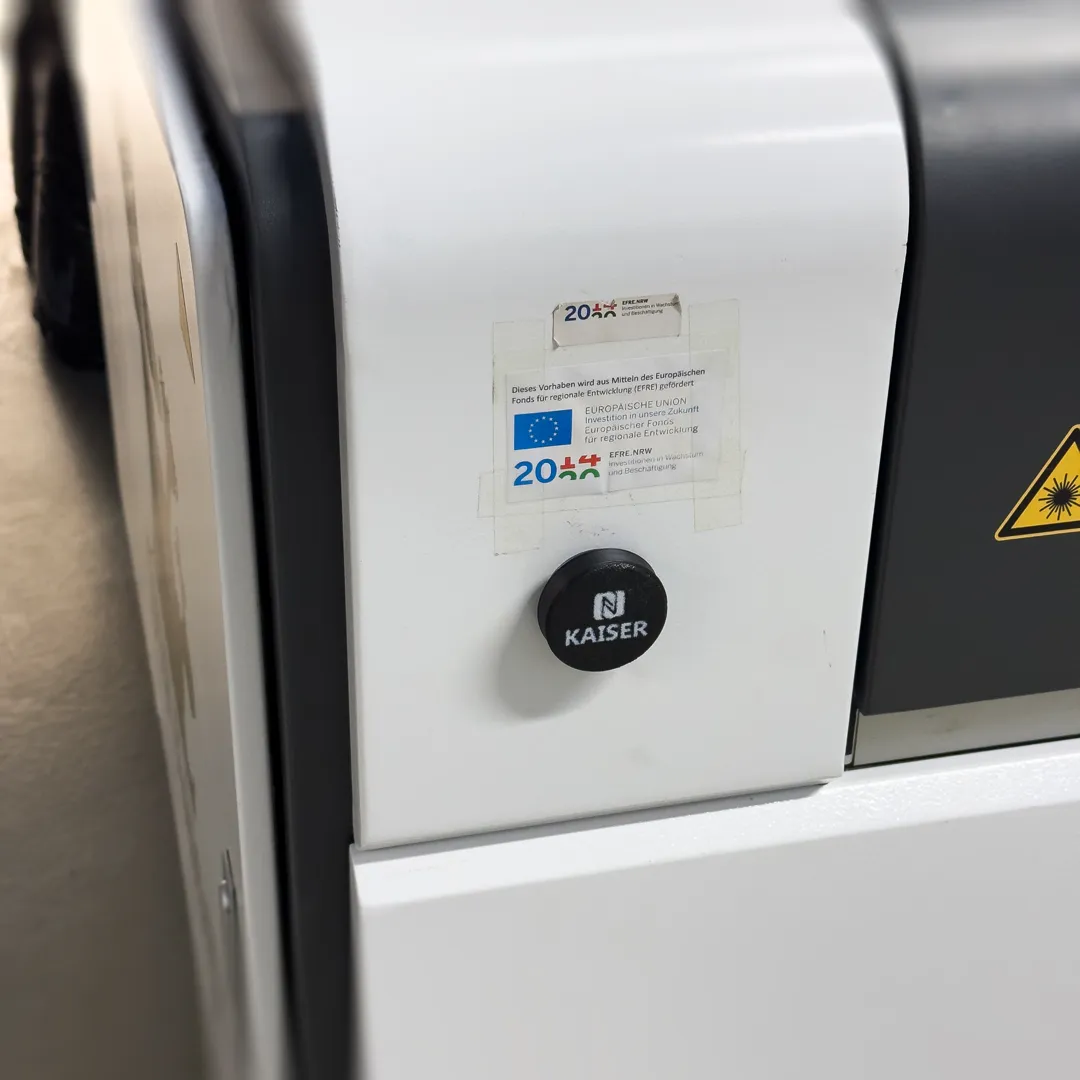
Printed NFC Tag on the Kaiser Laser Cutter
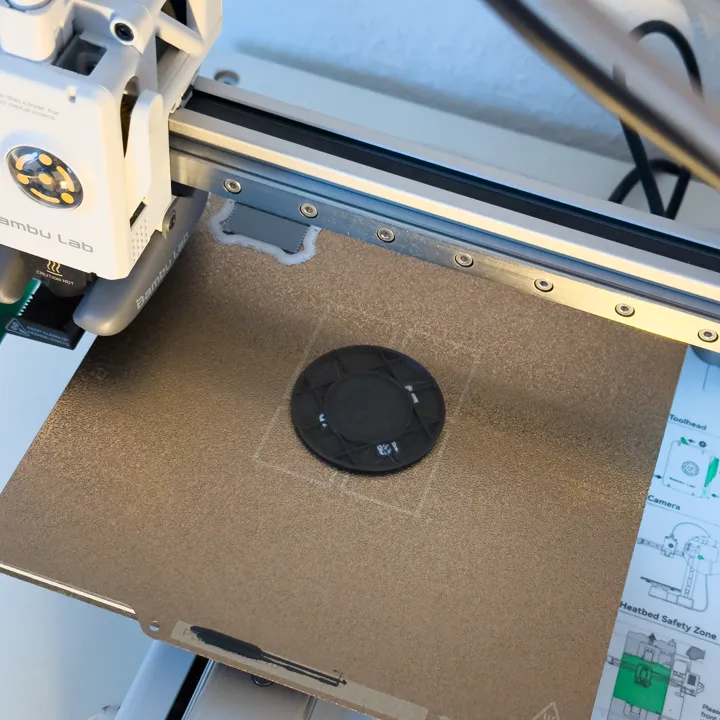
3D Printing on Bambu Lab A1 Mini
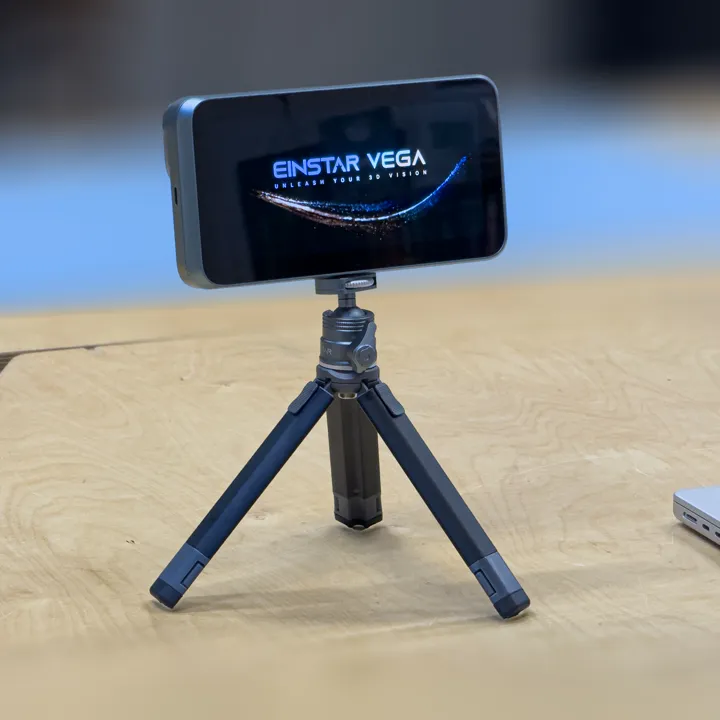
3D Scanner

Suction Cups and NFC Tags for Embedding
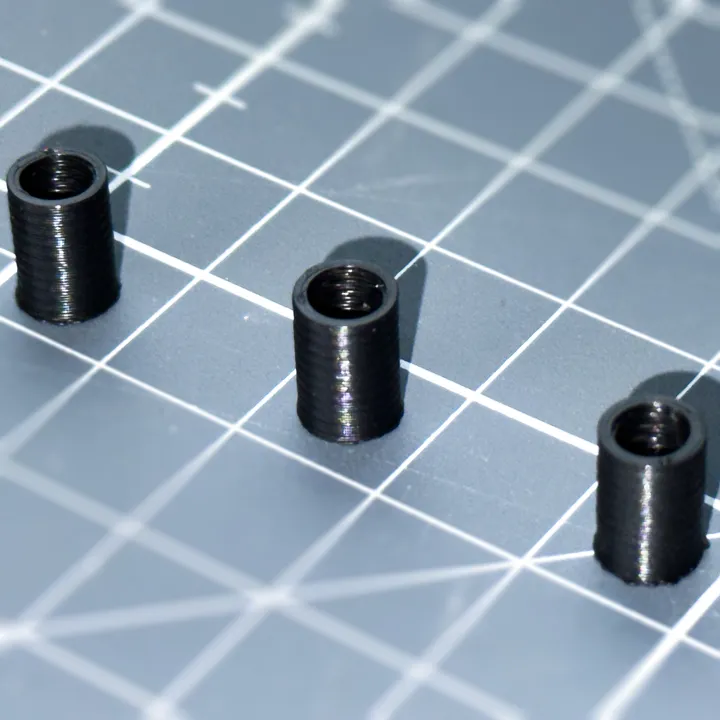
Thread Diameter Test
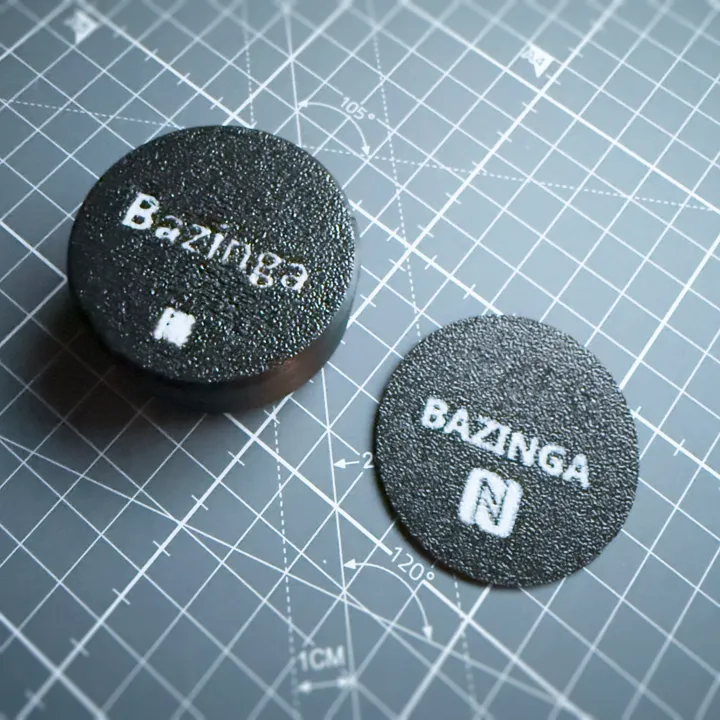
3D Printed NFC Tag for Machines
Idea
For this project, I decided to design an NFC tag that can be easily attached to machines and linked to a folder containing all relevant tests, manuals, and machine-specific information.
Initially, I considered using a magnet to attach the tag to the machines. However, since some of the machines are made of plastic, I developed an alternative solution using a suction cup to secure the NFC tag. This method allows the tag to be easily removed while remaining securely in place.
To help identify the machines and their corresponding NFC tags, I also included the machine’s name and the NFC icon, so it is clear how to interact with the device.
File Creation
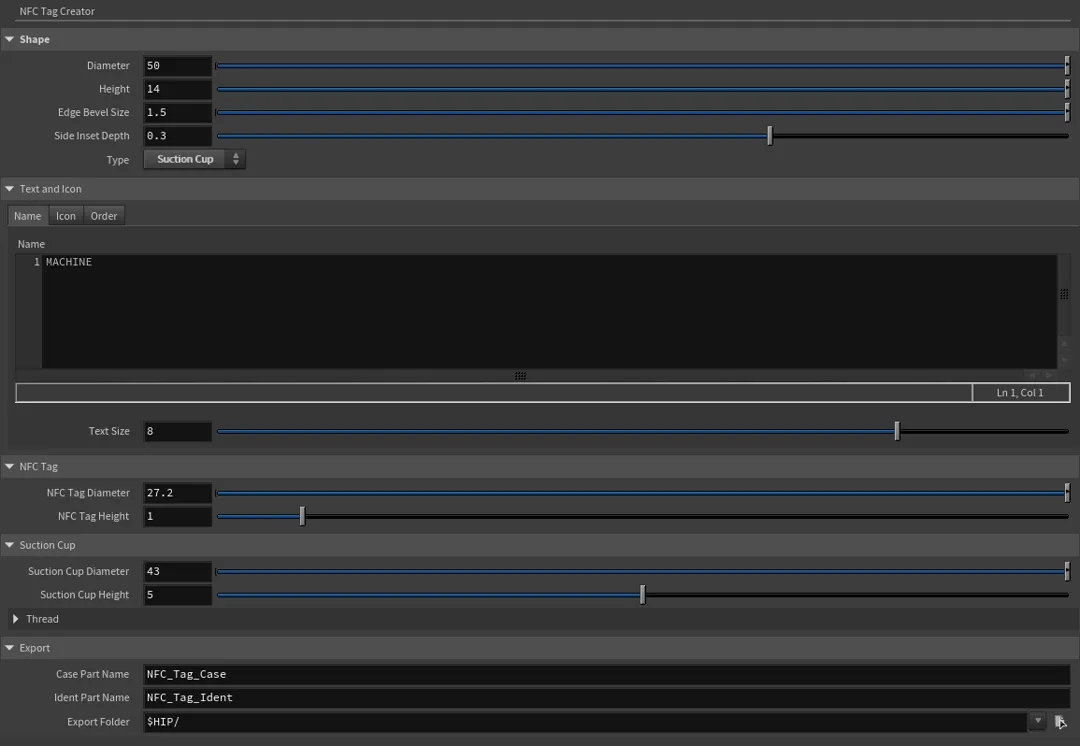
The idea was modeled in Houdini, where I created a customizable preset. This allows you to adjust parameters such as the size, suction cup, thread, name, name position, and NFC tag diameter.
I also created a version with magnets instead of suction cups, which is still useful for attaching the tags to rough metal cases where suction cups might not work effectively.
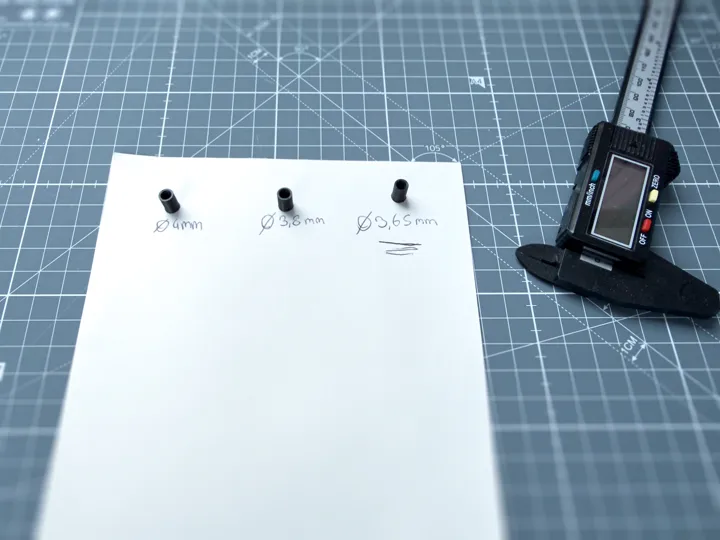
Before starting the final print, I made sure that the thread fit the suction cup screw by creating three versions and gradually adjusting the diameter until I got the perfect fit. With the third version, the thread worked well, and I used it for the final print.
Printing
Prepare for Printing (Slicing Software)
The file is exported from Houdini as an STL and loaded into Bambu Studio, a slicing software. The software calculates the optimal path for the 3D printer and determines when to use which filament.
Multi Part Support
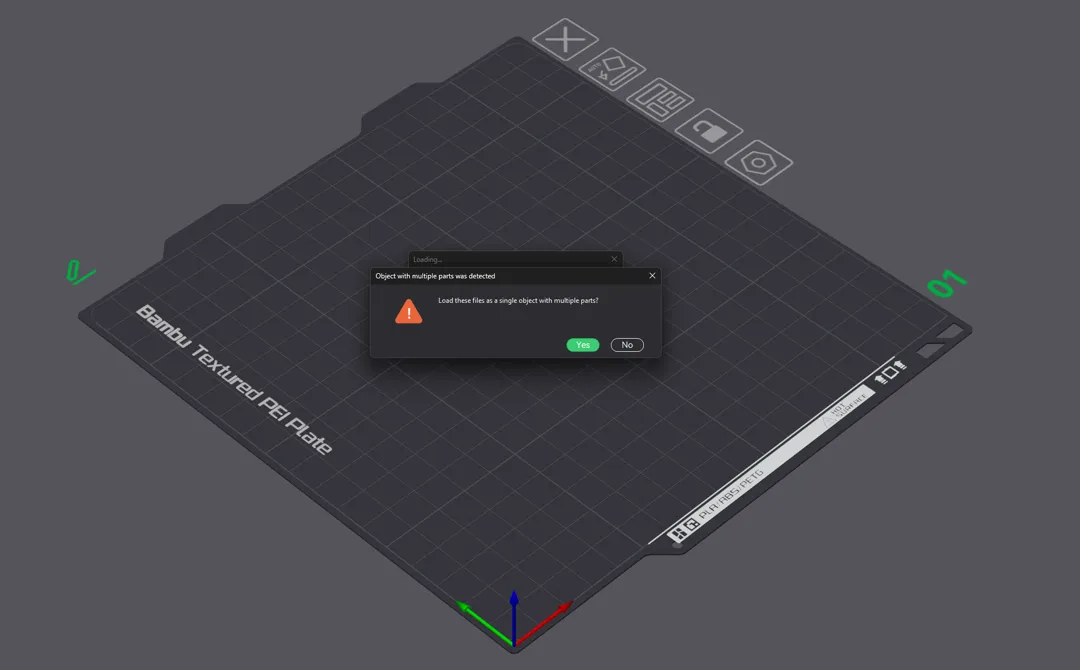
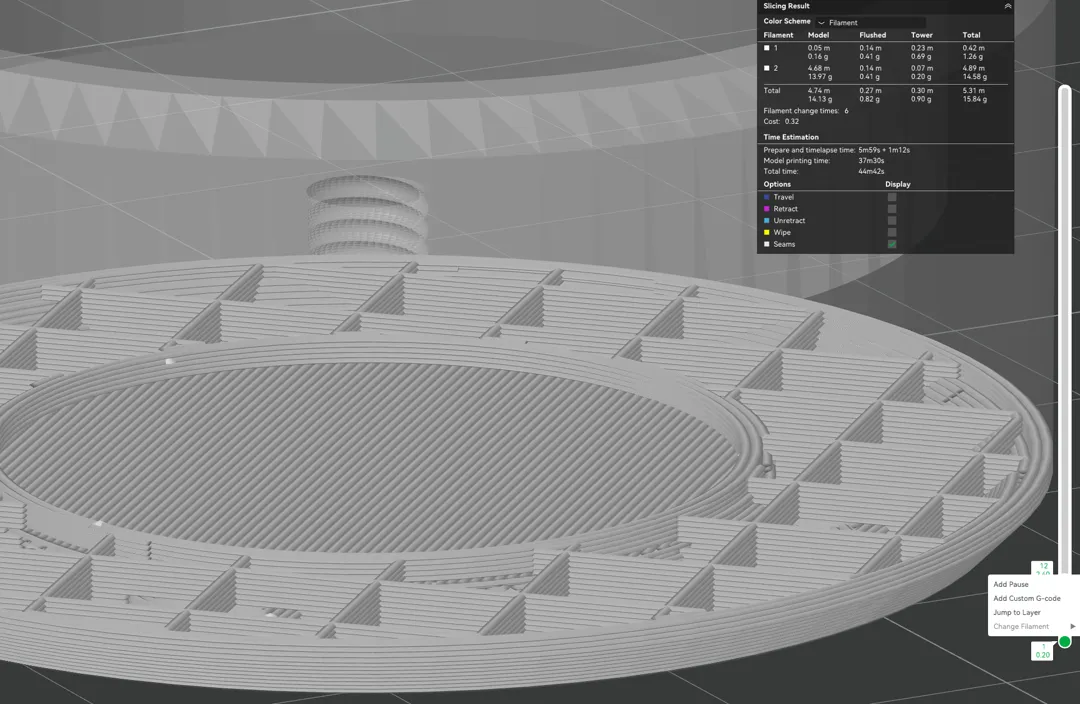
To differentiate the name and icon from the rest of the object, I used a different filament color for these elements. For this to work, Houdini automatically exports two parts:
NFC_Tag_Case.stlNFC_Tag_Ident.stl
Once both parts are loaded into the slicer, it will ask whether to load them as a single object. You can confirm this choice.
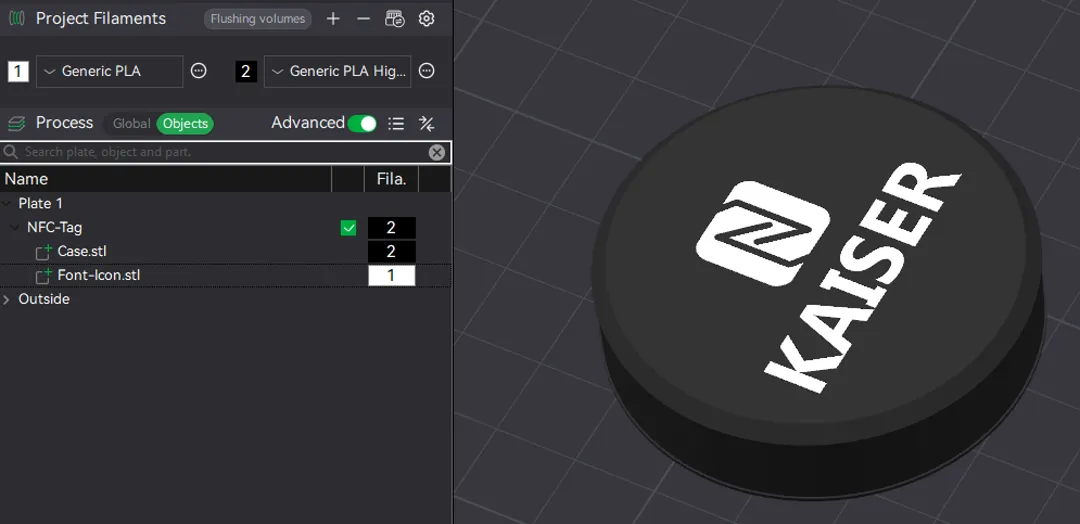
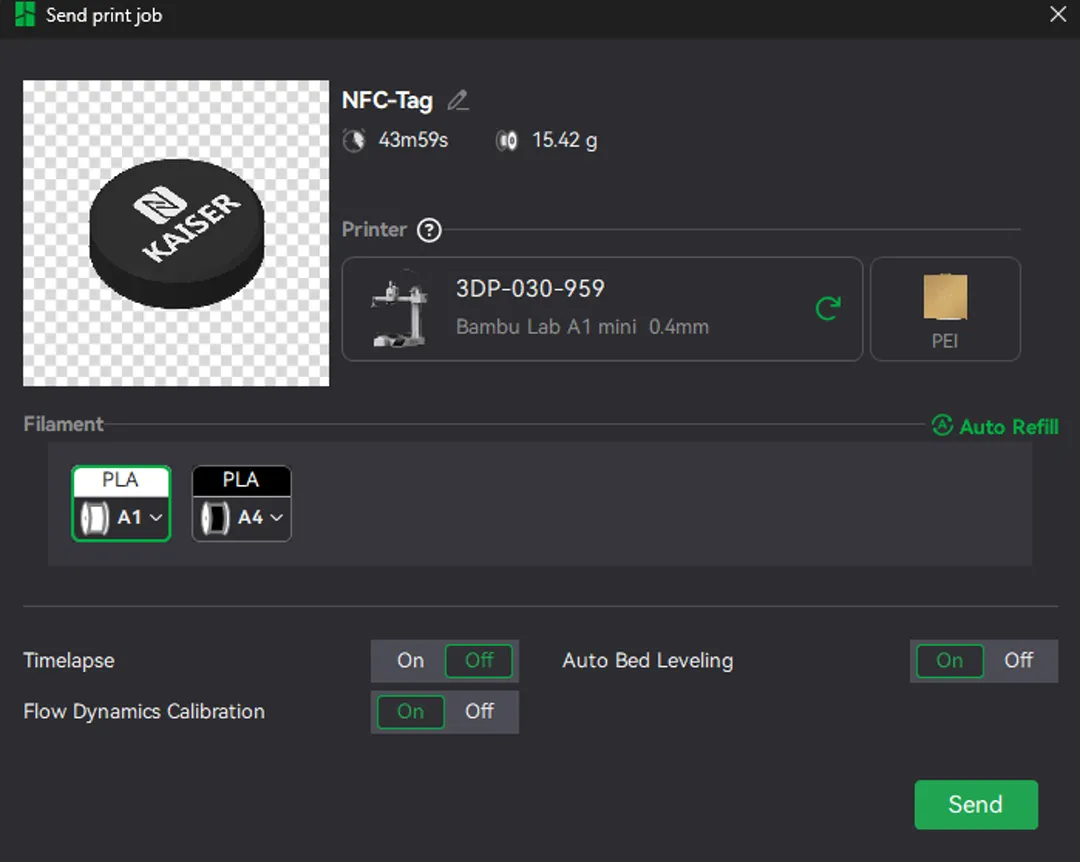
In the slicer’s properties, you can choose which filament to use. This only works if the printer supports multiple filaments. In this case, the BambuLab A1 Mini with AMS, which allows for up to four different filaments, was used.
Embed Objects into Printing Process
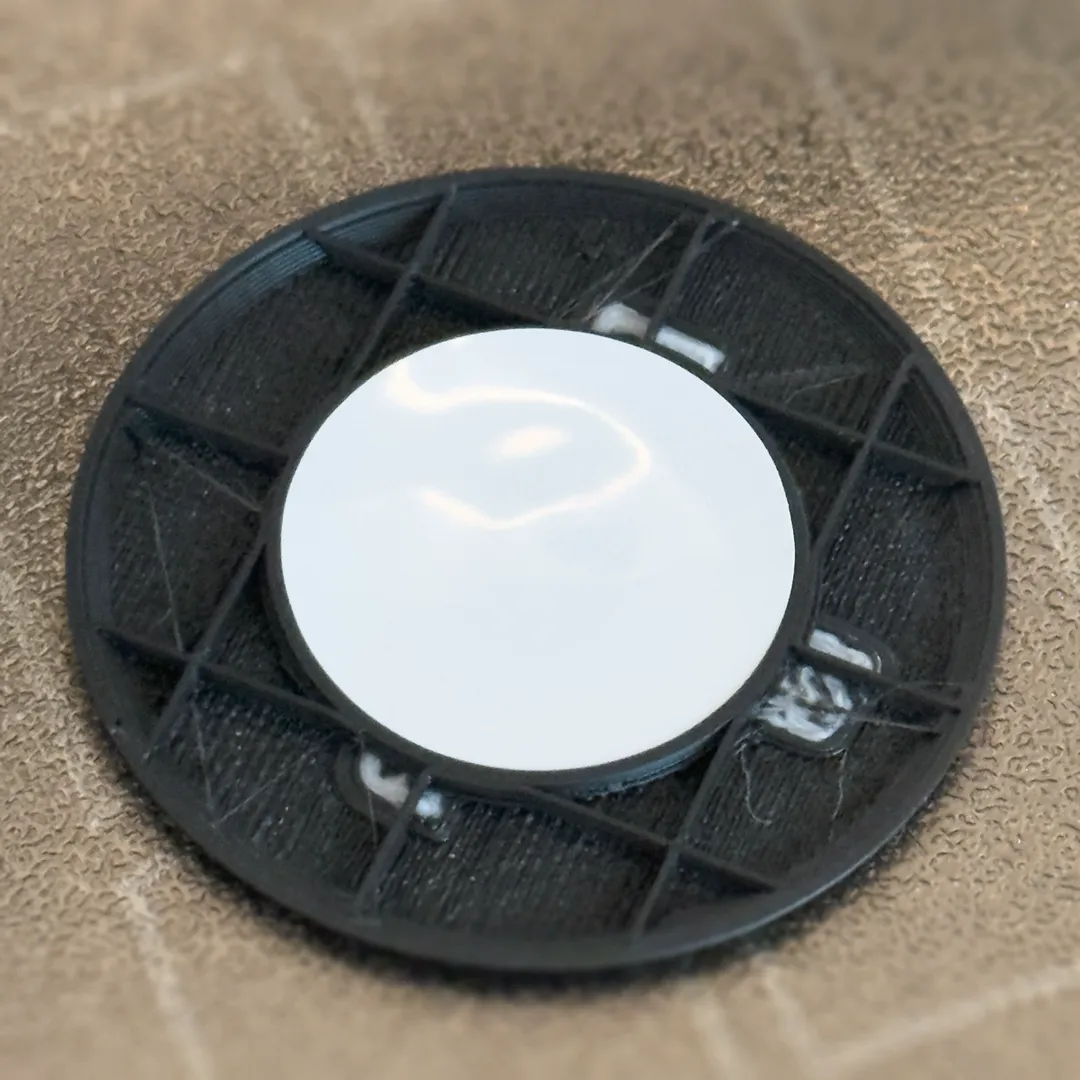
To embed the NFC tag, the print is paused once the casing around the tag is finished. You can then place or glue the NFC tag into the case and resume printing by pressing Continue in the slicer software or directly on the printer.
To add the pause, slice your object, then go to the right side where each layer is displayed, right-click, and select Add Pause.
Final Printing Result
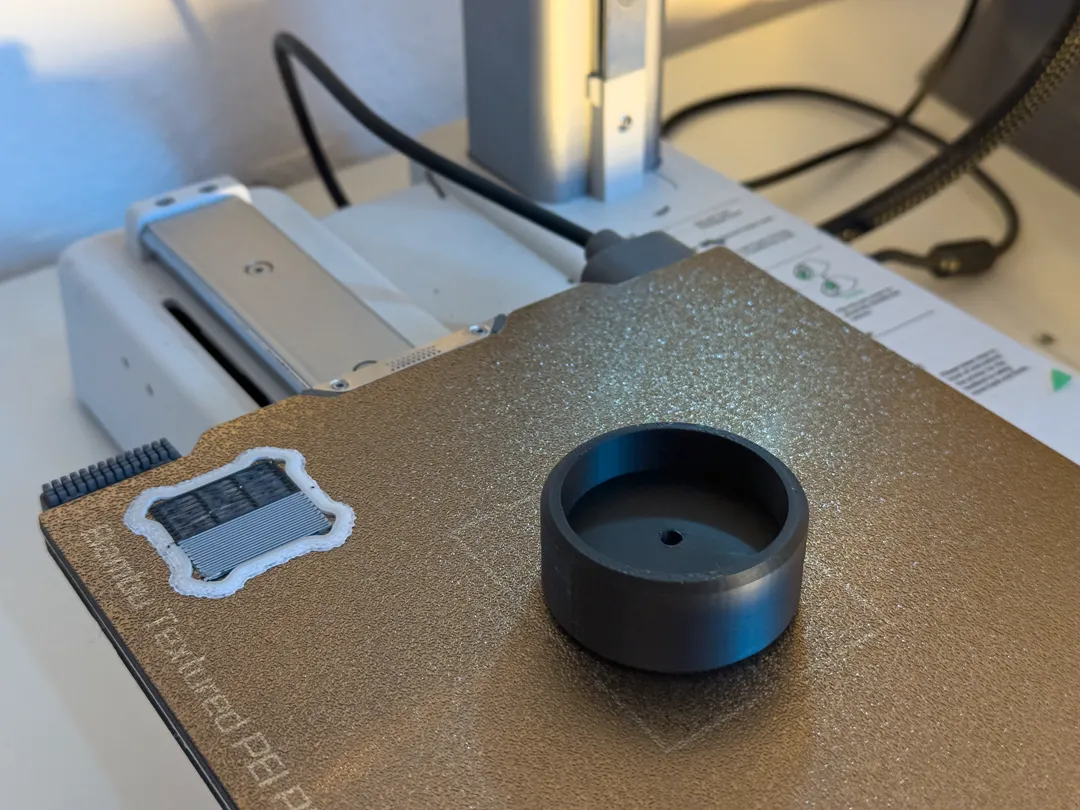
Once the print is complete, the object should be allowed to cool to avoid warping, then carefully removed from the print bed.

For better readability and clearer visual guidance, you may want to use a flat printing surface such as the Cold Plate. As shown here, I also updated my design by increasing the text thickness, because the previous version was not easy to read.
Read and Write NFC Tags
Finally, the suction cup is screwed into place, and the NFC tag is ready to be written to.
To write to the NFC tag, I recommend using a smartphone app, as smartphones come with built-in NFC writers, so no additional hardware is needed. In this case, I used the iOS app NFC Tools, which is also available for Android.
First, select Write and then click Add a record. Here you have many options for what you can write onto your NFC tag. For this case, select URL / URI and enter your shared folder URL.
Click the checkbox in the top-right corner and the tag is ready to be written. Now select the Write / n Bytes button and you will be asked to scan your NFC tag.
Keep your device stable and close to the tag while it is writing. When everything works as intended, you should get a popup notification to open the webpage or the interaction you added.
Instead of selecting https://, you can also enter a Custom URL / URI, which allows you to change the prefix of your URL. This can be useful if you want the link to open in a dedicated app, for example Microsoft Teams using something like msteams://yoururl.com/link. For Microsoft SharePoint URLs, this can still lead to issues because MS Teams may not handle these links reliably.
3D Scanning
3D Scanning Test: Polycam vs Einstar Vega
For this test, I decided to scan a small part that had come off a partition wall and is now missing. It would be extremely practical to simply 3D print this part and replace the missing piece. The part is approximately 5 cm x 1 cm x 1.5 cm in size, which made it quite a challenge.
I compared two different methods of 3D scanning: first, a method I am familiar with using Polycam, which generates a 3D model through photos with some lidar support and is available as a mobile app. On the other hand, I wanted to test a dedicated 3D scanner with specialized hardware for this purpose. For this, I used the Vega 3D Scanner by Einstar, an all-in-one wireless 3D scanner. This scanner uses multiple sensors and has a Working Distance of 100-1500 mm.
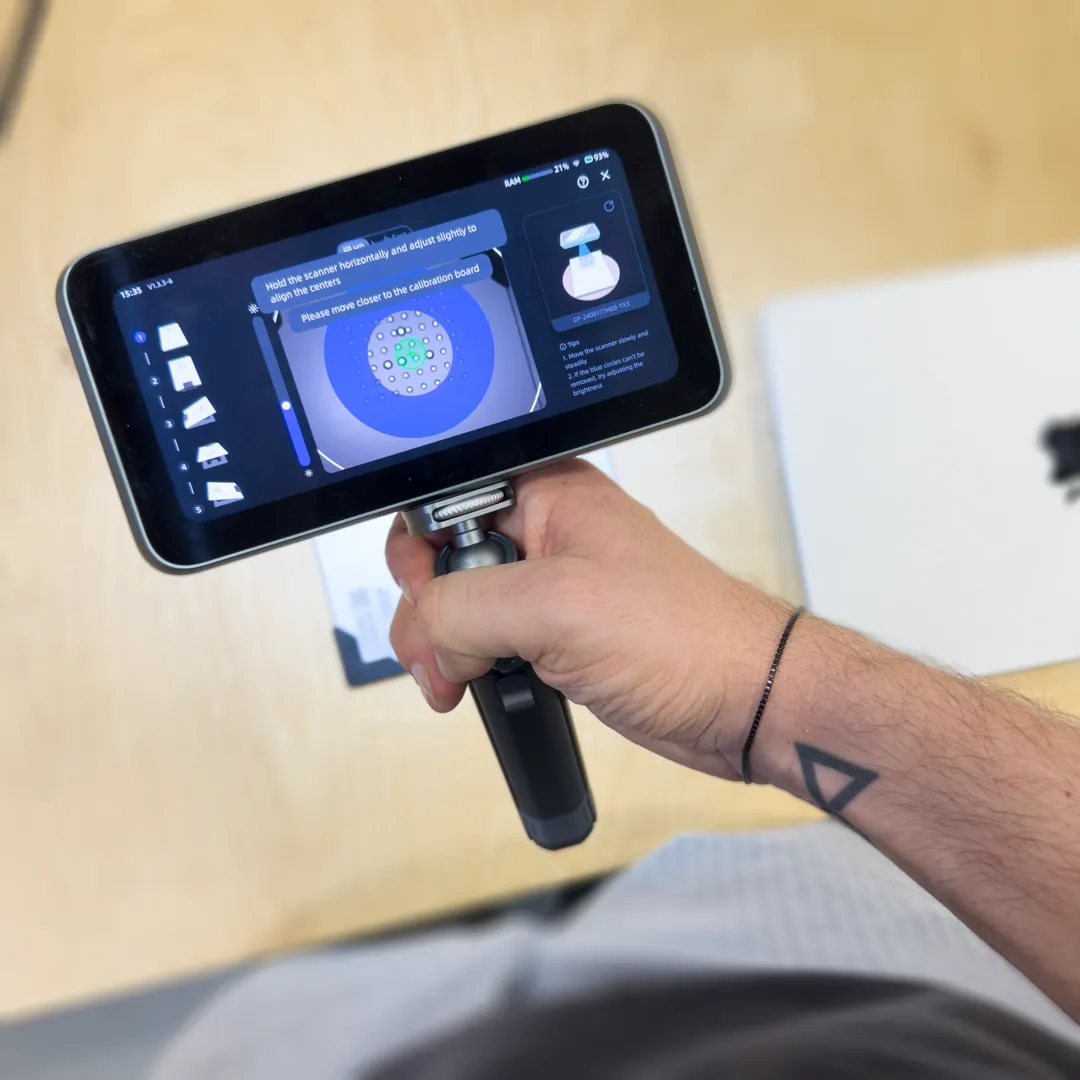
Calibration and Setup
With Polycam, I was able to simply open the app and start scanning right away. However, with the Vega, I first needed to calibrate the device. This involved using a calibration board with two sides, which I had to set up in various ways. The device had to be moved carefully over the board, with on-screen instructions guiding the process. This calibration takes about 15-20 minutes, but it only needs to be done every few months. It is a bit fiddly, but with some practice, it can be done faster.
Once calibrated, I was ready to begin scanning. The Vega offers two modes: HD and Fast. The HD mode uses infrared MEMS, while the Fast mode uses infrared VCSEL. The point distance in HD mode is between 0.05 - 3 mm, and in Fast mode, it is between 0.5 - 10 mm. For my scan, I used the HD mode. The FPS in HD mode is 15, making the device feel somewhat laggy.
Scanning & Export
For scanning, I slowly moved around the object. The Vega frequently lost tracking and threw an error, even with minimal movement. It is worth noting again that the object I was scanning was quite small, which likely made it more challenging. Meanwhile, I also started a scan with Polycam by selecting the Object option in the menu. This process uses photogrammetry, meaning the 3D model is created by stitching together many individual images. Just like with the Vega, I had to move around the object, and the app regularly took pictures, confirming with a vibration each time. The more images I captured, the more detailed the final model would be. Polycam only gives vibration feedback and does not show an interactive preview of the model being captured, unlike the Vega.
I spent about 5 minutes on each scan. With the Vega, I kept losing tracking, as mentioned earlier. Regaining tracking was mostly trial and error, and it was not something I could fix easily via the user interface. This made the scanning process slower, especially when trying to scan the back of the object. Polycam, on the other hand, worked seamlessly without complaints and provided consistent capture feedback.
After scanning, both methods allow mesh generation. With Einstar, you first see a point cloud, while with Polycam, you need to process the data before seeing the result, so there is no immediate feedback on whether the scan was successful. However, Polycam lets you add more pictures later, though this can cause issues if the object moves or if you are no longer in the same location. Generating a high-detail mesh in Polycam took about 6 minutes, while Einstar’s mesh generation took only 1-2 minutes.
Both methods support exporting 3D scans. Einstar offers a convenient QR code for downloading the scan, as well as direct access to the device’s internal storage via PC. Polycam stores the results in the cloud for download. Both methods support textures and common file formats.
Polycam’s free version only supports exporting in GLB format, but it does allow texture exports. Online converters are available, and Houdini also supports importing this format.
Results
Now, let’s compare the quality of the 3D scans. The interactive comparison below shows the scanner setup and one scan result view.
When looking at the overall shape, it is clear that Polycam produces a more rounded version of the scan with fewer details. A closer inspection shows that this is mainly due to the significantly lower mesh density. The triangles in the Einstar scan are much denser than in Polycam. If we remove the unnecessary ground polygons and compare only the object itself, we see a clear difference: 9,110 points in the Einstar scan versus 3,491 points in Polycam. This results in a much higher level of detail in the Einstar scan.
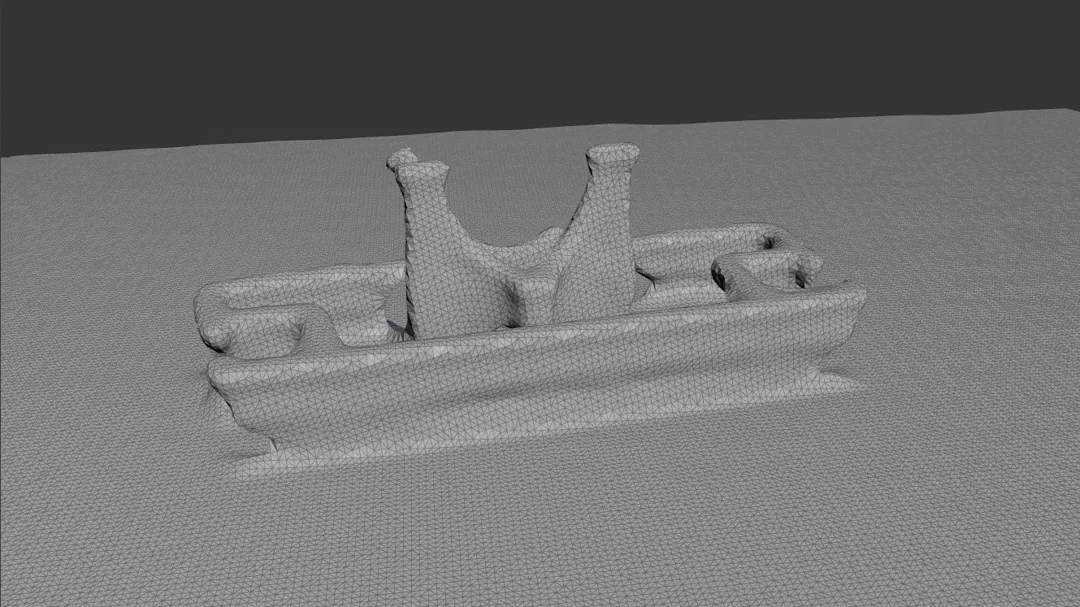
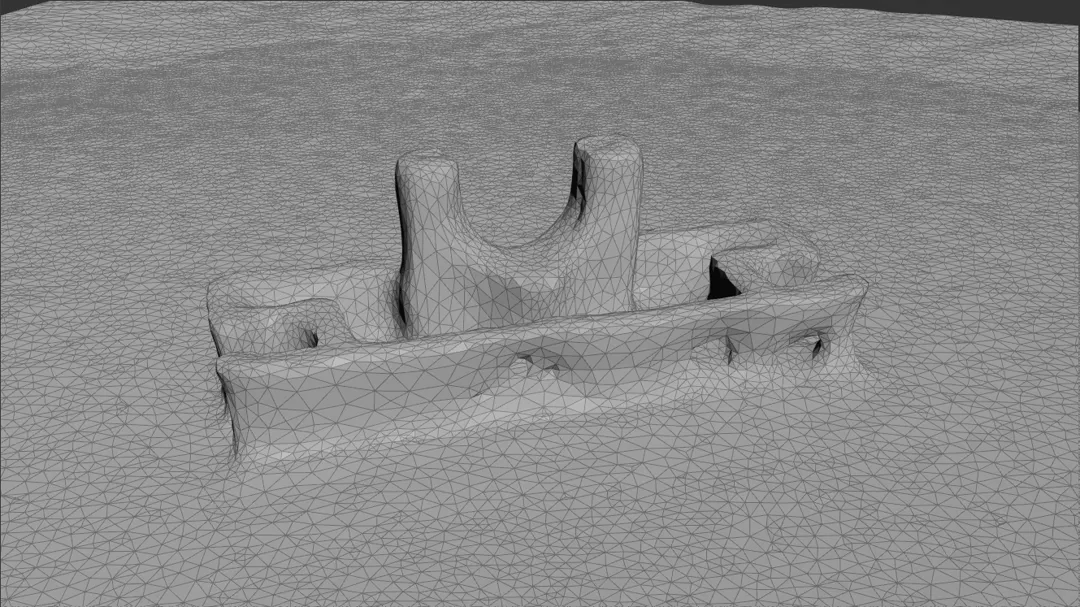
However, after rotating both models in the 3D viewport, it quickly became clear that the Vega scan also has some issues. There are significant holes in the mesh, particularly on the back side. This is likely caused by the tracking issues mentioned earlier. Polycam, on the other hand, did not show such large holes, although there were three smaller holes on the front side. These could be fixed more easily in post-processing.
Conclusion
In the end, neither scan was accurate enough to be used directly as a replacement part. Also, considering the time spent, recreating the part through traditional modeling would likely have been faster. Nevertheless, 3D scanning is a fascinating technology with potential in many applications. In this case, however, it was not quite feasible within my limited time. I can imagine that with a better setup, more diffuse lighting, more time, or perhaps a different object, much better results could be achieved.
Both providers recommend some general scanning tips: use matte, non-reflective objects (I used chalk spray to create a matte finish) and move slowly. With these adjustments, the process should become smoother. I look forward to further tests and research in the future to explore this technology more deeply and see whether better results can be achieved under different conditions.

