Appearance
Design- Driver Takeover Monitoring System
Computer Aided Design
This model showcases the 3D enclosure and internal architecture of the driver monitoring device, created using Autodesk Fusion 360. The design includes precise mounts for the camera module, LED ring, and biosensor interface, ensuring both structural stability and functional integration. Parametric modeling was used to enable easy iteration and adaptation throughout the prototyping process.
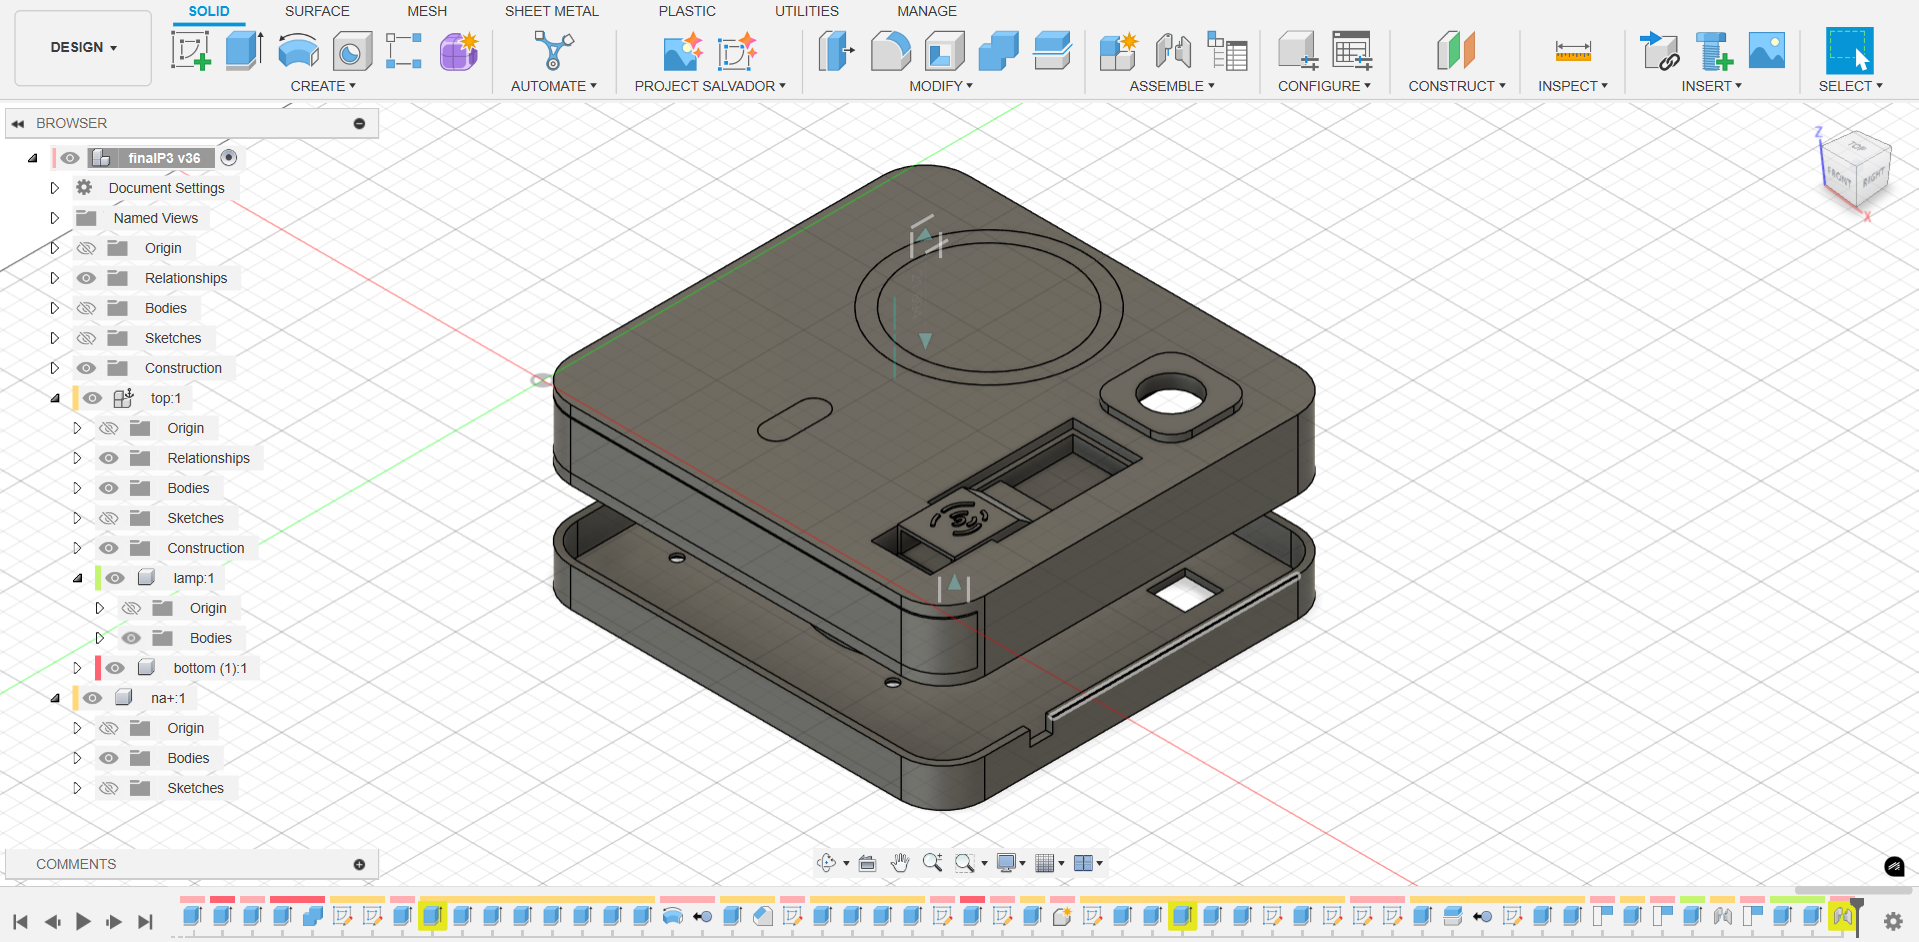
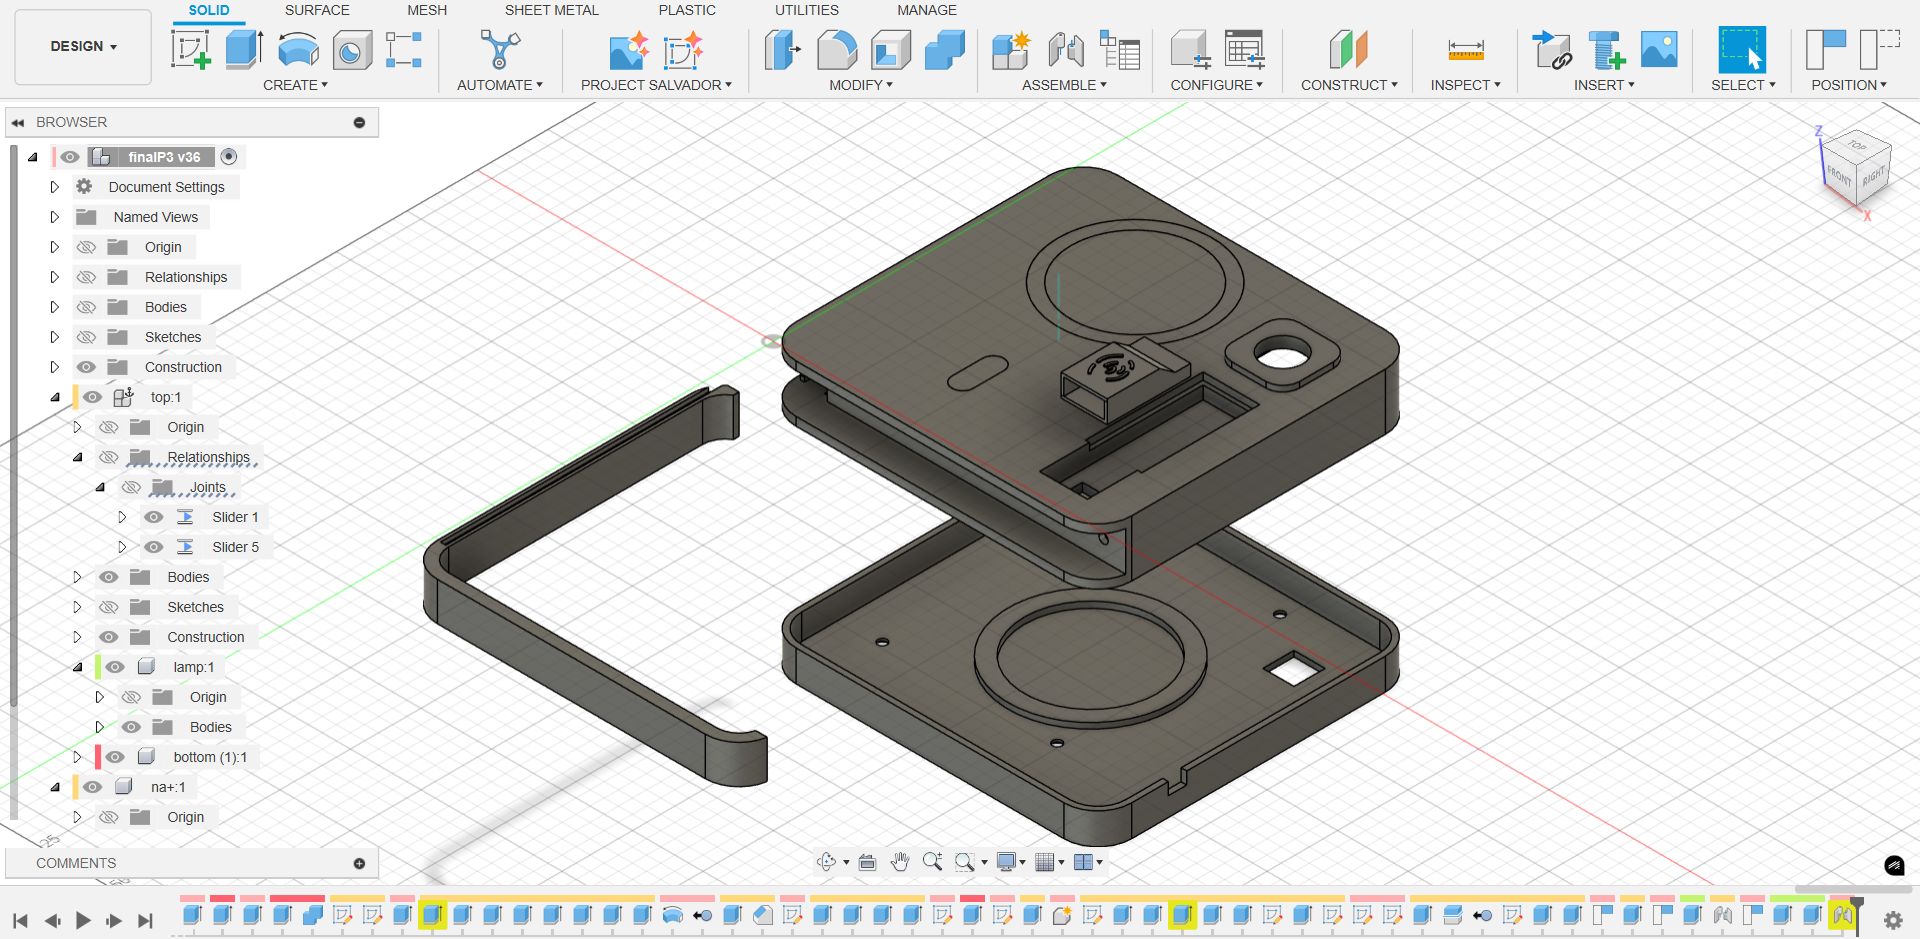 The 3D design process is document as video below.
Electronics Design
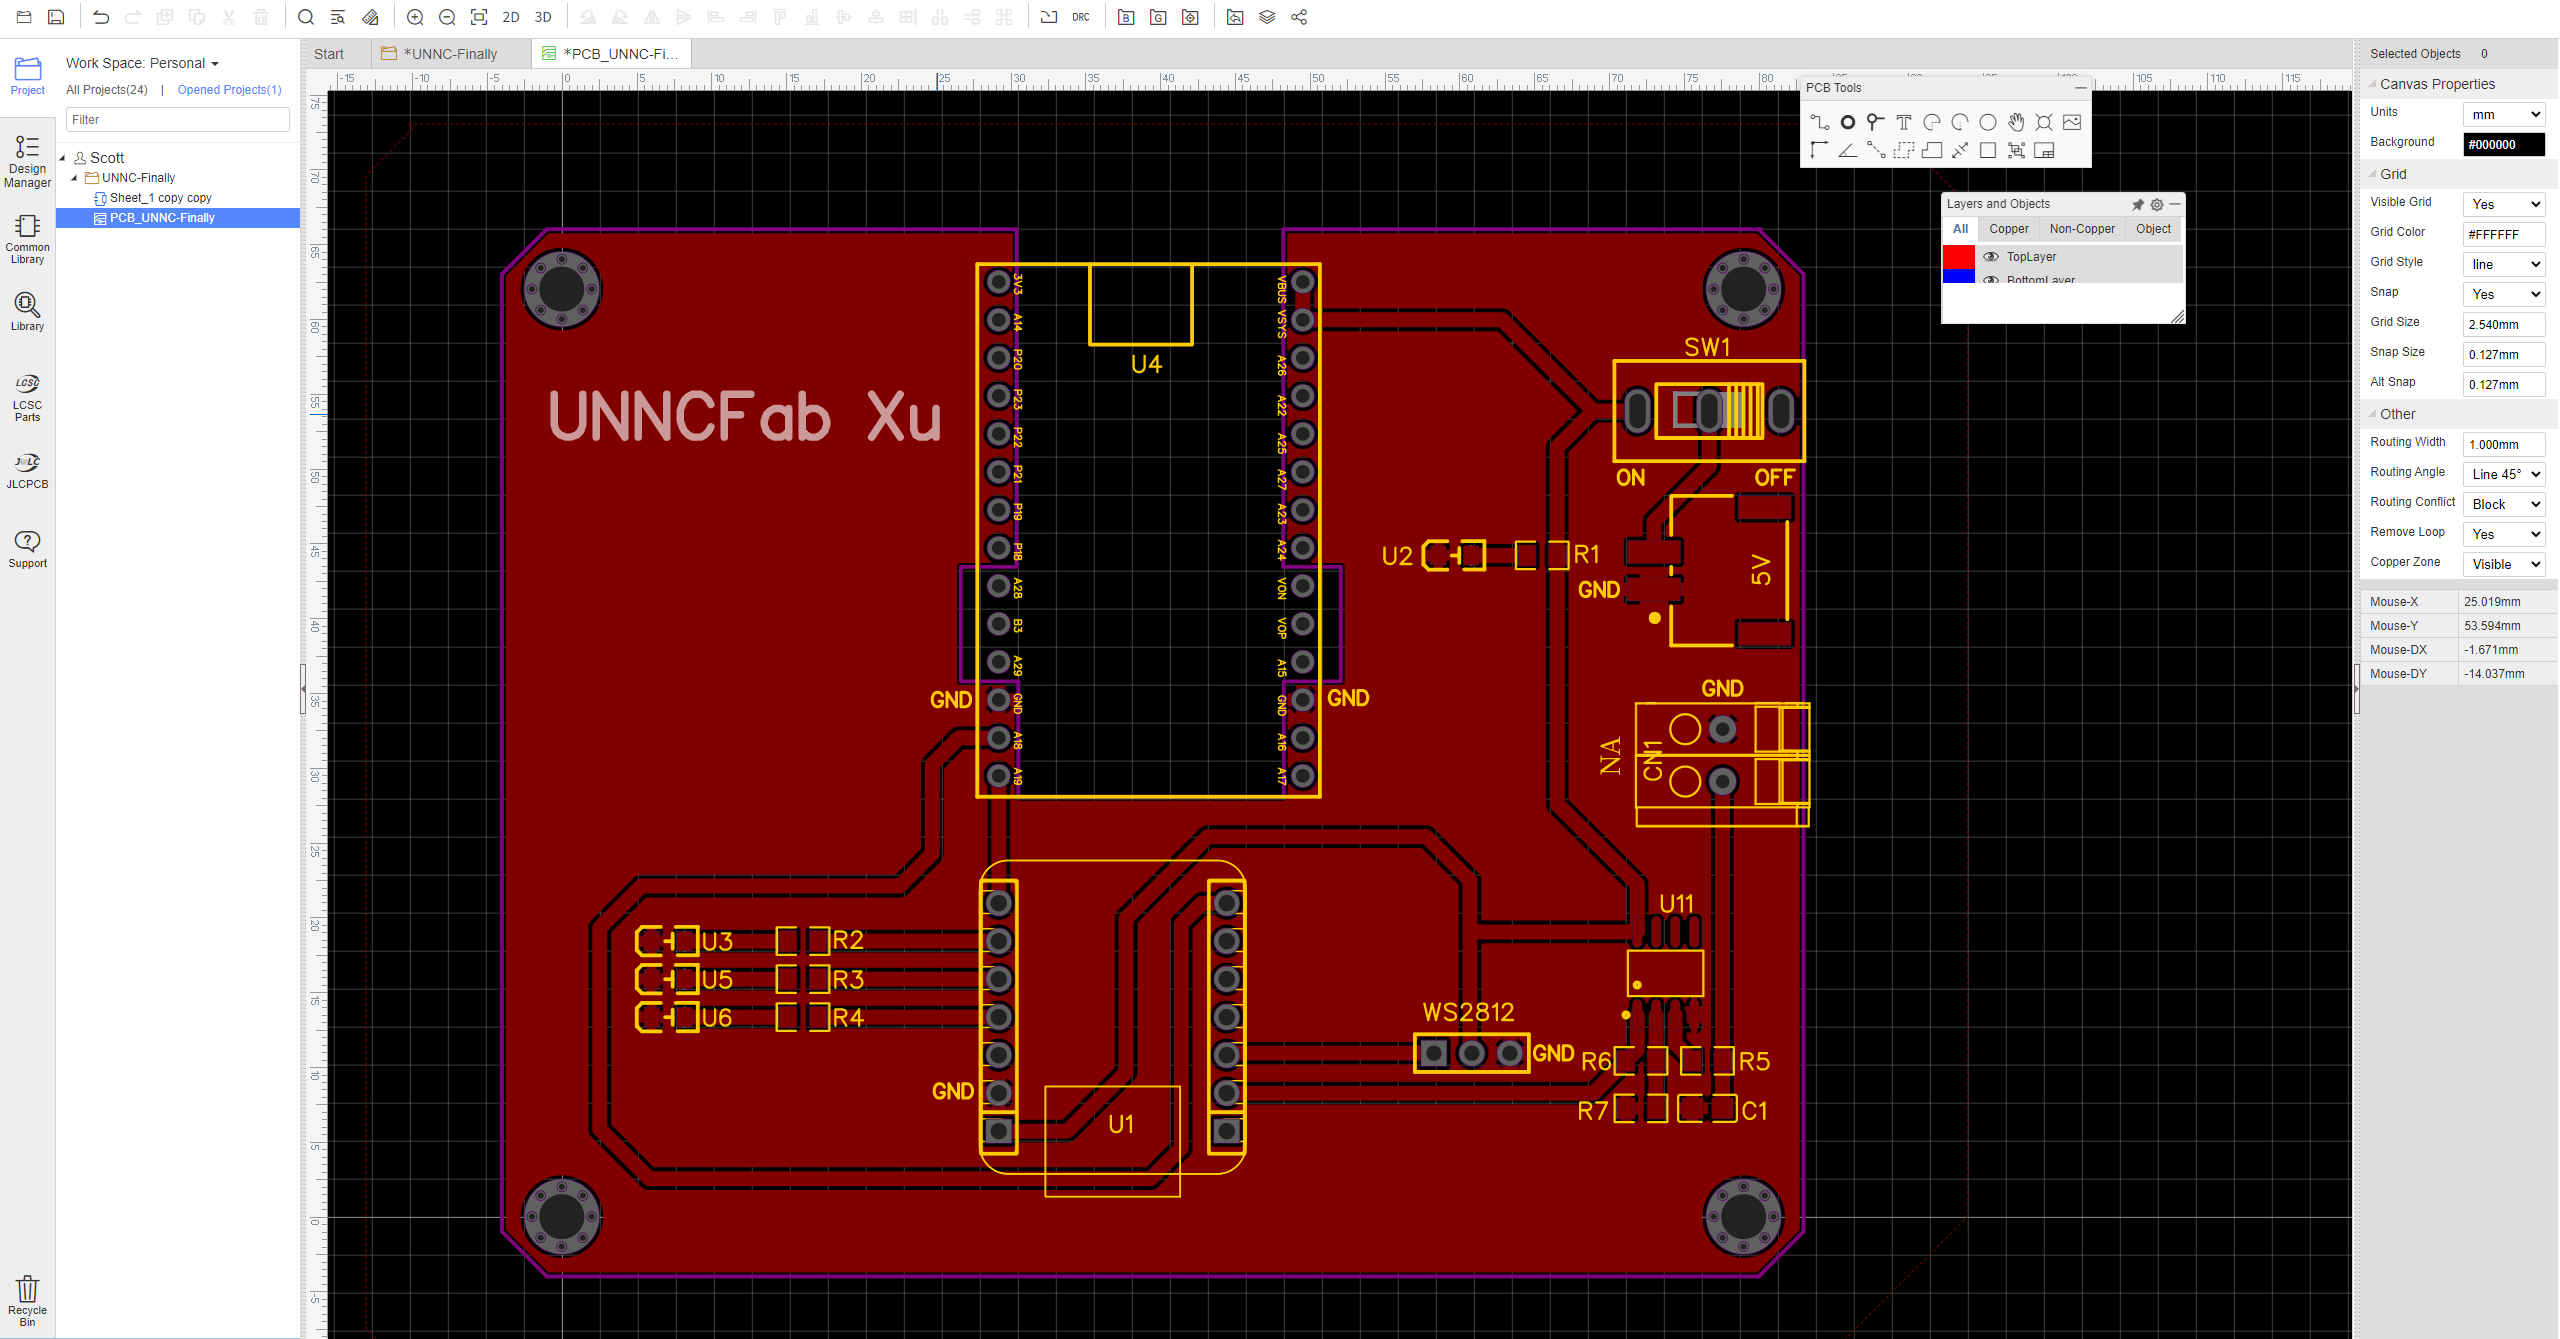
Custom PCB Design with JLCEDA
The PCB layout was designed using JLCEDA (嘉立创 EDA), a free, browser-based electronic design automation platform provided by JLCPCB. This tool offers a streamlined workflow from schematic capture to PCB layout, with a vast library of standard components and real-time design rule checks. Once the design is complete, the files can be directly submitted to JLCPCB for fabrication, greatly reducing turnaround time and ensuring manufacturing compatibility.
The board was customized for the integration of the XIAO ESP32C3, power regulation circuitry, and interfaces for biosensors and LEDs. Its compact form factor and precision layout make it ideal for embedding into the 3D-printed enclosure designed in Fusion 360. 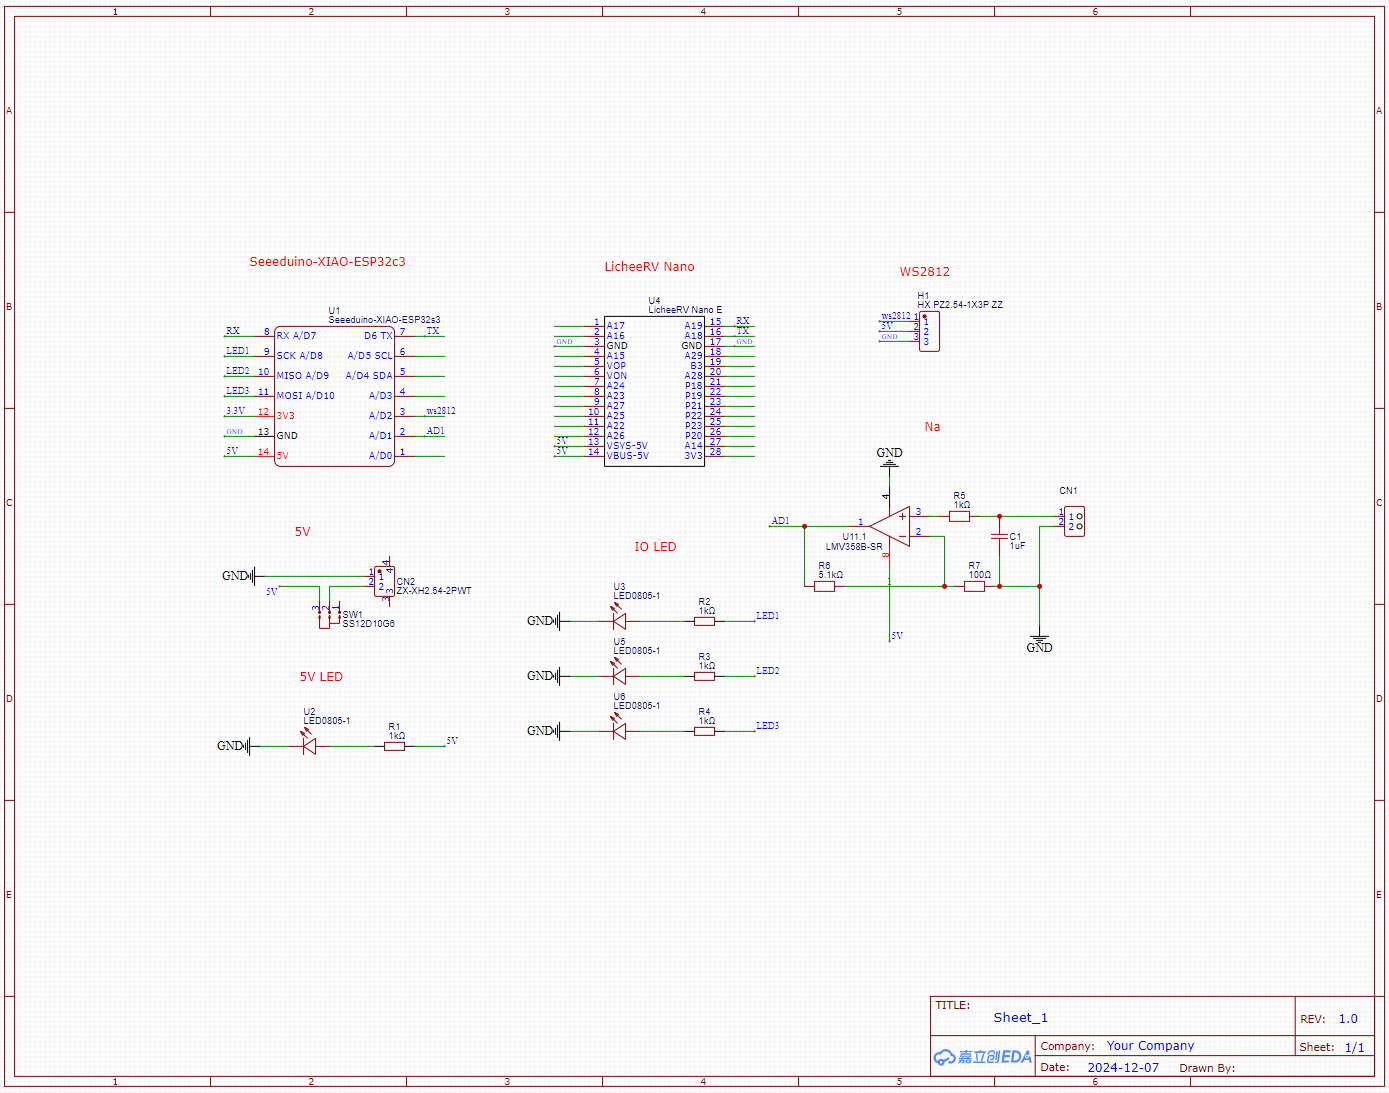
You can view the official PCB ordering process at the JLCEDA documentation page.
CNC-Milled LED PCB Board Design in Fusion 360
In addition to the primary control PCB, a custom LED light board was designed using Fusion 360. 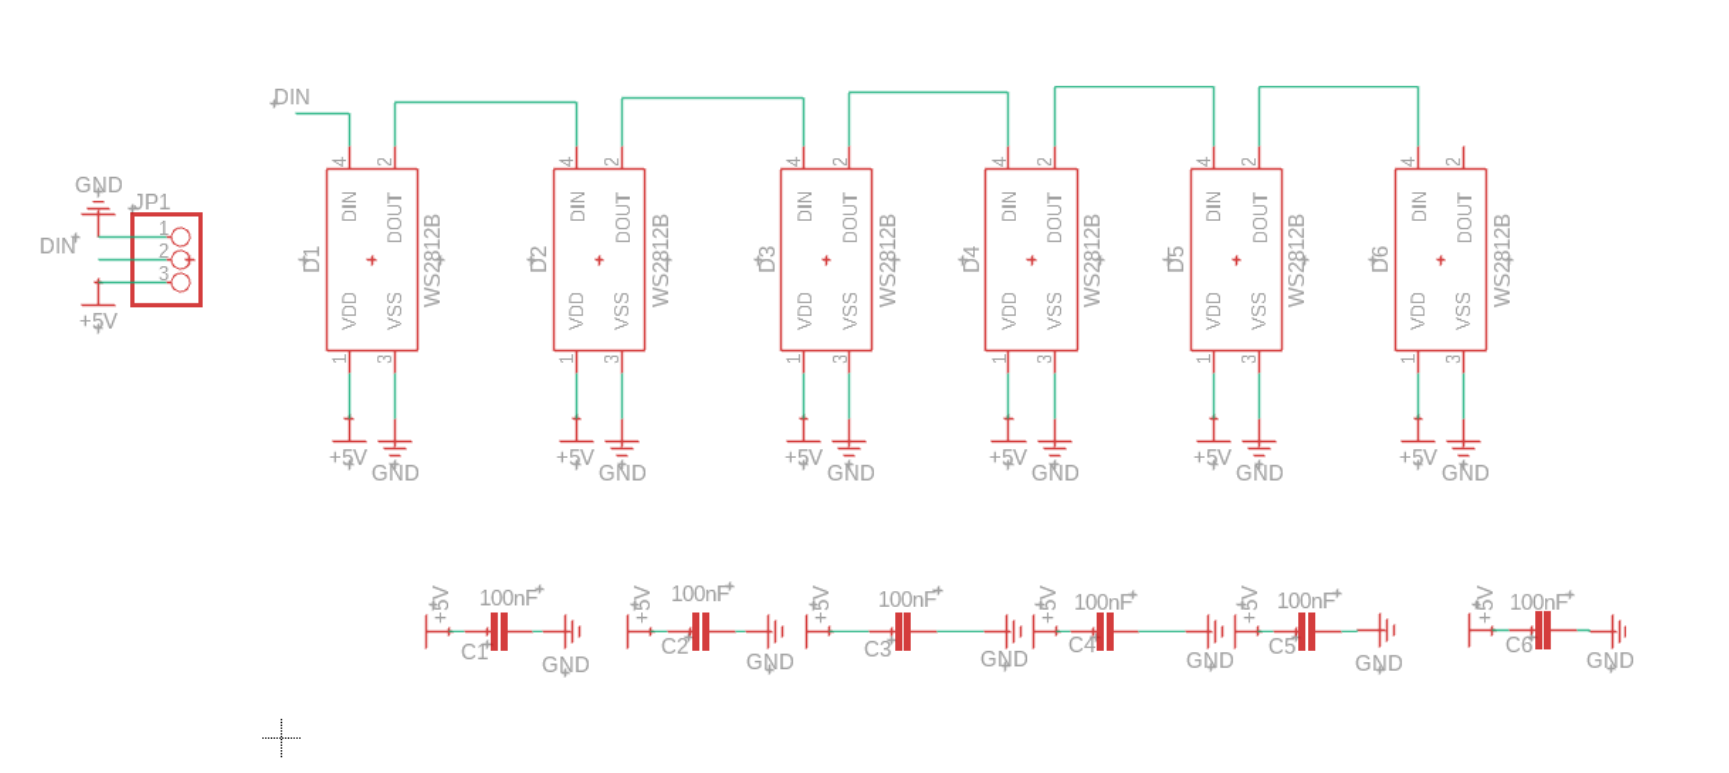
Unlike standard PCB fabrication, this board was milled in-house using CNC machining on a copper-clad board. The Fusion 360 design was exported as a 2D toolpath for subtractive manufacturing, allowing precise trace routing and hole drilling for LED placement and wire connections.
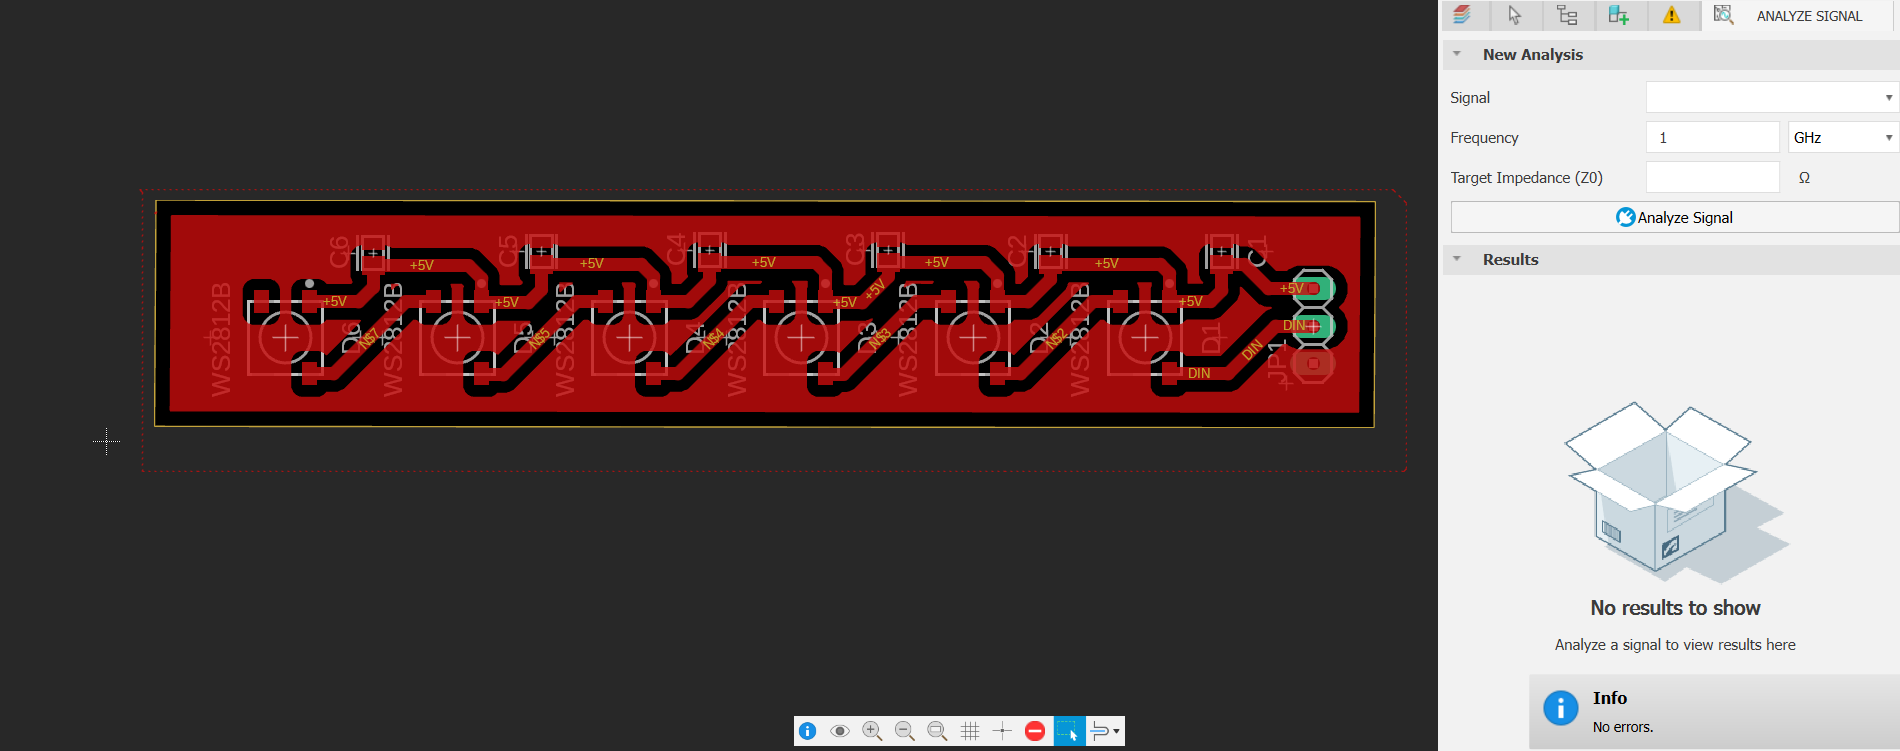
The result is a low-cost, rapidly fabricated light board that can be easily integrated with the main sensor housing.
Embedded Programming for sensors
This section includes the complete codebase responsible for sensing driver emotional and physiological states, processing the data, and updating the system status accordingly.
Camera-based Emotion Recognition (MaixPy)
The Python script below runs on the Sipeed Maix series embedded device, using a YOLOv8-based face detector and a custom emotion classification model. It captures real-time video, detects facial expressions, and classifies emotions into seven categories. The most probable emotion is sent via UART to the control board. The display shows both the cropped face and classification results for debugging and visualization.
The emotion model can be switched via screen input. If a significant change in emotion is detected or a fixed time interval elapses, the label is transmitted to the microcontroller.
Wiring Diagram: 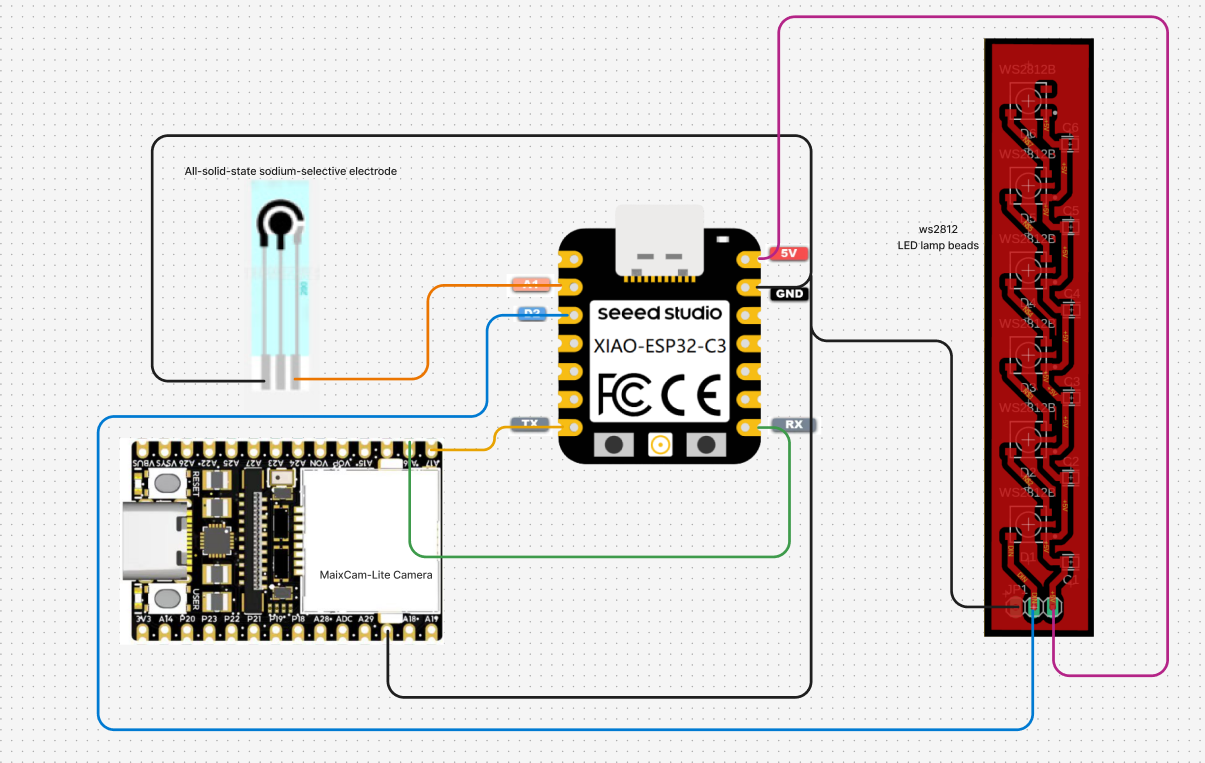
Code Implementation:
python
from maix import camera, display, image, nn, app, time, touchscreen
import math
from maix import uart

models = {
    "7 classes": "/root/models/face_emotion.mud"
}
models_keys = list(models.keys())
curr_model = 0

# sensor.reset()
# sensor.set_vflip(True)

def is_in_button(x, y, btn_pos):
    return x > btn_pos[0] and x < btn_pos[0] + btn_pos[2] and y > btn_pos[1] and y < btn_pos[1] + btn_pos[3]

def main(disp):
    global curr_model
    last_emotion = ""
    last_time = time.time()

    detect_conf_th = 0.5
    detect_iou_th = 0.45
    emotion_conf_th = 0.5
    max_face_num = -1
    crop_scale = 0.9
    ser = uart.UART("/dev/ttyS0", 115200)


    # detect face model
    detector = nn.YOLOv8(model="/root/models/yolov8n_face.mud", dual_buff = False)
    # we only use one of it's function to crop face from image, wo we not init model actually
    landmarks_detector = nn.FaceLandmarks(model="")
    # emotion classify model
    classifier = nn.Classifier(model=models[models_keys[curr_model]], dual_buff=False)
    cam = camera.Camera(detector.input_width(), detector.input_height(), detector.input_format())

    mode_pressed = False
    ts = touchscreen.TouchScreen()
    img_back = image.load("/maixapp/share/icon/ret.png")
    back_rect = [0, 0, 32, 32]
    mode_rect = [0, cam.height() - 26, image.string_size(models_keys[curr_model]).width() + 6, 30]
    back_rect_disp = image.resize_map_pos(cam.width(), cam.height(), disp.width(), disp.height(), image.Fit.FIT_CONTAIN, back_rect[0], back_rect[1], back_rect[2], back_rect[3])
    mode_rect_disp = image.resize_map_pos(cam.width(), cam.height(), disp.width(), disp.height(), image.Fit.FIT_CONTAIN, mode_rect[0], mode_rect[1], mode_rect[2], mode_rect[3])


    # for draw result info
    max_labels_length = 0
    for label in classifier.labels:
        size = image.string_size(label)
        if size.width() > max_labels_length:
            max_labels_length = size.width()

    max_score_length = cam.width() / 4

    while not app.need_exit():
        img = cam.read()
        img.replace(vflip=True)
        # img.vflip()
        # img.rotation_corr(x_rotation=90,y_rotation=90)
        # img.rotation_corr()


        results = []
        objs = detector.detect(img, conf_th = detect_conf_th, iou_th = detect_iou_th, sort = 1)
        count = 0
        idxes = []
        img_std_first : image.Image = None
        for i, obj in enumerate(objs):
            img_std = landmarks_detector.crop_image(img, obj.x, obj.y, obj.w, obj.h, obj.points,
                                                classifier.input_width(), classifier.input_height(), crop_scale)
            if img_std:
                img_std_gray = img_std.to_format(image.Format.FMT_GRAYSCALE)
                res = classifier.classify(img_std_gray, softmax=True)
                results.append(res)
                idxes.append(i)
                if i == 0:
                    img_std_first = img_std
                count += 1
                if max_face_num > 0 and count >= max_face_num:
                    break
        for i, res in enumerate(results):
            # draw fisrt face detailed info
            if i == 0:
                img.draw_image(0, 0, img_std_first)
                for j in range(len(classifier.labels)):
                    idx = res[j][0]
                    score = res[j][1]
                    img.draw_string(0, img_std_first.height() + idx * 16, classifier.labels[idx], image.COLOR_WHITE)
                    img.draw_rect(max_labels_length, int(img_std_first.height() + idx * 16), int(score * max_score_length), 8, image.COLOR_GREEN if score >= emotion_conf_th else image.COLOR_RED, -1)
                    img.draw_string(int(max_labels_length + score * max_score_length + 2), int(img_std_first.height() + idx * 16), f"{score:.1f}", image.COLOR_RED)
            # draw on all face
            color = image.COLOR_GREEN if res[0][1] >= emotion_conf_th else image.COLOR_RED
            obj = objs[idxes[i]]
            img.draw_rect(obj.x, obj.y, obj.w, obj.h, color, 1)
            img.draw_string(obj.x, obj.y, f"{classifier.labels[res[0][0]]}: {res[0][1]:.1f}", color)
            # 在发送前判断
            if res[0][1] >= emotion_conf_th:
                emotion_label = classifier.labels[res[0][0]]
                now = time.time()
                if emotion_label != last_emotion or (now - last_time) > 1:  # 每秒发送一次或变更时发送
                    ser.write((emotion_label + "\n").encode())
                    print(f"emotion_label: {emotion_label}\n")
                    last_emotion = emotion_label
                    last_time = now

        img.draw_image(0, 0, img_back)
        img.draw_rect(mode_rect[0], mode_rect[1], mode_rect[2], mode_rect[3], image.COLOR_WHITE)
        img.draw_string(4, img.height() - 20, f"{models_keys[curr_model]}")
        disp.show(img)
        x, y, preesed = ts.read()
        if preesed:
            mode_pressed = True
        elif mode_pressed:
            mode_pressed = False
            if is_in_button(x, y, back_rect_disp):
                app.set_exit_flag(True)
            if is_in_button(x, y, mode_rect_disp):
                curr_model = (curr_model + 1) % len(models_keys)
                msg = "switching model ..."
                size = image.string_size(msg, scale=1.3)
                img.draw_string((img.width() - size.width()) // 2, (img.height() - size.height())//2, msg, image.COLOR_RED, scale=1.3, thickness=-3)
                img.draw_string((img.width() - size.width()) // 2, (img.height() - size.height())//2, msg, image.COLOR_WHITE, scale=1.3)
                disp.show(img)
                del detector
                del landmarks_detector
                break

disp = display.Display()
try:
    while not app.need_exit():
        main(disp)
except Exception:
    import traceback
    msg = traceback.format_exc()
    img = image.Image(disp.width(), disp.height())
    img.draw_string(0, 0, msg, image.COLOR_WHITE)
    disp.show(img)
    while not app.need_exit():
        time.sleep_ms(100)
Arduino Code for Sensor Fusion and LED Control
The Arduino code runs on the XIAO ESP32C3 board. It handles:
Analog data acquisition from a solid-state sodium-selective biosensor (via ADC),
Emotion label reception from the MaixPy module (via Serial1),
Wi-Fi and cloud connectivity via Arduino IoT Cloud,
LED feedback using a WS2812 LED strip to reflect real-time emotional and physiological state,
Takeover judgment logic, determining whether the driver is in a safe state (happy/neutral) to take over control of the vehicle.
The device combines biosensor readings and emotion classification results to update safeToTakeOver status in the cloud and visually signal readiness using LED colors: green for safe, red for unsafe.
cpp
#include "arduino_secrets.h"
#include "thingProperties.h"
#include <FastLED.h>

#define NUM_LEDS 6
#define LED_DT D2
#define LED_TYPE WS2812B
#define COLOR_ORDER GRB
uint8_t max_bright = 50;
CRGB leds[NUM_LEDS];

String received = "";
String currentEmotion = "";

uint16_t adcRaw = 0;
float voltage = 0.0;

// Read single ADC value
uint16_t Get_Adc(uint8_t pin) {
  return analogRead(pin);
}

// Read multiple ADC samples and return the average
uint16_t Get_Adc_Average(uint8_t pin, uint8_t times) {
  uint32_t total = 0;
  for (uint8_t i = 0; i < times; i++) {
    total += analogRead(pin);
    delay(5);
  }
  return total / times;
}

void setup() {
  Serial.begin(9600);
  delay(1500);

  initProperties();
  ArduinoCloud.begin(ArduinoIoTPreferredConnection);
  setDebugMessageLevel(2);
  ArduinoCloud.printDebugInfo();

  FastLED.addLeds<LED_TYPE, LED_DT, COLOR_ORDER>(leds, NUM_LEDS);
  FastLED.setBrightness(max_bright);

  Serial1.begin(115200, SERIAL_8N1, 20, 21);  // RX=20, TX=21
  pinMode(D1, INPUT);
}

void loop() {
  ArduinoCloud.update();

  // Read average ADC value
  adcRaw = Get_Adc_Average(D1, 10);
  voltage = adcRaw * 3.3 / 4095.0;

  Serial.print("ADC Value: ");
  Serial.print(adcRaw);
  Serial.print("   Voltage: ");
  Serial.print(voltage, 3);
  Serial.println(" V");

  // Update voltage value to the cloud
  aDC_Value = voltage;

  // Read emotion string from Serial1
  while (Serial1.available()) {
    char c = Serial1.read();

    if (c == '\n') {
      received.trim();
      if (received.length() > 0) {
        Serial.print("Received emotion: ");
        Serial.println(received);
        currentEmotion = received;
        setColorByEmotion(received);
      }
      received = "";
    } else {
      received += c;
    }
  }

  // Update current emotion to the cloud
  current_Emotion = currentEmotion;

  // Determine whether it's safe to take over
  bool isSafeToTakeOver = (currentEmotion == "happy" || currentEmotion == "neutral");
  safeToTakeOver = isSafeToTakeOver;  // Update to the cloud
  setColorForTakeOver(isSafeToTakeOver);

  delay(1000);  // Update every second
}

void setColorByEmotion(String emotion) {
  CRGB color;

  if (emotion == "angry" || emotion == "sad" || emotion == "fear" || emotion == "surprise") {
    color = CRGB::Red;
  } else if (emotion == "happy") {
    color = CRGB::Green;
  } else if (emotion == "neutral") {
    color = CRGB::White;
  } else {
    color = CRGB::Black;
  }

  fill_solid(leds, NUM_LEDS, color);
  FastLED.show();
}

void setColorForTakeOver(bool safe) {
  CRGB color = safe ? CRGB::Green : CRGB::Red;
  fill_solid(leds, NUM_LEDS, color);
  FastLED.show();
}

// Cloud variable change callback functions (optional)
void onADCValueChange() {
  // Optional handling logic
}

void onCurrentEmotionChange() {
  // Optional handling logic
}

void onSafeToTakeOverChange() {
  // Optional handling logic
}