System Integration
System Integration is the process of bringing together various subsystems— mechanical, electronic, and software—into one unified, functioning system. It ensures that all individual components of a project work together seamlessly to perform the intended operation.
For our Fantasy Flair animatronic wing project, we carried out system integration by combining:
- Mechanical Design: Lightweight articulated wings were fabricated using electrical casing pipe components and custom linkages to achieve natural flapping motion.
- Electronics: We embedded servo motors and an ESP32-C3 controller to actuate the wings. Limit switches and a power distribution circuit ensured reliable motion control.
- Software: Custom Arduino code controlled the wing flapping sequence, while Wi-Fi connectivity was added to enable remote triggering via a smartphone app.
We integrated all these components to create a wearable, interactive cosplay wing system that delivers a visually striking and dynamic experience. The final prototype flaps smoothly, synchronizing mechanical movement with user input, showcasing the power of effective system integration.
System integration combines mechanical components, electronics, sensors, and control systems to ensure all subsystems (mechanical, electrical, software) work together efficiently.
Visit: System Integration Page
Mechanical Design:
What tasks have been completed?
Mechanism Overview
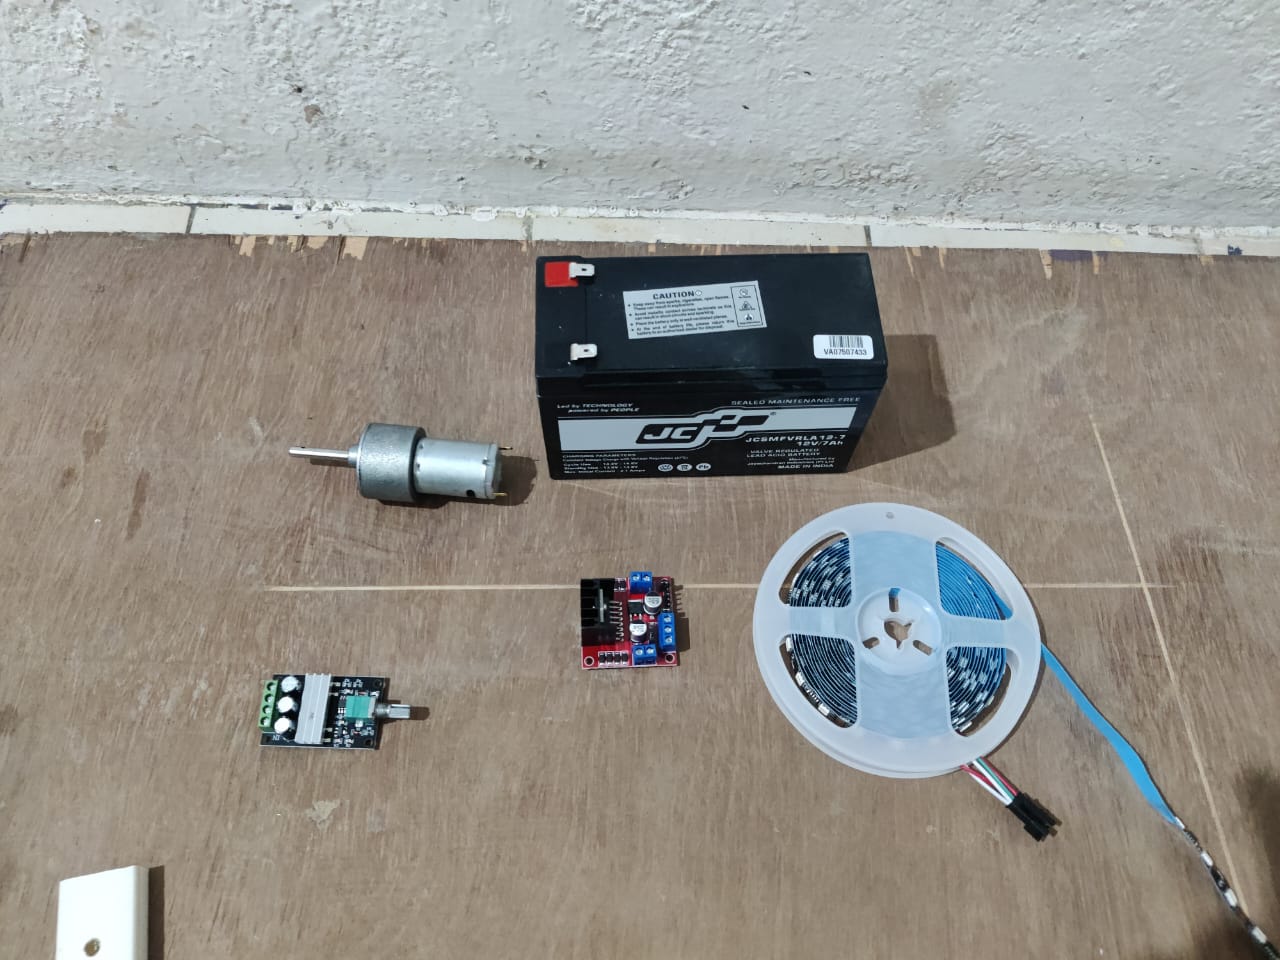
- Input: 12V 7A Battery
- Drive System: 12V 1A DC Motor, Lead Screw (threaded rod), Moving Nut
- Output: 2 Side Wings (mechanical movement), RGB LEDs
- Sensor: LDR to trigger motion & lighting
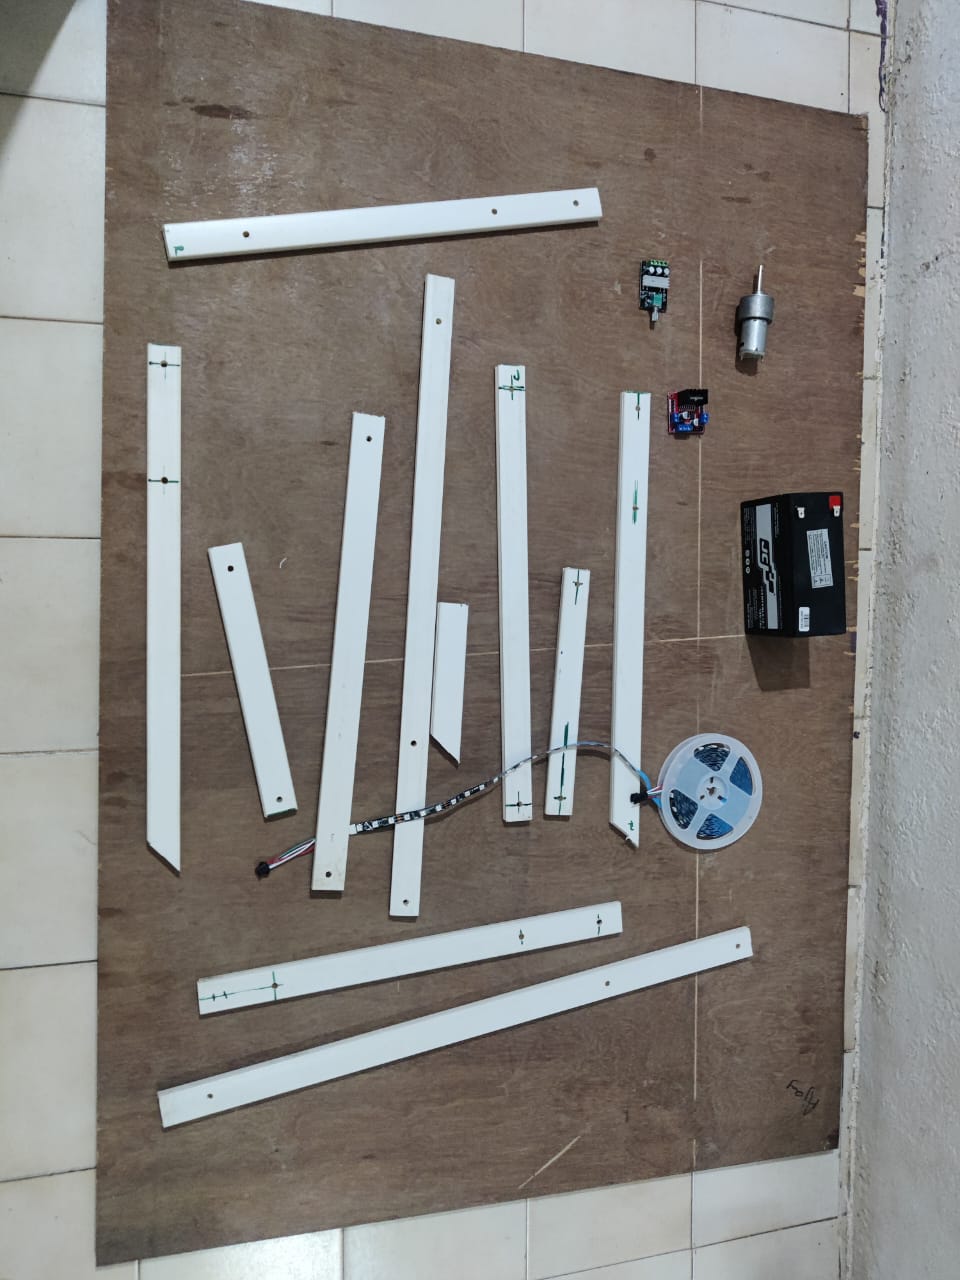
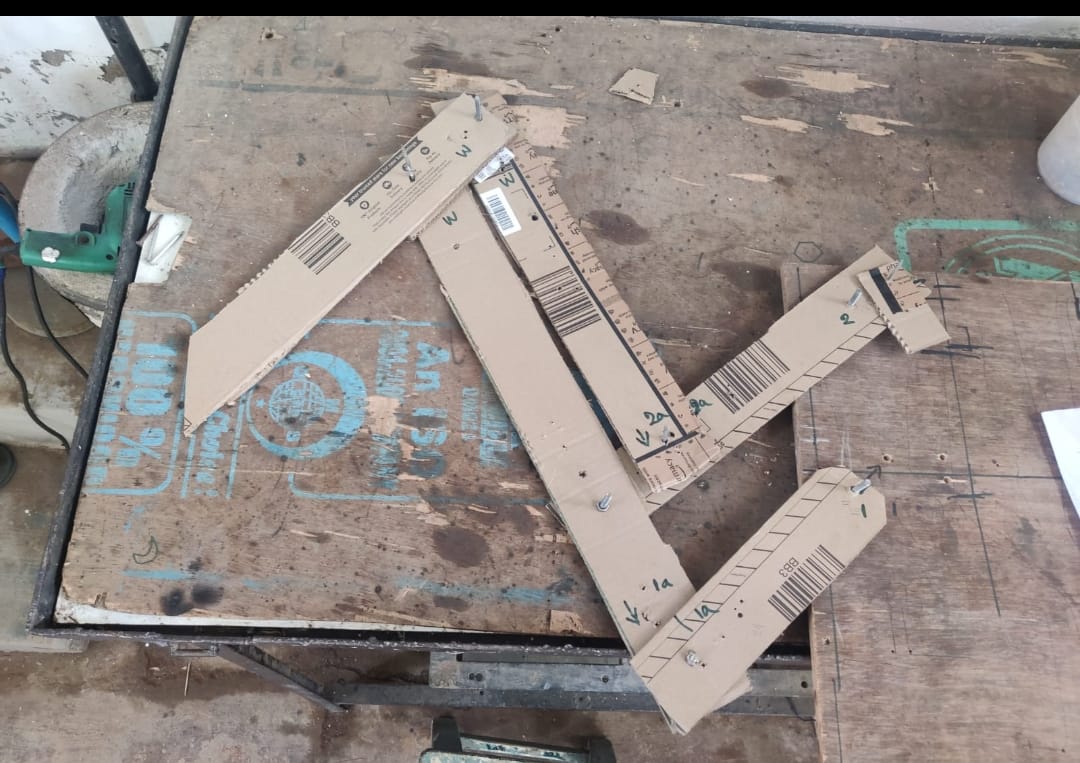
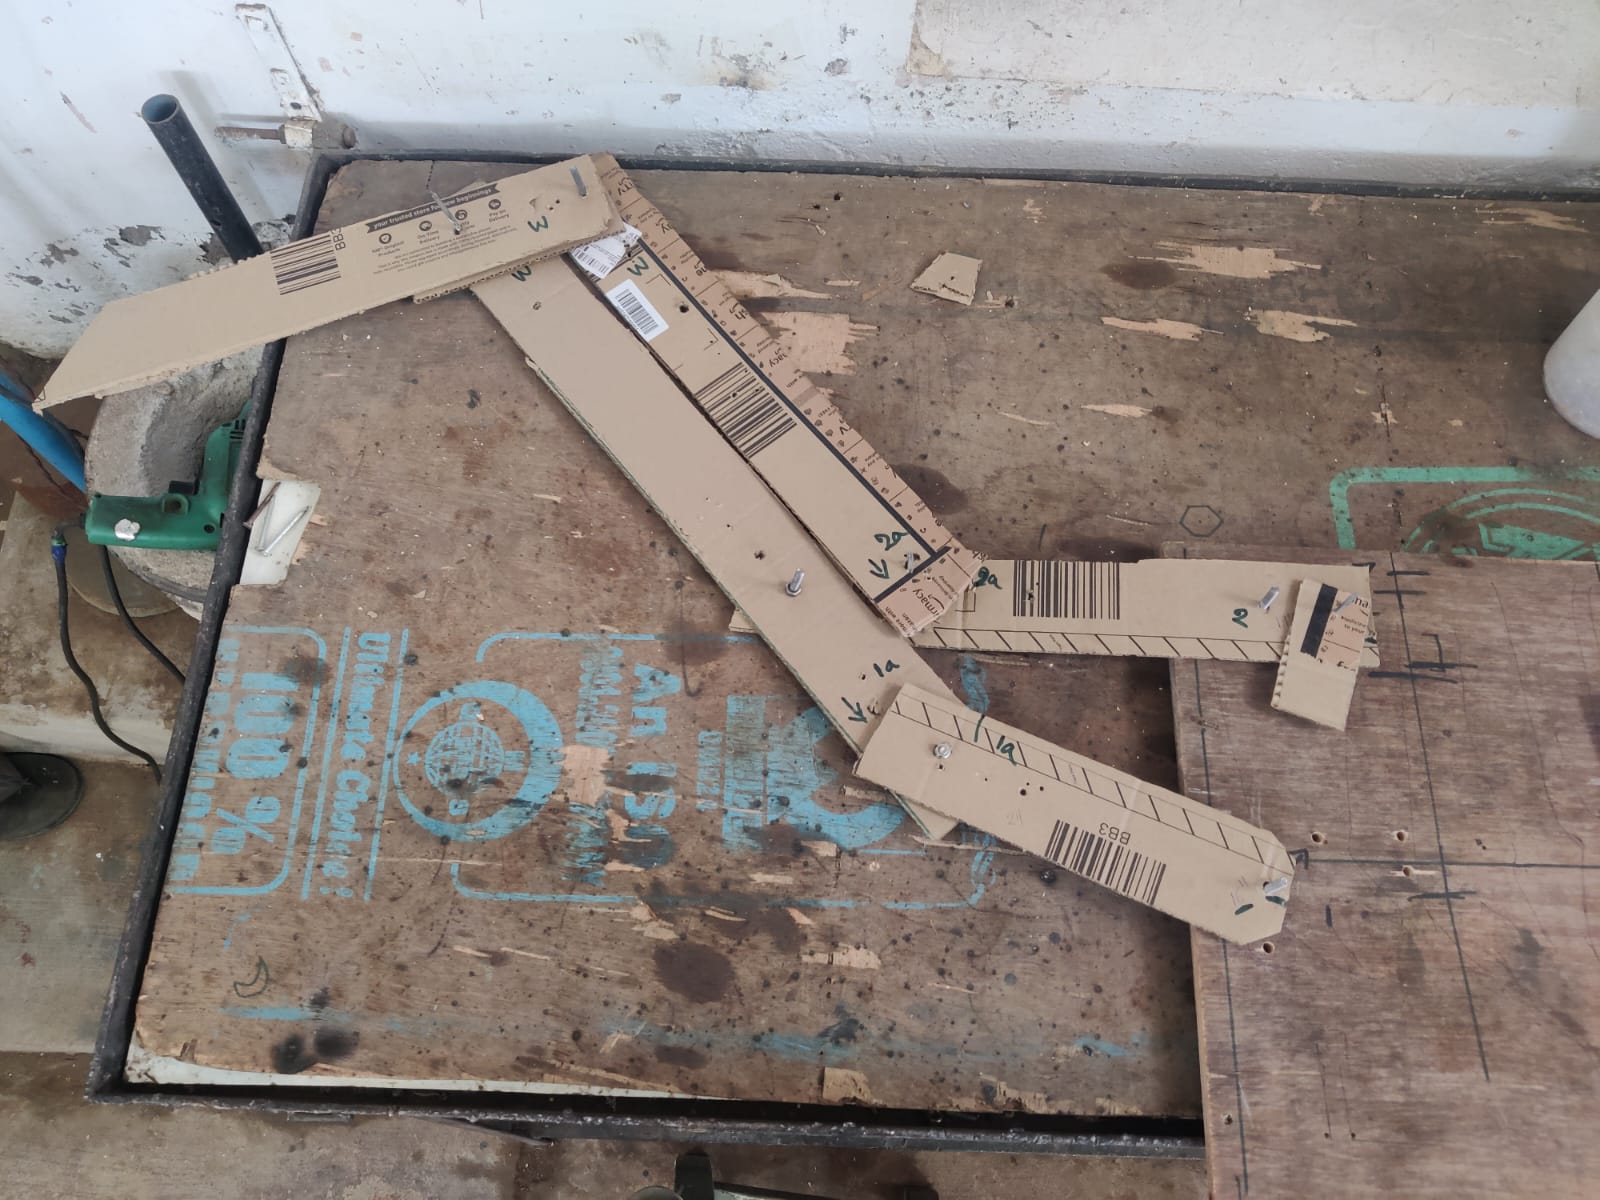
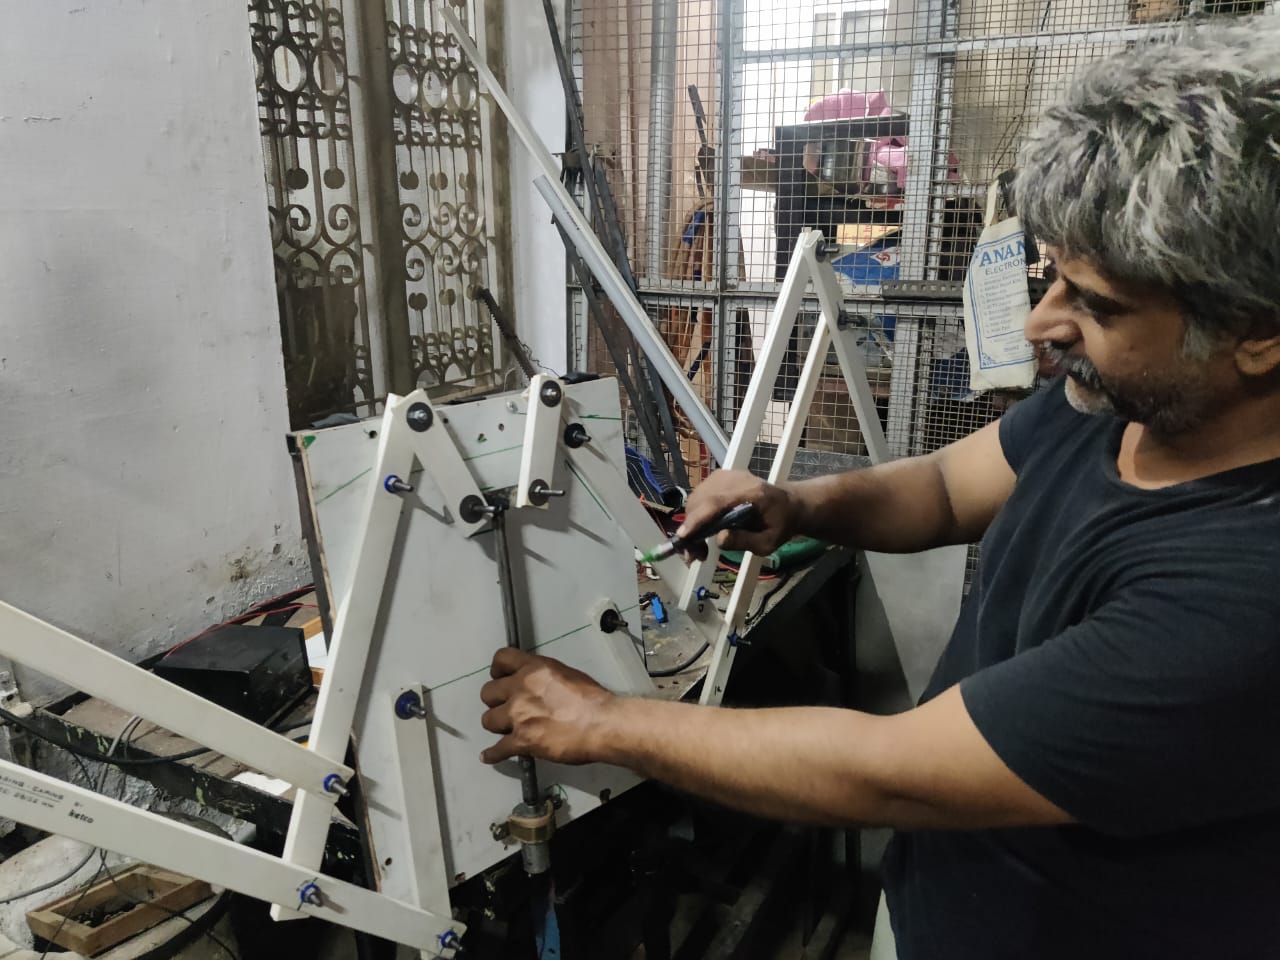
I am assembling the mechanical framework of an animatronic wing mechanism. The structure features a scissor linkage system mounted on a sturdy vertical base, which is designed to provide articulated wing movement. Using basic tools, I am carefully aligning and fastening the threaded rod and Motor coupling that serve as the core drive system for the actuation. This setup is part of my final project where I combine mechanical precision with control electronics to simulate lifelike wing flapping, suitable for interactive exhibits.
Electronics:
Custom-Designed PCB Packaging

As part of the system integration process, I designed and implemented custom PCBs tailored to the project's enclosure using KiCad. The photo shows me assembling the electronics inside a custom-built control box, where each PCB was mounted precisely according to the enclosure layout. I used pre-planned mounting holes to secure the boards to the panel, ensuring they remain stable during operation and transport.
Edge connectors and screw terminals were chosen for easy connection and disconnection of peripheral components like motors and sensors. The internal wiring was planned to minimize clutter and reduce electromagnetic interference. The layout considered insulation distances and thermal relief zones to improve safety and performance.
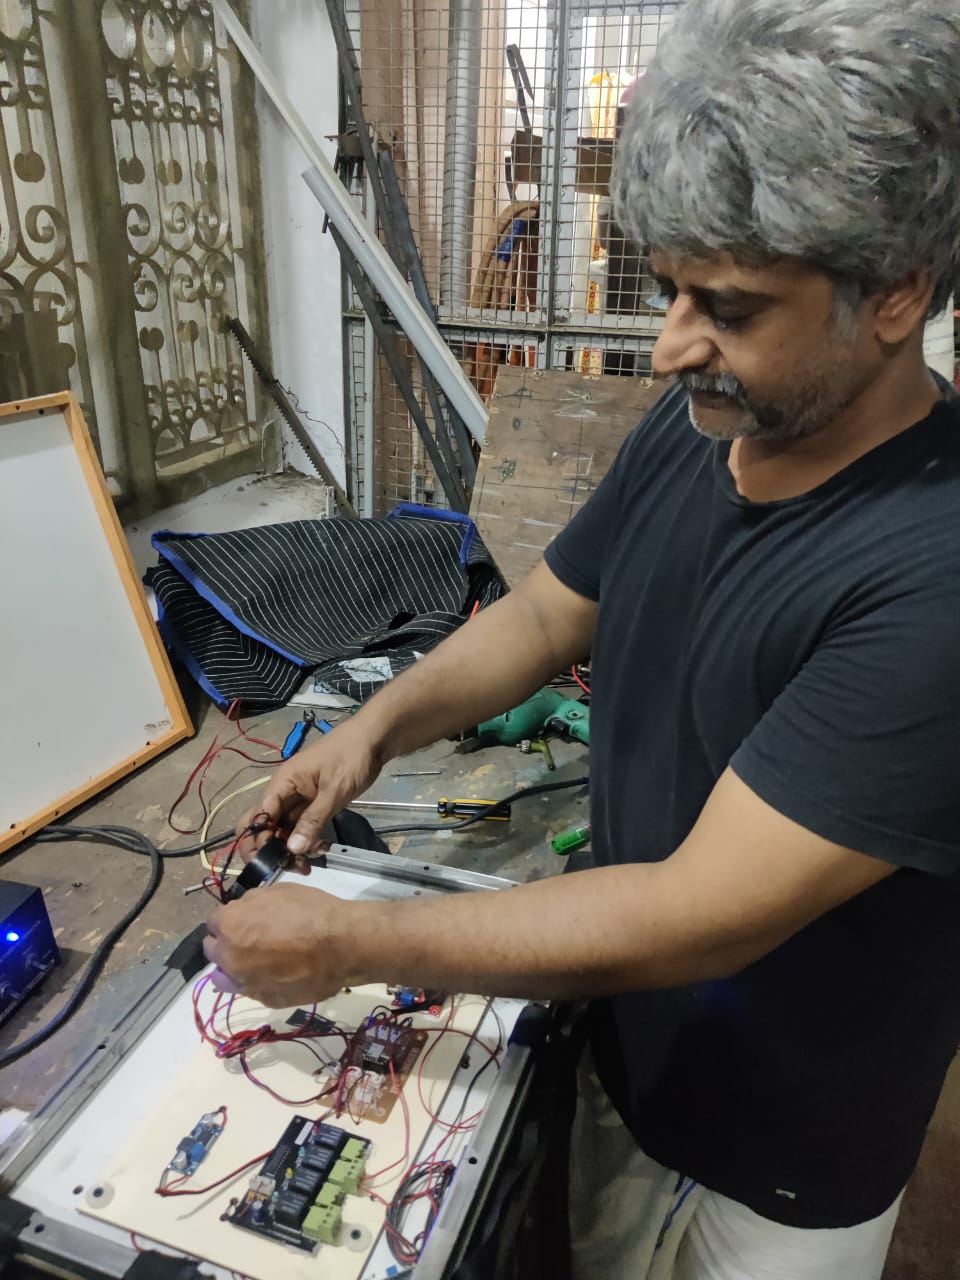
This method ensured that the electronics were not only functional but also integrated neatly into the mechanical housing. It provided ease of maintenance, enhanced durability, and contributed to the professional finish of the final system.
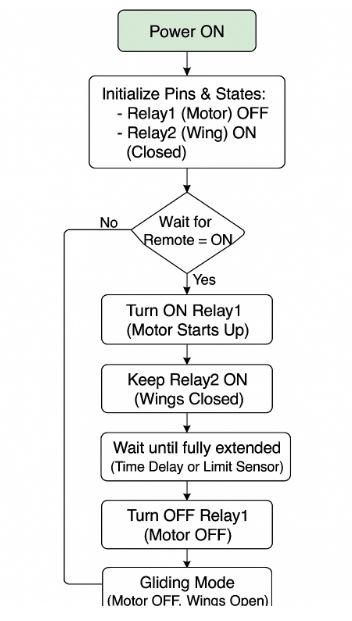
Programming / Logic Control
ESP32 WiFi-Based Wing Control System
This Arduino code is designed for an ESP32 board to control an animatronic wing system via Wi-Fi using a web interface. It connects to a Wi-Fi network and hosts a webpage with buttons to control four output pins: FLY UP, FLY DOWN, FLYING, and LED OUT. These outputs are connected to LEDs, motors (via L298), or sound/light effects. The user interface, styled with CSS and JavaScript, sends HTTP requests to the ESP32 to toggle each output.
The code also handles input from physical switches and an LDR sensor. If the LDR detects
darkness, an LED (pin 10) is turned on. Additionally, during “FLYING” mode (a == 1), the system
responds dynamically to switch inputs, automatically reversing the wing motor direction based on UP or DOWN
limit switch triggers.
The server continuously listens for client requests and updates outputs accordingly. This implementation combines hardware control, sensory input, and a responsive web interface for interactive, remote-controlled motion.
Tools Used: Arduino IDE
- LDR input
- Motor direction control
- LED brightness based on light level
ESP32 Wi-Fi-Based Animatronic Wing Control – Complete Arduino Code
// Complete Arduino Code:
#include <WiFi.h>
#include <WebServer.h>

// Wi-Fi Credentials
const char* ssid = "Redmi10T";
const char* password = "12345678";
int a = 0;

// LED pins
const int ledPins[4] = {3, 4, 8, 10}; // GPIOs for Red, Green, Blue, Pink OUTPUTS
// 2, 3 Motor Logic Input to L298 to forward and reverse direction
// 8 Bird Sound Output
// 10 WLED Output

WebServer server(80);

// HTML Page with JavaScript and CSS
const char MAIN_page[] PROGMEM = R"rawliteral(
<!DOCTYPE html>
<html>
<head>
  <title>ESP32 LED Control</title>
  <style>
    body { font-family: Arial; text-align: center; margin-top: 40px; background: #f0f0f0; }
    h1 { color: #333; }
    button {
      font-size: 18px; padding: 10px 20px; margin: 10px;
      border: none; border-radius: 8px;
      cursor: pointer; color: white;
    }
    .red { background-color: #e53935; }
    .green { background-color: #43a047; }
    .blue { background-color: #1e88e5; }
    .pink { background-color: #d81b60; }
    .off { background-color: #757575; }
  </style>
</head>
<body>
  <h1>ESP32 LED Controller</h1>
  <div>
    <button class="red" onclick="send('red/on')">FLY UP</button>
    <button class="off" onclick="send('red/off')">FLY UP OFF</button><br>
    <button class="green" onclick="send('green/on')">FLY DOWN</button>
    <button class="off" onclick="send('green/off')">FLY DOWN OFF</button><br>
    <button class="blue" onclick="send('blue/on')">FLYING</button>
    <button class="off" onclick="send('blue/off')">FLYING OFF</button><br>
    <button class="pink" onclick="send('pink/on')">LED OUT</button>
    <button class="off" onclick="send('pink/off')">LED OFF</button>
  </div>
  <script>
    function send(path) {
      fetch('/' + path)
        .then(response => response.text())
        .then(data => console.log(data));
    }
  </script>
</body>
</html>
)rawliteral";

// Web server route handling
void handleRoot() {
  server.send_P(200, "text/html", MAIN_page);
}

void setupRoutes() {
  server.on("/", handleRoot);
  server.on("/red/on", []() {
    digitalWrite(ledPins[0], HIGH); Serial.println("FLY UP");
    server.send(200, "text/plain", "Red ON");
  });
  server.on("/red/off", []() {
    digitalWrite(ledPins[0], LOW); Serial.println("FLY UP OFF");
    server.send(200, "text/plain", "Red OFF");
  });
  server.on("/green/on", []() {
    digitalWrite(ledPins[1], HIGH); Serial.println("FLY DOWN");
    server.send(200, "text/plain", "Green ON");
  });
  server.on("/green/off", []() {
    digitalWrite(ledPins[1], LOW); Serial.println("FLY DOWN OFF");
    server.send(200, "text/plain", "Green OFF");
  });
  server.on("/blue/on", []() {
    digitalWrite(ledPins[2], HIGH); Serial.println("FLYING"); a = 1;
    server.send(200, "text/plain", "Blue ON");
  });
  server.on("/blue/off", []() {
    digitalWrite(ledPins[2], LOW); Serial.println("FLYING OFF"); a = 0;
    server.send(200, "text/plain", "Blue OFF");
  });
  server.on("/pink/on", []() {
    digitalWrite(ledPins[3], HIGH); Serial.println("LED OUT");
    server.send(200, "text/plain", "Pink ON");
  });
  server.on("/pink/off", []() {
    digitalWrite(ledPins[3], LOW); Serial.println("LED OFF");
    server.send(200, "text/plain", "Pink OFF");
  });
}

void setup() {
  Serial.begin(115200);
  for (int i = 0; i < 4; i++) {
    pinMode(ledPins[i], OUTPUT); digitalWrite(ledPins[i], LOW);
  }
  pinMode(5, INPUT);  // UP STOP Switch
  pinMode(6, INPUT);  // DOWN STOP Switch
  pinMode(9, INPUT);  // LDR Sensor

  WiFi.begin(ssid, password);
  Serial.print("Connecting to WiFi");
  while (WiFi.status() != WL_CONNECTED) {
    delay(500); Serial.print(".");
  }
  Serial.println("\nWiFi connected. IP address: ");
  Serial.println(WiFi.localIP());

  setupRoutes();
  server.begin();
}

void loop() {
  if (digitalRead(5)==LOW) {
    digitalWrite(ledPins[0], LOW); Serial.println("FLY UP OFF");
    server.send(200, "text/plain", "Red OFF");
  }
  if (digitalRead(6)==LOW) {
    digitalWrite(ledPins[1], LOW); Serial.println("FLY DOWN OFF");
    server.send(200, "text/plain", "Green OFF");
  }
  if (digitalRead(9)==HIGH) {
    digitalWrite(10, HIGH);
  } else {
    digitalWrite(10, LOW);
  }

  if (a == 1) {
    if (digitalRead(5)==LOW) {
      digitalWrite(ledPins[0], LOW); digitalWrite(ledPins[1], HIGH);
      Serial.println("FLY UP OFF"); Serial.println("FLY DOWN");
      server.send(200, "text/plain", "Red OFF");
      server.send(200, "text/plain", "Green ON");
    }
    if (digitalRead(6)==LOW) {
      digitalWrite(ledPins[1], LOW); digitalWrite(ledPins[0], HIGH);
      Serial.println("FLY DOWN OFF"); Serial.println("FLY UP");
      server.send(200, "text/plain", "Green OFF");
      server.send(200, "text/plain", "Red ON");
    }
  }
  server.handleClient();
}
Bill of Material
| Product Name | Description | Price | Quantity | Total Price | |
|---|---|---|---|---|---|
| Square Pipe (Mild Steel) | 10 feet | ₹50/ft | 1 | ₹500 | |
| Motor to screwrod Coupler | 16mm | ₹377 | 1 | ₹377 | |
| DC Motor | 12V 30RPM | ₹350 | 1 | ₹350 | |
| Battery | 12V 7 amps | ₹750 | 1 | ₹750 | |
| Battery case in sheet metal | lasercut charges | ₹500 | 1 | ₹500 | |
| Wire | 14/36 Multi Color | ₹100 | 1 | ₹100 | |
| Limit Switch | DC Motor Cutoff | ₹100 | 2 | ₹200/ | |
| Motor Driver | Manual Direction | ₹180 | 1 | ₹180 | |
| Motor fixture | 1.5inch Pipe clamp | ₹10 | 1 | ₹10 | |
| Wing Materials | Electric casing pipe 20 feet. | 1 feet ₹8 | 20 | ₹160 | |
| Rgb Led | 10feet | ₹500 | 1 | ₹881 | |
| bag belt,lock,rivit etc | 5meter,1,24no | 350 | 1 | ₹350 | |
| 2 inch,1 inch bolt,nut,washer | 24 no | 80 | 1 | ₹80 | |
| Grand Total | ₹4,438 | ||||