Group Assignment:
As part of the Computer-Controlled Machining group assignment, we first completed CNC machine safety training and learned the proper operating procedures. The team studied machine components, cutting tools, spindle operation, workpiece fixturing, emergency stop functions, and dust extraction systems. We also learned the importance of personal protective equipment (PPE) and safe machine handling practices.
The group then characterized the CNC machine by testing runout, alignment, fixturing methods, cutting parameters, materials, and toolpaths. Different feeds, speeds, depth of cut, and machining strategies were evaluated to understand their effect on machining quality and accuracy. Test cuts were performed to verify machine performance and determine suitable settings for large-format CNC machining.
Through these experiments, we gained practical knowledge of CNC workflow, including CAD design preparation, CAM toolpath generation, machine setup, zero-point calibration, stock fixing, tool selection, and machining operations. The results helped us identify optimal machining parameters and understand how machine settings influence cut quality, dimensional accuracy, and overall machining efficiency.
This group assignment provided hands-on experience in safely operating a CNC machine and understanding the relationship between tooling, fixturing, feeds, speeds, and toolpaths. The knowledge gained formed a strong foundation for successfully completing the individual "Make Something Big" project.
Complete your lab's safety training
Test runout, alignment, fixturing, speeds, feeds, materials and toolpaths for your machine
Document your work to the group work page and
Reflect on your individual page what you learned
In the Computer Controlled Machining group assignment, I was responsible for generating the toolpaths using ArtCAM. The original design was created in Fusion 360 by another group member. I imported the design file into ArtCAM and carefully prepared it for CNC machining.
This involved setting up the correct material dimensions, selecting the appropriate tool (end mill), defining the cutting depths, and generating the 2D toolpaths for engraving. I also simulated the machining operation in ArtCAM to ensure the paths were accurate and safe to use.
Once finalized, the toolpath files were exported and sent to the CNC machine for actual engraving. This workflow helped us bridge CAD and CAM processes efficiently, demonstrating the importance of collaborative work in digital fabrication.
Individual project
Make (design+mill+assemble) something big
Computer-controlled machining, also known as CNC (Computer Numerical Control) machining, is a manufacturing
process that uses
computer software to control machine tools. CNC machines are used to create precise parts from a variety of
materials.
How CNC machining works?
A CAD (Computer-Aided Design) or CAM (Computer-Aided Manufacturing) file is created.
The CAD file is loaded into the CNC machine's memory.
The machine follows the instructions in the file to cut, mill, or drill the material.
Benefits of CNC machining
Precision: CNC machines can create parts with high accuracy.
Speed: CNC machines can work at high speeds.
Versatility: CNC machines can work with a variety of materials, including metals, wood, and stone.
Efficiency: CNC machines are efficient and can perform complex operations.
Prototype Design
Prototype Design of Interlocking Plywood Bookshelf for FabLab – Computer-Controlled Machining
This prototype features an interlocking bookshelf designed specifically for fabrication using CNC routing technology within a FabLab setup. The design leverages precise digital modeling and toolpath generation to create slot-based joints that eliminate the need for screws or adhesives. Cut from standard plywood sheets, the components are crafted to fit together seamlessly, ensuring a sturdy, modular, and easy-to-assemble structure. This project demonstrates the power of computer-controlled machining in creating functional, flat-pack furniture through efficient material use and digital fabrication workflows.
Hero Shot
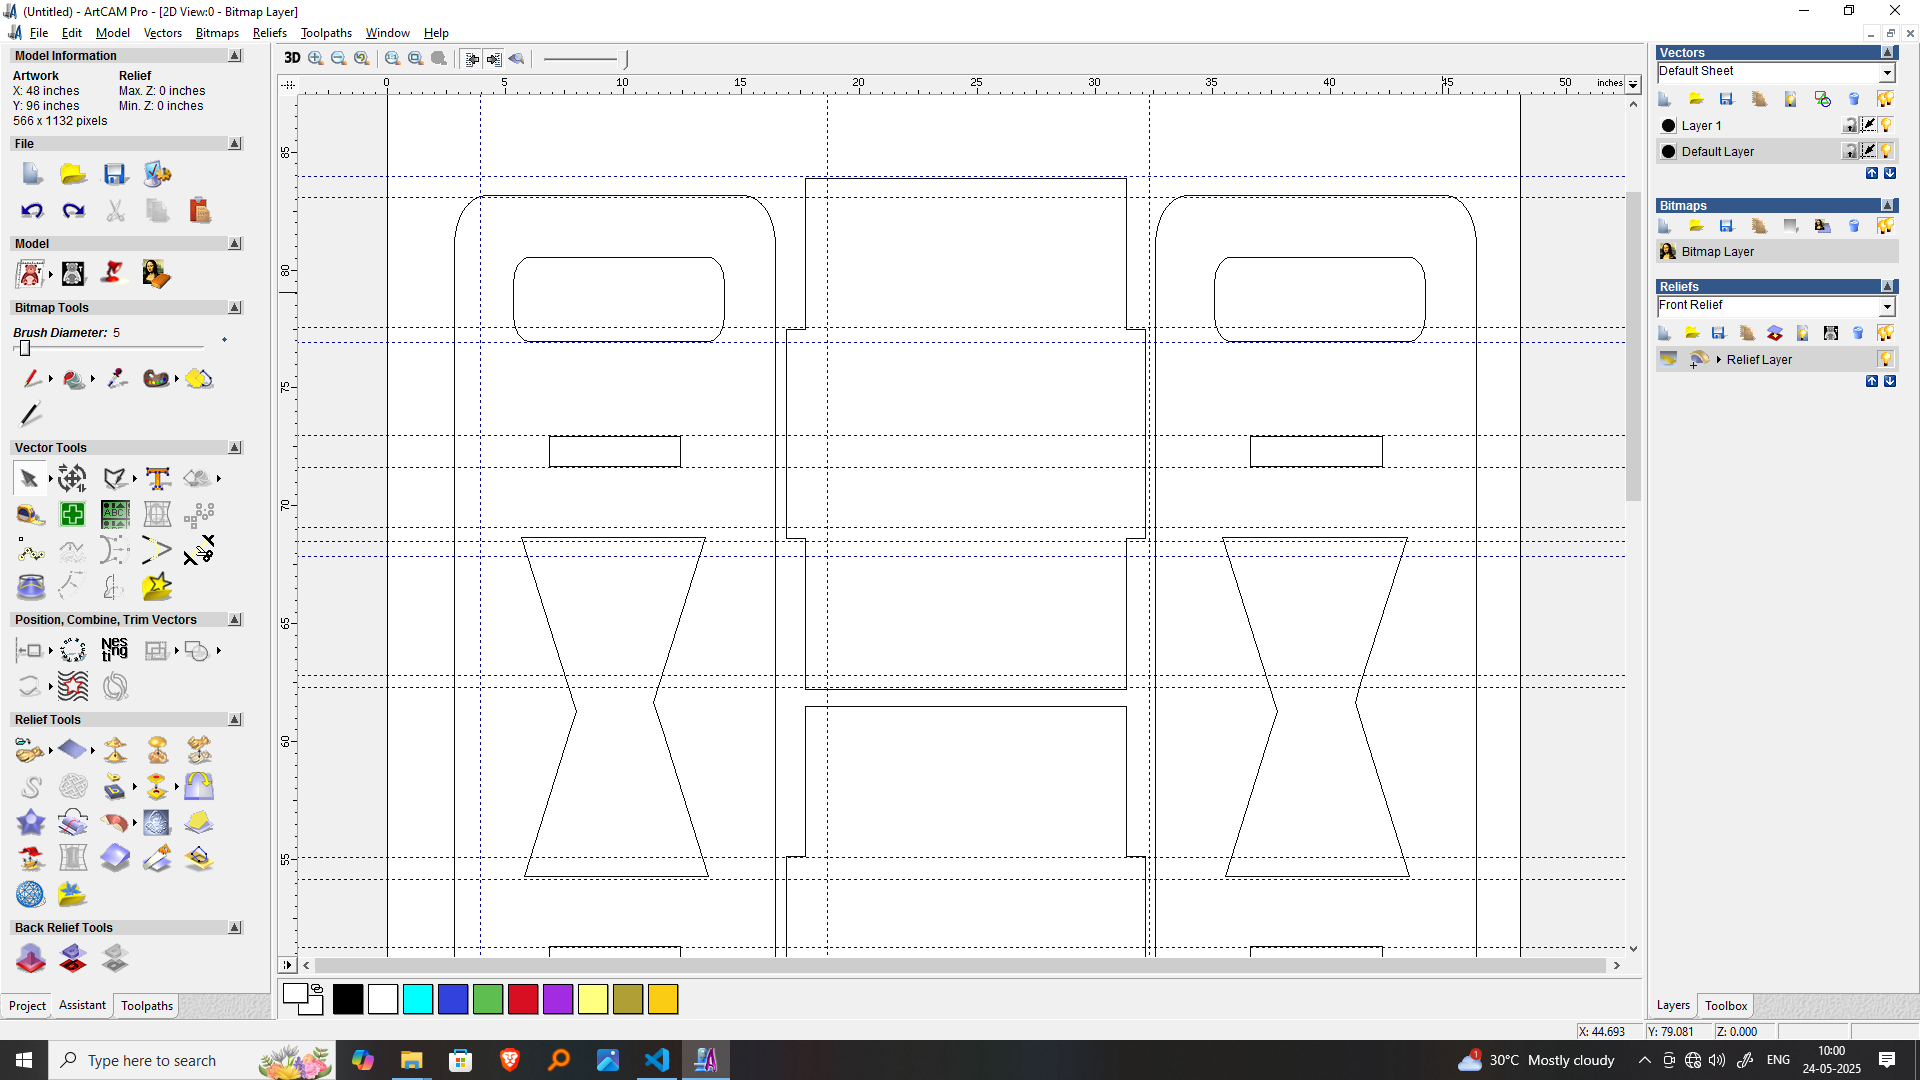
Step 1:Create Design using Artcam.
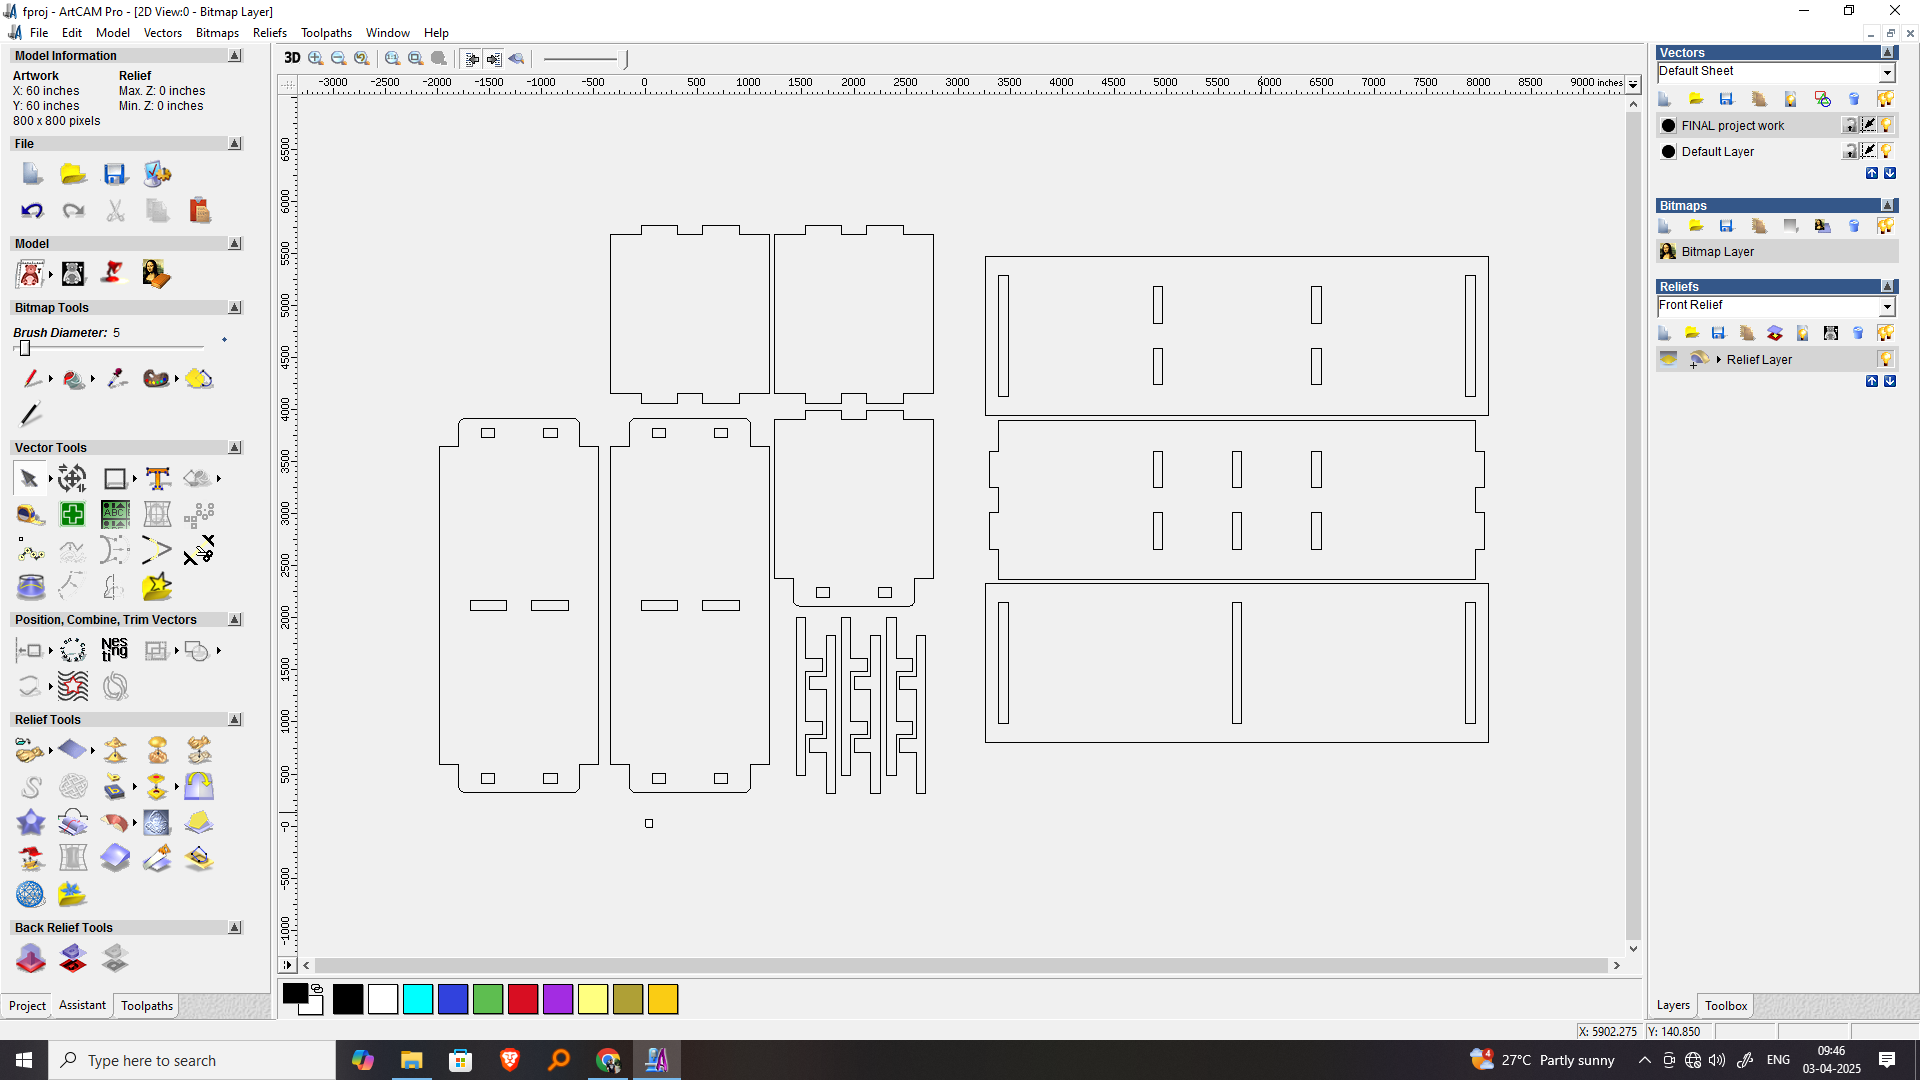
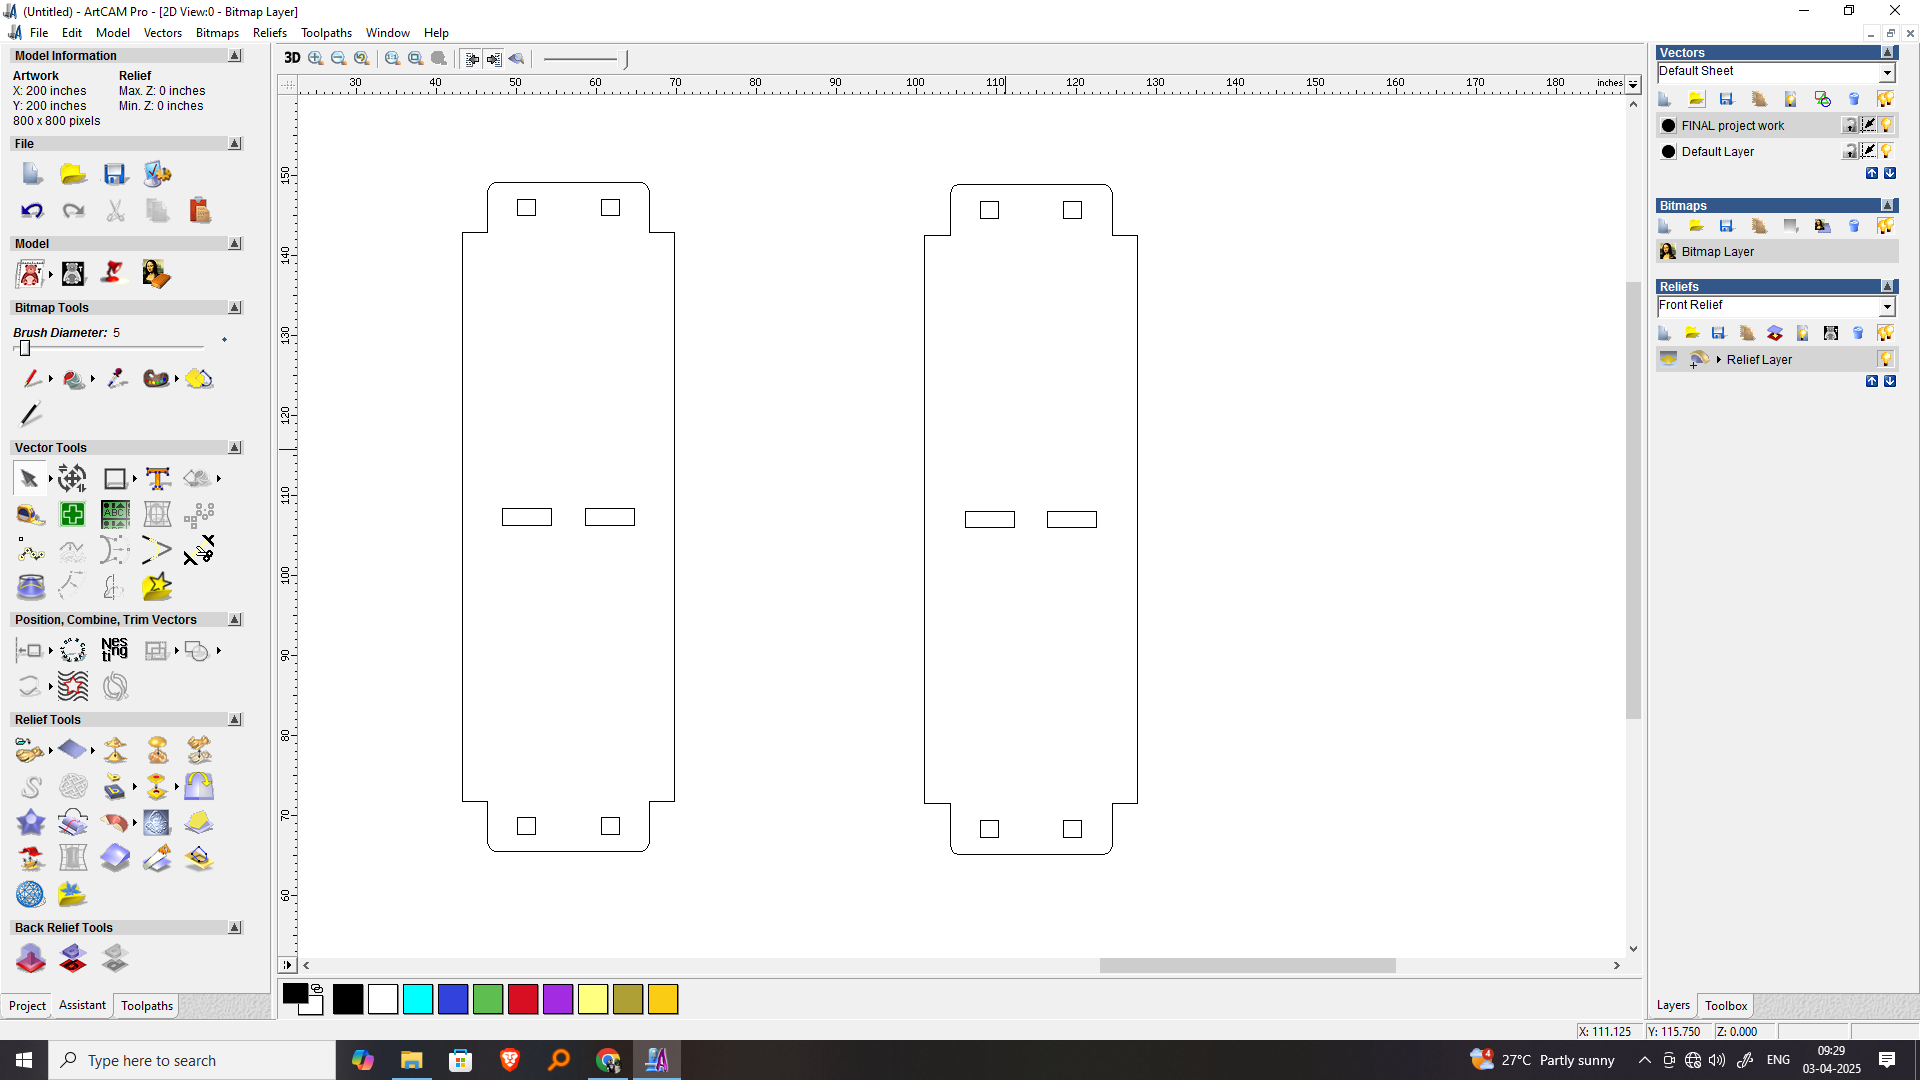
Draw vectors for side panels with evenly spaced18mm wide slots and shelves with matching end slots. Use dog-bone fillets for slot corners to ensure fit. Arrange vectors on a plywood sheet, apply inside/outside profile toolpaths, and add tabs. Use a 6mm flat endmill and export toolpaths for CNC cutting. Assembly is press-fit, requiring no glue. Save as DXF or SVG for FabLab use.
Design an interlocking bookshelf in ArtCAM using 18mm plywood. Create vertical side panels and horizontal shelves with 18.2mm-wide slots for tight fits. Add dog-bone fillets for clean corners. Arrange parts, mirror sides, and export as DXF for CNC cutting, ensuring easy, glue-free assembly.
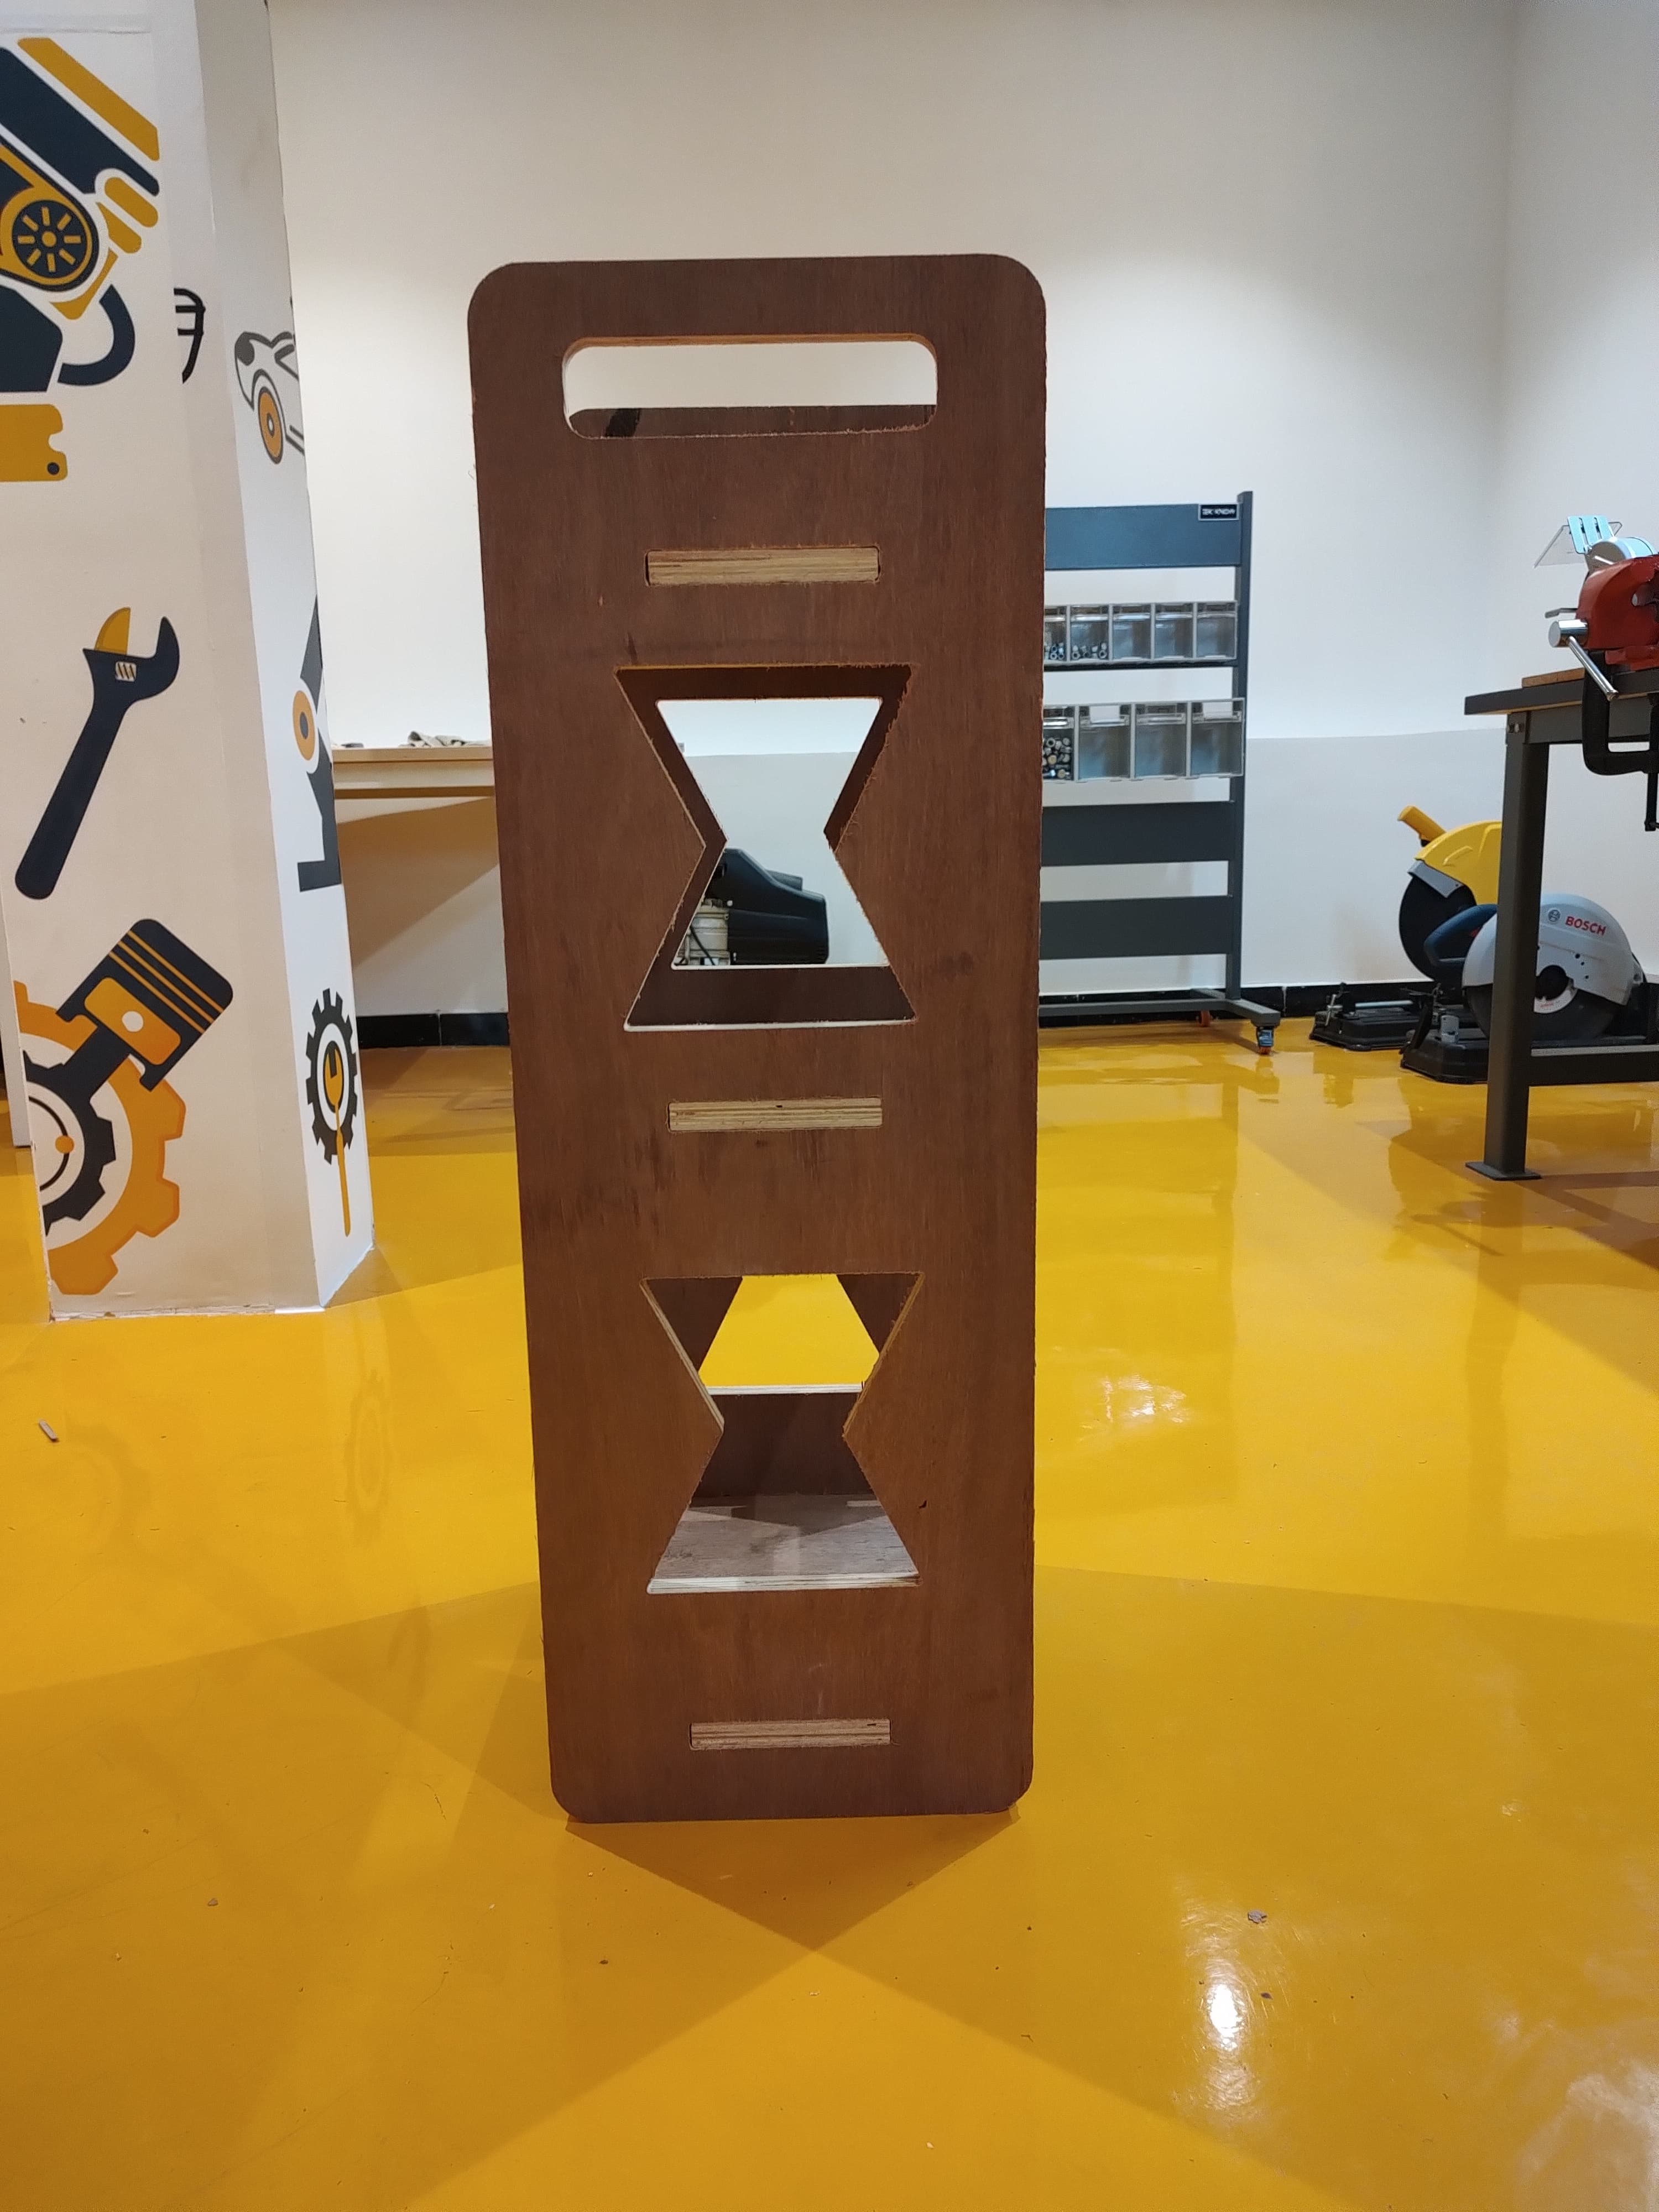
The shelf measures height 4feet*width 1.5 feet*18 mm thickness deep, with two vertical side panels and 3 horizontal shelves and design cut.

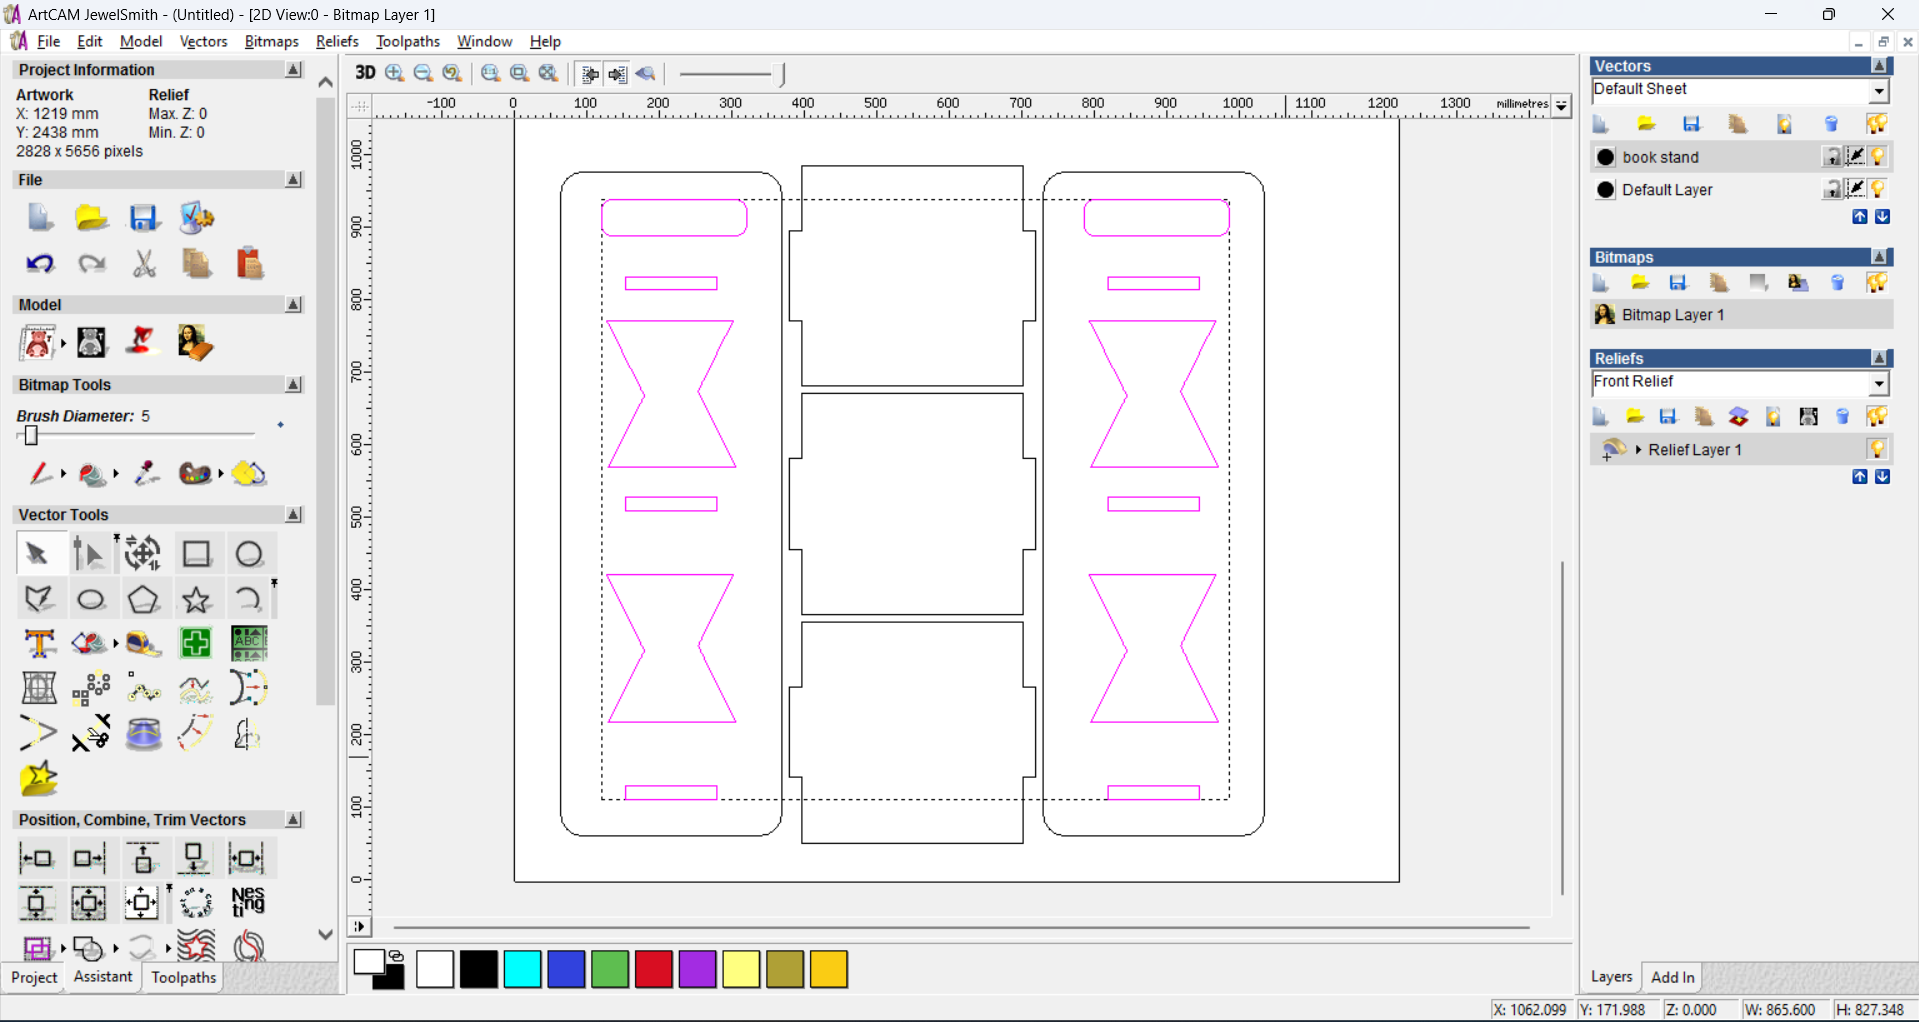
Use ArtCAM’s vector tools to add slot details and outline on the center piece. Then apply the mirror function to create the opposite side panel by flipping the design horizontally. This ensures perfectly matching, symmetrical parts for seamless interlocking and accurate CNC cutting of both sides.

After completing the center interlocking piece design, duplicate it to create a mirrored copy for the opposite side. Ensure the slots and edges align perfectly with the shelves. This creates symmetrical side panels, allowing shelves to fit securely between them for a balanced, sturdy bookshelf assembly.
Design the center interlocking piece as a vertical panel with evenly spaced slots matching the shelves’ thickness. Slots should be 12.2mm wide with dog-bone fillets for fit. The panel height matches the bookshelf height, and slot positions align precisely with horizontal shelves to ensure secure, glue-free interlocking assembly.
Exactly! Create each bookshelf piece with matching slots in ArtCAM, align them properly, then save the complete vector layout as a DXF file. This file can be used directly for CNC cutting, ensuring all parts interlock perfectly for easy assembly without glue or fasteners.
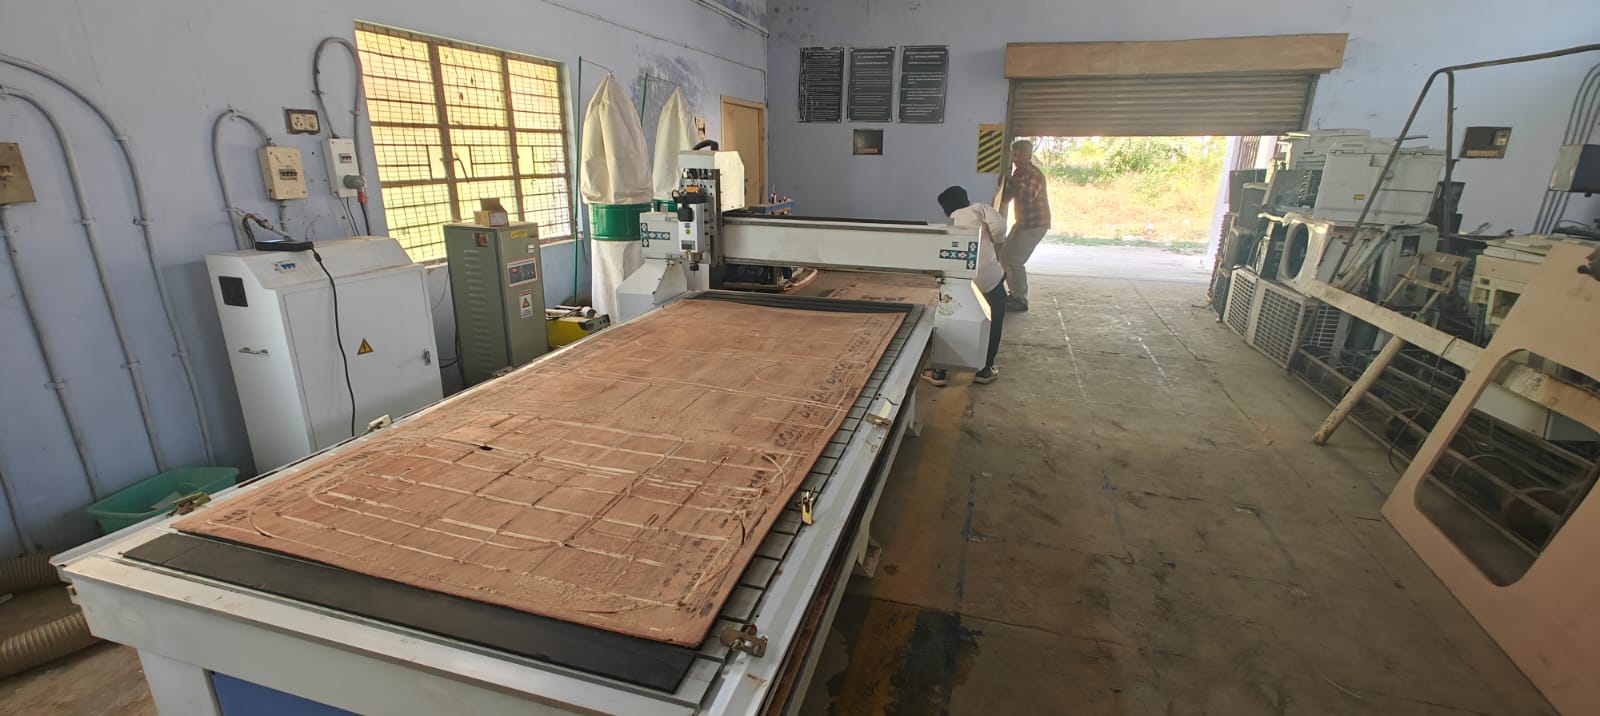
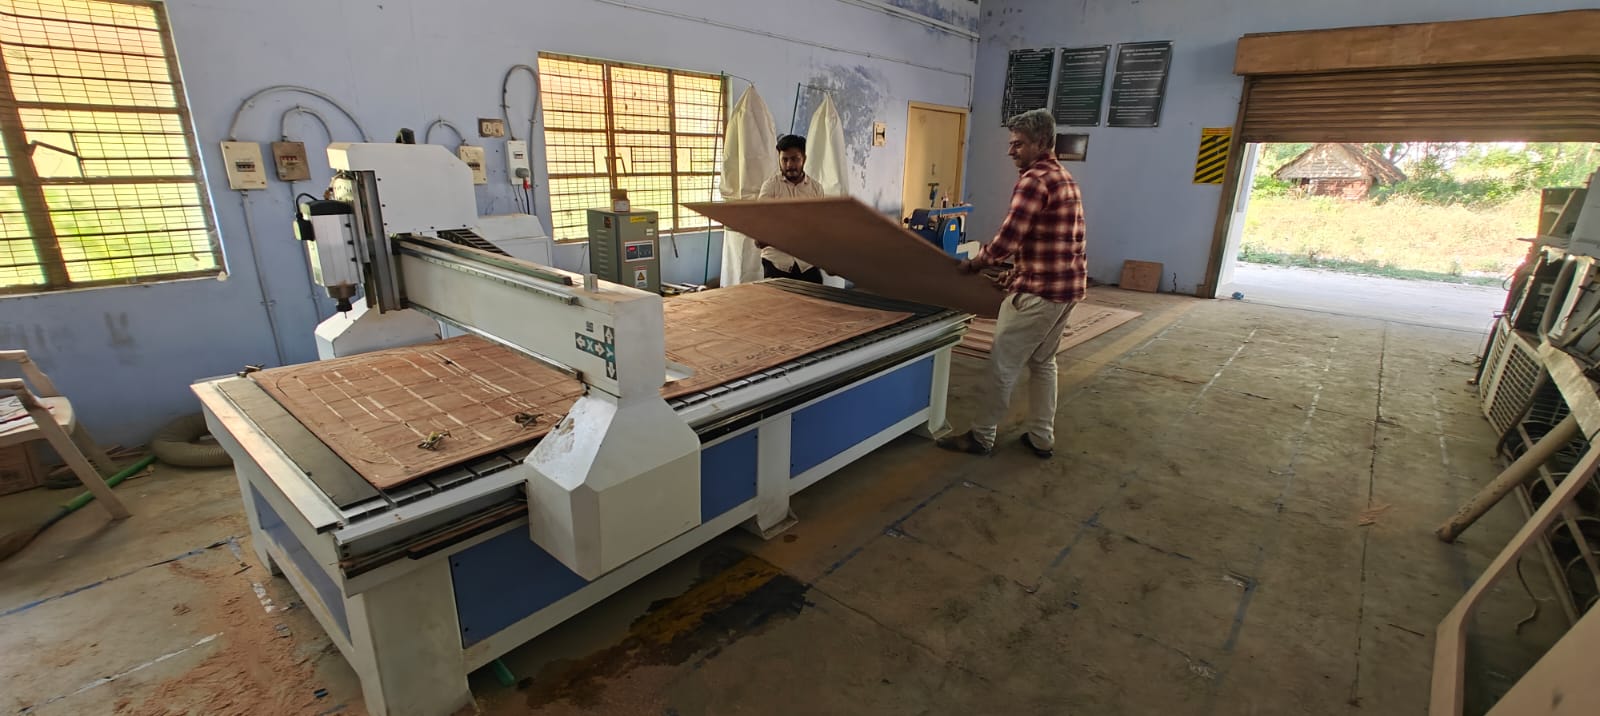
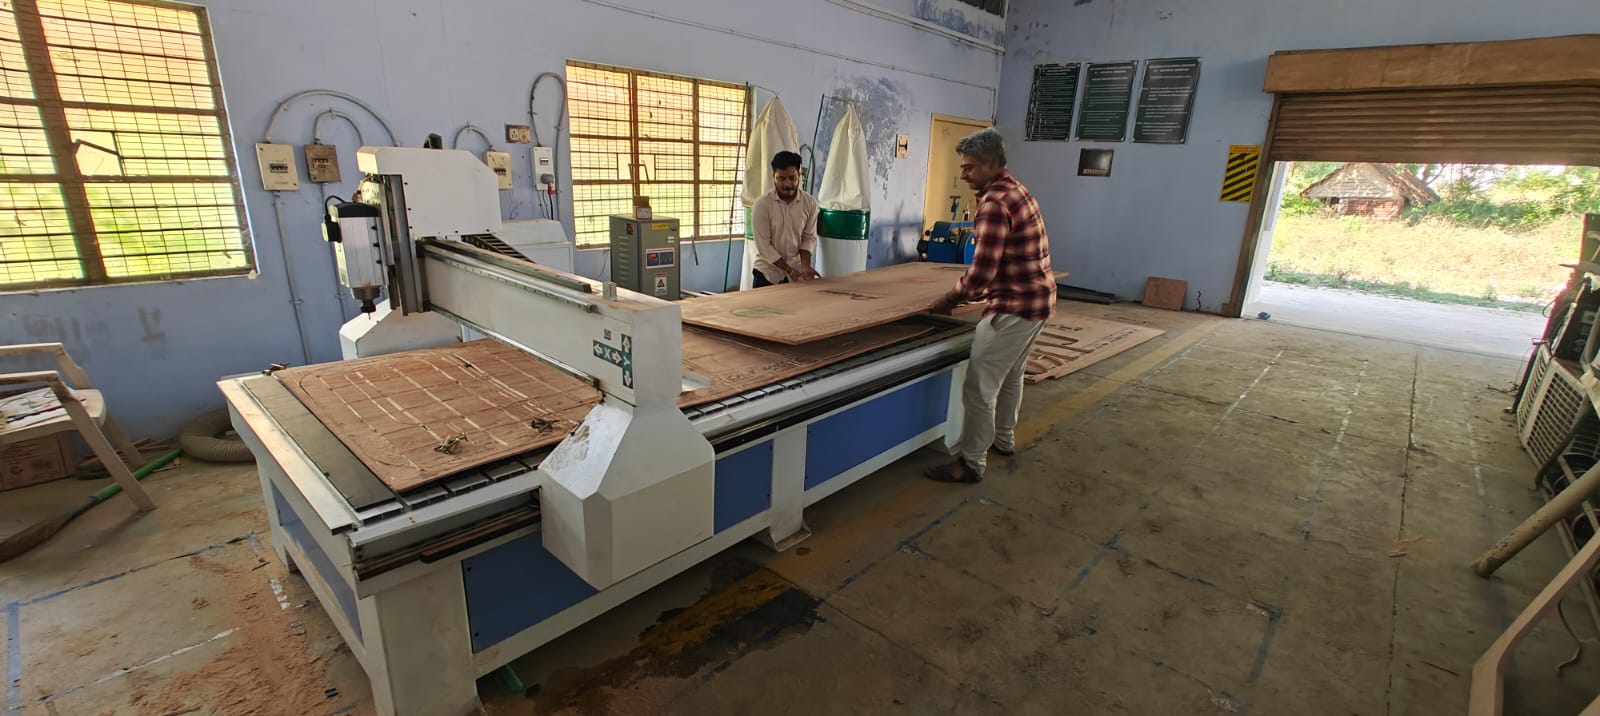
Step 2: Load and Align Plywood on CNC Router.
 |
 |
 |
 |
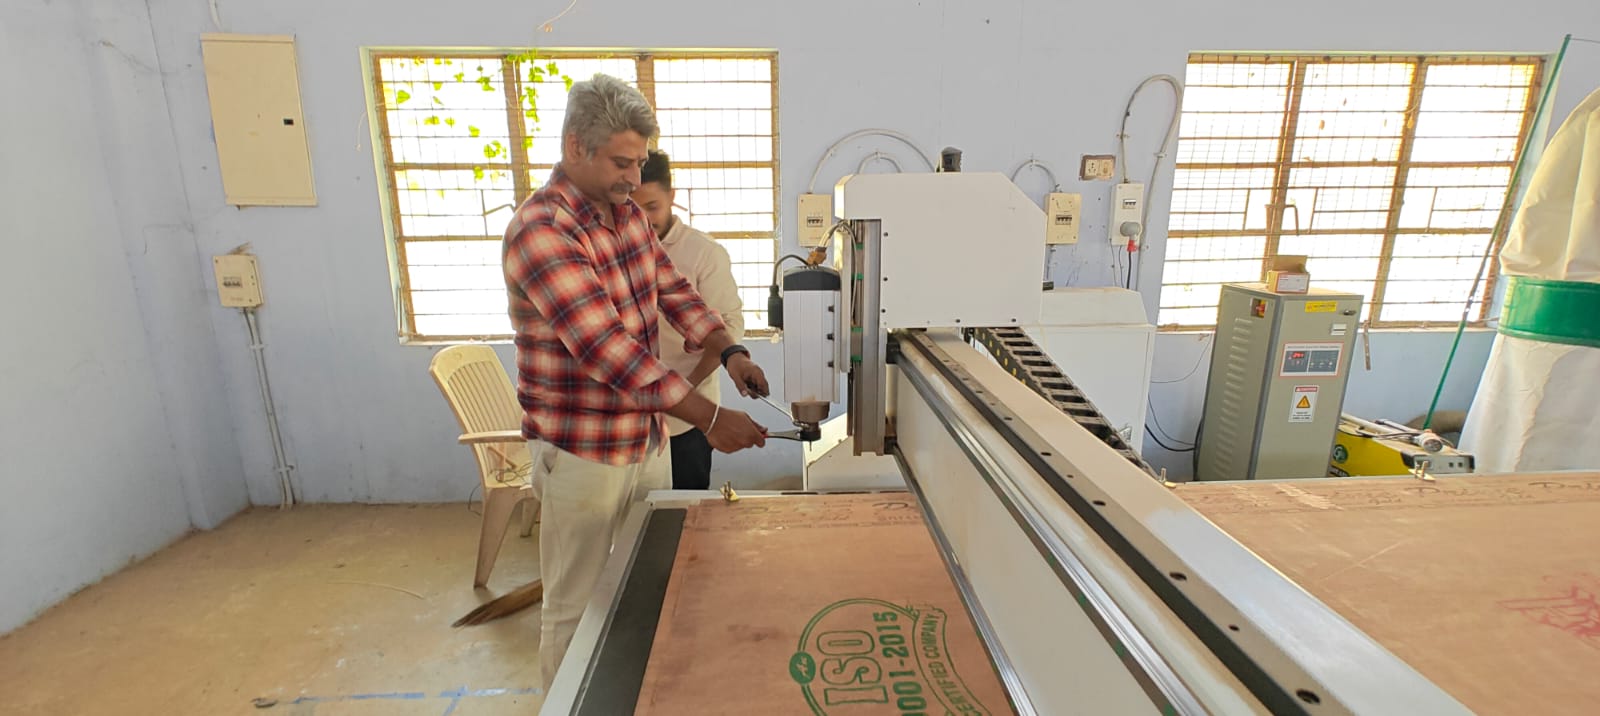
Step 3: Locking the Workpiece in Place Using Screw Clamps
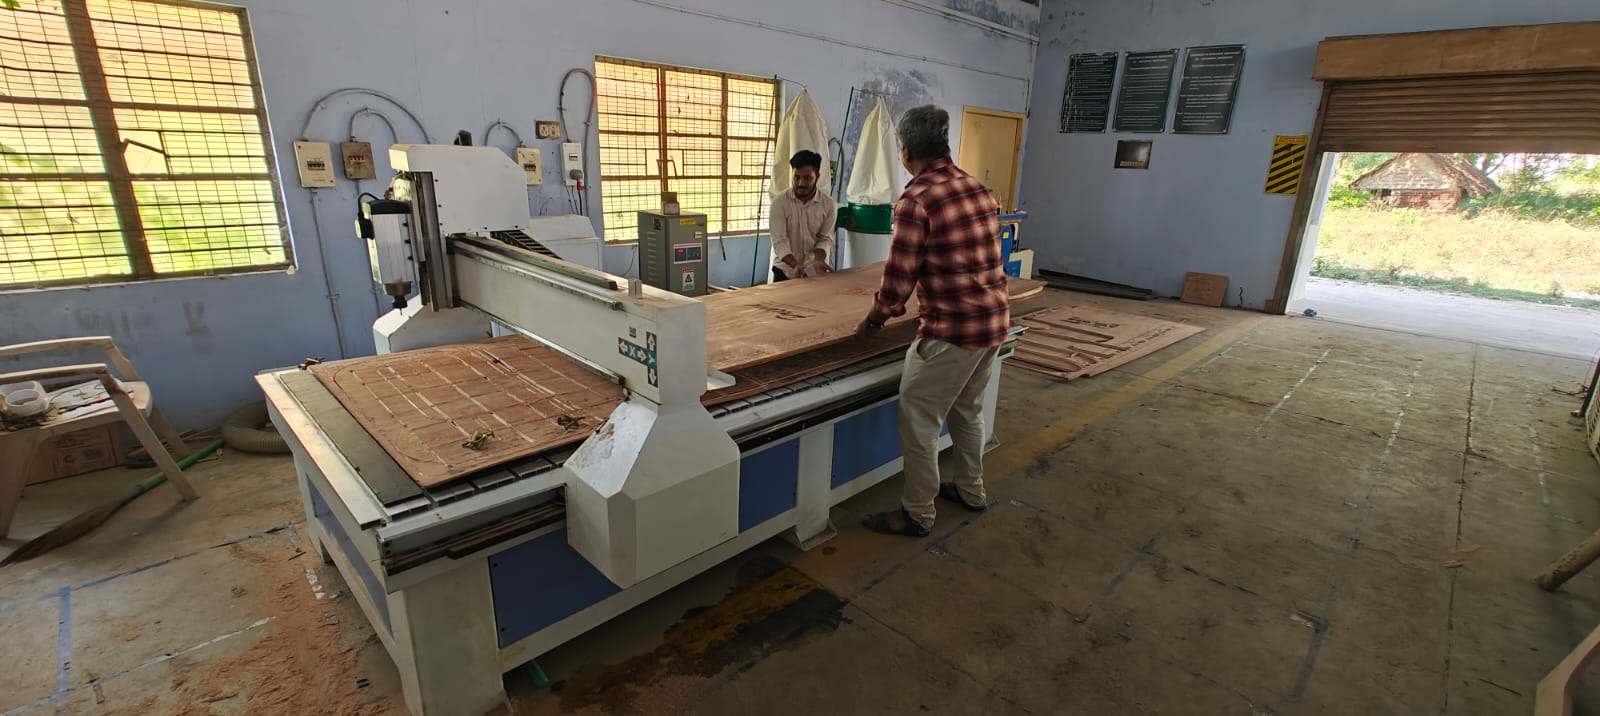
Placing a 4ft × 8ft plywood sheet on a CNC machine is a crucial step that directly affects machining accuracy and overall safety. Due to the large size and weight of the sheet, it is advisable to have at least two people to handle the placement process. Begin by thoroughly cleaning the CNC machine bed to remove any debris, dust, or leftover material that may interfere with proper seating. Ensure that the bed is level and that your spoilboard or support surface is in good condition.
Lift the plywood sheet vertically from the storage position to avoid warping or bending. Carefully bring it over to the CNC bed, taking care not to damage the sheet edges. Lower the sheet gently onto the machine bed, aligning one corner with the machine’s defined origin point, usually the bottom-left corner of the work area.
Securing the plywood sheet properly before machining is crucial for safety and precision. Screw clamps provide a simple and reliable method for clamping, especially when working on a non-vacuum CNC bed. The plywood sheet is positioned with alignment stops or reference edges, then clamped around its perimeter using steel screw clamps at regular intervals to prevent shifting or vibration. Care must be taken not to place clamps where the toolpaths will pass. Alternatively, sacrificial strips can be used beneath the sheet to allow full-depth cutting while protecting the machine bed from tool contact.
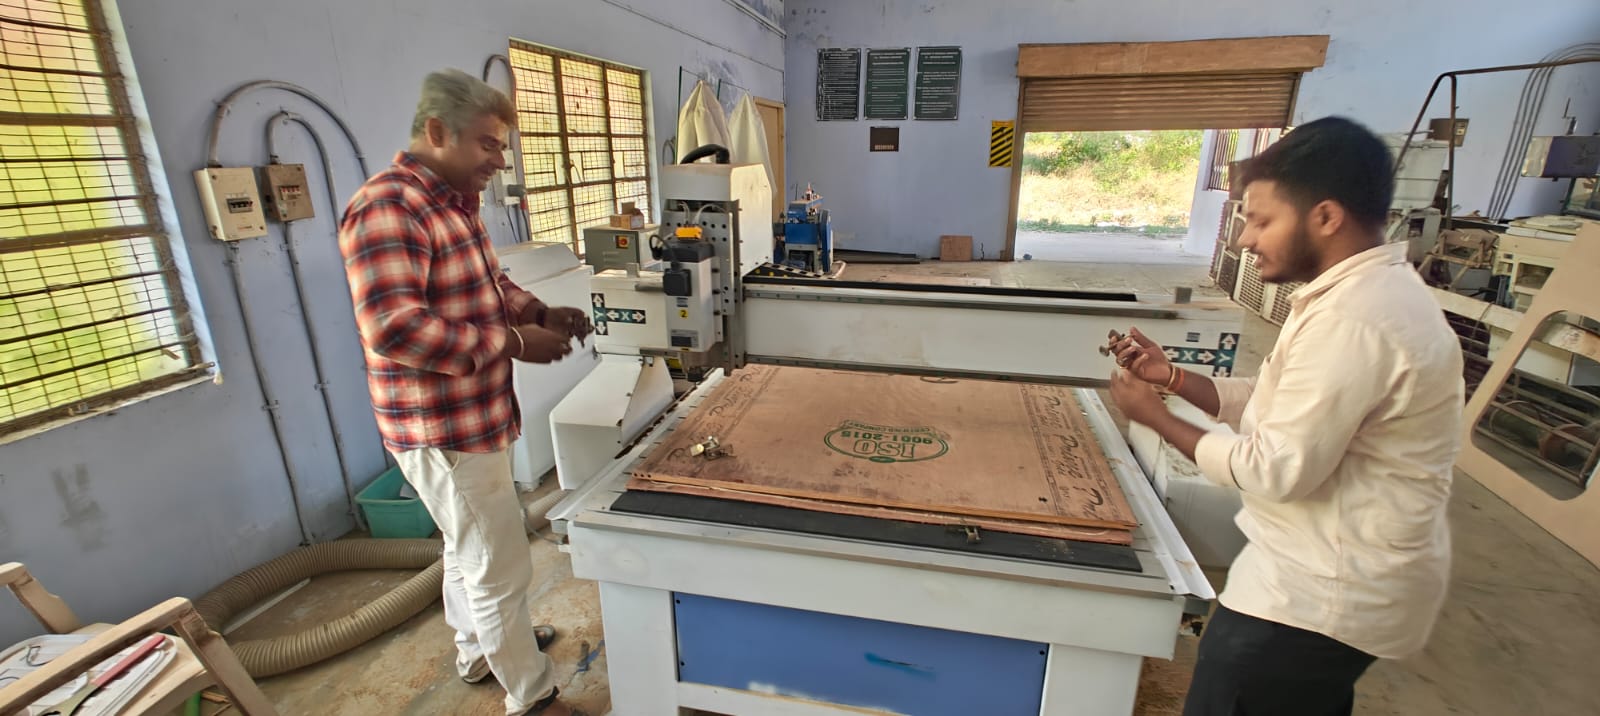
Step 4: Tool Setup – Securing the 6mm End Mill Cutter

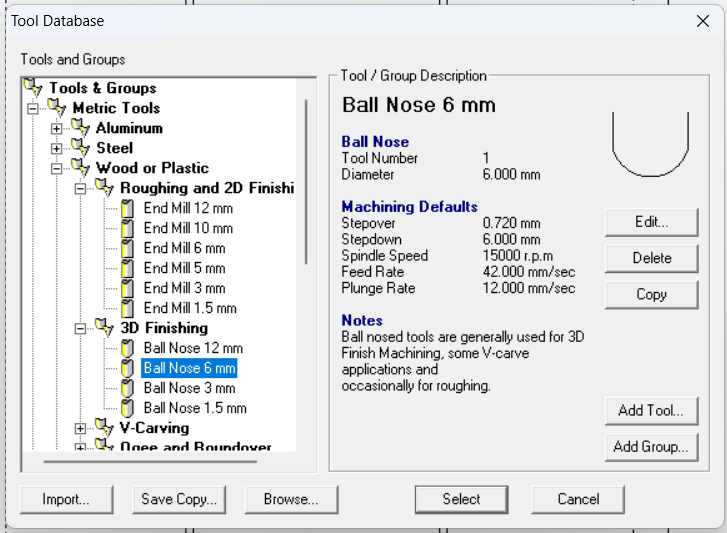
Once the workpiece is clamped, the next step is tool setup. A 6mm round end mill is ideal for cutting plywood, offering a balance between precision and cutting speed. The cutter is inserted into the spindle collet and securely tightened using two spanners to prevent any slippage during operation. Proper insertion depth is critical— typically two-thirds of the shank should be inside the collet. The tool is then zeroed to the work surface using either a touch-off plate or manual jog method. Ensuring that the cutter is sharp and undamaged helps maintain clean edges and minimizes tool wear.
Once the plywood sheet is securely fixed and the 6mm end mill cutter is installed in the CNC machine, I open ArtCAM 9 Jewelsmith software to create the toolpaths First, I set the plywood sheet size in the software to 1220mm × 2440mm with an 18mm thickness. wood routing creating tool path-tracing
Step 5: Generating the CNC Tool Path
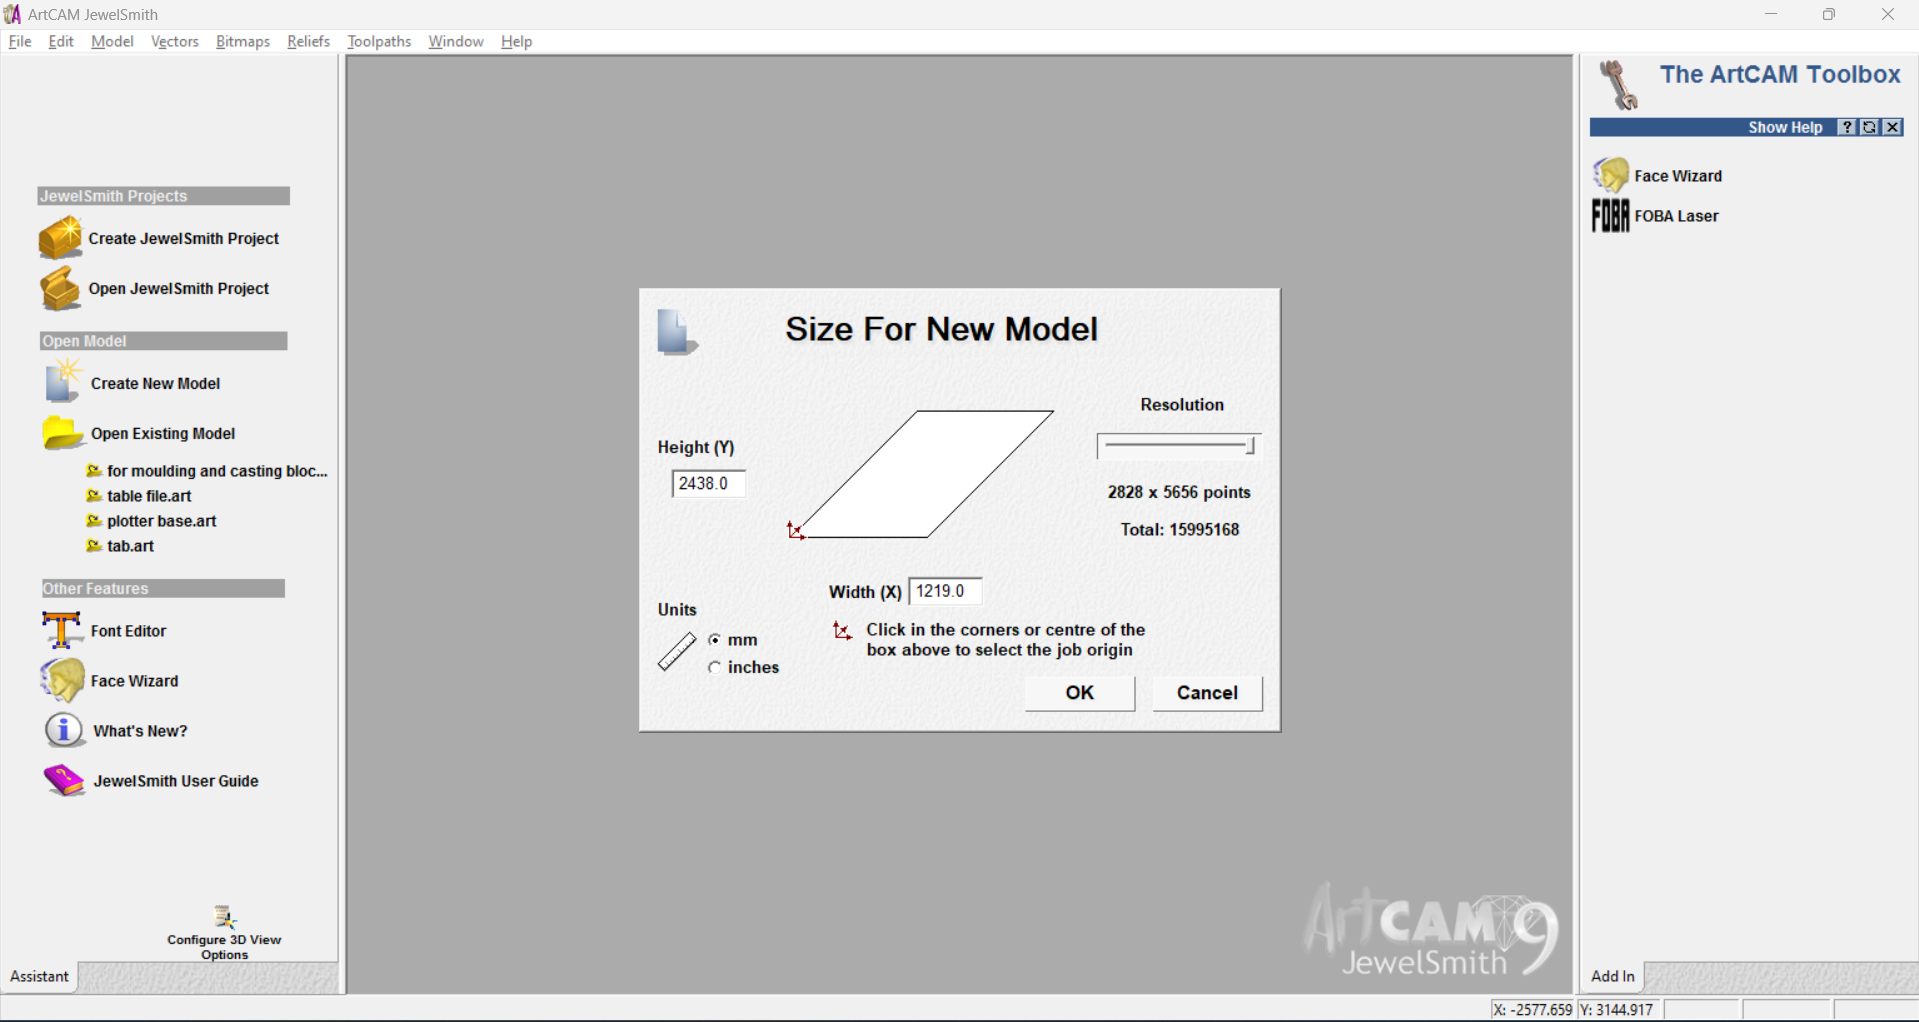
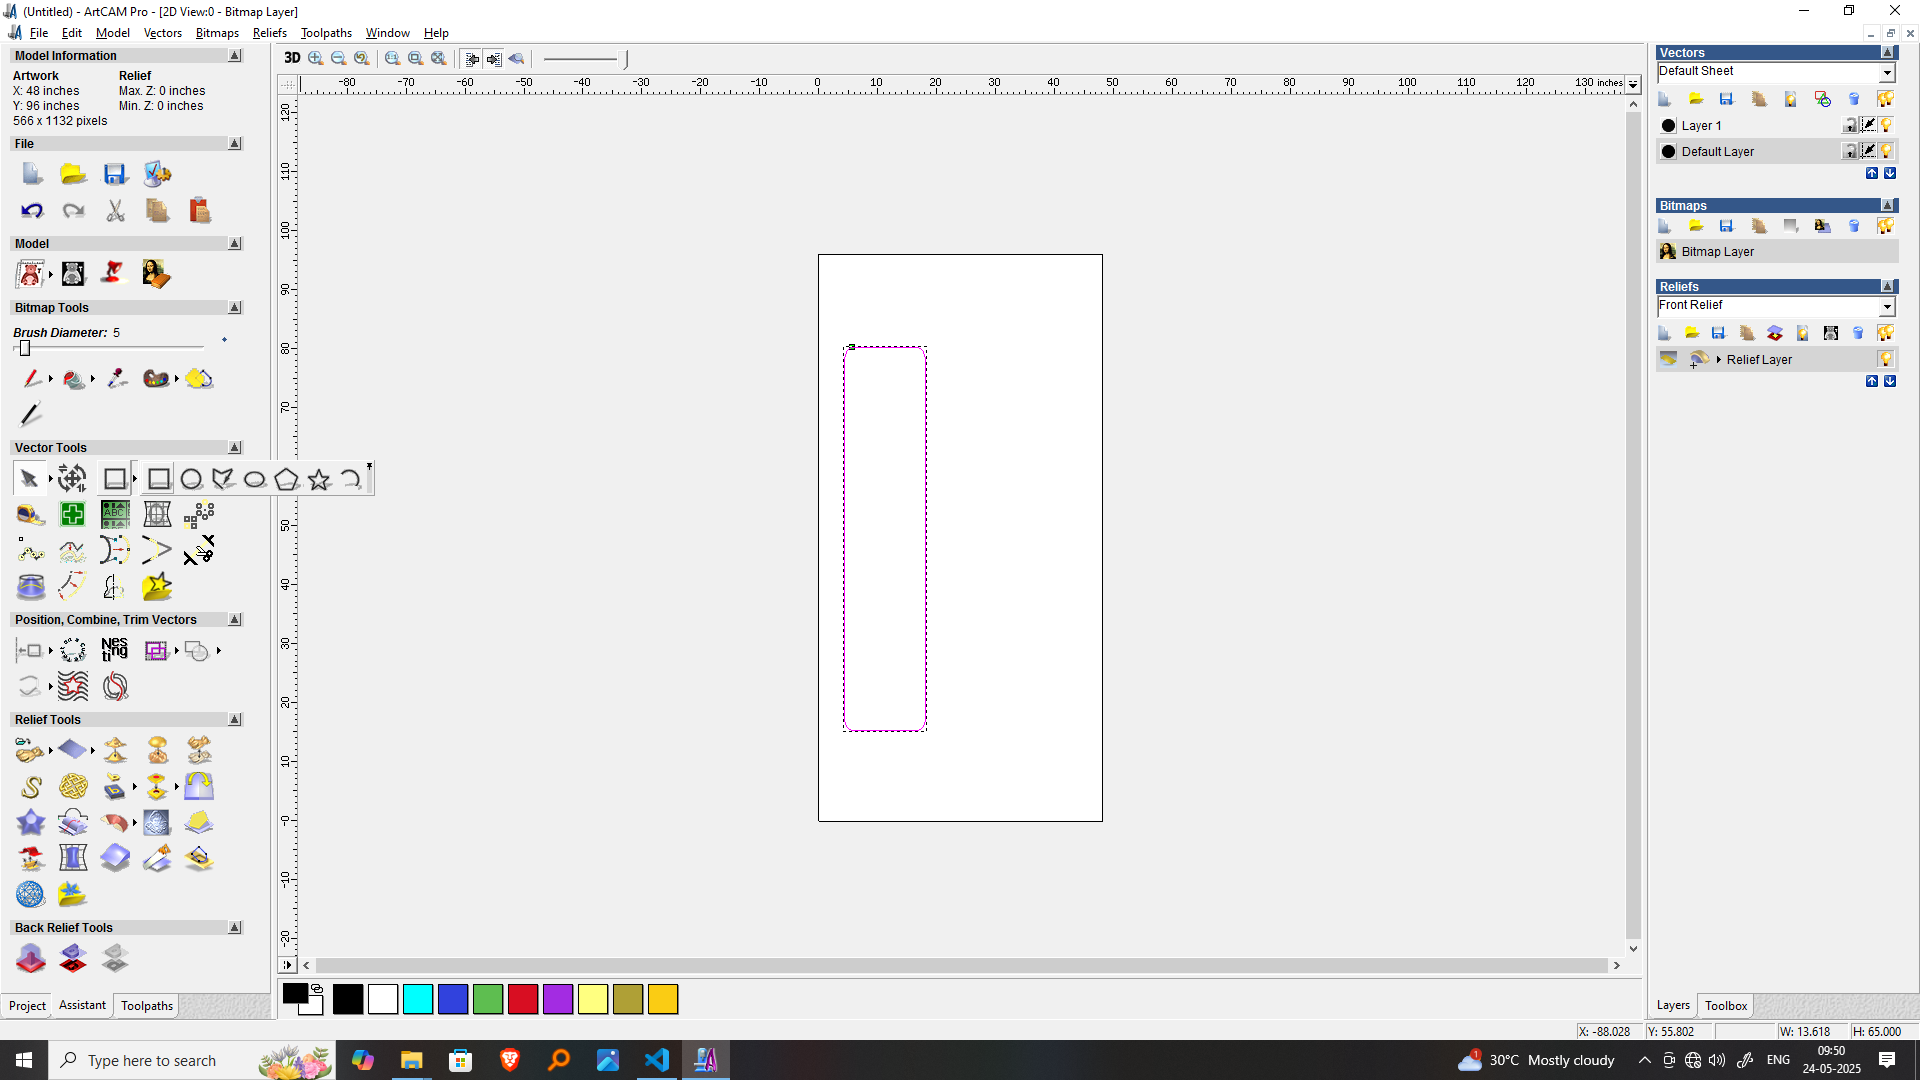
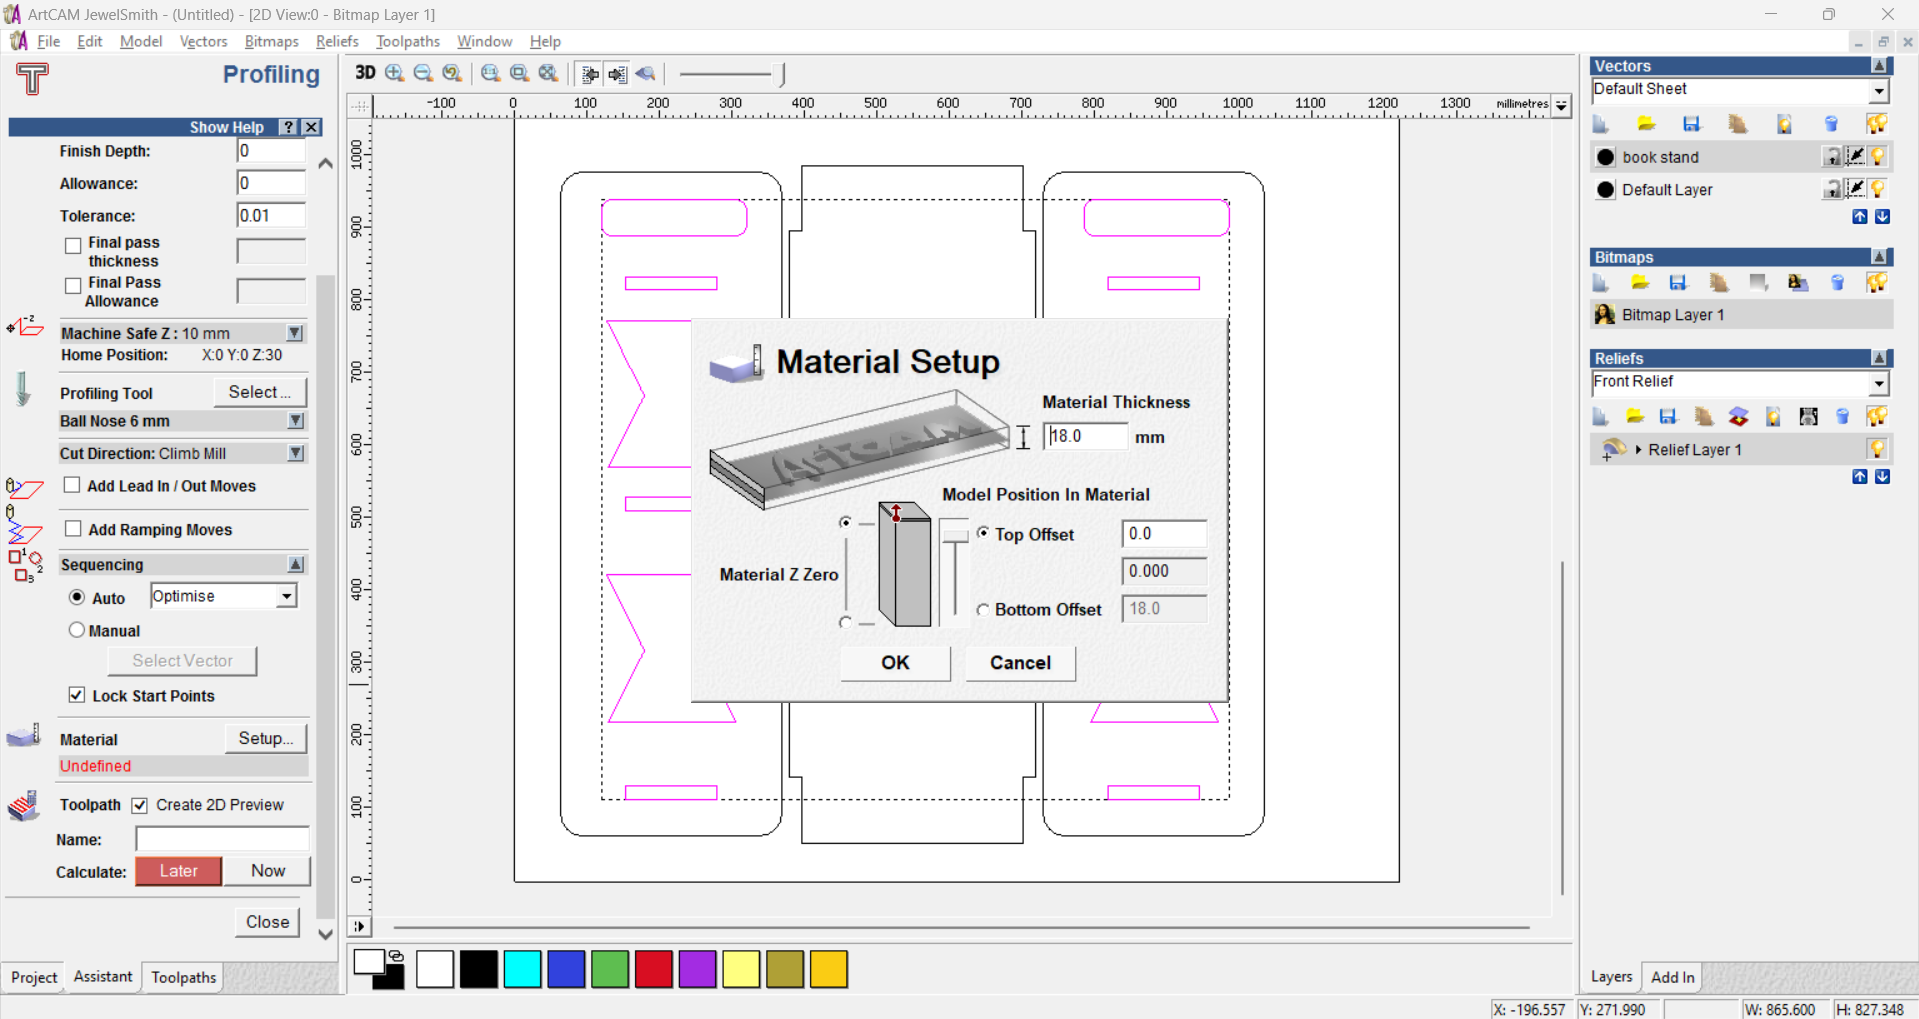
In ArtCAM, the work area file is created by first setting up a new project with the exact dimensions of the plywood sheet—1220mm × 2440mm and 18mm thickness. I define the origin point, typically at the bottom-left corner, matching the CNC machine’s setup. The material settings are entered, including surface position and Z-zero reference. This work area acts as the digital workspace where I import or draw 2D vectors for the interlocking bookshelf parts. It ensures that all design elements are positioned accurately within the plywood sheet, ready for toolpath creation and export to the CNC machine.

After creating the work area in ArtCAM, I proceed to import the DXF file that contains the 2D design of the bookshelf parts.
Using the “Import Vector” option, I select the DXF file and load it into the workspace. The imported vectors appear on the defined plywood area, and I check their position and scale to ensure they fit within the 1220mm × 2440mm sheet.
If needed, I align or move the parts to optimize material usage. Once placed correctly, I verify that all lines are closed and ready for toolpath creation for accurate CNC cutting.
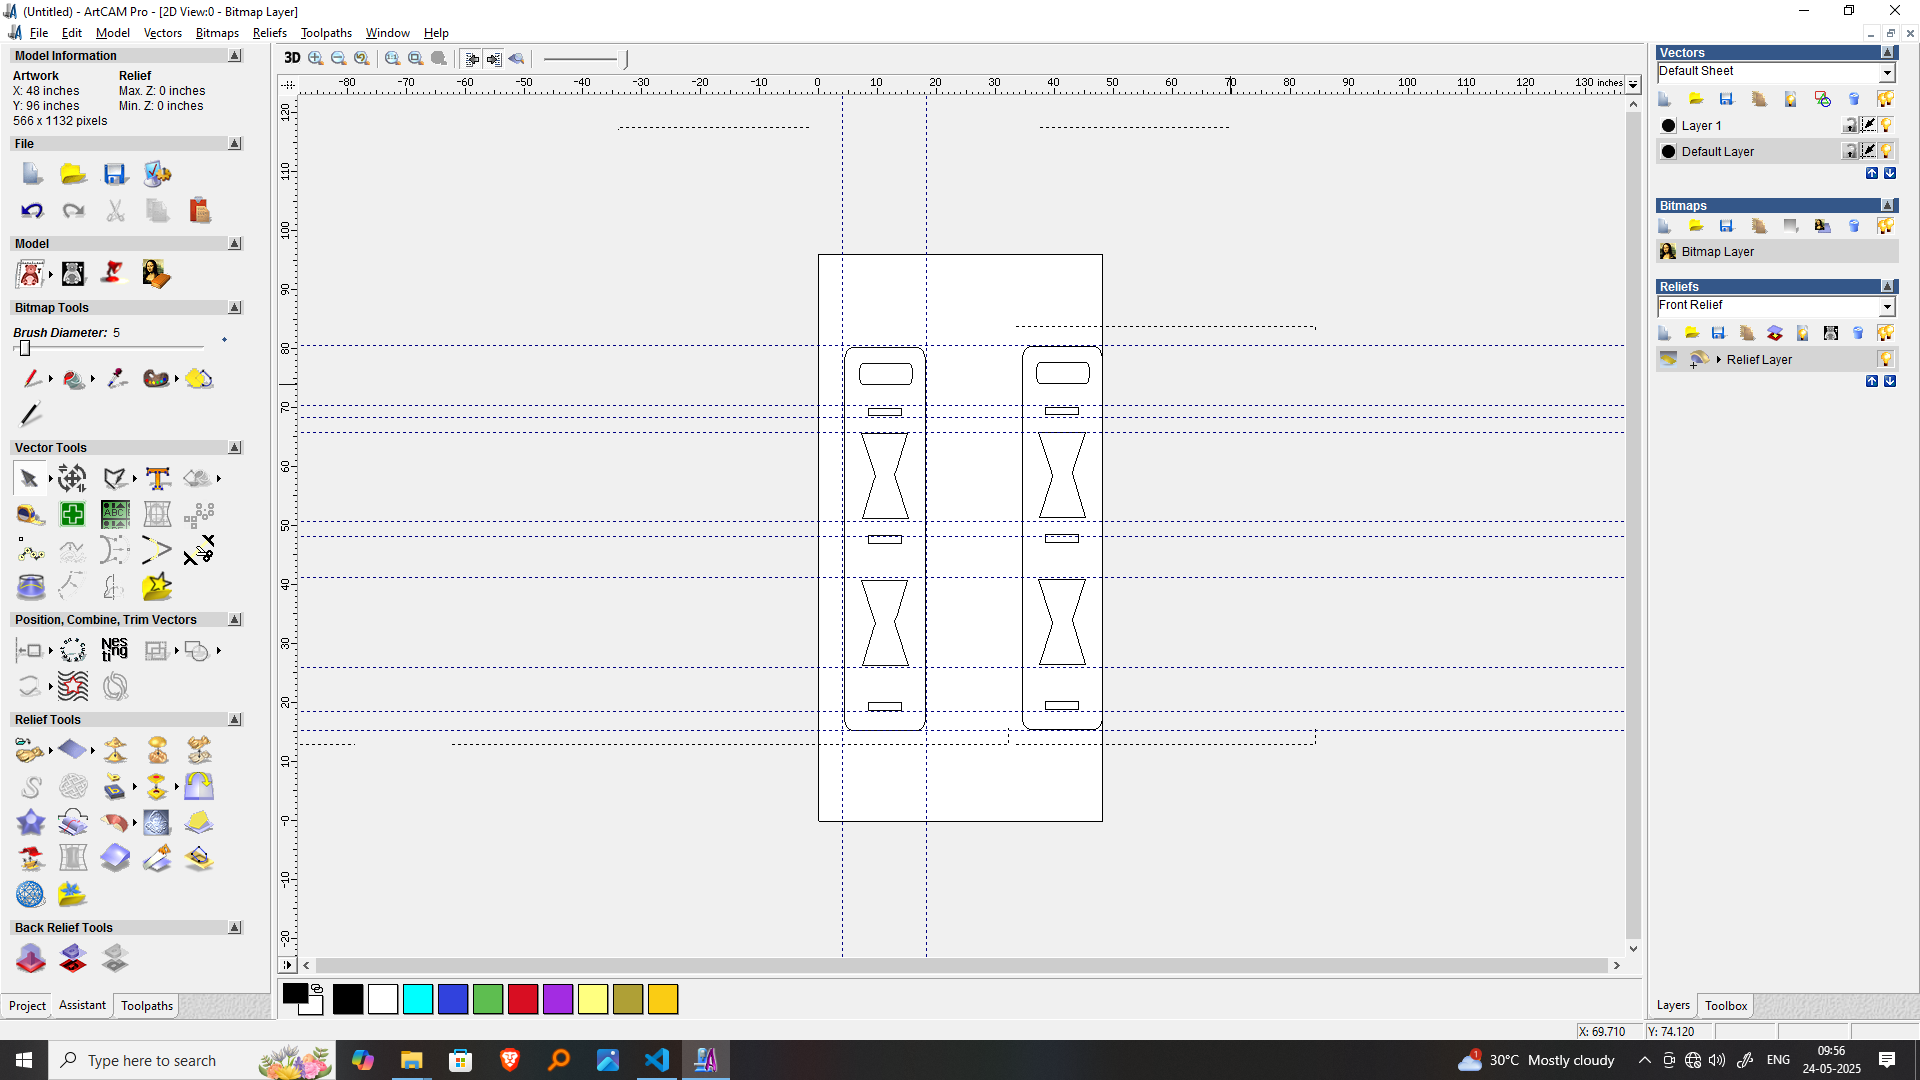
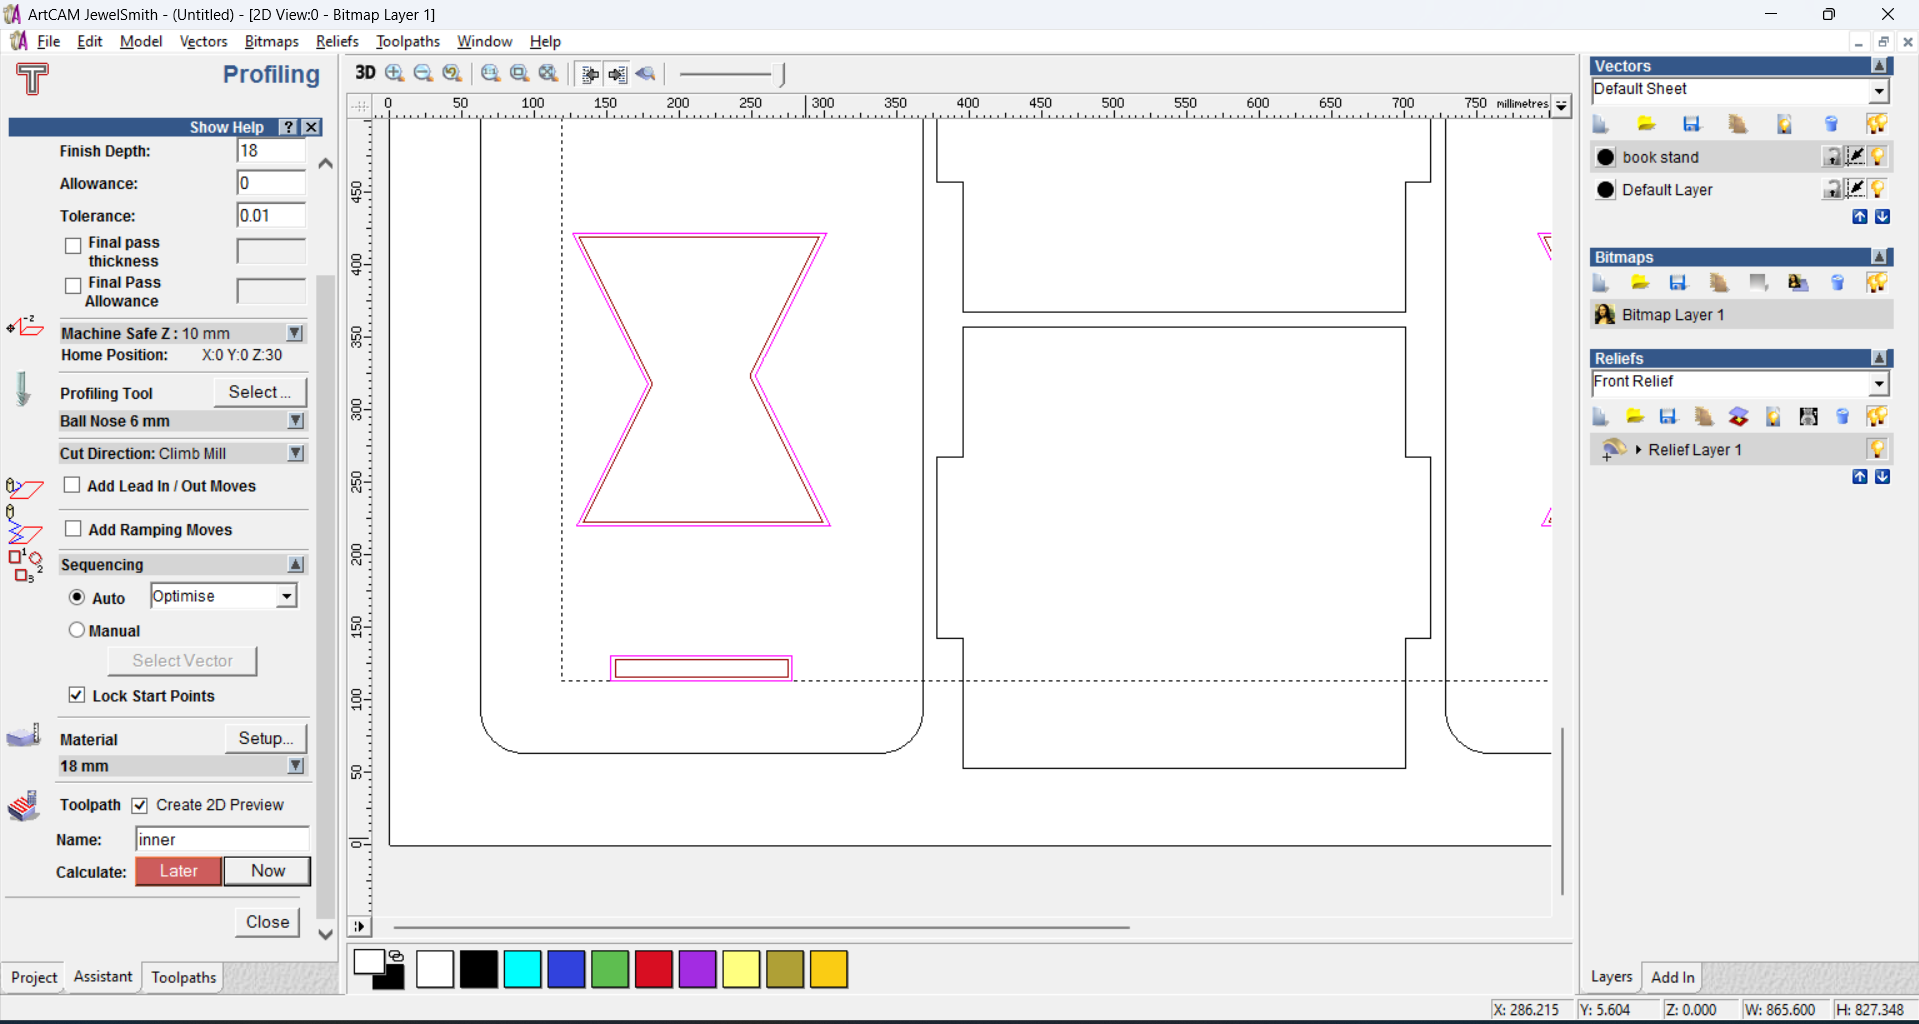
ArtCAM profiling is a toolpath operation used to cut along the outline of selected vectors. It allows you to choose inside, outside, or on-the-line cutting, set pass depths, tool types, and feed rates. Profiling is ideal for cutting parts out of materials like plywood in precise shapes.
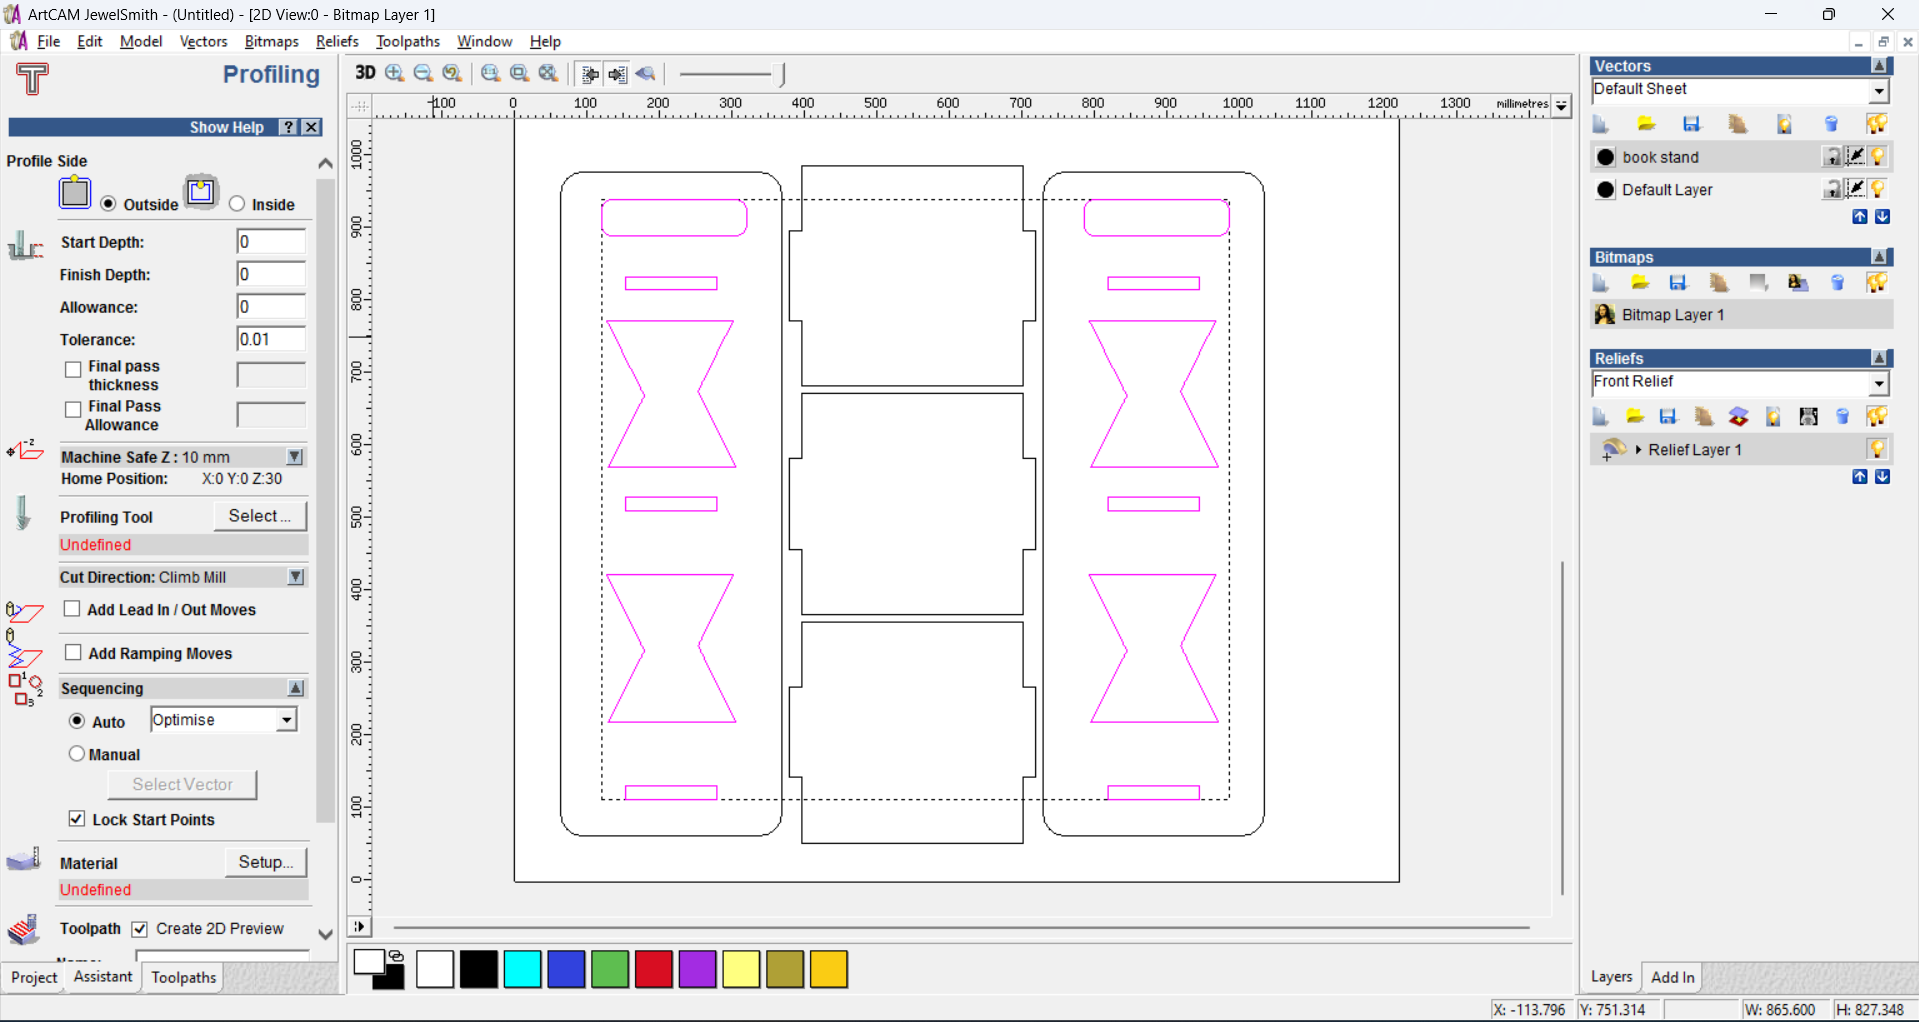
I choose a 6mm diameter ball nose end mill from the tool database. Since the plywood thickness is 18mm, I set the Z stepdown to 6mm, meaning the tool will cut 6mm depth per pass. To reach the full depth, I configure the toolpath to make 3 passes. This approach ensures a smooth, accurate cut while reducing tool stress and preventing burning . Once these settings are applied, I generate the toolpath, ready for export to the CNC machine.
In ArtCAM profiling, I confirm the material thickness as 18mm to match the actual plywood sheet. I set the pass depth to 6mm, which means the CNC will cut 6mm per pass. As a result, the machine performs the profiling operation in three passes to fully cut through the material. This step-by-step cutting ensures clean edges, reduces tool load, and prevents damage to both the cutter and the plywood. After verifying these settings, I generate the profile toolpath, which the CNC uses to cut along the vector outlines accurately and safely.
In ArtCAM, after importing or creating your design, the next step is to select the vector shapes that define the areas to be machined. These vectors represent outlines, pockets, or decorative features. Once selected, you choose the appropriate toolpath type based on the operation you want to perform. For cutting parts out, a profile toolpath is used. For removing material inside an area, you choose pocketing. For surface detailing, engraving or 3D finishing may be applied. Each toolpath type allows you to assign tools and machining parameters, ensuring the CNC machine follows the correct path to shape your material.
ArtCAM, setting tool parameters is a crucial step before generating the toolpath. You begin by selecting the appropriate tool type based on your operation, such as an end mill or ball nose. For example, a 6mm diameter ball nose cutter is commonly used for smooth profiling. Next, set the pass depth—in this case, 6mm per pass for 18mm plywood, resulting in three passes. The spindle speed is also important, typically set between 16,000–20,000 RPM depending on material and tool size. Properly configuring these parameters ensures efficient, accurate cutting while reducing the risk of tool wear .
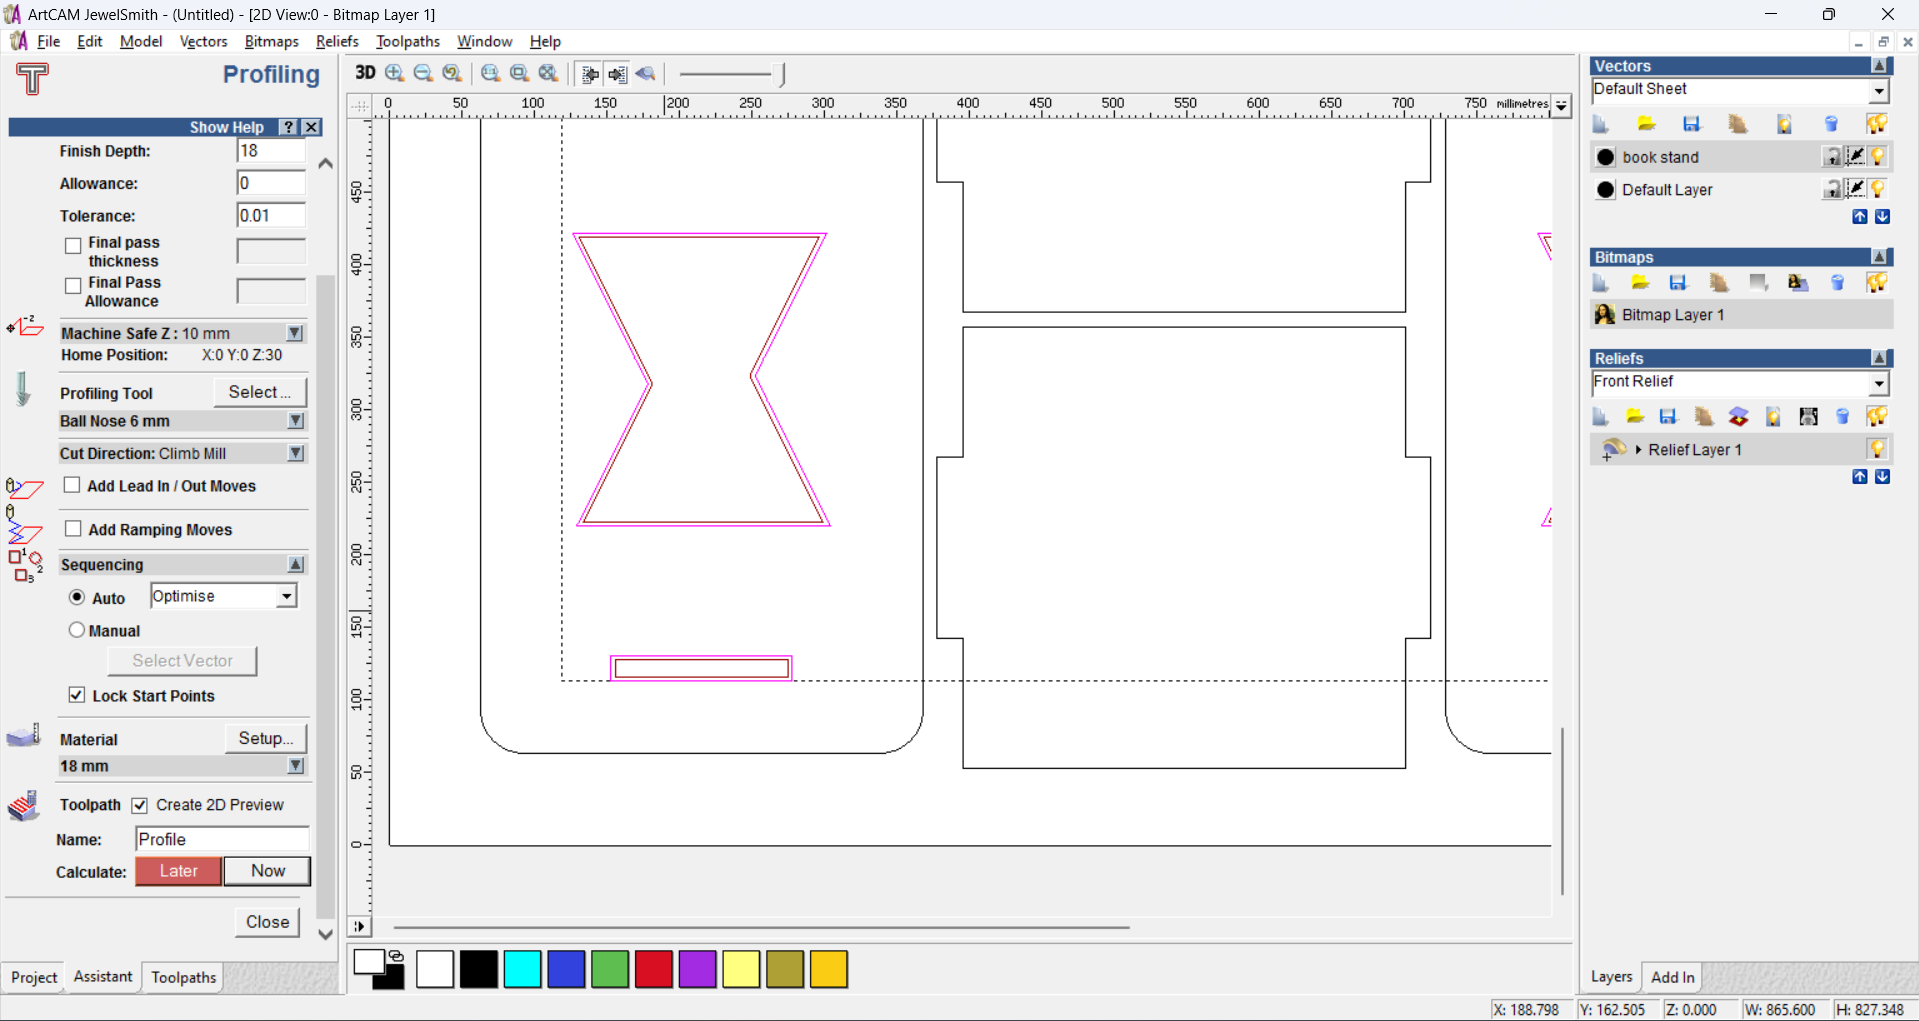
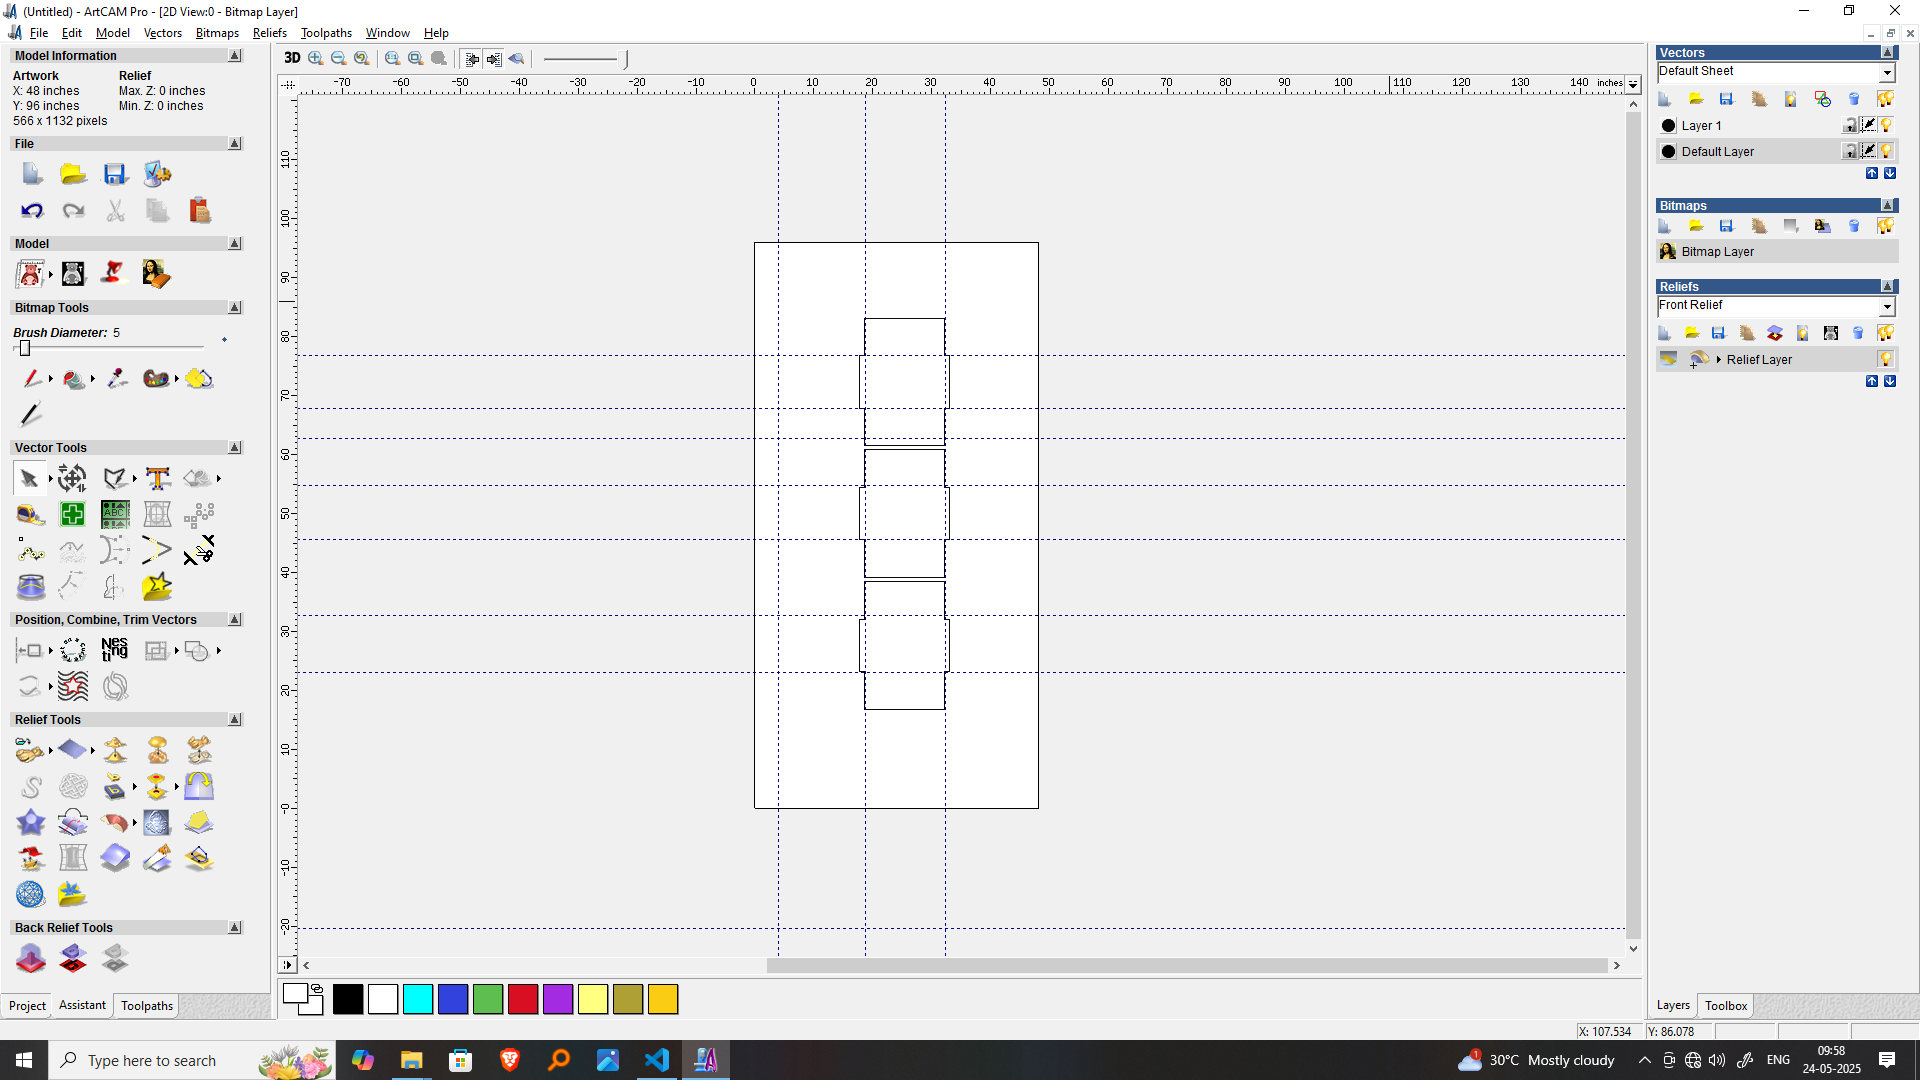
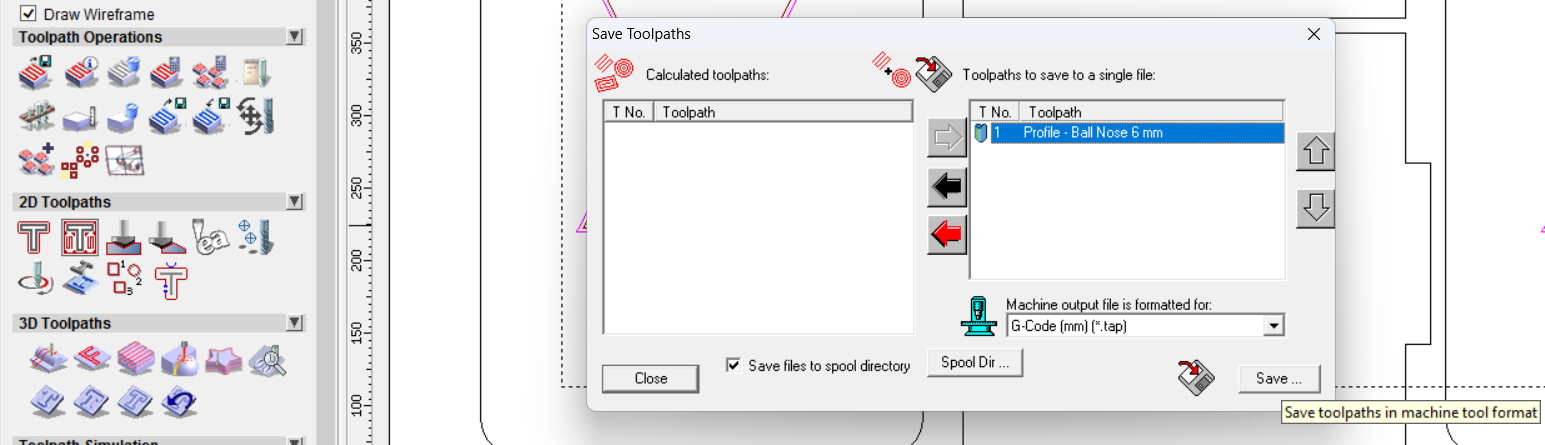
Once all toolpath settings are configured in ArtCAM—such as tool type, pass depth, cutting direction, and material thickness—you proceed to generate the toolpath. The software calculates the optimal path the CNC machine will follow based on the selected vectors and parameters. After reviewing the simulated toolpath to ensure accuracy and safety, you save it as a G-code file. This G-code contains the instructions for the CNC machine to execute the cuts exactly as designed. The file is then transferred to the CNC controller, where it is loaded and run to begin the actual machining process on the plywood sheet.
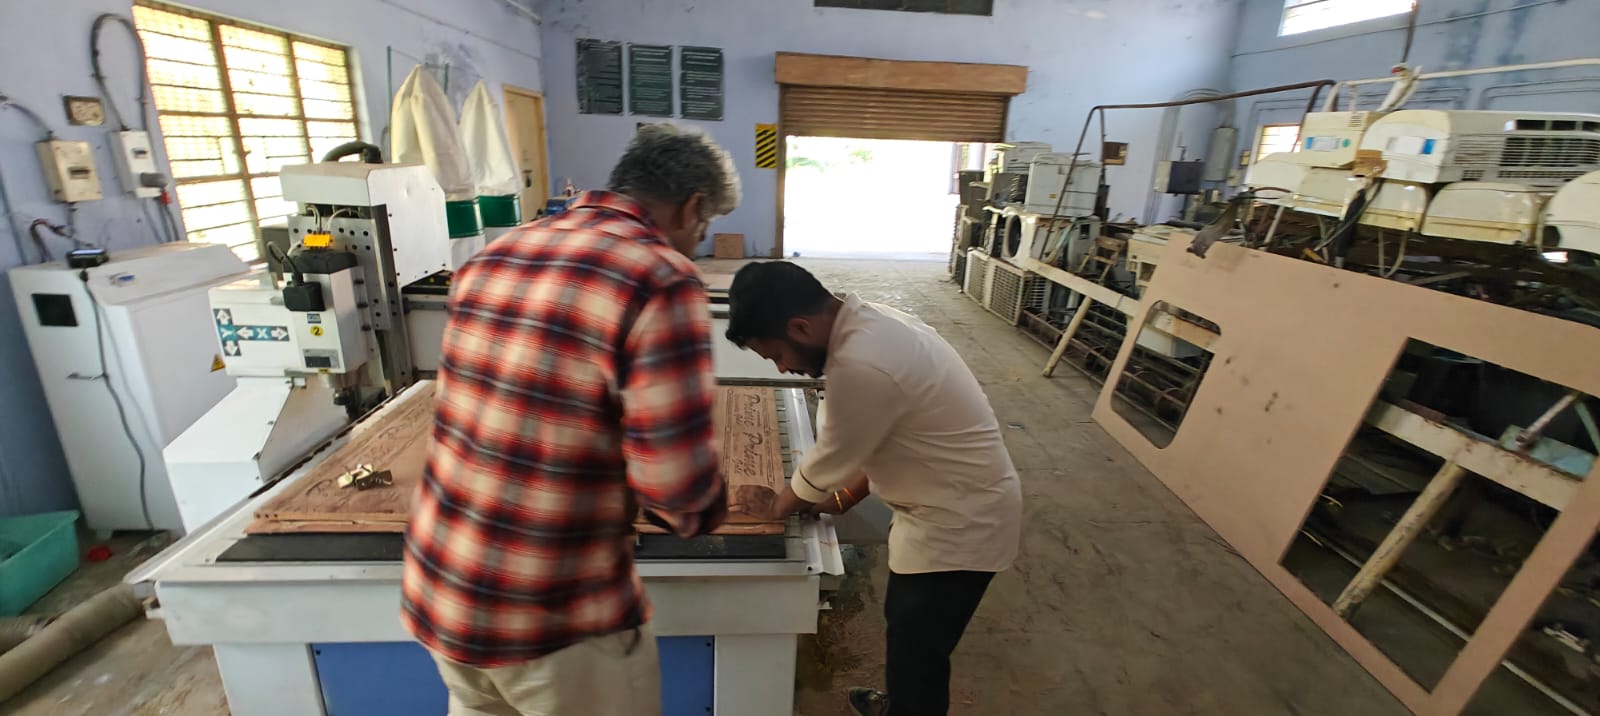
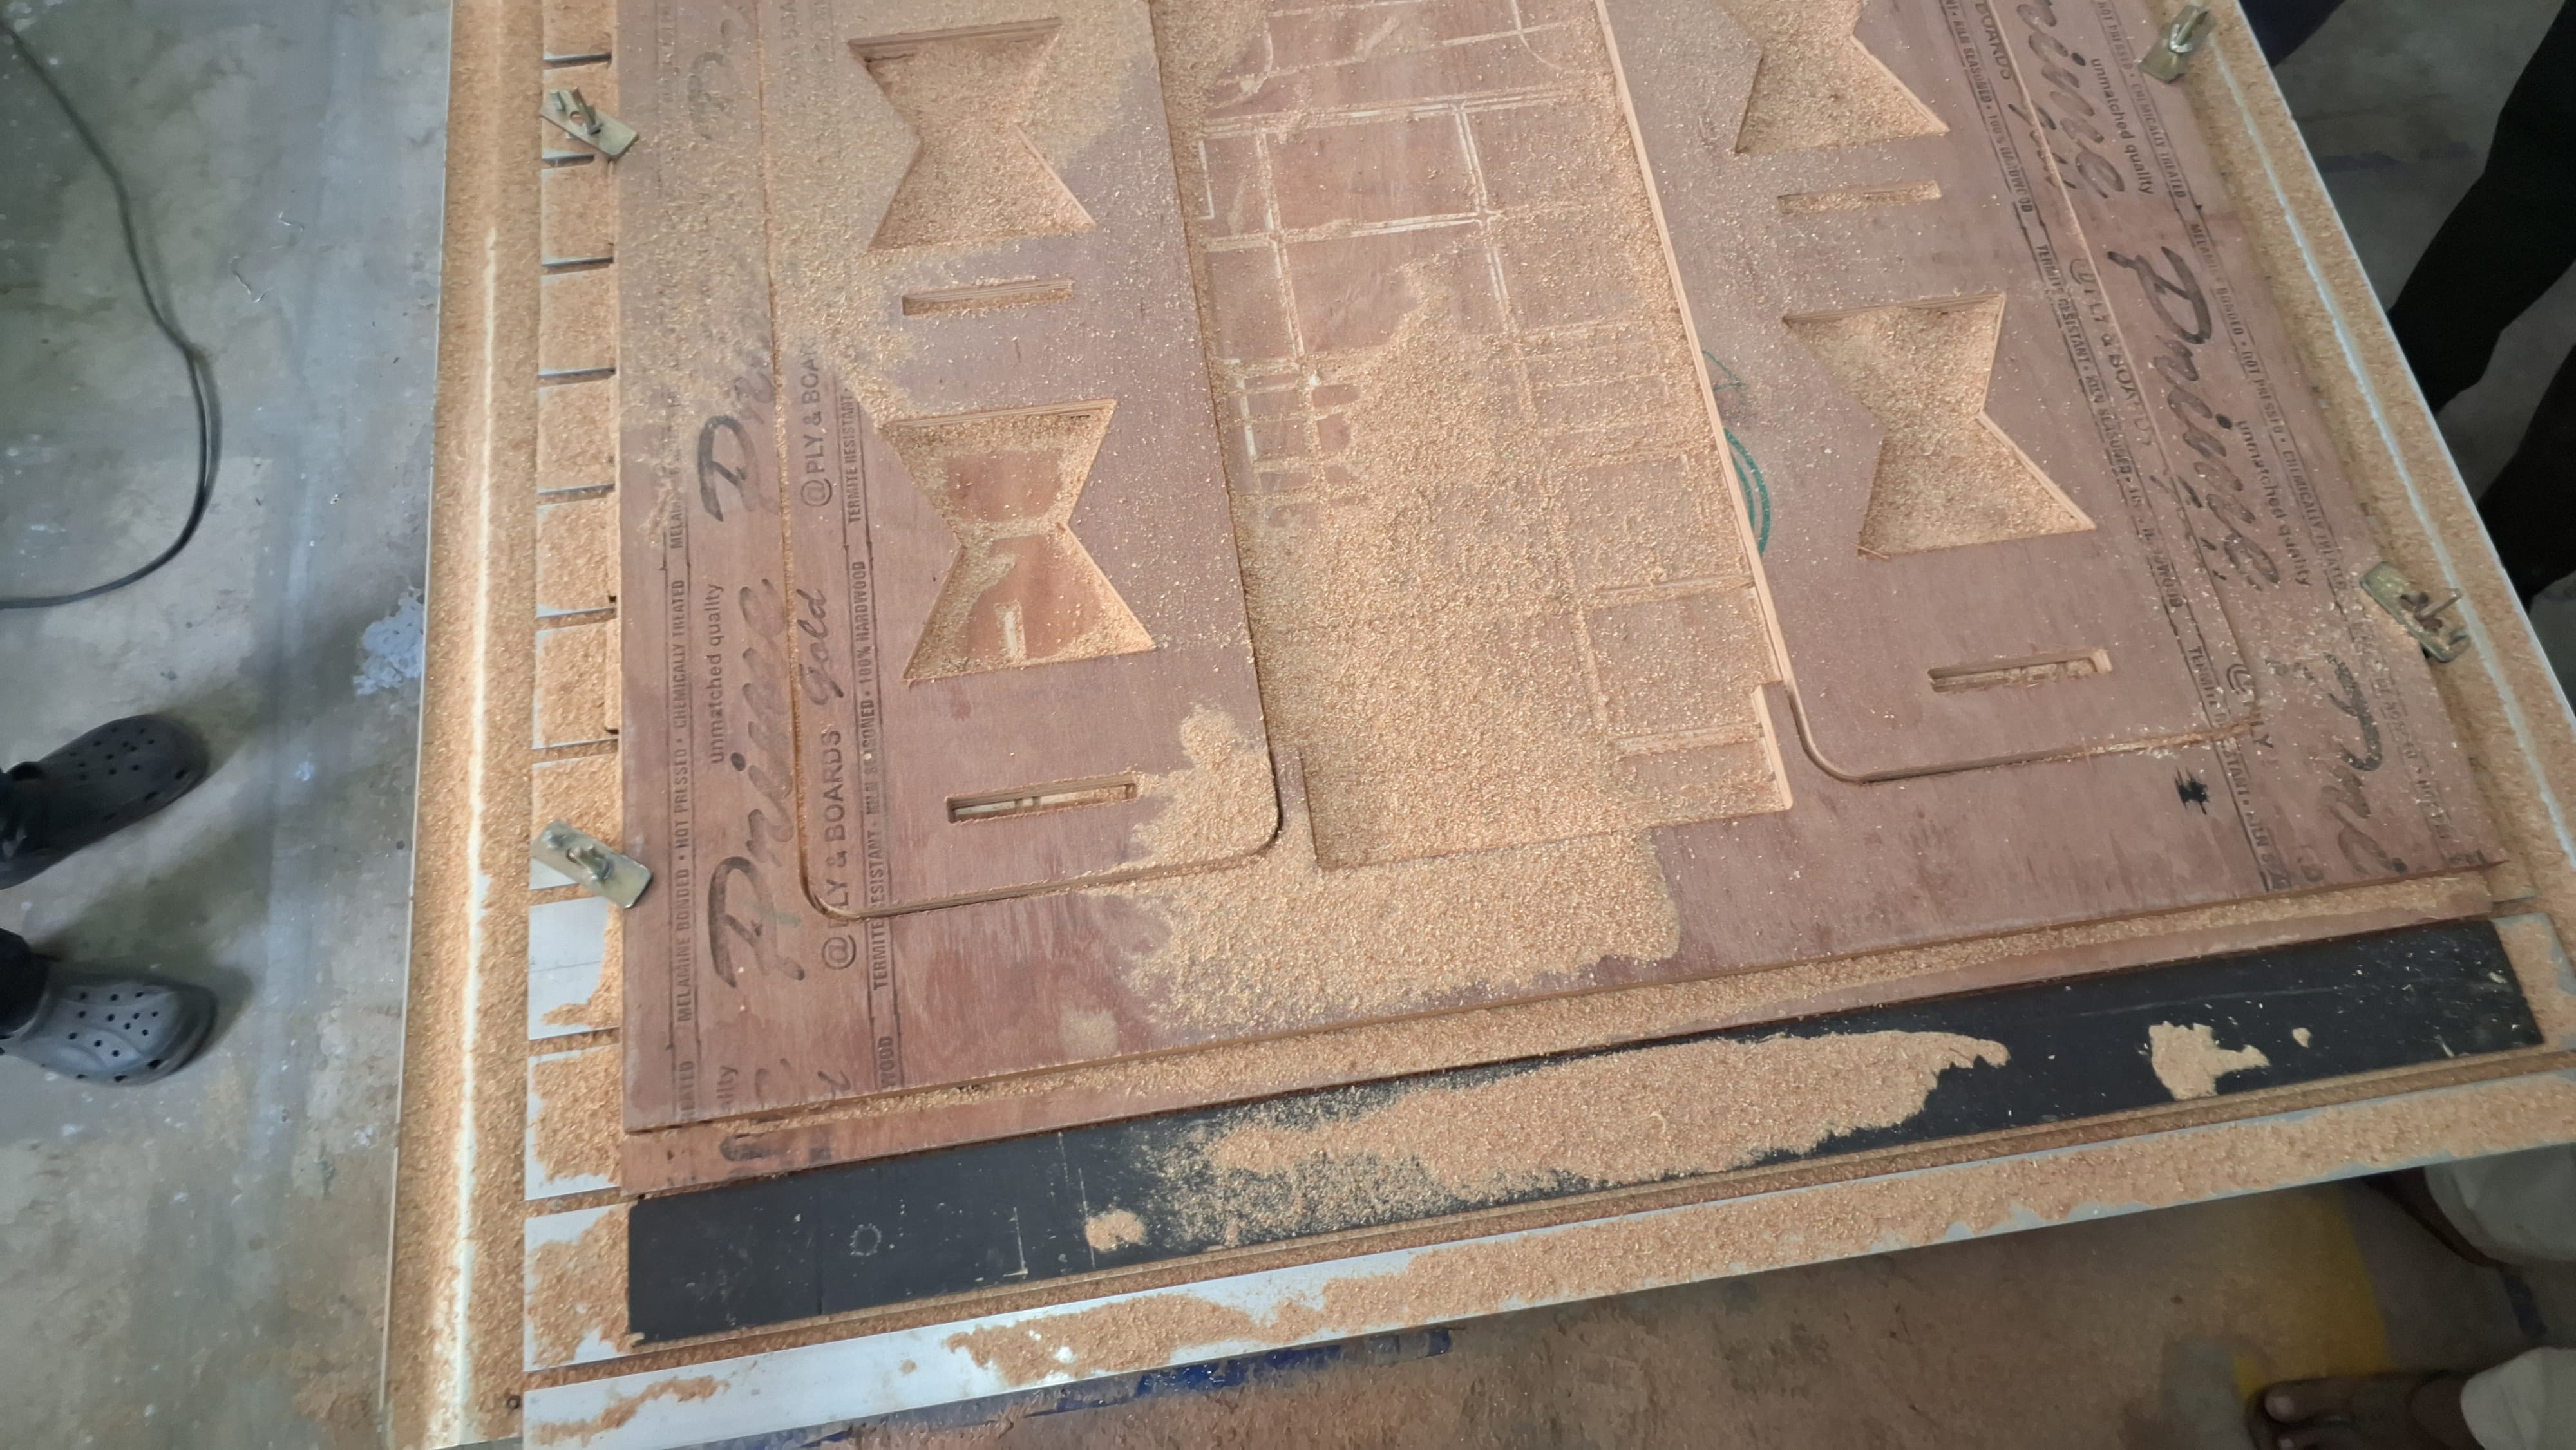
After creating the toolpath in ArtCAM and transferring the G-code to the CNC machine, I started the cutting process. The machine followed the programmed path precisely, using the 6mm end mill. It engraved and cut the plywood smoothly in three passes, each removing 6mm depth to reach the full 18mm thickness. The first pass marked and partially cut the shapes, the second deepened the cuts, and the third completed the profiles cleanly. Each pass was accurate and stable, with minimal vibration or edge tear-out. The final result was neatly cut interlocking parts, ready for easy assembly into the bookshelf.
Step 5: CNC Machining Operation Begins
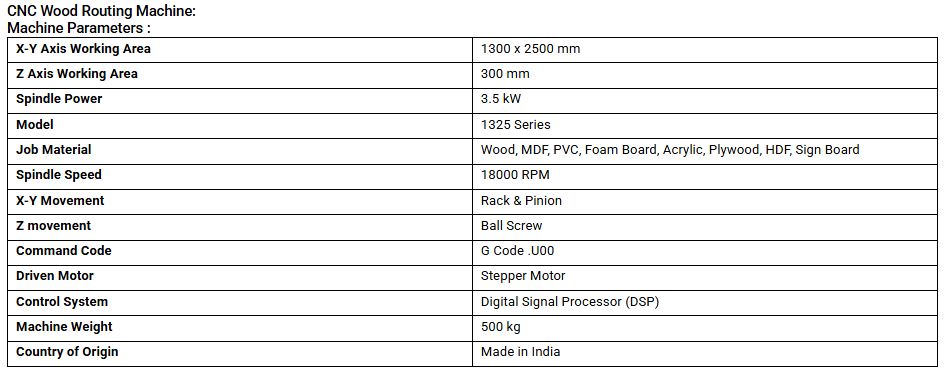
Machine details:
General CNC Settings for Plywood/MDF
- Tool Type: Flat End Mill (2-flute)
- Tool Diameter: 3.175 mm (1/8") or 6 mm
- Spindle Speed: 12,000 – 18,000 RPM
- Feed Rate: 800 – 1500 mm/min
- Plunge Rate: 300 – 500 mm/min
- Depth per Pass: 1.5 – 2 mm (for 6 mm tool), 0.8 – 1 mm (for 3.175 mm tool)
- Cutting Strategy: Profile (outside/inside), Pocket, Engrave
- Step Over: 40 – 50%
- Clearance Height: 5 – 10 mm
- Home/Origin: Bottom-left corner or center, Z = top of material
- Tolerance for Press Fit: 0.2 mm clearance
Once the toolpath is generated and verified, the CNC machining process begins. Ensure all safety precautions are in place, including wearing protective gear and clearing the workspace. Start the CNC router and allow the machine to follow the programmed path precisely. The 6mm end mill cutter will move along the defined toolpath, cutting the plywood to the desired shape and dimensions
 |
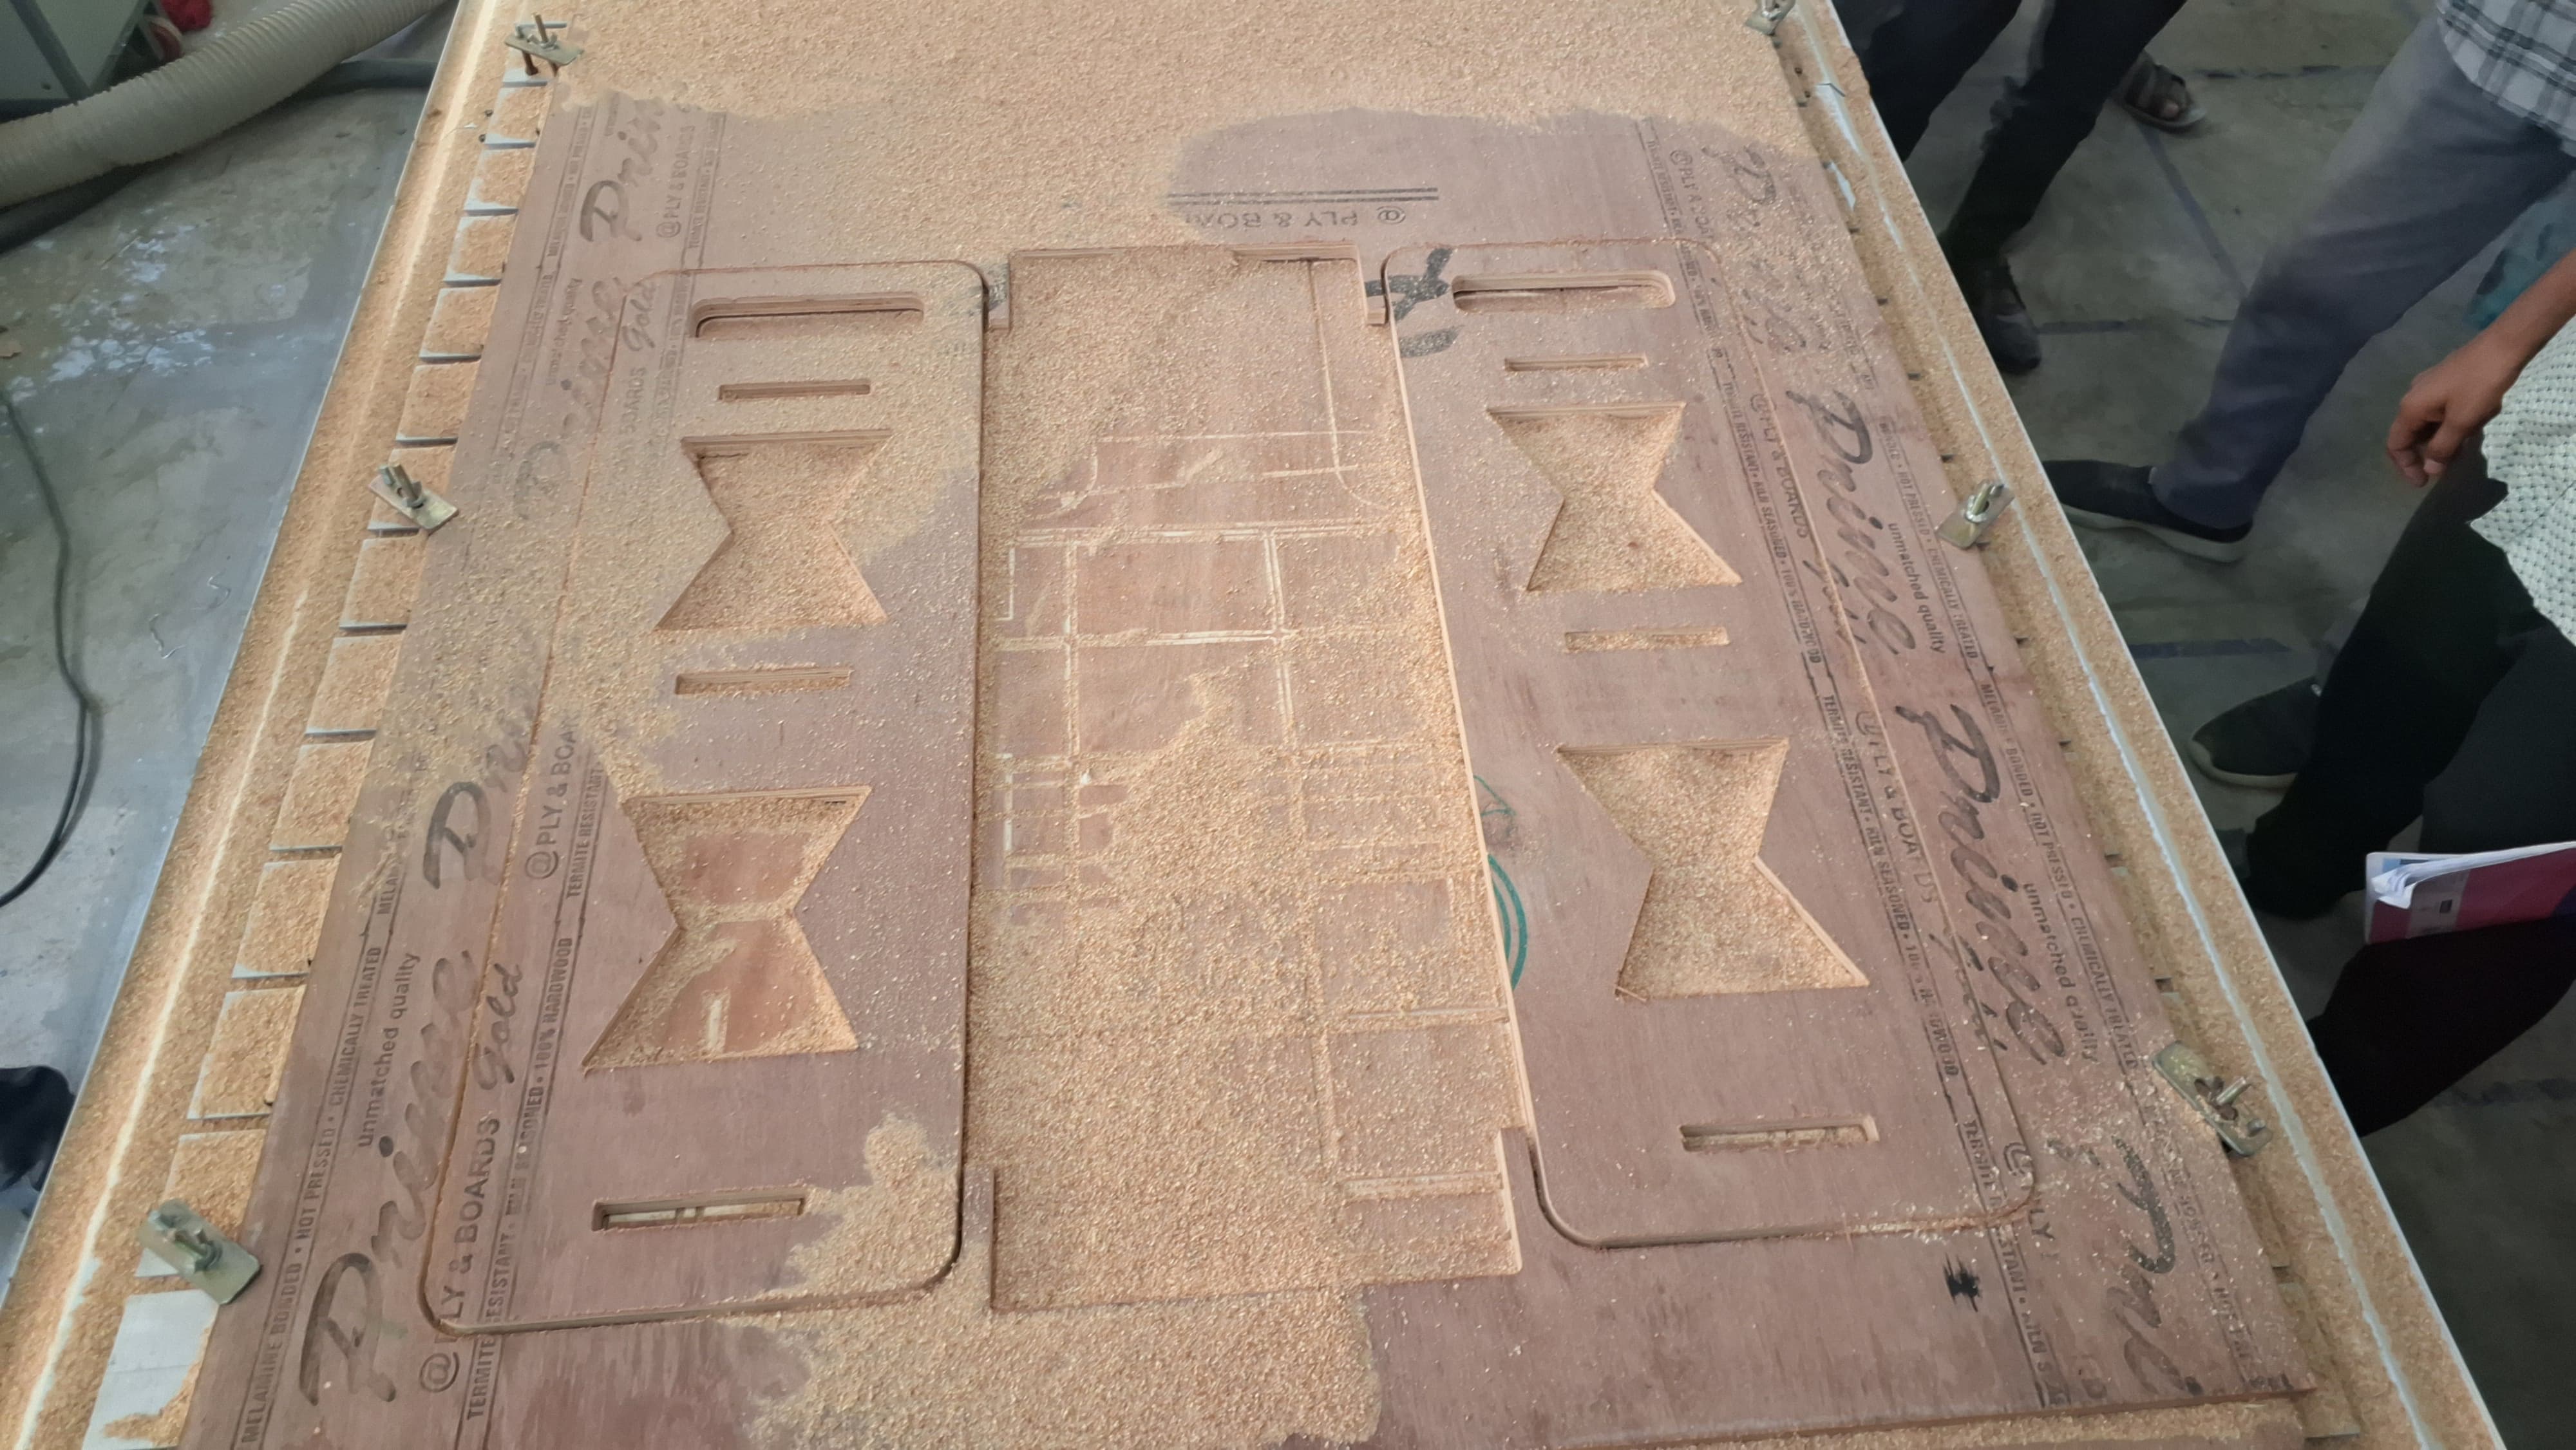 |
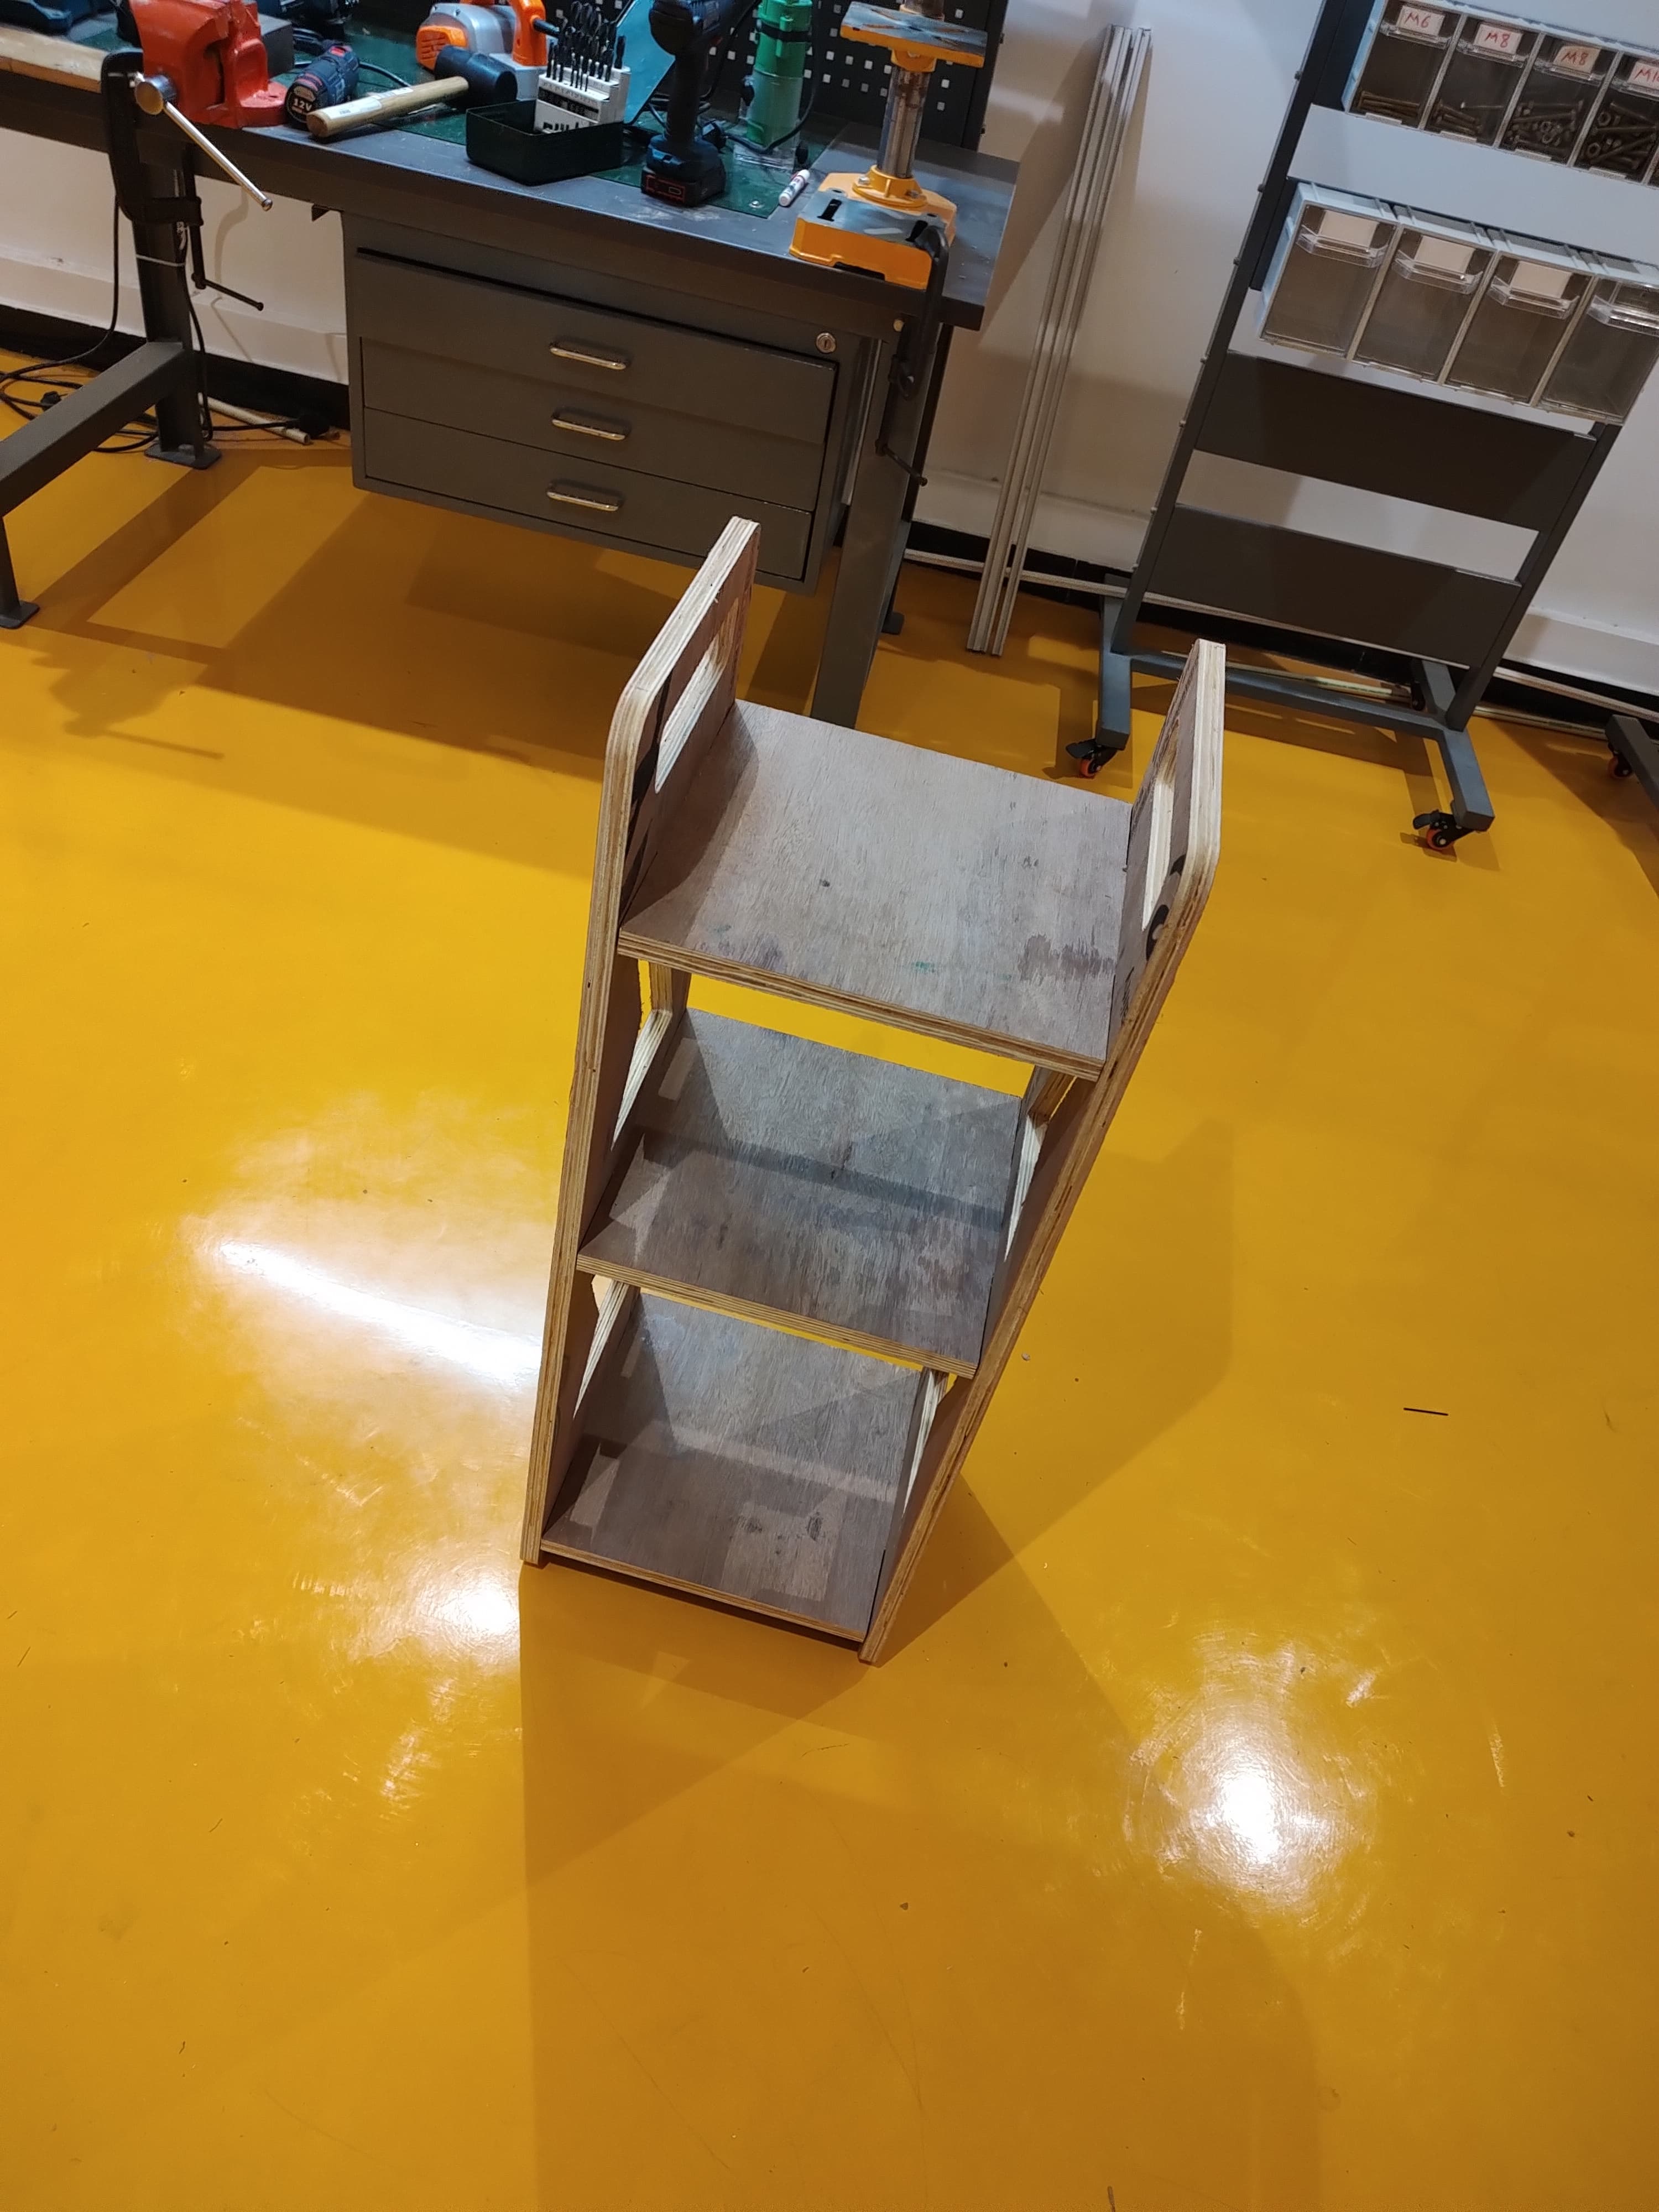
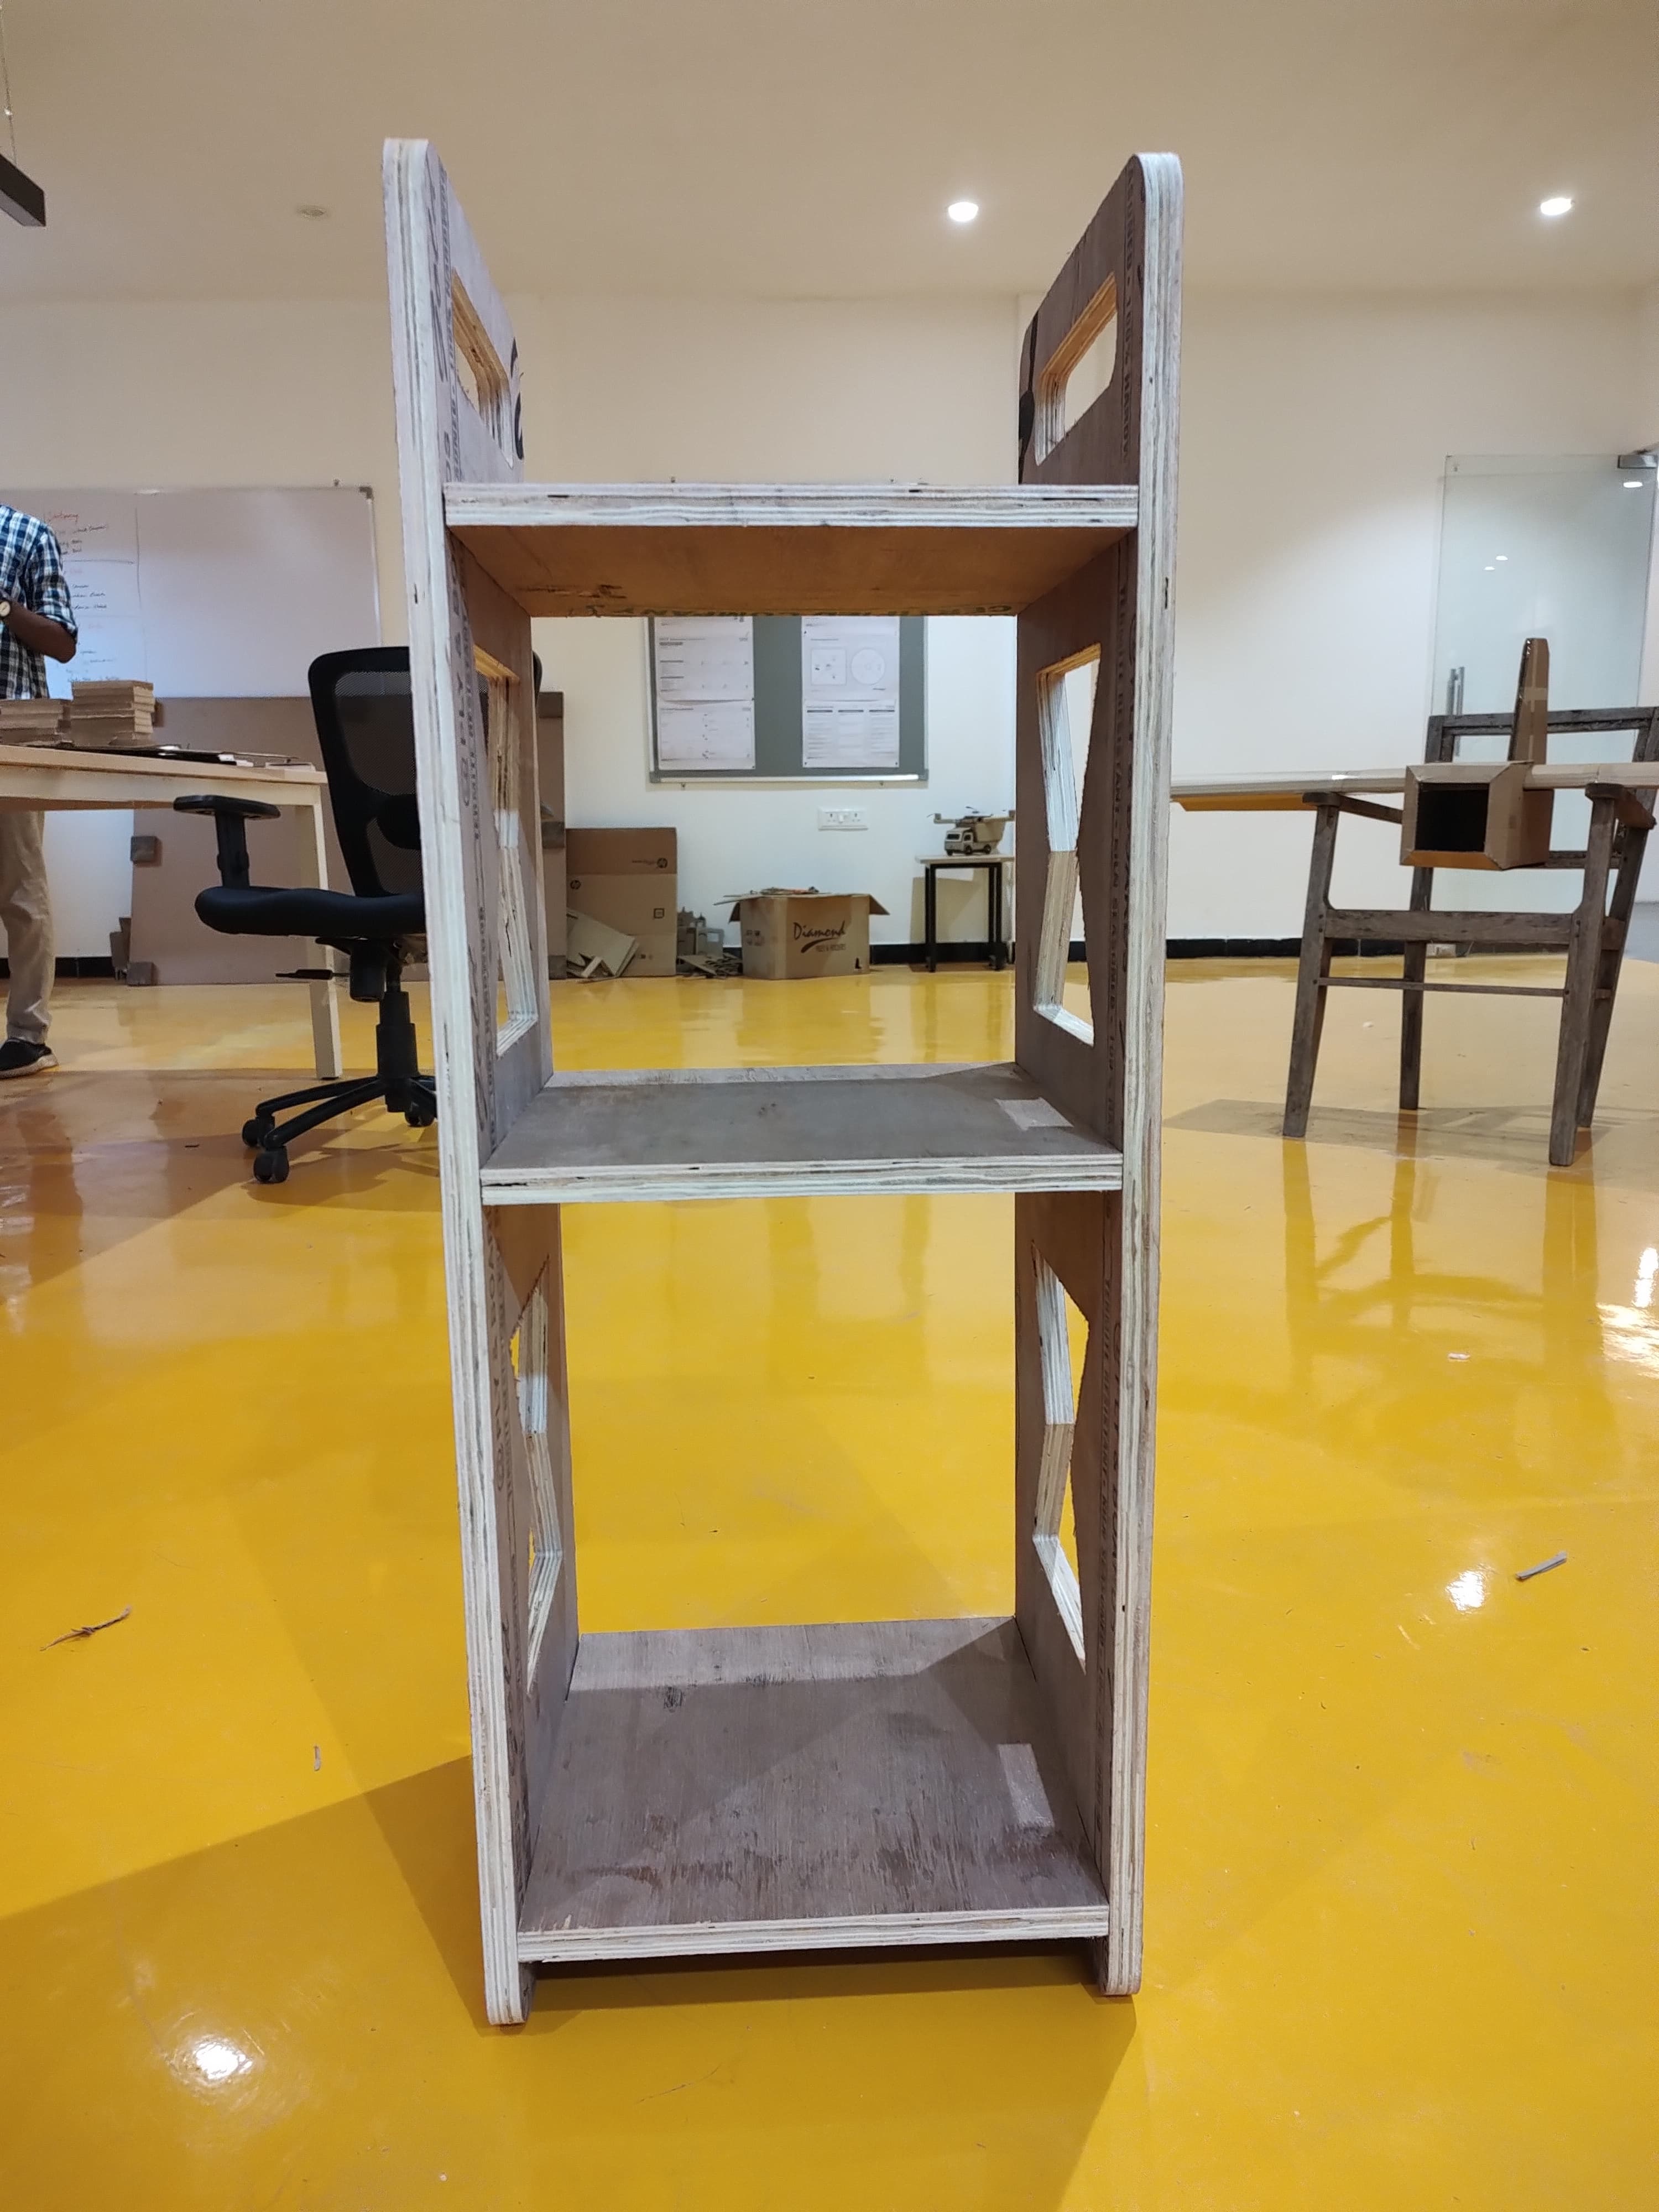
Step 6: Finished Product - Bookshelf Parts from CNC Router
The final output of my interlocking bookshelf was precisely cut using ArtCAM software and a CNC machine. After designing the parts and generating the toolpaths, the CNC accurately cut each piece from the 18mm plywood sheet.Once all components were cut, I carefully removed and cleaned them before assembly. Thanks to the interlocking design, the pieces fit together seamlessly without the need for screws or glue. After assembly, the bookshelf is sturdy and well-aligned. I then placed the completed bookshelf in its designated spot, where it serves as both a functional storage unit and a showcase of precise CNC craftsmanship.
 |
 |
 |
 |
Challenges Faced During CNC Routing of an Interlocking Plywood Bookshelf
While CNC routing an interlocking plywood bookshelf for my Fab Academy project, I faced issues with inconsistent plywood thickness and slight warping, which affected the accuracy of the interlocking joints. Some parts didn’t fit well due to tight tolerances. Additionally, toolpath errors and part movement during cutting required multiple test runs and manual adjustments.
3d Files of book stand Click here to book stand.dxf