Group Assignment
Embedded Programming Overview
This document demonstrates and compares the toolchains and development workflows for different embedded architectures, focusing on ARM (XIAO RP2040), AVR (Arduino Uno), ESP32 (XIAO ESP32C3), and ESP32-WROOM-32E. The aim is to provide an overview of the setup process, ease of use, available libraries, and debugging capabilities for each architecture.
- Processor Families:
- AVR: Known for its ease of use and extensive documentation.
- ARM: Offers a wide range of performance options, from low-power to high-performance cores.
- RISC-V: An open-source ISA that provides flexibility and customization options.
- Programming Languages:
- C: The go-to language for embedded programming due to its low-level control and efficiency.
- Rust: Offers memory safety and concurrency, making it an emerging choice for embedded systems.
- Python: Used for high-level control and scripting, especially with MicroPython on devices like ESP32.
- Development Tools:
- GCC: Widely used compiler for various architectures.
- Arduino IDE: Popular for its simplicity and extensive library support.
- VS Code: Versatile editor with extensions for various embedded development tools.
- Communication Protocols:
- USB: Commonly used for device communication and programming.
- UART: Simple and widely used serial communication protocol.
Information gathered through Datasheets
Seeed Studio XIAO RP2040 (ARM Cortex-M0+)
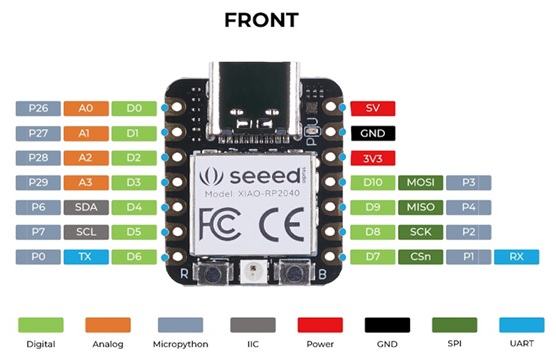
The Seeed Studio XIAO RP2040 v1.0 is as small as the Seeeduino XIAO but it’s more powerful. On one hand, it carries the powerful Dual-core RP2040 processor that can flexible clock running up to 133 MHz which is a low-power microcontrollers. On the XIAO RP2040 there is also 264KB of SRAM, and 2MB of on-board Flash memory which can provide more program to save and run. On the other hand, this little board has good performance in processing but needs less power.
All in all, it is designed in a tiny size as small as a thumb(20×17.5mm) and can be used for wearable devices and small projects.
There are 14 GPIO PINs on XIAO RP2040, on which there are 11 digital pins, 4 analog pins, 11 PWM Pins,1 I2C interface, 1 UART interface, 1 SPI interface, 1 SWD Bonding pad interface
Features:
- Powerful MCU: Dual-core ARM Cortex M0+ processor, flexible clock running up to 133 MHz
- Rich on-chip resources: 264KB of SRAM, and 2MB of on-board Flash memory
- Flexible compatibility: Support Micropython/Arduino/CircuitPython
- Easy project operation: Breadboard-friendly & SMD design, no components on the back
- Small size: As small as a thumb(20×17.5mm) for wearable devices and small projects.
- Multiple interfaces: 11 digital pins, 4 analog pins, 11 PWM Pins,1 I2C interface, 1 UART interface, 1 SPI interface, 1 SWD Bonding pad interface.

Image Source: Seeed Studio Wiki
- Toolchain:
- IDE: Arduino IDE, Thonny (MicroPython)
- Compiler: GCC (for ARM)
- Debugger: SWD (Serial Wire Debug)
- Build System: CMake, Arduino CLI
- Development Workflow:
- Setup: Install Arduino IDE or Thonny, and libraries.
- Code: Write code in C/C++ or MicroPython.
- Upload: Use USB to upload code.
- Debug: Use SWD or serial monitor for debugging.
- Test: Test the code on the device.
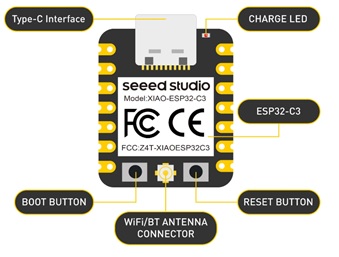
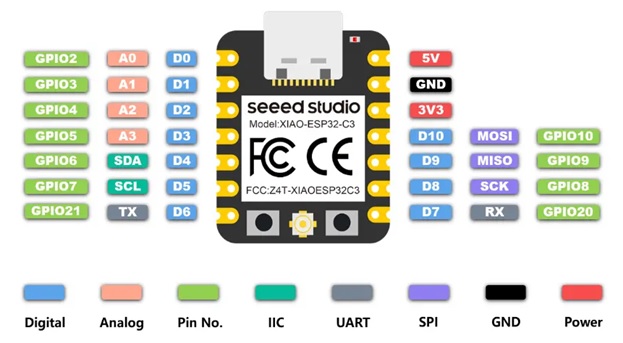
SEED STUDIO XIAO ESP 32C3
Seeed Studio XIAO ESP32C3 featuring ESP32C3 carries a complete Wi-Fi system along with Bluetooth Low Energy function. With its exquisite design and WiFi+BT ability, it’s perfect for various IoT controlling scenarios and complex carriable applications.The board equips highly-integrated ESP32-C3 SoC. The chip has been installed with a complete 2.4GHz Wi-Fi subsystem which means it supports Station mode, SoftAP mode, SoftAP & Station mode, and promiscuous mode for multiple Wi-Fi applications. It works under an ultra-low power state, also supporting features of Bluetooth 5 and Bluetooth mesh. There are 400 KB SRAM & 4 MB Flash on the chip, allowing for more programming space, and bringing more possibilities to the IoT control scenarios.
Features:
- Outstanding RF performance, Powerful ESP32-C3 SoC and U.FL antenna provided that supports WiFi/Bluetooth connection over 100m.
- Thumb-size Design, 21 x 17.5mm overall dimension, portable and lightweight.
- Low power consumption, Lowest as 44 μA (deep sleep mode), with 4 working modes available.
- Onboard battery charge IC, Supports battery charging, great for various wearable scenarios and wireless IoT applications.
- Ready for productization, Single-sided components design, easily integrated into other boards and Seeed provides Fusion Service for rapid production.
Image Source: Seeed Studio
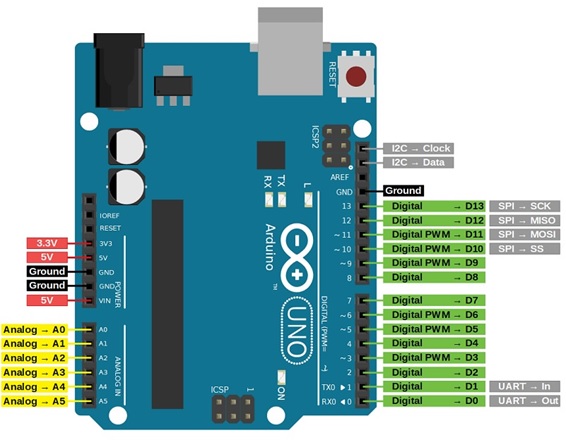
ARDUINO UNO (AVR)
- Architecture:
- Microcontroller: AVR (ATmega328P)
- Clock Speed: 16 MHz
- Memory: 2 KB SRAM, 32 KB Flash, 1 KB EEPROM
- Digital I/O Pins: 14 (6 PWM)
- Analog Input Pins: 6 (10-bit ADC)
- Communication: UART, SPI, I2C
- Toolchain:
- IDE: Arduino IDE
- Compiler: AVR-GCC
- Debugger: Limited, typically using serial monitor
- Build System: Arduino CLI
- Development Workflow:
- Setup: Install Arduino IDE and libraries.
- Code: Write sketches (C/C++).
- Upload: Use USB to upload code.
- Debug: Use serial monitor for debugging.
- Test: Test the code on the device.
Image Source: Arduino
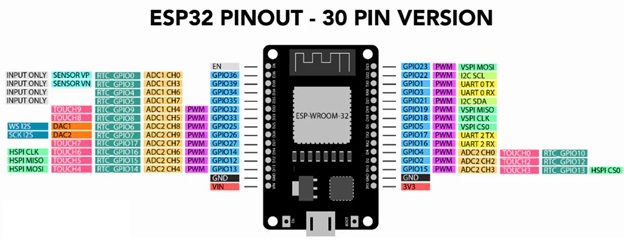
ESP32
- Architecture:
- Microcontroller: Xtensa dual-core 32-bit LX6
- Clock Speed: Up to 240 MHz
- Memory: 520 KB SRAM, 4 MB Flash (for typical modules)
- Digital I/O Pins: 34
- Analog Input Pins: 18 (12-bit ADC)
- Communication: UART, SPI, I2C, CAN, Ethernet, Wi-Fi, Bluetooth
- Toolchain:
- IDE: Arduino IDE, ESP-IDF
- Compiler: Xtensa GCC
- Debugger: OpenOCD, JTAG/SWD
- Build System: Make, CMake
- Development Workflow:
- Setup: Install Arduino IDE, ESP-IDF, and libraries.
- Code: Write code in C/C++ or Python (MicroPython).
- Upload: Use USB, OTA (Over-the-Air) updates.
- Debug: Use advanced debugging tools.
- Test: Test the code on the device.
Comparison Summary
- Ease of Use: Arduino Uno is the most beginner-friendly with a simple setup and large community support. Seeed Studio XIAO RP2040 offers versatility with its dual-core processor and support for C/C++ and MicroPython. ESP32 has a steeper learning curve but offers advanced features.
- Performance: ESP32 significantly outperforms both Seeed Studio XIAO RP2040 and Arduino Uno in terms of processing power and memory. Seeed Studio XIAO RP2040 is more powerful than Arduino Uno but less powerful than ESP32.
- Connectivity: ESP32 has built-in Wi-Fi and Bluetooth, making it ideal for IoT projects. Seeed Studio XIAO RP2040 and Arduino Uno require additional modules for such features.
- Flexibility: Seeed Studio XIAO RP2040 and ESP32 support multiple programming languages, offering more flexibility in programming compared to Arduino Uno.
This table highlights the key differences and features of each microcontroller.
Here's a comparison of the key features of each microcontroller:
|
Feature
|
Seeed Studio XIAO RP2040
|
Arduino Uno
|
ESP32
|
XIAO ESP32C3
|
|
Processor
|
Dual-core ARM Cortex M0+
@ 133 MHz
|
ATmega328P
@ 16 MHz
|
Tensilica Xtensa LX6
@ 240 MHz
|
ESP32-C3, 32-bit RISC-V
@ 160 MHz
|
|
Flash Memory
|
2 MB
|
32 KB
|
Varies (typically 4 MB)
|
4 MB
|
|
SRAM
|
264 KB
|
2 KB
|
520 KB
|
400 KB
|
|
Digital I/O Pins
|
11
|
14
|
Varies (typically 34)
|
11
|
|
Analog I/O Pins
|
4
|
6
|
Varies (typically 18)
|
4
|
|
PWM Pins
|
11
|
6
|
Varies (typically 16)
|
11
|
|
Interfaces
|
I2C, UART, SPI, SWD
|
I2C, UART, SPI
|
I2C, UART, SPI, I2S, CAN
|
I2C, UART, SPI, JTAG
|
|
Wireless Connectivity
|
None
|
None
|
Wi-Fi, Bluetooth
|
Wi-Fi, Bluetooth 5 (BLE)
|
|
Power Supply
|
3.3V/5V DC
|
5V
|
3.3V
|
3.3V
|
|
Dimensions
|
21x17.8 mm
|
68.6x53.4 mm
|
Varies
|
21x17.8 mm
|
Each microcontroller has its own strengths and is suitable for different types of projects. The Seeed Studio XIAO RP2040 is compact and powerful, making it great for small projects and wearables. The Arduino Uno is a classic choice for beginners and general-purpose projects. The ESP32 offers extensive connectivity options and is ideal for IoT applications. The XIAO ESP32C3 combines the small form factor of the XIAO series with the connectivity features of the ESP32.
Useful Websites for components and reference
-
Useful Websites for components and reference
Seeed Studio Wiki
Seeed Studio
Elprocus
WatElectronics
Arduino
Electronics Hub
The Engineering Projects
Circuit Schools
Components101
1. Selection of Embedded Architectures
The embedded architectures chosen for this comparison are:
- ARM (XIAO RP2040)
- AVR (Arduino Uno)
- ESP32 (XIAO ESP32C3)
- ESP32-WROOM-32E
2. Development Environment Setup
How to Install Arduino IDE: Followed the same steps in the below website
Use your Arduino Uno on the Arduino Desktop IDE
https://www.instructables.com/How-to-Install-Arduino-IDE-on-Windows-10/
https://www.arduino.cc/en/Guide/ArduinoUno#use-your-arduino-uno-on-the-arduino-web-ide
Installing Board Drivers
https://www.arduino.cc/en/Guide/ArduinoUno#install-the-board-drivers
Open Up Your Sketch
https://www.arduino.cc/en/Guide/ArduinoUno#open-your-first-sketch
3. Writing and Uploading Code
For each architecture, write a simple program (e.g., blinking an LED), compile it, and upload it to the respective microcontroller.
Adding different boards in Arduino IDE. You have to follow the below mentioned steps
Compiling LED Blinking in different Boards
4. Debugging and Testing
Use the debugging tools provided by each development environment to test and verify the uploaded code:
- ARM: Serial Monitor, SWD.
- AVR: Serial Monitor.
- ESP32: Serial Monitor, JTAG.
- ESP32-WROOM-32E: Serial Monitor, JTAG.
5. Comparison of Toolchains
- ARM (XIAO RP2040):
- Toolchain: GCC-based.
- Development Environments: Arduino IDE, PlatformIO.
- Connectivity: None.
- Debugging Tools: Serial Monitor, SWD.
- Community Support: Extensive.
- AVR (Arduino Uno):
- Toolchain: AVR-GCC.
- Development Environment: Arduino IDE.
- Connectivity: None.
- Debugging Tools: Serial Monitor.
- Community Support: Large.
- ESP32 (XIAO ESP32C3):
- Toolchain: GCC-based.
- Development Environments: Arduino IDE, ESP-IDF.
- Connectivity: Wi-Fi, Bluetooth.
- Debugging Tools: Serial Monitor, JTAG.
- Community Support: Growing.
- ESP32-WROOM-32E:
- Toolchain: GCC-based.
- Development Environments: Arduino IDE, ESP-IDF.
- Connectivity: Wi-Fi, Bluetooth.
- Debugging Tools: Serial Monitor, JTAG.
- Community Support: Growing