
Week 15
Assignment: Interface and Application Programming
Group assignment
The Link of Group assignments.
Individual assignment
- write an application that interfaces a user with an input &/or output device that you made
Introduction
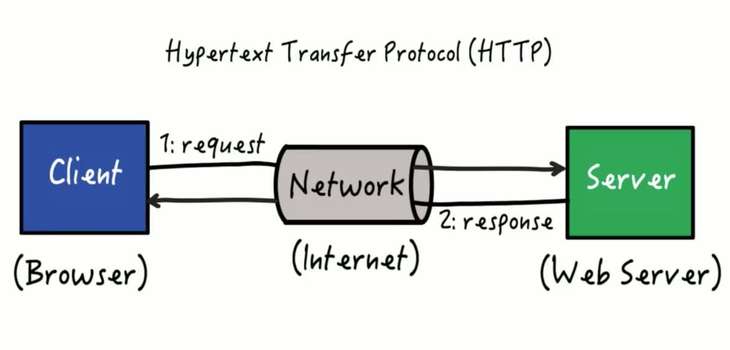
Interface and Application Programming involves creating a communication bridge between a human (user) and a machine (microcontroller or system). It allows us to monitor data, control devices, and visualize interactions in a user-friendly way.
Key Concepts:
- Interface: The point of interaction between the user and the device/software. It can be graphical (GUI), command-line (CLI), or web-based.
- Application Programming: Writing software that allows hardware to be controlled or monitored using a computer or mobile interface.
Why It's Important:
- Helps users interact with embedded devices more easily.
- Useful for real-time monitoring and control (e.g., switching on lights, displaying sensor data).
- Bridges the gap between hardware and human users.
Common Tools and Platforms:
- Processing – A simple programming language and IDE for visual applications.
- Python (Tkinter / PyQt / Flask) – Widely used for creating GUI and web-based interfaces.
- MIT App Inventor / Thunkable – For building mobile apps easily.
- JavaScript + HTML/CSS – For creating browser-based interfaces.
Embedded Local Server Hosting
Embedded Local Server means running a small-scale web server directly from a microcontroller or development board (like ESP32). It allows users to access an interface via a browser on the same network without using the internet.
Why Use Embedded Local Servers?
- You don't need an internet connection — just Wi-Fi.
- Useful for smart home or local control systems.
- Lightweight and perfect for IoT projects.
Example Microcontrollers That Support It:
- ESP32 / ESP8266: These boards have Wi-Fi capabilities and can serve HTML pages.
How It Works:
- The microcontroller is programmed to create a Wi-Fi access point or connect to local Wi-Fi.
- A small HTTP server is hosted using code (often with Arduino IDE).
- The server listens to incoming requests from a browser.
- It serves HTML/JS/CSS files to create a control panel or data viewer.
- Any user on the same network can access the interface via an IP address (e.g.,
192.168.4.1).
Common Libraries for Hosting Web Server:
- ESPAsyncWebServer (for ESP32/ESP8266) – Efficient and event-driven.
- WebServer.h (built-in with ESP boards in Arduino IDE).
- MicroPython with uasyncio or socket module – if using Python firmware.
Communication Protocols Used
In our ESP32 relay control projects, we used two different communication protocols: HTTP protocol for the web server approach where any device with a browser can send HTTP GET requests (like /pattern/1 or /relay/on) to the ESP's IP address over WiFi, and the ESP responds with web pages or JSON status data; and Serial communication protocol for the Processing interface approach where commands like "P1", "P2", "P3" are sent directly through USB cable using UART serial communication at 115200 baud rate, with the microcontroller sending back real-time status messages like "PATTERN_START:2" and "BLINK_ON:1" - the HTTP method works wirelessly over a network while serial communication provides direct, fast, cable-based control with instant feedback.
HTTP Protocol Features:
- Wireless communication over WiFi network
- Browser-based interface accessible from any device
- RESTful API endpoints for control commands
- JSON response format for status updates
Serial Communication Features:
- Direct USB cable connection (UART)
- 115200 baud rate for fast data transfer
- Real-time bidirectional communication
- Custom command protocol for relay control
Learn More:
ESP32 Documentation: Complete guide to ESP32 communication - https://docs.espressif.com/projects/esp-idf/en/latest/esp32/
Processing.org: Official Processing language documentation - https://processing.org/
Arduino ESP32 Guide: Arduino IDE setup for ESP32 - https://randomnerdtutorials.com/getting-started-with-esp32/
Complete ESP32 Web Server Relay Control Code
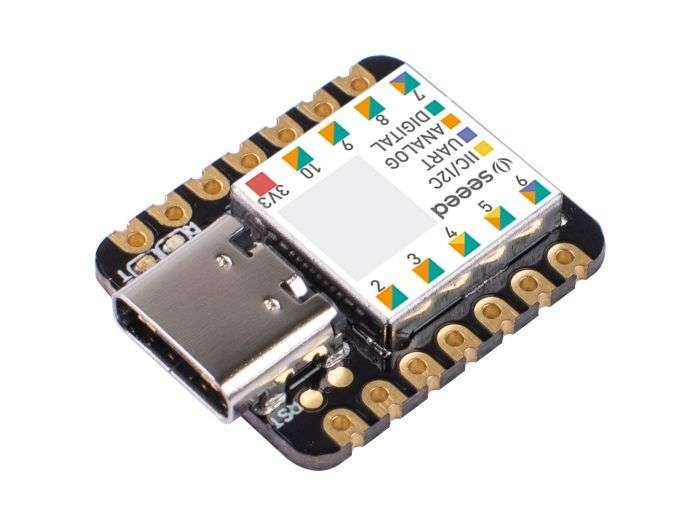
This is the complete Arduino code for ESP32 (Xiao ESP32S3) that creates a web-based relay control system with a professional interface. The code includes WiFi connectivity, web server setup, and a responsive HTML interface.
#include <WiFi.h>
#include <WebServer.h>
#include <ArduinoJson.h>
// WiFi credentials
const char* ssid = "YOUR_WIFI_NAME";
const char* password = "YOUR_WIFI_PASSWORD";
// Relay pin - Using GPIO2 (D2 on Xiao ESP32S3)
const int relayPin = 2;
// Web server on port 80
WebServer server(80);
// Relay state
bool relayState = false;
void setup() {
Serial.begin(115200);
delay(1000);
Serial.println("\n=== Xiao ESP32S3 Relay Server Starting ===");
// Initialize relay pin
pinMode(relayPin, OUTPUT);
digitalWrite(relayPin, LOW); // Start with relay OFF
Serial.println("Relay pin initialized on GPIO2");
// Print WiFi info
Serial.println("WiFi Credentials:");
Serial.println("SSID: " + String(ssid));
Serial.println("Password: " + String(password));
// Connect to WiFi
WiFi.begin(ssid, password);
Serial.print("Connecting to WiFi");
int attempts = 0;
while (WiFi.status() != WL_CONNECTED && attempts < 20) {
delay(500);
Serial.print(".");
attempts++;
}
if (WiFi.status() == WL_CONNECTED) {
Serial.println();
Serial.println("WiFi connected successfully!");
Serial.print("IP address: ");
Serial.println(WiFi.localIP());
Serial.print("Subnet mask: ");
Serial.println(WiFi.subnetMask());
Serial.print("Gateway: ");
Serial.println(WiFi.gatewayIP());
Serial.print("DNS: ");
Serial.println(WiFi.dnsIP());
// Define web server routes
server.on("/", handleRoot);
server.on("/relay/on", handleRelayOn);
server.on("/relay/off", handleRelayOff);
server.on("/relay/toggle", handleRelayToggle);
server.on("/relay/status", handleRelayStatus);
// Start server
server.begin();
Serial.println("Web server started on port 80");
Serial.println("Access the server at: http://" + WiFi.localIP().toString());
} else {
Serial.println();
Serial.println("WiFi connection failed!");
Serial.println("Please check your credentials and network.");
Serial.println("WiFi Status: " + String(WiFi.status()));
}
}
void loop() {
// Check if WiFi is still connected
if (WiFi.status() != WL_CONNECTED) {
Serial.println("WiFi disconnected! Attempting to reconnect...");
WiFi.begin(ssid, password);
int attempts = 0;
while (WiFi.status() != WL_CONNECTED && attempts < 10) {
delay(500);
Serial.print(".");
attempts++;
}
if (WiFi.status() == WL_CONNECTED) {
Serial.println("\nReconnected to WiFi");
Serial.println("IP: " + WiFi.localIP().toString());
}
}
server.handleClient();
}
// Root page with control interface
void handleRoot() {
String html = "<!DOCTYPE html><html><head>";
html += "<title>Xiao ESP32S3 Relay Control</title>";
html += "<meta name='viewport' content='width=device-width, initial-scale=1'>";
html += "<style>";
html += "body { font-family: Arial; margin: 0; padding: 0; background-color: #f0f0f0; }";
html += ".header { display: flex; justify-content: space-between; align-items: center; padding: 15px 30px; background-color: #2c3e50; color: white; font-weight: bold; }";
html += ".header-left { font-size: 18px; }";
html += ".header-right { font-size: 16px; }";
html += ".container { text-align: center; margin: 50px auto; background-color: white; padding: 40px; border-radius: 15px; box-shadow: 0 4px 8px rgba(0,0,0,0.1); max-width: 400px; }";
html += ".button { border: none; color: white; padding: 20px 40px; font-size: 18px; margin: 15px; cursor: pointer; border-radius: 10px; transition: all 0.3s; min-width: 140px; }";
html += ".button:hover { transform: translateY(-3px); box-shadow: 0 6px 12px rgba(0,0,0,0.2); }";
html += ".button-on { background-color: #27ae60; }";
html += ".button-on:hover { background-color: #229954; }";
html += ".button-off { background-color: #e74c3c; }";
html += ".button-off:hover { background-color: #c0392b; }";
html += ".status { font-size: 24px; margin: 30px 0; padding: 20px; border-radius: 10px; font-weight: bold; }";
html += ".status-on { background-color: #d5f4e6; color: #27ae60; border: 2px solid #27ae60; }";
html += ".status-off { background-color: #fadbd8; color: #e74c3c; border: 2px solid #e74c3c; }";
html += "h1 { color: #2c3e50; margin-bottom: 30px; font-size: 28px; }";
html += ".bulb-icon { font-size: 60px; margin: 20px 0; }";
html += "</style></head><body>";
html += "<div class='header'>";
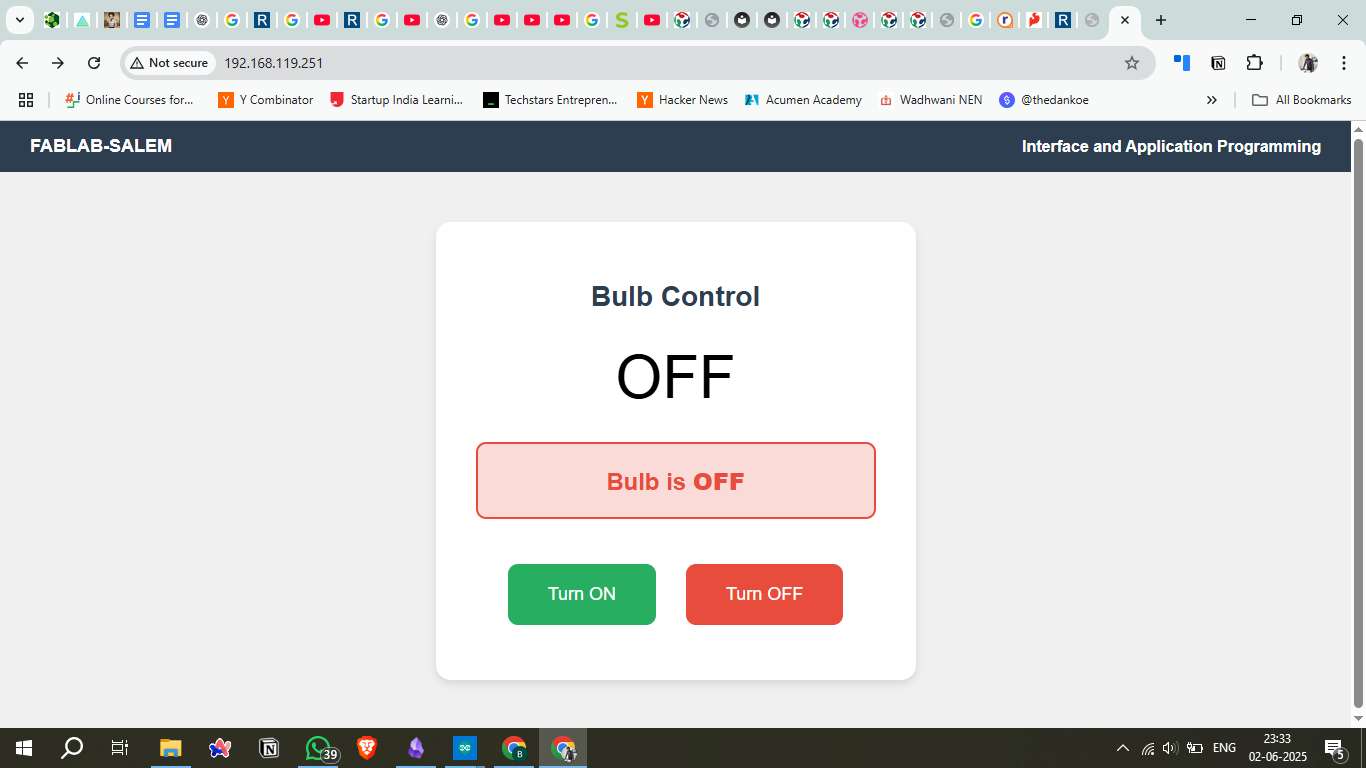
html += "<div class='header-left'>FABLAB-SALEM</div>";
html += "<div class='header-right'>Interface and Application Programming</div>";
html += "</div>";
html += "<div class='container'>";
html += "<h1>Bulb Control</h1>";
html += "<div class='bulb-icon'>" + String(relayState ? "ON" : "OFF") + "</div>";
html += "<div id='status' class='status " + String(relayState ? "status-on" : "status-off") + "'>";
html += "Bulb is <strong>" + String(relayState ? "ON" : "OFF") + "</strong>";
html += "</div>";
html += "<button class='button button-on' onclick='controlRelay(\"on\")'>Turn ON</button>";
html += "<button class='button button-off' onclick='controlRelay(\"off\")'>Turn OFF</button>";
html += "</div>";
html += "<script>";
html += "function controlRelay(action) {";
html += " fetch('/relay/' + action)";
html += " .then(response => response.text())";
html += " .then(data => {";
html += " updateStatus();";
html += " })";
html += " .catch(error => {";
html += " console.error('Error:', error);";
html += " });";
html += "}";
html += "function updateStatus() {";
html += " fetch('/relay/status')";
html += " .then(response => response.json())";
html += " .then(data => {";
html += " const statusDiv = document.getElementById('status');";
html += " const bulbIcon = document.querySelector('.bulb-icon');";
html += " const isOn = data.relay_state;";
html += " statusDiv.className = 'status ' + (isOn ? 'status-on' : 'status-off');";
html += " statusDiv.innerHTML = 'Bulb is <strong>' + (isOn ? 'ON' : 'OFF') + '</strong>';";
html += " bulbIcon.innerHTML = isOn ? 'ON' : 'OFF';";
html += " })";
html += " .catch(error => console.error('Status update failed:', error));";
html += "}";
html += "setInterval(updateStatus, 2000);";
html += "</script>";
html += "</body></html>";
server.send(200, "text/html", html);
}
// Turn relay ON
void handleRelayOn() {
digitalWrite(relayPin, HIGH);
relayState = true;
Serial.println("Relay turned ON");
server.send(200, "text/plain", "Relay turned ON");
}
// Turn relay OFF
void handleRelayOff() {
digitalWrite(relayPin, LOW);
relayState = false;
Serial.println("Relay turned OFF");
server.send(200, "text/plain", "Relay turned OFF");
}
// Toggle relay state
void handleRelayToggle() {
relayState = !relayState;
digitalWrite(relayPin, relayState ? HIGH : LOW);
Serial.println("Relay toggled to: " + String(relayState ? "ON" : "OFF"));
server.send(200, "text/plain", "Relay toggled to: " + String(relayState ? "ON" : "OFF"));
}
// Get relay status as JSON
void handleRelayStatus() {
JsonDocument doc;
doc["relay_state"] = relayState;
doc["status"] = relayState ? "ON" : "OFF";
doc["timestamp"] = millis();
doc["device"] = "Xiao ESP32S3";
String jsonString;
serializeJson(doc, jsonString);
server.send(200, "application/json", jsonString);
}Code Features & Functionality
WiFi & Web Server
- Automatic WiFi Connection: Connects to your home/office WiFi network
- Reconnection Logic: Automatically reconnects if WiFi drops
- HTTP Web Server: Hosts a local web server on port 80
- Network Information: Displays IP address, subnet, gateway, and DNS info
Relay Control
- GPIO2 Control: Uses GPIO2 pin to control relay module
- Multiple Control Methods: ON, OFF, Toggle, and Status check
- Real-time Updates: Status updates every 2 seconds automatically
- Serial Monitoring: Debug information via Serial Monitor
Professional Web Interface
- Responsive Design: Works on desktop, tablet, and mobile devices
- Modern Styling: Professional CSS with hover effects and animations
- Real-time Status: Visual indicators showing current relay state
- FABLAB Branding: Custom header with your lab information
API Endpoints
GET /- Main control interfaceGET /relay/on- Turn relay ONGET /relay/off- Turn relay OFFGET /relay/toggle- Toggle relay stateGET /relay/status- Get JSON status data
Setup Instructions
Prerequisites
- Arduino IDE installed on your computer
- ESP32 board package installed in Arduino IDE
- ArduinoJson library installed
- Xiao ESP32S3 or compatible ESP32 board
- Relay module
Hardware Setup
- Connect Relay Module:
- VCC → 3.3V or 5V (depending on relay module)
- GND → GND
- Signal → GPIO2
- Connect Load: Connect your bulb/device to the relay's output terminals
Software Setup
- Install Libraries:
- Go to Tools → Manage Libraries
- Search and install "ArduinoJson" by Benoit Blanchon
- Configure WiFi:
- Replace
"YOUR_WIFI_NAME"with your WiFi network name - Replace
"YOUR_WIFI_PASSWORD"with your WiFi password
- Replace
- Upload Code:
- Select your ESP32 board from Tools → Board
- Select correct COM port
- Click Upload button
Access the Interface
- Open Serial Monitor (115200 baud rate)
- Wait for WiFi connection and note the IP address
- Open web browser on any device connected to the same WiFi
- Navigate to the ESP32's IP address (e.g., http://192.168.1.100)
- Use the web interface to control your relay!
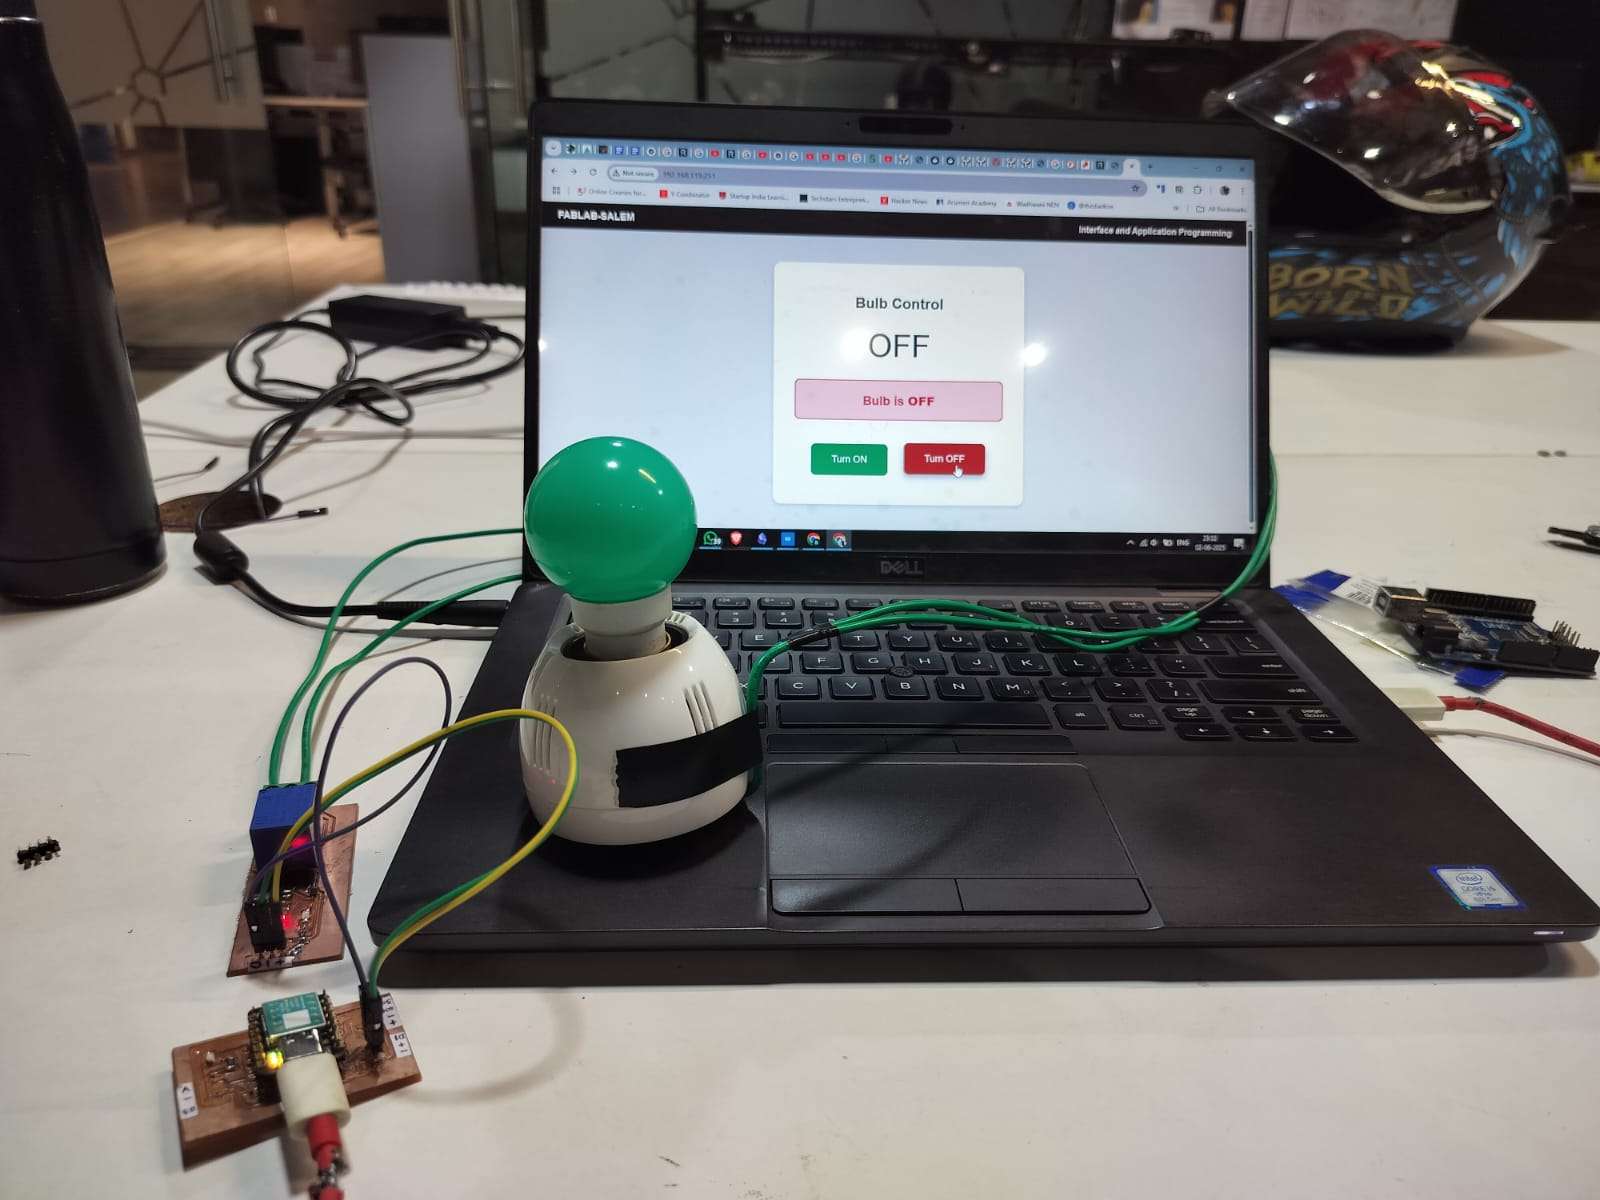
Results
Hero shot
Downloadable Files
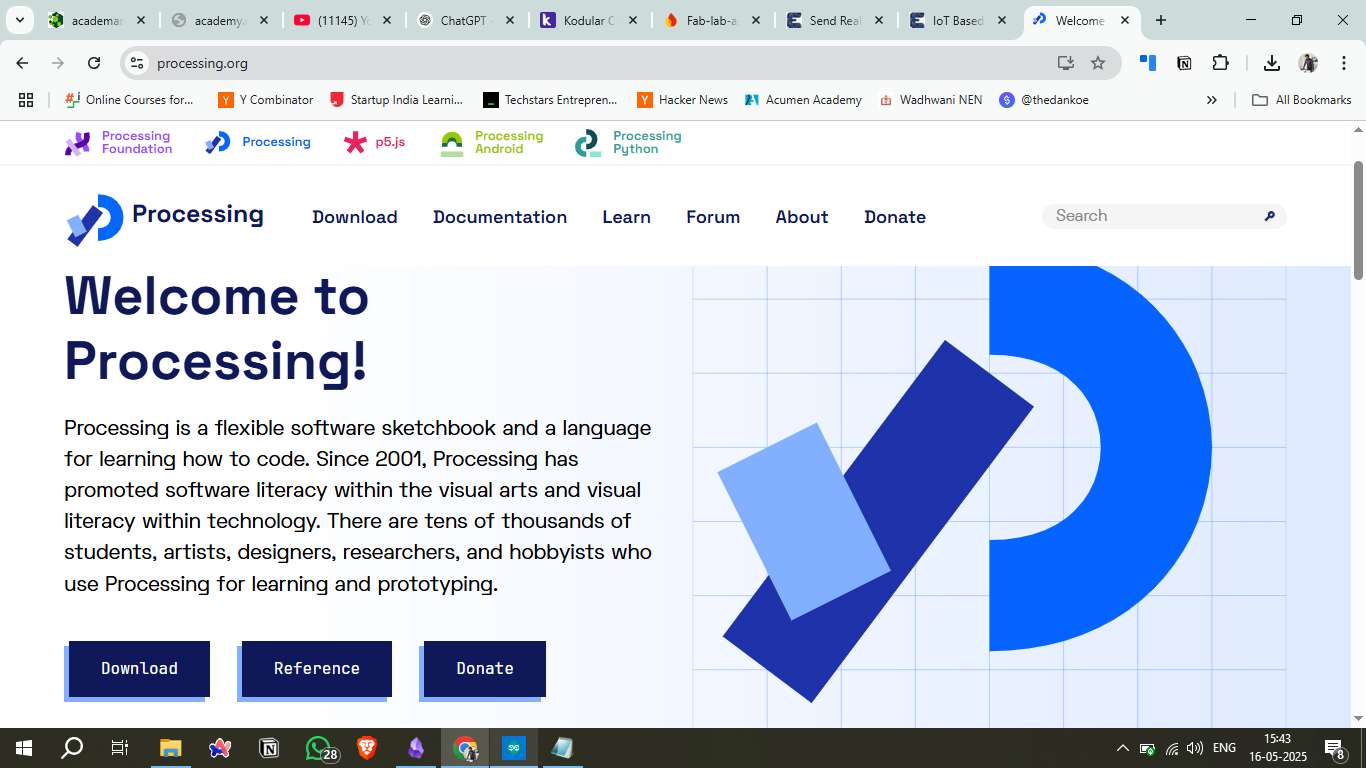
What is Processing?
Processing is an open-source graphical programming language and development environment (IDE) built for electronic arts, new media art, and visual design communities. It is especially useful for creating interactive graphics, visualizations, and GUI interfaces that can communicate with embedded devices like Arduino.
Key Features of Processing
| Feature | Description |
|---|---|
| Simple Syntax | Based on Java, but much simpler—ideal for beginners. |
| Built-in Graphics Support | Easily draw shapes, colors, text, and animations. |
| Serial Communication | Communicates directly with Arduino via USB using serial port. |
| Real-Time Interaction | Captures inputs from mouse, keyboard, or sensors and gives real-time response. |
| Cross-platform | Works on Windows, macOS, and Linux. |
Applications in Interface Programming
Visual Interface Creation
- Control Panels: Create custom GUI controls for embedded devices
- Data Visualization: Real-time graphs, charts, and sensor data displays
- Interactive Art: Responsive installations and digital art projects
- Prototyping: Quick interface mockups for embedded systems
Arduino Integration
- Serial Communication: Send commands to Arduino via USB/Serial
- Sensor Monitoring: Display real-time sensor readings
- Device Control: Create buttons to control LEDs, motors, relays
- Data Logging: Record and visualize sensor data over time
Common Use Cases
- Smart home control interfaces
- IoT device monitoring dashboards
- Educational programming tools
- Interactive museum exhibits
- Research data visualization
Why Choose Processing?
Advantages
- Beginner Friendly: Simple syntax and extensive documentation
- Visual Feedback: Immediate visual results help with learning
- Active Community: Large community with tutorials and examples
- Hardware Integration: Easy connection with Arduino and other devices
- Free & Open Source: No licensing costs
- Rapid Prototyping: Quick development of interactive interfaces
Considerations
- Performance: Not suitable for high-performance applications
- Mobile Deployment: Limited mobile app development capabilities
- Advanced Features: May lack some advanced GUI components
- Scalability: Better for prototypes than large applications
Getting Started with Processing
Installation Steps
- Download Processing from https://processing.org/download
- Extract the downloaded file to your desired location
- Run the Processing executable
- Start coding immediately - no additional setup required!
Basic Code Structure
// Processing basic structure
            void setup() {
              size(800, 600);  // Window size
              // Initialization code here
            }

            void draw() {
              background(255);  // White background
              // Main program loop
              // Drawing and interaction code
            }

            // Event handlers
            void mousePressed() {
              // Handle mouse clicks
            }

            void keyPressed() {
              // Handle keyboard input
            }
Learning Resources
- Official Website: https://processing.org/
- Tutorials: https://processing.org/tutorials/
- Reference: https://processing.org/reference/
- Examples: Built-in examples in the IDE (File → Examples)
- Community: Processing Community Forum
Processing vs Other Interface Tools
| Tool | Best For | Difficulty | Hardware Integration |
|---|---|---|---|
| Processing | Visual prototypes, Arduino integration | Easy | Excellent |
| Python (Tkinter) | Desktop applications, data analysis | Medium | Good |
| Web (HTML/JS) | Browser-based interfaces, IoT | Medium | Limited |
| MIT App Inventor | Mobile apps, Bluetooth devices | Easy | Good |
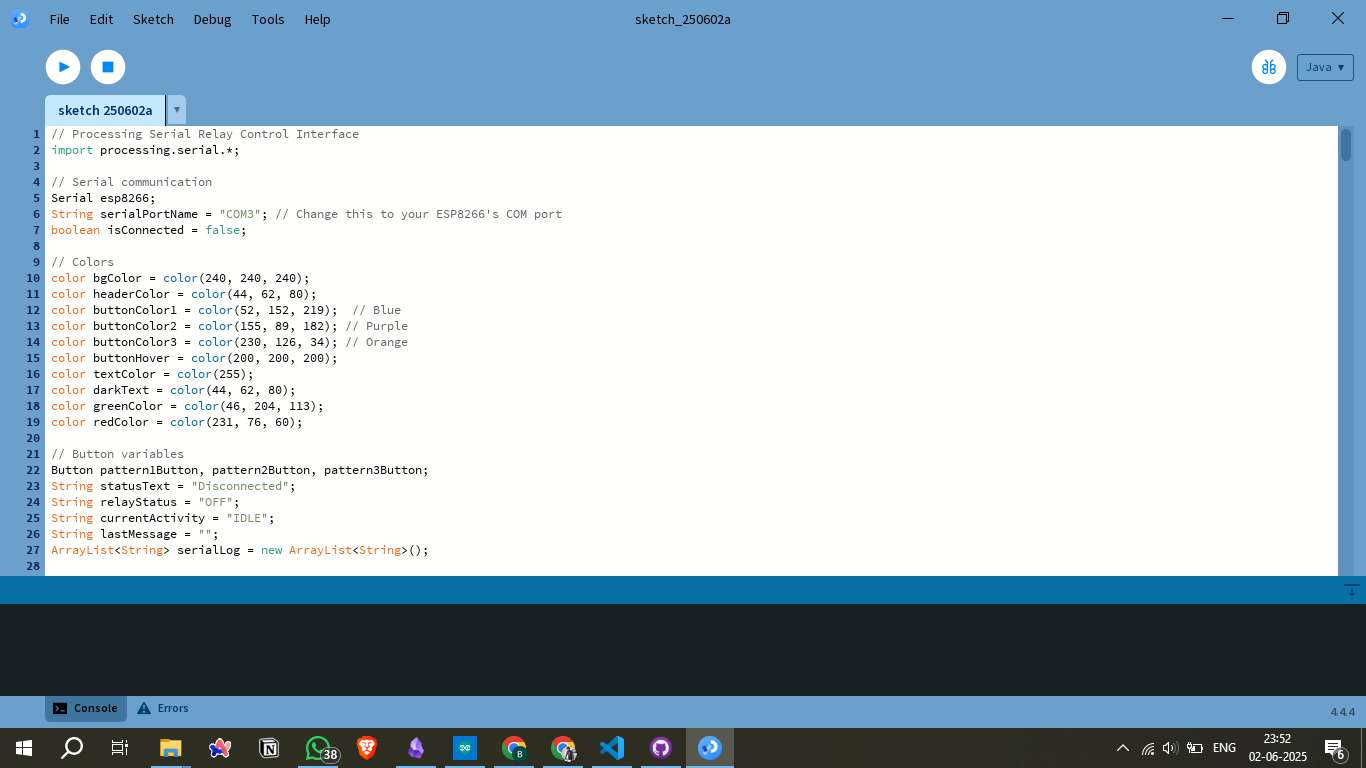
Processing Serial Relay Control Interface
This Processing code creates a professional GUI interface to control relay patterns via serial communication with ESP32/ESP8266. The interface features real-time status monitoring, pattern control buttons, and a comprehensive serial log display.
1. Library Imports and Initial Setup
The code begins by importing the Processing Serial library and setting up essential variables for communication and interface styling.
// Processing Serial Relay Control Interface
            import processing.serial.*;

            // Serial communication
            Serial esp8266;
            String serialPortName = "COM5"; // Change this to your ESP8266's COM port
            boolean isConnected = false;

            // Colors
            color bgColor = color(240, 240, 240);
            color headerColor = color(44, 62, 80);
            color buttonColor1 = color(52, 152, 219);  // Blue
            color buttonColor2 = color(155, 89, 182); // Purple
            color buttonColor3 = color(230, 126, 34); // Orange
            color buttonHover = color(200, 200, 200);
            color textColor = color(255);
            color darkText = color(44, 62, 80);
            color greenColor = color(46, 204, 113);
            color redColor = color(231, 76, 60);

            // Button variables
            Button pattern1Button, pattern2Button, pattern3Button;
            String statusText = "Disconnected";
            String relayStatus = "OFF";
            String currentActivity = "IDLE";
            String lastMessage = "";
            ArrayList<String> serialLog = new ArrayList<String>();

            // Fonts
            PFont titleFont, buttonFont, statusFont;
Key Components:
- Serial Library: Enables communication with microcontroller via USB
- Color Scheme: Professional blue, purple, and orange color palette
- Button Objects: Three pattern control buttons
- Status Variables: Track connection, relay state, and activity
- Serial Log: ArrayList to store communication history
2. Setup Function - Interface Initialization
The setup() function initializes the window, creates fonts, buttons, and establishes serial connection.
void setup() {
              size(900, 700);

              // Create fonts
              titleFont = createFont("Arial Bold", 28);
              buttonFont = createFont("Arial Bold", 18);
              statusFont = createFont("Arial", 16);

              // Create buttons
              pattern1Button = new Button(width/2 - 150, 320, 300, 70, "Pattern 1 (1x Blink)", buttonColor1);
              pattern2Button = new Button(width/2 - 150, 410, 300, 70, "Pattern 2 (2x Blink)", buttonColor2);
              pattern3Button = new Button(width/2 - 150, 500, 300, 70, "Pattern 3 (3x Blink)", buttonColor3);

              // Initialize serial connection
              initializeSerial();
            }
Setup Features:
- Window Size: 900x700 pixels for optimal interface layout
- Typography: Three font sizes for different interface elements
- Button Layout: Centered pattern control buttons with distinct colors
- Auto-Connection: Automatically attempts serial connection on startup
3. Main Draw Loop - Interface Rendering
The draw() function continuously renders the interface, updating all visual elements in real-time.
void draw() {
background(bgColor);
// Draw header
drawHeader();
// Draw title
textFont(titleFont);
fill(darkText);
textAlign(CENTER);
text("Relay Pattern Control Panel", width/2, 100);
// Draw connection status
drawConnectionStatus();
// Draw relay status
drawRelayStatus();
// Draw buttons
pattern1Button.display();
pattern2Button.display();
pattern3Button.display();
// Draw serial log
drawSerialLog();
// Draw instructions
drawInstructions();
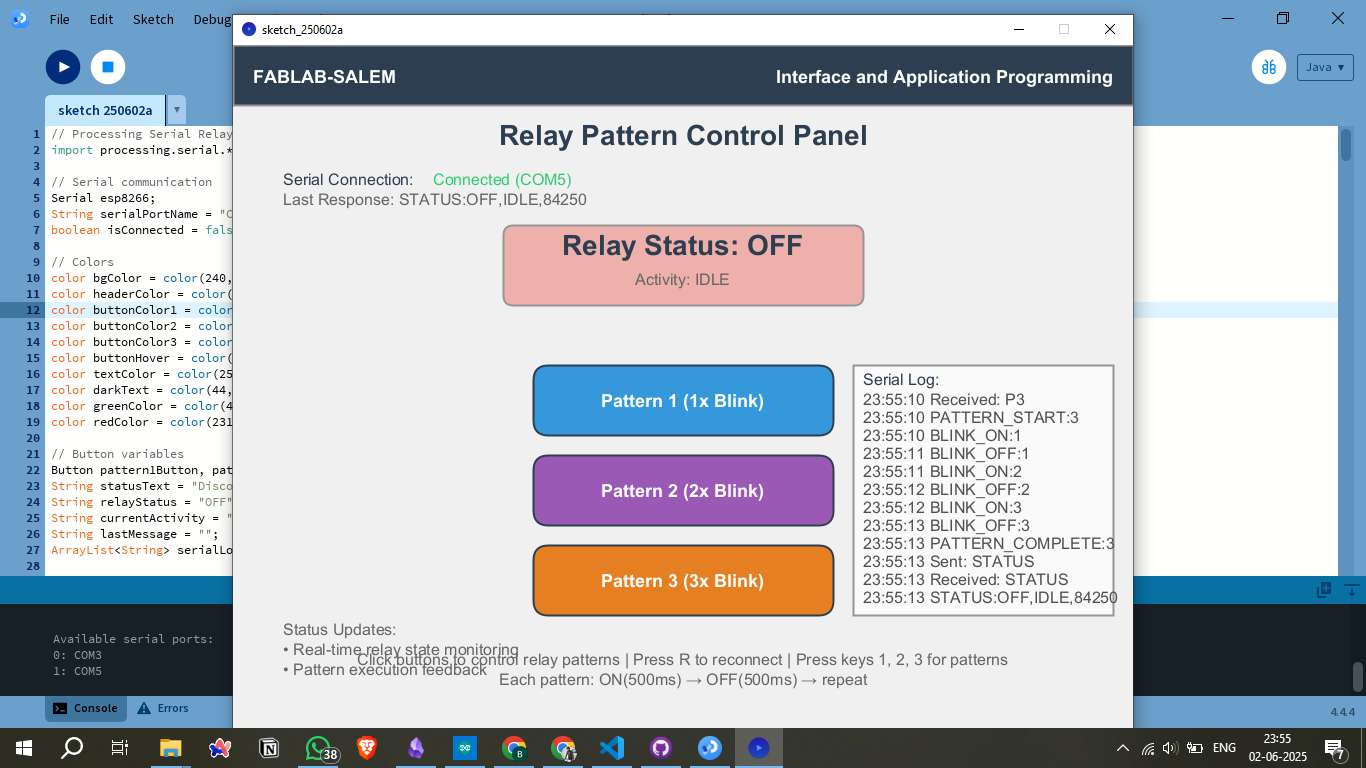
}Interface Elements:
- Header Bar: FABLAB-SALEM branding with course title
- Status Display: Real-time connection and relay status
- Control Buttons: Interactive pattern selection buttons
- Serial Log: Live communication history
- Instructions: User guidance and keyboard shortcuts
4. Status Display Functions
These functions handle the visual representation of connection status, relay state, and activity monitoring.
void drawConnectionStatus() {
              textFont(statusFont);
              textAlign(LEFT);

              // Connection status
              fill(darkText);
              text("Serial Connection:", 50, 140);

              fill(isConnected ? greenColor : redColor);
              text(isConnected ? "Connected (" + serialPortName + ")" : "Disconnected", 200, 140);

              if (!lastMessage.equals("")) {
                fill(100);
                text("Last Response: " + lastMessage, 50, 160);
              }
            }

            void drawRelayStatus() {
              // Status box background
              if (relayStatus.equals("ON")) {
                fill(greenColor, 100);
              } else {
                fill(redColor, 100);
              }
              rect(width/2 - 180, 180, 360, 80, 10);

              // Status text
              textFont(titleFont);
              fill(darkText);
              textAlign(CENTER);
              text("Relay Status: " + relayStatus, width/2, 210);

              textFont(statusFont);
              fill(100);
              text("Activity: " + currentActivity, width/2, 240);
            }
Status Features:
- Color-Coded Status: Green for connected/ON, Red for disconnected/OFF
- Connection Info: Shows COM port and connection state
- Relay State: Large, prominent display of current relay status
- Activity Tracking: Shows current operation (IDLE, RUNNING PATTERN, etc.)
5. Serial Communication Functions
These functions handle the serial communication protocol, message processing, and connection management.
void initializeSerial() {
              try {
                // List available serial ports
                println("Available serial ports:");
                for (int i = 0; i < Serial.list().length; i++) {
                  println(i + ": " + Serial.list()[i]);
                }

                // Try to connect to specified port
                esp8266 = new Serial(this, serialPortName, 115200);
                esp8266.bufferUntil('\n');
                isConnected = true;
                statusText = "Connected";
                addToLog("Connected to " + serialPortName);

                // Request initial status
                delay(2000);
                sendCommand("STATUS");

              } catch (Exception e) {
                isConnected = false;
                statusText = "Connection Failed";
                addToLog("Failed to connect: " + e.getMessage());
                println("Connection failed. Available ports:");
                printArray(Serial.list());
              }
            }

            void serialEvent(Serial port) {
              if (port.available() > 0) {
                String message = port.readStringUntil('\n');
                if (message != null) {
                  message = message.trim();
                  processSerialMessage(message);
                }
              }
            }

            void processSerialMessage(String message) {
              addToLog(message);
              lastMessage = message;

              if (message.startsWith("STATUS:")) {
                String[] parts = message.substring(7).split(",");
                if (parts.length >= 2) {
                  relayStatus = parts[0];
                  currentActivity = parts[1];
                }
              } else if (message.startsWith("PATTERN_START:")) {
                currentActivity = "RUNNING PATTERN " + message.substring(14);
              } else if (message.startsWith("PATTERN_COMPLETE:")) {
                currentActivity = "IDLE";
                sendCommand("STATUS");
              }
            }
Communication Protocol:
- Auto-Detection: Lists and attempts connection to available ports
- 115200 Baud: High-speed serial communication
- Message Parsing: Processes status updates and pattern notifications
- Error Handling: Graceful handling of connection failures
6. Button Class and Interaction
The custom Button class provides interactive controls with hover effects and visual feedback.
// Button class
            class Button {
              float x, y, w, h;
              String label;
              color normalColor, currentColor;
              boolean isPressed = false;

              Button(float x, float y, float w, float h, String label, color c) {
                this.x = x;
                this.y = y;
                this.w = w;
                this.h = h;
                this.label = label;
                this.normalColor = c;
                this.currentColor = c;
              }

              void display() {
                // Update color based on mouse hover and connection
                if (isConnected && isMouseOver()) {
                  currentColor = lerpColor(normalColor, buttonHover, 0.3);
                } else if (!isConnected) {
                  currentColor = lerpColor(normalColor, color(150), 0.5);
                } else {
                  currentColor = normalColor;
                }

                // Draw button
                fill(currentColor);
                stroke(darkText);
                strokeWeight(2);
                rect(x, y, w, h, 15);

                // Draw text
                textFont(buttonFont);
                fill(textColor);
                textAlign(CENTER, CENTER);
                text(label, x + w/2, y + h/2);

                noStroke();
              }

              boolean isMouseOver() {
                return mouseX >= x && mouseX <= x + w && mouseY >= y && mouseY <= y + h;
              }

              void clicked() {
                isPressed = true;
                currentColor = lerpColor(normalColor, color(0), 0.2);
              }
            }
Button Features:
- Hover Effects: Color changes when mouse hovers over buttons
- State-Aware: Disabled appearance when not connected
- Visual Feedback: Click animation for user confirmation
- Rounded Corners: Modern, professional appearance
7. User Input and Control Functions
Mouse and keyboard event handlers provide multiple ways to control the relay patterns.
void mousePressed() {
              if (!isConnected) {
                addToLog("Error: Not connected to ESP8266");
                return;
              }

              if (pattern1Button.isMouseOver()) {
                pattern1Button.clicked();
                sendCommand("P1");
              } else if (pattern2Button.isMouseOver()) {
                pattern2Button.clicked();
                sendCommand("P2");
              } else if (pattern3Button.isMouseOver()) {
                pattern3Button.clicked();
                sendCommand("P3");
              }
            }

            void keyPressed() {
              if (!isConnected && (key == 'r' || key == 'R')) {
                initializeSerial();
                return;
              }

              if (isConnected) {
                if (key == '1') {
                  sendCommand("P1");
                } else if (key == '2') {
                  sendCommand("P2");
                } else if (key == '3') {
                  sendCommand("P3");
                } else if (key == 's' || key == 'S') {
                  sendCommand("STATUS");
                } else if (key == 'r' || key == 'R') {
                  initializeSerial();
                }
              }
            }
Control Methods:
- Mouse Control: Click buttons to send pattern commands
- Keyboard Shortcuts: Press 1, 2, 3 for patterns
- Status Request: Press 'S' to request current status
- Reconnect: Press 'R' to attempt reconnection
- Error Prevention: Commands only work when connected
Results
Hero shot
Downloadable Files
Table of Contents
- Assignment
- Introduction
- Embedded Local Server
- Communication Protocols
- ESP32 Web Server Code
- Code Features
- Setup Instructions
- What is Processing?
- Processing Features
- Processing Applications
- Why Choose Processing?
- Getting Started
- Processing vs Alternatives
- Serial Relay Interface
- Library Imports & Setup
- Setup Function
- Main Draw Loop
- Status Display
- Serial Communication
- Button Class
- User Controls