Week 14
Assignment: Moulding and Casting
Group assignment
The Link of Group assignments.
Individual assignment
- design a mold around the process you'll be using, produce it with a smooth surface finish that does not show the production process toolpath, and use it to cast parts
- extra credit: use more then two mold parts
Manufacturing Processes
Two fundamental manufacturing methods are used across industries for creating parts and products:
Molding: A widely used manufacturing process in which a pliable or molten material—such as plastic, rubber, or even metal—is shaped by being forced into a rigid frame called a mold. This mold defines the exact shape and surface details of the final product. Once inside the mold, the material is cooled or cured so that it solidifies and retains the mold's shape. Molding allows for the high-speed, repeatable production of parts with high accuracy and surface finish, making it ideal for large-scale manufacturing.
There are various types of molding techniques depending on the material and end-use—such as injection molding (used for complex plastic parts), blow molding (used for hollow items like bottles), and compression molding (commonly used for rubber or thermosetting plastics). This process is essential in industries such as automotive, packaging, electronics, and consumer goods.
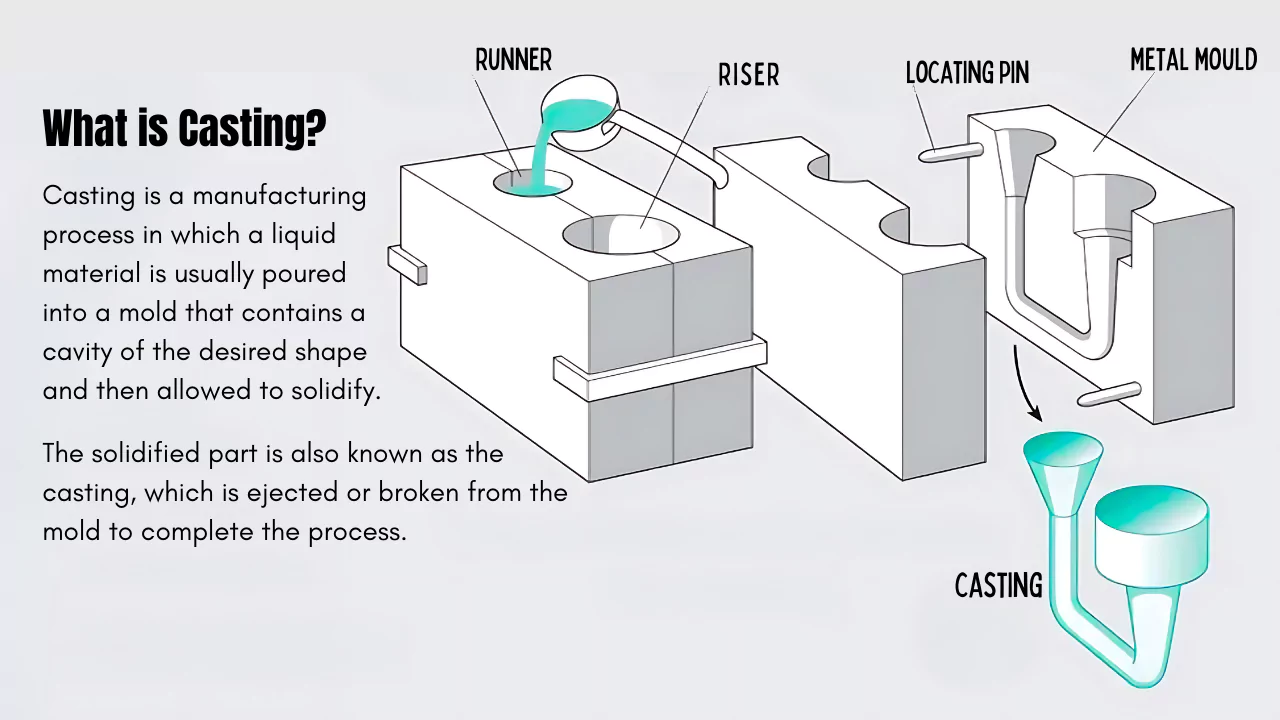
Casting: A traditional and versatile manufacturing method where a material—typically metal, plastic, or resin—is heated until it becomes liquid and then poured into a hollow mold shaped like the desired final product. Once the liquid cools and solidifies, the mold is removed, revealing the cast object. This process is particularly effective for creating complex or large parts that would be difficult or expensive to machine.
Casting techniques vary based on the material and precision needed—common methods include sand casting (great for large metal parts), die casting (ideal for mass production of metal components with fine details), and investment casting (used for high-precision items like turbine blades or jewelry). Casting is integral to industries such as aerospace, automotive, construction, and art due to its flexibility in material choice, cost-effectiveness for large production runs, and ability to form intricate geometries.
Types of Molding
There are several different molding techniques used in manufacturing, each suited for specific materials and applications:
Injection Molding: Injection molding is one of the most commonly used techniques for making plastic parts. In this process, melted plastic is injected into a metal mold under high pressure. Once it cools and solidifies, the mold opens to release the shaped product. This method is ideal for producing large numbers of identical items, like phone cases, bottle caps, and plastic toys.
Compression Molding: Compression molding involves placing a heated, soft material—usually rubber or thermosetting plastic—into an open mold. The mold is then closed, and pressure is applied to shape and cure the material. This process is used to make durable parts such as automotive panels, kitchenware, and rubber seals.
Blow Molding: Blow molding is mainly used to produce hollow plastic objects like bottles or containers. It starts with a heated plastic tube, which is placed inside a mold and then expanded with compressed air until it fills the mold cavity. The plastic cools and takes the shape of the mold, creating lightweight, seamless products.
Rotational Molding (Rotomolding): In rotational molding, powdered plastic is added into a hollow mold, which is then heated and rotated slowly along two axes. As the mold spins, the plastic melts and coats the inside walls evenly. It's perfect for making large, hollow items such as water tanks, dustbins, and playground slides.
Vacuum Forming (Thermoforming): Vacuum forming uses a heated plastic sheet stretched over a mold. Once it's soft, a vacuum pulls the sheet tightly against the mold surface. This technique is often used for making packaging trays, plastic enclosures, and lightweight machine parts.
Types of Casting
There are several different casting techniques used in manufacturing, each offering unique advantages for specific materials and applications:
Sand Casting: Sand casting is a traditional and versatile method where a mold is made from compacted sand. Molten metal is poured into the mold and allowed to cool and harden. Once solid, the sand mold is broken apart to reveal the cast item. This is commonly used for engine blocks, pump housings, and other heavy-duty parts.
Die Casting: Die casting uses metal molds (dies) and high pressure to inject molten metal—usually aluminum or zinc—into the mold. It allows for high-speed production and excellent surface finish. It's often used in automotive and electronics industries for parts like housings and brackets.
Investment Casting (Lost-Wax Casting): Investment casting starts with a wax model of the desired part. The model is coated in ceramic to form a mold, and then the wax is melted out. Molten metal is poured into the hollow space to create a highly detailed casting. This method is used for jewelry, turbine blades, and precision instruments.
Centrifugal Casting: In centrifugal casting, the mold spins rapidly while the molten material is poured into it. The centrifugal force distributes the metal evenly, creating dense and uniform parts. It's great for making pipes, rings, and other cylindrical components.
Shell Casting: Shell casting is similar to sand casting but uses a thin shell mold made from resin-coated sand. It offers better surface finish and precision compared to regular sand casting. This technique is often used in the automotive and aerospace industries.
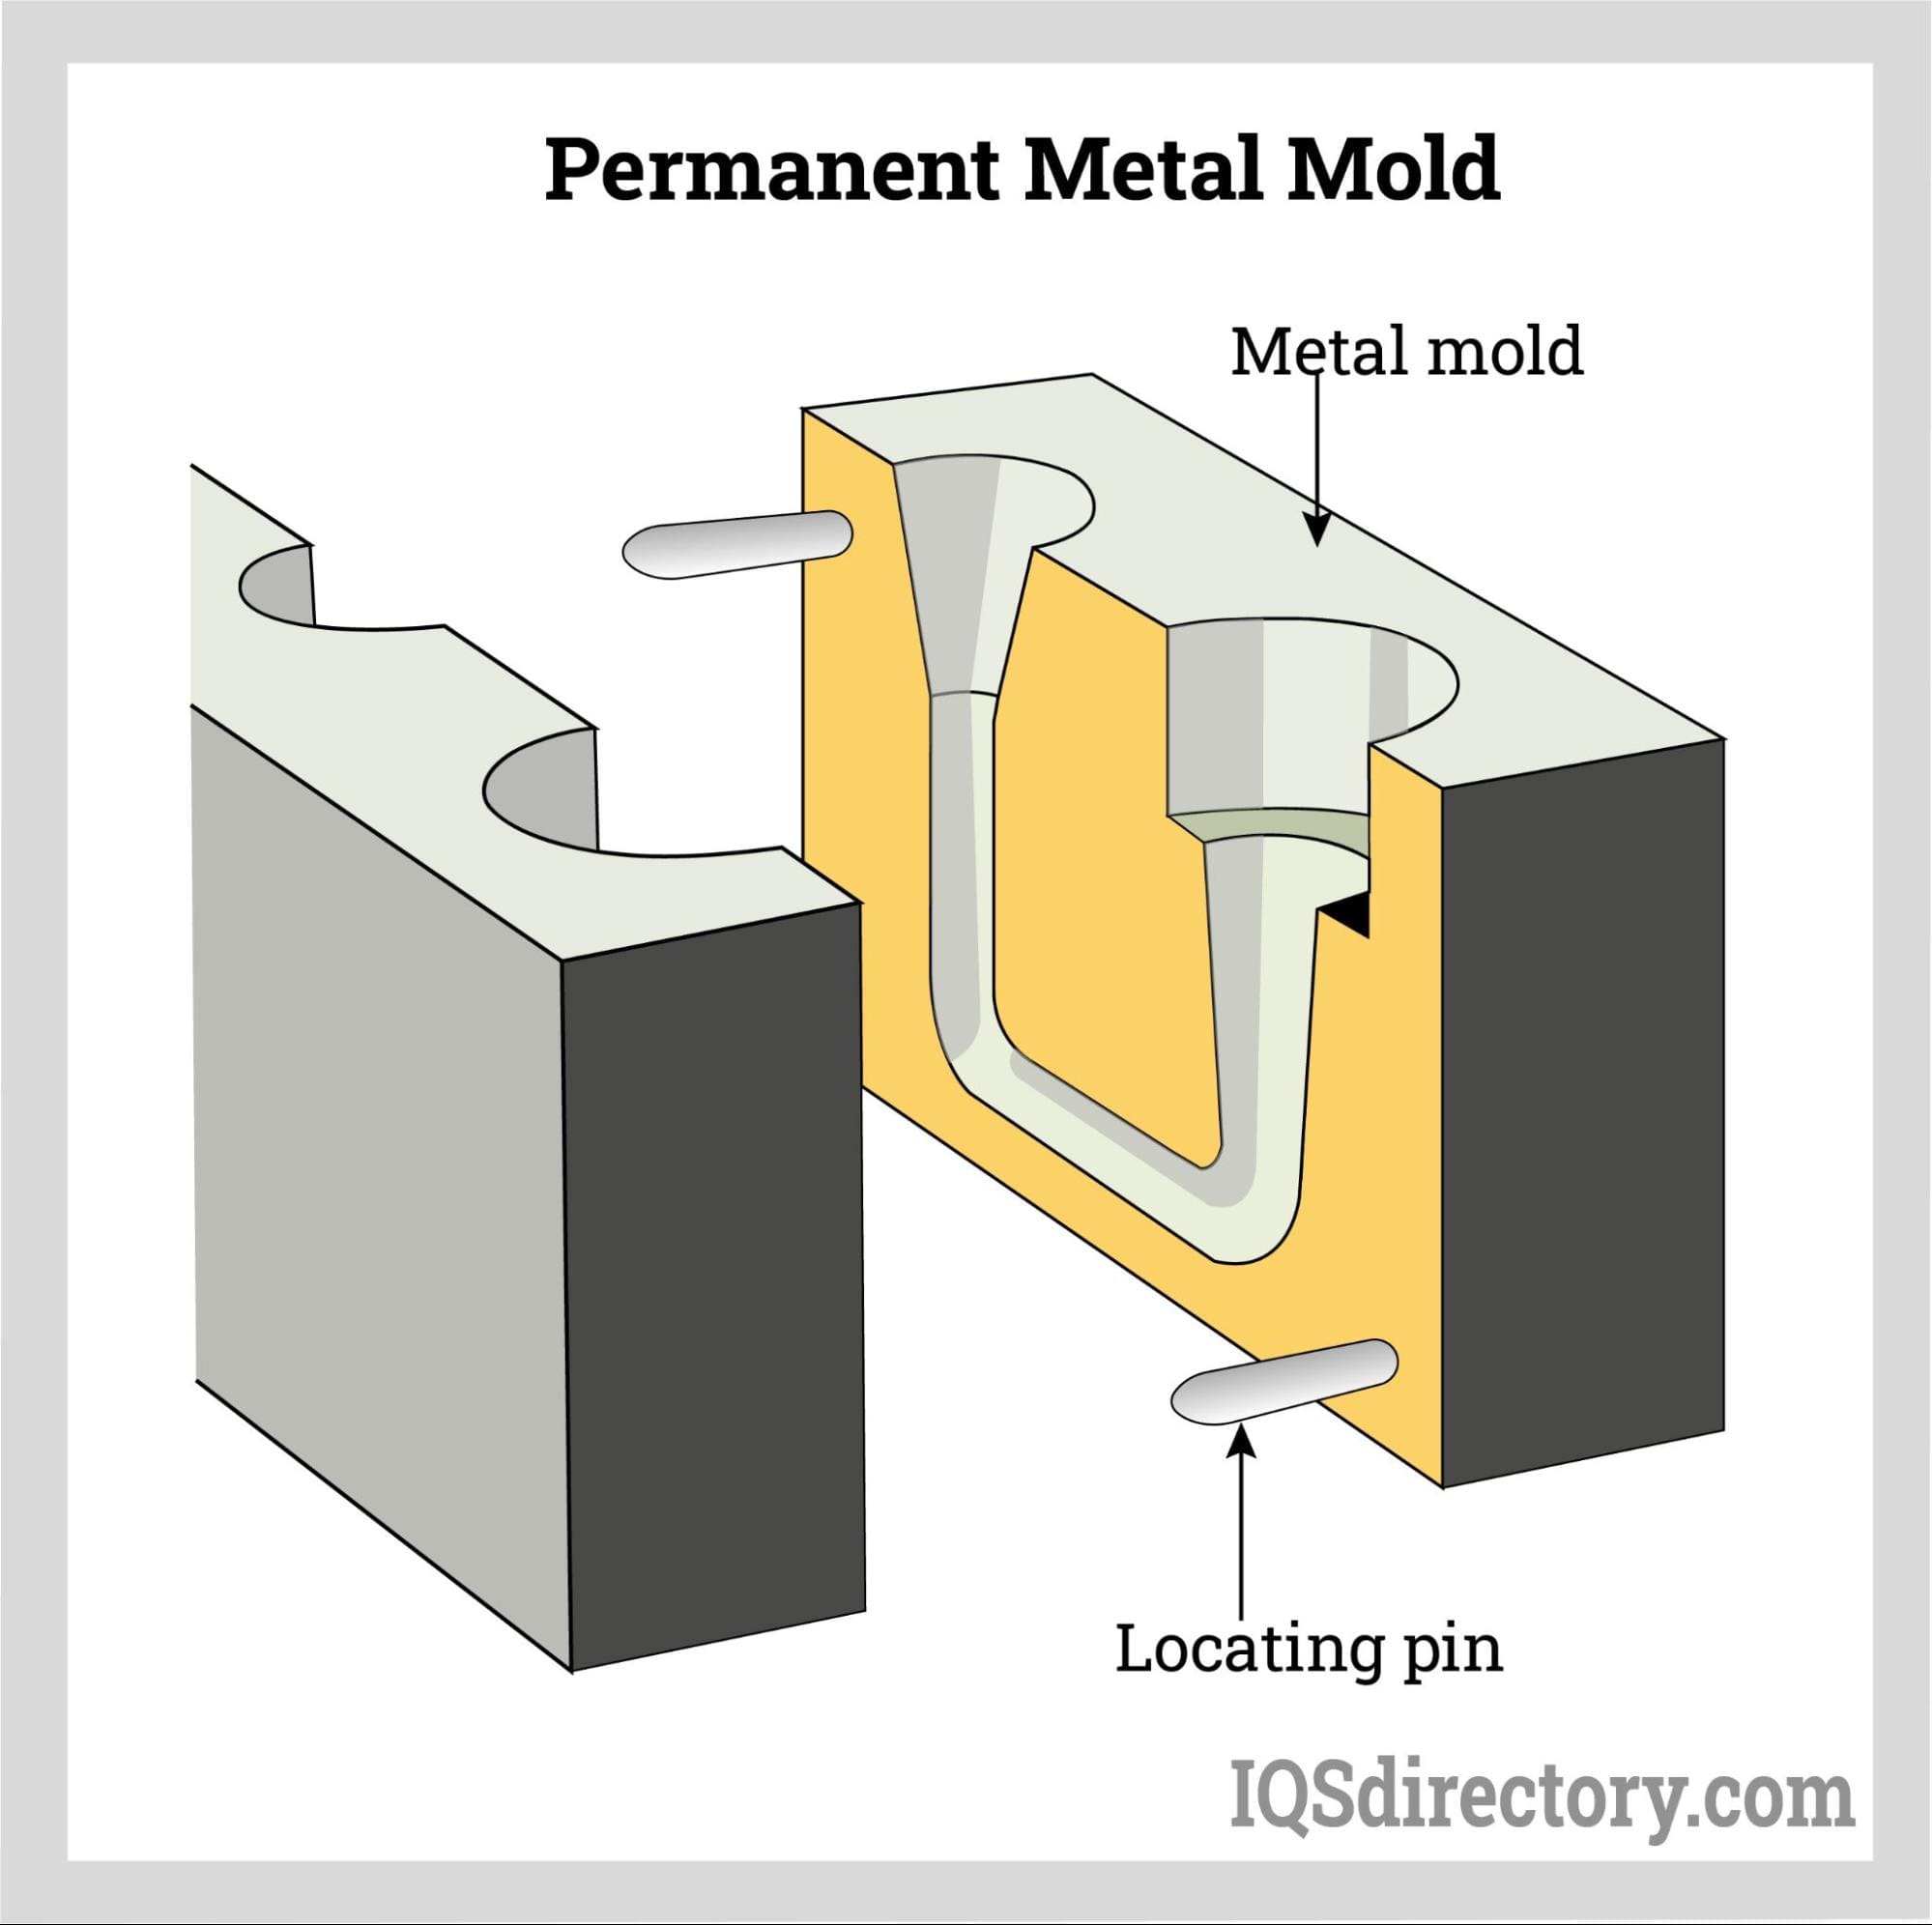
Permanent Mold Casting: Permanent mold casting uses reusable metal molds, and molten metal is poured into them—either by gravity or low pressure. The result is a strong and consistent product. This method is used for manufacturing gears, pistons, and other industrial parts.
Mold Creation Using 3D Printing – Corona Safety Touch Tool
The process of creating a mold for casting using 3D printing technology involves several key steps from design to final output:
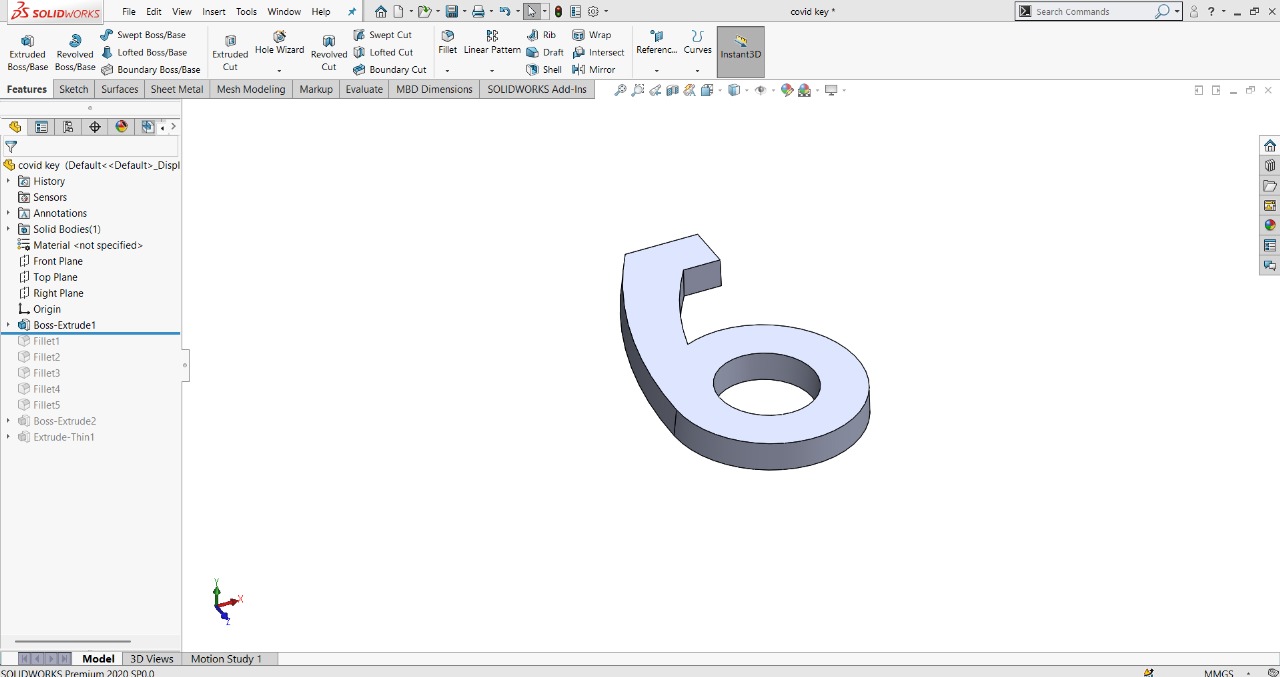
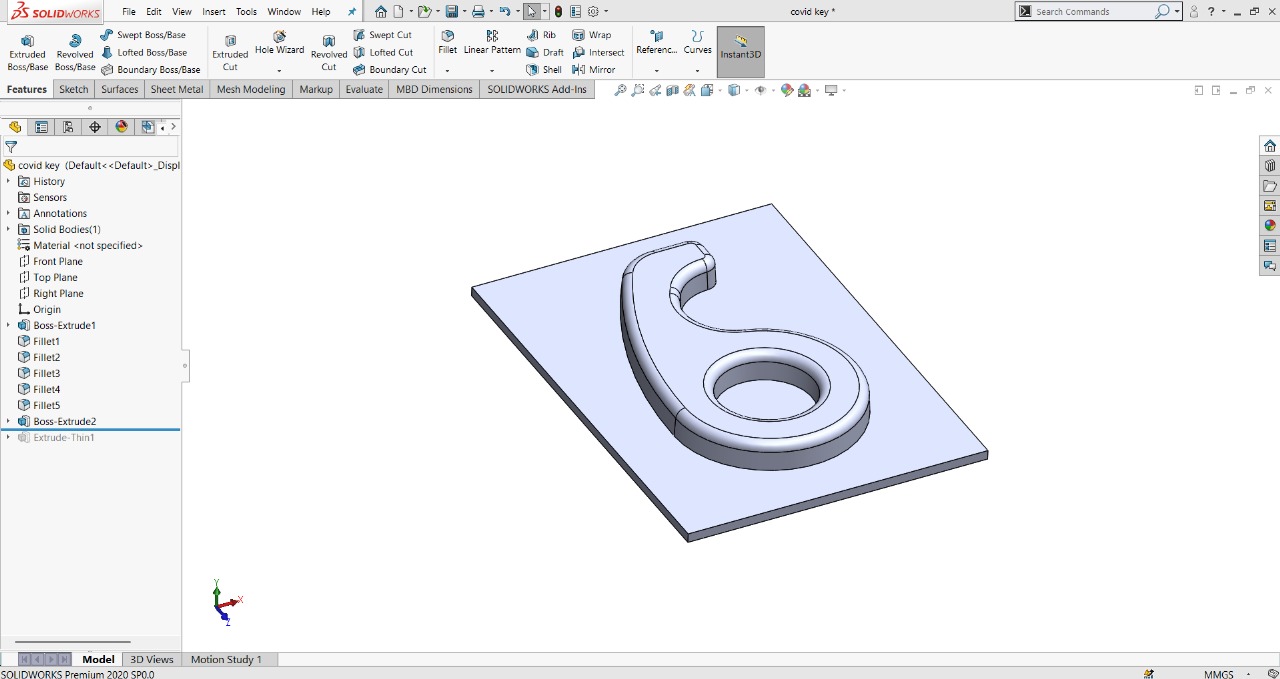
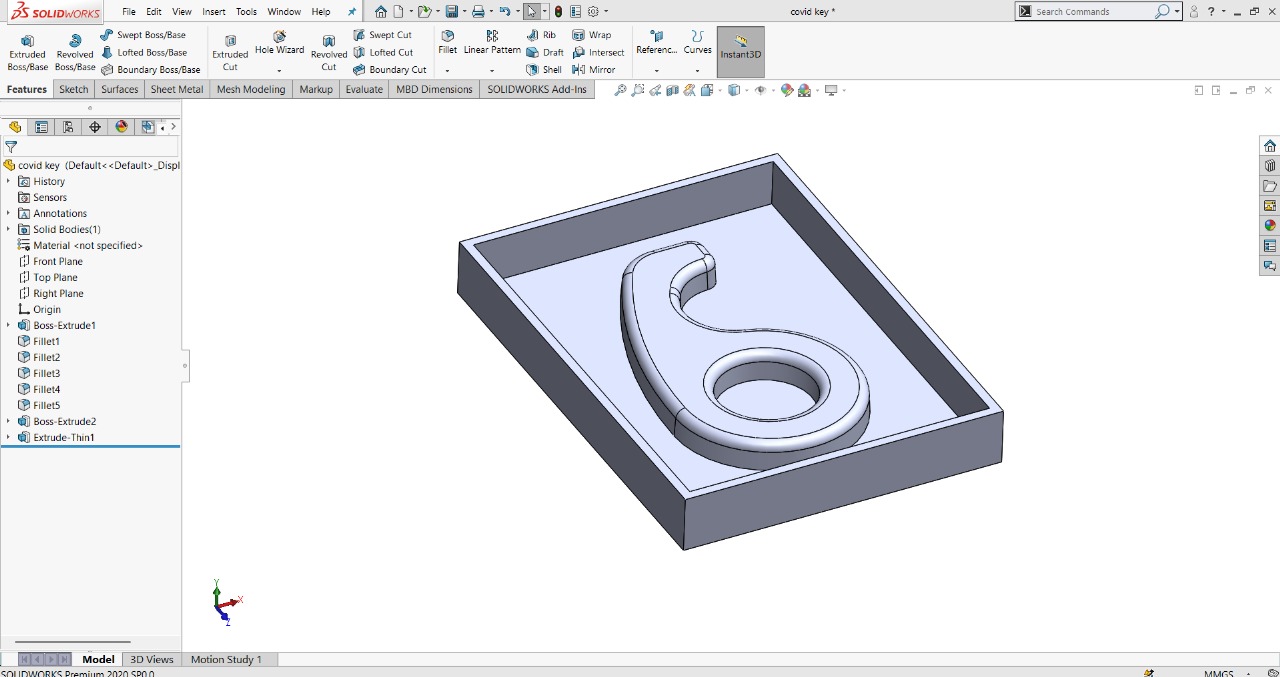
3D Modeling in SolidWorks: I started the process by designing a Corona Safety Touch Tool in SolidWorks. The design was created with ergonomics and usability in mind. I began with a basic outline and used Boss-Extrude features to give the design its 3D shape. Multiple fillet features were added to smooth out the sharp edges and improve comfort during use.

Finalizing the Mold Design: Once the product model was ready, I moved on to designing the mold. I embedded the 3D model into a rectangular base to create a positive mold layout. Later, side walls were added to form a mold cavity that could contain the casting material. This step is important to ensure proper boundaries during the casting process.
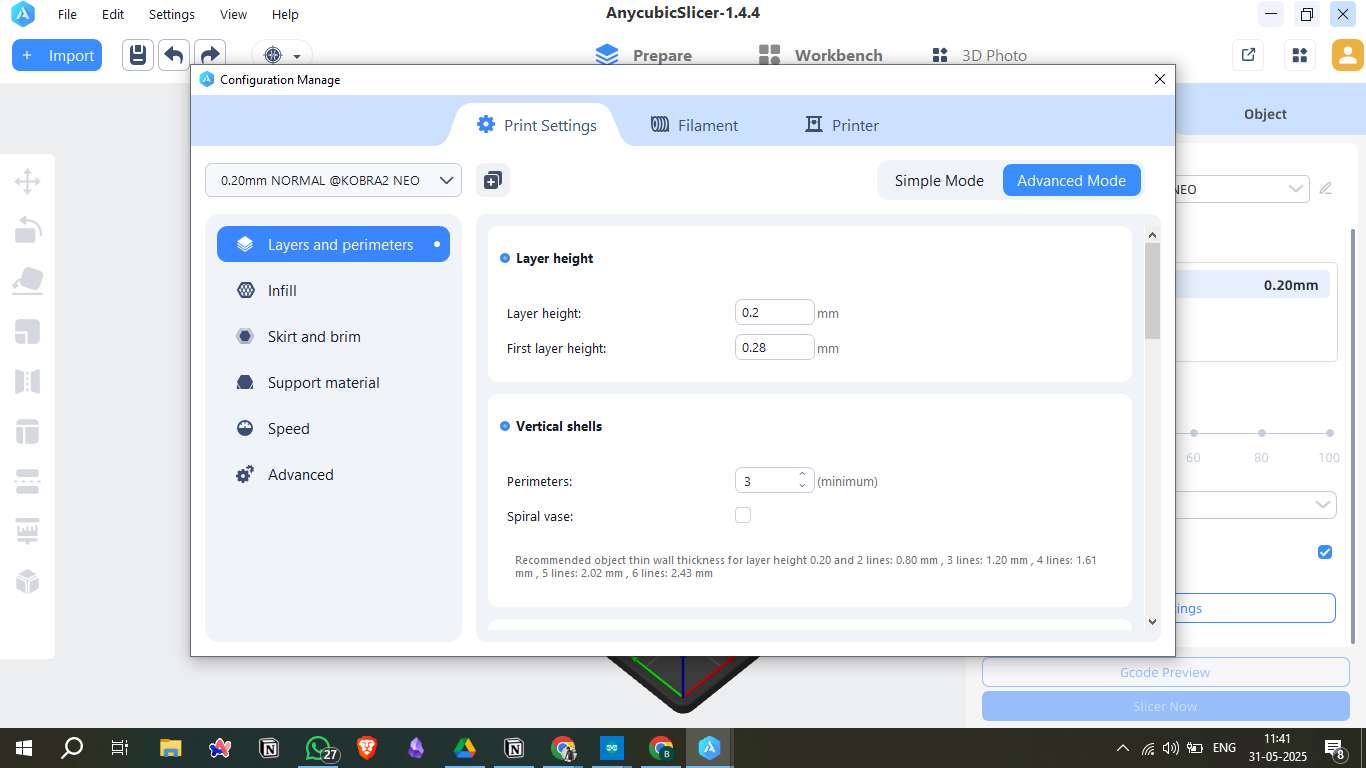
Exporting and Slicing the File: After finalizing the mold model, I exported the file as an STL format, which is the standard for 3D printing. I then imported it into Anycubic Slicer software. In the slicer, I adjusted settings like layer height (0.2 mm), infill density, and support settings. Once done, the file was sliced and converted to G-code, which the 3D printer understands.
3D Printing the Mold: The G-code was then uploaded to an Anycubic Kobra 2 Neo 3D printer using PLA filament. The printer followed the G-code instructions and printed the mold layer by layer. After a few hours of printing, the mold was successfully produced with good dimensional accuracy and surface finish.
Mold Output: The final printed mold came out clean and ready to be used for casting. It captured all the fine details of the original design and had a durable structure for single or multiple castings.

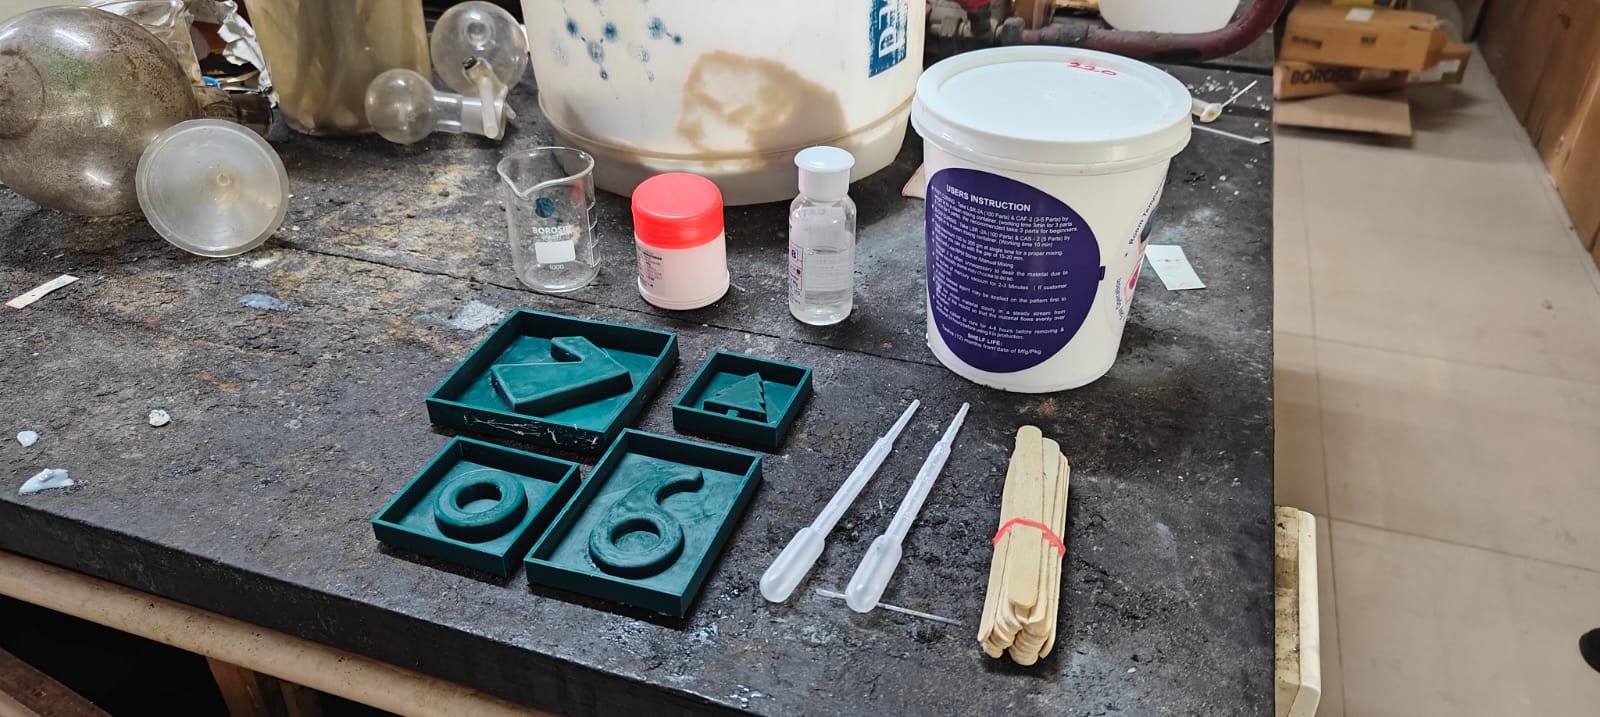
Casting Process
For the casting process, I used a soft silicone rubber called MoldSil along with its catalyst (Part B). These two components must be mixed in the correct ratio to ensure proper curing and flexibility of the final cast. Here's a step-by-step breakdown of how the casting was done:
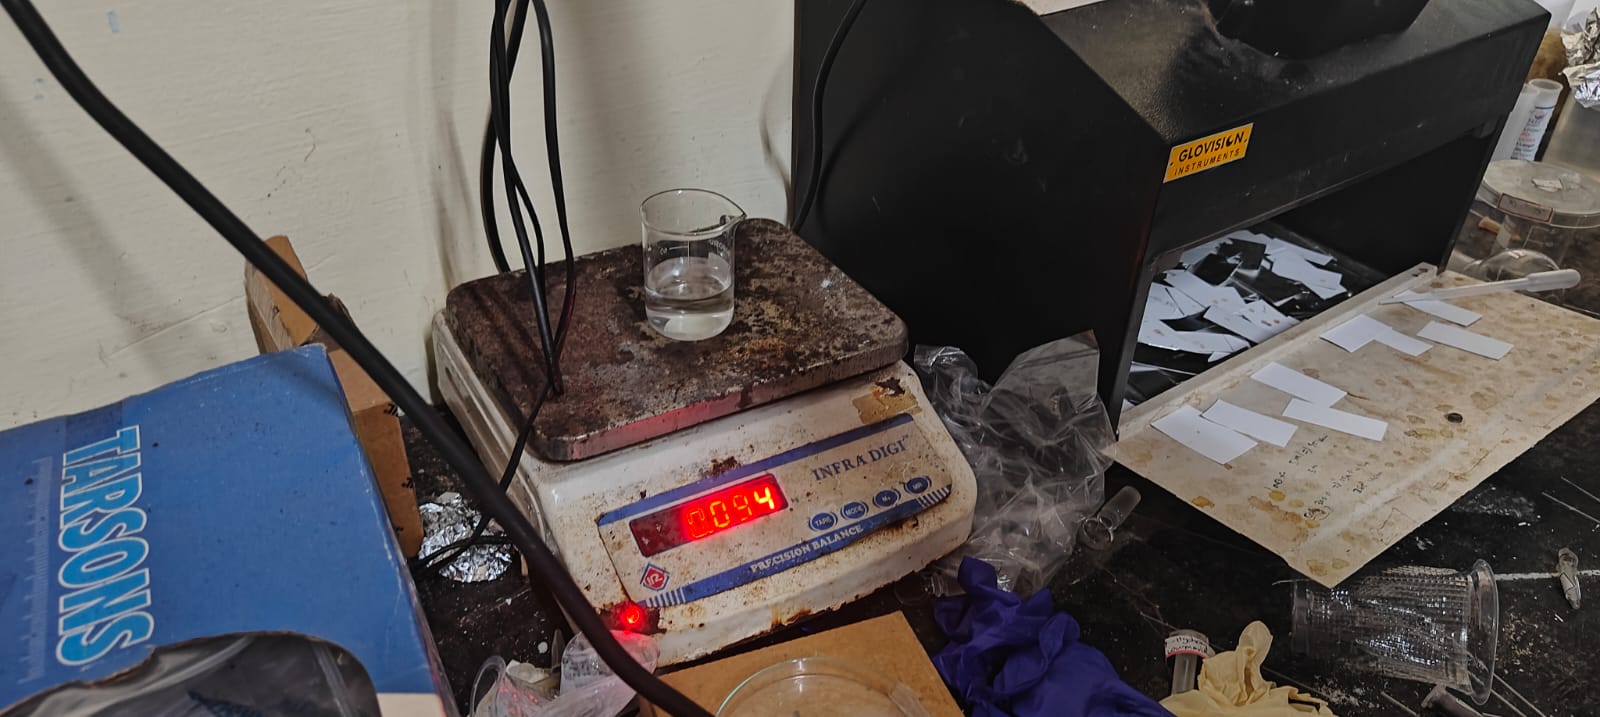
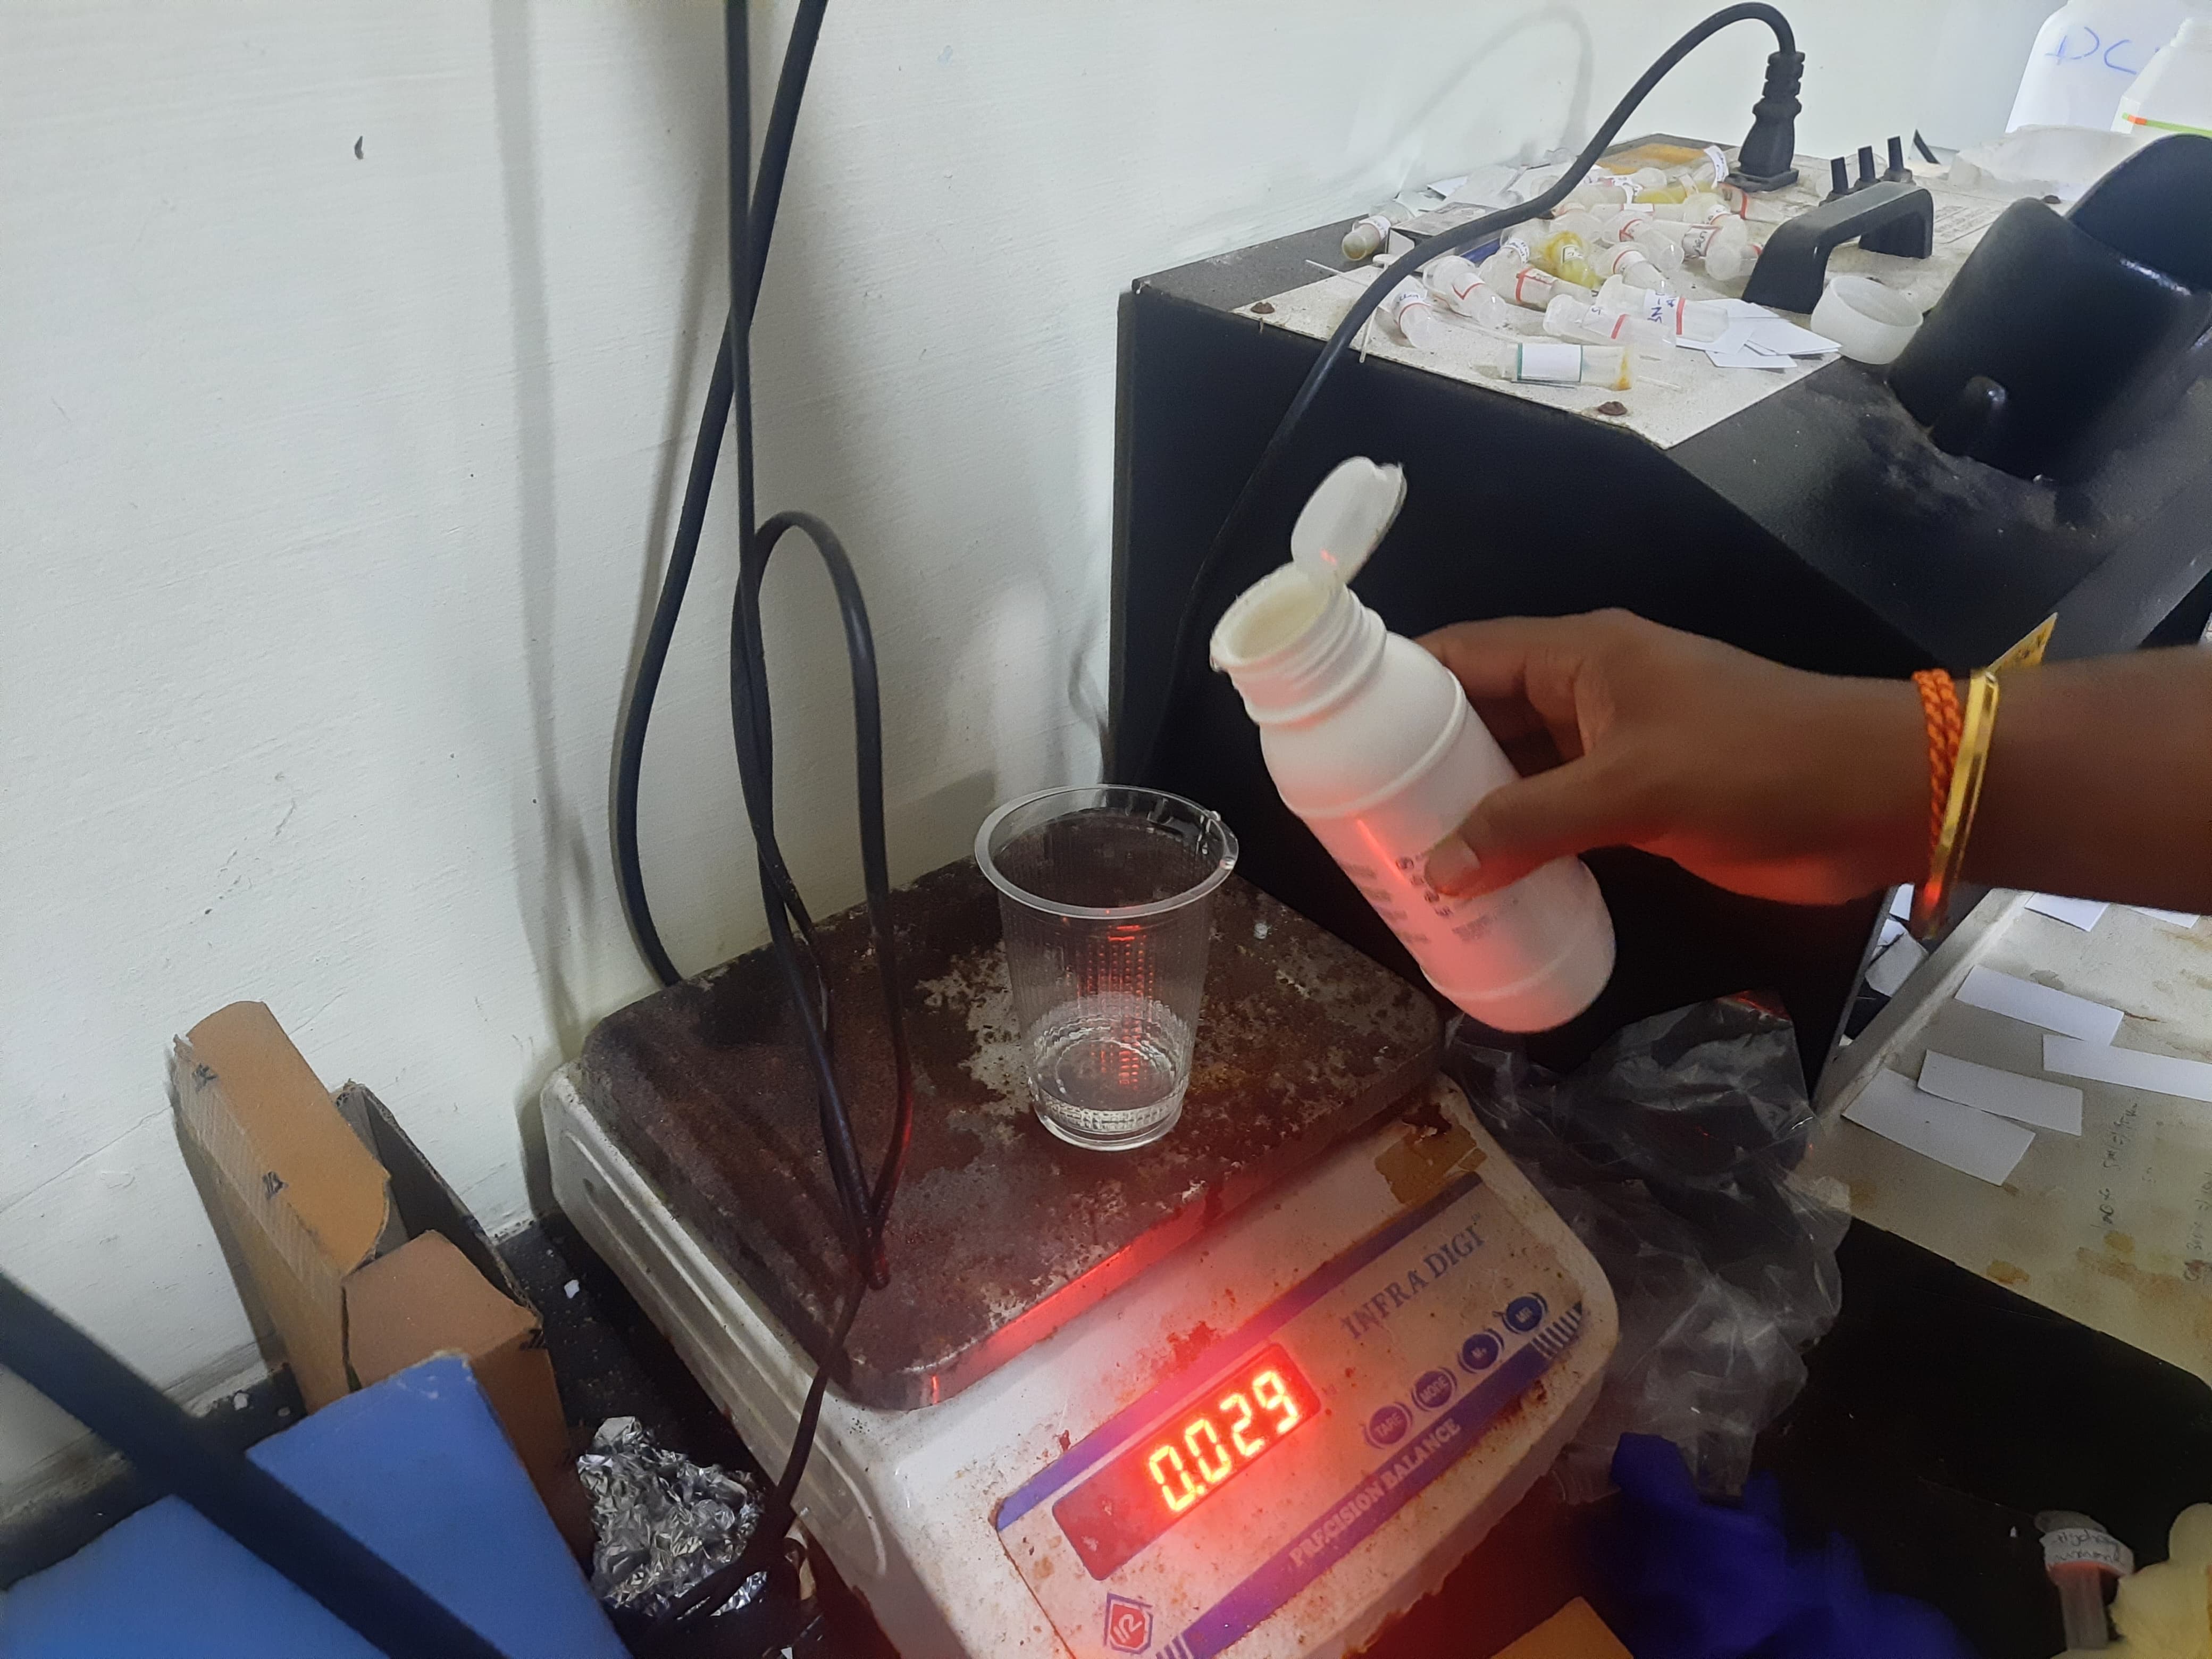
Materials Used: MoldSil (Base Silicone – Part A), Catalyst (Part B), Weighing Scale, and Water (used for calculating volume and cleaning tools)
Preparing the Mold: Before mixing the casting materials, I ensured the 3D printed mold was clean and free from dust or residues. A dry mold ensures proper bonding and avoids defects in the final cast. I also made sure the mold was level on the working surface to prevent the silicone from flowing unevenly.
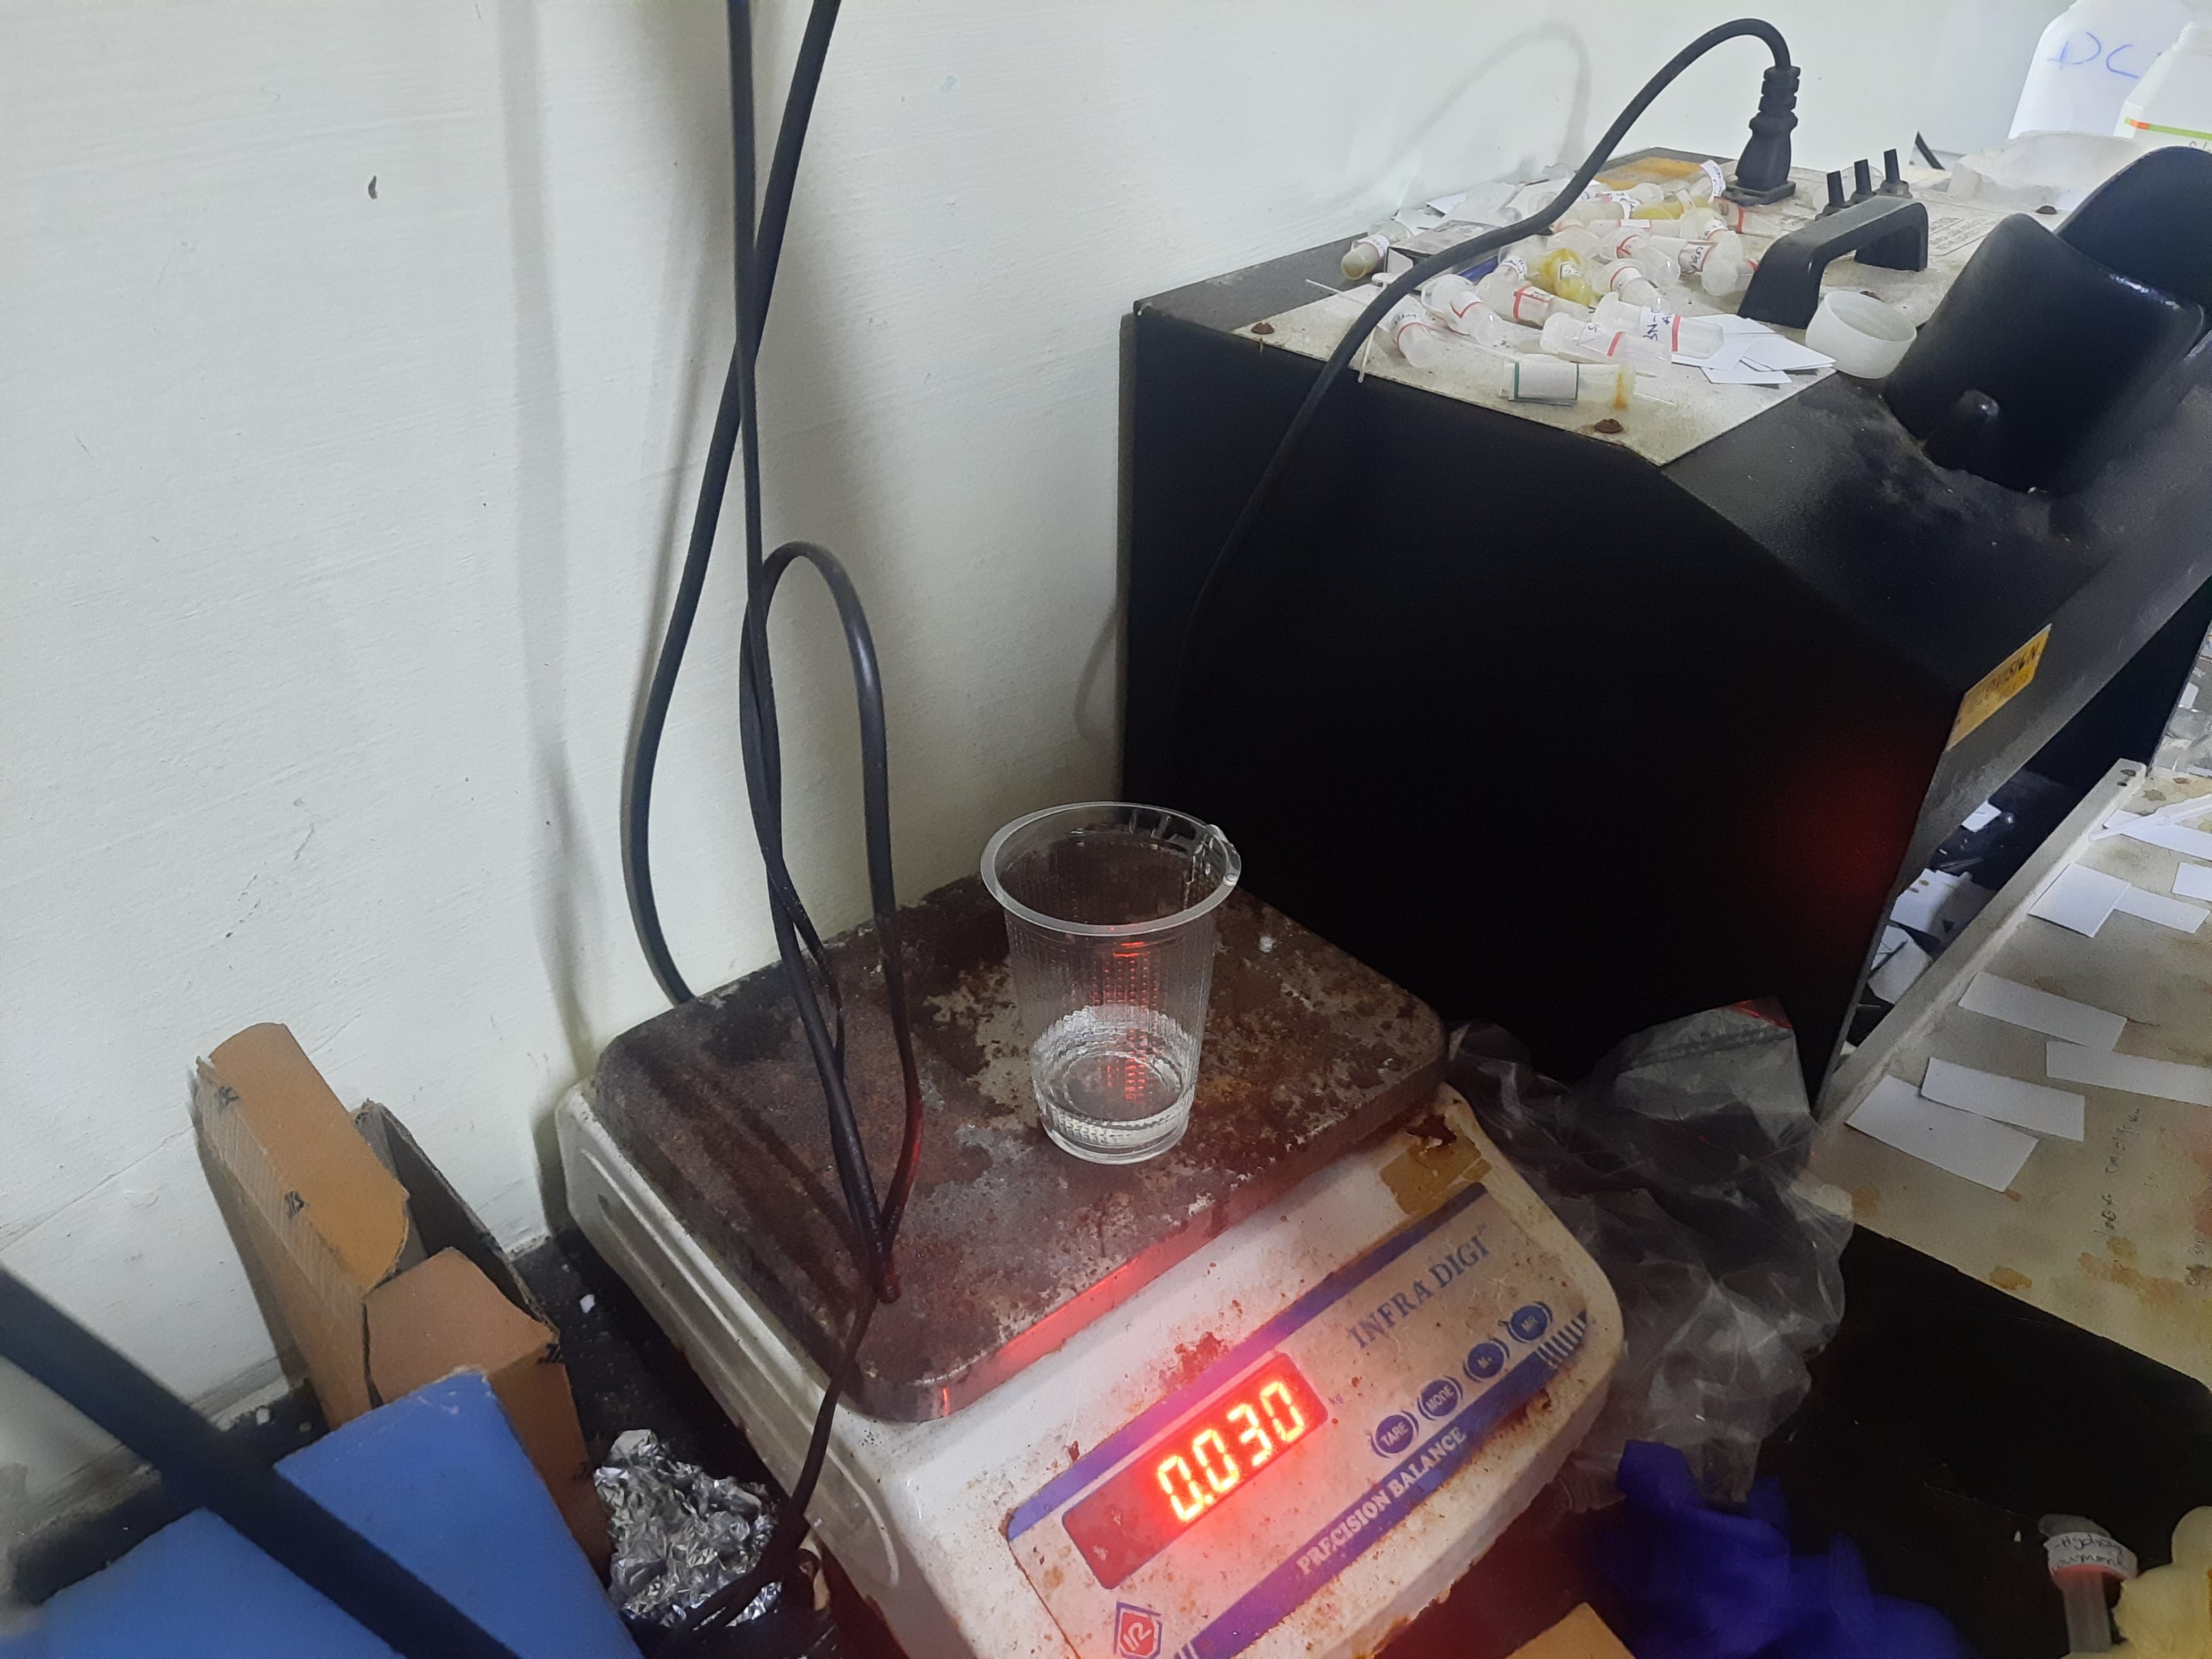
Measuring the Silicone and Catalyst: Using a digital weighing scale, I measured the required amount of MoldSil (Part A). Then, I calculated the correct amount of Catalyst (Part B) based on the manufacturer's recommended ratio (usually 10:1 or as specified). Accurate measurements are very important in casting, as improper ratios can result in a sticky or uncured mold.
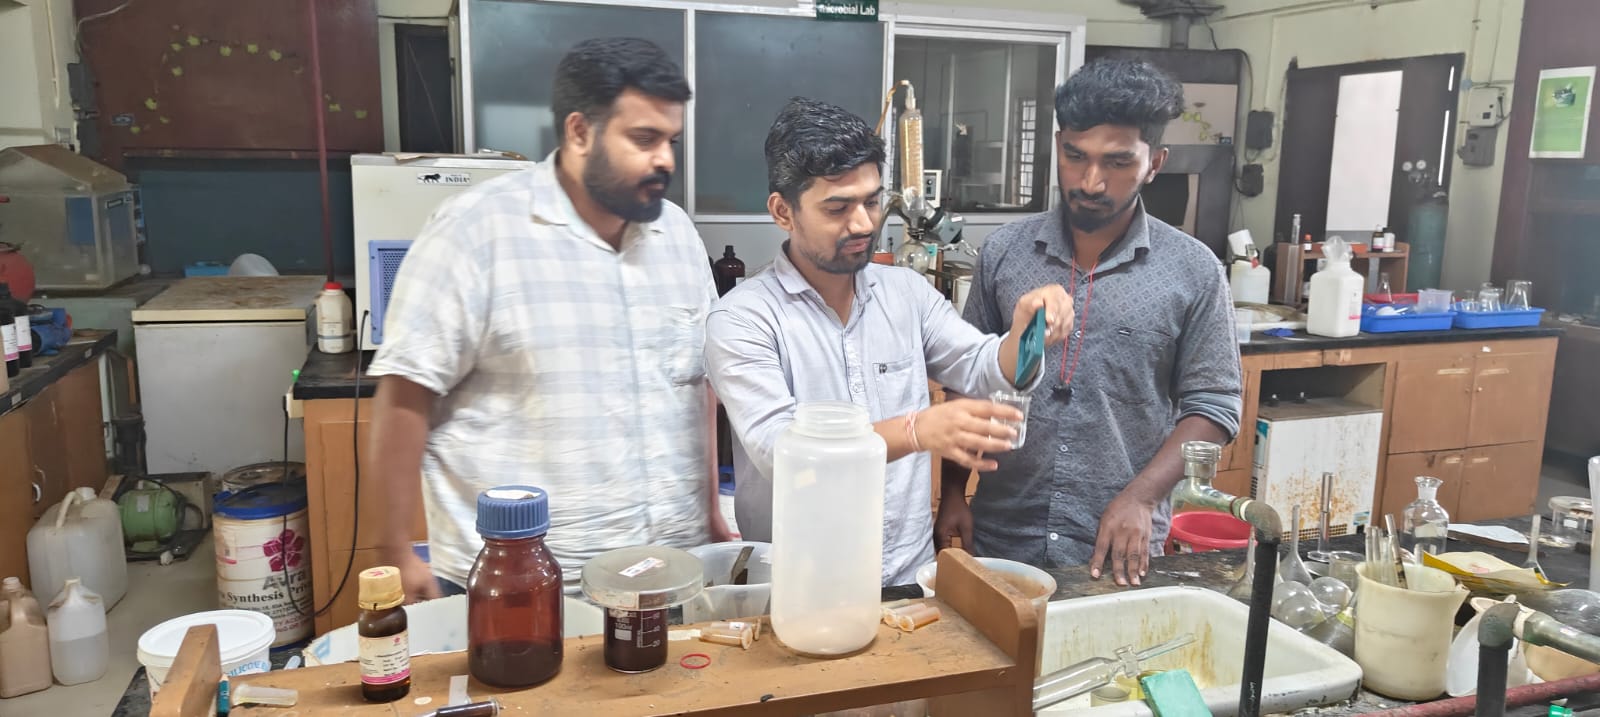
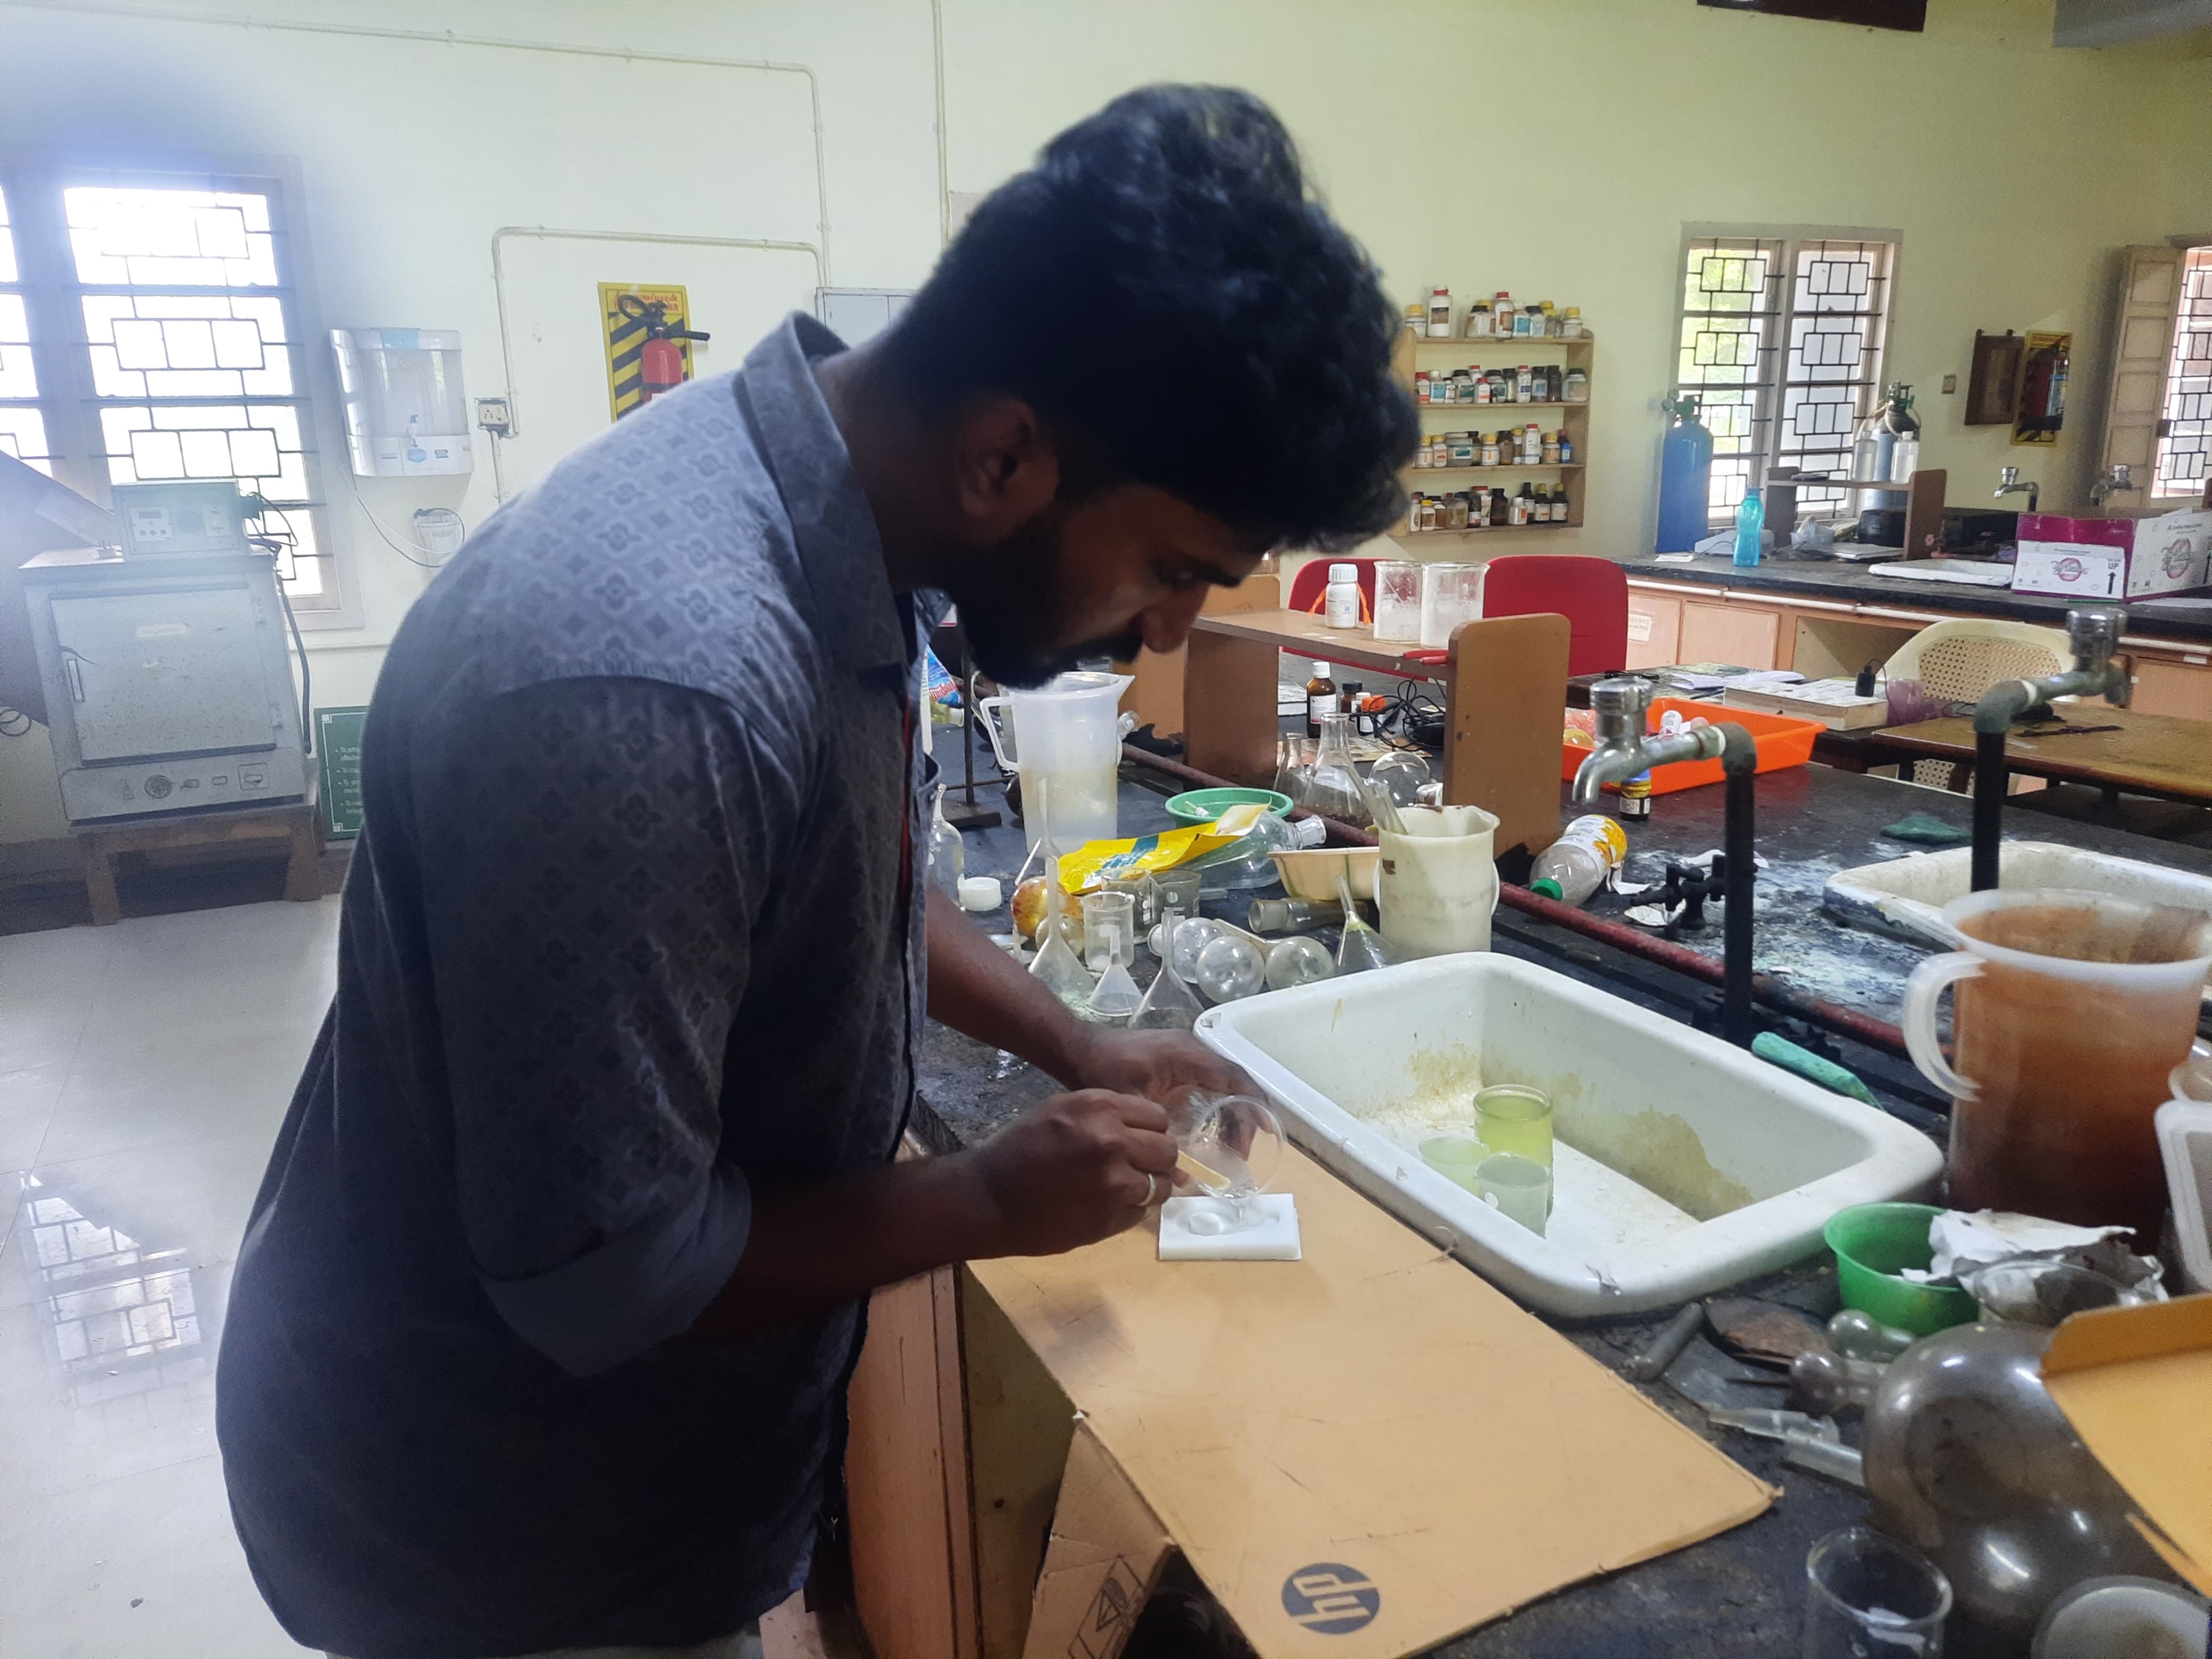
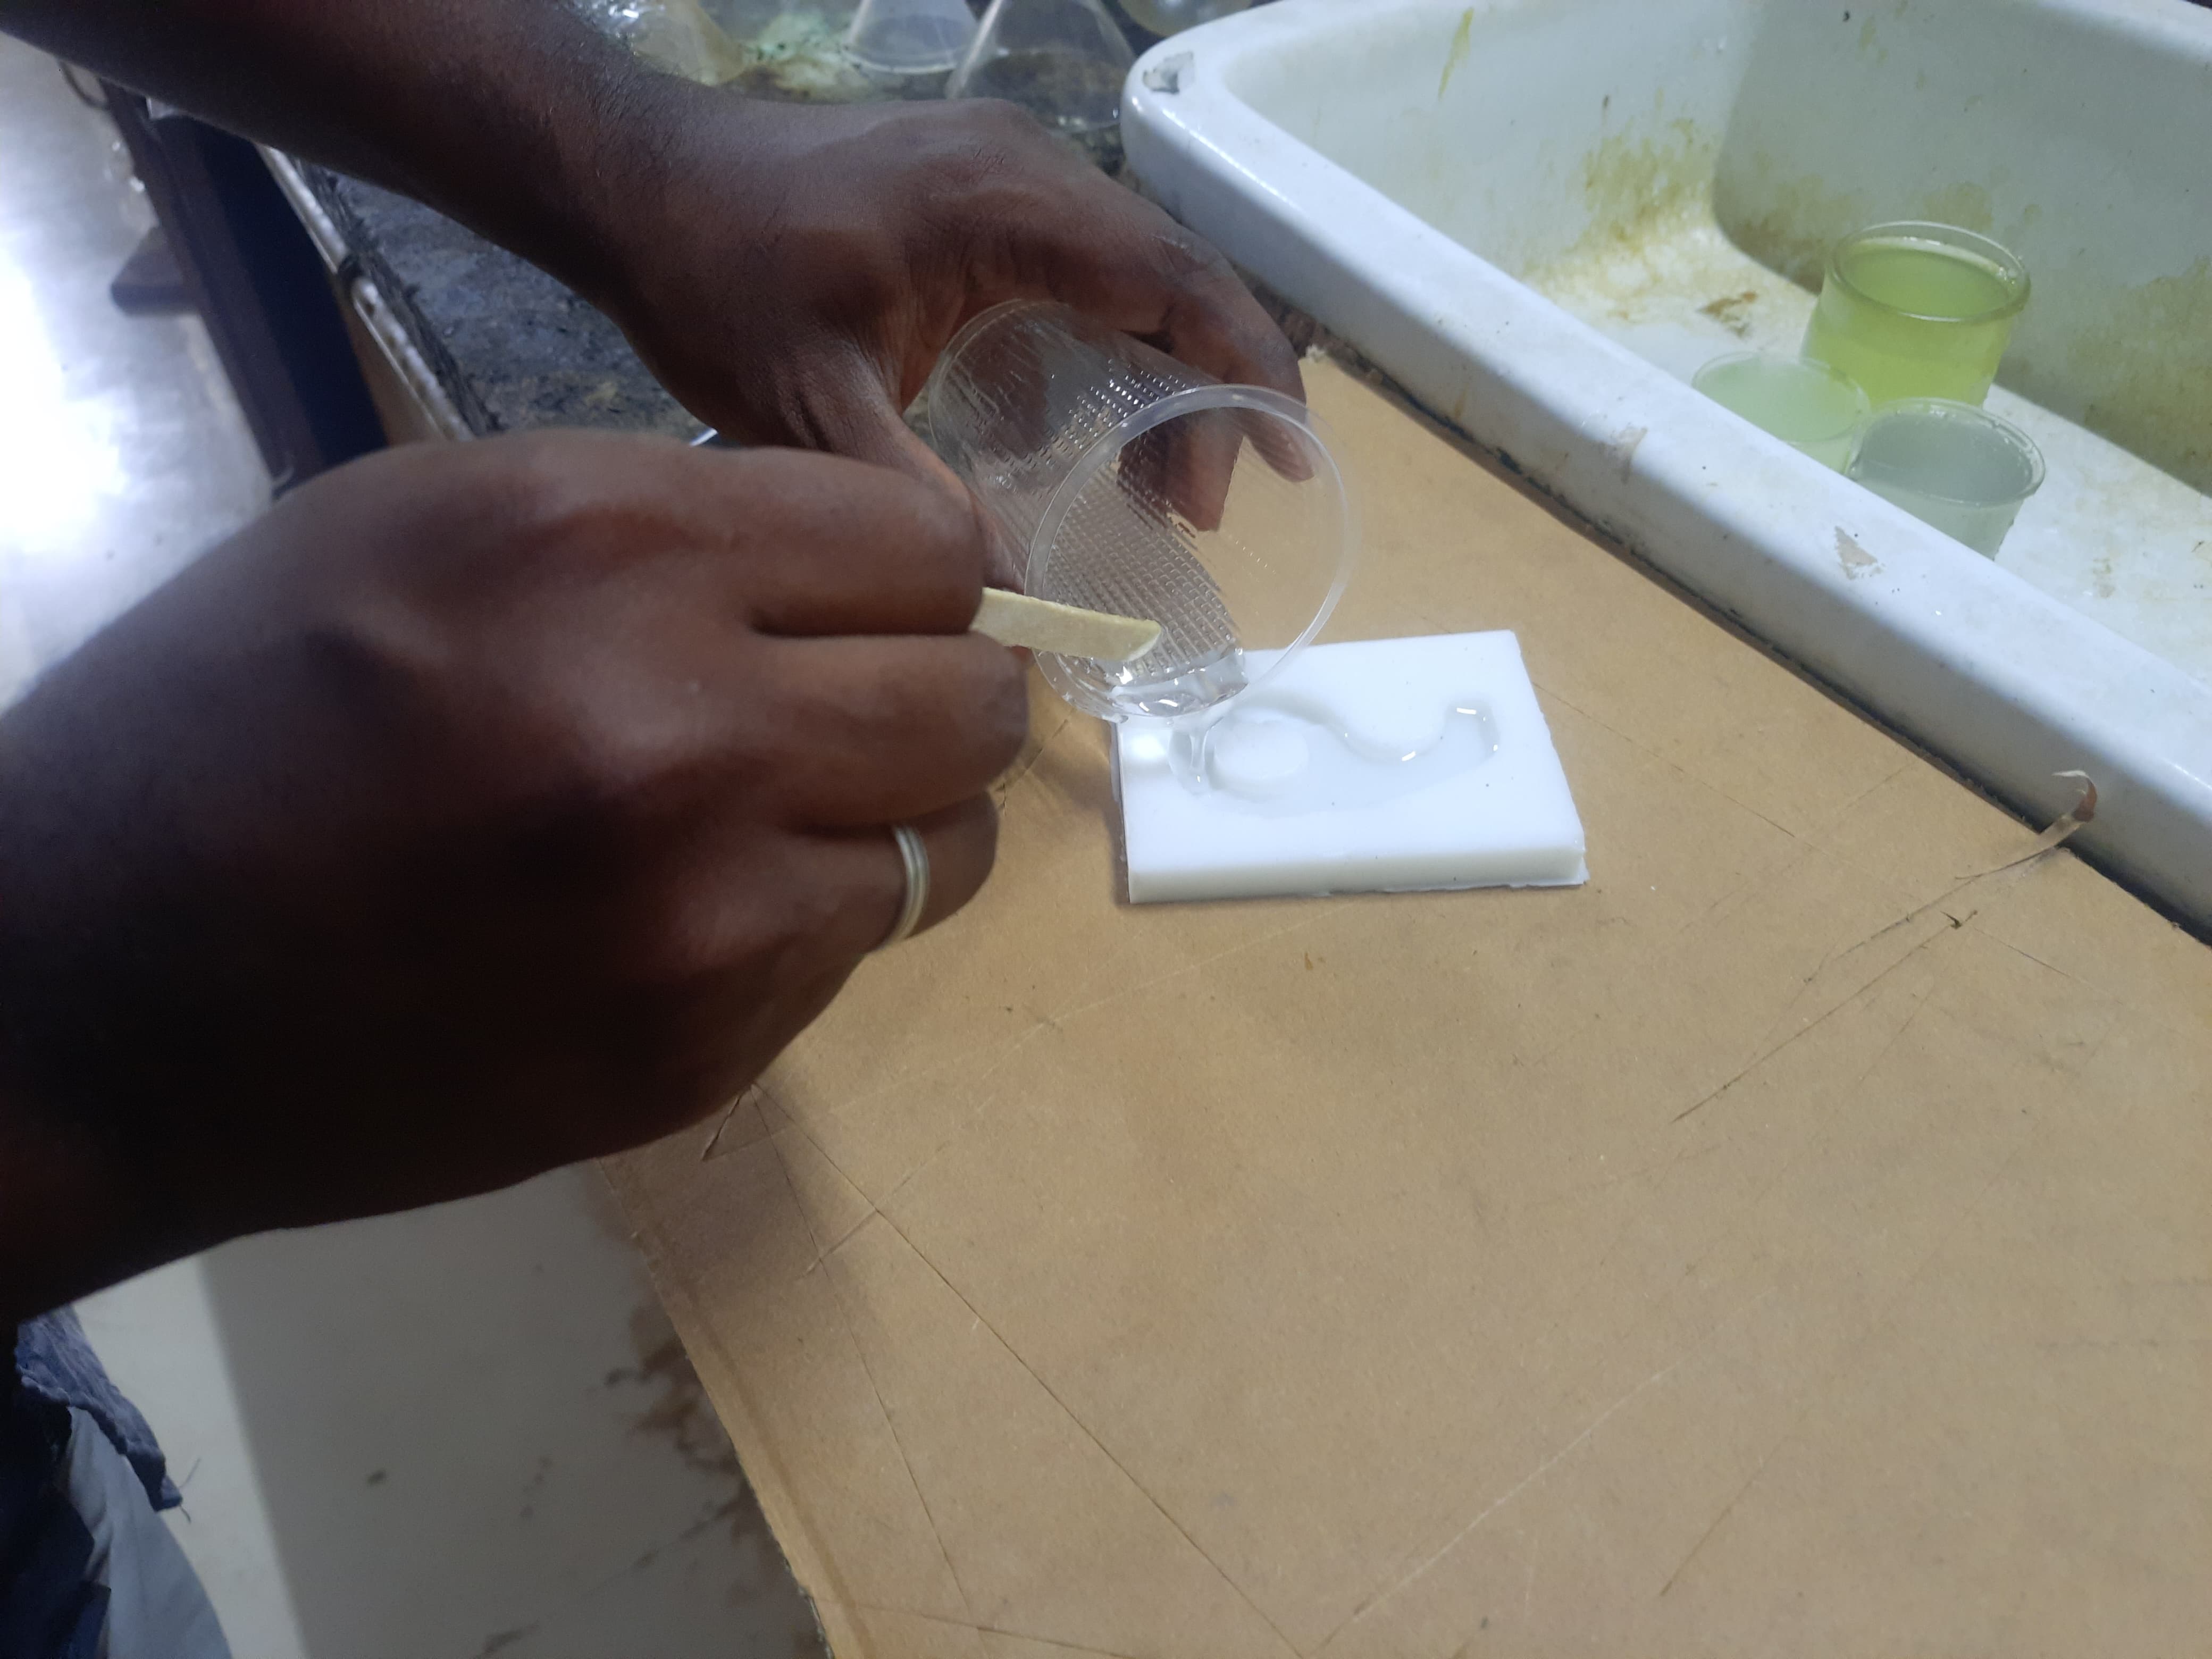
Mixing the Components: I gently mixed the MoldSil and catalyst together in a clean container. Care was taken to stir slowly to avoid creating air bubbles. The goal was to mix thoroughly until the color became uniform, indicating a proper blend of Part A and B. Air bubbles can affect the surface finish, so I allowed the mixture to sit for a minute after mixing to let bubbles rise to the surface.
Pouring the Mixture: Once mixed, I poured the silicone mixture slowly into the 3D printed mold, starting from one corner. This technique helps push out trapped air and allows the silicone to flow smoothly into all corners and details of the design. I tapped the mold lightly on the table to help air bubbles escape.
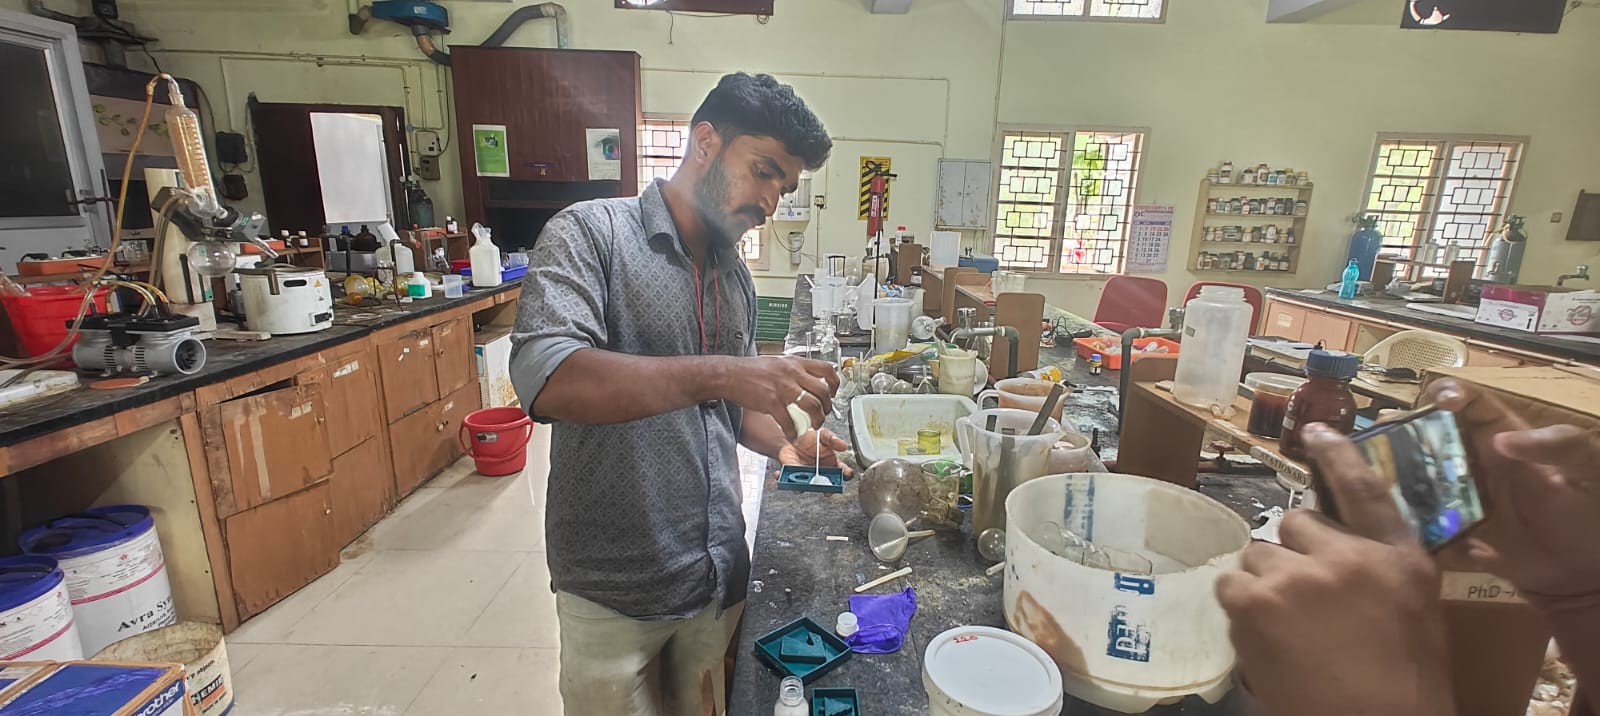
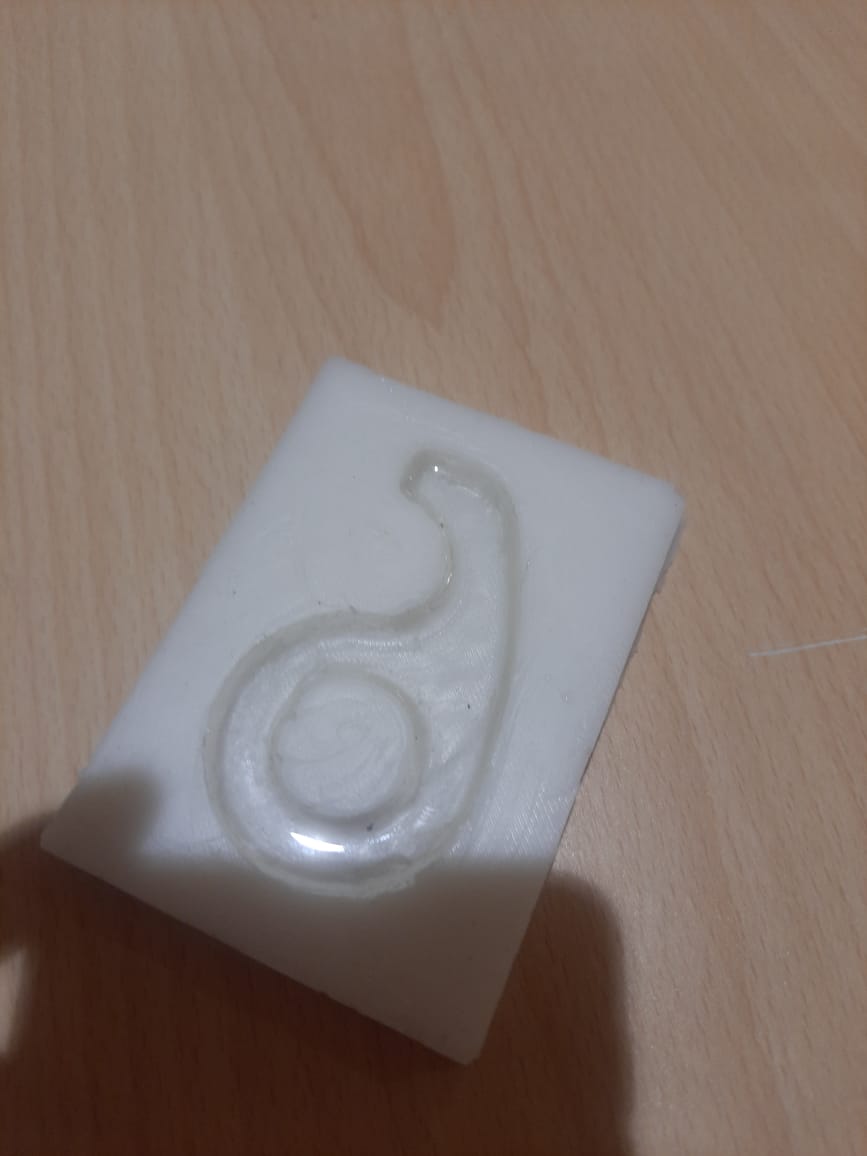
Curing and Demolding: The mold was left undisturbed for several hours (depending on the curing time mentioned by the silicone manufacturer). After full curing, I gently removed the cast from the mold. The final output was a flexible silicone replica of the Corona Safety Touch Tool, capturing all the details and curves of the 3D print.

Cleaning and Finishing: After demolding, I cleaned any residue from the edges of the cast part using water and a soft tool. The mold was also cleaned and stored properly for reuse if needed.