Week 11
Assignment: Networking and Communications
Group assignment
The Link of Group assignments.
Individual assignment
design, build, and connect wired or wireless node(s) with network or bus addresses and local input &/or output device(s)
What is a Communication Protocol?
In embedded systems, a communication protocol is a standardized method that devices use to exchange data. Protocols define the rules for data formatting, timing, transmission, and error-checking to ensure seamless communication between microcontrollers, sensors, actuators, or other systems.
Protocol Categories
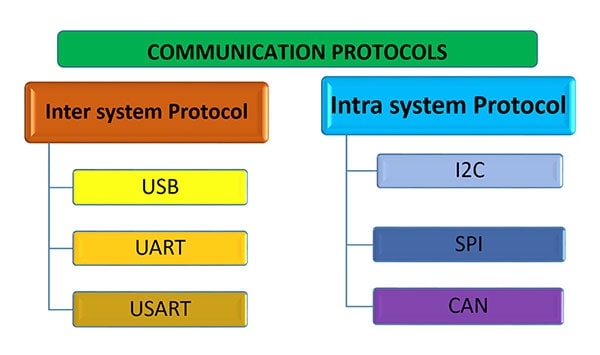
Protocols can be categorized into:
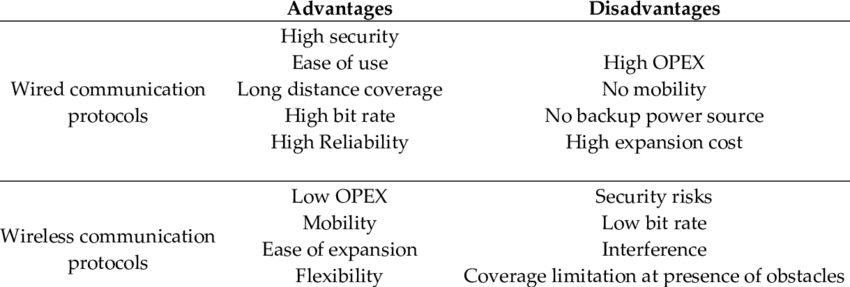
- Wired Communication Protocols – Use physical connections like cables or PCB traces (e.g., UART, I2C, SPI).
- Wireless Communication Protocols – Use radio frequency or electromagnetic signals (e.g., WiFi, Bluetooth).
Types of Communication Protocols in Embedded Systems
Communication protocols allow embedded devices to exchange data reliably with other devices. These protocols fall into three major categories:
1. Wired Communication Protocols
These use physical cables or PCB traces to transfer data. They are reliable, fast, and widely used in embedded hardware.
UART (Universal Asynchronous Receiver/Transmitter)
- Type: Point-to-point, asynchronous
- Wires: TX (Transmit), RX (Receive)
- Features: Simple serial communication, doesn't require clock signal, commonly used for debugging or device-to-device communication
- Example Uses: GPS modules, GSM, Bluetooth modules (HC-05), debug output
I2C (Inter-Integrated Circuit)
- Type: Multi-master, multi-slave, synchronous
- Wires: SDA (Data), SCL (Clock)
- Features: Can connect many devices with just two wires, each device has a unique address
- Example Uses: Accelerometers, temperature sensors, OLED displays
SPI (Serial Peripheral Interface)
- Type: Full-duplex, synchronous
- Wires: MISO, MOSI, SCLK, SS (Slave Select)
- Features: Faster than I2C, requires more wires, Master-Slave architecture
- Example Uses: SD cards, displays, high-speed sensors
CAN (Controller Area Network)
- Type: Multi-master, message-based
- Wires: CAN High, CAN Low
- Features: Used in automotive and industrial applications, robust and fault-tolerant
- Example Uses: Car ECUs, industrial machines
RS-232 / RS-485
- Type: Serial communication standards
- RS-232: Single-ended, used for point-to-point
- RS-485: Differential, supports multiple devices on one bus
- Example Uses: Industrial automation, long-distance serial communication
Learn more
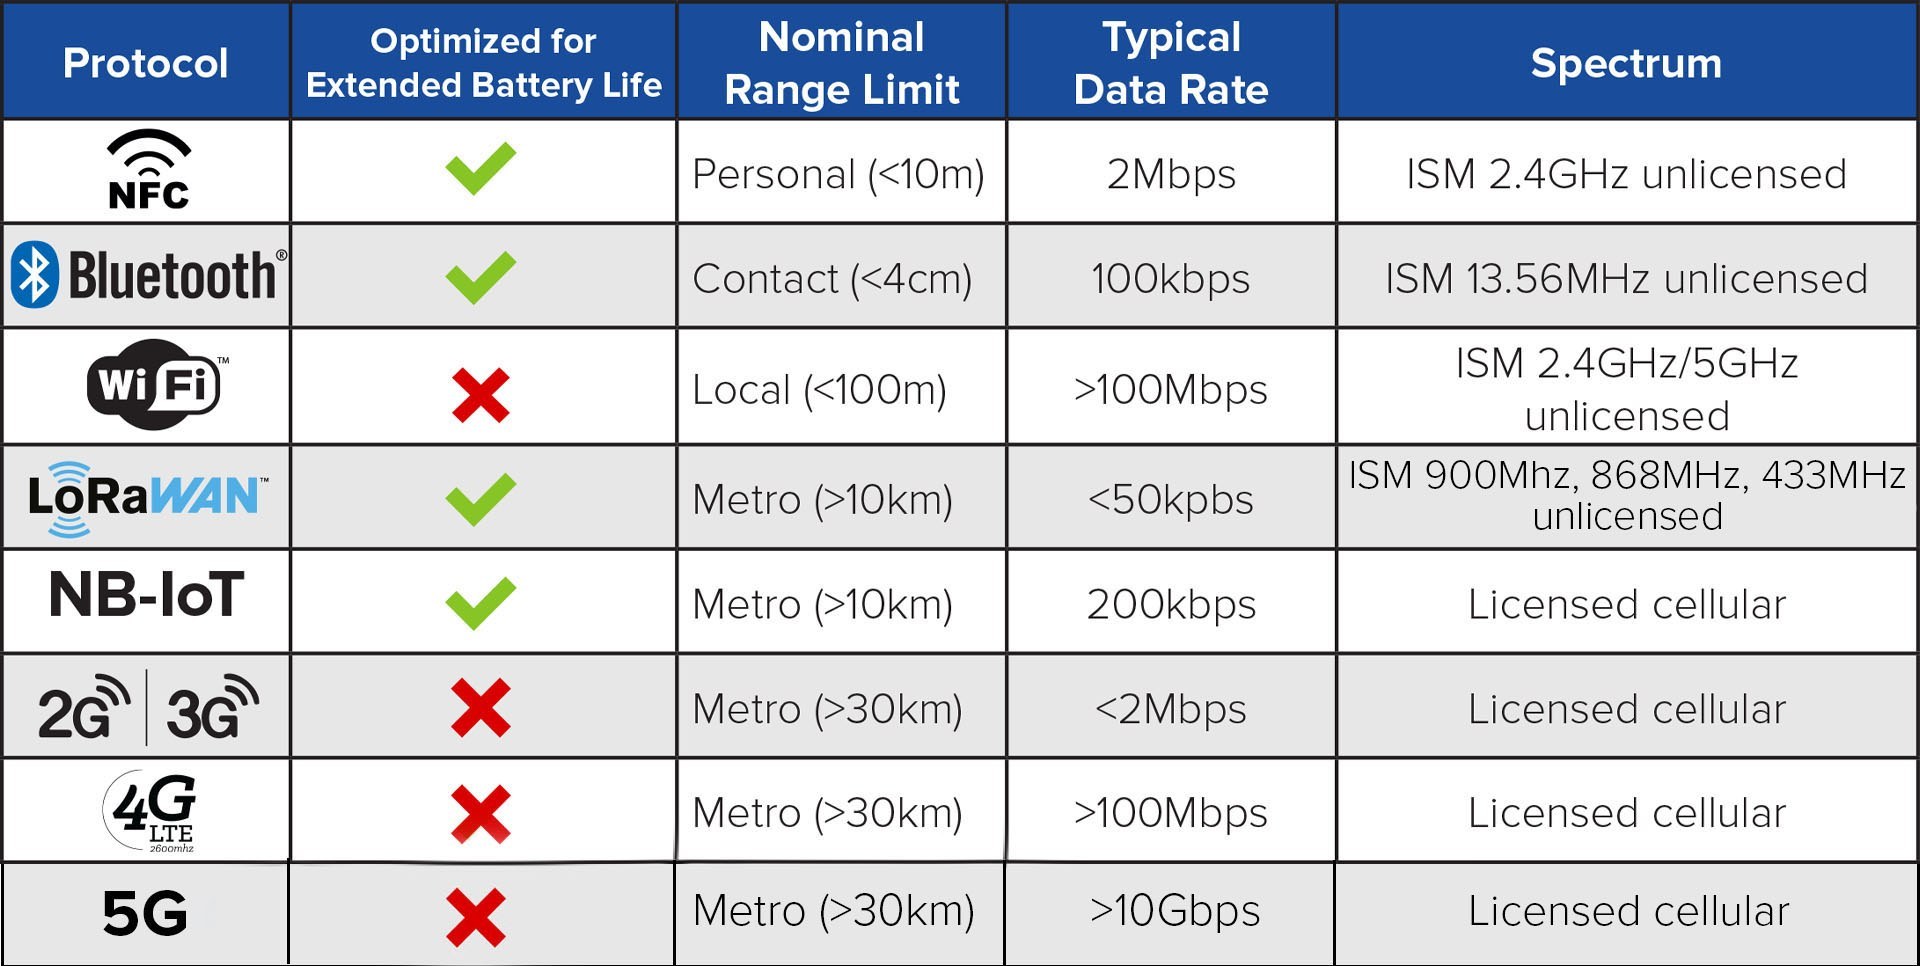
2. Wireless Communication Protocols
These use electromagnetic waves to transmit data without physical connections.
WiFi (IEEE 802.11)
- Range: 30–100 meters
- Speed: High data rate
- Features: Internet access, peer-to-peer or cloud communication
- Example Uses: IoT devices, cloud logging, smart home products
Bluetooth / Bluetooth Low Energy (BLE)
- Range: ~10 meters (BLE can go more)
- Power: BLE is optimized for low power
- Features: Device pairing, short-range wireless control
- Example Uses: Fitness bands, wireless sensors, mobile apps
LoRa (Long Range)
- Range: Several kilometers
- Speed: Low data rate
- Features: Ultra-long-range communication, low power
- Example Uses: Remote environmental monitoring, smart agriculture
Zigbee
- Range: 10–100 meters
- Features: Mesh networking, low power
- Example Uses: Home automation, smart lighting
NFC (Near Field Communication)
- Range: ~4 cm
- Features: Short-distance communication, touch-to-connect interface
- Example Uses: Contactless payments, ID cards
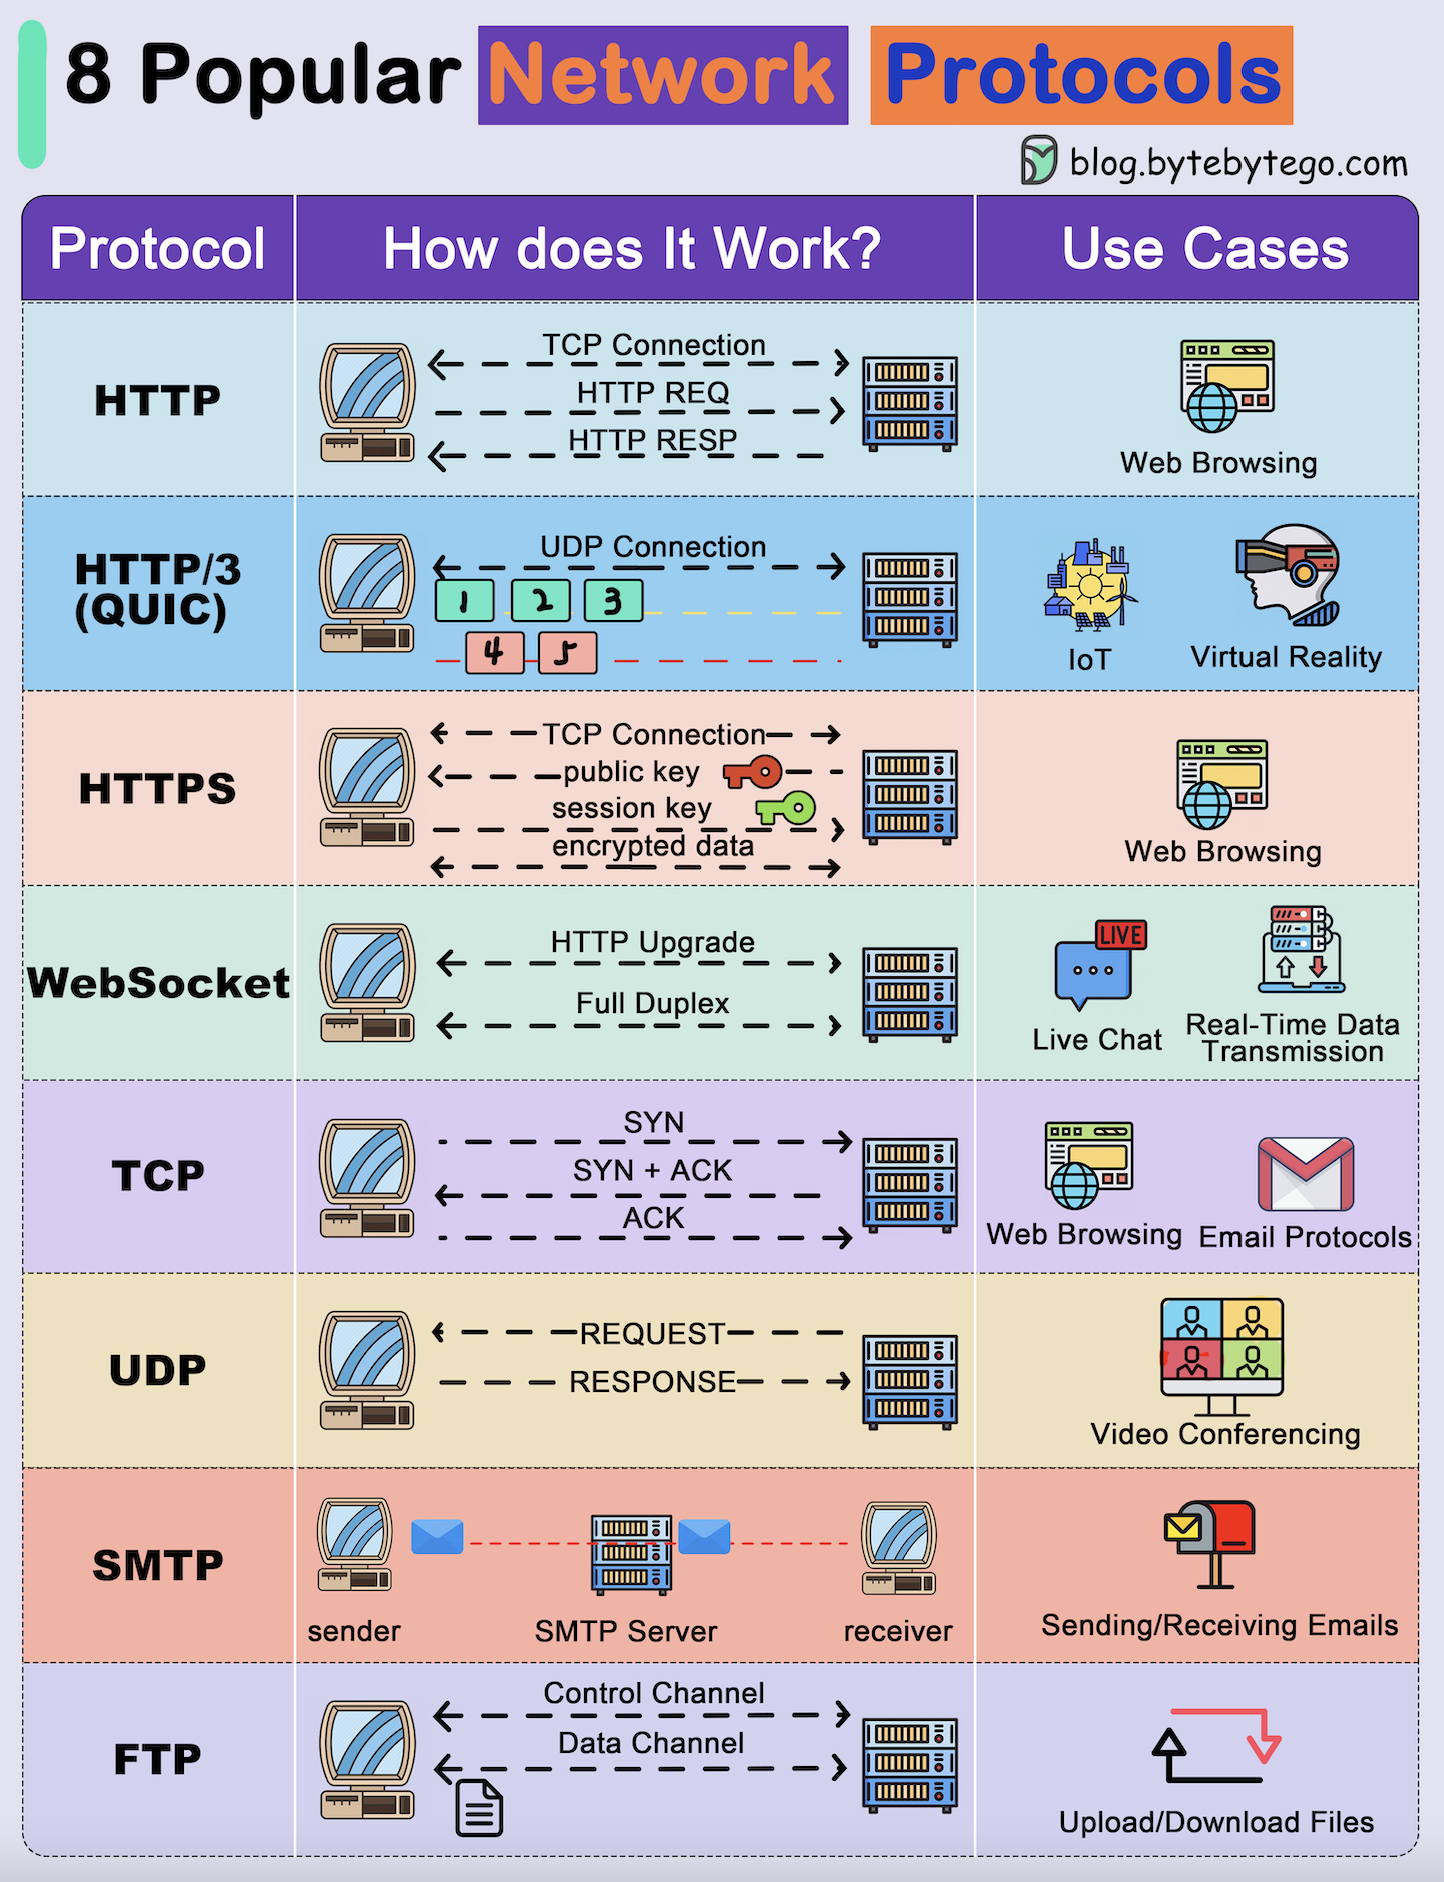
3. Network Communication Protocols (Higher-Level)
These define how data is formatted and transmitted over wired/wireless systems.
HTTP / HTTPS (HyperText Transfer Protocol)
- Used in web communication
- Often used with WiFi modules to send data to web servers
MQTT (Message Queuing Telemetry Transport)
- Lightweight protocol for IoT
- Publish/Subscribe model
- Works well on low-bandwidth, high-latency networks
CoAP (Constrained Application Protocol)
- Similar to HTTP but for constrained devices
- Used in low-power IoT environments
WebSocket
- Full-duplex communication over a single TCP connection
- Used for real-time web applications and IoT dashboards
Communication Protocols Summary
A comprehensive overview of communication protocols categorized by their primary use cases and connection types:
Protocol Categories and Applications
| Category | Protocol | Wired/Wireless | Main Use Case |
|---|---|---|---|
| Serial | UART | Wired | Debugging, GPS, GSM, simple modules |
| Bus | I2C | Wired | Sensors, displays, EEPROMs |
| High-Speed | SPI | Wired | Flash memory, OLED, ADCs |
| Industrial | CAN | Wired | Automotive, industrial controllers |
| Long-range | LoRa | Wireless | Agriculture, remote sensing |
| Network | WiFi | Wireless | IoT cloud connection, data logging |
| Personal | Bluetooth | Wireless | Wearables, phone interaction |
| Local | Zigbee | Wireless | Smart home, mesh networks |
| Proximity | NFC | Wireless | ID cards, payments |
| Web | HTTP/MQTT | Wireless | IoT API, dashboard, cloud services |
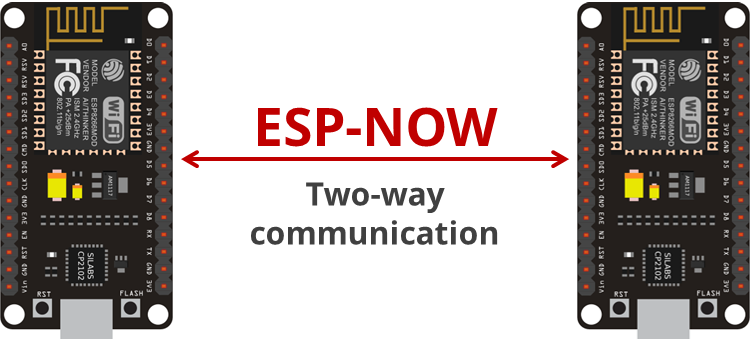
What is ESP-NOW?
ESP-NOW is a wireless communication protocol developed by Espressif that allows multiple ESP32 and ESP8266 devices to communicate with each other directly without WiFi router/internet access.
Key Features of ESP-NOW
| Feature | Description |
|---|---|
| No WiFi router needed | Devices communicate directly, even when not connected to a WiFi network |
| One-to-many / many-to-one | One sender can broadcast to many devices; one receiver can collect from many |
| Low latency | Communication delay is typically <10 ms |
| Low power | Great for battery-powered IoT devices |
| Encrypted communication | Supports MAC-based pairing and encryption |
How ESP-NOW Works
ESP-NOW uses the WiFi radio hardware but doesn't require a connection to an access point. Each device communicates using its MAC address. You can:
- Broadcast messages
- Send data to specific devices (unicast)
- Register peers (for secure communication)
Wireless Temperature Monitoring and Response System using XIAO ESP32S3
In this project, we demonstrate a simple yet powerful wireless communication system between two Seeed Studio XIAO ESP32S3 boards using BLE (Bluetooth Low Energy). The setup is designed to simulate a basic sensor–receiver model, commonly used in IoT systems for environmental monitoring and control.
System Architecture
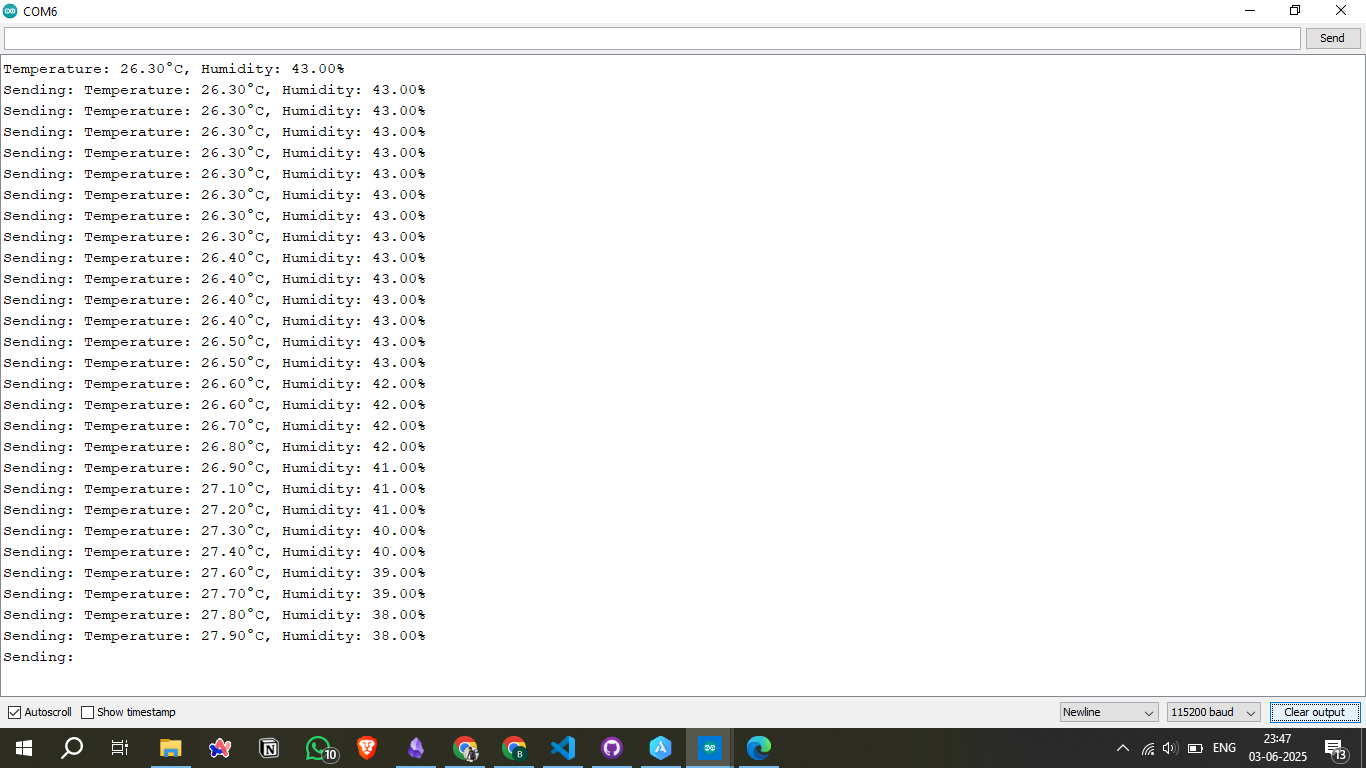
One board acts as a BLE Peripheral (Sensor Node), which is connected to a DHT11 temperature and humidity sensor. It continuously reads the ambient temperature and transmits the data wirelessly.
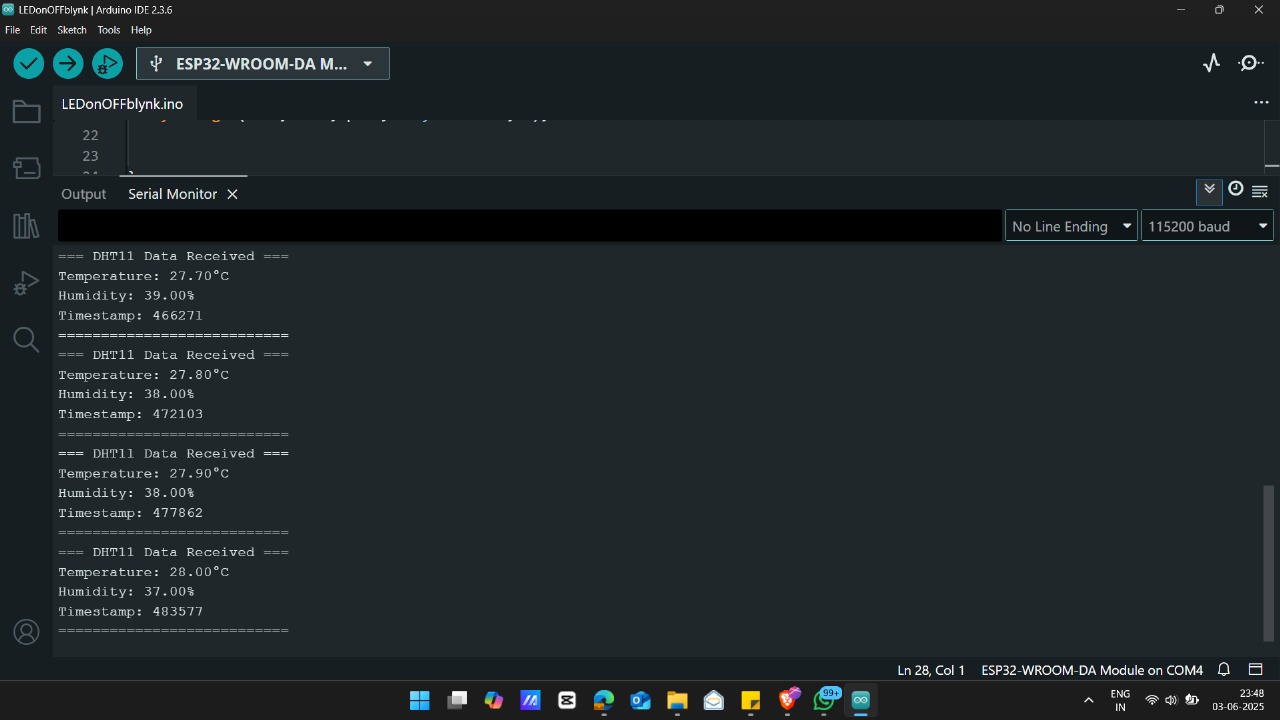
The second board functions as a BLE Central (Control Node), which receives the temperature readings and displays them via the serial monitor. Additionally, it allows the user to input a textual comment such as "hot" or "cold" into the serial monitor.
Interactive Communication Flow
Once the comment is entered, the central node sends this input back to the peripheral. The sensor node compares the received command against its real-time temperature reading and responds with a logical answer ("yes" or "no") indicating whether the comment matches the actual temperature condition.
Use Case Highlights
- Wireless sensor communication using BLE
- Real-time temperature data transmission
- Two-way interaction between boards
- Ideal for learning BLE GATT server/client communication
- Demonstrates how to build interactive and responsive IoT nodes
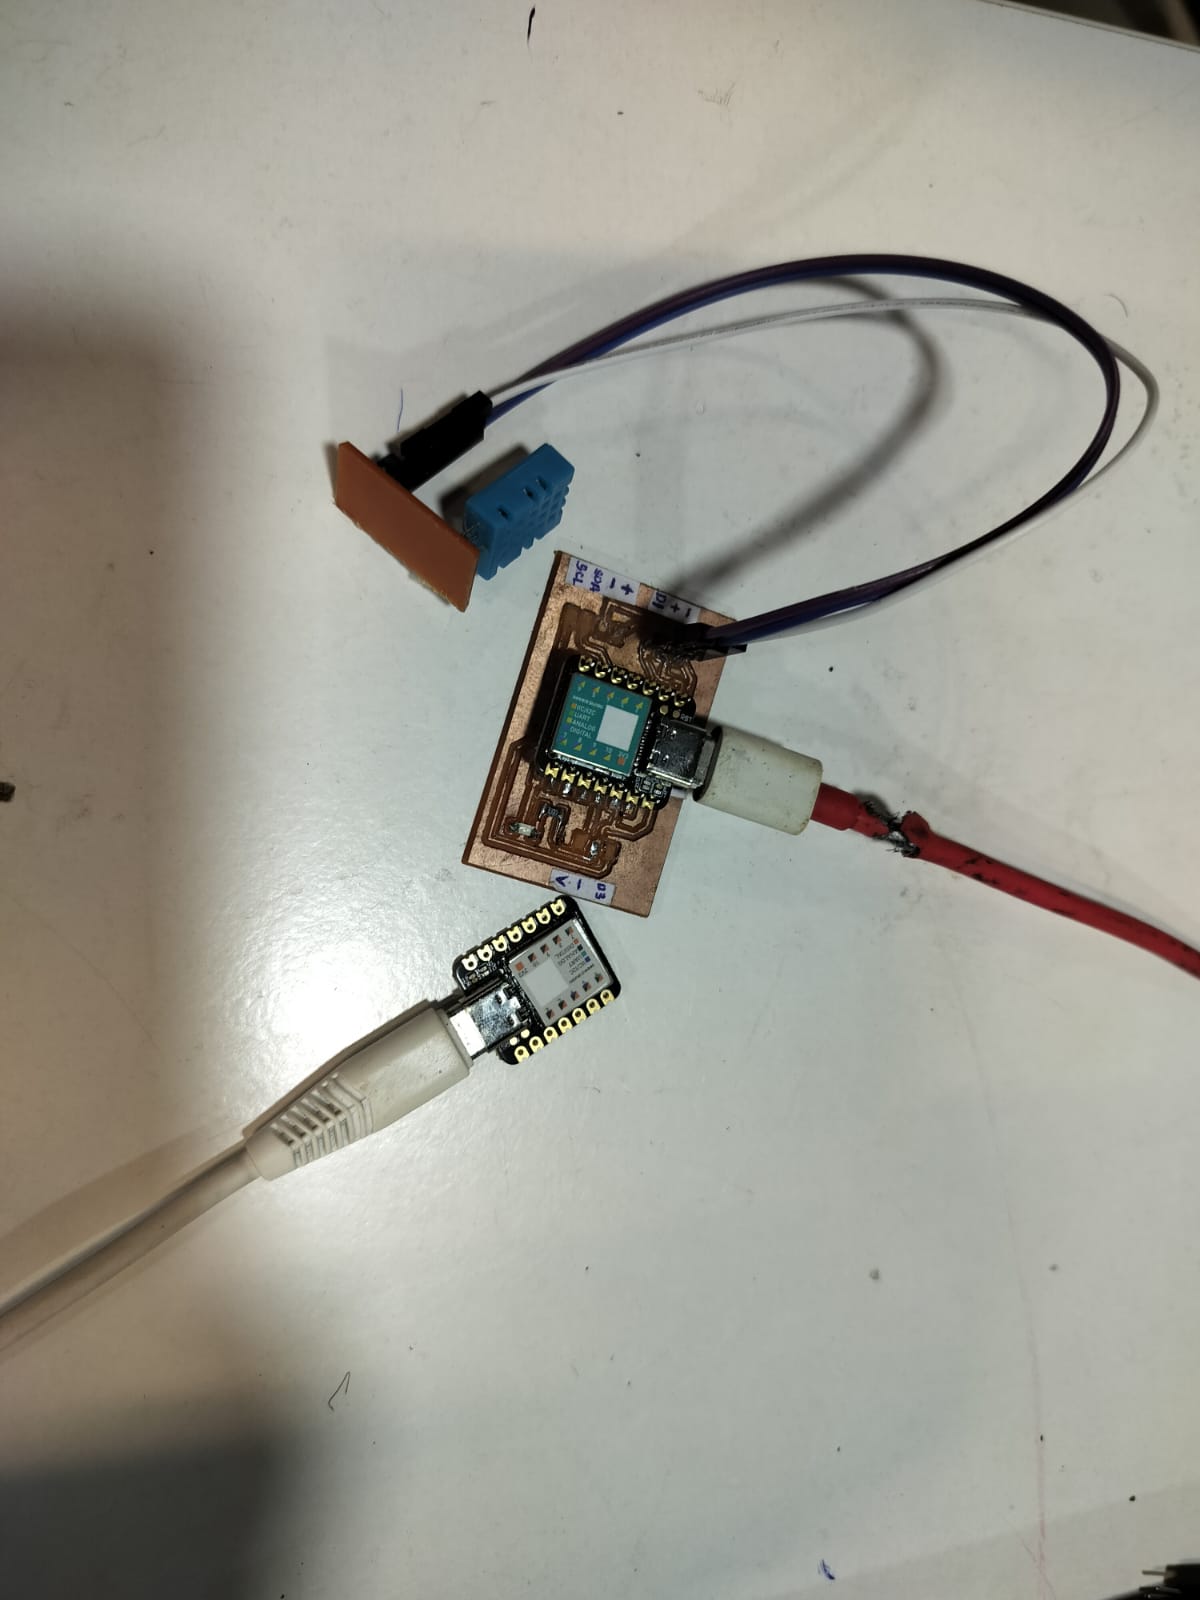
Note
Here I used the boards developed during my Input and Output Devices assignments. Please check out those assignments for detailed information on the design, components used, and testing process. These boards played a crucial role in enabling sensor input and motor control, seamlessly integrating into the final project.
Input Devices
ESP32 BLE Peripheral (Sensor Node)
Hardware Connections
Connect the DHT11 temperature sensor to the ESP32 board using the following wiring:
- DHT11 VCC → ESP32 3.3V
- DHT11 GND → ESP32 GND
- DHT11 DATA → ESP32 GPIO4
Temperature Thresholds
The system uses intelligent temperature classification with the following thresholds:
- Cold: Below 20°C
- Normal/Warm: 20°C to 26°C
- Hot: Above 26°C
Complete Arduino Code
This code creates a BLE peripheral device that reads temperature data and processes intelligent commands.
/*
            * ESP32 BLE PERIPHERAL (SENSOR NODE)
            *
            * Hardware Connections:
            * DHT11 Sensor:
            * - VCC -> 3.3V
            * - GND -> GND
            * - DATA -> GPIO4
            *
            * This board acts as a BLE peripheral that:
            * 1. Reads temperature from DHT11 sensor
            * 2. Broadcasts temperature data via BLE
            * 3. Receives commands from central device
            * 4. Responds with "yes"/"no" based on temperature conditions
            */

            #include <BLEDevice.h>
            #include <BLEServer.h>
            #include <BLEUtils.h>
            #include <BLE2902.h>
            #include <DHT.h>

            // DHT11 Configuration
            #define DHT_PIN 4
            #define DHT_TYPE DHT11
            DHT dht(DHT_PIN, DHT_TYPE);

            // BLE Configuration
            #define SERVICE_UUID        "12345678-1234-1234-1234-123456789abc"
            #define TEMP_CHAR_UUID      "87654321-4321-4321-4321-cba987654321"
            #define COMMAND_CHAR_UUID   "11111111-2222-3333-4444-555555555555"

            BLEServer* pServer = NULL;
            BLECharacteristic* pTempCharacteristic = NULL;
            BLECharacteristic* pCommandCharacteristic = NULL;
            bool deviceConnected = false;
            float currentTemp = 0.0;

            // Temperature thresholds
            const float HOT_THRESHOLD = 26.0;   // Above 26°C is considered hot
            const float COLD_THRESHOLD = 20.0;  // Below 20°C is considered cold

            class MyServerCallbacks: public BLEServerCallbacks {
                void onConnect(BLEServer* pServer) {
                    deviceConnected = true;
                    Serial.println("✓ Central device connected!");
                }

                void onDisconnect(BLEServer* pServer) {
                    deviceConnected = false;
                    Serial.println("✗ Central device disconnected!");
                    BLEDevice::startAdvertising(); // Restart advertising
                }
            };

            class CommandCallbacks: public BLECharacteristicCallbacks {
                void onWrite(BLECharacteristic *pCharacteristic) {
                    String command = pCharacteristic->getValue().c_str();
                    command.toLowerCase();
                    command.trim();

                    Serial.println("📨 Received command: '" + command + "'");

                    String response = processCommand(command);
                    Serial.println("📤 Sending response: '" + response + "'");

                    // Send response back through the same characteristic
                    pCharacteristic->setValue(response.c_str());
                    pCharacteristic->notify();
                }
            };

            String processCommand(String command) {
                Serial.println("🌡️  Current temperature: " + String(currentTemp, 1) + "°C");

                if (command == "hot") {
                    bool isHot = (currentTemp > HOT_THRESHOLD);
                    Serial.println("🔥 Is it hot (>" + String(HOT_THRESHOLD) + "°C)? " + (isHot ? "YES" : "NO"));
                    return isHot ? "yes" : "no";
                }
                else if (command == "cold") {
                    bool isCold = (currentTemp < COLD_THRESHOLD);
                    Serial.println("❄️  Is it cold (<" + String(COLD_THRESHOLD) + "°C)? " + (isCold ? "YES" : "NO"));
                    return isCold ? "yes" : "no";
                }
                else if (command == "warm" || command == "normal") {
                    bool isWarm = (currentTemp >= COLD_THRESHOLD && currentTemp <= HOT_THRESHOLD);
                    Serial.println("🌤️  Is it warm/normal (" + String(COLD_THRESHOLD) + "-" + String(HOT_THRESHOLD) + "°C)? " + (isWarm ? "YES" : "NO"));
                    return isWarm ? "yes" : "no";
                }
                else {
                    Serial.println("❓ Unknown command received");
                    return "unknown_command";
                }
            }

            void setup() {
                Serial.begin(115200);
                Serial.println("========================================");
                Serial.println("🔧 ESP32 BLE Peripheral (Sensor Node)");
                Serial.println("========================================");

                // Initialize DHT sensor
                dht.begin();
                Serial.println("🌡️  DHT11 sensor initialized");

                // Initialize BLE
                BLEDevice::init("ESP32_Sensor_Node");
                pServer = BLEDevice::createServer();
                pServer->setCallbacks(new MyServerCallbacks());

                // Create BLE Service
                BLEService *pService = pServer->createService(SERVICE_UUID);

                // Temperature Characteristic (Read/Notify)
                pTempCharacteristic = pService->createCharacteristic(
                                        TEMP_CHAR_UUID,
                                        BLECharacteristic::PROPERTY_READ |
                                        BLECharacteristic::PROPERTY_NOTIFY
                                      );
                pTempCharacteristic->addDescriptor(new BLE2902());

                // Command Characteristic (Write/Notify)
                pCommandCharacteristic = pService->createCharacteristic(
                                          COMMAND_CHAR_UUID,
                                          BLECharacteristic::PROPERTY_WRITE |
                                          BLECharacteristic::PROPERTY_NOTIFY
                                        );
                pCommandCharacteristic->setCallbacks(new CommandCallbacks());
                pCommandCharacteristic->addDescriptor(new BLE2902());

                // Start the service
                pService->start();
                Serial.println("📡 BLE service started");

                // Start advertising
                BLEAdvertising *pAdvertising = BLEDevice::getAdvertising();
                pAdvertising->addServiceUUID(SERVICE_UUID);
                pAdvertising->setScanResponse(false);
                pAdvertising->setMinPreferred(0x0);
                BLEDevice::startAdvertising();

                Serial.println("📻 BLE advertising started");
                Serial.println("⏳ Waiting for central device to connect...");
                Serial.println("");
            }

            void loop() {
                if (deviceConnected) {
                    // Read temperature from DHT11
                    float temp = dht.readTemperature();

                    if (!isnan(temp)) {
                        currentTemp = temp;
                        String tempStr = String(temp, 1) + "°C";

                        // Update temperature characteristic
                        pTempCharacteristic->setValue(tempStr.c_str());
                        pTempCharacteristic->notify();

                        Serial.println("📊 Temperature broadcast: " + tempStr);
                    } else {
                        Serial.println("⚠️  Failed to read from DHT sensor!");
                    }
                } else {
                    Serial.println("⏳ No device connected...");
                }

                delay(2000); // Send temperature every 2 seconds
            }
Key Features
- BLE Communication: Establishes wireless connection using Bluetooth Low Energy
- Temperature Sensing: Continuously reads DHT11 sensor data every 2 seconds
- Intelligent Processing: Processes text commands and responds with logical answers
- Auto Recovery: Automatically restarts advertising when connection is lost
Required Libraries
Install these libraries through Arduino IDE Library Manager:
- DHT sensor library by Adafruit
- Adafruit Unified Sensor by Adafruit
- ESP32 BLE Arduino (included with ESP32 board package)
ESP32 BLE Central (Control Node)
Hardware Requirements
This board acts as the BLE central device and requires only an ESP32 development board - no additional sensors needed.
- Board: ESP32 Development Board
- Connection: USB cable for programming and serial communication
- Power: 5V via USB or external power supply
Available Commands
The system accepts the following text commands via Serial Monitor:
- hot - Check if temperature is hot (>26°C)
- cold - Check if temperature is cold (<20°C)
- warm - Check if temperature is warm (20-26°C)
- normal - Same as warm command
Complete Arduino Code
This code creates a BLE central device that scans, connects, and communicates with the sensor node.
/*
                * ESP32 BLE CENTRAL (CONTROL NODE)
                *
                * Hardware: ESP32 board only (no additional sensors needed)
                *
                * This board acts as a BLE central that:
                * 1. Scans for and connects to the peripheral sensor node
                * 2. Receives temperature data from the sensor
                * 3. Allows user to input commands via Serial Monitor
                * 4. Sends commands to sensor and displays responses
                *
                * Usage:
                * 1. Open Serial Monitor at 115200 baud
                * 2. Wait for connection to sensor node
                * 3. Type commands: "hot", "cold", "warm", or "normal"
                * 4. Press Enter to send commands
                */

                #include <BLEDevice.h>
                #include <BLEUtils.h>
                #include <BLEScan.h>
                #include <BLEAdvertisedDevice.h>
                #include <BLEClient.h>

                // BLE Configuration (must match peripheral)
                #define SERVICE_UUID        "12345678-1234-1234-1234-123456789abc"
                #define TEMP_CHAR_UUID      "87654321-4321-4321-4321-cba987654321"
                #define COMMAND_CHAR_UUID   "11111111-2222-3333-4444-555555555555"

                // Global variables
                static boolean doConnect = false;
                static boolean connected = false;
                static BLERemoteCharacteristic* pTempCharacteristic;
                static BLERemoteCharacteristic* pCommandCharacteristic;
                static BLEAdvertisedDevice* myDevice;
                static BLEClient* pClient;

                // Callback for temperature notifications
                static void tempNotifyCallback(BLERemoteCharacteristic* pBLERemoteCharacteristic,
                                              uint8_t* pData, size_t length, bool isNotify) {
                    String temperature = String((char*)pData, length);
                    Serial.println("🌡️  Temperature: " + temperature);
                }

                // Callback for command response notifications
                static void commandNotifyCallback(BLERemoteCharacteristic* pBLERemoteCharacteristic,
                                                  uint8_t* pData, size_t length, bool isNotify) {
                    String response = String((char*)pData, length);
                    if (response == "yes") {
                        Serial.println("✅ Sensor Response: " + response);
                    } else if (response == "no") {
                        Serial.println("❌ Sensor Response: " + response);
                    } else {
                        Serial.println("❓ Sensor Response: " + response);
                    }
                    Serial.println("");
                    Serial.println("💬 Enter command (hot/cold/warm/normal): ");
                }

                // Client callback for connection events
                class MyClientCallback : public BLEClientCallbacks {
                    void onConnect(BLEClient* pclient) {
                        Serial.println("✅ Connected to peripheral!");
                    }

                    void onDisconnect(BLEClient* pclient) {
                        connected = false;
                        Serial.println("❌ Disconnected from peripheral!");
                        Serial.println("🔄 Restarting scan...");
                        BLEDevice::getScan()->start(5, false);
                    }
                };

                // Scan callback to find our target device
                class MyAdvertisedDeviceCallbacks: public BLEAdvertisedDeviceCallbacks {
                    void onResult(BLEAdvertisedDevice advertisedDevice) {
                        // Check if this device advertises our service
                        if (advertisedDevice.haveServiceUUID() &&
                            advertisedDevice.isAdvertisingService(BLEUUID(SERVICE_UUID))) {

                            Serial.println("🎯 Found target sensor device!");
                            Serial.println("📍 Device: " + String(advertisedDevice.getName().c_str()));

                            BLEDevice::getScan()->stop();
                            myDevice = new BLEAdvertisedDevice(advertisedDevice);
                            doConnect = true;
                        }
                    }
                };

                bool connectToServer() {
                    Serial.println("🔗 Connecting to BLE Server...");

                    pClient = BLEDevice::createClient();
                    pClient->setClientCallbacks(new MyClientCallback());

                    // Connect to the remote BLE Server
                    if (!pClient->connect(myDevice)) {
                        Serial.println("❌ Failed to connect to server");
                        return false;
                    }
                    Serial.println("🔗 Connected to server");

                    // Obtain a reference to the service
                    BLERemoteService* pRemoteService = pClient->getService(SERVICE_UUID);
                    if (pRemoteService == nullptr) {
                        Serial.println("❌ Failed to find service UUID");
                        pClient->disconnect();
                        return false;
                    }
                    Serial.println("✅ Found service");

                    // Get temperature characteristic
                    pTempCharacteristic = pRemoteService->getCharacteristic(TEMP_CHAR_UUID);
                    if (pTempCharacteristic == nullptr) {
                        Serial.println("❌ Failed to find temperature characteristic");
                        pClient->disconnect();
                        return false;
                    }
                    Serial.println("🌡️  Found temperature characteristic");

                    // Get command characteristic
                    pCommandCharacteristic = pRemoteService->getCharacteristic(COMMAND_CHAR_UUID);
                    if (pCommandCharacteristic == nullptr) {
                        Serial.println("❌ Failed to find command characteristic");
                        pClient->disconnect();
                        return false;
                    }
                    Serial.println("💬 Found command characteristic");

                    // Register for temperature notifications
                    if(pTempCharacteristic->canNotify()) {
                        pTempCharacteristic->registerForNotify(tempNotifyCallback);
                        Serial.println("📡 Subscribed to temperature updates");
                    }

                    // Register for command response notifications
                    if(pCommandCharacteristic->canNotify()) {
                        pCommandCharacteristic->registerForNotify(commandNotifyCallback);
                        Serial.println("📡 Subscribed to command responses");
                    }

                    connected = true;
                    return true;
                }

                void setup() {
                    Serial.begin(115200);
                    Serial.println("========================================");
                    Serial.println("🎮 ESP32 BLE Central (Control Node)");
                    Serial.println("========================================");

                    BLEDevice::init("ESP32_Control_Node");

                    // Start scanning for devices
                    BLEScan* pBLEScan = BLEDevice::getScan();
                    pBLEScan->setAdvertisedDeviceCallbacks(new MyAdvertisedDeviceCallbacks());
                    pBLEScan->setInterval(1349);
                    pBLEScan->setWindow(449);
                    pBLEScan->setActiveScan(true);
                    pBLEScan->start(5, false);

                    Serial.println("🔍 Scanning for sensor device...");
                    Serial.println("📡 Looking for 'ESP32_Sensor_Node'");
                    Serial.println("");
                }

                void loop() {
                    // If connection is flagged, attempt to connect
                    if (doConnect == true) {
                        if (connectToServer()) {
                            Serial.println("🎉 Connection established successfully!");
                            Serial.println("");
                            Serial.println("📋 Available commands:");
                            Serial.println("   • hot    - Check if temperature is hot");
                            Serial.println("   • cold   - Check if temperature is cold");
                            Serial.println("   • warm   - Check if temperature is warm");
                            Serial.println("   • normal - Check if temperature is normal");
                            Serial.println("");
                            Serial.println("💬 Enter command: ");
                        } else {
                            Serial.println("❌ Failed to connect. Restarting scan...");
                            BLEDevice::getScan()->start(5, false);
                        }
                        doConnect = false;
                    }

                    // Handle serial input for commands
                    if (connected && Serial.available()) {
                        String command = Serial.readStringUntil('\n');
                        command.trim();
                        command.toLowerCase();

                        if (command.length() > 0) {
                            // Validate command
                            if (command == "hot" || command == "cold" || command == "warm" || command == "normal") {
                                Serial.println("📤 Sending command: '" + command + "'");
                                pCommandCharacteristic->writeValue(command.c_str(), command.length());
                                Serial.println("⏳ Waiting for sensor response...");
                            } else {
                                Serial.println("❌ Invalid command! Use: hot, cold, warm, or normal");
                                Serial.println("💬 Enter command: ");
                            }
                        }
                    }

                    // Check connection status periodically
                    if (connected && !pClient->isConnected()) {
                        connected = false;
                        Serial.println("⚠️  Connection lost!");
                    }

                    delay(100);
                }
Usage Instructions
Follow these steps to operate the central control node:
- Step 1: Upload code to ESP32 and open Serial Monitor (115200 baud)
- Step 2: Wait for "Connection established successfully!" message
- Step 3: Type commands (hot, cold, warm, normal) in Serial Monitor
- Step 4: Press Enter to send commands to sensor
- Step 5: View sensor responses (yes/no) and temperature data
Key Features
- Device Discovery: Automatically scans and connects to sensor nodes
- Real-time Data: Receives live temperature updates every 2 seconds
- Command Interface: User-friendly serial monitor command input
- Auto Reconnection: Automatically reconnects if connection is lost
- Input Validation: Validates commands and provides helpful error messages
System Configuration
- Board Type: ESP32 Dev Module
- Upload Speed: 921600
- CPU Frequency: 240MHz
- Flash Size: 4MB
- Serial Baud Rate: 115200
Hero Shot