Mechanical Design, Machine Design
Description of group assignment
-
Design a machine that includes mechanism + actuation + automation + application
-
Build the mechanical parts and operate it manually
Document the group project
Group Assignment
Group Assignment
Here you can find group assignment
Through Our group documentation includes full details on our shared experimentation while designing and building machine
INDIVIDUAL ASSIGNMENT
My Machine Week Contribution - The Software Side
For machine week, our group built a 5-axis robotic arm. While others handled the mechanical structure and electronics, I was in charge of writing the firmware and developing the interface to control the robot. I was part of Group 3: Firmware and Interfacing.

Writing the Arduino Firmware
The Arduino firmware we built was to control up to four stepper motors through serial commands sent from a web-based UI. The code parses motor instructions, handles position control, supports speed adjustments, and allows session-based memory for saved poses. The firmware is compatible with the ULN2003 driver and uses angle-to-step conversion for 28BYJ-48 motors.
The Core Features we Implemented:
- Multi-axis stepper control via serial interface
- Angle-based motion mapping (0–180°) with step conversion
- Session-based position memory with support for save and playback
- Looped playback feature with adjustable timing between steps
- Motor reset function to bring all motors to 0°
Command Examples:
// Move motor 1 to 90 degrees 1,90
// Set loop delay to 1000ms
delay:1000

// Save current positions
save

// Start looped playback
play

// Stop playback
stop

// Reset all motors to 0 degrees
reset
Challenges Faced
- Serial Command Parsing: Since the interface was based on comma-separated strings, splitting and validating inputs reliably was critical to prevent misexecution.
- Angle to Step Conversion: Each motor used a specific number of steps per revolution, requiring custom scaling (e.g., 1° ≈ 5.68 steps for 28BYJ-48 with gear ratio).
- Position Memory: EEPROM was avoided to preserve lifespan, so all positions were stored in volatile memory during runtime and lost on power-off.
- Looped Playback Timing: Introducing a custom delay between motor sequences helped simulate coordinated movement but required precise state tracking.
- Safety Reset: A manual reset command was implemented to avoid mechanical overextension by returning motors to their safe base (0°) position.
here are the codes for firmware
codes for firmwareUser Interface (UI) Overview:
The 4-Axis Stepper Motor Control System features a clean, intuitive web-based interface designed for real-time motor control and position management. The UI provides full control over each motor's angle and speed and allows easy connection through WIFI.
Main UI Sections:
- Connection Panel: Select serial port and baud rate, then connect. Real-time connection status is shown with visual indicators.
- Motor Controls: Each of the four motors has:
- Angle control (via slider)
- Speed control (steps/second)
- “Move Motor” button for each axis
- Saved Positions: Quick-save and recall up to 10 positions. Includes labels like "Left Turn," "Right Turn," and "Wave".
- Console: Real-time feedback and command log to monitor system messages and sent commands.
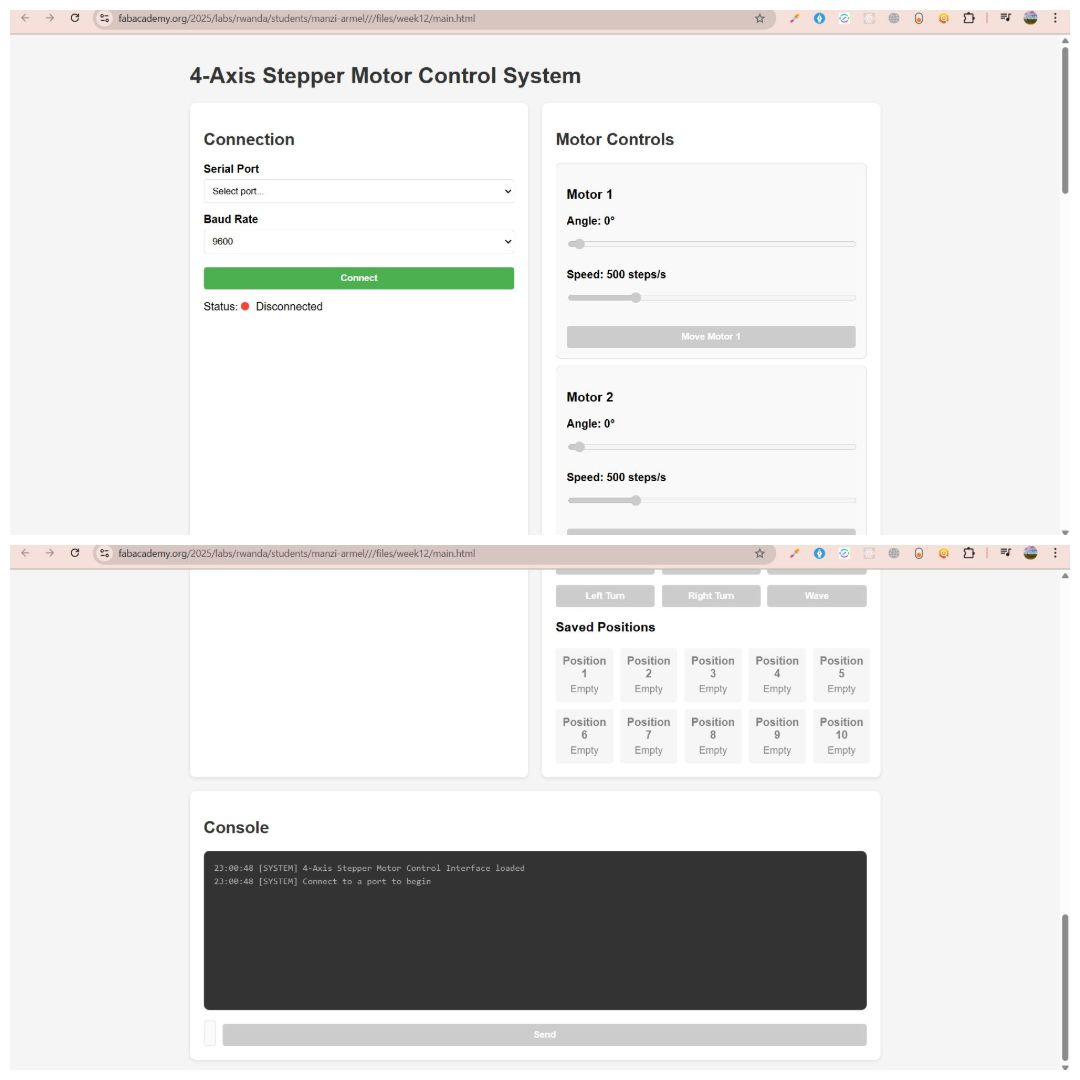
The UI made it possible for anyone in the group to test and run robot motions without touching the firmware. It also served as a useful debugging tool during development.
Challenges Faced
- Serial Port Detection: Web-based serial connection sometimes failed to detect available ports, requiring browser refresh or driver updates.
- Connection Stability: Keeping a stable connection between the browser and microcontroller was critical. Disconnects led to frozen UI buttons.
- UI Responsiveness: Sliders and buttons needed event debouncing to prevent accidental multi-triggers, especially for fast stepper movement.
- Command Timing: Commands sent from UI had to be timed precisely to avoid motor jitter or skipped steps when multiple buttons were clicked quickly.
- Position Sync: Saved positions in the UI were not persistent; they only worked within the active session due to lack of backend storage.
for web preview please visit the link below
UI-preview onlinehere is the video that show how we ended up with the work
My contribution to team
I contributed primarily to the design and implementation of the user interface for the 4-Axis Stepper Motor Control System. I developed a clean, responsive web-based UI that allows users to send real-time commands to each motor, control angles and speed, save and replay movements, and enable looped playback. The interface communicates with the Arduino firmware via serial connection, providing intuitive buttons and input fields for seamless control. My focus was on making the system user-friendly, visually clear, and functionally reliable.
from that now the robot can be controlled by the firmware we built