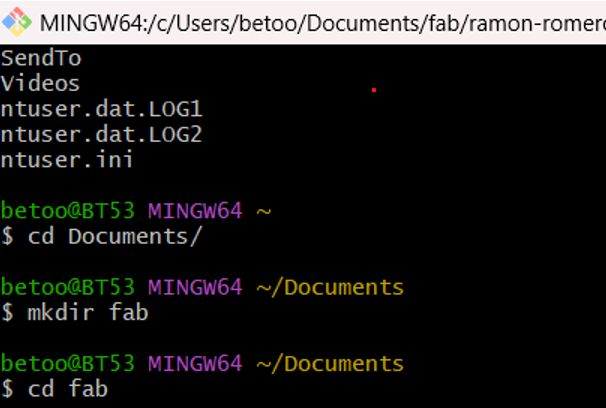
Fig 1. Navigating directories in Git Bash
1. Project Management
Embedded Programming
It is the interaction of hardware and software created to carry out a specific task. Unlike general-purpose computers, these systems are designed to perform particular functions efficiently and reliably. They generally operate under resource constraints such as limited memory, processing capacity, and power consumption.
Electronic Circuit
An electronic circuit is a connection of electrical and electronic components that allows the flow of current to perform a specific function.
Microcontroller
A microcontroller is a small integrated circuit that functions as the "brain" of electronic devices. It contains a processor, memory, and various input and output interfaces.
Wokwi
Wokwi is an online simulator of embedded and IoT (Internet of Things) systems. In Wokwi, we can find different types of microcontrollers, such as Arduino Uno, Arduino Nano, Esp32, Esp8266, or the Raspberry Pi Pico, each serving different purposes. Below is a comparative table of some basic aspects to consider when choosing the ideal microcontroller:
Wokwi Link
Wokwi - World's most advanced ESP32 Simulator
Comparative Table of Microcontrollers
| Característica | Arduino Uno | Arduino Nano | ESP32 | ESP8266 | Raspberry Pi Pico |
|---|---|---|---|---|---|
| Tamaño | Grande | Pequeño | Pequeño | Pequeño | Pequeño |
| Velocidad | Lento (16 MHz) | Lento (16 MHz) | Rápido (240 MHz) | Medio (80/160 MHz) | Rápido (133 MHz) |
| Memoria | Poca (32 KB) | Poca (32 KB) | Mucha (4 MB) | Mucha (4 MB) | Media (2 MB) |
| Pines para conectar | 14 | 22 | 34 | 17 | 26 |
| Wi-Fi | No tiene | No tiene | Sí tiene | Sí tiene | No tiene |
| Bluetooth | No tiene | No tiene | Sí tiene | No tiene | No tiene |
| USB | Sí (para programar) | Sí (mini USB) | Sí (micro USB) | Sí (micro USB) | Sí (micro USB) |
Project Objective
The objective of this project is to implement a cooling control system using an ESP32 and programmed in Wokwi using MicroPython. A DHT22 sensor will be used to measure the ambient temperature. When the temperature exceeds a predefined threshold, a red LED will light up as a warning signal. If the temperature continues to rise, a servo motor will be activated, simulating the activation of a cooling system.
Required Components
- ESP32 (Main microcontroller)
- DHT22 (Temperature and humidity sensor)
- Red LED (Visual indicator of high temperature)
- 220Ω resistor (To limit the LED current)
- Servo motor (To simulate the cooling system)
Components and Connections
ESP32
In this image we can see all the ESP32 pins in this case we only use GPIO2, GPIO5 GPIO14, 5v, 3.3v and GN
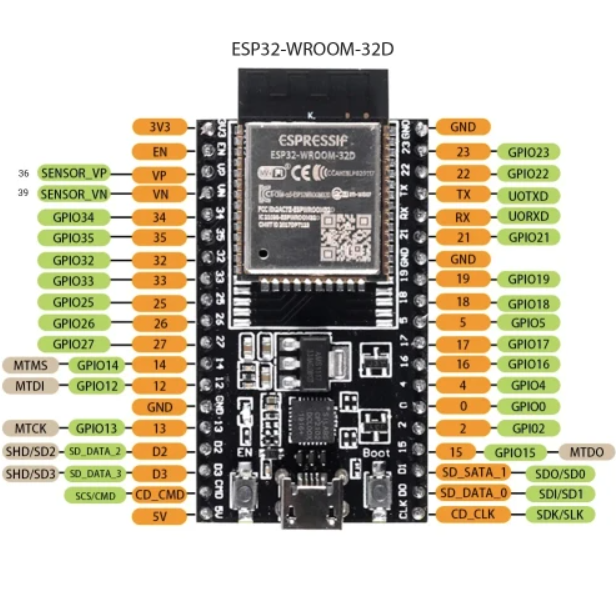
Fig 1. Esp32 conections
ESP32 will perform the following actions
- Reading the temperature from the DHT22 sensor.
- Turning on the LED if the temperature exceeds the threshold.
- Activating the servo motor to simulate a cooling system.
- Reading the DIP switch state to enable or disable the system.
DHT22 Temperature and Humidity Sensor
The DHT22 is a digital sensor that measures temperature and humidity and sends data through a single communication line.
| DHT22 Pin | ESP32 Connection | Explanation |
|---|---|---|
| VCC | 3.3V | The sensor operates at 3.3V. |
| GND | GND | Required for a common ground reference. |
| DATA | GPIO2 | Chosen as a free GPIO suitable for digital signals. |
Red LED - High Temperature Indicator
The red LED serves as a visual warning when the temperature exceeds 30°C.
| LED Pin | ESP32 Connection | Explanation |
|---|---|---|
| Anode (+, long leg) | GPIO5 (with 220Ω resistor to GND) | GPIO5 is a general-purpose pin; the resistor protects the LED. |
| Cathode (-, short leg) | GND | Completes the circuit. |
Servo Motor SG90 - Cooling System Simulation
The SG90 servo motor will simulate the activation of a cooling system by moving to 90°.
| Servo Wire | ESP32 Connection | Explanation |
|---|---|---|
| VCC | 5V | The servo requires 5V to operate correctly. |
| GND | GND | Common ground reference. |
| Signal | GPIO14 | GPIO14 supports PWM signals required for servo control. |
DIP Switch
The DIP switch is a mechanical switch used to manually enable or disable the system.
| DIP Switch Pin | ESP32 Connection | Reason for Connection |
|---|---|---|
| One side of the switch | GND | Defines the logical state of the switch. |
| Other side of the switch | GPIO4 | Detects if the switch is ON or OFF. |
Getting Started with Wokwi
Starting a New MicroPython Project
Once you open the IDE for the project, you’ll see a section called "Start Your Project Using Popular Languages".
Under this section, choose MicroPython.
Then, scroll down to the button labeled "New Project" and click on it.
A pop-up window will appear with project type options. Select "MicroPython on ESP32".
Adding New Components
To add a new component to your project, first locate the component toolbar, usually on the left or top of the interface.
Search for the component you want to add, such as the DHT22 ( temperature and humidity sensor), Red LED, SG90 Servo Motor, and DIP switch.
Click on the component, then place it on your project workspace.
After placing the component, connect the corresponding pins to the ESP32’s pins, based on the table provided, using virtual wires in the interface.
Recommended Wire Colors
When connecting components to the ESP32, it’s important to choose wire colors that are clear and easy to identify. Here are some recommendations:
- Red for the power wire (VCC).
- Black for the ground wire (GND).
- Yellow or Orange for signal wires (like GPIO).
Summary of Components and Connections
| Component | ESP32 Pin | Reason for Connection |
|---|---|---|
| DHT22 | GPIO2 | Digital signal input for temperature reading. |
| Red LED | GPIO5 | Used as a temperature warning indicator. |
| Servo Motor SG90 | GPIO14 | Controls the cooling system . |
| DIP Switch | GPIO4 | Enables/disables the cooling system. |
In this image you can see the connections mentioned above, you can also use the table as a guide.
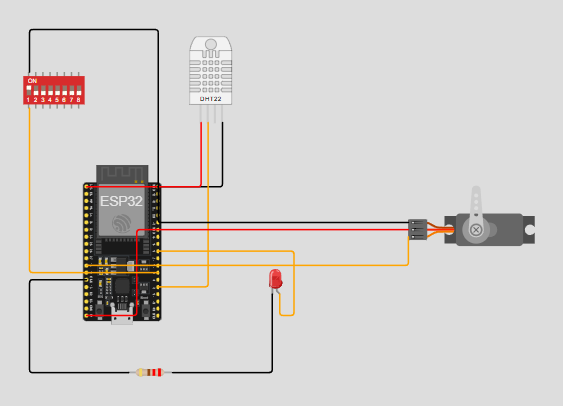
Fig 2. Conections of the proyect
Upload the Code to ESP32
After making the connections, you’ll need to write the code in MicroPython to interact with the components.
Pin Configuration
			from machine import Pin, PWM
			from time import sleep
			import dht

			Pin configuration
			DHTPIN = 2  # Pin for DHT22
			LED_PIN = 5  # Pin for LED
			SERVO_PIN = 14  # Pin for servo motor
			DIP_SWITCH_PIN = 4  # Pin for DIP switch
Initialization of DHT22 Sensor
			Initialization of DHT22 sensor
			sensor = dht.DHT22(Pin(DHTPIN))
LED and Servo Motor Configuration
			 LED configuration as output
			led = Pin(LED_PIN, Pin.OUT)

			 Servo motor configuration
			servo = PWM(Pin(SERVO_PIN), freq=50)  # Frequency of 50 Hz
DIP Switch Configuration
			 DIP switch configuration as input with internal pull-up
			dip_switch = Pin(DIP_SWITCH_PIN, Pin.IN, Pin.PULL_UP)
Control Variables
			 Control variables
			temperature = 20   Initial temperature
			max_temperature = 32   Maximum temperature before resetting
			ciclos_completos = 0   Complete cycle counter
			max_ciclos = 3  Number of complete cycles before stopping
Function to Move the Servo Motor
			 Function to move the servo motor
			def move_servo(angle):
				duty = int(26 + (angle / 180) * (102 - 26))  # Range 0-180 degrees
				servo.duty(duty)
				print(f"Servo: {angle}°")
Wait for DIP Switch Activation
			 Wait for DIP switch activation
			print("Waiting for DIP switch activation...")
			while dip_switch.value() == 1:  # While the DIP switch is deactivated
				sleep(0.1)  # Wait 100 ms before checking again

			print("DIP switch activated. Starting prototype...")
Main Cycle
			 Main cycle
			while ciclos_completos < max_ciclos:
				try:
					 Read the DHT22 sensor
					sensor.measure()
					humidity = sensor.humidity()

					 Increase temperature by 1
					temperature += 1

					 Reset temperature when reaching 45°C
					if temperature >= max_temperature:
						temperature = 20
						ciclos_completos += 1
						print(f"Cycle {ciclos_completos} completed")

					 Control the LED based on temperature
					if temperature > 25:
						led.on()  # Turn on LED if temperature is above 25°C
					else:
						led.off()  # Turn off LED if temperature is 25°C or below

					 Control the servo motor based on temperature
					if temperature >= 30:
						move_servo(90)  # Move the servo motor to 90° if temperature is >= 30°C
					else:
						move_servo(0)  # Move the servo motor to 0° if temperature is < 30°C

					 Display values on the serial monitor
					print(f"Temp: {temperature}°C | Hum: {humidity}%")

				except OSError as e:
					print(f"Error reading DHT22 sensor: {e}")
					sensor = dht.DHT22(Pin(DHTPIN))  # Reset the sensor in case of error

				sleep(2)  # Wait 2 seconds between iterations
Completion Message
			 Completion message
			print("Prototype completed")
Programming
Programming is a set of instructions written in a programming language that tells a device what to do. For microcontrollers, programs are written in languages like C++ or Python and loaded onto the chip to control the components of the circuit.
This program is an example of how to control a system that includes a temperature and humidity sensor (DHT22), an LED, a servomotor, and a DIP switch using a microcontroller, such as those based on the ESP32 or ESP8266 platform. Below, each part of the program is explained in detail:
1. Importing Libraries
Libraries: Libraries are sets of pre-written code that provide specific functionalities. In this case, three libraries are imported:
- Pin and PWM from machine: These libraries allow interaction with the microcontroller's pins. Pin is used to configure pins as inputs or outputs, and PWM is used to control devices requiring pulse width modulation signals, such as a servomotor.
- sleep from time: This function is used to pause the program's execution for a certain amount of time.
- dht: This library allows interaction with temperature and humidity sensors like the DHT22.
2. Pin Configuration
Variables: Variables are memory spaces that store data. In this case, several variables are defined to store the pin numbers to which the devices are connected:
- DHTPIN = 2: The pin connected to the DHT22 sensor.
- LED_PIN = 5: The pin connected to the LED.
- SERVO_PIN = 14: The pin connected to the servomotor.
- DIP_SWITCH_PIN = 4: The pin connected to the DIP switch.
3. Device Initialization
- DHT22 sensor: The DHT22 sensor is initialized using the previously defined pin (DHTPIN).
- LED: The LED pin is configured as an output (Pin.OUT), meaning the microcontroller can send signals to turn the LED on or off.
- Servomotor: The servomotor pin is configured as a PWM output with a frequency of 50 Hz, which is the typical frequency for controlling servomotors.
- DIP switch: The DIP switch pin is configured as an input (Pin.IN) with an internal pull-up resistor (Pin.PULL_UP), allowing the switch's state (on or off) to be read.
4. Control Variables
Variables: Several variables are defined to control the program's behavior:
- temperature = 20: Stores the initial temperature.
- max_temperature = 32: Defines the maximum temperature before resetting.
- ciclos_completos = 0: Complete cycle counter.
- max_ciclos = 3: Maximum number of cycles before stopping the program.
5. Function to Move the Servomotor
Explanation of the mover_servo Function
A function in programming is a block of code that performs a specific task. Functions allow you to reuse code and organize it in a clearer and more structured way. In Python, functions are defined using the def keyword, followed by the function name and parentheses that may contain parameters.
Code Explanation
			 Function to move the servo motor
			def mover_servo(angle):
				# Validate that the angle is between 0 and 180 degrees
				if 0 <= angle <= 180:
					# Calculate the corresponding duty cycle
					duty = int(26 + (angle / 180) * (102 - 26))  # Range 0-180 degrees
					# Move the servo motor to the desired angle
					servo.duty(duty)
					print(f"Servo: {angle}°")
				else:
				print("Error: The angle must be between 0 and 180 degrees.")

			 Usage example
			mover_servo(90)  # Moves the servo motor to 90 degrees
Function Definition
def mover_servo(angle):
Here we are defining a function called mover_servo that takes a parameter called angle.
Angle Validation
if 0 <= angle <= 180:
This line checks that the value of angle is within the allowed range (0 to 180 degrees). If the angle is not within this range, the else block will be executed.
Duty Cycle Calculation
duty = int(26 + (angle / 180) * (102 - 26)) # Range 0-180 degrees
The duty cycle is a measure of how long a signal is in the high state (on) compared to the total cycle time.
Here, we are calculating the duty cycle needed to move the servo motor to the desired angle. The formula converts
the angle into a duty cycle value that the servo motor can understand.
Move the Servo Motor
servo.duty(duty)

			print(f"Servo: {angle}°")
These lines send the calculated duty cycle to the servo motor to move it to the desired angle and then print the angle to which the servo motor has moved.
Error Handling
else:

			print("Error: The angle must be between 0 and 180 degrees.")
If the provided angle is not within the allowed range, an error message is printed.
6. Wait for the DIP Switch to be Activated
While loop: This loop waits for the DIP switch to be activated. While the DIP switch value is 1 (off), the program waits 100 ms before checking again. When the DIP switch is activated (value 0), the program continues.
Main Loop Code
				 Main loop
				while complete_cycles < max_cycles:
			try:
				# Read the DHT22 sensor
				sensor.measure()
				humidity = sensor.humidity()

				 Increase the temperature by 1
				temperature += 1

				 Reset temperature when reaching 45°C
				if temperature >= max_temperature:
					temperature = 20
					complete_cycles += 1
					print(f"Cycle {complete_cycles} completed")

				 Control the LED based on temperature
				if temperature > 25:
					led.on()  # Turn on LED if temperature is greater than 25°C
				else:
					led.off()  # Turn off LED if temperature is less than or equal to 25°C

				 Control the servo motor based on temperature
				if temperature >= 30:
					move_servo(90)  # Move the servo motor to 90° if temperature is >= 30°C
				else:
					move_servo(0)  # Move the servo motor to 0° if temperature is < 30°C
				 Display values on the serial monitor
				print(f"Temp: {temperature}°C | Hum: {humidity}%")

			except OSError as e:
				print(f"Error reading the DHT22 sensor: {e}")
				sensor = dht.DHT22(Pin(DHTPIN))  # Reset the sensor in case of error

			sleep(2)  # Wait 2 seconds between iterations

			 Completion message
			print("Prototype completed")
Main Loop
while complete_cycles < max_cycles:
This is the main loop of the program. It runs while the variable complete_cycles is less than max_cycles. This allows the program to perform a specified number of cycles before finishing.
try Block
The try block is used to handle exceptions. If an error occurs within this block, the program will jump to the except block.
Read the DHT22 Sensor
sensor.measure()

			humidity = sensor.humidity()
These lines read data from the DHT22 sensor. The measure() function updates the sensor readings, and humidity() gets the humidity value.
Increase the Temperature
temperature += 1
This line increments the temperature variable by 1 in each iteration of the loop.
Reset Temperature
if temperature >= max_temperature:

			temperature = 20

			complete_cycles += 1

			print(f"Cycle {complete_cycles} completed")
If the temperature reaches or exceeds max_temperature (45°C in this case), the temperature is reset to 20°C and complete_cycles is incremented by 1. A message is also printed indicating that a cycle has been completed.
Control the LED
if temperature > 25:

			led.on()  # Turn on LED if temperature is greater than 25°C

			else:

			led.off()  # Turn off LED if temperature is less than or equal to 25°C
These lines control the state of the LED based on the temperature. If the temperature is greater than 25°C, the LED is turned on; otherwise, it is turned off.
Control the Servo Motor
if temperature >= 30:

			move_servo(90)  # Move the servo motor to 90° if temperature is >= 30°C

			else:

			move_servo(0)  # Move the servo motor to 0° if temperature is < 30°C
These lines control the servo motor based on the temperature. If the temperature is greater than or equal to 30°C, the servo motor is moved to 90 degrees; otherwise, it is moved to 0 degrees.
Display Values on the Serial Monitor
print(f"Temp: {temperature}°C | Hum: {humidity}%")
This line prints the current temperature and humidity values to the serial monitor.
Error Handling
except OSError as e:

			print(f"Error reading the DHT22 sensor: {e}")

			sensor = dht.DHT22(Pin(DHTPIN))  # Reset the sensor in case of error
If an error occurs while reading the DHT22 sensor, the OSError exception is caught and an error message is printed. The sensor is then reset.
Wait Between Iterations
sleep(2) # Wait 2 seconds between iterations
This line makes the program wait for 2 seconds before the next iteration of the loop.
Completion Message
print("Prototype completed")
This line prints a message indicating that the prototype has completed once all cycles are finished.
Mi Video
