WEEK 4: Embedded Programming
Assignment
1. About ESP32 Microcontrollers and data sheet.
2. Simulate using TinkerCAD and test on the development board Arduino UNO.
About ESP32
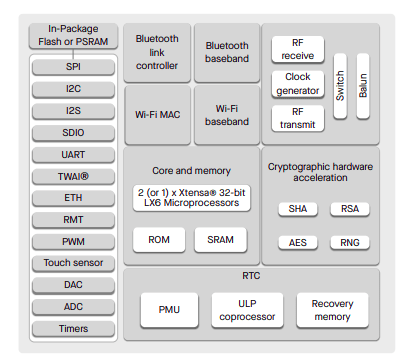
ESP32 is a single 2.4 GHz Wi-Fi-and-Bluetooth combo chip designed with the TSMC low-power 40 nm technology. It is designed to achieve the best power and RF performance, showing robustness, versatility and reliability in a wide variety of applications and power scenarios.
The functional block diagram of the SOC
Features
The ESP32 Dev Kit is a development board based on the ESP32 microcontroller, providing easy access to its
features and functionalities. Key specifications include:
1. Microcontroller: ESP32-WROOM-32
2. Operating Voltage: 3.3V
3. Input Voltage: 5V via USB
4. Flash Memory: 4MB
5. GPIO Pins: 38 (varies by model)
6. Communication Interfaces: UART, SPI, I2C
7. PWM Channels: Available on multiple GPIOs
8. ADC Channels: Up to 18 (12-bit resolution)
9. DAC Channels: 2 (8-bit resolution)
10. Wi-Fi Standards: 802.11 b/g/n
11. Bluetooth: BLE 4.2 + Classic
12. USB-to-Serial Converter: CP2102 or CH340G
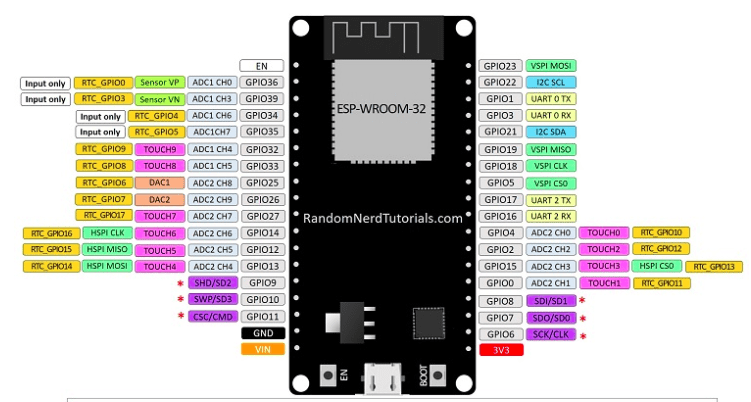
PinOut
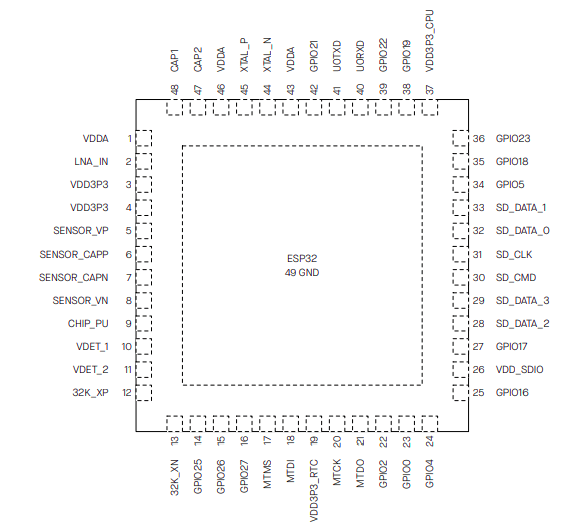
ESP32 DEVKIT
ESP32 Datasheet
Comparison Between Arduino IDE (C++) and MicroPython (Python)
| Feature | Arduino IDE (C++) | MicroPython (Python) |
|---|---|---|
| Programming Language | C++ | Python (MicroPython) |
| Code Simplicity | More complex syntax and boilerplate code | Simpler, cleaner, and more readable |
| Learning Curve | Steeper for beginners | Beginner-friendly |
| Development Environment | Arduino IDE | Thonny, uPyCraft, or any serial terminal |
| Execution Method | Compiled and uploaded | Interpreted directly on the board |
| Library Support | Extensive Arduino libraries | Growing, but fewer libraries |
| Community & Support | Large and well-established | Growing community, especially in education |
| Best Use Case | Real-time, performance-critical applications | Quick prototyping, educational projects |
I preferred writting code in python since it is faster development, easy syntax, ideal for quick testing with ESP32
Assignment Program
Objective
To measure the distance of an object using an ultrasonic sensor with an ESP32 microcontroller. The implementation includes programming in both Arduino IDE and Python, with simulation conducted in Wokwi and Thonny.
Group AssignmentWOKWI
Wokwi is an online simulator for embedded systems, allowing users to prototype and test microcontroller-based projects without physical hardware. It supports various microcontrollers like ESP32, Arduino, and Raspberry Pi Pico, along with components like sensors, displays, and motors. Wokwi provides a virtual environment where users can write and debug code, simulate circuits, and visualize data in real-time, making it ideal for learning, testing, and rapid prototyping.
Simulation in WOKWI
1. Open Wokwi.(https://wokwi.com/)
2. Select ESP32 as the microcontroller.
3. Connect the ultrasonic sensor and assign the respective GPIO pins.
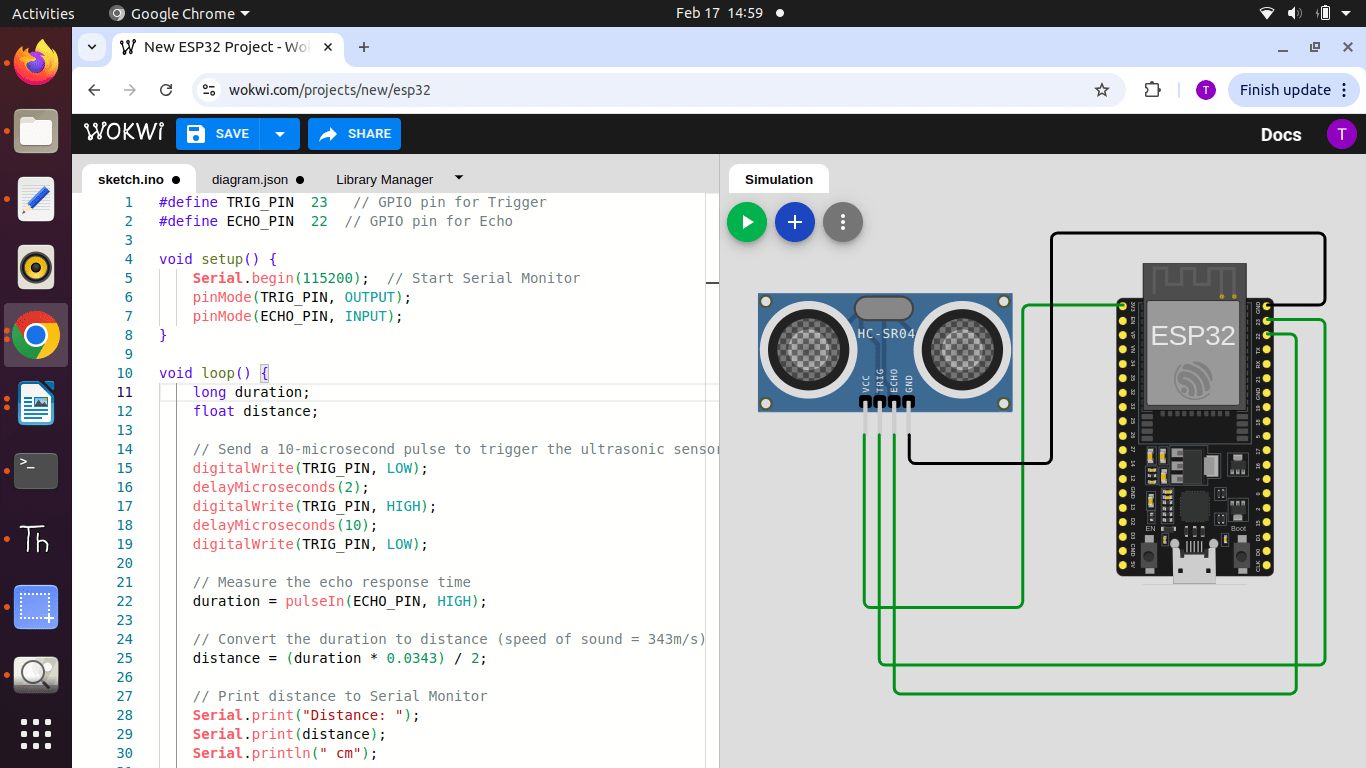
4. Upload the Arduino IDE code and monitor the serial output.
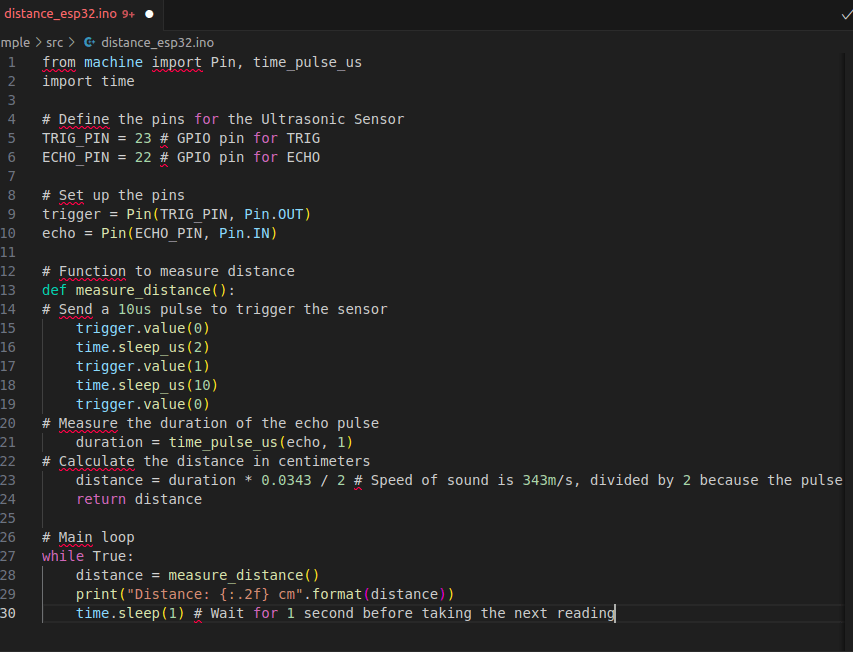
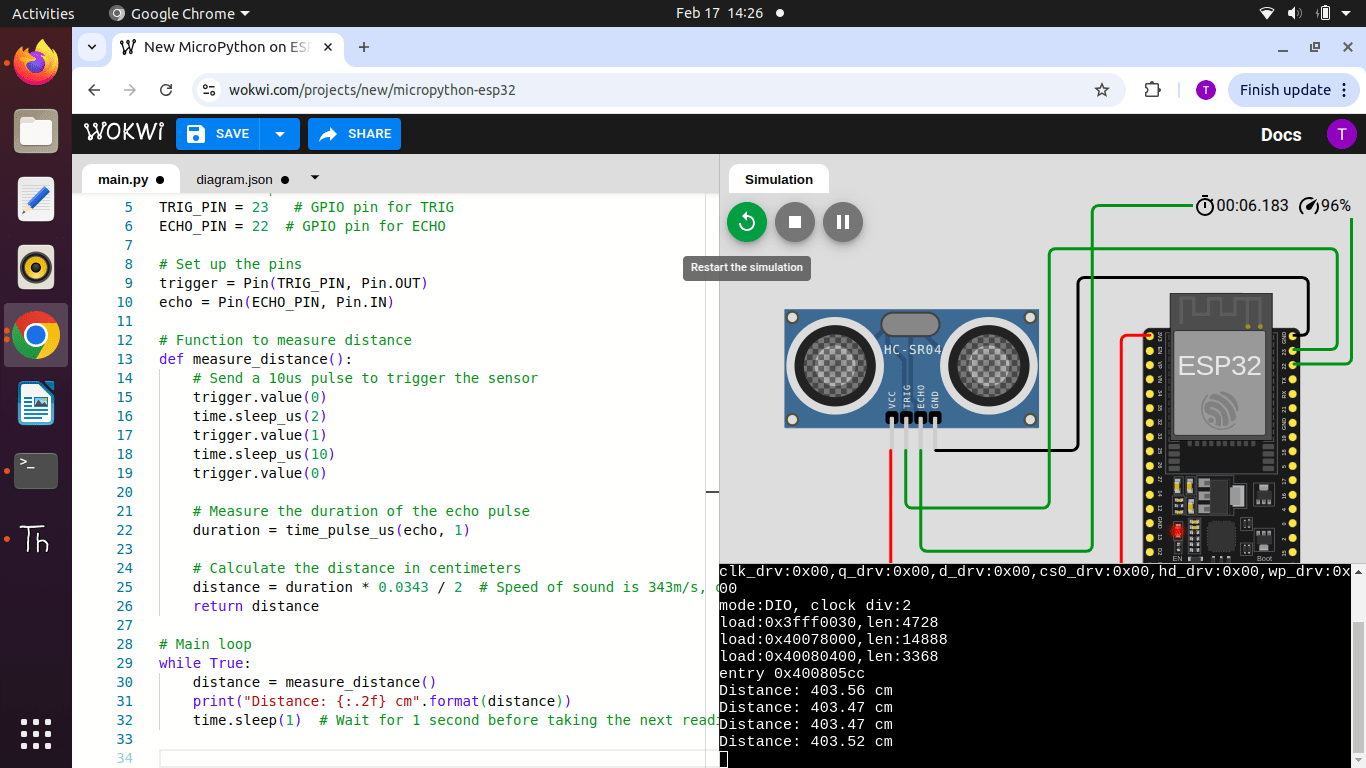
Python Program to find the distance of the object using ultrasonic sensor(HC-SR04)
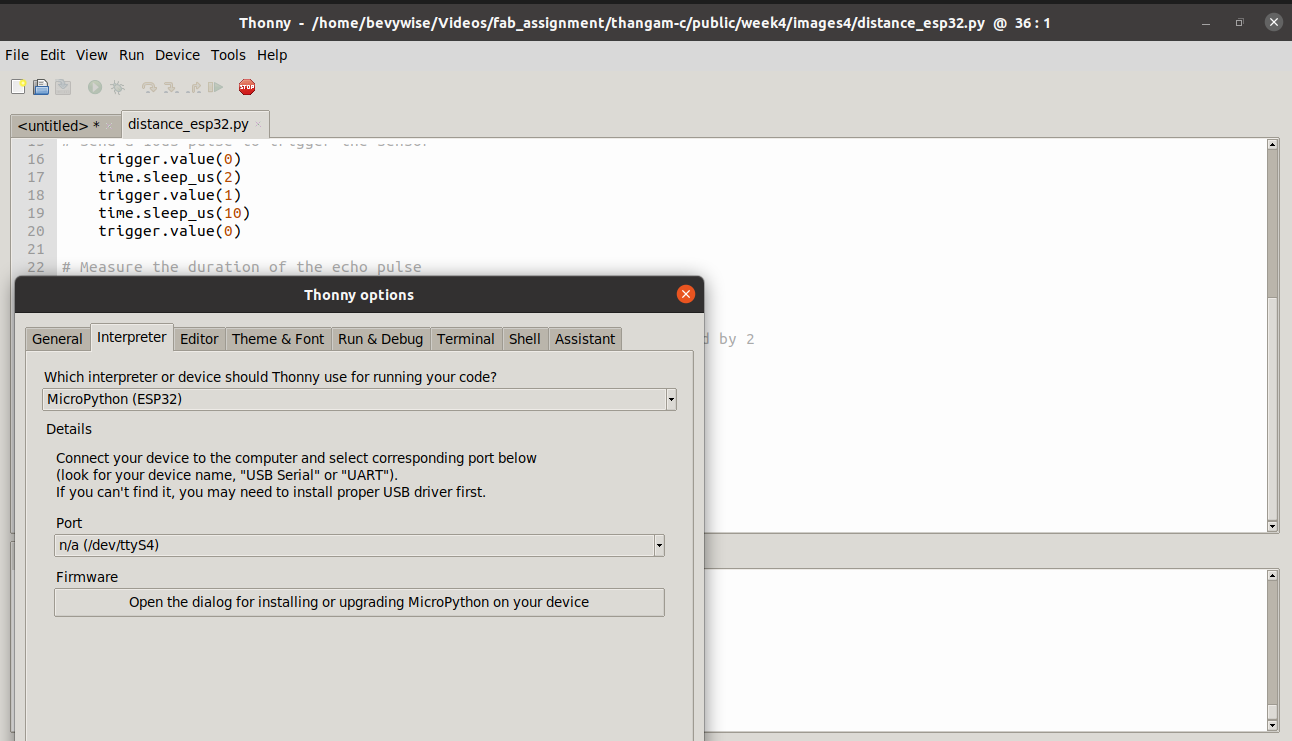
Thonny Reference
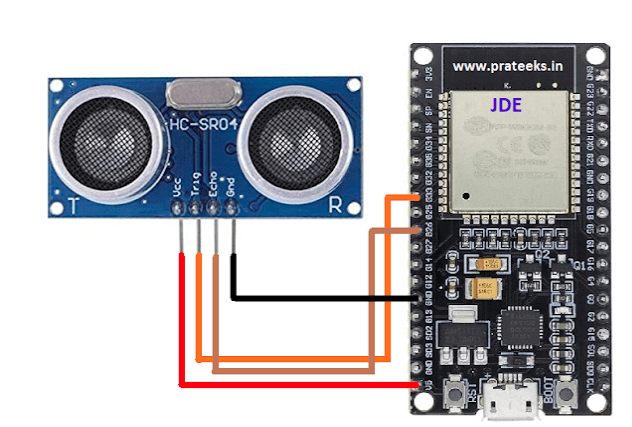
CIrcuit Diagram
Simulated Output using Pyhton and Arduino IDE code
Roll Count Detection System Using Ultrasonic Sensor and ESP32
This project uses an ultrasonic sensor with an ESP32 to count the number of paper rolls stored in a cupboard. The sensor measures the distance to detect the presence of rolls, and based on the readings, the total count is determined. The detected roll count is then displayed on a 16x2 LCD screen for easy monitoring. The ESP32 processes the sensor data and updates the count in real-time, ensuring accurate inventory tracking.Wokwi is an online simulator for embedded systems, allowing users to prototype and test microcontroller-based projects without physical hardware. It supports various microcontrollers like ESP32, Arduino, and Raspberry Pi Pico, along with components like sensors, displays, and motors. Wokwi provides a virtual environment where users can write and debug code, simulate circuits, and visualize data in real-time, making it ideal for learning, testing, and rapid prototyping.
Video
Snipping Tool
I have used snipping tool to capture the images for this document. It is a built-in screen capture utility in Windows that allows users to take screenshots (snips) of the computer screen. It provides several modes to capture the full screen, a window, or a user-defined area. It's useful for documenting, sharing, and troubleshooting purposes.
How to Open Snipping Tool
Search Method
-> Click on the Start button or press Windows Key.
-> Type "Snipping Tool" in the search bar.
-> Click on the app from the search results.
Shortcut (Windows 10/11):
-> Press Windows Key + Shift + S to open the Snipping Tool directly in snip mode.
Capture Modes
-> Rectangular Snip: Drag the cursor to form a rectangle to capture a specific area.
-> Free-form Snip: Draw a freehand shape around the area you want to capture.
-> Window Snip: Capture a specific window (e.g., browser, application).
-> Full-screen Snip: Captures the entire screen.
How to Use Snipping Tool (Steps)
-> Launch the Tool (see above).
-> Click on New to start snipping.
-> Choose your preferred Snip Mode from the Mode dropdown or toolbar.
-> Select the area of the screen to capture.
-> The screenshot will open in the editor where you can annotate or save it.
Benefits of Using Snipping Tool
-> Easy to Use: Simple UI, no learning curve.
-> Fast Access: Shortcut keys for quick snips.
-> Built-in Tool: No need to install third-party apps.
-> Annotation Tools: Markup for explanation or feedback.
-> Lightweight: Uses minimal system resources.
-> Multiple Formats: Save images in various formats.
-> Productivity Boost: Ideal for documentation, tutorials, bug reporting, and communication.
Download Code Files
Click on the links below to download the program files:
Challenges Faced
Code Porting Between Platforms : Writing the same logic in both Arduino (C++) and MicroPython (Python) was a challenge due to syntax and library differences.
LCD Display Issues : Getting the LCD display to show proper characters involved correctly wiring the I2C interface and using the right I2C address. Wrong address or poor connections led to blank screens initially.