Objectives
group assignment:review the safety data sheets for each of your molding and casting materials, then make and compare test casts with each of them. Compare mold making processes
individual assignment: design a mold around the process you'll be using, produce it with a smooth surface finish that does not show the production process toolpath, and use it to cast parts
Group assignment
Group assignment page13. MOLDING AND CASTING
Molding is a manufacturing process that involves shaping a liquid or pliable material using a rigid frame known as a mold or matrix. This technique is used to form materials such as plastic, metal, glass, or ceramics into specific shapes and products. Depending on the material and desired outcome, various molding methods can be employed, including injection molding, compression molding, blow molding, and rotational molding. Each technique offers unique advantages and is selected based on factors like the complexity of the shape, production volume, and material properties. Molding is widely used in industries ranging from automotive and aerospace to consumer goods and packaging.
Types of molding
Injection Molding : In this process, molten plastic is injected into a mold under high pressure. After the material cools and hardens, the mold opens, and the finished product is released.
Blow Molding: Used mainly to produce hollow plastic objects like bottles. It involves extruding a molten plastic tube (parison), which is then expanded within a mold using air pressure to match the mold’s shape.
Compression Molding: Ideal for forming thermoset plastics and rubber. A preheated material is placed into a heated mold cavity and then compressed between two mold halves until it takes the desired form.
Rotational Molding: This process creates large, hollow parts by placing powdered plastic in a mold that rotates biaxially. The heat melts the powder, which coats the mold’s interior to form the part.
Extrusion Molding: A continuous process in which heated material is forced through a shaped die, producing long products with consistent cross-sections like pipes or profiles, which are then cooled and cut to length.
Thermoforming: Involves heating a plastic sheet until it becomes flexible, then shaping it over or into a mold. Once formed, it is cooled and trimmed into the final product.
Casting: A simple yet versatile process where liquid material such as metal or resin is poured into a mold and allowed to solidify. Once set, the mold is removed, revealing the final shape.
Die Casting: A precise method of forming metal parts by injecting molten metal into a metal mold (die) under high pressure. It is commonly used to produce components with high dimensional accuracy and a fine surface finish.
Silicone molding
Silicone molding, also known as silicone rubber molding, is a flexible and precise manufacturing process used for creating detailed, durable parts, particularly in prototyping and low-volume production. The process begins with a master pattern, either a premade object or a custom model that serves as the positive shape for the mold. Silicone rubber is then mixed and poured over the pattern, ensuring it covers the model adequately. Once cured, often using a vacuum chamber to eliminate bubbles and speed up the process, the mold is removed. After final curing, the master pattern is gently extracted, leaving behind a reusable mold cavity. Casting materials such as resin or wax can then be poured into the silicone mold to replicate the original design.
Making a Mushroom
1. Design in Fusion 360
.AS mushroom is symmetrical , I used a single positive mold which can be used to make two negative silicon molds. A machinable wax of dimension 3"x3.5"x1.5" was given. So I started by drawing the block. The intial sketches of both the mold and mushroom were made.
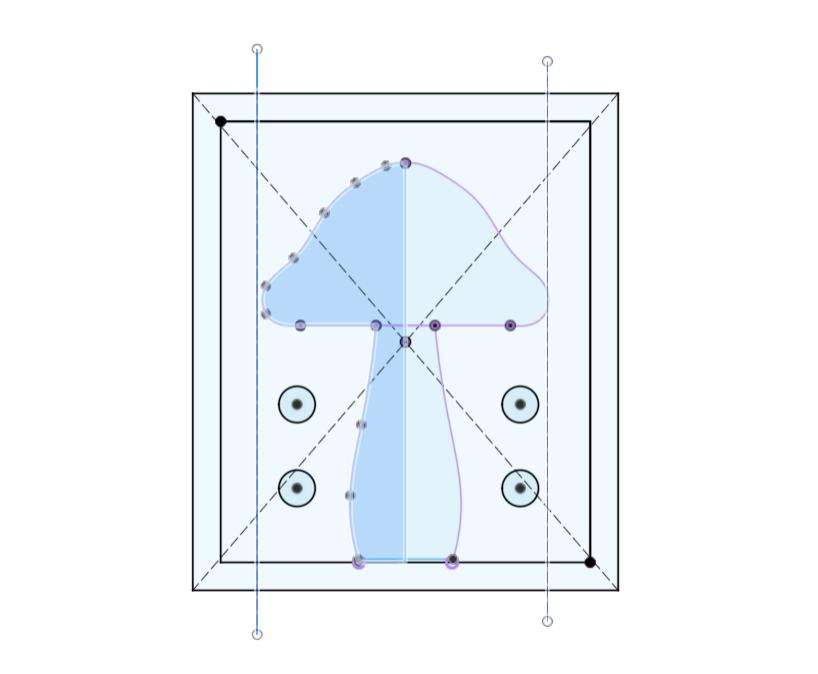
Then I used revolve tool to create the 3D mushroom and extruded the rectangle to create mold.
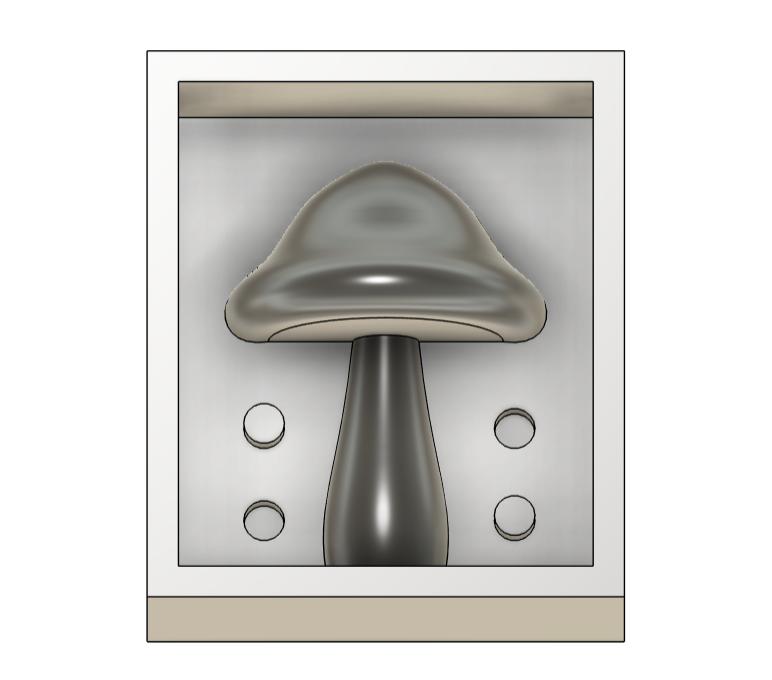
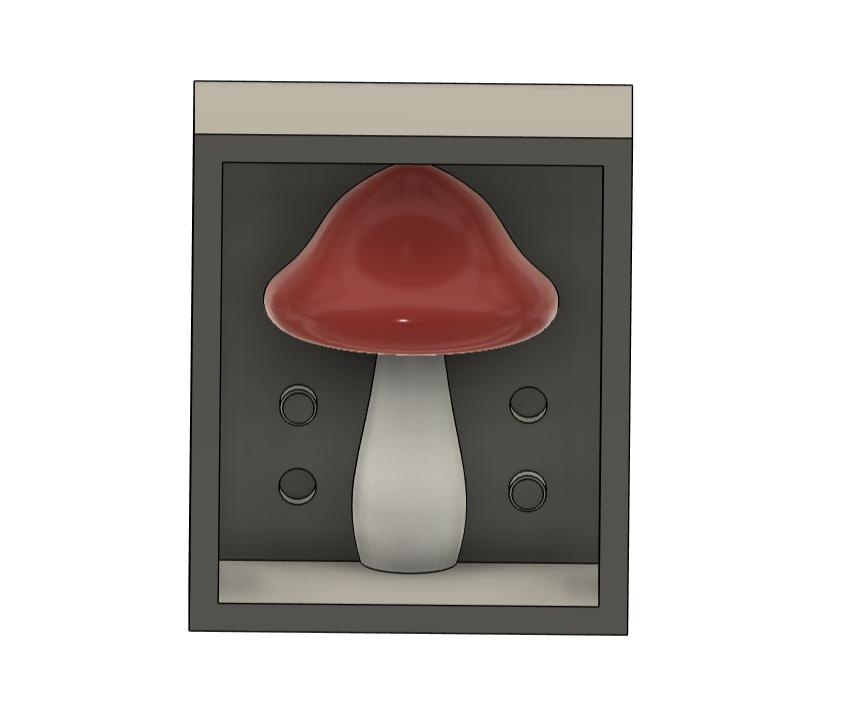
I added appearance to get a realistic look.
The design time line is shown below.
2.Computer aided manufacturing
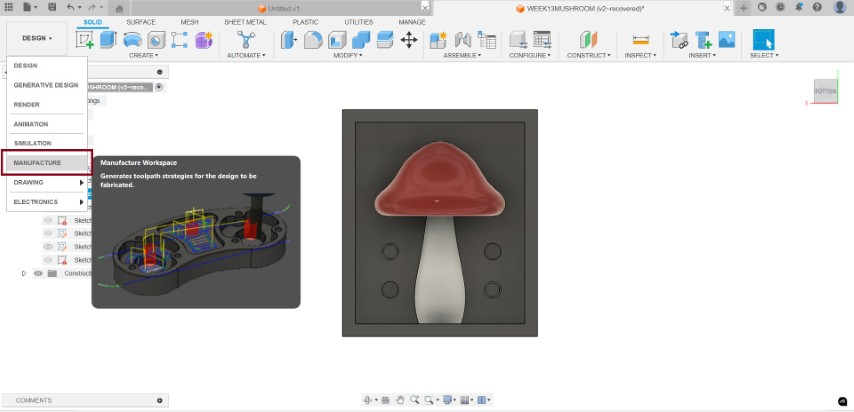
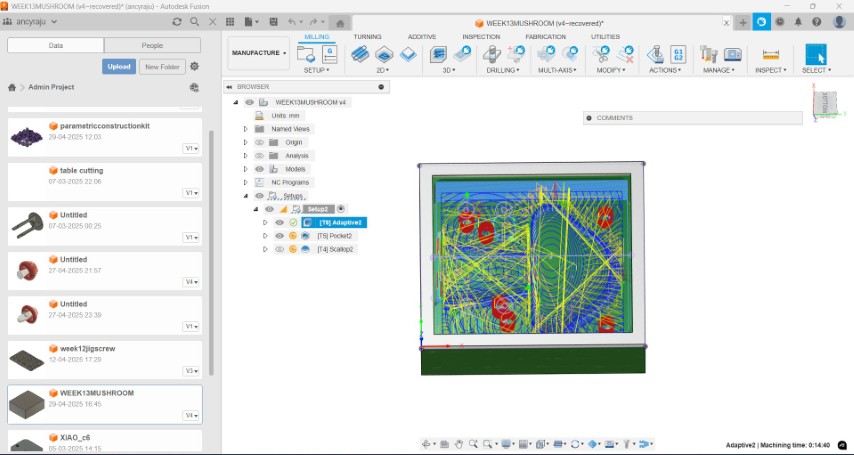
Computer-Aided Manufacturing (CAM) is a process that utilizes specialized software and automated machinery to control and optimize the production of physical products. By transforming digital models from CAD (Computer-Aided Design) software into machine-readable instructions, CAM directs tools like CNC machines to execute precise manufacturing tasks. I used fusion 360 for CAM. The first step was to change the workspace. Select manufacture workspace.
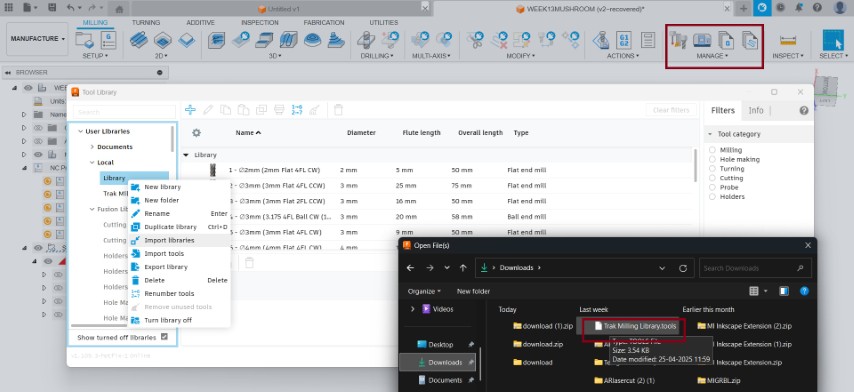
We can add custom libraries in fusion. I added tool library which consisted the tools available in the lab. Manage -> tool library(right click) -> Import libraries
From setup, select new setup
.jpeg)
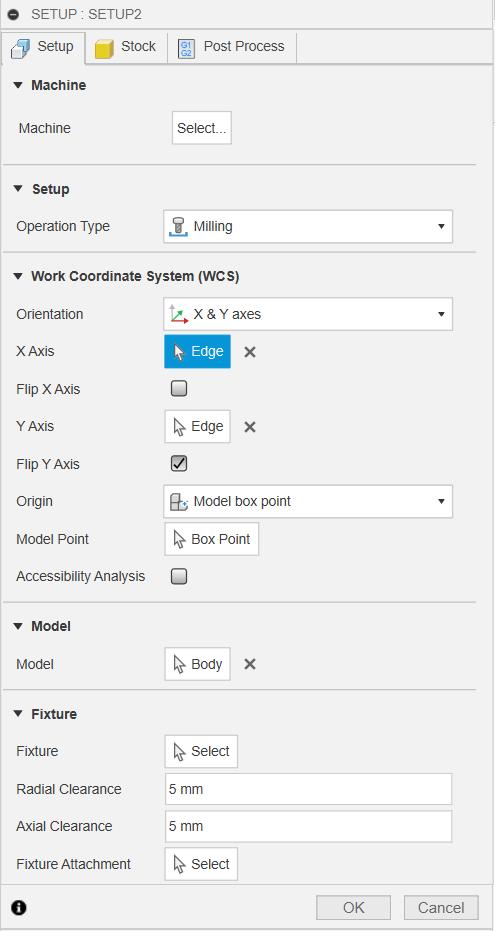
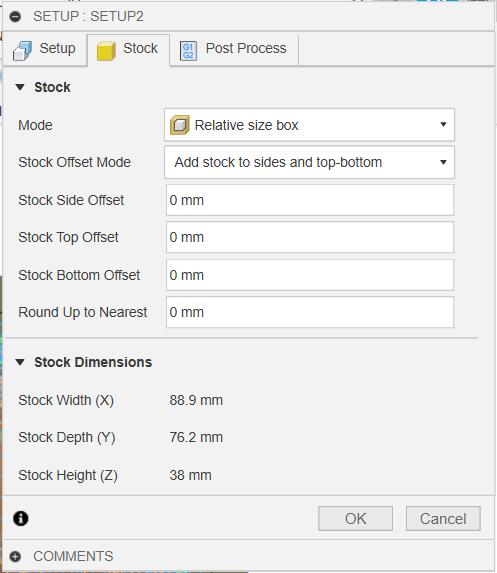
In setup we can choose the orientation and where to set origin, stock and stock dimensions.
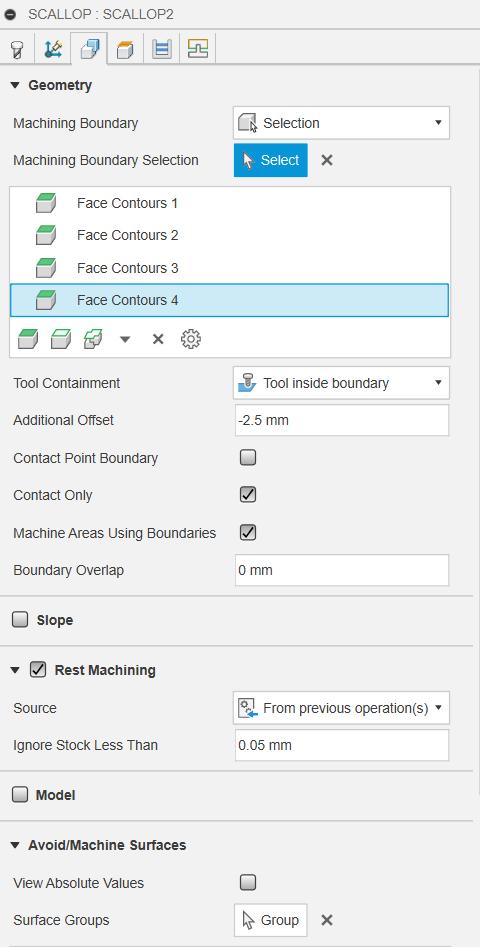
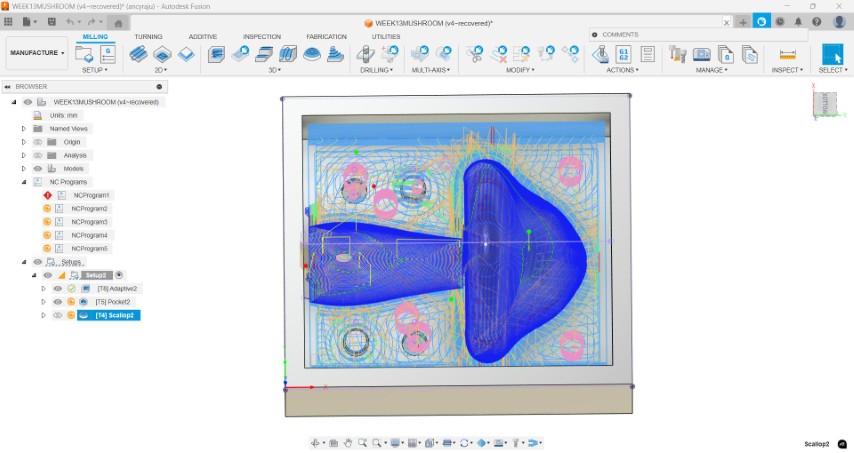
From 3D option, we need to set adaptive clearing, pocket clearing and scallop.
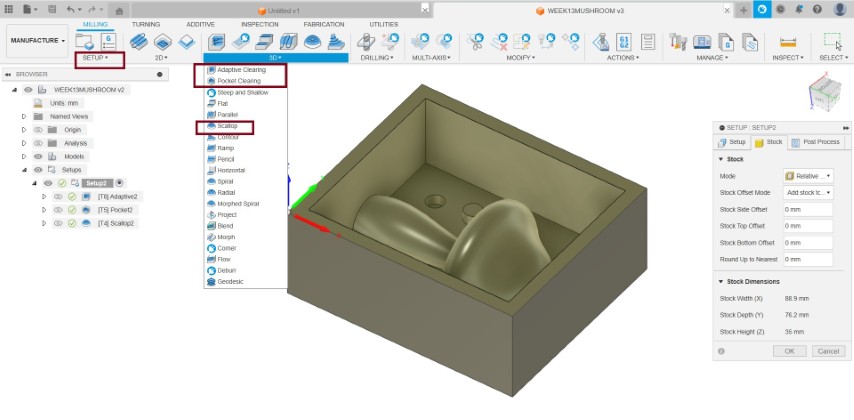
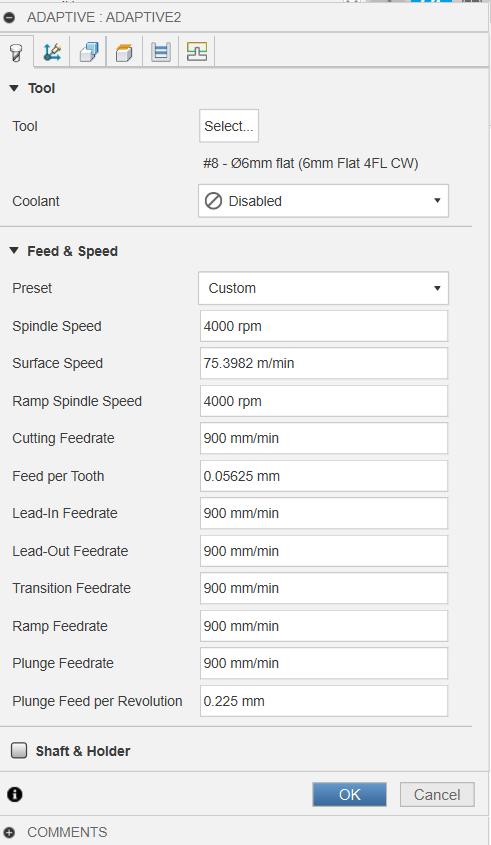
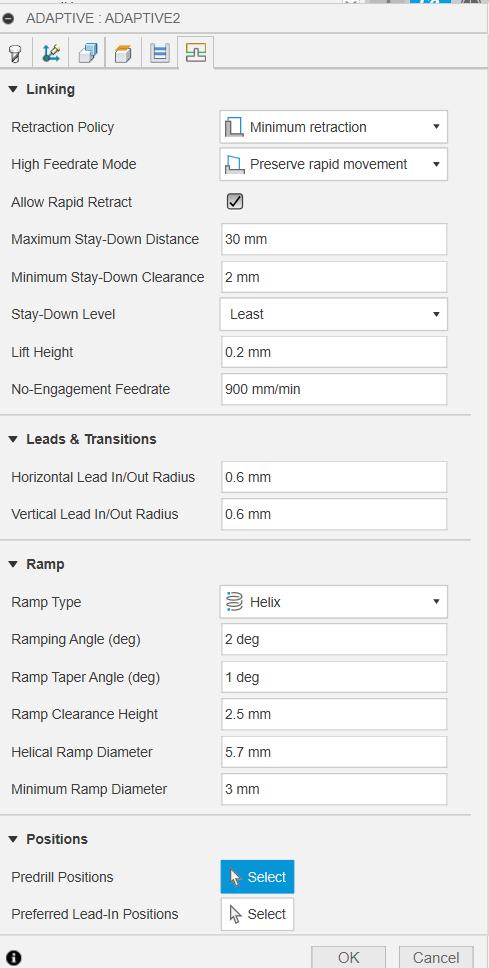
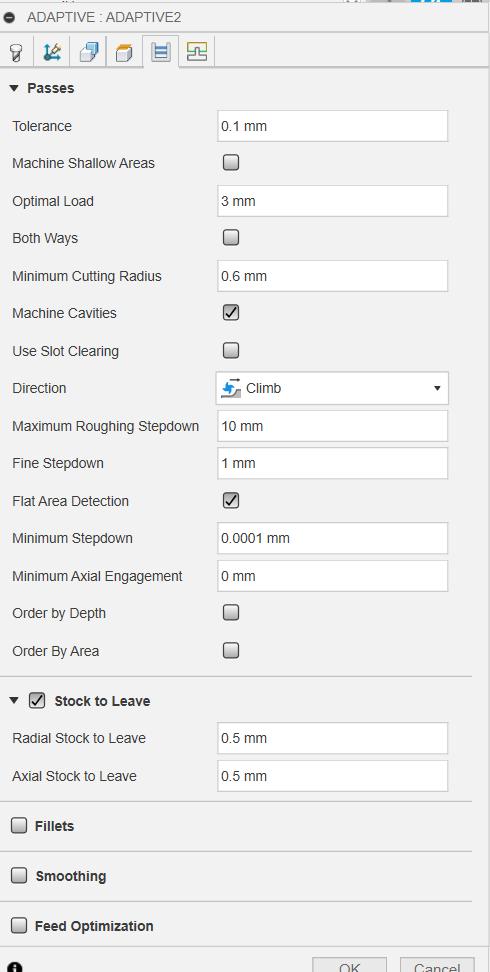
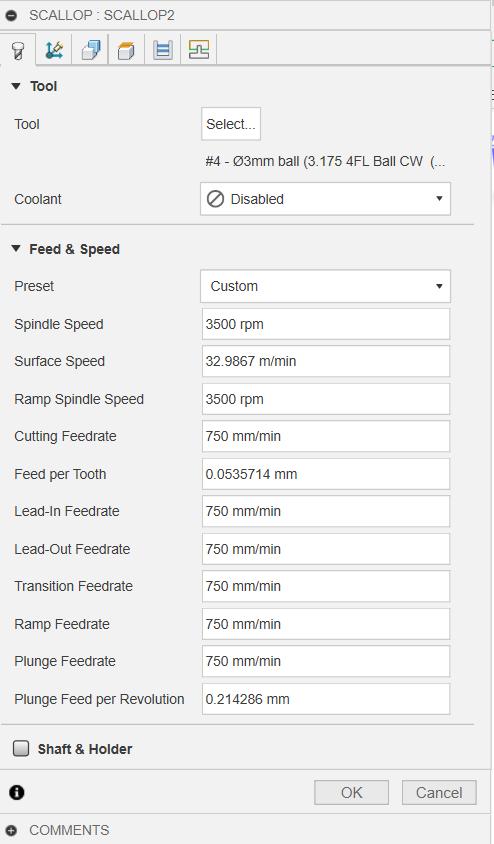
Adaptive clearing in Fusion 360 is a roughing strategy designed to efficiently remove large amounts of material while maintaining a consistent tool load and speeding up machining time. 3D-> Adaptive clearing. The settings I used are given below. I used a 6mm flat 4 flute end mill.

Pocket clearing is a toolpath strategy primarily used for roughing out large areas of material, specifically in pockets (cavities) and open areas.I used the same 6 mm flat end mill for pocket clearing. The settings I used is given below.
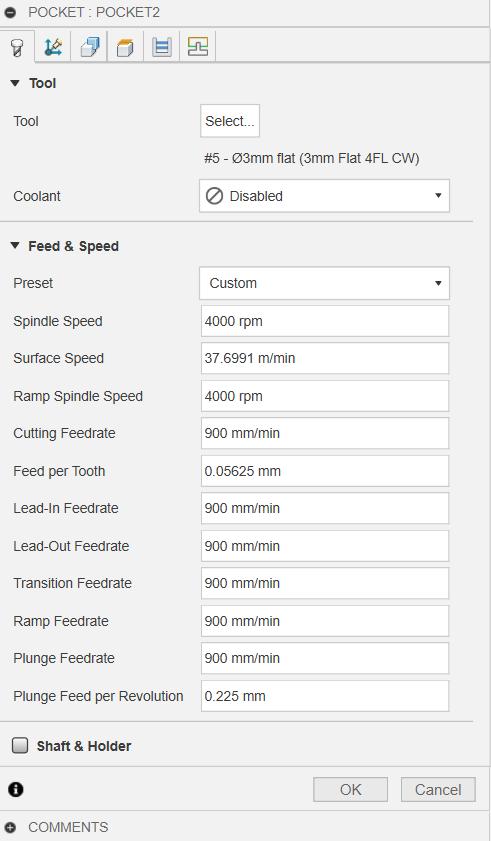
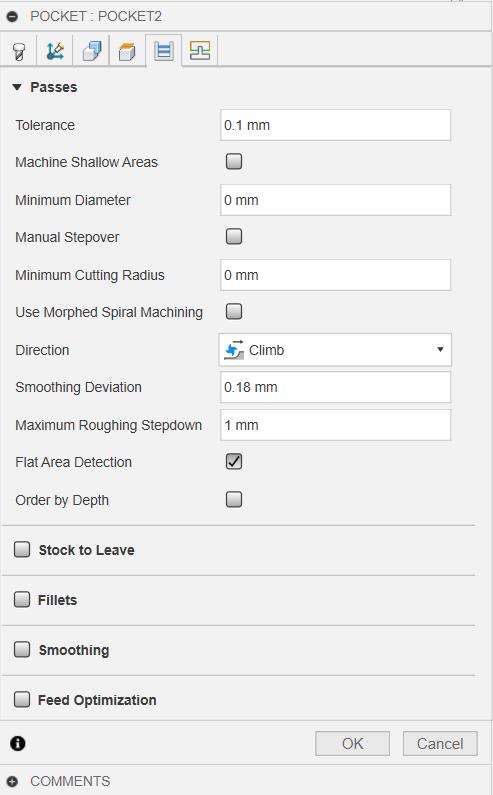
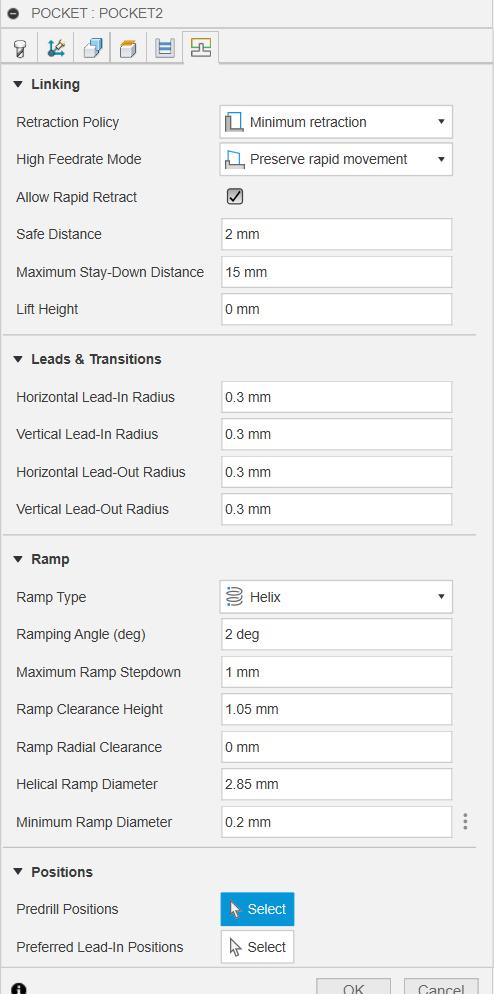
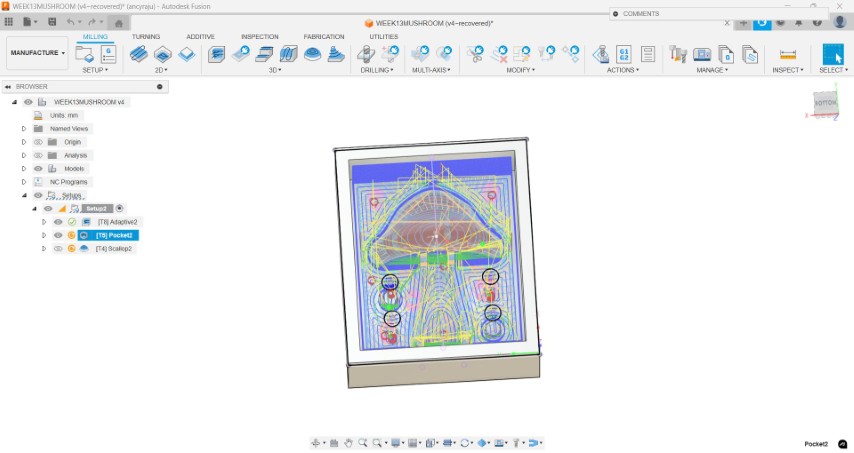
The toolpath of pocket clearing is given below
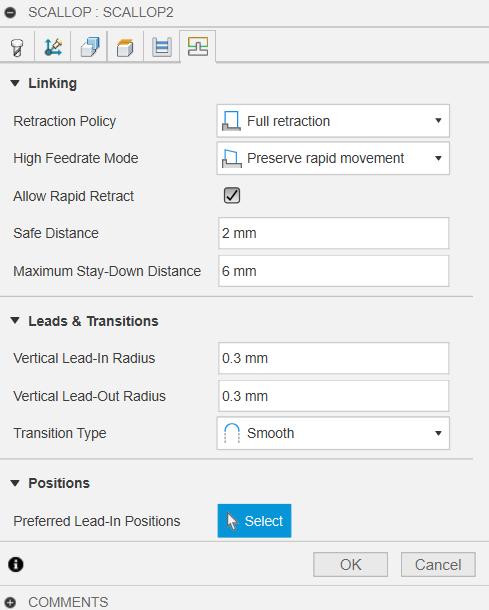
Scallop is used to create a consistent surface finish by removing material along a surface. This approach is particularly effective for finishing areas with complex geometries, ensuring a smooth and uniform surface finish.
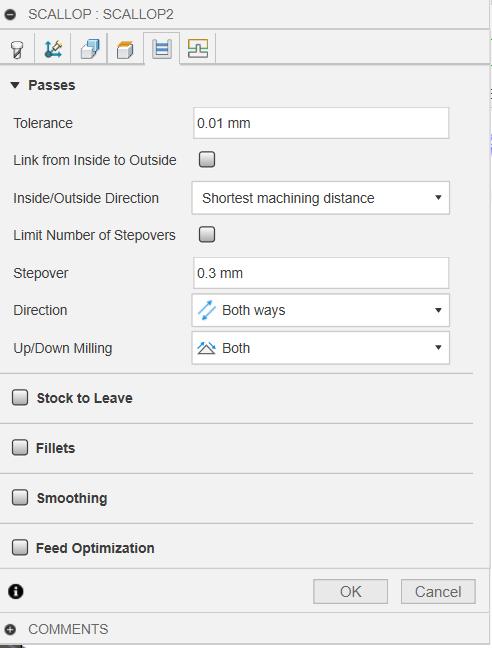
The toolpath of scallop is given below
To generate G-code, Actions-> post process.
CAM simulation video is given below. For simulation, actions->simulate
3.Creating the positive mold
TRAK DPM RX2
The picture of TRAK DPM RX2 machine is shown below
 |
 |
- Hybrid operation: Manual, 2-axis, or 3-axis CNC
- Heavy-duty and rigid build with solid ram
- ProtoTRAK RMX provides easy conversational programming
- Precision ballscrews and Turcite-coated ways for smooth movement
- Real handwheels for manual precision
Specifications
| Feature | Details |
|---|---|
| ProtoTRAK CNC Model | RMX |
| CNC Control | ProtoTRAK RMX (Factory Integrated) |
| Table Size | 49″ x 9″ |
| T-Slots | 3 slots, 0.63″ wide, 2.5″ spacing |
| Axis Travel (X, Y, Z) | 31″ x 16″ x 23.25″ |
| Quill | 3 3/8″ diameter, 5″ travel |
| Spindle Taper | R8 |
| Spindle Speed | 40–600 / 300–5000 RPM |
| Spindle Motor | 3 HP |
| Quill Feeds | 0.0015″ / 0.003″ / 0.006″ per spindle rev |
| Drilling Capacity | 1″ diameter |
| Milling Capacity | 3 in³/min |
| Tapping Capacity | ¾″ – 10 |
| Coolant Capacity | 10 gallons |
| Max Workpiece Weight | 1320 lbs |
| Power Requirement | 200–240V, 3-phase, 27A |
First we need to set the origin. Click DRO on the right panel of TRAK screen. We need to move the machine manually using the wheels.I used edge finder to set x and Y axis, the edge finder is rotated and moved near the machinable wax. Once the probe touches the wax and is aligned, take the next misaligning point to set origin.Instead of entering zero we need to enter -2mm which is the radius of the probe. Once set, click the ABS SET. For 'Z' axis, we can choose a reference point on the machine table. Use the jog controls to move the Z-axis in the desired direction. Remember to click return after completing the jog.
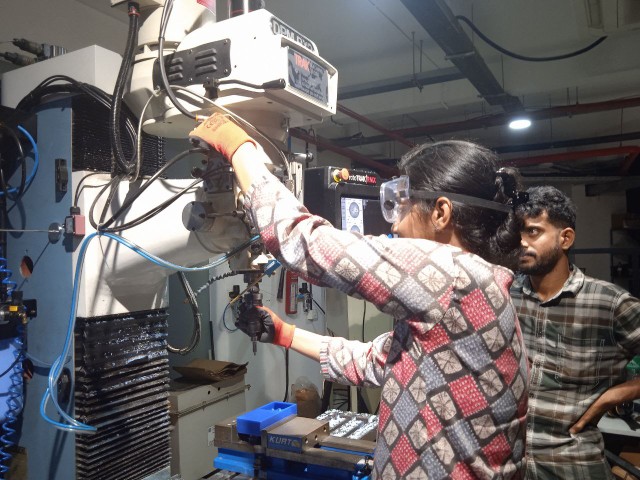
Using a pen drive transfer the G-code to the machine. Place the machinable wax and tighten it to the vice. Change the tools using the IN and OUT buttons in the top left corner of the machine. Select PROG IN/OUToption in the screen.Now select the “TOOL TABLE” and add the details of the tool that you are using. I was using a 6mm rough end mill in the begining.
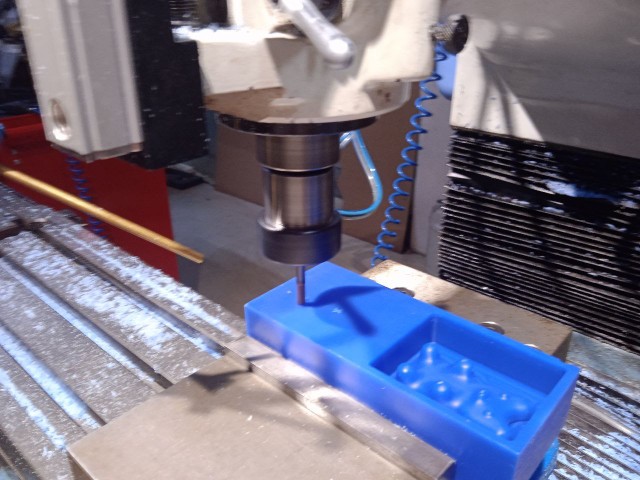
After completing the 6mm end mill processes, here the result.
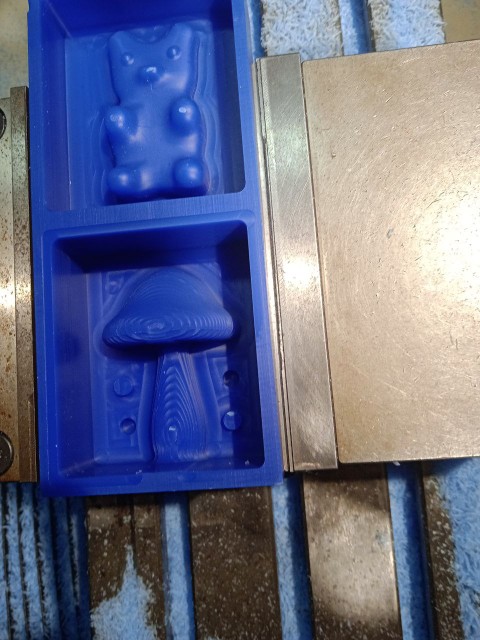
Then I changed the tool to 3mm ball mill. I got a smooth finish. Here is the result.
4. Creating the negative mold
Aditya Silicone Rubber RTV – 1010

- Hardness (Shore A): 10 (after cure)
- Viscosity: 10,000 cP
- Curing Agent / Hardener Ratio: 2.5% to 3% by weight
- Working Time: Approximately 8–10 minutes
- Curing Time: 12 to 24 hours
- Color: Milky
Safety Precautions
Ventilation
- Ensure good ventilation in the work area to avoid inhaling fumes or vapors released during the curing process.
Protection
- Skin and Eye Contact: Avoid direct contact with uncured silicone rubber and the curing agent. Wear protective gloves and safety glasses or goggles.
- Ingestion: Do not ingest any silicone materials. Seek medical help immediately if swallowed.
- Fire Safety: Silicone rubber is flammable. Keep away from open flames and heat sources.
- Storage: Store materials in a cool, dry place away from direct sunlight and extreme temperatures.
Disposal
- Dispose of silicone rubber waste and curing agents according to local hazardous waste disposal regulations.
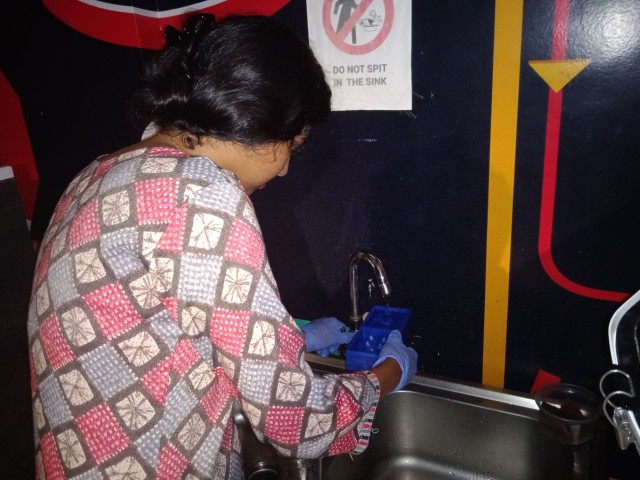
To create a negative mold, first we need to know the volume. For that I filled the mold with water and poured it to a glass. The level of water is noted. The water is then removed and filled with silicon in the same level. Hardener is added to the silicon. To get the amount of hardner, ratio calculator is used.

When weighted, it was 164.7 gm. So I added 5 gms of hardener.
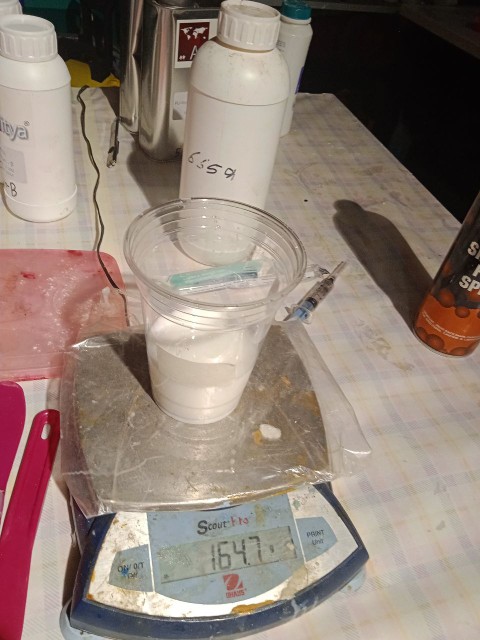
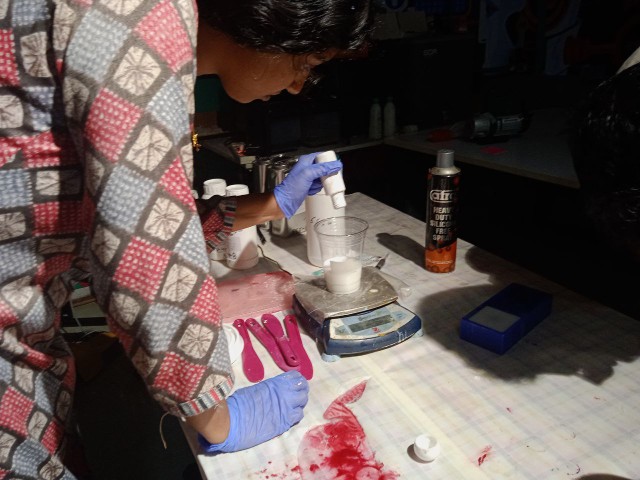
I mixed the silicon with hardener and placed it under a vaccum chamber to remove bubbles. It is then poured into the mold and let it rest for 24 hrs. I didn't used releasing agent but it is a better practice to add it before pouring silicone to the mold
 |
 |
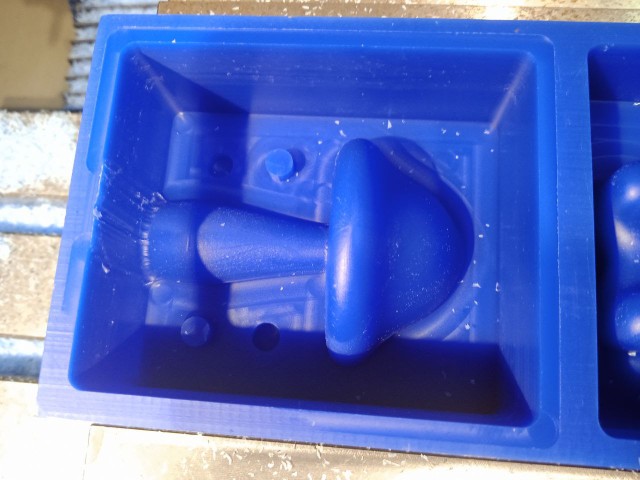
Next day I detached the silicon mold from the positive mold.

5. casting
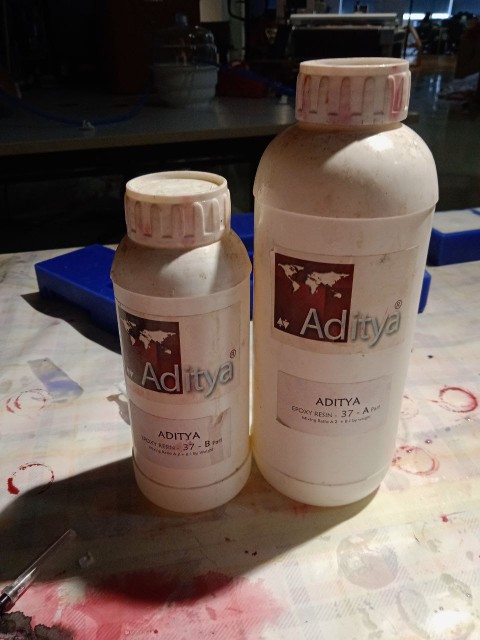
Aditya Ultra Clear Cast Epoxy – 37 is a general-purpose, crystal-clear epoxy resin suitable for tabletop casting, craft projects, and artistic applications. It is known for its low-viscosity flow, clarity, and compatibility with color pigments.
- Mix Ratio: 100 parts of Part A to 50 parts of Part B (by weight)
Curing Information
- Demold Time: 24–48 hours
- Full Cure Time: 72 hours
- Pot Time: Typically 20–40 minutes (varies based on temperature and batch size)
- Temperature & Humidity: Warmer conditions accelerate curing
Safety Precautions
- Ventilation: Ensure proper airflow in the work area to dissipate fumes during curing
- Personal Protective Equipment (PPE): Use gloves (vinyl or nitrile), safety glasses, and a mask when handling
- Skin/Eye Contact: Avoid direct contact; epoxy can cause irritation or allergic reactions
- Inhalation: Do not inhale fumes; wear a suitable respirator if ventilation is poor
- Hygiene: Wash hands thoroughly after handling epoxy before eating or touching your face
Storage & Disposal
- Storage: Store in a cool, dry place, tightly sealed, away from heat, sunlight, and out of reach of children or pets
- Disposal: Dispose of unused resin and waste according to local hazardous waste regulations
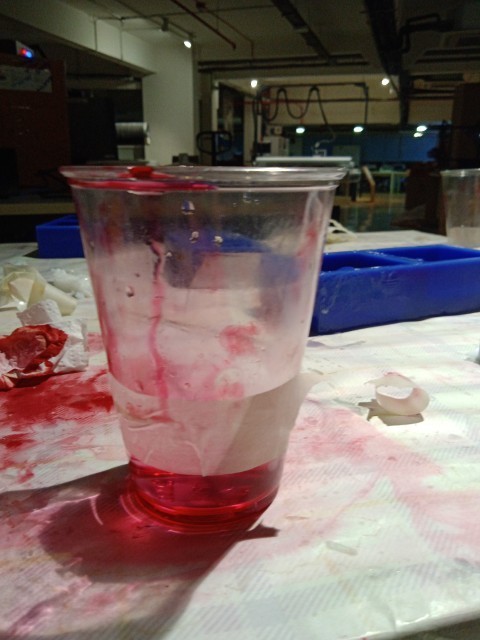
The next step is to pour epoxy resin into the mold. I used Mould Releasing Spray 1083 in silicone mold for easy release.

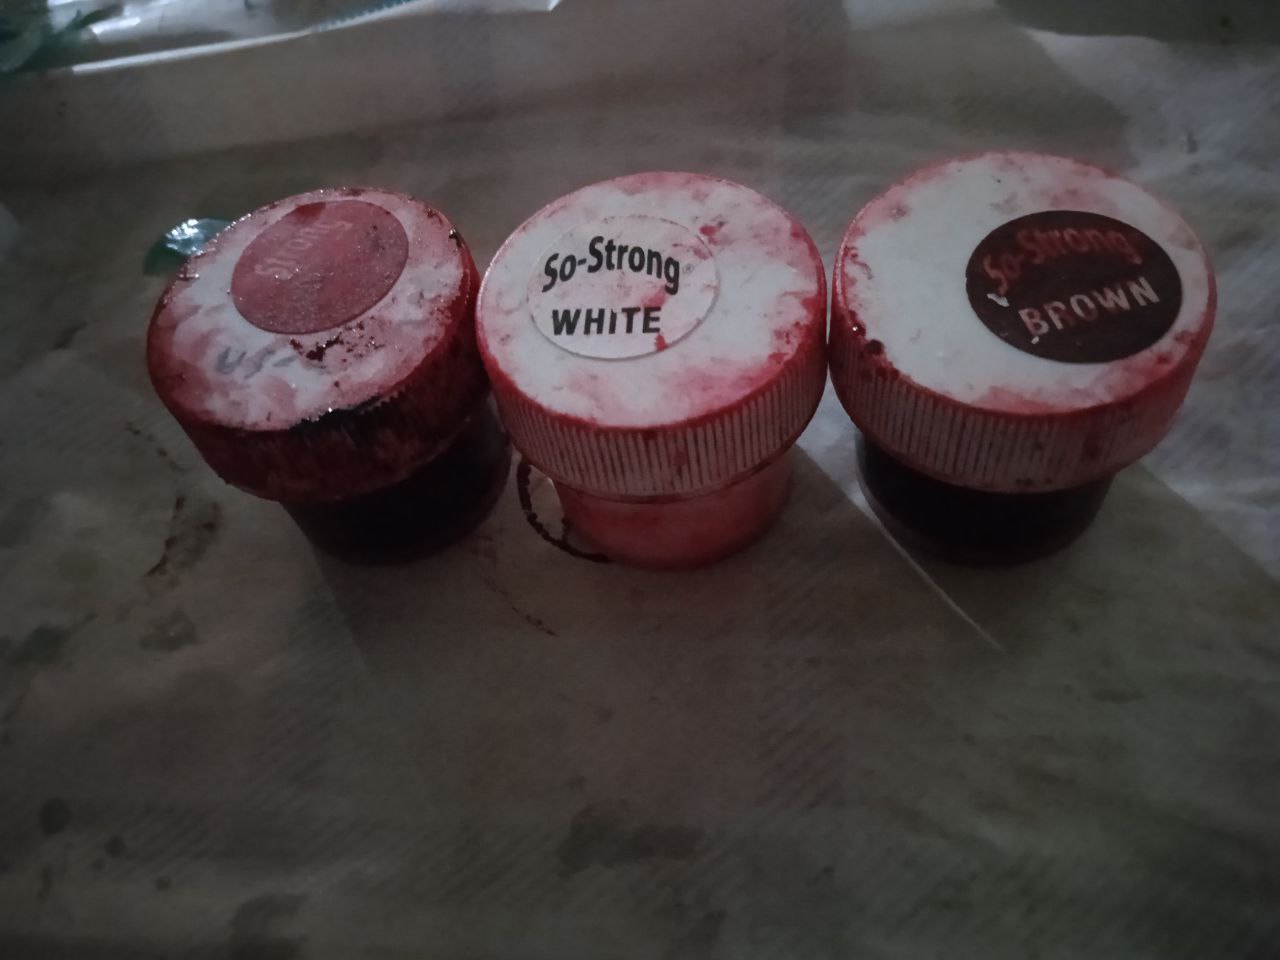
I wanted to make a fridge magnet. To make it work, I had to add magnet to the mushroom head. As I wanted the mushroom in two colour, resin were mixed as two parts. I used red dye and mixed a tiny portion with resin, making sure to keep the color as light as possible. For the stem, I added white with a very small amount of brown.
Magnet was attached to the mushroom head. To make it stay intact an external magnet was attached. An acrylic piece was cut to close the negative mold.
 |
 |
Result
 |
 |
Heroshot
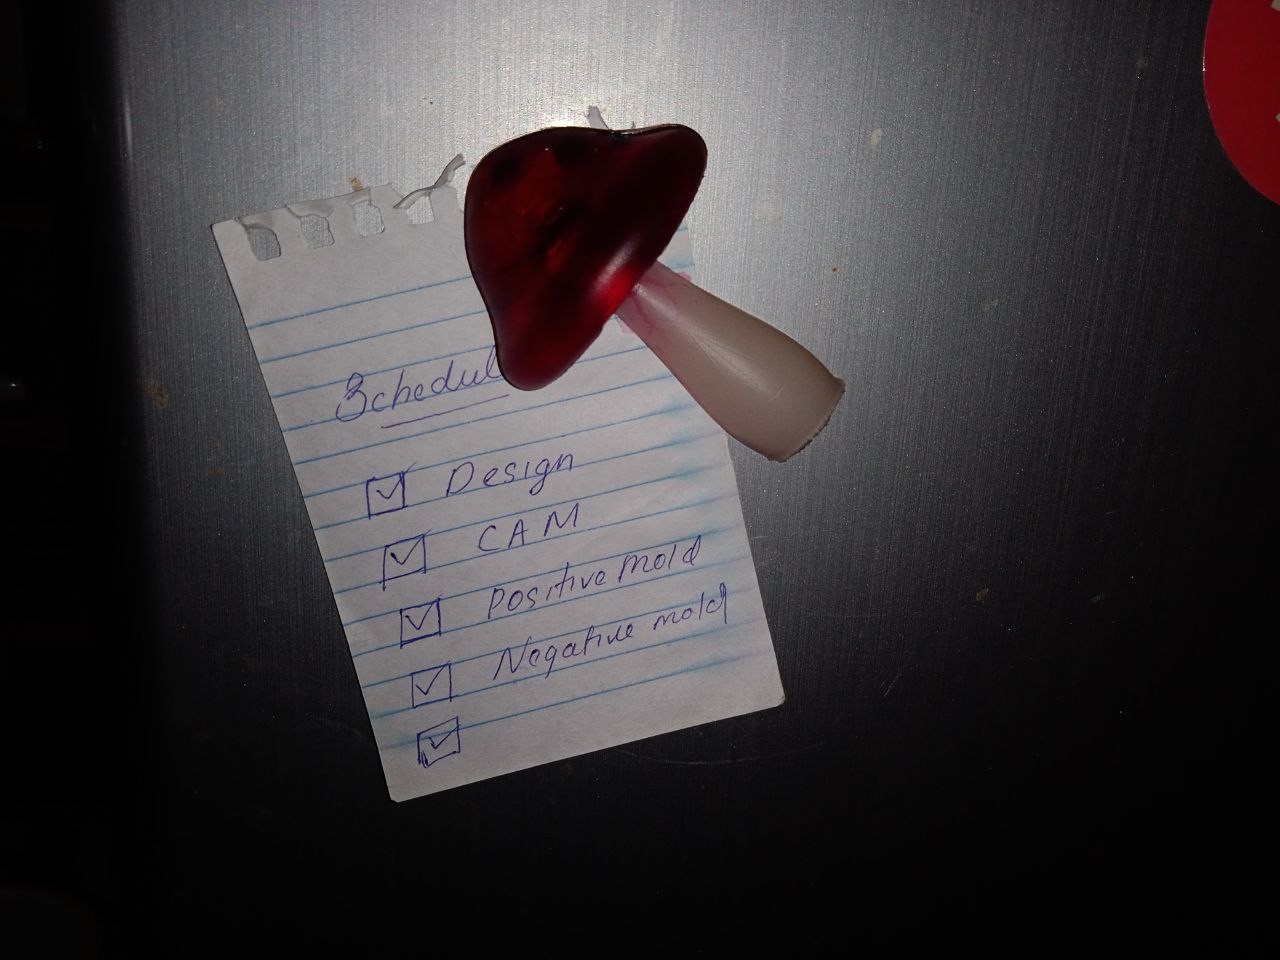
This assignment was a very enjoyable and rewarding experience. It gave me a complete hands-on understanding of the molding and casting process - from creating the 3D model in Fusion 360 to machining the positive mold and casting the final product using epoxy resin. I learned a lot about material behavior, especially how important timing and precision are when working with silicone and resin. I also had fun adding my own twist to the piece by making it two-toned and turning it into a fridge magnet. It felt great to see a simple design idea transform into a functional and decorative object.