Output devices
- Add an output device to a microcontroller board you've designed, and program it to do something
In the group assignment, we'd tried to use a stepper motor as an output component and use ammeter to test the output consumption. In my final project, I want to show some word introduction to the players, so in the individual part, I want to try other output that can showing information.
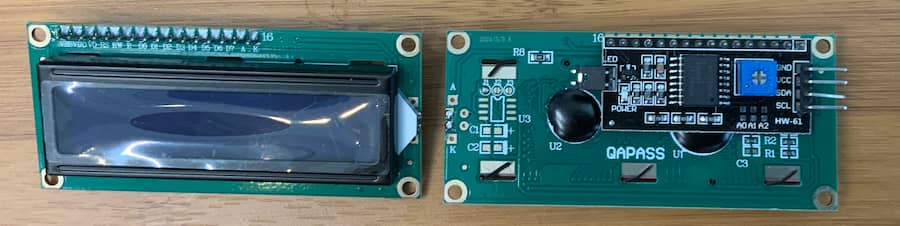
LCD (1602 - I2C connection)
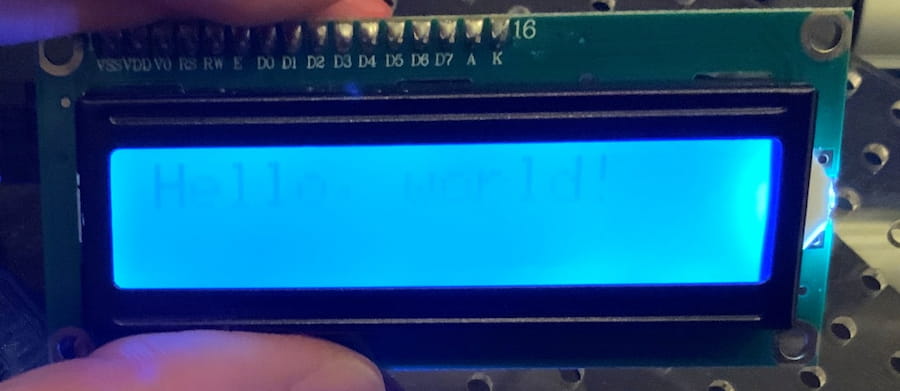
LCD stands for Liquid Crystal Display, which is a simple and inexpensive way to display information. The model I used is 1602, which means it can display 16 font per row in X axis and 2 row in y-axis.
Connection
As the LCD is connected in I2C, so I need to check the I2C pin from the datasheet first.
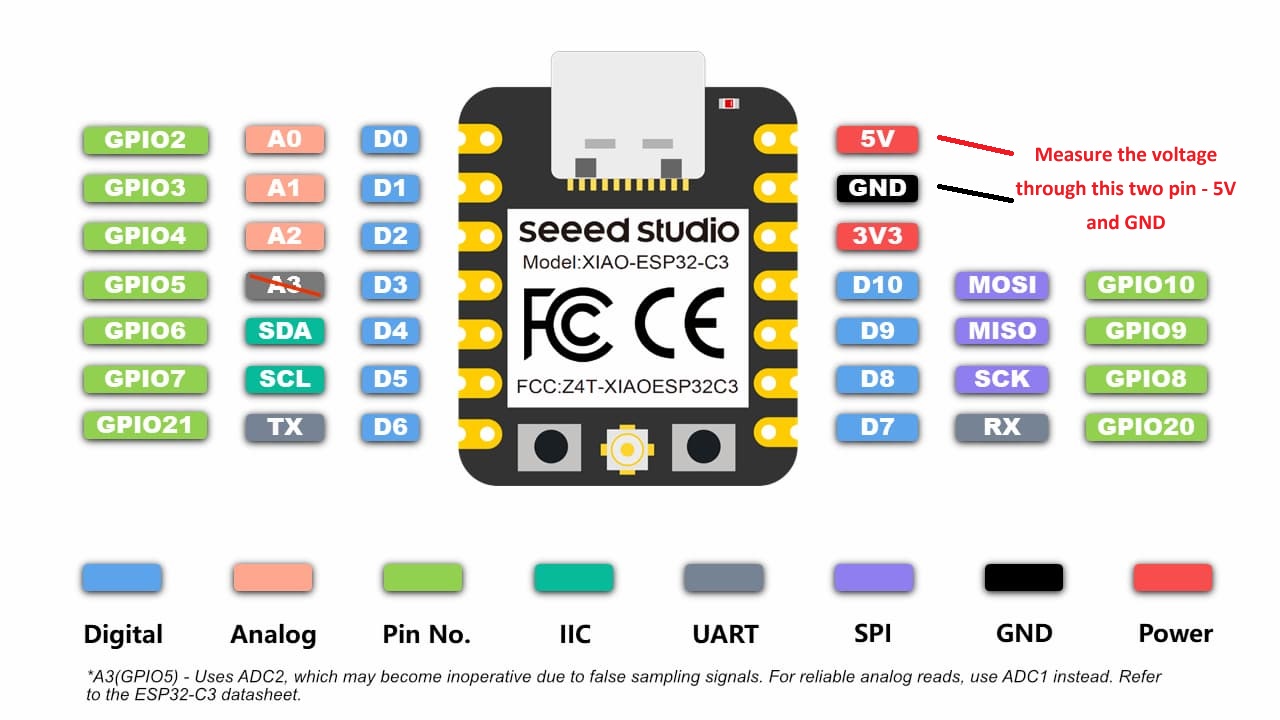
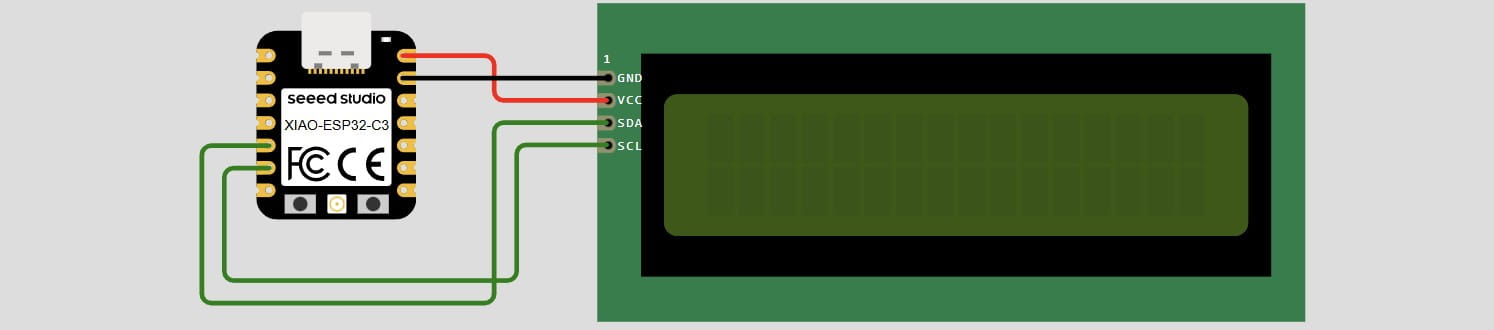
- The Vcc pin of the LCD need to connect to 5V. If it connected to 3.3V, the font will be so light that almost can't be seen.
Programming
The software I used is Arduino IDE and library I used is LiquidCrystal_I2C
Details
To program the LCD screen easily, we need to install a LCD library:
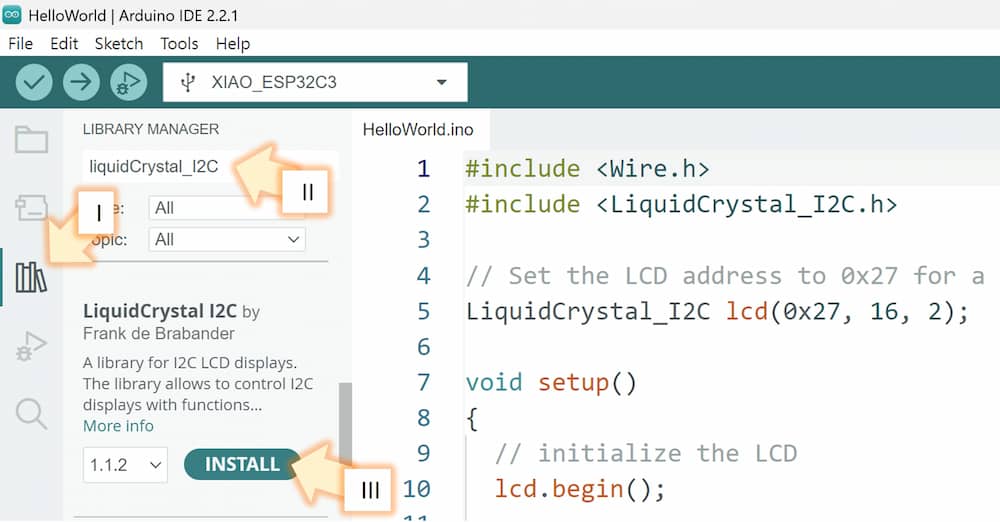
library icon on the left barII. Search the
LiquidCrystal_I2C in the search barIII. Install the
LiquidCrystal_I2C library by Frank de BrabanderAfter the library is intalled, there will be a new column LiquidCrystal_I2C in the example.
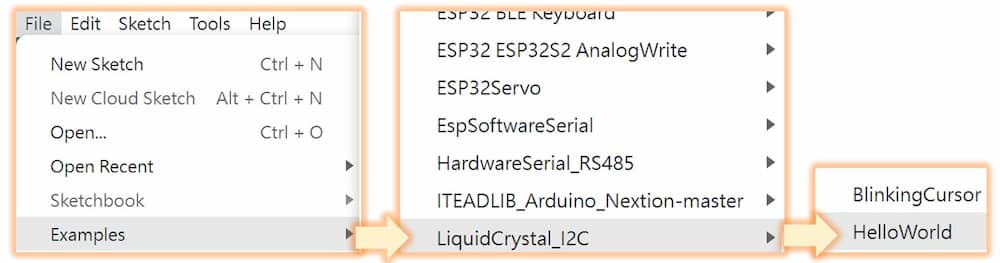
Hello world example:#include <Wire.h>
#include <LiquidCrystal_I2C.h>
// Set the LCD address to 0x27 for a 16 chars and 2 line display, sometime 0x27 might need to change as 0X3F
LiquidCrystal_I2C lcd(0x27, 16, 2);
void setup()
{
lcd.begin(); // initialize the LCD
lcd.backlight();
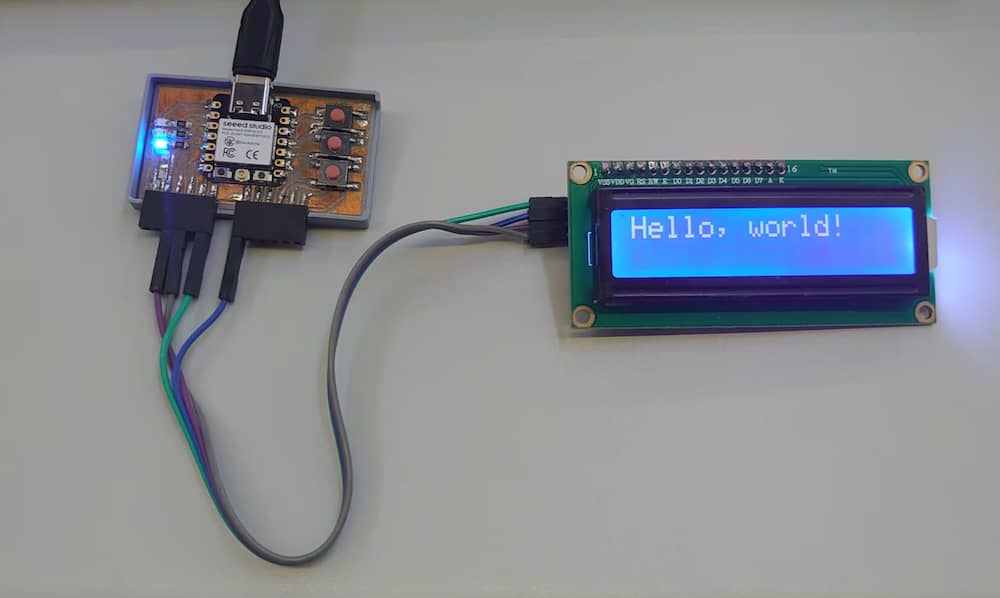
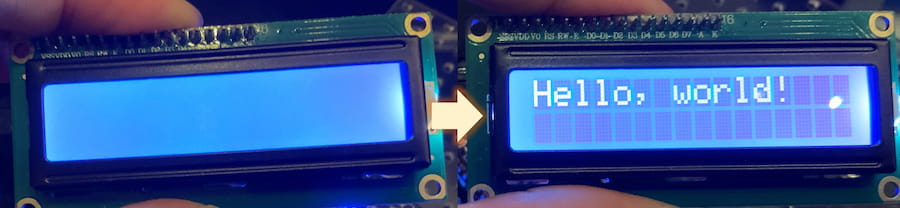
lcd.print("Hello, world!"); //change other word to display other font
delay(1000);
}
void loop()
{
}
Here is the test result:
-
Sometime no font is shown even if the program is correct. There might be the default brightness setting is too dark.
Turn to the back of the LCD and tune the blue variable resistance with a screwdriver, which can adjust the brightness of the font.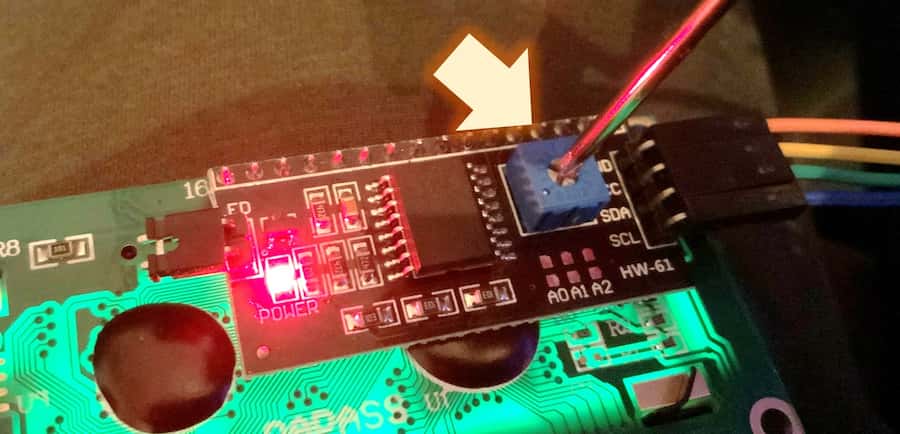
-
If the font is still not show, the reason might be the address of some LCD might is 0x3F, not 0x27. Change the code
LiquidCrystal_I2C lcd(0x27, 16, 2);toLiquidCrystal_I2C lcd(0x3F, 16, 2);will solve it.
OLED (SSD1306 0.96 in)
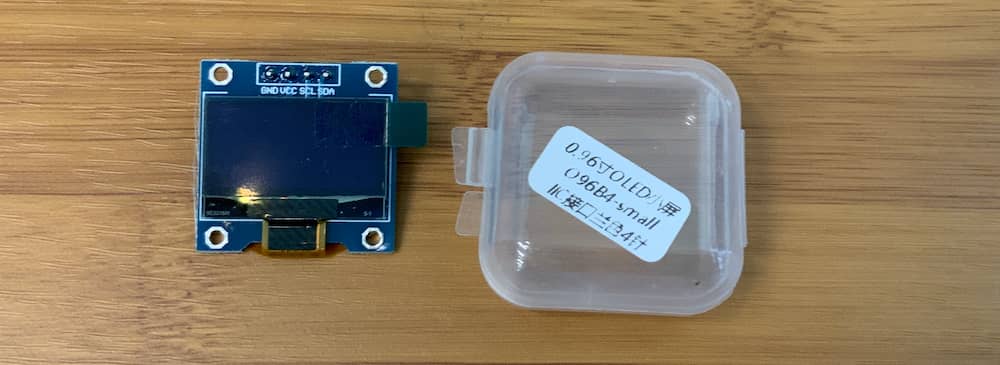
The next component I try is OLED, the SSD1306 0.96 version. The size of the OLED is much smaller that the 1602 LCD, but the font can showed is much more, which is 128x64.
Connection
The connect method is I2C, basically same as the LCD screen

Vcc can be both 3.3V or 5V
Programming
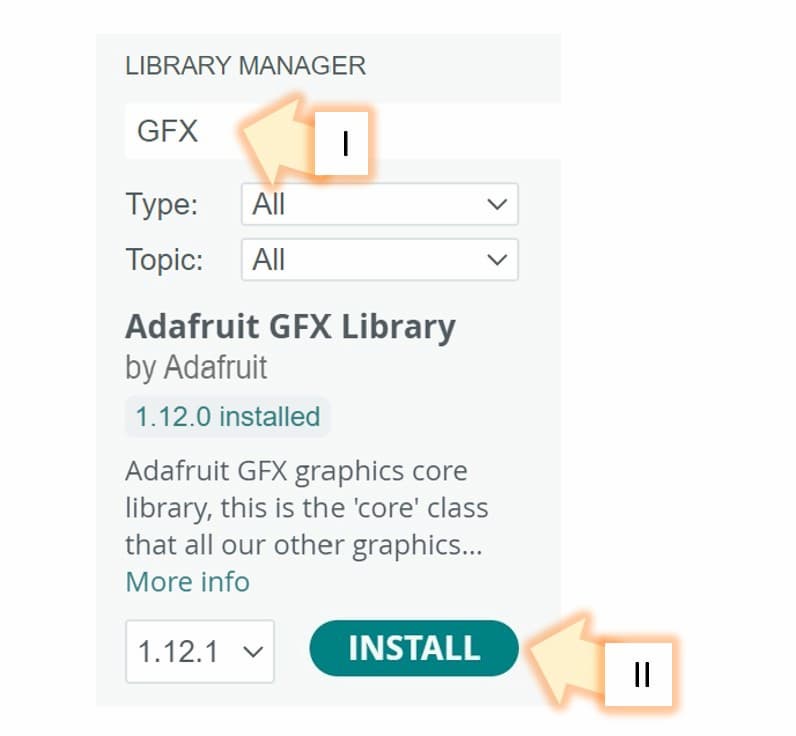
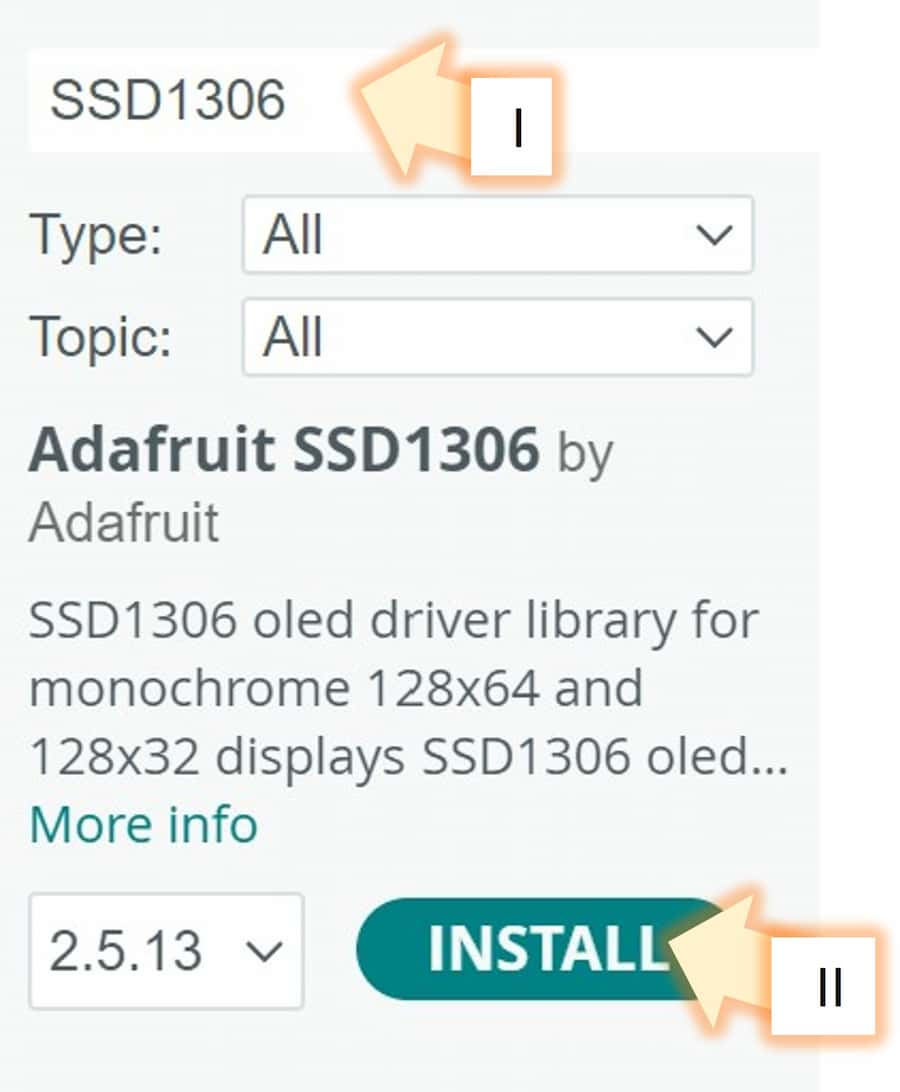
Like the LCD component, we also need to install some library, one is Adafruit GFX Library and one is Adafruit SSD1306, both by Adafruit
Basic example
Details
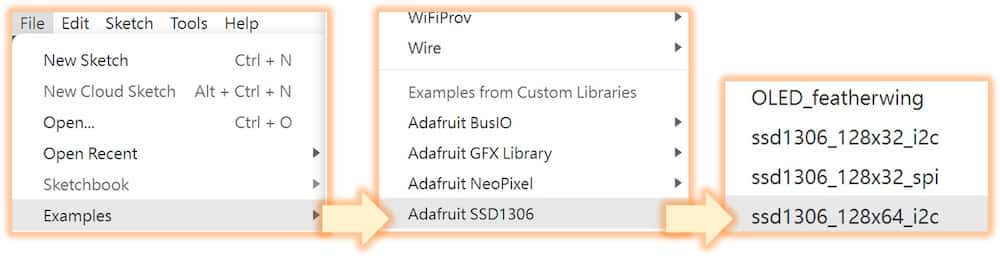
We can test the ssd1306_128x64_i2c example in the Adafruit SSD1306 library:
- After the program is uploaded, there are no error but my OLED show nothing. After change the
#define SCREEN_ADDRESS 0x3Dto#define SCREEN_ADDRESS 0x3Cin line 35, it work. Seems the address of some OLED might be 0x3D and some is 0x3C.
The testing result:
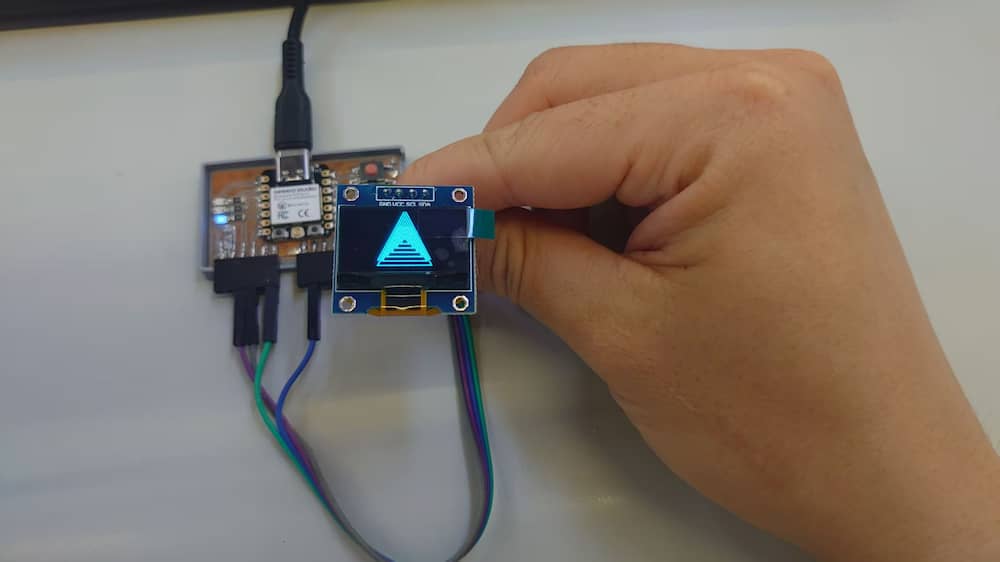
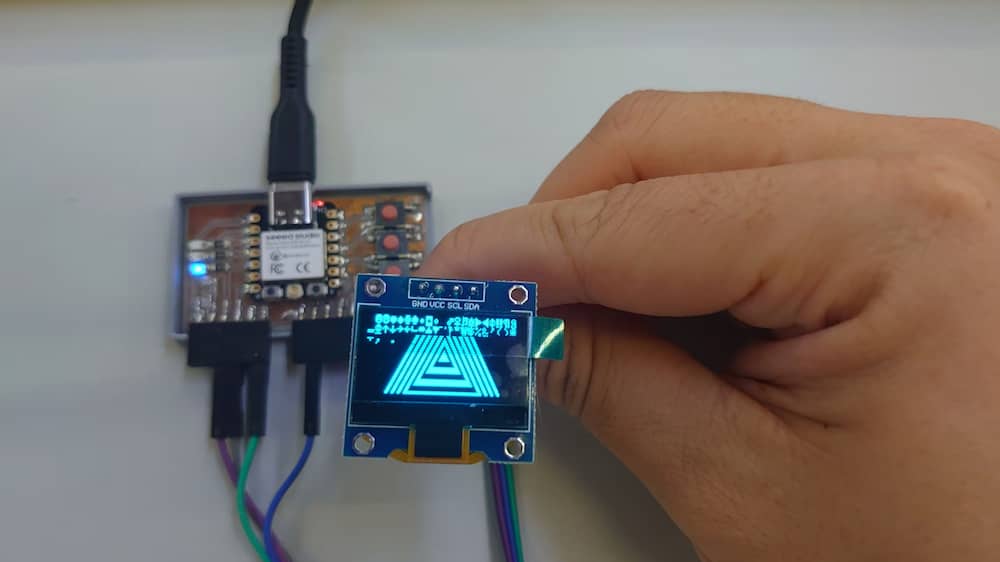
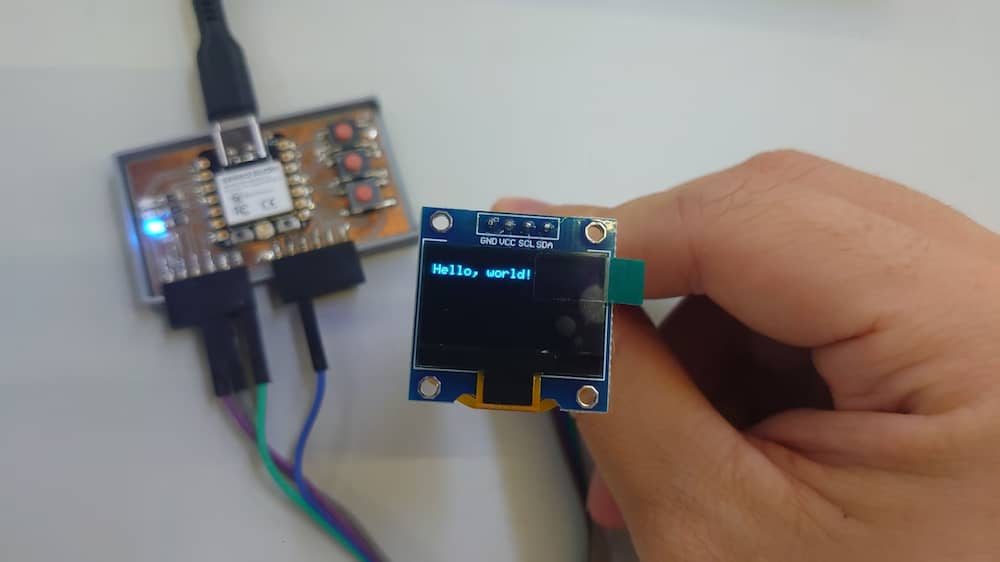
Showing "Hello, world!"
Details
#include <Wire.h>
#include <Adafruit_GFX.h>
#include <Adafruit_SSD1306.h>

#define SCREEN_WIDTH 128 // OLED display width, in pixels
#define SCREEN_HEIGHT 64 // OLED display height, in pixels

// Declaration for an SSD1306 display connected to I2C (SDA, SCL pins)
Adafruit_SSD1306 display(SCREEN_WIDTH, SCREEN_HEIGHT, &Wire, -1);

void setup() {
  Serial.begin(115200);

  if(!display.begin(SSD1306_SWITCHCAPVCC, 0x3C)) { // Address 0x3D for 128x64
    Serial.println(F("SSD1306 allocation failed"));
    for(;;);
  }
  delay(2000);
  display.clearDisplay();

  display.setTextSize(1);
  display.setTextColor(WHITE);
  display.setCursor(0, 10);
  // Display static text
  display.println("Hello, world!");
  display.display();
}

void loop() {

}
The testing result:
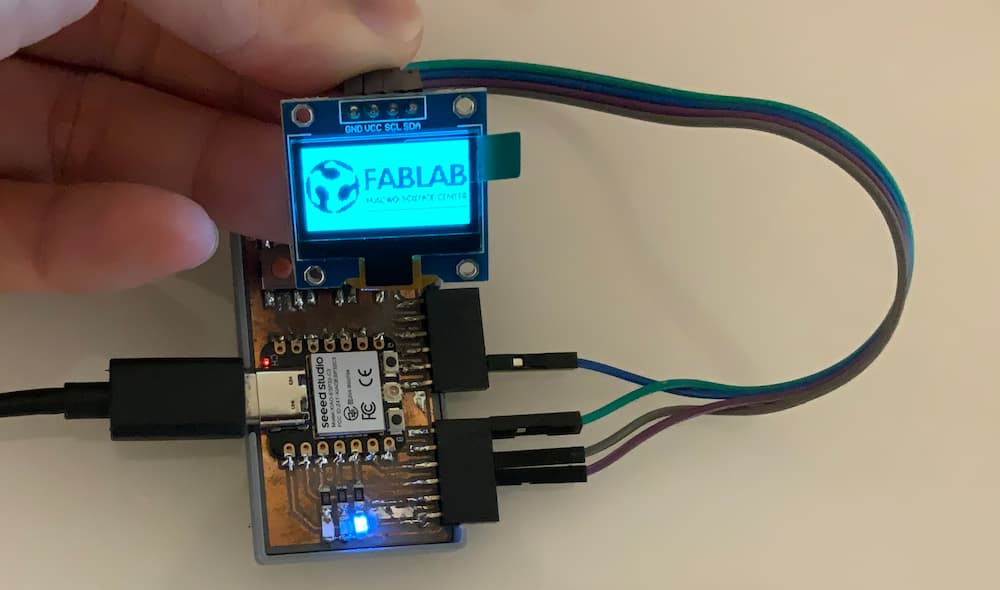
Showing Fablab logo
Details
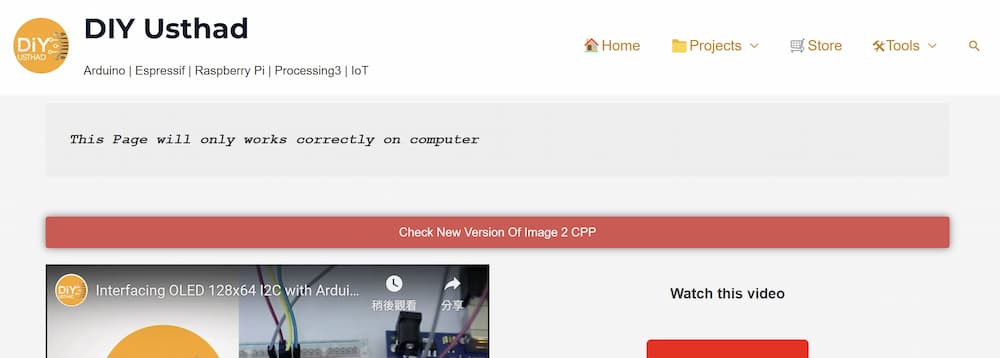
First we need to convert the picture to code. I convert the Fablab MSC logo to size 128x64 first:

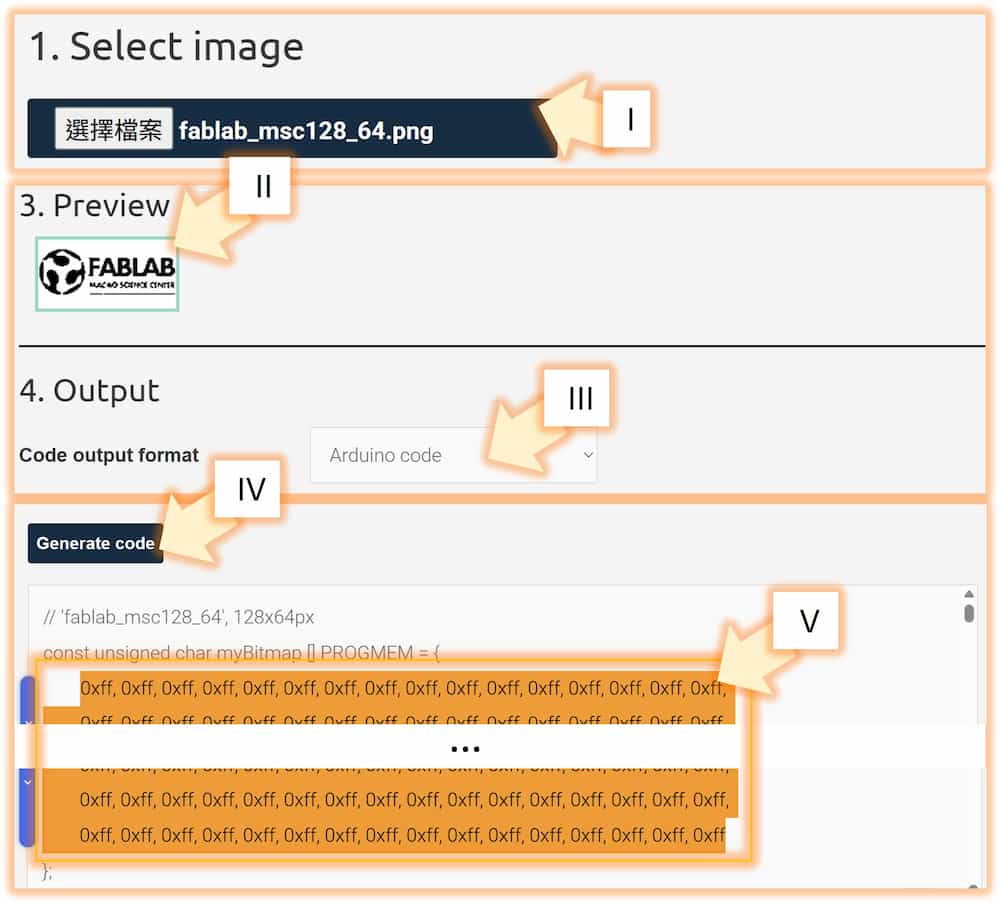
II. Check the result III. Change the
Code output format to Arduino codeIV. Click the
Generate code button to start convertV. Copy the code between the { and }
VI. Paste the code in the line 16 in the example below.
/*********
  Rui Santos
  Complete project details at https://randomnerdtutorials.com
*********/

#include <Wire.h>
#include <Adafruit_GFX.h>
#include <Adafruit_SSD1306.h>

#define SCREEN_WIDTH 128
#define SCREEN_HEIGHT 64

Adafruit_SSD1306 display(SCREEN_WIDTH, SCREEN_HEIGHT, &Wire, -1);

static const uint8_t image_data_Saraarray[1024] = {
 //paste the 0xXX array here.

};

void setup() {
  Serial.begin(115200);

  if(!display.begin(SSD1306_SWITCHCAPVCC, 0x3C)) {
    Serial.println(F("SSD1306 allocation failed"));
    for(;;);
  }
  delay(2000); // Pause for 2 seconds

  // Clear the buffer.
  display.clearDisplay();

  // Draw bitmap on the screen
  display.drawBitmap(0, 0, image_data_Saraarray, 128, 64, 1);
  display.display();
}

void loop() {

}
For the Fablab MSC logo sample, the code is here:
0xff, 0xff, 0xff, 0xff, 0xff, 0xff, 0xff, 0xff, 0xff, 0xff, 0xff, 0xff, 0xff, 0xff, 0xff, 0xff,
0xff, 0xff, 0xff, 0xff, 0xff, 0xff, 0xff, 0xff, 0xff, 0xff, 0xff, 0xff, 0xff, 0xff, 0xff, 0xff,
0xff, 0xff, 0xff, 0xff, 0xff, 0xff, 0xff, 0xff, 0xff, 0xff, 0xff, 0xff, 0xff, 0xff, 0xff, 0xff,
0xff, 0xff, 0xff, 0xff, 0xff, 0xff, 0xff, 0xff, 0xff, 0xff, 0xff, 0xff, 0xff, 0xff, 0xff, 0xff,
0xff, 0xff, 0xff, 0xff, 0xff, 0xff, 0xff, 0xff, 0xff, 0xff, 0xff, 0xff, 0xff, 0xff, 0xff, 0xff,
0xff, 0xff, 0xff, 0xff, 0xff, 0xff, 0xff, 0xff, 0xff, 0xff, 0xff, 0xff, 0xff, 0xff, 0xff, 0xff,
0xff, 0xff, 0xff, 0xff, 0xff, 0xff, 0xff, 0xff, 0xff, 0xff, 0xff, 0xff, 0xff, 0xff, 0xff, 0xff,
0xff, 0xff, 0xff, 0xff, 0xff, 0xff, 0xff, 0xff, 0xff, 0xff, 0xff, 0xff, 0xff, 0xff, 0xff, 0xff,
0xff, 0xff, 0xff, 0xff, 0xff, 0xff, 0xff, 0xff, 0xff, 0xff, 0xff, 0xff, 0xff, 0xff, 0xff, 0xff,
0xff, 0xff, 0x80, 0x1f, 0xff, 0xff, 0xff, 0xff, 0xff, 0xff, 0xff, 0xff, 0xff, 0xff, 0xff, 0xff,
0xff, 0xfc, 0x02, 0x03, 0xff, 0xff, 0xff, 0xff, 0xff, 0xff, 0xff, 0xff, 0xff, 0xff, 0xff, 0xff,
0xff, 0xf0, 0x0f, 0x80, 0xff, 0xff, 0xff, 0xff, 0xff, 0xff, 0xff, 0xff, 0xff, 0xff, 0xff, 0xff,
0xff, 0xc0, 0x3f, 0xc0, 0x3f, 0xff, 0xff, 0xff, 0xff, 0xff, 0xff, 0xff, 0xff, 0xff, 0xff, 0xff,
0xff, 0x80, 0x7f, 0xf0, 0x1f, 0xff, 0xff, 0xff, 0xff, 0xff, 0xff, 0xff, 0xff, 0xff, 0xff, 0xff,
0xff, 0x00, 0x7f, 0xfc, 0x07, 0xff, 0xff, 0xff, 0xff, 0xff, 0xff, 0xff, 0xff, 0xff, 0xff, 0xff,
0xfe, 0x00, 0x00, 0x7e, 0x03, 0xff, 0xff, 0xff, 0xff, 0xff, 0xff, 0xff, 0xff, 0xff, 0xff, 0xff,
0xfc, 0x00, 0x00, 0x1f, 0x81, 0xff, 0xff, 0xff, 0xff, 0xff, 0xff, 0xff, 0xff, 0xff, 0xff, 0xff,
0xf8, 0x78, 0x00, 0x0f, 0xe1, 0xfe, 0x00, 0x7e, 0x1f, 0xc0, 0x1f, 0x0f, 0xfe, 0x1f, 0xc0, 0x1f,
0xf0, 0xfc, 0x00, 0x07, 0xf8, 0xff, 0x00, 0x7c, 0x0f, 0xc0, 0x07, 0x0f, 0xfc, 0x0f, 0xc0, 0x07,
0xff, 0xfc, 0x00, 0x07, 0xfd, 0xff, 0x00, 0x7c, 0x0f, 0xc0, 0x07, 0x0f, 0xfc, 0x0f, 0xc0, 0x07,
0xef, 0xfc, 0x00, 0x07, 0xff, 0xff, 0x1f, 0xf8, 0x0f, 0xc3, 0x87, 0x0f, 0xf8, 0x0f, 0xc3, 0x87,
0xe7, 0xfe, 0x00, 0x07, 0xff, 0x3f, 0x1f, 0xf8, 0x07, 0xc3, 0xc7, 0x0f, 0xf8, 0x07, 0xc3, 0xc7,
0xc7, 0xff, 0x00, 0x0f, 0xff, 0x3f, 0x1f, 0xf8, 0x87, 0xc3, 0x87, 0x0f, 0xf8, 0xc7, 0xc3, 0x87,
0xc7, 0xff, 0x80, 0x1f, 0xff, 0x3f, 0x1f, 0xf0, 0xc3, 0xc3, 0x07, 0x0f, 0xf0, 0xc3, 0xc3, 0x07,
0xc7, 0xff, 0xf0, 0xff, 0xff, 0x1f, 0x00, 0x70, 0xc3, 0xc0, 0x0f, 0x0f, 0xf0, 0xc3, 0xc0, 0x0f,
0x87, 0xff, 0xff, 0xff, 0xff, 0x1f, 0x00, 0x61, 0xc3, 0xc0, 0x07, 0x0f, 0xf1, 0xc3, 0xc0, 0x07,
0x87, 0xff, 0xff, 0xff, 0xff, 0x1f, 0x00, 0x61, 0xe1, 0xc0, 0x03, 0x0f, 0xe1, 0xe1, 0xc0, 0x03,
0x87, 0xff, 0xff, 0xff, 0xfe, 0x1f, 0x1f, 0xe1, 0xe1, 0xc3, 0xc3, 0x0f, 0xe1, 0xe1, 0xc3, 0xe1,
0x87, 0xc3, 0xff, 0xfe, 0x18, 0x1f, 0x1f, 0xc0, 0x01, 0xc3, 0xe1, 0x0f, 0xc0, 0x00, 0xc3, 0xe1,
0x87, 0x80, 0xff, 0xf8, 0x00, 0x0f, 0x1f, 0xc0, 0x00, 0xc3, 0xe1, 0x0f, 0xc0, 0x00, 0xc3, 0xe1,
0x87, 0x00, 0x7f, 0xf0, 0x00, 0x0f, 0x1f, 0xc0, 0x00, 0xc3, 0xc1, 0x0f, 0x80, 0x00, 0xc3, 0xc1,
0x87, 0x00, 0x7f, 0xe0, 0x00, 0x1f, 0x1f, 0x87, 0xf8, 0x00, 0x03, 0x00, 0x07, 0xf8, 0x00, 0x03,
0x87, 0x00, 0x3f, 0xe0, 0x00, 0x1e, 0x1f, 0x87, 0xf8, 0x00, 0x07, 0x00, 0x07, 0xf8, 0x00, 0x07,
0x87, 0x00, 0x1f, 0xc0, 0x03, 0x1e, 0x1f, 0x0f, 0xf8, 0x00, 0x0f, 0x00, 0x0f, 0xfc, 0x00, 0x0f,
0x87, 0x00, 0x1f, 0xc0, 0x07, 0x1f, 0xff, 0xff, 0xff, 0xff, 0xff, 0xff, 0xff, 0xff, 0xff, 0xff,
0xc7, 0x80, 0x1f, 0xc0, 0x0f, 0x1f, 0xff, 0xff, 0xff, 0xff, 0xff, 0xff, 0xff, 0xff, 0xff, 0xff,
0xc7, 0x80, 0x1f, 0x80, 0x0f, 0x1f, 0xff, 0xff, 0xff, 0xff, 0xff, 0xff, 0xff, 0xff, 0xff, 0xff,
0xc7, 0xc0, 0x1f, 0x80, 0x1f, 0x3f, 0xff, 0xff, 0xff, 0xff, 0xff, 0xff, 0xff, 0xff, 0xff, 0xff,
0xe7, 0xc0, 0x1f, 0xc0, 0x1f, 0x3f, 0xff, 0xff, 0xff, 0xff, 0xff, 0xff, 0xff, 0xff, 0xff, 0xff,
0xe7, 0xe0, 0x1f, 0xc0, 0x3f, 0x7f, 0xff, 0xfb, 0xfc, 0xfb, 0x9e, 0xff, 0x77, 0xdb, 0xff, 0xb7,
0xf3, 0xe0, 0x3f, 0xc0, 0x7e, 0x7f, 0x27, 0x31, 0x98, 0x73, 0x00, 0x92, 0x07, 0x02, 0x60, 0x23,
0xf0, 0xe0, 0x7f, 0xf3, 0xf8, 0xff, 0x26, 0x2f, 0x13, 0x33, 0x75, 0x91, 0xcf, 0x76, 0x2b, 0x6b,
0xf8, 0x60, 0x7f, 0xff, 0xe0, 0xff, 0x06, 0xaf, 0x03, 0x38, 0x74, 0xa1, 0xc7, 0x72, 0x8b, 0x23,
0xfc, 0x00, 0x7f, 0xff, 0xc1, 0xff, 0x50, 0x07, 0x0a, 0x7d, 0x21, 0xb6, 0xcf, 0x36, 0xcb, 0x63,
0xfc, 0x00, 0x7f, 0xff, 0x03, 0xff, 0xfd, 0xd3, 0xec, 0xf3, 0x9c, 0xf7, 0x27, 0x93, 0xeb, 0x3b,
0xfe, 0x00, 0x7f, 0xfc, 0x07, 0xff, 0xff, 0xff, 0xff, 0xff, 0xff, 0xff, 0xff, 0xff, 0xff, 0xff,
0xff, 0x80, 0x7f, 0xf0, 0x0f, 0xff, 0xff, 0xff, 0xff, 0xff, 0xff, 0xff, 0xff, 0xff, 0xff, 0xff,
0xff, 0xc0, 0x3f, 0xe0, 0x3f, 0xff, 0xff, 0xff, 0xff, 0xff, 0xff, 0xff, 0xff, 0xff, 0xff, 0xff,
0xff, 0xe0, 0x0f, 0x80, 0x7f, 0xff, 0xff, 0xff, 0xff, 0xff, 0xff, 0xff, 0xff, 0xff, 0xff, 0xff,
0xff, 0xf8, 0x06, 0x01, 0xff, 0xff, 0xff, 0xff, 0xff, 0xff, 0xff, 0xff, 0xff, 0xff, 0xff, 0xff,
0xff, 0xff, 0x06, 0x0f, 0xff, 0xff, 0x00, 0x08, 0x00, 0x00, 0x00, 0x00, 0x00, 0x00, 0x00, 0x01,
0xff, 0xff, 0xff, 0xff, 0xff, 0xff, 0xff, 0xff, 0xff, 0xff, 0xff, 0xff, 0xff, 0xff, 0xff, 0xff,
0xff, 0xff, 0xff, 0xff, 0xff, 0xff, 0xff, 0xff, 0xff, 0xff, 0xff, 0xff, 0xff, 0xff, 0xff, 0xff,
0xff, 0xff, 0xff, 0xff, 0xff, 0xff, 0xff, 0xff, 0xff, 0xff, 0xff, 0xff, 0xff, 0xff, 0xff, 0xff,
0xff, 0xff, 0xff, 0xff, 0xff, 0xff, 0xff, 0xff, 0xff, 0xff, 0xff, 0xff, 0xff, 0xff, 0xff, 0xff,
0xff, 0xff, 0xff, 0xff, 0xff, 0xff, 0xff, 0xff, 0xff, 0xff, 0xff, 0xff, 0xff, 0xff, 0xff, 0xff,
0xff, 0xff, 0xff, 0xff, 0xff, 0xff, 0xff, 0xff, 0xff, 0xff, 0xff, 0xff, 0xff, 0xff, 0xff, 0xff,
0xff, 0xff, 0xff, 0xff, 0xff, 0xff, 0xff, 0xff, 0xff, 0xff, 0xff, 0xff, 0xff, 0xff, 0xff, 0xff,
0xff, 0xff, 0xff, 0xff, 0xff, 0xff, 0xff, 0xff, 0xff, 0xff, 0xff, 0xff, 0xff, 0xff, 0xff, 0xff,
0xff, 0xff, 0xff, 0xff, 0xff, 0xff, 0xff, 0xff, 0xff, 0xff, 0xff, 0xff, 0xff, 0xff, 0xff, 0xff,
0xff, 0xff, 0xff, 0xff, 0xff, 0xff, 0xff, 0xff, 0xff, 0xff, 0xff, 0xff, 0xff, 0xff, 0xff, 0xff,
0xff, 0xff, 0xff, 0xff, 0xff, 0xff, 0xff, 0xff, 0xff, 0xff, 0xff, 0xff, 0xff, 0xff, 0xff, 0xff,
0xff, 0xff, 0xff, 0xff, 0xff, 0xff, 0xff, 0xff, 0xff, 0xff, 0xff, 0xff, 0xff, 0xff, 0xff, 0xff,
0xff, 0xff, 0xff, 0xff, 0xff, 0xff, 0xff, 0xff, 0xff, 0xff, 0xff, 0xff, 0xff, 0xff, 0xff, 0xff
The testing result:
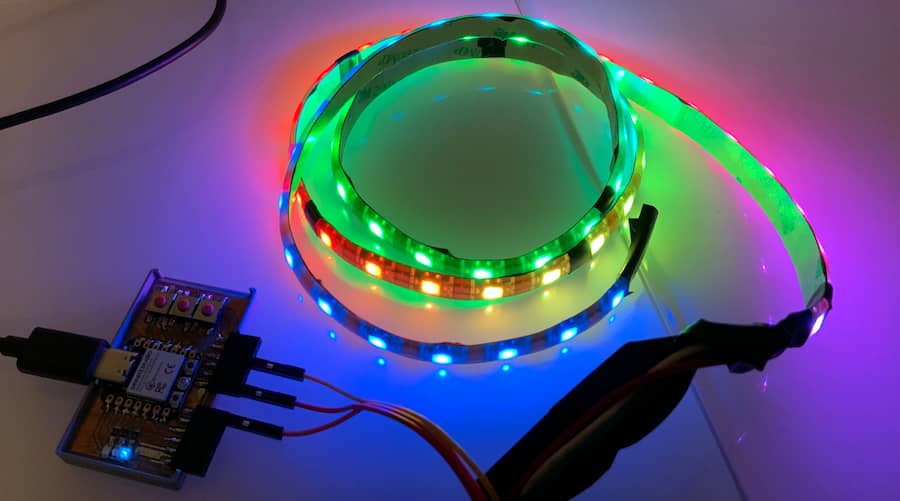
WS2812B
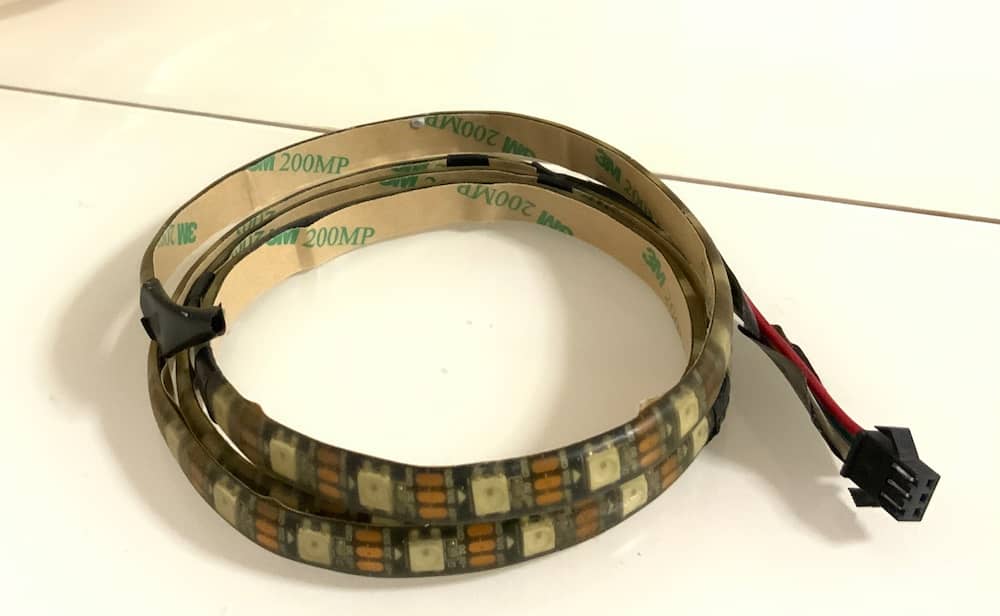
Connection
The connect of WS2812B need a 5V, Din and GND. The Din pin is for the MCU to give signal, controlling the color of the WS2812B, and it can be any I/O pin. Here I use the D8 pin to connect to the Din pin. The Dout pin is used to connect to the next WS2812B if necessary.

Programming
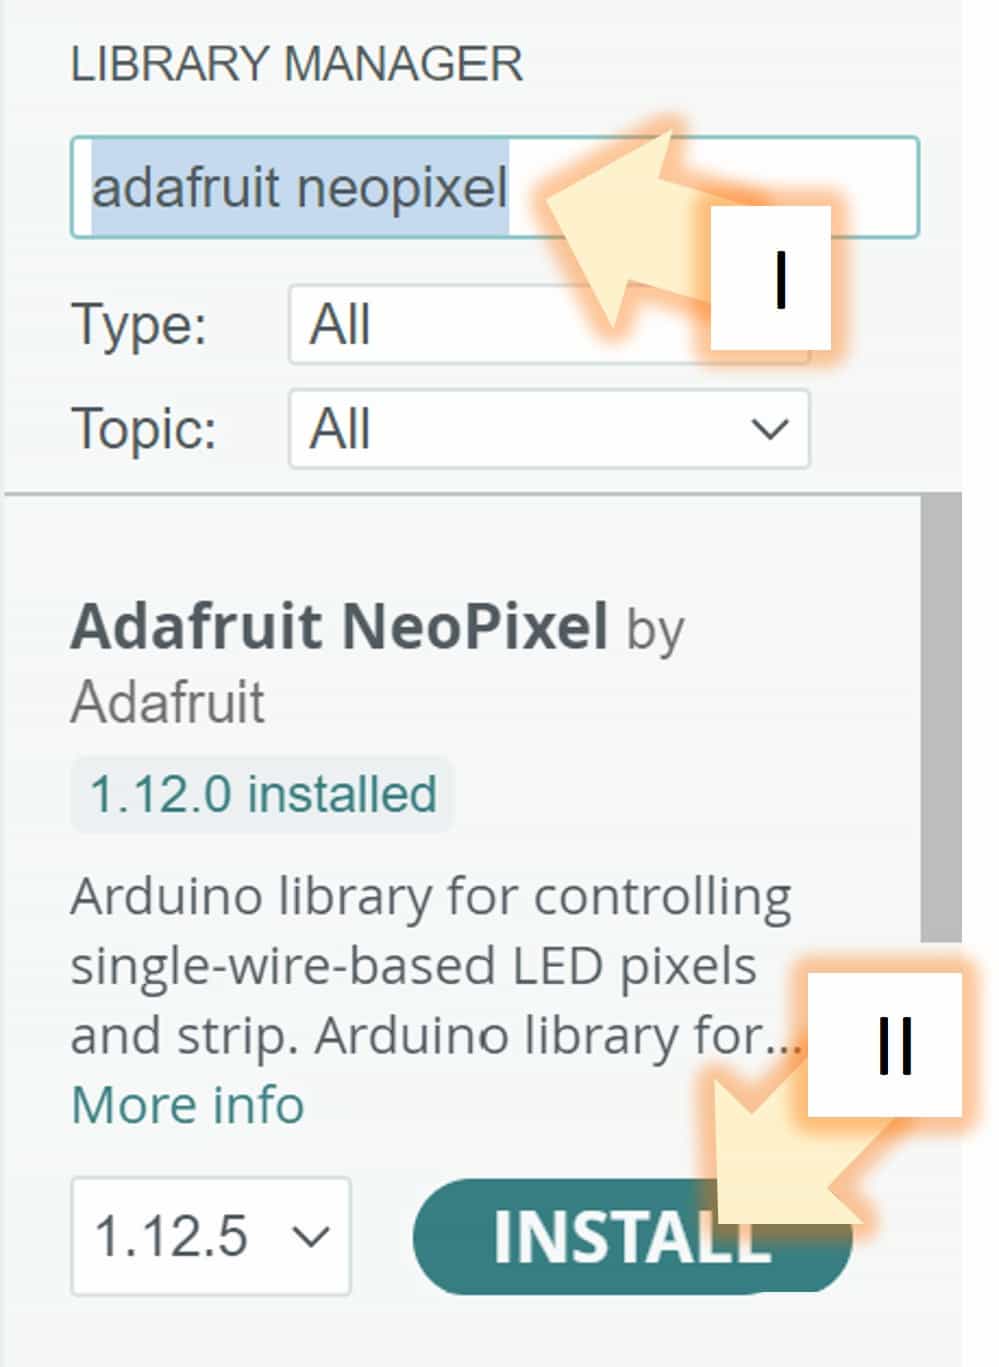
The library I used is Adafruit NeoPixel by Adafruit.
Basic example
Details
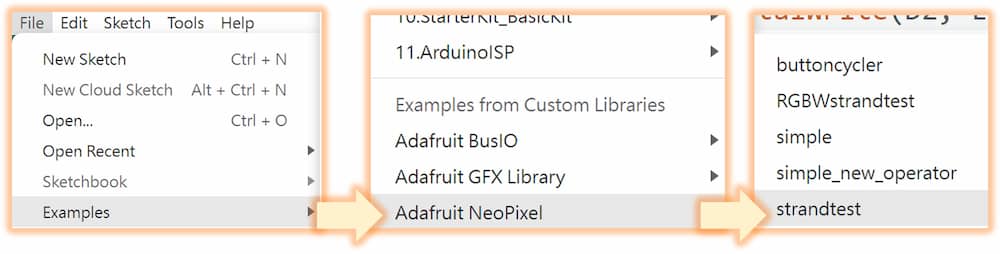
Test the strandtest example in the Adafruit NeoPixel library:
There are two place need to adjust in the sample code, as I connect the WS2812B to D8 pin, so the pin in line 20 should be changed to D8, and my testing WS2812B has 62 pixels, so the number in line 23 should be changed to 62.
#define LED_PIN   D8

// How many NeoPixels are attached to the Arduino?
#define LED_COUNT 62
The testing result: