Project Summary
About “Chirp and Clean” device
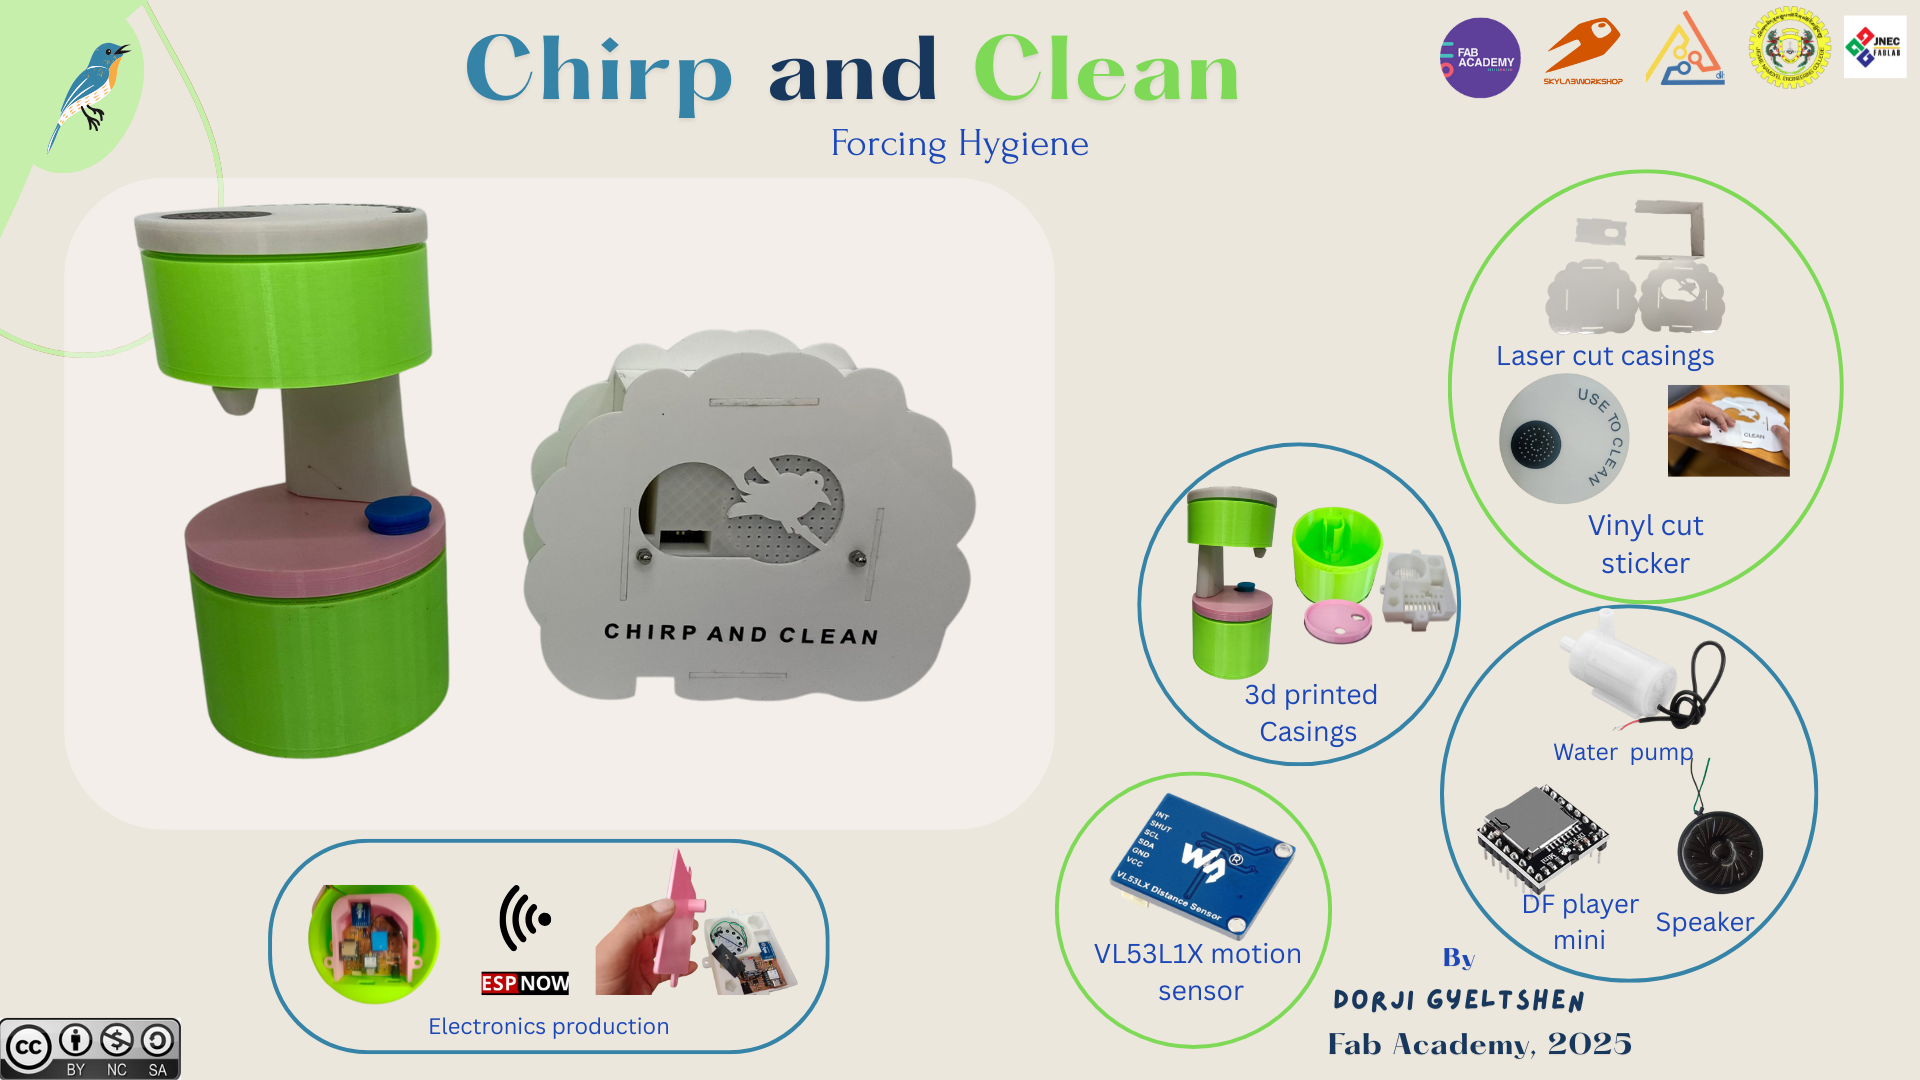
My project is a simple basic system but it can useful to encourage the people with proper hand washing habbits although such kinds of systems exist in the markets.Moreover, it can solve hygiene problem as we usually neglect to practice in our daily life.People still use manual soap bottles or bar soaps which require contact and may spread germs, and time consuming too.You will see an user interaction as i have developed a system where the wash room user is introduced to the system and making them to wash hands compulsorily.
It consists of two main parts, namely “Chirp” which can detect person in the washroom and allows the other device with same wifi module to communicate between them.The other “Clean” device will receive message and works untill the user wash hands.I have used ESP NOW protocol to communicate between my two fabricated PCB with XIAO ESP32 C3 modules.
This system will encourage hand hygiene, prevents spread of germs, teaches clean habbits early especially for children, safe and easy to use with the emerging technlogy.
Final project presentation and slide.
Here is the youtube link for my final project.
Here is my final project presentation video and slide.
My final project presentation video can availed from this link
Final project slide

Here is the link for the presentation slide
Answers and Planning
Here is the link to assignment of applications and implications, and project development that emphasize on the master piece of final project answering the range of questions.
You can also refer to my week 18 assignment that elaborates on the dissemination of my final project.
Gantt Chart
I prepared gantt chart to work as per the schedule to complete my final project.

System diagrams for Chirp and Clean
My final project requires the ESP NOW as the protocol for communication between the two XIAO ESP32C-3 PCB.Here is my system diagram that will show communication between my two fabricated PCB.

This information is also available under the mid-term review under system diagram
Bill of Materials(BOM)
| Component | Quantity | Unit Price ($) | Total Price ($) | Source |
|---|---|---|---|---|
| Seeed XIAO ESP32-C3 | 2 | $7.49 | $14.98 | JNWSFL, Thimphu |
| Speaker (8 ohm, 0.5 watt) | 2 | $4.44 | $8.88 | JNWSFL, Thimphu |
| 5V USB adapter | 2 | $2.50 | $5.00 | JNWSFL, Thimphu |
| VL53L1X sensor | 2 | $4.48 | $8.96 | JNWSFL, Thimphu |
| 3D print filament (PLA) | 1 | $2.10 | $2.10 | JNWSFL, Thimphu |
| DFPlayer Mini | 2 | $4.99 | $9.98 | JNWSFL, Thimphu |
| Power jack | 2 | $0.29 | $0.58 | JNWSFL, Thimphu |
| Screw terminal | 3 | $0.60 | $1.80 | JNWSFL, Thimphu |
| LED 1206 | 2 | $0.0035 | $0.007 | JNWSFL, Thimphu |
| Resistor (499/0/1K ohm) | 6 | $0.05 | $0.30 | JNWSFL, Thimphu |
| Mini water pump | 1 | $2.00 | $2.00 | JNWSFL, Thimphu |
| Diode IN4007 | 1 | $0.24 | $0.24 | JNWSFL, Thimphu |
| Transistor BC547 | 1 | $0.093 | $0.093 | JNWSFL, Thimphu |
| Relay SRD-05VDC-SL-C | 1 | $2.50 | $2.50 | JNWSFL, Thimphu |
| Acrylic sheet, 3mm | 1 | $3.50 | $3.50 | JNWSFL, Thimphu |
| Copper clad | 1 | $1.00 | $1.00 | JNWSFL, Thimphu |
| Vinyl sticker, black | 1 | $2.10 | $2.10 | JNWSFL, Thimphu |
| Total = $64.02 |
So the total amount cost for my final project was approximately $64 which is equal to Ngultrum(Bhutanese)
**5495**/- only.
You can access about Bill of materials for my final project under week 17 assignment
Electronics design and production
As my final project consists of two parts, i have designed two PCB, one for the chirp part(MCU-1) and Clean(Soap dispenser).I designed using KICAD.Here is the design for CHIRPING bird(PCB-1)

Then i milled it using the SRM-2O Milling machine and soldered and check for the continuity after aech soldering actions.


Similarly, I also made my second PCB where it can be named as CLEAN(MCU-2).
 After milling, i checked for connections and it was working.

For more detailed, you can refer to my final project site under Electronics Design and Production
Design and Manufacturing
CAD for my final project
I have designed using Fusion 360.For MCU-2(CHIRP), I had additive manufacturing and combination of additive and subtractive manufacturing for MCU-1(CLEAN).
Design and laser cutting for MCU-1
I exported DXF files and took to the laser cutting machine.


Design and 3D Printing case for MCU-1
I did slicing using the Bambu Lab software and 3D Printed the case using the Bambu lab A1 printer.I had used prusa MK3S printer to 3D print its lid.


Design and 3D printing for soap dispenser container and MCU-2 case.
Firstly i designed the base for storing the soap solution and the slot for mounting the mini water pump.I planned to make threaded lid as i wanted to make it removable.I have also added connector to joint with the MCU-2 case.


I designed the MCU-2 case with lid, speaker case and the top lid and 3D printed them.


The more details on my CAD for my final project can be available at my final project site under Design and Manufacturing
My input and output devices.
For my final project, i used VL53L1X sensor as input device for both Chirp and clean devices, where it can detect motion for Chirp and to detect hand for the Clean device.
I used submersible mini water pump and speaker with DF player mini as my output devices for my final project.I have tested the working of them during the
I wanted to use a code to test if my speaker and df player mini is working with the VL53L1X motion sensor that includes both input and output device.


This is the code i used for testing input and output device with PCB-2 during Output device week
#include <WiFi.h>
#include <esp_now.h>  // - esp now library

#include <Wire.h>
#include <VL53L1X.h>  // - Person_Approaching sensor library

#include <DFRobotDFPlayerMini.h>
#include <HardwareSerial.h>

VL53L1X sensor;

uint8_t receiverMac[] = {0x84, 0xFC, 0xE6, 0x00, 0xCF, 0x78}; // - recievers Address

#define SDA_PIN 4
#define SCL_PIN 6
#define DF_RX_PIN 9
#define DF_TX_PIN 10
#define THRESHOLD 800
#define DEBOUNCE_COUNT 3

HardwareSerial dfSerial(1);
DFRobotDFPlayerMini dfplayer;

bool personPresent = false;
uint8_t debounceCounter = 0;

void setup() {
  Serial.begin(115200);
  WiFi.mode(WIFI_STA);

  if (esp_now_init() != ESP_OK) {
    Serial.println("ESP-NOW init failed");
    return;
  }

  esp_now_peer_info_t peerInfo = {};
  memcpy(peerInfo.peer_addr, receiverMac, 6);
  peerInfo.channel = 0;
  peerInfo.encrypt = false;

  if (esp_now_add_peer(&peerInfo) != ESP_OK) {
    Serial.println("Failed to add peer");
    return;
  }

  Wire.begin();
  Wire.setClock(400000); // use 400 kHz I2C

  sensor.setTimeout(500);
  if (!sensor.init())
  {
    Serial.println("Failed to detect and initialize sensor!");
    while (1);
  }

  // information on range and timing limits.
  sensor.setDistanceMode(VL53L1X::Long);
  sensor.setMeasurementTimingBudget(50000);
  sensor.startContinuous(50);

  //dfplayer
  dfSerial.begin(9600, SERIAL_8N1, DF_RX_PIN, DF_TX_PIN);
  if (!dfplayer.begin(dfSerial)) while (1);
  dfplayer.volume(25);

}

void loop() {

  sensor.read();
  int Person_Approaching = sensor.ranging_data.range_mm;

  Serial.print("Range: ");
  Serial.print(Person_Approaching);

  if (Person_Approaching < THRESHOLD && !personPresent) {
    personPresent = true;
    dfplayer.play(1);  // Entry bird sound
    //delay(5000);

  }else if(Person_Approaching > THRESHOLD && personPresent) {
    const char *message = "Person_Exited";  // - SMS like message
    esp_err_t result = esp_now_send(receiverMac, (uint8_t *)message, strlen(message)); // - send SMS

    if (result == ESP_OK) {
      Serial.println("Message sent");
    } else {
      Serial.println("Failed to send");
    }
    dfplayer.stop();
    personPresent = false;
  }

  Serial.println();

  delay(2000);  // Send every 5 seconds
}


System Integration.
As explained earlier, my final project titled CHIRP and CLEAN Device consists of two parts, CHIRP(MCU-1) with DF player mini, speaker, VL53L1X motion sensor and XIAO ESP32-C3.The other CLEAN(MCU-2) consists of DF player mini, speaker, VL53L1X distance sensor, mini water pump and XIAO ESP32 C-3.

The MCU-1(CHIRP) part will act as a master and MCU-2(CLEAN) part as receiver device where they can communicate using the ESP NOW protocol.
While using the ESP NOW to communicate between my two XIAO ESP32 C-3, i need to add the MAC address.I do not need other library for ESP NOW as i have already installed the ESP32 library package by Espressif System. In order to add the MAC ADDRESS, i referred this website and i have used that example code to get my MAC ADDRESS.
You can see more detailed working on this under weekly assignment of Networking and Communication here.
For more detailed can be availed from my weekly assignments system integration
Assemblying CLEAN device(MCU-2)
Firstly, i have mounted the mini water pump into its slot of the base.The pump hose and terminals were sent up via the threaded hole of the connector to the top MCU-2 case.

The pump hose was further sent via the track outside to the nozzle and pump terminals connected to the terminal block.


The pump hose was connected to the nozzle and covered with the lid.


Assemblying CHIRP device(MCU-1)

Vinyl cutting to add names for my final project.
To add title to my project, i added text using the Inkscape and exported the file in DXF format.Then i did vinyl cutting.


License
There are different types of licences for the creaters or inventors, each of these has their own rules.I want to choose Attribution-NonCommercial-ShareAlike license for my project.With this license others can use , share and change or modify my work but they must give me credits and not use it for commercial purposes and share any changes under the same license.

Here is the reference link for the license type i choosed,
Here is the terms for my final project:

And here is the Legal Code of **CC BY-NC-SA
Final project codes
- Master code(Chirp)
#include <WiFi.h>
#include <esp_now.h>  // - esp now library

#include <Wire.h>
#include <VL53L1X.h>  // - Person_Approaching sensor library

#include <DFRobotDFPlayerMini.h>
#include <HardwareSerial.h>

VL53L1X sensor;

uint8_t receiverMac[] = {0x84, 0xFC, 0xE6, 0x00, 0xCF, 0x78}; // - recievers Address

#define SDA_PIN 4
#define SCL_PIN 6
#define DF_RX_PIN 9
#define DF_TX_PIN 10
#define THRESHOLD 800
#define DEBOUNCE_COUNT 3

HardwareSerial dfSerial(1);
DFRobotDFPlayerMini dfplayer;

bool personPresent = false;
uint8_t debounceCounter = 0;

void setup() {
  Serial.begin(115200);
  WiFi.mode(WIFI_STA);

  if (esp_now_init() != ESP_OK) {
    Serial.println("ESP-NOW init failed");
    return;
  }

  esp_now_peer_info_t peerInfo = {};
  memcpy(peerInfo.peer_addr, receiverMac, 6);
  peerInfo.channel = 0;
  peerInfo.encrypt = false;

  if (esp_now_add_peer(&peerInfo) != ESP_OK) {
    Serial.println("Failed to add peer");
    return;
  }

  Wire.begin();
  Wire.setClock(400000); // use 400 kHz I2C

  sensor.setTimeout(500);
  if (!sensor.init())
  {
    Serial.println("Failed to detect and initialize sensor!");
    while (1);
  }

  // information on range and timing limits.
  sensor.setDistanceMode(VL53L1X::Long);
  sensor.setMeasurementTimingBudget(50000);
  sensor.startContinuous(50);

  //dfplayer
  dfSerial.begin(9600, SERIAL_8N1, DF_RX_PIN, DF_TX_PIN);
  if (!dfplayer.begin(dfSerial)) while (1);
  dfplayer.volume(25);

}

void loop() {

  sensor.read();
  int Person_Approaching = sensor.ranging_data.range_mm;

  Serial.print("Range: ");
  Serial.print(Person_Approaching);

  if (Person_Approaching < THRESHOLD && !personPresent) {
    personPresent = true;
    dfplayer.play(1);  // Entry bird sound
    //delay(5000);

  }else if(Person_Approaching > THRESHOLD && personPresent) {
    const char *message = "Person_Exited";  // - SMS like message
    esp_err_t result = esp_now_send(receiverMac, (uint8_t *)message, strlen(message)); // - send SMS

    if (result == ESP_OK) {
      Serial.println("Message sent");
    } else {
      Serial.println("Failed to send");
    }
    dfplayer.stop();
    personPresent = false;
  }

  Serial.println();

  delay(2000);  // Send every 5 seconds
}
- Slave code
//-----final soap dispensor code------------
#include <WiFi.h>
#include <esp_now.h>
#include <Wire.h>
#include <VL53L1X.h>
#include <DFRobotDFPlayerMini.h>
#include <HardwareSerial.h>

// ---------- Configuration ----------
#define PUMP_PIN D2
#define SDA_PIN D4
#define SCL_PIN D5
#define DF_RX_PIN D9
#define DF_TX_PIN D10
#define THRESHOLD 80  // mm

// ---------- Globals ----------
VL53L1X sensor;
HardwareSerial dfSerial(1);
DFRobotDFPlayerMini dfplayer;

bool monitoring = false;
bool soapDispensed = false;
bool handDetected = false;
unsigned long triggerTime = 0;
int reminderStage = 0; // 0 = none, 1 = first msg, 2 = second msg, 3 = final msg

void resetFlags() {
  monitoring = false;
  soapDispensed = false;
  handDetected = false;
  triggerTime = 0;
  reminderStage = 0;
}

// ---------- ESP-NOW Callback ----------
void onDataReceive(const uint8_t *mac, const uint8_t *incomingData, int len) {
  String received = "";
  for (int i = 0; i < len; i++) {
    received += (char)incomingData[i];
  }

  Serial.print("Received: ");
  Serial.println(received);

  if (received == "Person_Exited") {
    resetFlags();
    monitoring = true;
    triggerTime = millis();
    Serial.println("Monitoring started after person exit");
  }
}

// ---------- Setup ----------
void setup() {
  Serial.begin(115200);
  WiFi.mode(WIFI_STA);

  pinMode(PUMP_PIN, OUTPUT);
  digitalWrite(PUMP_PIN, LOW);

  // ESP-NOW
  if (esp_now_init() != ESP_OK) {
    Serial.println("ESP-NOW init failed");
    return;
  }
  esp_now_register_recv_cb(onDataReceive);

  // VL53L1X
  Wire.begin(SDA_PIN, SCL_PIN);
  Wire.setClock(400000);
  sensor.setTimeout(500);
  if (!sensor.init()) {
    Serial.println("VL53L1X not found");
    while (1);
  }
  sensor.setDistanceMode(VL53L1X::Long);
  sensor.setMeasurementTimingBudget(50000);
  sensor.startContinuous(50);

  // DFPlayer
  dfSerial.begin(9600, SERIAL_8N1, DF_RX_PIN, DF_TX_PIN);
  if (!dfplayer.begin(dfSerial)) {
    Serial.println("DFPlayer init failed");
    while (1);
  }
  dfplayer.volume(30);  // Adjust as needed
}

// ---------- Loop ----------
void loop() {
  sensor.read();
  int distance = sensor.ranging_data.range_mm;

  if (!monitoring) return;

  unsigned long elapsed = millis() - triggerTime;

  // Hand detected
  if (distance < THRESHOLD && !soapDispensed) {
    Serial.println("Hand detected - dispensing soap");
    digitalWrite(PUMP_PIN, HIGH);
    delay(2000);
    digitalWrite(PUMP_PIN, LOW);
    dfplayer.play(4); // Thank you
    soapDispensed = true;
    monitoring = false;
    return;
  }

  // Reminders based on time
  if (elapsed > 5000 && reminderStage == 0) {
    Serial.println("Playing reminder 1: Don't forget to wash your hands");
    dfplayer.play(1); // Don't forget
    reminderStage = 1;
  } else if (elapsed > 10000 && reminderStage == 1) {
    Serial.println("Playing reminder 2: Please wash your hands");
    dfplayer.play(2); // Please wash
    reminderStage = 2;
  } else if (elapsed > 15000 && reminderStage == 2) {
    Serial.println("Playing reminder 3: Unhygienic...");
    dfplayer.play(3); // Unhygienic
    reminderStage = 3;
  }

  delay(100);
}
Files
-
The Fusion360 design files for CHIRPY device(MCU-1) is here
-
The Fusion360 design files for CLEAN device(MCU-2) is here
-
PCB design for MCU-1 is here
-
PCB design for MCU-2 is here
-
Receiver code is here
-
Sender code is here
-
DXF file for laser cut is here
-
DXF files for vinyl cut is here
My final notes
I am grateful to my main local instructor mam Tshering Wangzom, along with Sangay Dorji and Yeshey Wangmo who supported throughout my fab academy course and my final project. Mr. Mani Kumar Basnet, Associate Analyst also helped me with coding and programming for my final project.
Moreover, Thankful to our Fab Guru Rico san for being the pillar and my Global Evaluator, MR. Saverio Silli for ensuring to meet global standard.