WEEK 1 - Principles and practices / Project Management
Principles and practices checklist:
- Plan and sketch a potential final project.
- Sign and upload the student agreement.
Project management checklist:
- Work through a git tutorial.
- Build a personal website describing you and your final project.
- Upload all the process and material to the class archive.
Student Agreement
**Fab Academy Student Agreement**

*The Fab Academy is responsible for:*

- Teaching principles and practices of digital fabrication
- Arranging lectures, recitations, meetings, and events for the class
- Evaluating and providing feedback on student work
- Offering clear standards for completing assignments
- Certifying and archiving student progress
- Supervising class preparation
- Reviewing prospective students, instructors, and labs
- Providing central staff and infrastructure for students, instructors, and labs
- Fund-raising for costs not covered by student tuition
- Managing and reporting on the program's finances, results, and impacts
- Publicizing the program
- Promoting a respectful environment free of harassment and discrimination
- Encourage a diverse, accessible, and equitable community

*I am a Fab Academy student, responsible for:*

- Attending class lectures and participating in reviews
- Developing and documenting projects assigned to introduce and demonstrate skills
- Allowing the Fab Academy to share my work (with attribution) in the class for purposes compatible with its mission
- Honestly reporting on my work, and appropriately attributing the work of others (both human and machine)
- Working safely
- Leaving workspaces in the same (or better) condition than I found them
- Participating in the upkeep of my lab
- Ensuring that my tuition for local and central class costs is covered
- Following locally applicable health and safety guidance
- Promoting a respectful environment free of harassment and discrimination

Signed by committing this file in my repository,

(Marcela Gonzales Arias)
Building my personal web
Web design
[DISCLAIMER] I gotta say, diving into development was totally new territory for me. I was totally lost at the start, trying to figure out how to tackle that first assignment. Let me tell you, it was a bit of a mess! But now that I've had time to mull it over, I'm gonna lay out how I reckon we should've gone about building the website in a more organized way.
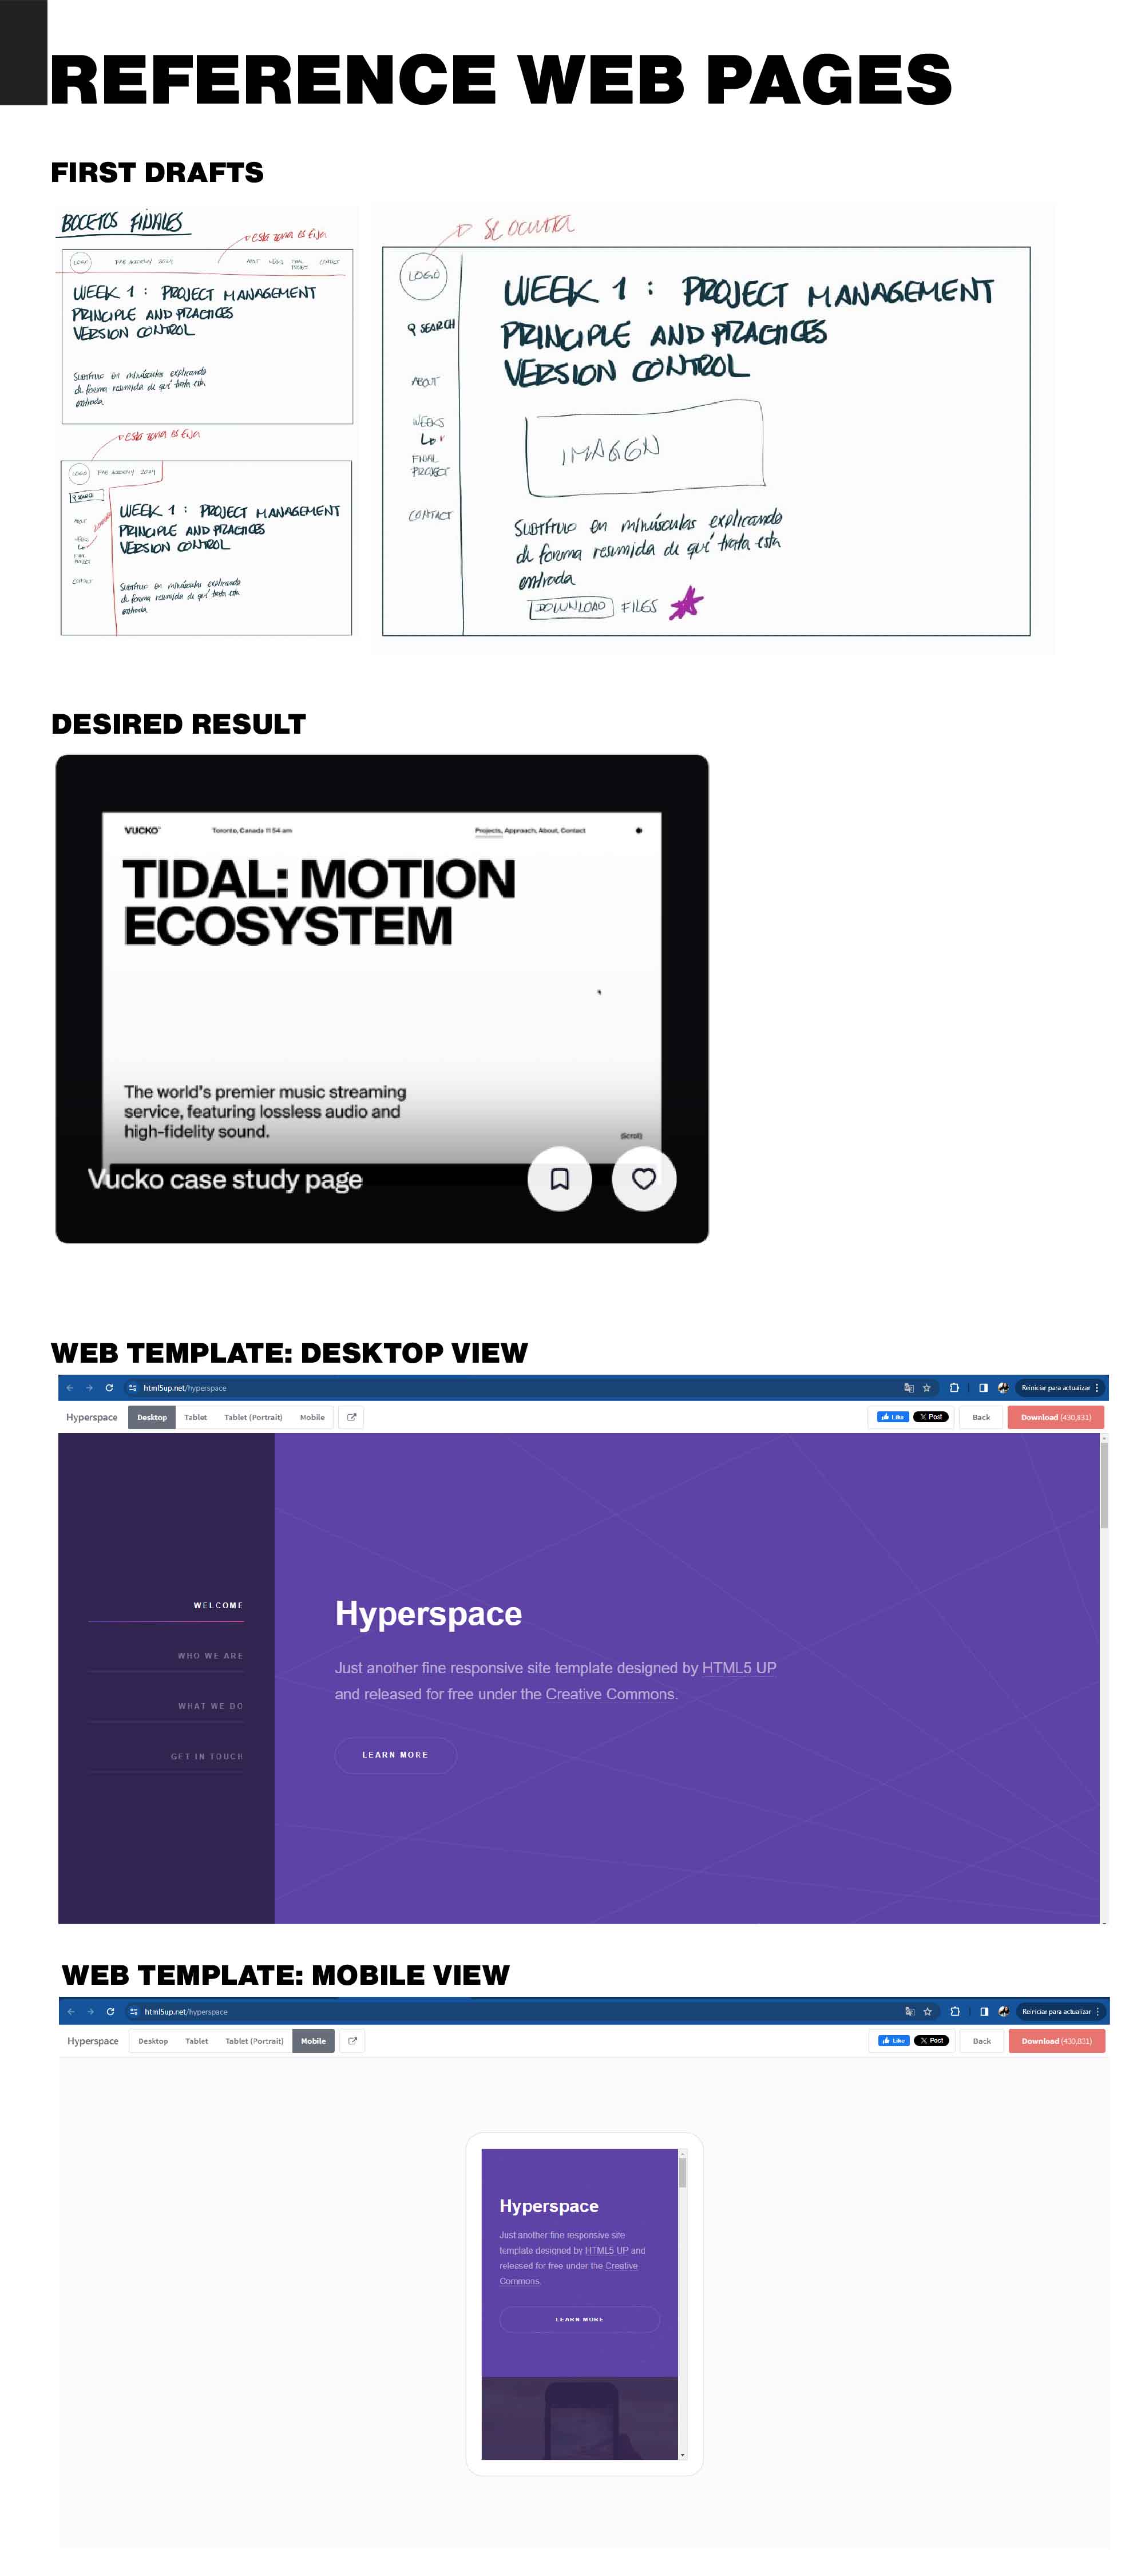
So, first things first, I doodled up some rough sketches of how I wanted the website layout to look, jotting down ideas for what features I wanted to include. Then, I went on a hunt for some cool websites to use as inspiration. Found a couple on Dribbble that caught my eye, so I whipped up some final sketches based on those. Trouble was, I couldn't quite wrap my head around how to actually use those templates.
Reference website: https://vucko.co/
After a frustrating process of trying out various options like (gohugo.io), (Dribbble), (Bootstrap), (CodePen), (Webflow), and others that initially seemed promising but ended up being too complicated to install or required paid templates (like Webflow), I took my instructor's advice to stick with something based on HTML, which he said would be simpler. So, I scoured HTML repositories online and stumbled upon a template on HTML5 UP called "Hyperspace" that was pretty close to what I was looking for.
Template website: https://html5up.net/hyperspace
Editing the HTML
Compiler and Color Editing
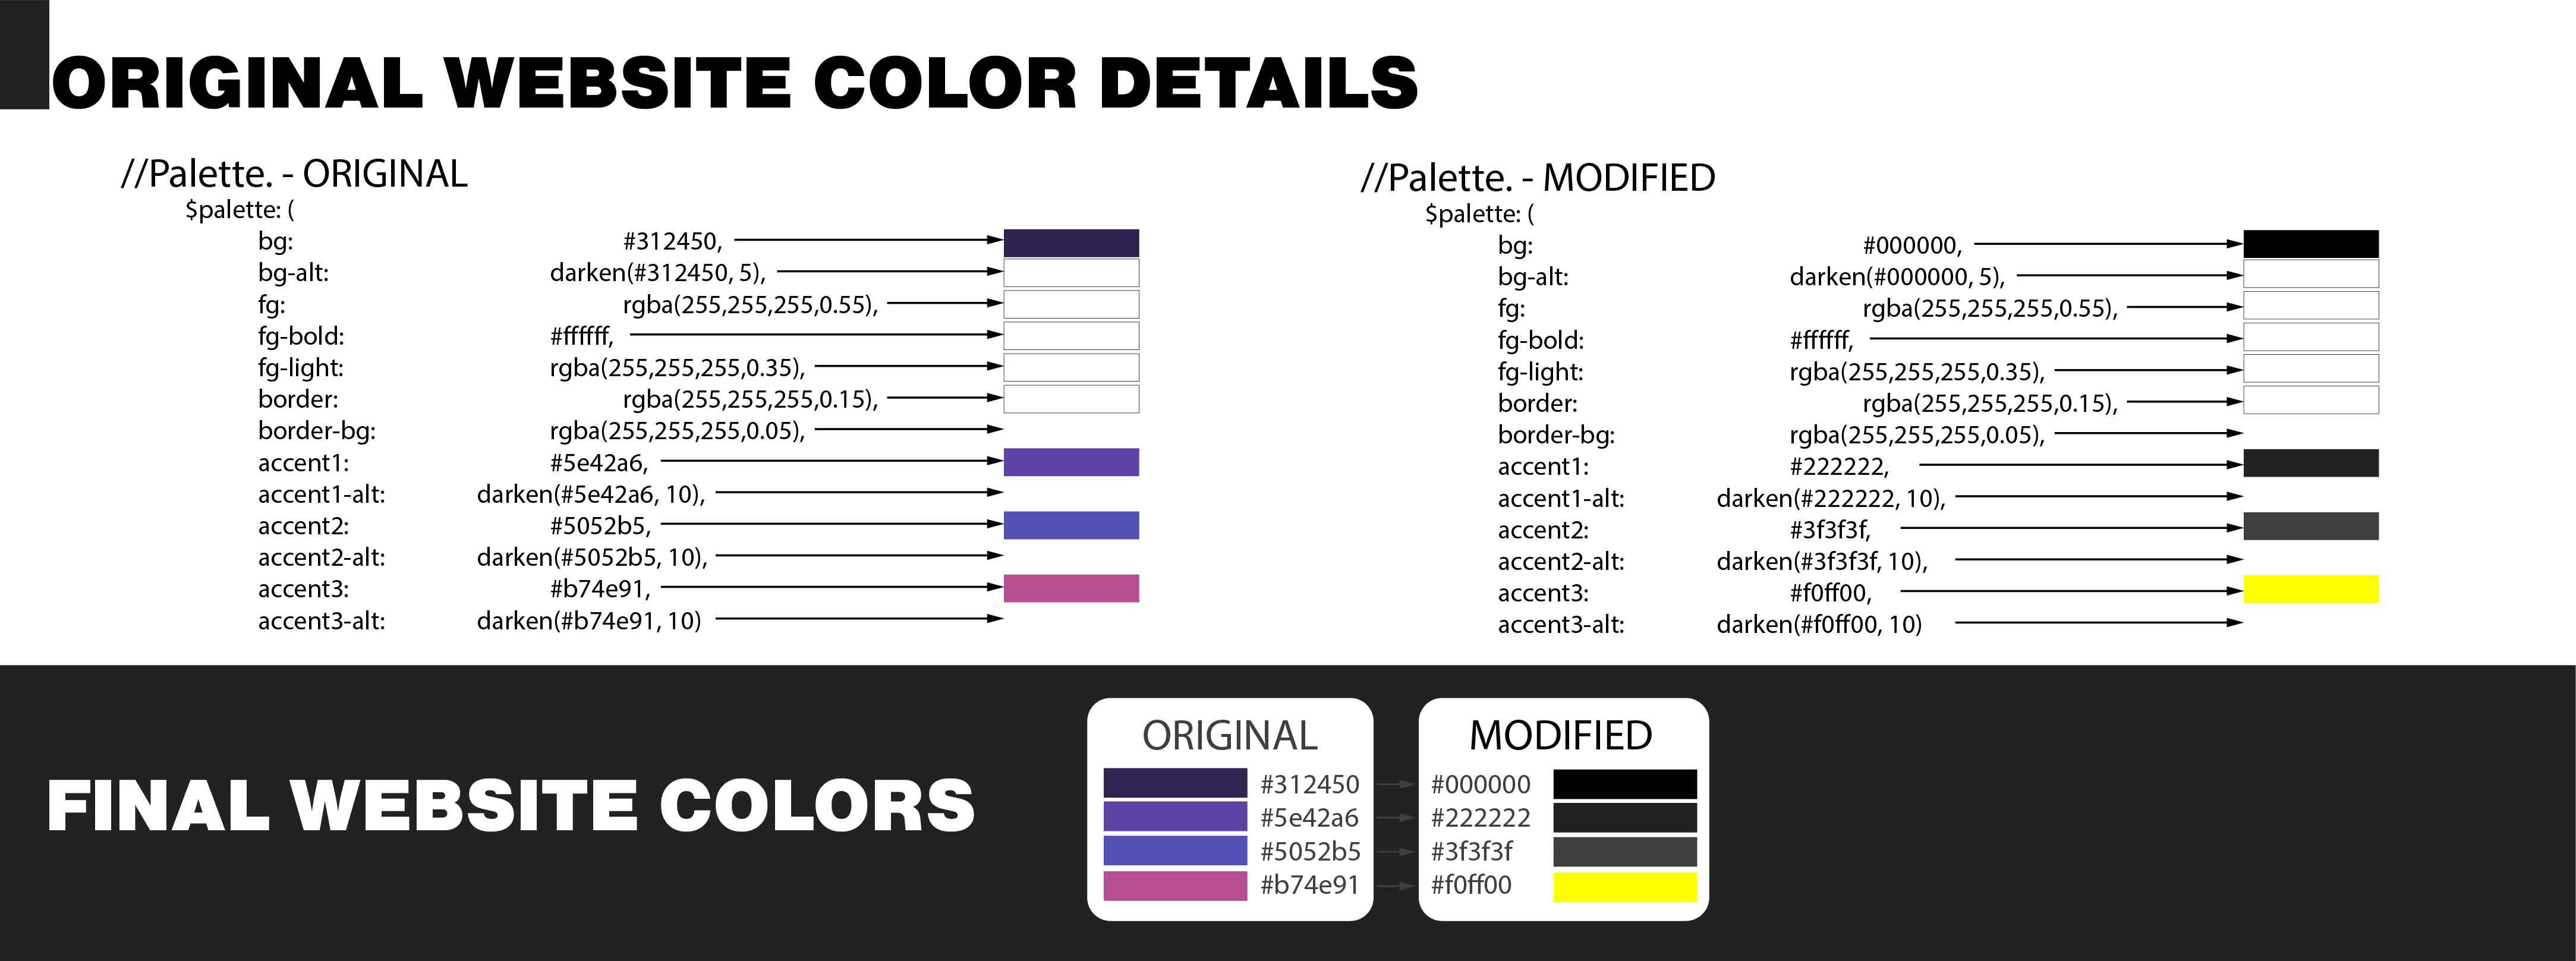
For editing and previewing the webpage template, I used the Brackets compiler (https://brackets.io/). My initial focus was on adjusting the colors, as my design aims to be user-friendly for individuals with low vision. Thus, I needed a dark background and high-contrast text to enhance readability.
After grasping that HTML modifies the basic structure and CSS alters its appearance, I delved into the code to locate color-related elements. I stumbled upon a "Palette" variable in the CSS file and, after scouring through all the files, pinpointed the one I needed to modify. The file location for editing color variables was: the "vars" file within "assets>sass>libs>vars."
However, this didn't fully address the issue, as the colors on the index page remained unchanged. So, I manually adjusted the colors in the CSS file ("Main") by identifying and altering the old color codes.
HTML Editing
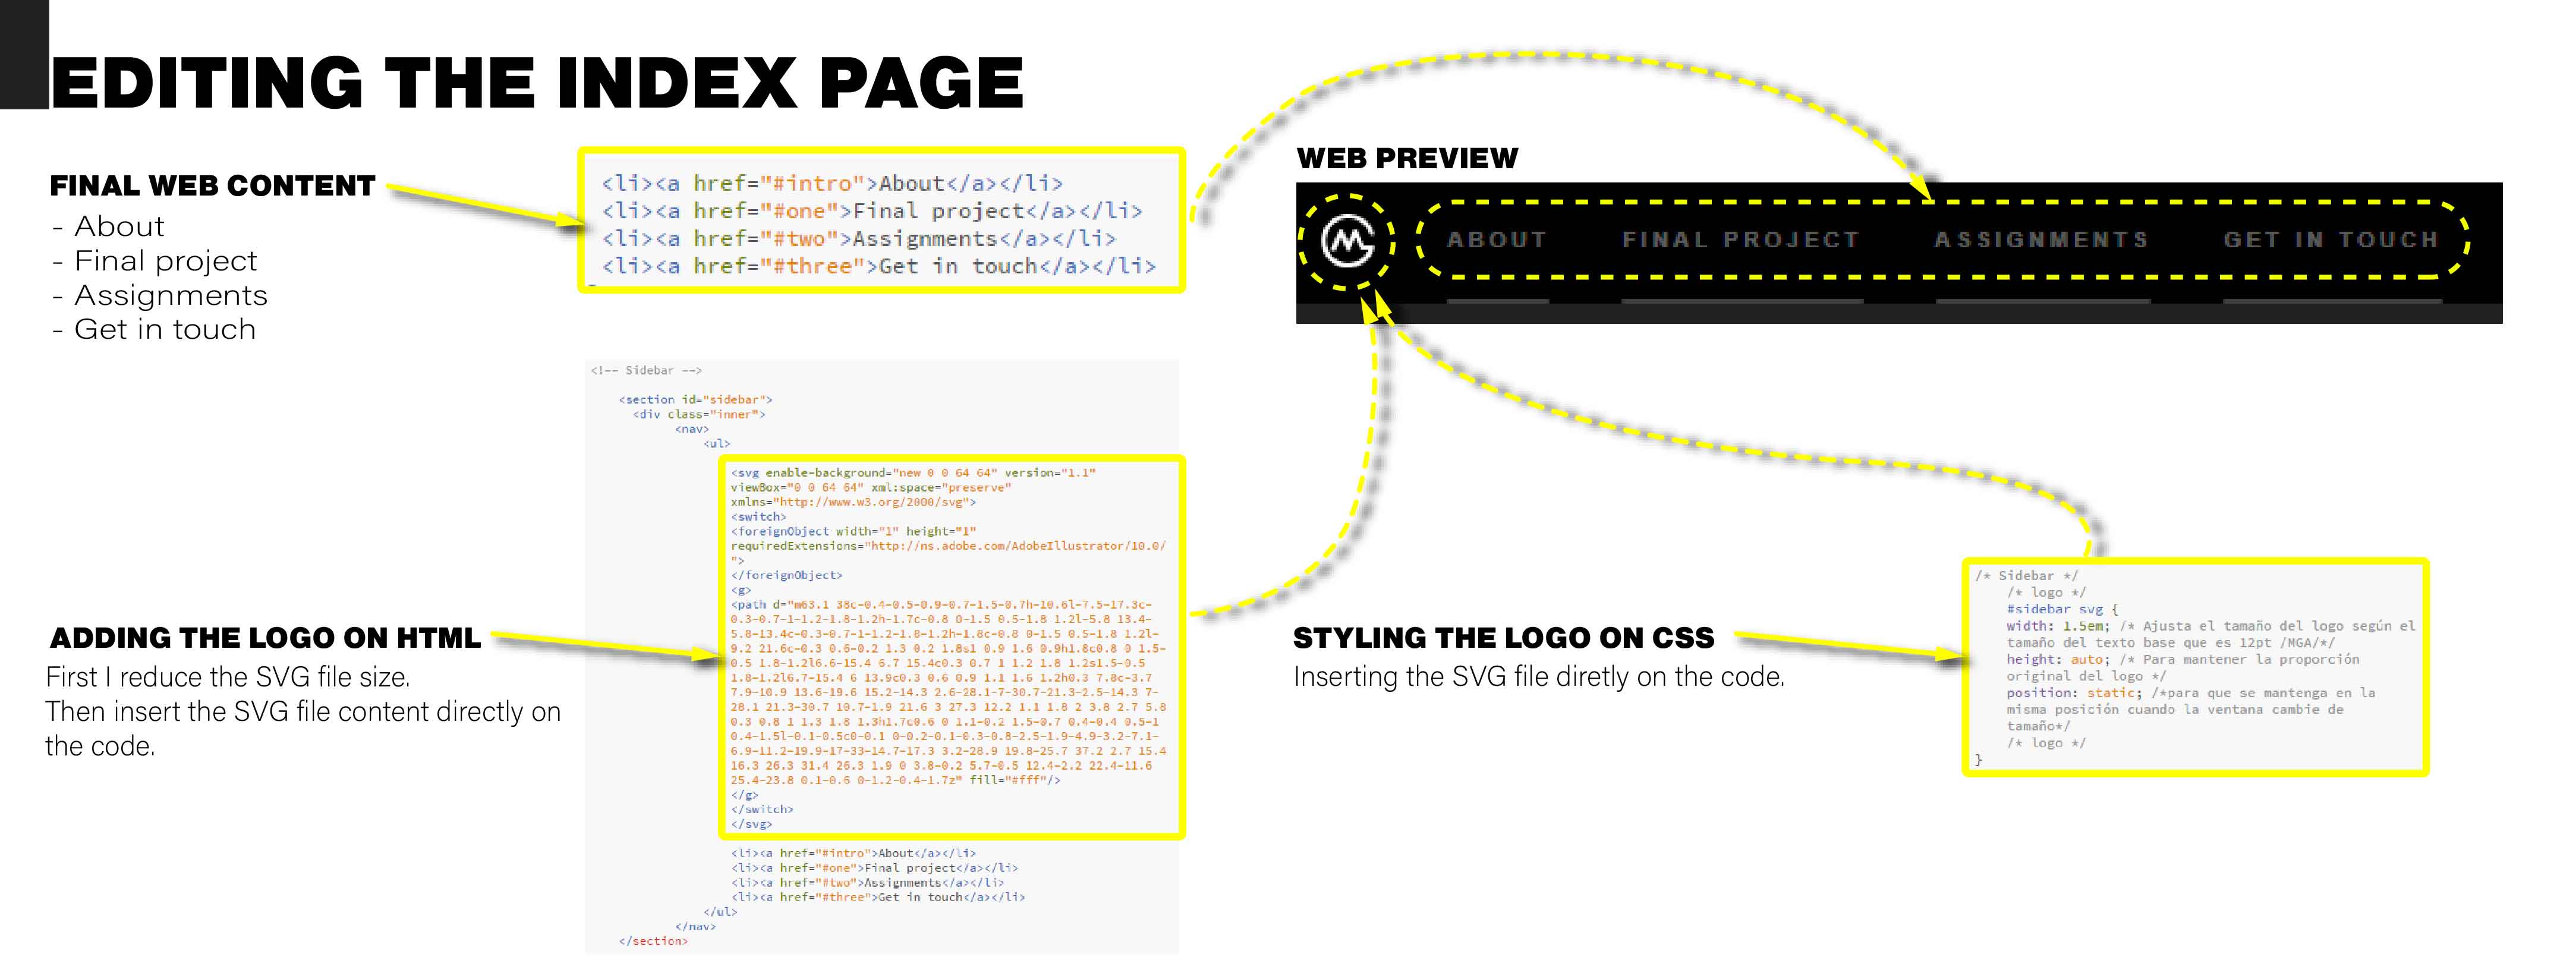
To change the layout, HTML modifications were necessary, including adjustments to the icons.

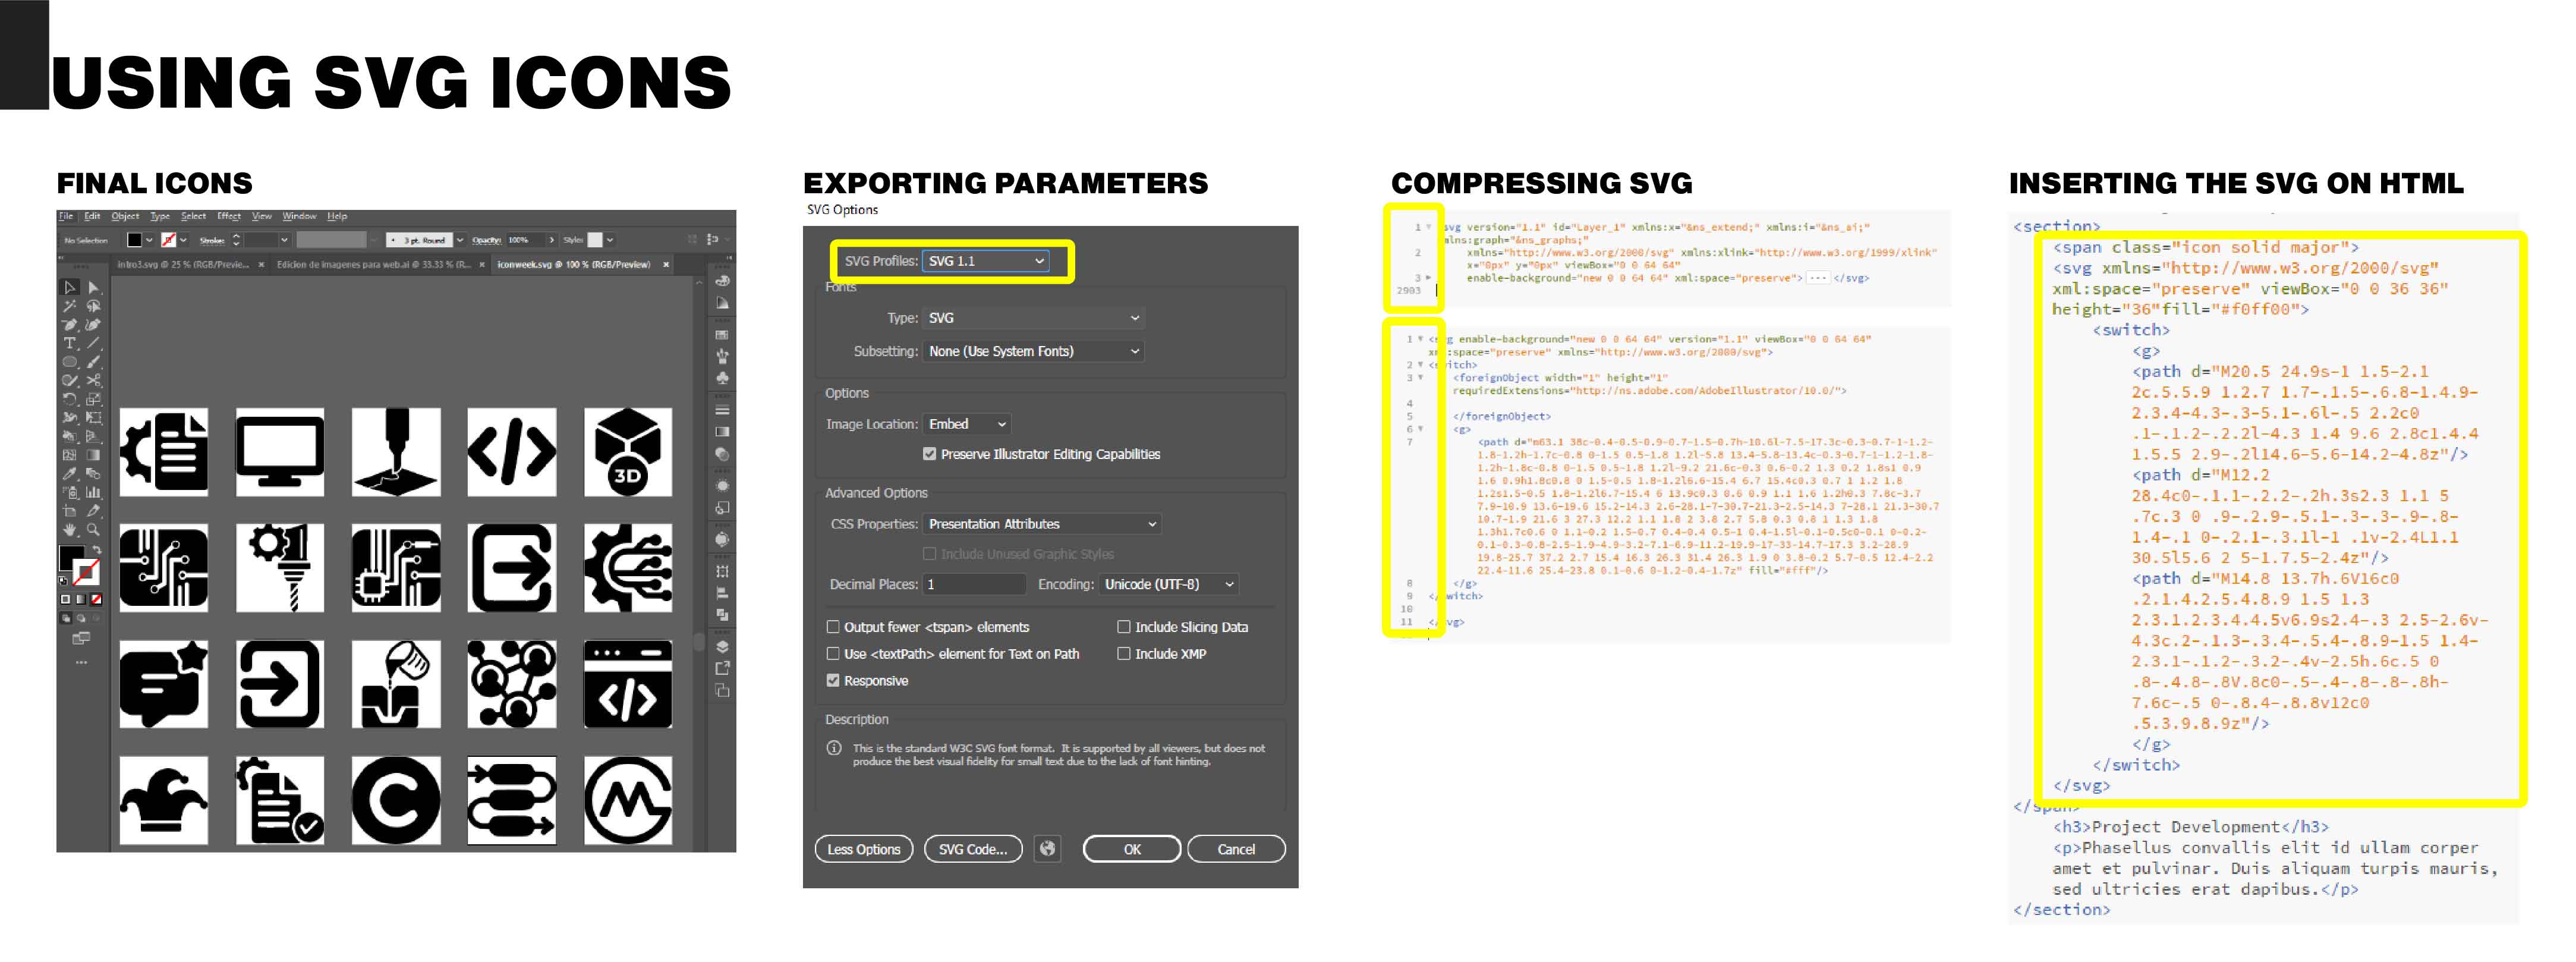
I sourced the icons from the website used in the example webpage, https://fontawesome.com/, opting for solid icons that closely matched my requirements. However, many of the desired icons didn't appear in the preview. This prompted me to consider creating my own icons. I turned to Adobe Illustrator, using examples from https://www.flaticon.com/ as a base, which I then customized to suit my needs.
Icon Editing
[Challenges] Exporting the icons proved to be a complex process initially. The primary issue was the length of the code, which amounted to nearly 3000 lines. I attempted to use two SVG compressors, https://www.svgminify.com/ and https://jakearchibald.github.io/svgomg/, but the format of the exported SVGs wasn't recognized by the web. After some experimentation, I discovered the correct parameter settings in Adobe Illustrator for exporting, enabling compression services to recognize and reduce the code from 3000 lines to just 11.

Web structure
After finishing modifications to the index page, I decided to sketch out a preliminary plan to better understand how to organize information on the website and determine the page order. Following this, I began editing the main page (index), the presentation page, the final project page, and finally, the page for the first week of assignments.

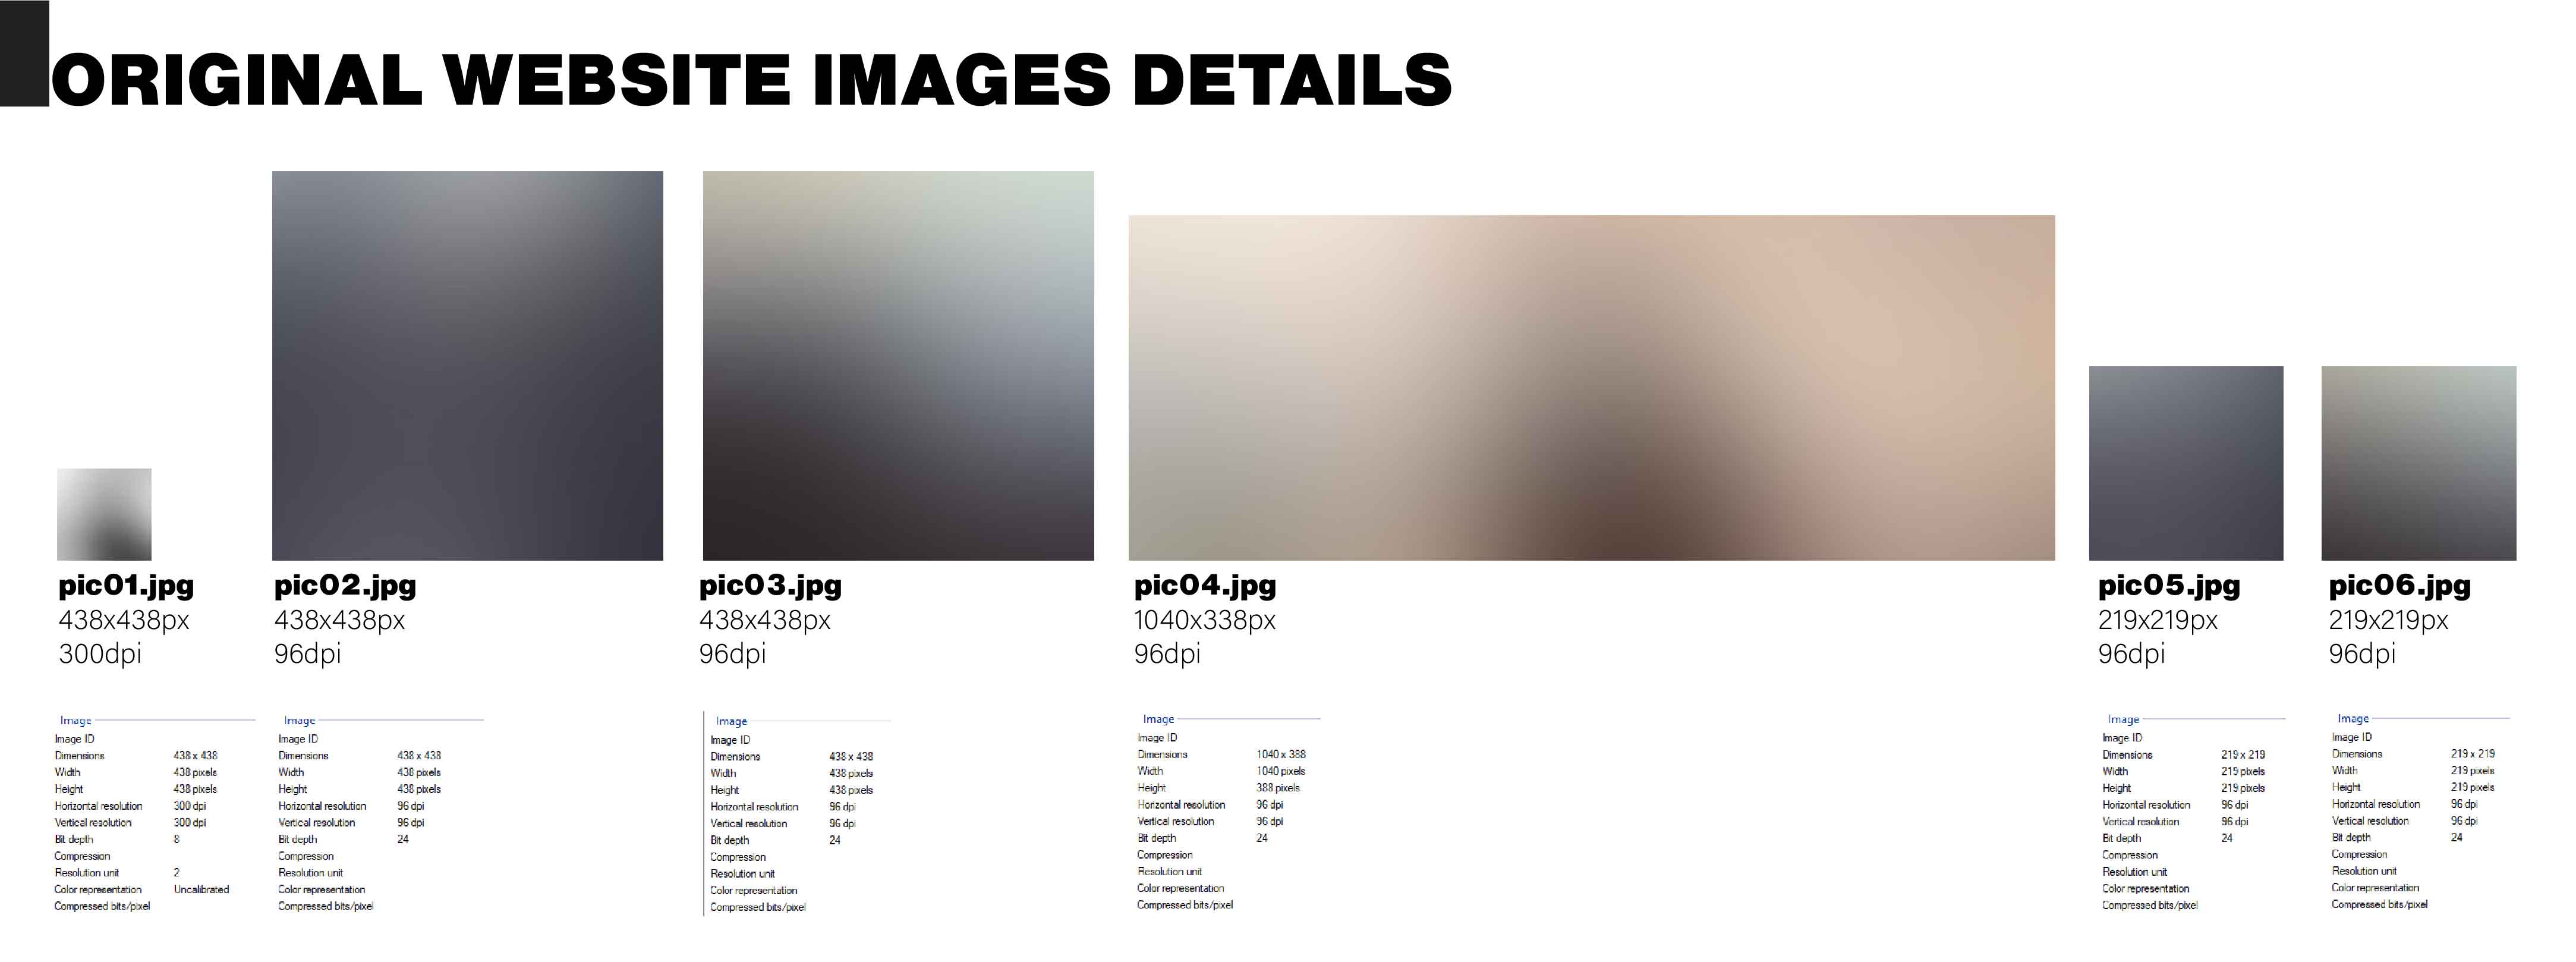
To edit the presentation page and insert the first image onto the website, I first analyzed the template's images and adjusted the profile picture to align with those characteristics:

Git tutorial
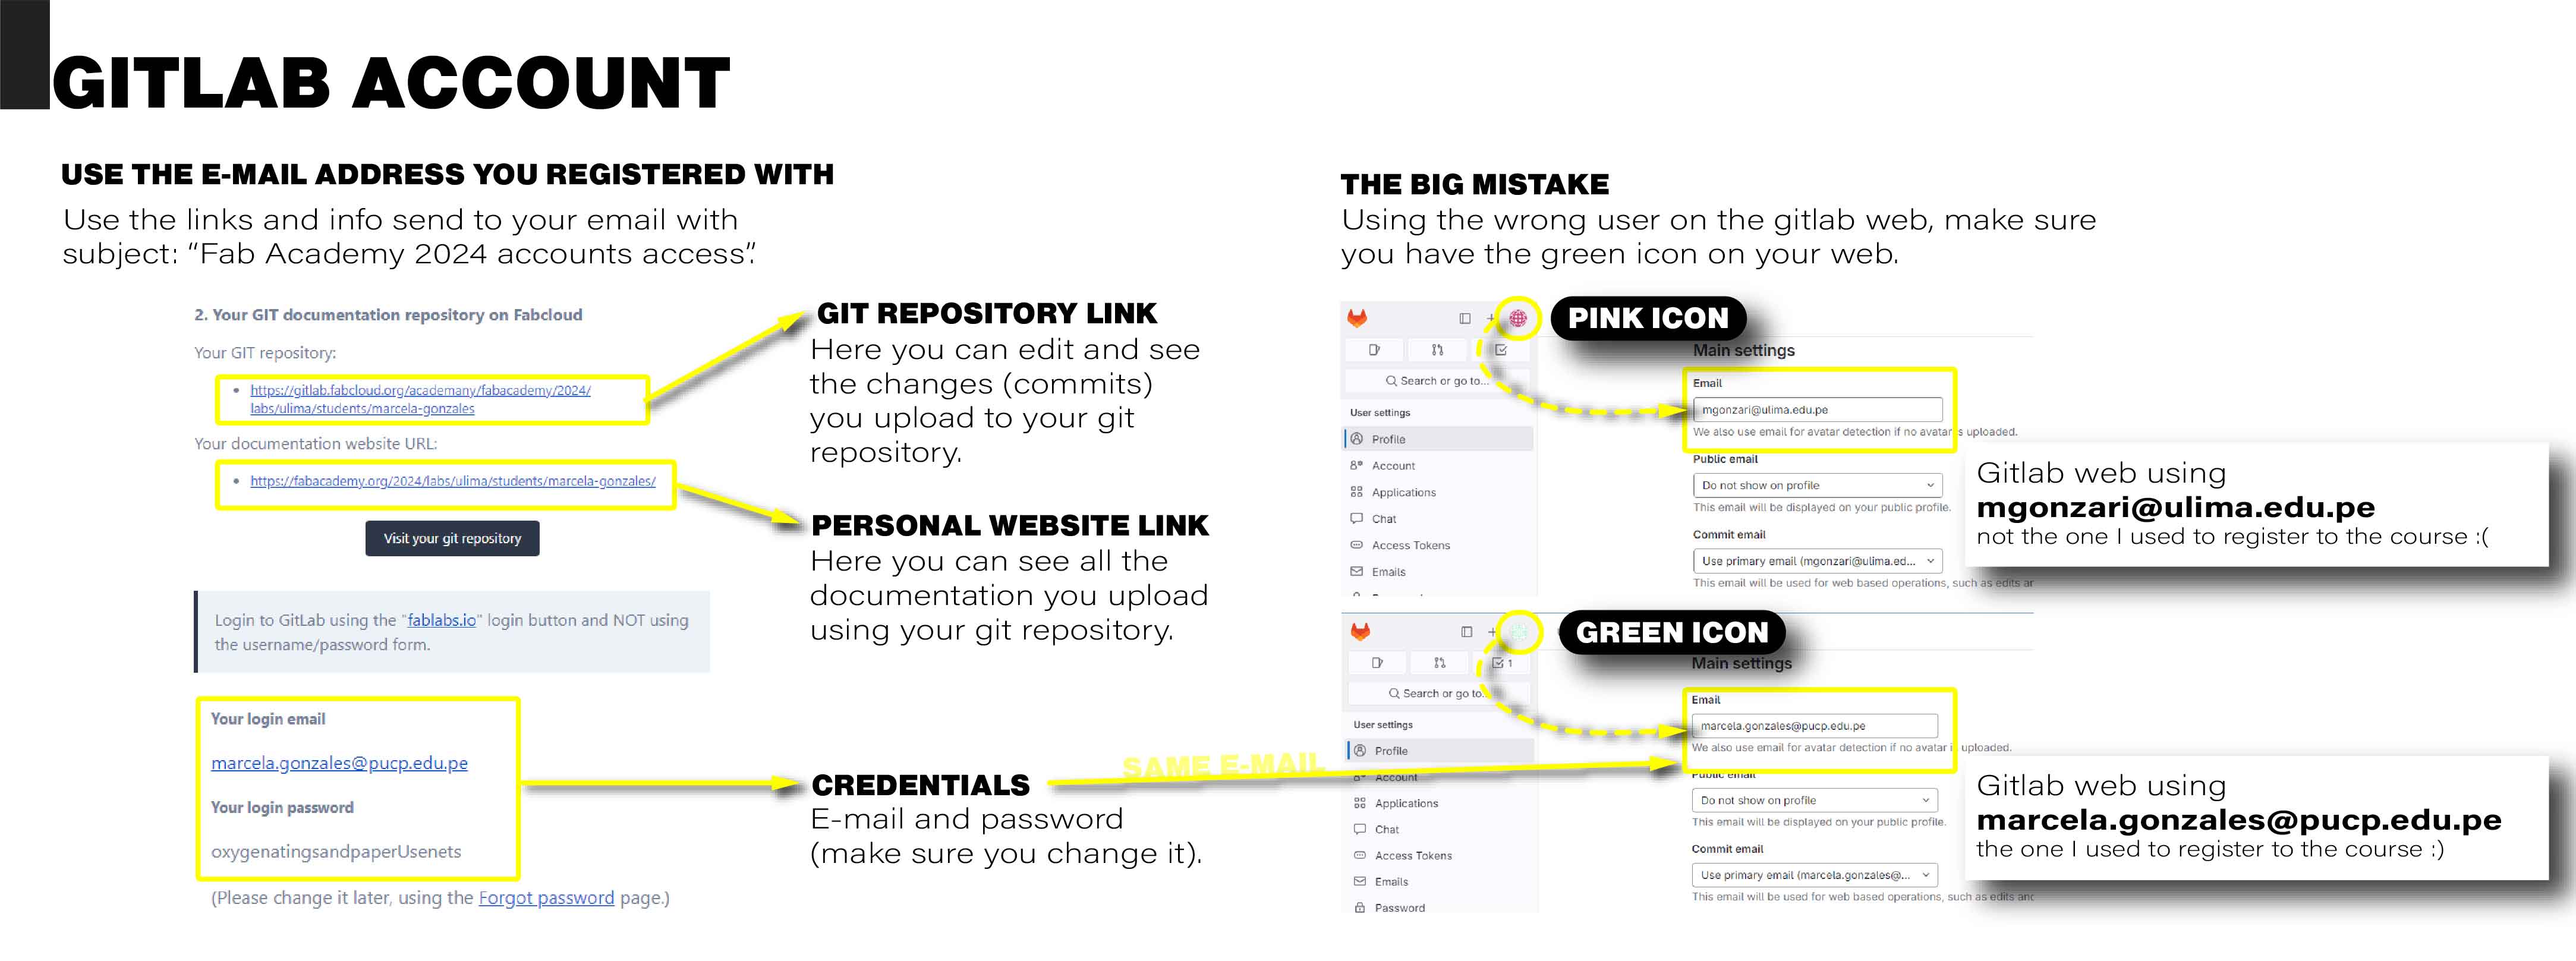
To begin with, this part was where I encountered the most complications. Among these challenges, the one I eventually resolved, albeit after considerable delay, stemmed from my oversight regarding another GitLab account linked to my email. This oversight hindered me from uploading content to the web repository (push).
Helpful links:
| Description | Link |
|---|---|
| Profile gitlab SSH keys | https://gitlab.fabcloud.org/-/profile/keys |
| Login account (Fablabs.io) | https://fablabs.io/signin/ |
| Your GIT documentation repository on Fabcloud | https://gitlab.fabcloud.org/academany/fabacademy/2024/labs/ulima/students/marcela-gonzales |
| Your documentation website URL | https://fabacademy.org/2024/labs/ulima/students/marcela-gonzales/ |
| Fabacademy chat server (using Mattermost) | https://chat.academany.org/ |
| The student evaluation platform (Nueval) | https://nueval.fabacademy.org/ |
Some of the mistakes I made:
| # | Description |
|---|---|
| 1 | To begin, refrain from editing the local copy of your Fab Academy website from the root folder. Instead, right-click within the "marcela-gonzales" folder and select "Open as Brackets project." |
| 2 | Access the website using the links and credentials provided to you via email, which you used to register. Pay particular attention to the link to your personal Fab Academy website repository, for example: git@gitlab.fabcloud.org:academany/fabacademy/2024/labs/ulima/students/marcela-gonzales |
| 3 | Disable the Windows firewall or any antivirus software you may be using. |
| 4 | Configure Gitbash to always run as an administrator. |
| 5 | When choosing a folder to copy your Fab Academy website, ensure that it does not have long paths such as "OneDrive." |
| 6 | When you try to upload large files (more than 10Mb) and your pipeline fills up, and you get ther error
"remote: fatal: pack exceeds maximum allowed size / write error: Broken pipes / error: remote unpack failed: unpack-objects abnormal exit" you can use two commands to reset it: Reset the repository status to the last commit on the remote server: Clean up untracked files: |
Tutorial to enable access:
| # | Description | Code |
|---|---|---|
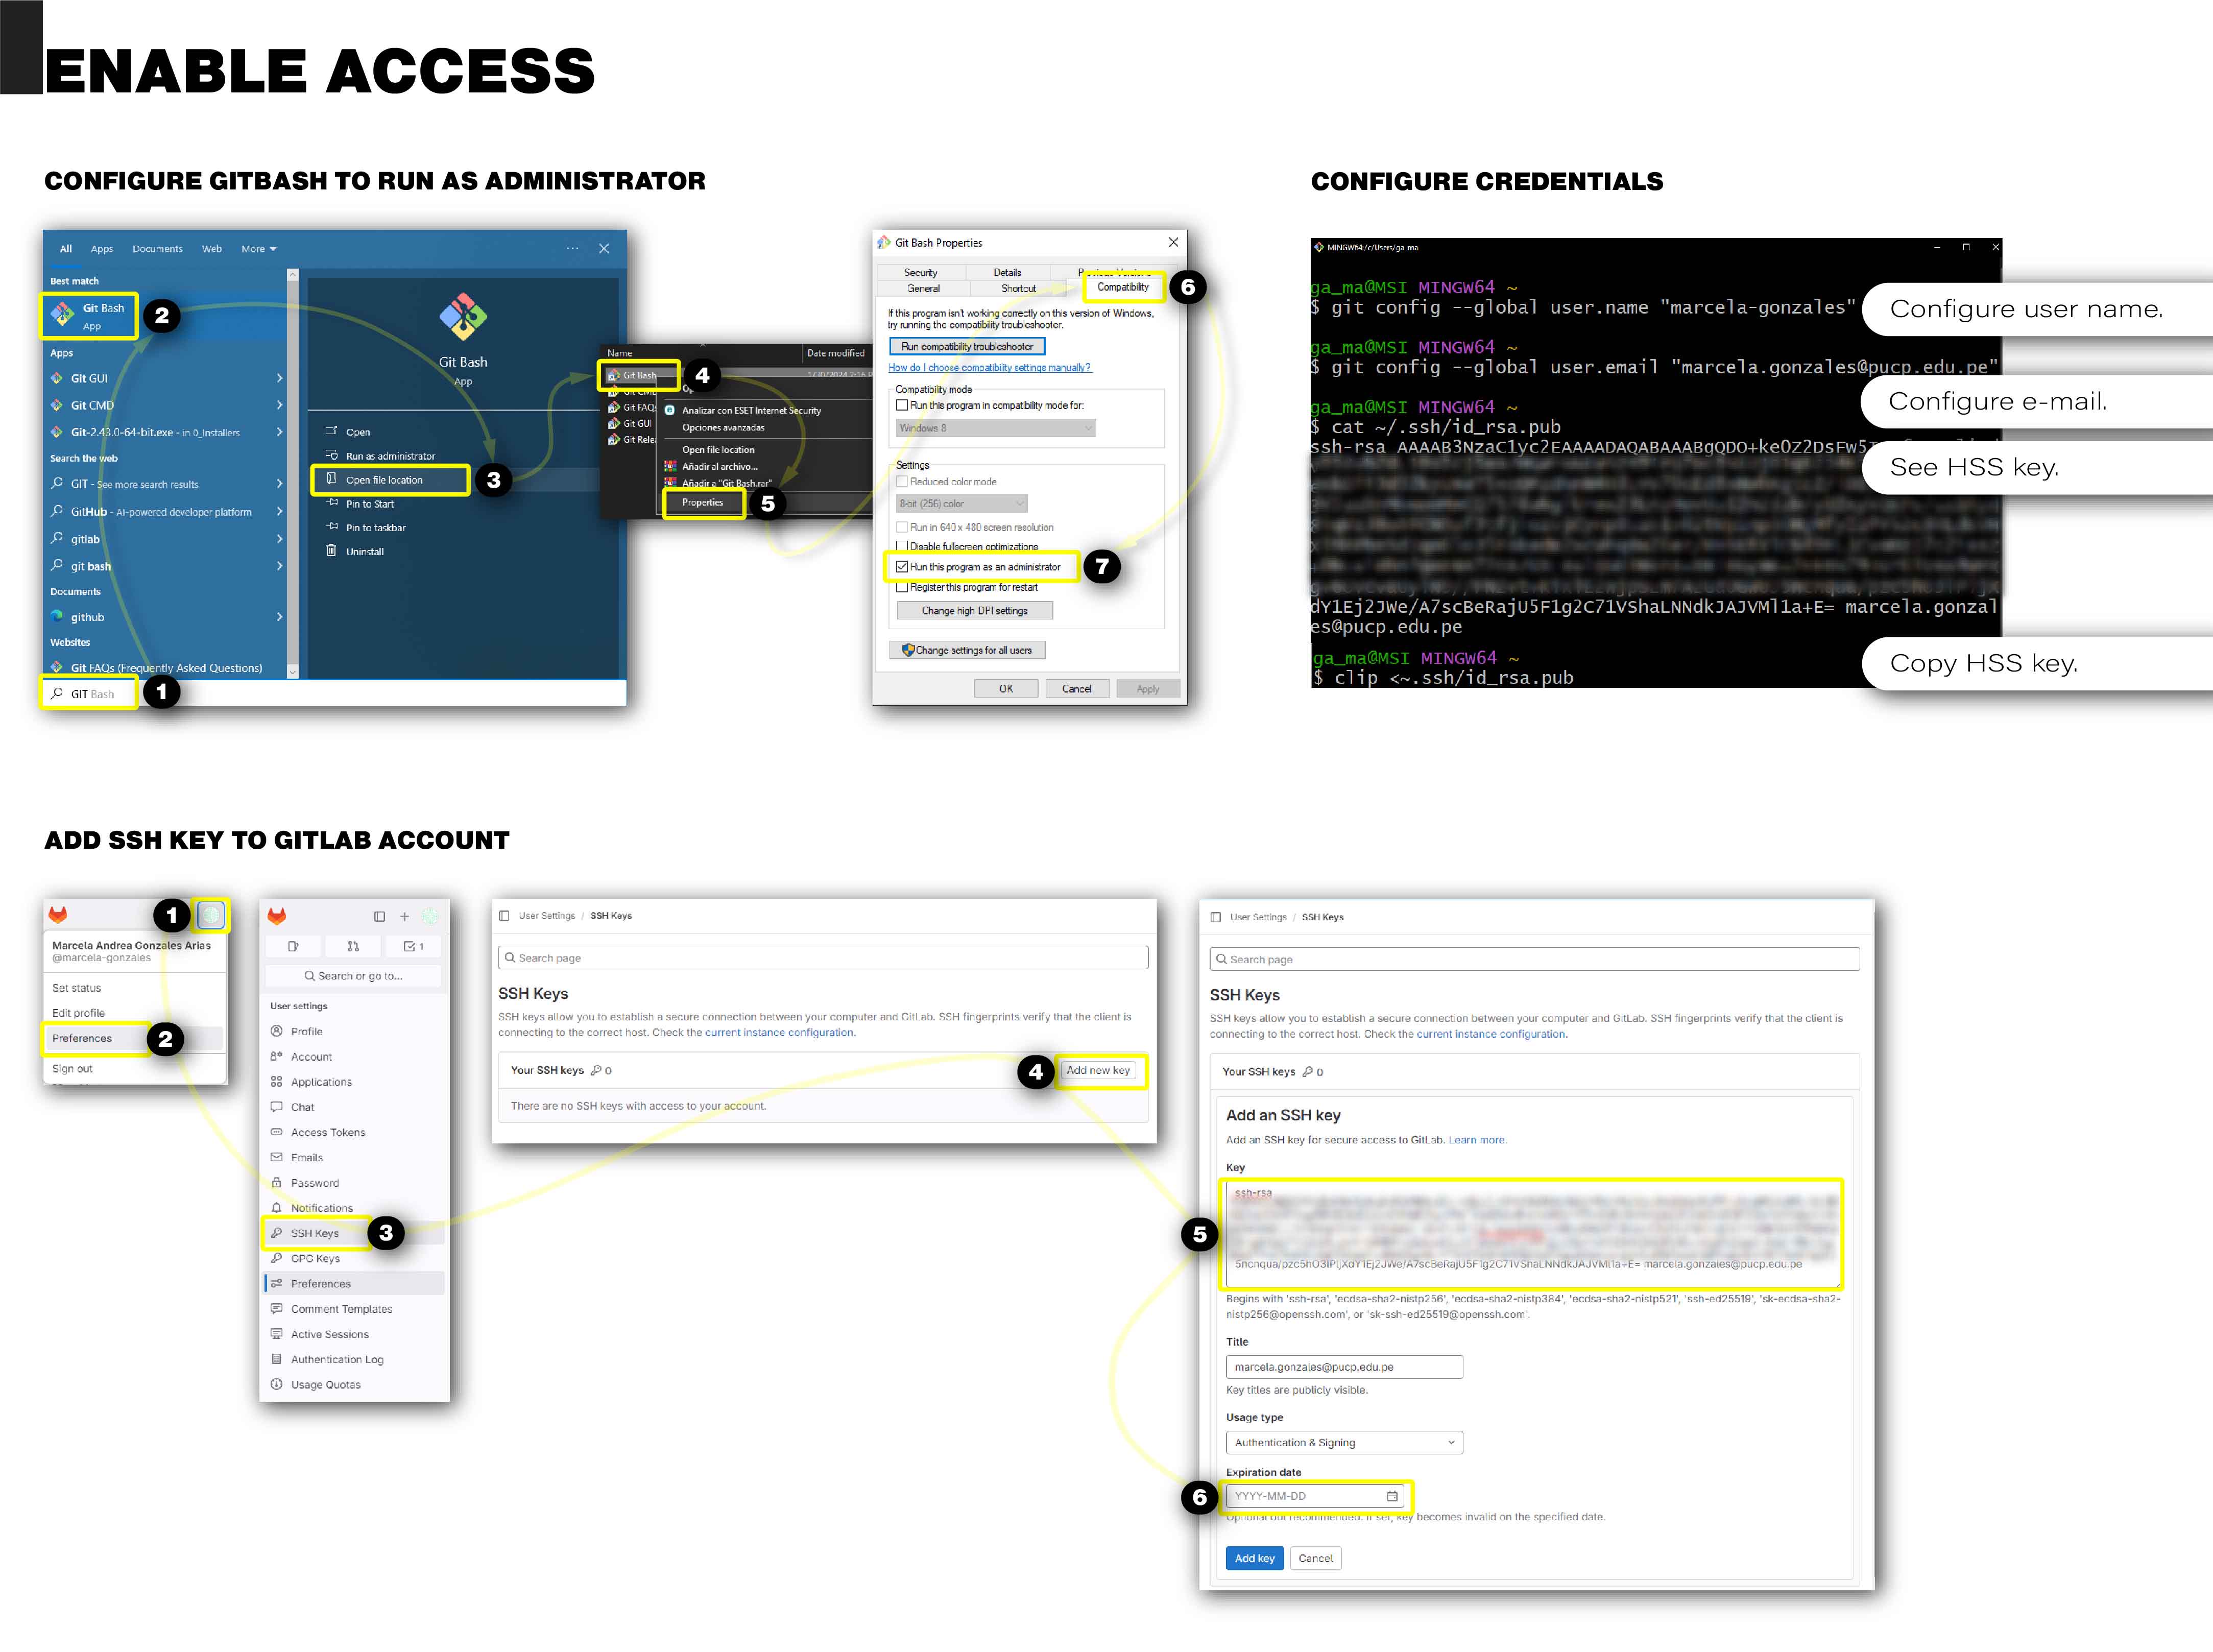
| 1 | Install Gitbash from https://gitforwindows.org/ | |
| 2 | Configure Gitbash to run as an administrator: | |
| 3 | Add your username: | |
| 4 | Configure your email address (use the same email you registered with and received the access email): | |
| 5 | Check your SSH key (use ALT+126 for the tilde symbol ~): | |
| 6 | Copy your SSH key using the following command for Windows: | |
| 7 | Add the SSH key to your GitLab page: |
Clonning the web
| # | Description |
|---|---|
| 8 | First, create a folder on your local computer to make a copy of your personal Fab Academy website. I recommend using a location with a short path, such as the desktop or the root folder "C:". In my case, I used the "C:" folder because my desktop had OneDrive in the path, which caused issues. |
| 9 | Navigate to the folder you created and open Gitbash. Right-click in the space and select the option "Open Git Bash here". |
| 10 | Pause the firewall. |
| 11 | Now, let's begin cloning the website:
|

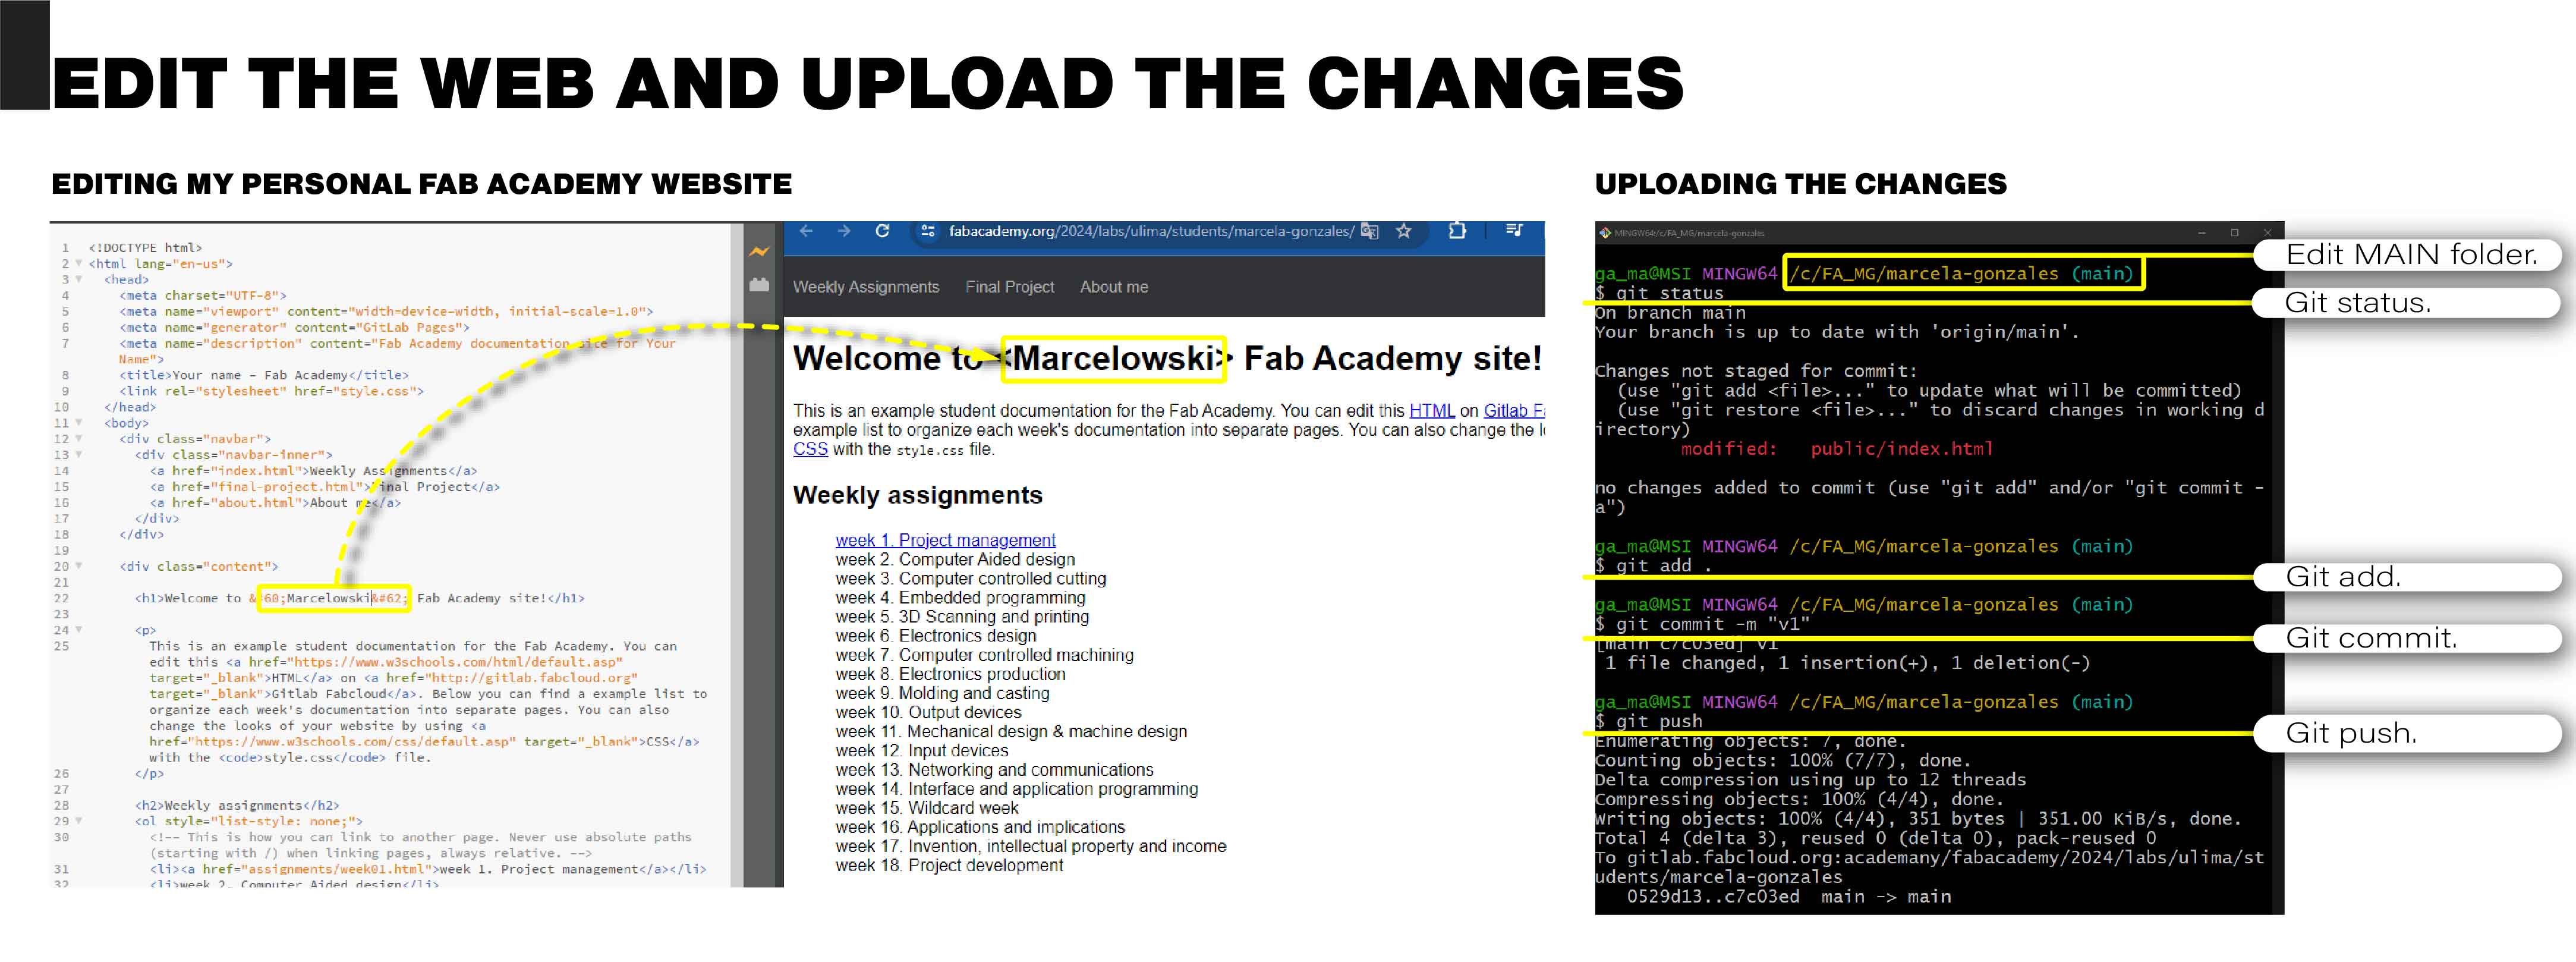
Editing the website and uploading changes
| # | Description | Code |
|---|---|---|
| 12 | Navigate to the "marcela-gonzales" folder and open the HTML file named "index" by right-clicking and selecting "Open with," then choose the "Brackets" application. | |
| 13 | Modify the title of the website on line 22. | |
| 14 | Next, go to the root folder, which bears your name "marcela-gonzales." Right-click in the space and open Gitbash. It's important that Gitbash displays the directory location indicating "(main)". | |
| 15 | Check the status using the following command; it should display a message indicating that there was a modification: | |
| 16 | Add the changes with the following command, ensuring there is a space before the period: | |
| 17 | Then use the commit command to name the set of changes you made and differentiate versions as modifications are made: | |
| 18 | Upload your website to the repository. This process may take time depending on the amount of changes and the size of the files to be uploaded: | |
| 19 | Verify the changes on your website by accessing the same link you used for the cloning process. |
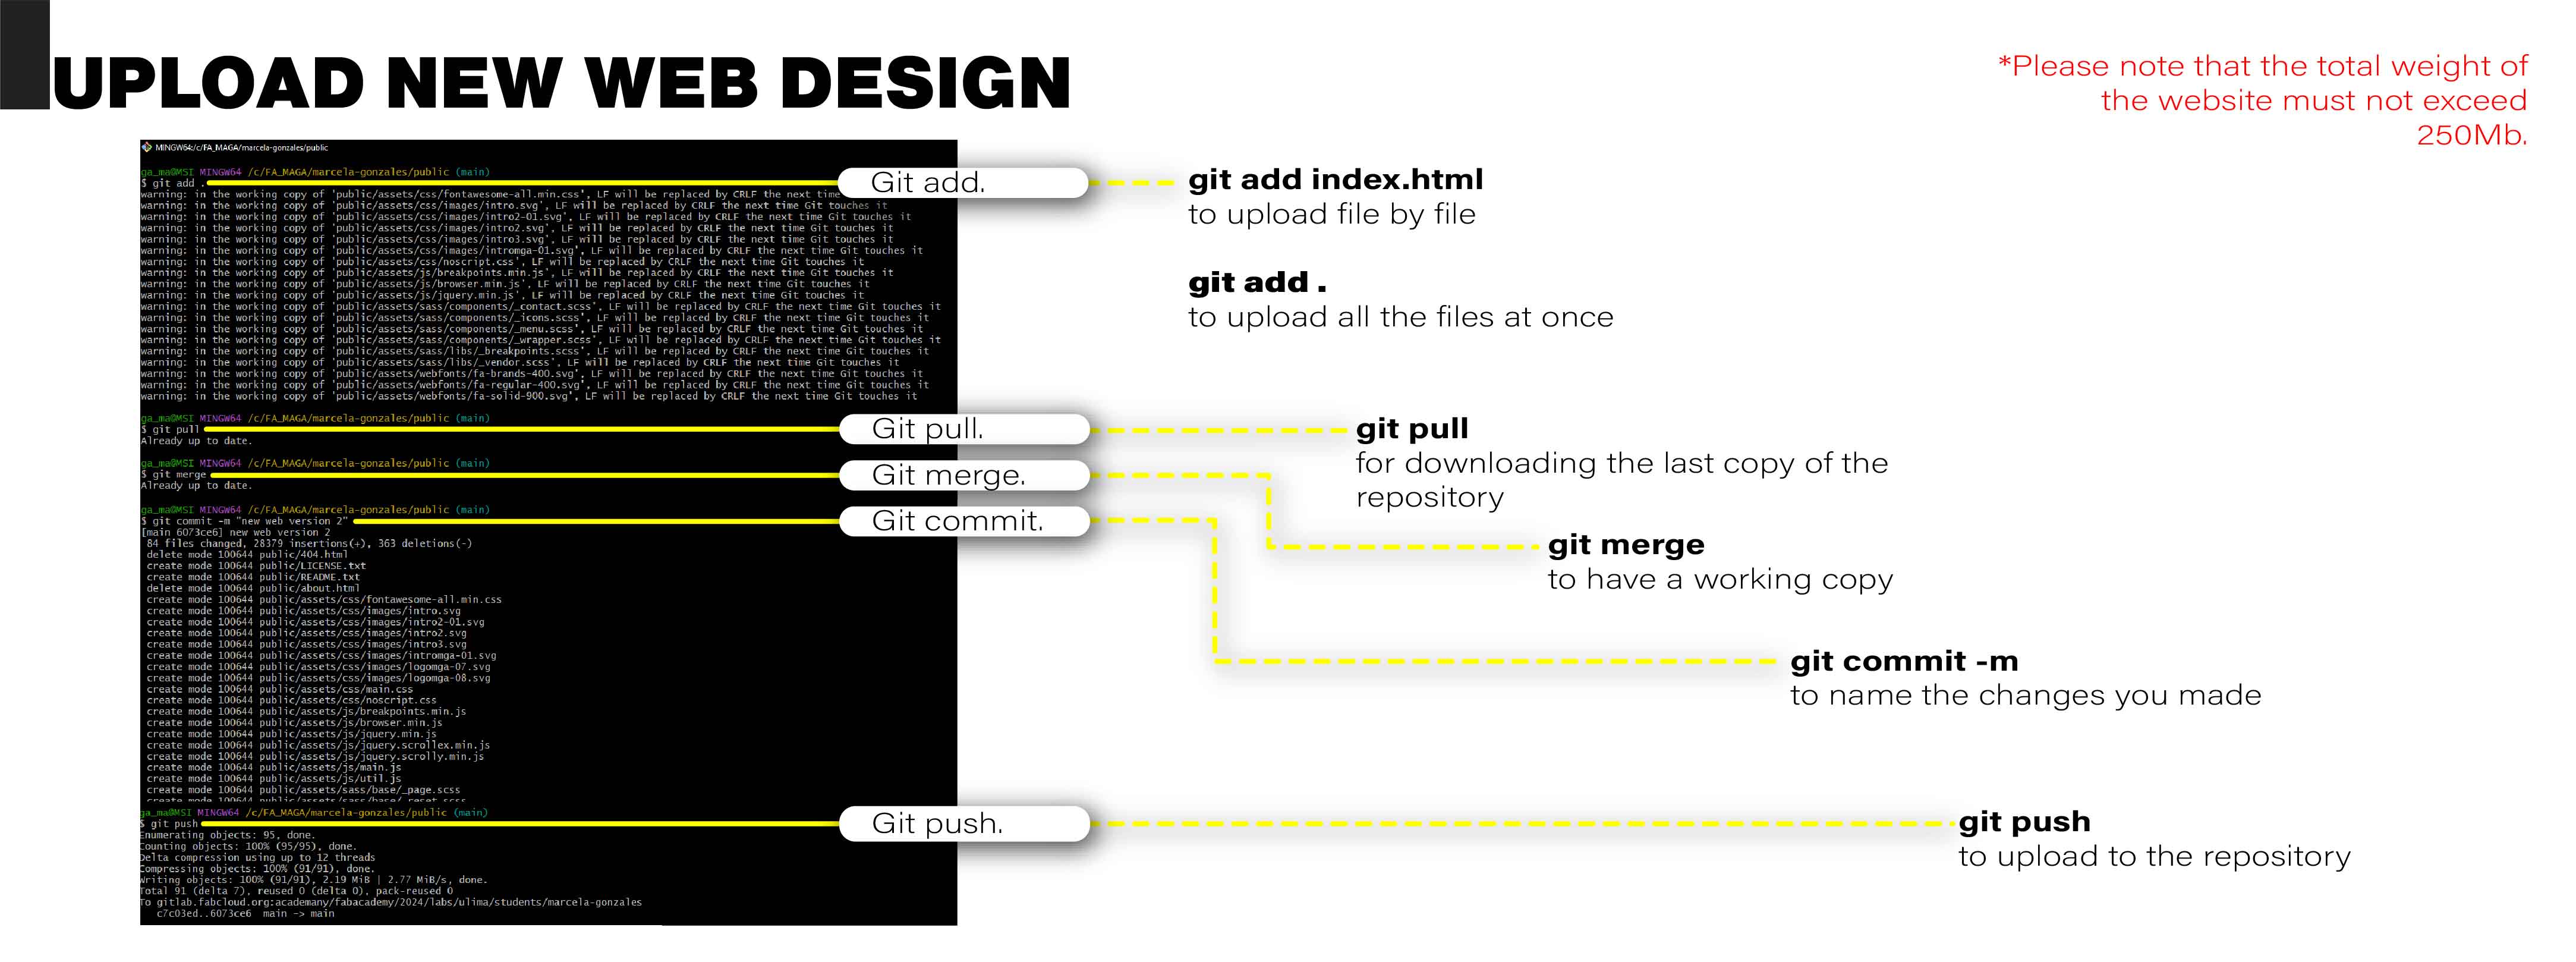
Uploading the new web design
| # | Description | Code |
|---|---|---|
| 1 | To begin, delete the files you cloned from your personal Fab Academy website. | |
| 2 | Next, copy the files from your new web design. | |
| 3 | Then, open Gitbash from the root folder. | |
| 4 | Add the changes using the following command (remember the space before the period):
sometimes it worked with "public/index.html" |
|
| 5 | Next, pull a copy of the current website using the command: | |
| 6 | Merge the changes using the command: | |
| 7 | Commit by indicating the name of the change: | |
| 8 | Finally, upload the files using the command: | |