Week 18: Project Development
Week 18: Project Development
What Tasks Have Been Completed?
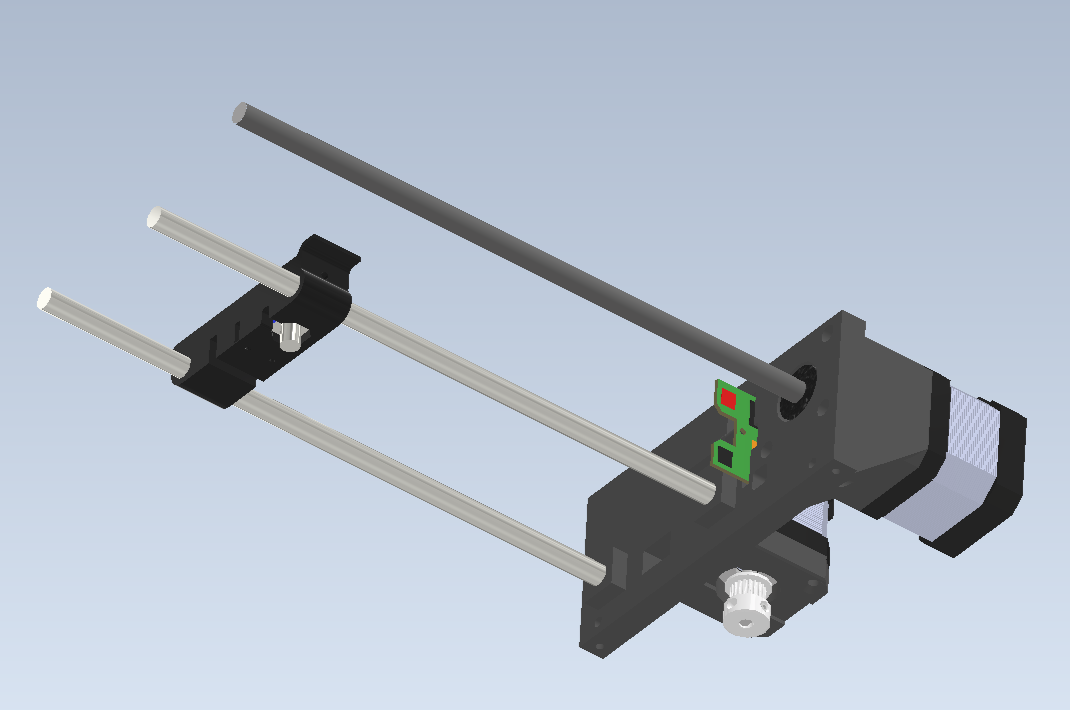
The mechanical assembly of the machine is now completed, and the PCB has been successfully mounted to the system, fitting well within the design. However, I am still in the process of refining and adjusting various details to enhance the overall functionality and performance. These ongoing improvements aim to ensure optimal operation and reliability of the machine.
What Tasks Remain?
-
Final Assembly of the Machine:
Complete the assembly of the final machine, incorporating all the final iterations and improvements made during the prototyping phase.
-
Coding for G-code Command Processing:
Develop and implement the code to process G-code commands, ensuring accurate and efficient execution of machine operations.
-
Microstepping Configuration:
Optimize microstepping to manage the step frequency and prevent overloading the Seeeduino XIAO, particularly when operating at high step rates.
-
G-code Commands Implementation:
Implement the specific G-code commands that will be used for machine operations:
- G28: Homing all axes to establish a reference position.
- G1: Linear movement command, with the following specific implementations:
- G1 X: Control the solenoid carriage movement.
- G1 Y: Control the paper feeder movement.
- P: Punch the paper with the solenoid.
What Has Worked? What Hasn't?
The machine is operating effectively, with the paper feeder assembly performing better than initially expected. However, there are areas where improvements are necessary to ensure consistent performance and address specific issues:
- Paper Jamming Prevention:
Occasionally, the paper jams when passing under the acrylic embossing plate. To prevent this, I plan to add smooth transitions and chamfers to the contact points. These modifications will guide the paper more smoothly, reducing the likelihood of jams.
- Solenoid Power and Heat Management:
The current solenoid lacks the necessary power to emboss in a semisphere pattern with 95g paper, and a more robust solenoid will be required for cardboard. When I attempted to increase the voltage from 5V to 7V, the solenoid overheated, making it unreliable for extended periods. The voltage regulator also became extremely hot during operation. To address this, I decided to maintain the existing solenoid but replaced the round tip with a pointier one. This change reduces the contact area, allowing the same force to generate more pressure, effectively creating holes.
To manage the heat generated by the voltage regulator, I added a heatsink. This addition helps dissipate the excess heat, ensuring more stable and reliable long-term operation.
- Optimized Embossing Tip:
The switch to a pointier embossing tip has proven effective. Ensuring that the tip material is durable and suitable for repeated use is crucial to maintaining consistent performance.
What Questions Need to be Resolved?
-
G-code Management:
- How can G-code be efficiently sent via serial communication for the PCB to read and interpret it?
- What specific format or protocol will be used to send G-code from the master PC to the Arduino?
- How can a queue be implemented in the Arduino code to queue and then read the executing codes?
-
Program Development:
- How can a program be developed on the master PC to convert documents (Word, .txt, etc.) into Braille text?
- What algorithms and data structures are required to create a matrix and translate text into Braille?
- How will the conversion program interface with the machine to ensure accurate Braille printing?
-
User Interface:
- What are the key features and functionalities needed for the user interface?
- How will the user interface integrate with the existing system and ensure ease of use?
-
Paper Handling:
- Should a paper feeder be designed, or would a paper guide suffice for the application?
- What are the advantages and disadvantages of each option in terms of reliability, complexity, and cost?
- How much time and resources are available to design and implement the chosen paper handling mechanism?
What Will Happen When?
Steps to Complete the Project
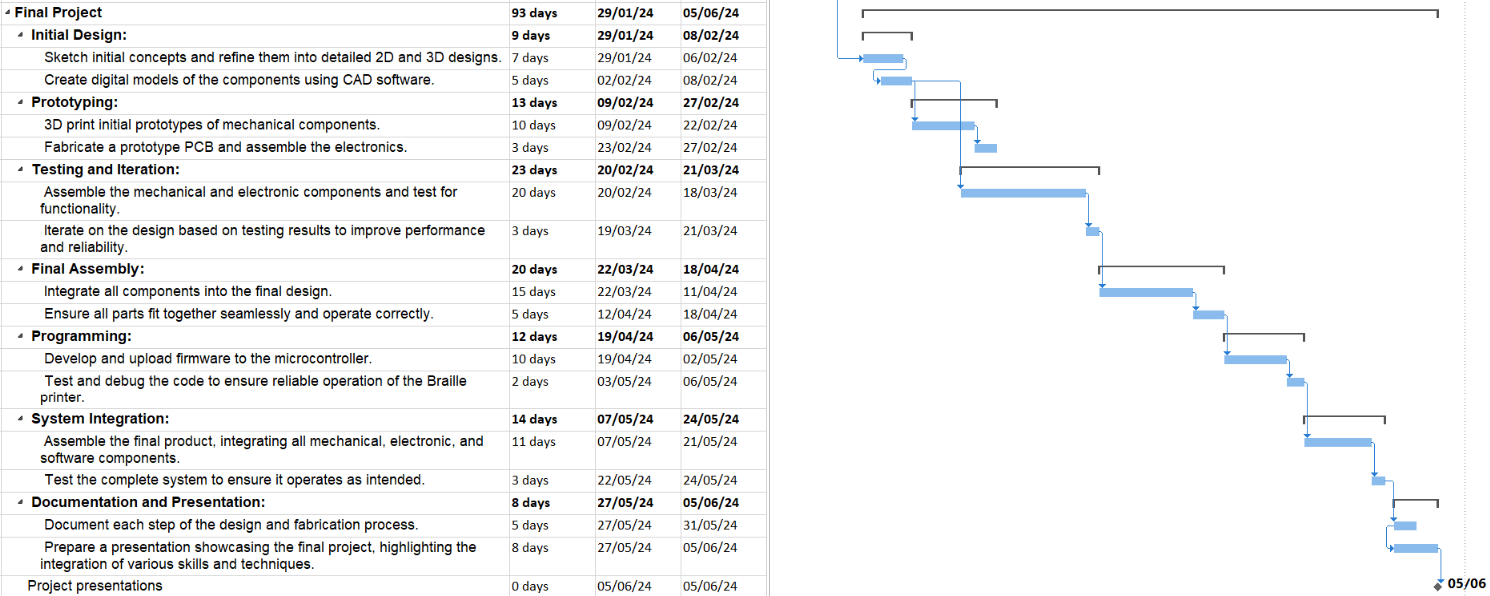
- Initial Design:
- Sketch initial concepts and refine them into detailed 2D and 3D designs.
- Create digital models of the components using CAD software.
- Prototyping:
- 3D print initial prototypes of mechanical components.
- Fabricate a prototype PCB and assemble the electronics.
- Testing and Iteration:
- Assemble the mechanical and electronic components and test for functionality.
- Iterate on the design based on testing results to improve performance and reliability.
- Final Assembly:
- Integrate all components into the final design.
- Ensure all parts fit together seamlessly and operate correctly.
- Programming:
- Develop and upload firmware to the microcontroller.
- Test and debug the code to ensure reliable operation of the Braille printer.
- System Integration:
- Assemble the final product, integrating all mechanical, electronic, and software components.
- Test the complete system to ensure it operates as intended.
- Documentation and Presentation:
- Document each step of the design and fabrication process.
- Prepare a presentation showcasing the final project, highlighting the integration of various skills and techniques.
GANTT DIAGRAM:
Fab Academy Assigments
Final Project Development:
What Have You Learned?
-
Project Management:
I learned that setting up a Gantt diagram for project management is crucial for having an organized and well-established foundation to begin working on. This helps in tracking progress and ensuring timely completion of tasks.
-
Prototyping and Iteration:
Ideas do not come fully formed and require a prototyping stage that involves designing, fast prototyping, applying corrections, and repeating. Modern 3D printing technologies allow for much faster design and iteration than before. My Custom Vzbot235 AWD machine and the Bambulab machines at the Ulima Fablab were particularly helpful in this process.
-
Component Testing:
It is better to use a breadboard to test components initially. Once the connections are verified and functioning correctly, you can proceed to PCB designing. I encountered errors during the electronics design phase and wasted a lot of time soldering a half-functioning board.
-
Attention to Detail:
I learned the importance of triple-checking and even quintuple-checking connections to prevent mistakes. This helps avoid the frustration of seeing hours of work fabricating a PCB go to waste due to a simple error, such as a wrong connection that can cause components to fail and release the "magic smoke."


