
Welcome to Week 4
Embedded programming
Hello! this time, let’s learn about Embedded programming, for this week we have the following group and individual assignments:
- Group assignment:
- Individual assignment:
o Browse through the datasheet for your microcontroller. - ✅ Done
o Compare the performance and development workflows for other architectures. - ✅ Done
o Document your work to the group work page and reflect on your individual page what you learned - ✅ Done
o Write a program for a microcontroller development board to interact (with local input &/or output devices) and communicate (with remote wired or wireless devices) - ✅ Done
GROUP ASSIGNMENT
Greetings! Today, we'll delve into embedded programming, focusing on exploring the Seeeduino XIAO RP2040 microcontroller. Let's get started!
For the FAB ACADEMY 2024, we were advised to use the SEEED STUDIO XIAO RP2040, which will assist us in executing all our task programming as well as our final project. It's a highly potent microcontroller known for its versatility, enabling us to program effectively due to its outstanding features.
Seeeduino XIAO RP2040:
The Seeed XIAO RP2040 is a powerful microcontroller known for its versatility and features. Some of its key features include:
| Small Form Factor | The XIAO RP2040 comes in a compact form factor, making it suitable for projects with space constraints or wearable applications |
|---|---|
| USB Connectivity | The microcontroller includes USB connectivity for programming and data transfer, enabling easy integration with computers and other devices. |
| Programmability | It can be programmed using the Arduino IDE, MicroPython, or CircuitPython, providing flexibility and ease of development. |
| Low Power Consumption | The RP2040 chip is designed for low power consumption, making it suitable for battery-powered applications. |
| Integrated Peripherals | It features integrated peripherals such as SPI, I2C, UART, PWM, and ADC, expanding its capabilities for various projects |
| Affordablen | The XIAO RP2040 is relatively affordable compared to other microcontrollers with similar capabilities, making it accessible to hobbyists, students, and professionals alike |

These features make the Seeed XIAO RP2040 a popular choice for a wide range of embedded projects and applications.
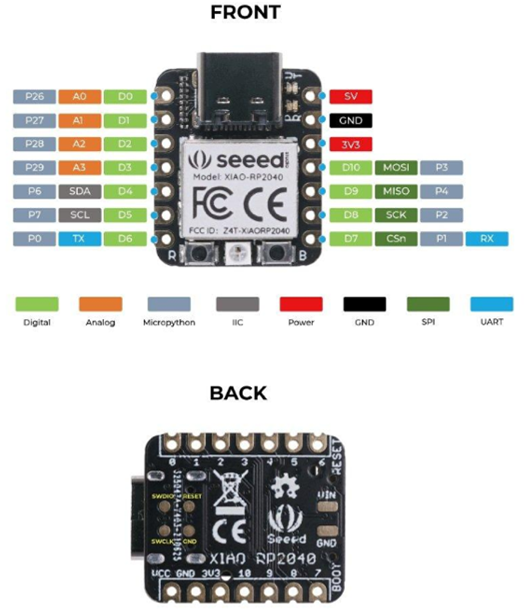
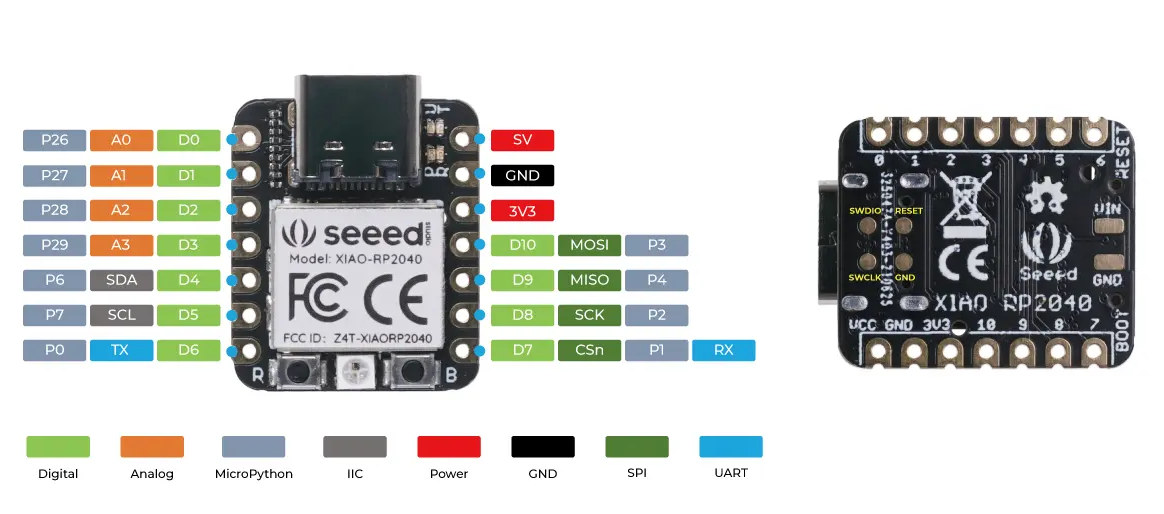
The simplified pinout for the Seeed Studio XIAO RP2040 microcontroller is:
- 3V3: 3.3V power output
- Earth Earth
- A0-A7: analog input pins
- D0-D23: Digital I/O Pins
- TX, RX: UART communication pins
- SCL, SDA: I2C communication pins
- SCK, MISO, MOSI, SS: SPI communication pins
- DAC0, DAC1: digital-to-analog converter output pins
- PWM0-PWM6: pulse width modulation pins
- USB: USB communication and power input
- VBUS, VBAT: battery input pins
- SWDIO, SWCLK: serial cable debugging pins.
Another example of a microcontroller I used was an Arduino nano:

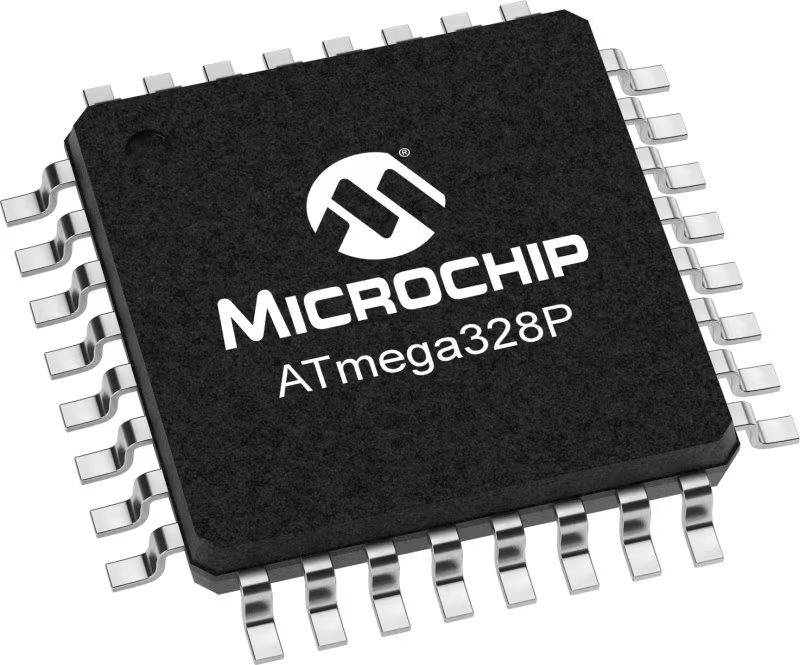
The Arduino Nano is a compact and functionally complete version of the Arduino Uno. Based on the ATmega328P microcontroller, the Arduino Nano is known for its small size and ease of integration into smaller, compact projects. This microcontroller is ideal for developers looking for a powerful and versatile solution in a small form factor.
We create test codes and upload them to each microcontroller.
Seeed Xiao RP2040
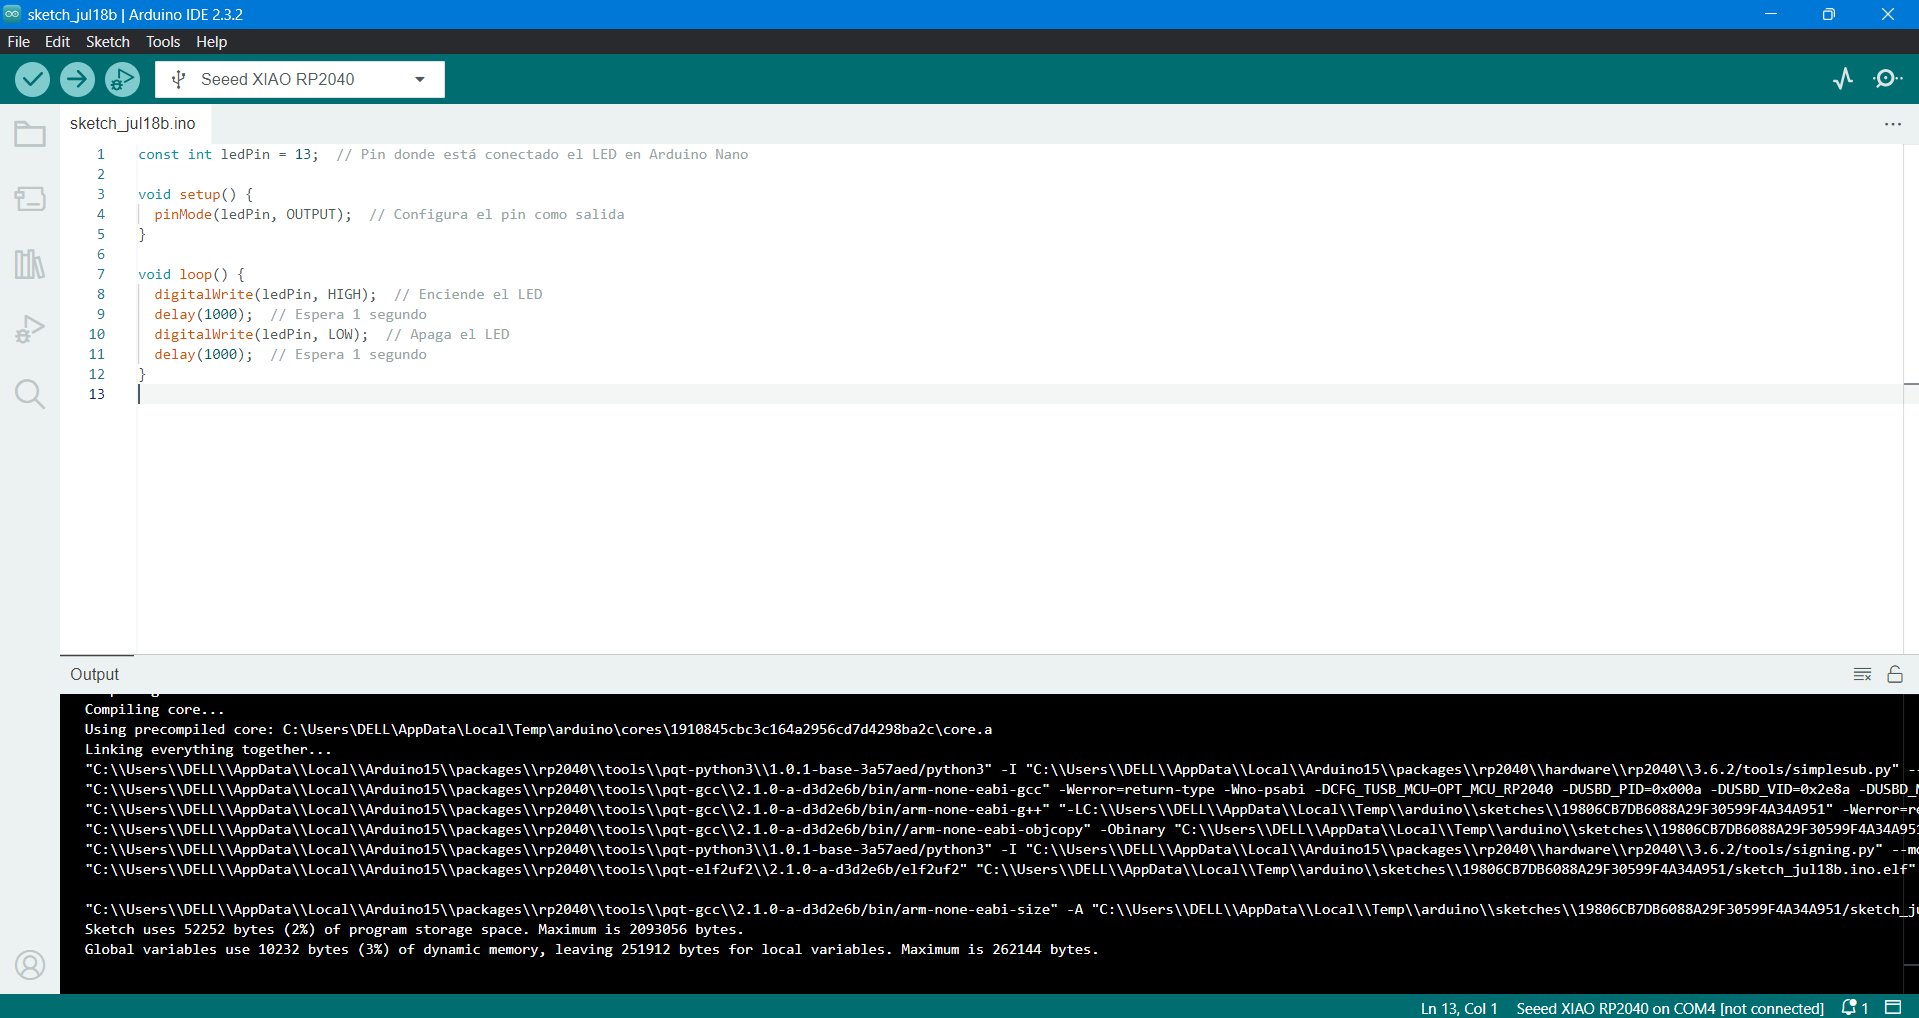
This is the code:
            const int ledPin = 13;  // Pin donde está conectado el LED en Arduino Nano

            void setup() {
              pinMode(ledPin, OUTPUT);  // Configura el pin como salida
            }

            void loop() {
              digitalWrite(ledPin, HIGH);  // Enciende el LED
              delay(1000);  // Espera 1 segundo
              digitalWrite(ledPin, LOW);  // Apaga el LED
              delay(1000);  // Espera 1 segundo
            }
Arduino Nano

This is the code:
            const int ledPin = 13;  // Pin GPIO donde está conectado el LED

            void setup() {
              pinMode(ledPin, OUTPUT);  // Configura el pin como salida
            }

            void loop() {
              digitalWrite(ledPin, HIGH);  // Enciende el LED
              delay(1000);  // Espera 1 segundo
              digitalWrite(ledPin, LOW);  // Apaga el LED
              delay(1000);  // Espera 1 segundo
            }
The following pictures show how each microcontroller uses the storage space and the dynamic memory respectively.
Seed Xiao RP2040

Arduino Nano

Here is a box with some more specific comparisons between the two microcontrollers:
| Feature | Seeed Xiao RP2040 | Arduino Nano |
|---|---|---|
| Architecture and Cores | ARM Cortex-M0+ 2 cores Up to 133 MHzs |
AVR 1 core 16 MHz |
| Memory | 264 KB SRAM 2 MB Flash (external) |
2 KB SRAM 32 KB Flash 1 KB EEPROM |
| Connectivity | No built-in wireless connectivity | No built-in wireless connectivity |
| GPIO and Peripherals | 11 GPIO pins 4 12-bit ADC channels SPI, I2C, UART, PWM, USB 1.1 |
14 digital GPIO pins 6 10-bit ADC channels SPI, I2C, UART, PWM |
| Power Consumption | Optimized for low power Power-saving mode available |
Optimized for low power applications |
| Support and Ecosystem | Raspberry Pi software support Extensive documentation Growing community |
Extensive software support in the Arduino environment Extensive documentation Large user community |
| Programming | C/C++ SDK from Raspberry Pi MicroPython Compatible with Arduino IDE |
Programming in C/C++ through the Arduino IDE Extensive library and example support |
Here is an example using the Arduino Nano:
In this link you can find more information about the Seeed Xiao RP2040: https://wiki.seeedstudio.com/XIAO-RP2040/
In this link you can find more information about the Arduino Nano: https://store-usa.arduino.cc/products/arduino-nano?selectedStore=us
And the Seed Xiao RP2040 was obtained thanks to the Amazon app: Seeed Studio Microcontrolador XIAO RP2040
And the Arduino Nano was obtained thanks to the Amazon app:Arduino Nano
Conclusions
The Seeed Studio XIAO RP2040 is a versatile and powerful microcontroller that offers numerous features and capabilities. Its compact form factor, combined with the RP2040 microcontroller's dual-core ARM Cortex-M0+ processor, makes it suitable for a wide range of embedded projects and applications.
One of the key strengths of the XIAO RP2040 is its flexibility in programming, as it can be programmed using various development environments such as Arduino IDE, MicroPython, or CircuitPython. This flexibility makes it accessible to both beginners and experienced developers.
The XIAO RP2040 also offers a rich set of integrated peripherals, including GPIO pins, USB connectivity, analog inputs, UART, SPI, I2C, PWM, and DAC outputs, providing ample options for interfacing with sensors, actuators, and other external components.
Moreover, its low power consumption and affordability further enhance its appeal for projects requiring battery-powered operation or budget constraints.
In conclusion, the Seeed Studio XIAO RP2040 microcontroller stands out as a reliable and versatile choice for makers, hobbyists, students, and professionals looking to develop innovative embedded systems and IoT applications.
Well now let's look at other architectures and make a small comparison
AVR Microcontroller (ATmega328P, used in Arduino Uno):
Development: Uses Arduino IDE or platforms like PlatformIO. Code is written in C/C++ and compiled using AVR GCC. Programming is done via AVR programmers or the USB interface on the Arduino board. Performance Optimization: Memory and performance consumption are analyzed, code is optimized using AVR-specific techniques, and low-power techniques are implemented.
ARM Microcontroller (Xiao RP2040, based on Raspberry Pi Foundation's RP2040):
Development: Utilizes development tools like Arduino IDE or RP2040-specific environments. Code is written in C/C++ and compiled using ARM GCC or RP2040's official compiler. Performance Optimization: Bottlenecks are identified, code is optimized using ARM-specific instructions, hardware acceleration is utilized when possible, and power consumption is optimized using low-power modes.
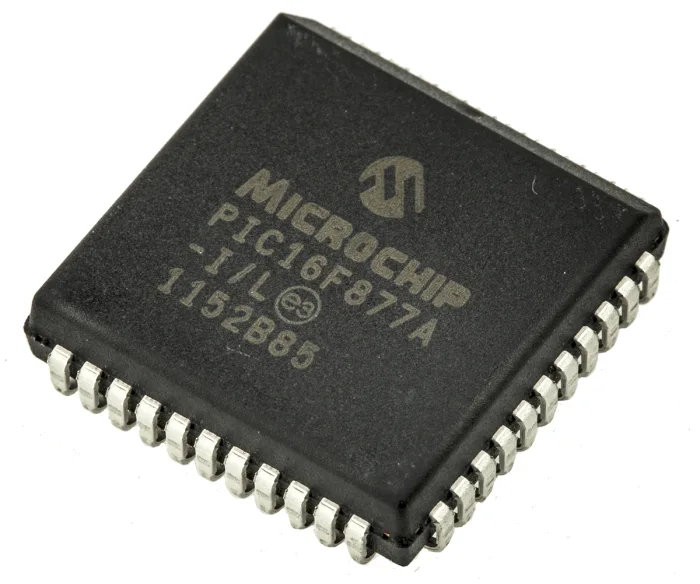
PIC Microcontroller (PIC16F877A, from Microchip Technology):
Development: Employs MPLAB X IDE with XC8 compiler. Code can be written in assembly or C. Programming is done using Microchip programmers like PICkit or MPLAB ICD. Performance Optimization: Performance is analyzed using Microchip-provided analysis tools, code is optimized using PIC-specific techniques, and low-power techniques are implemented.
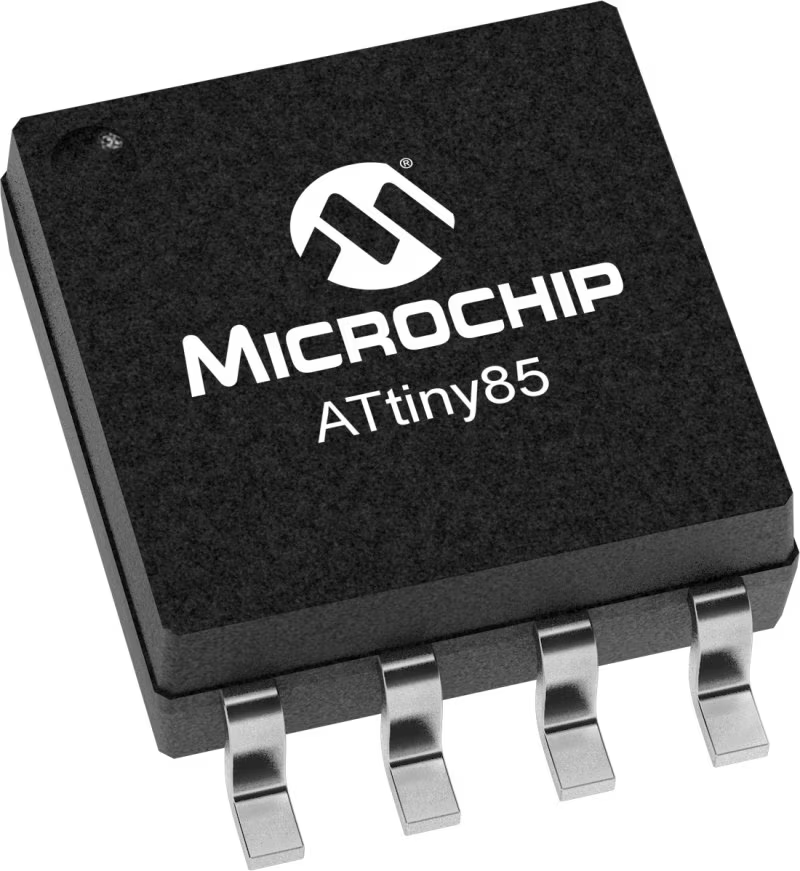
AVR Microcontroller (ATtiny85, from Microchip Technology):
Development: Uses tools like Arduino IDE or PlatformIO. Code is written in C/C++ and compiled with AVR GCC. Programming is done with compatible AVR programmers or the ISP interface on some boards. Performance Optimization: Memory and performance consumption are analyzed, code is optimized using AVR-specific techniques, and low-power techniques are implemented as per application requirements.
We already know about the SEEED XIAO RP2040, now let's start doing some programming exercises, let's get to work.
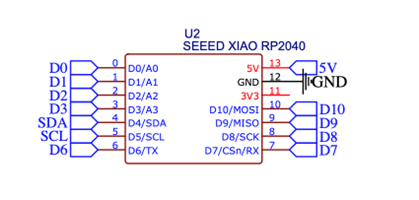
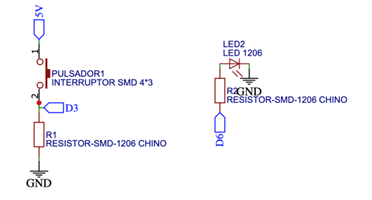
This is part of my circuit from my previously manufactured seeed xiao shield, place an LED on my shield, which is connected to pin D6. This is the one we will use for the first programming exercise.
Prior to uploading the code, we need to establish communication between our microcontroller and our PC. To do so, we should follow these steps:
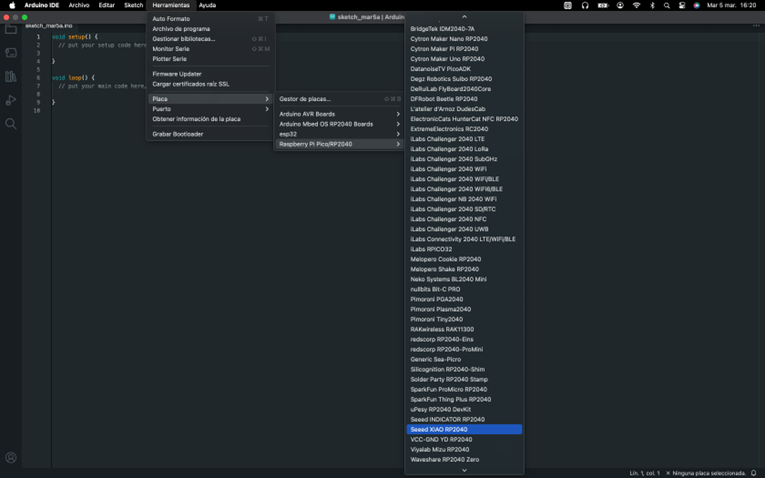
1. Visit the Seeed Studio webpage.
2. Install the Seeeduino libraries for Raspberry Pi Pico/RP2040.
The information available on the Seeed Studio webpage is comprehensive and detailed. However, for clarity and convenience, I will provide a summary of the installation steps. (It's always advisable to maintain clear information by attributing authorship and the information source.)
Once the library is installed, we can proceed to program our Seeed XIAO.
I made a code to test our Seeed XIAO:
            int LED = D6;
            void setup() {

            pinMode(LED, OUTPUT);
            }

            void loop() {
           digitalWrite(LED, HIGH);
           delay(1000);
            digitalWrite(LED, LOW);
            delay(1000);
            }
We can see that the LED of pin D6 is FLASHING as per the data mentioned in the program.
INDIVIDUAL ASSIGNMENT
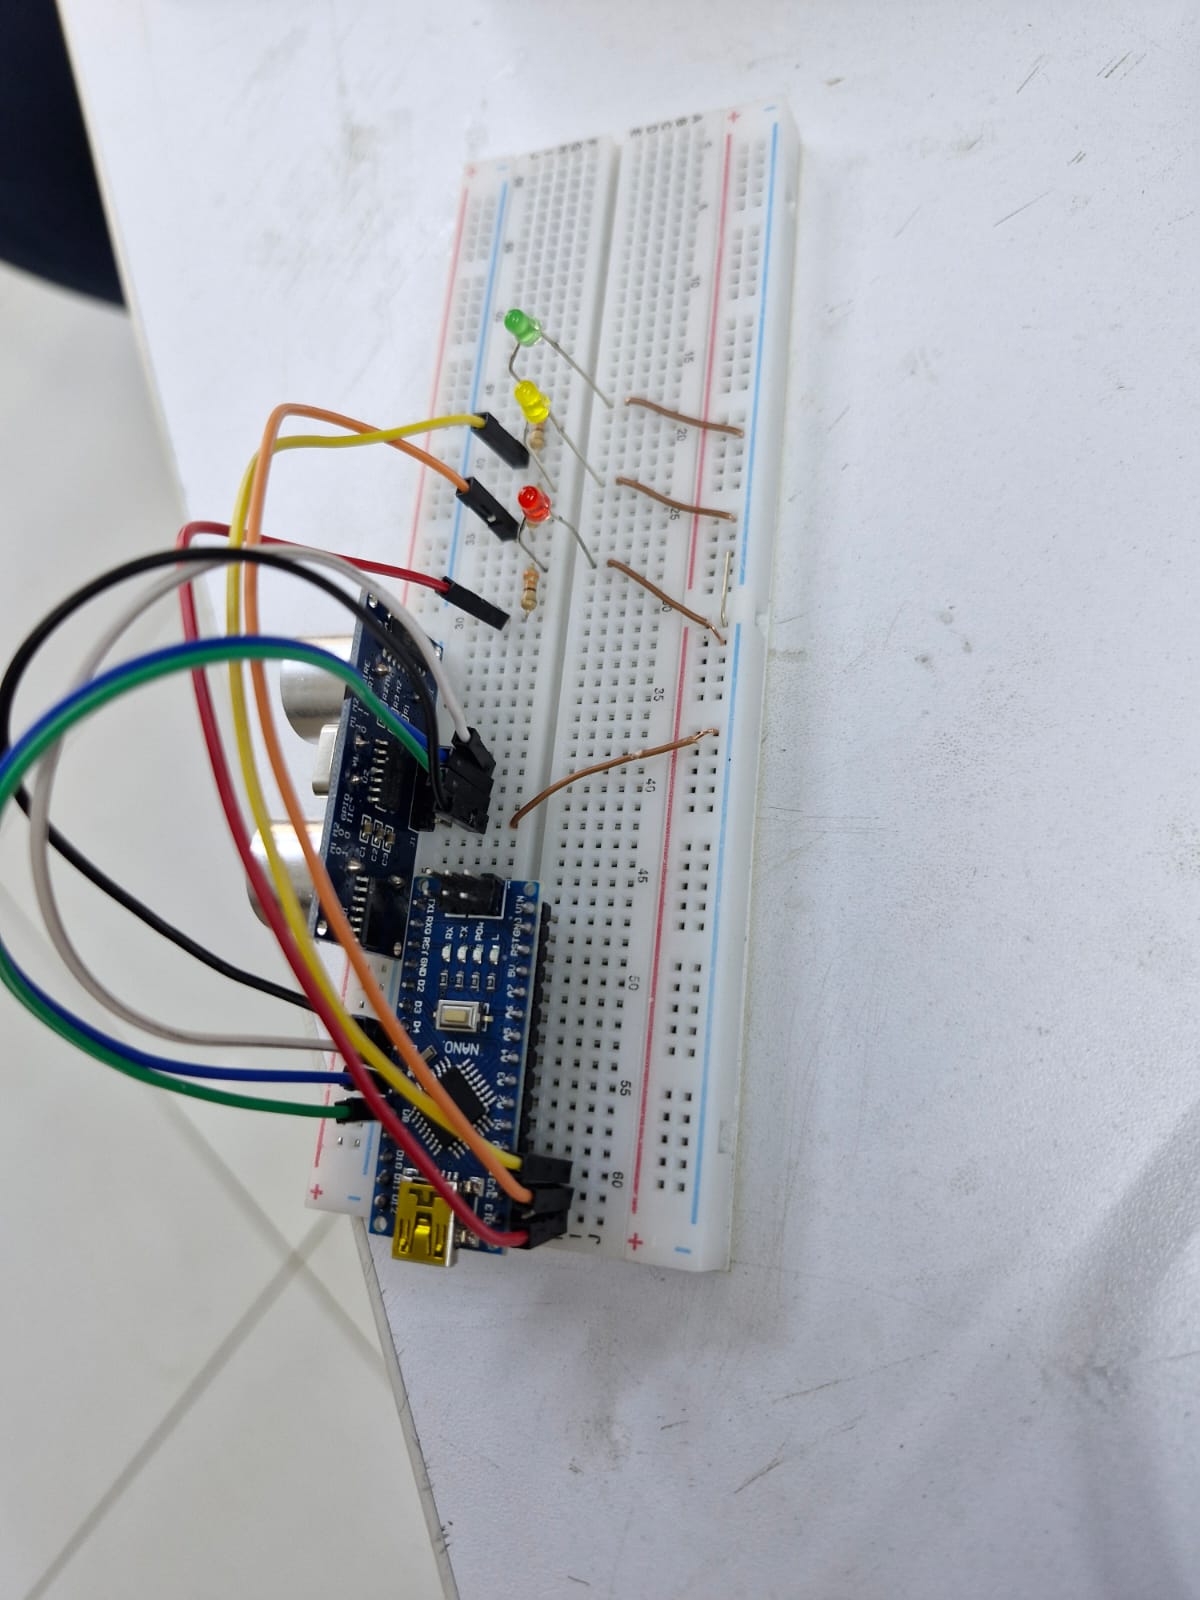
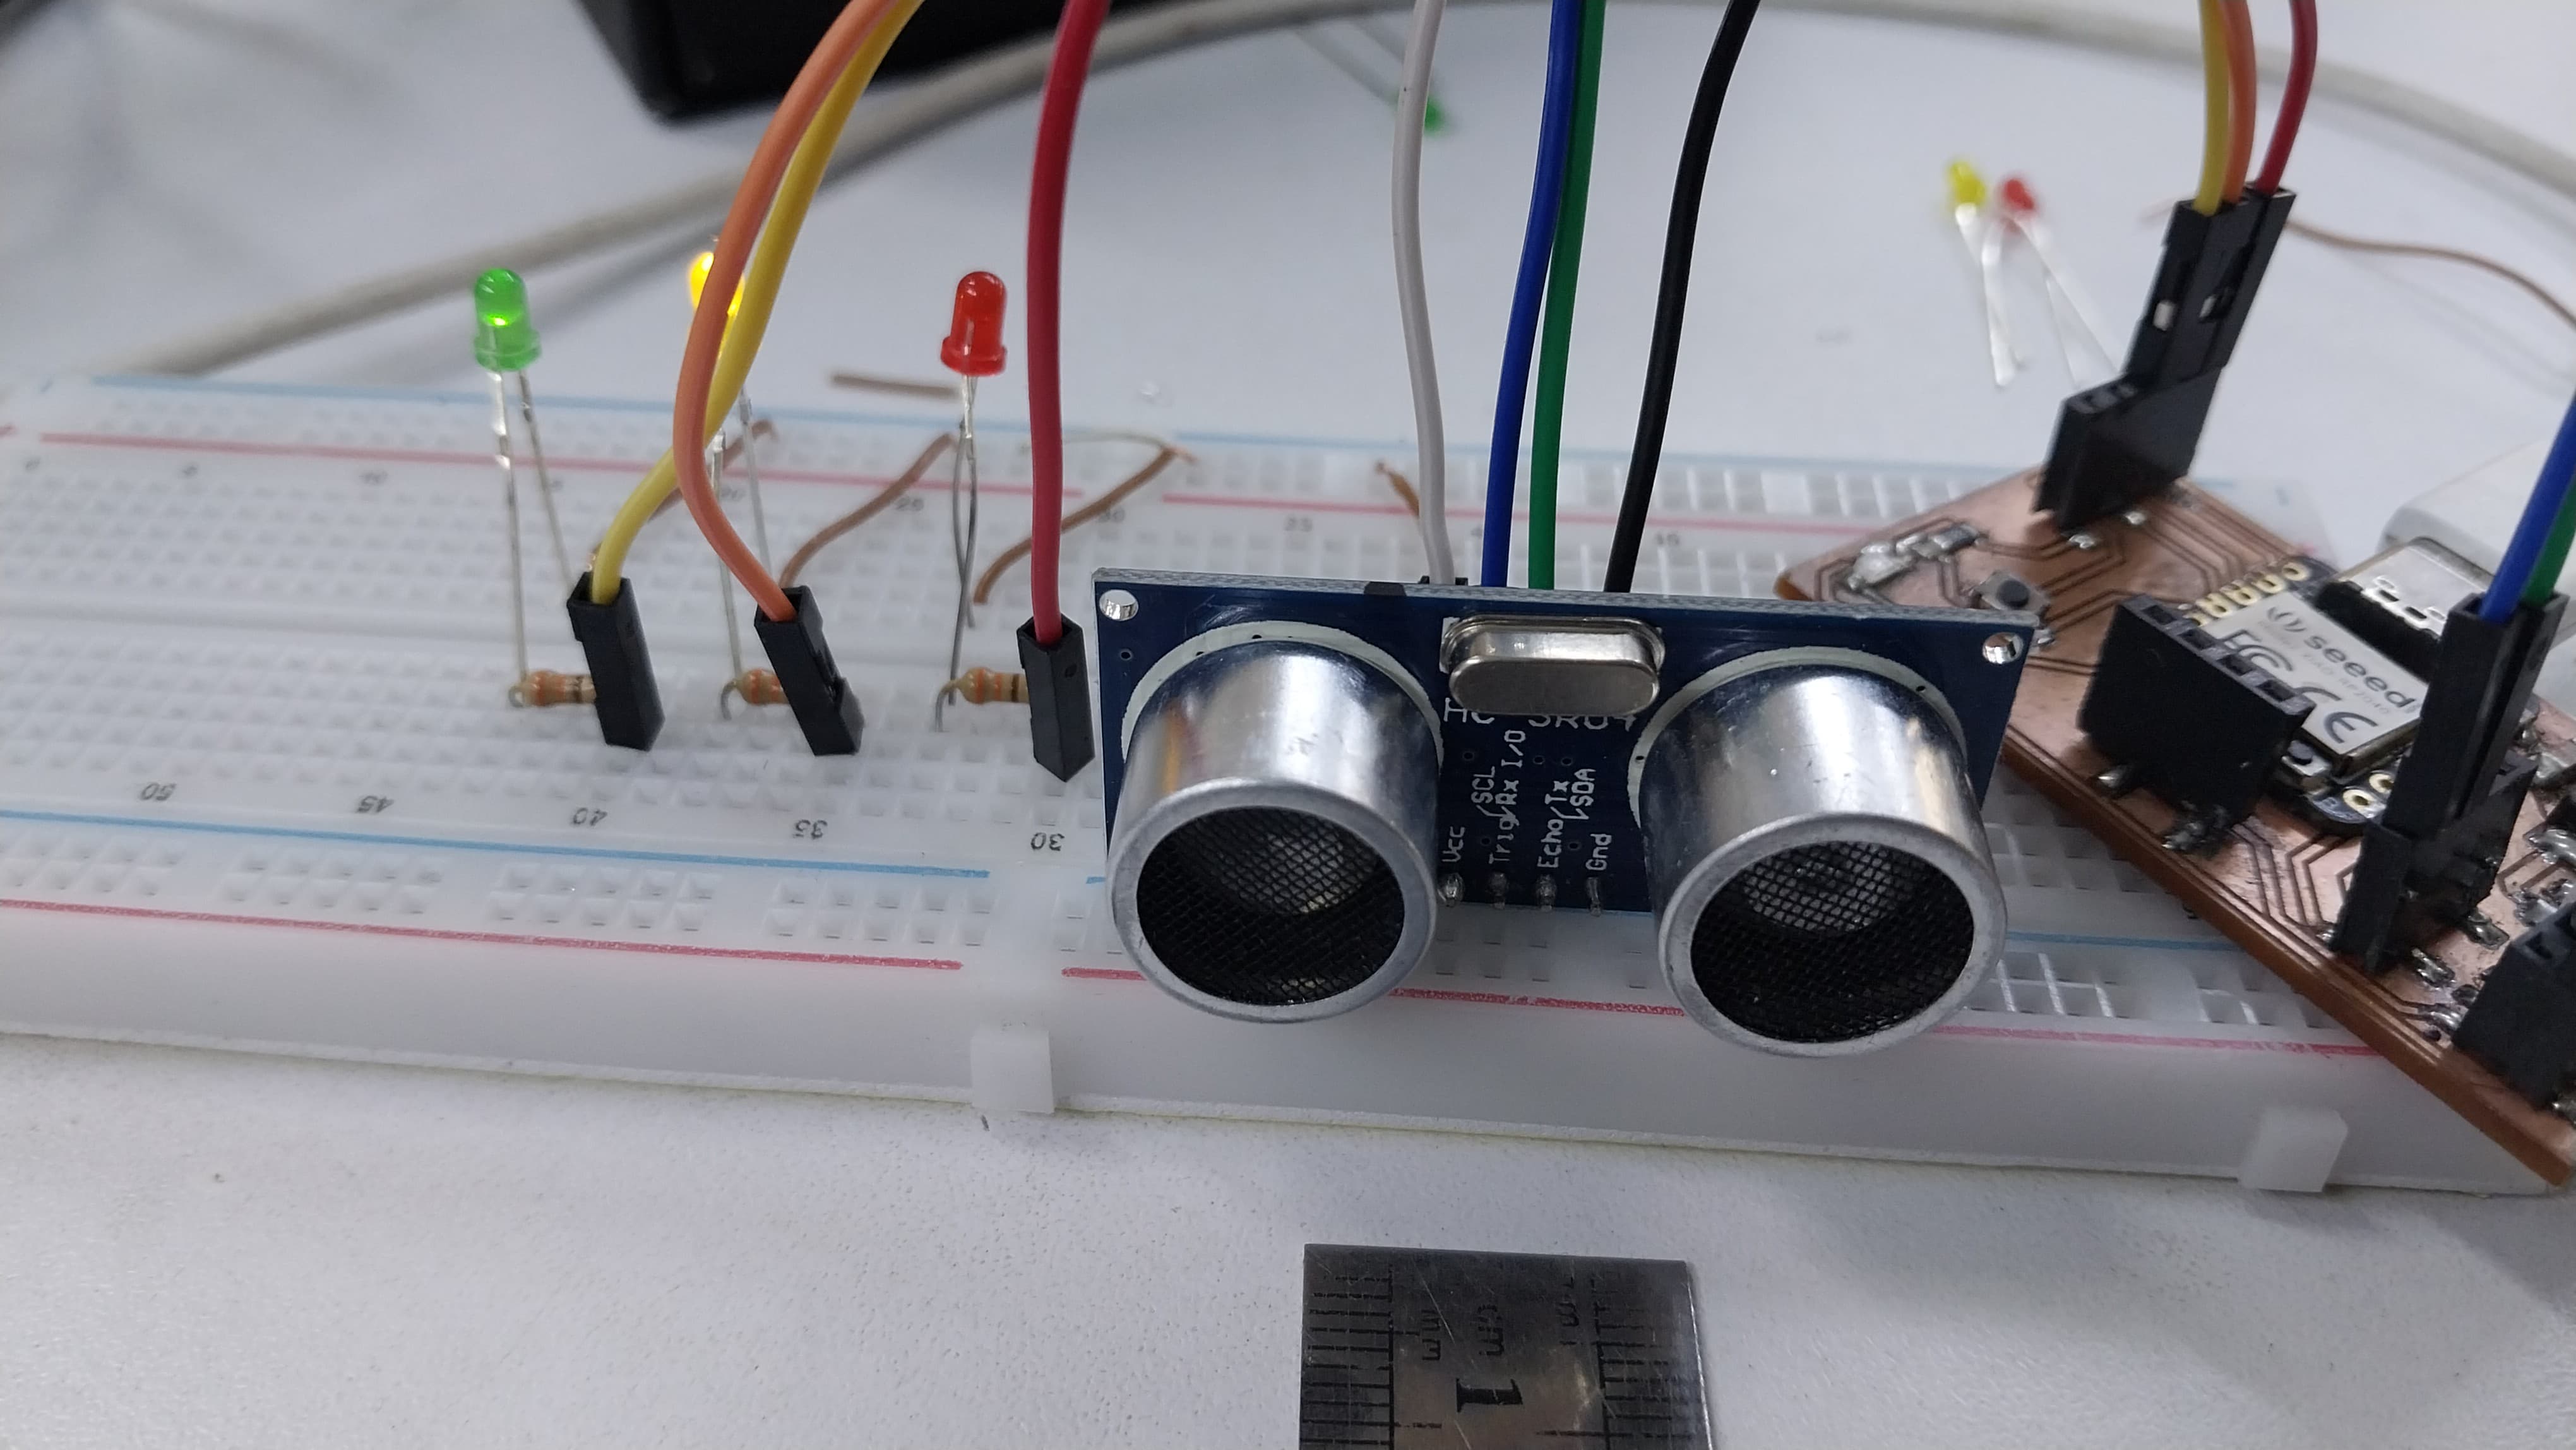
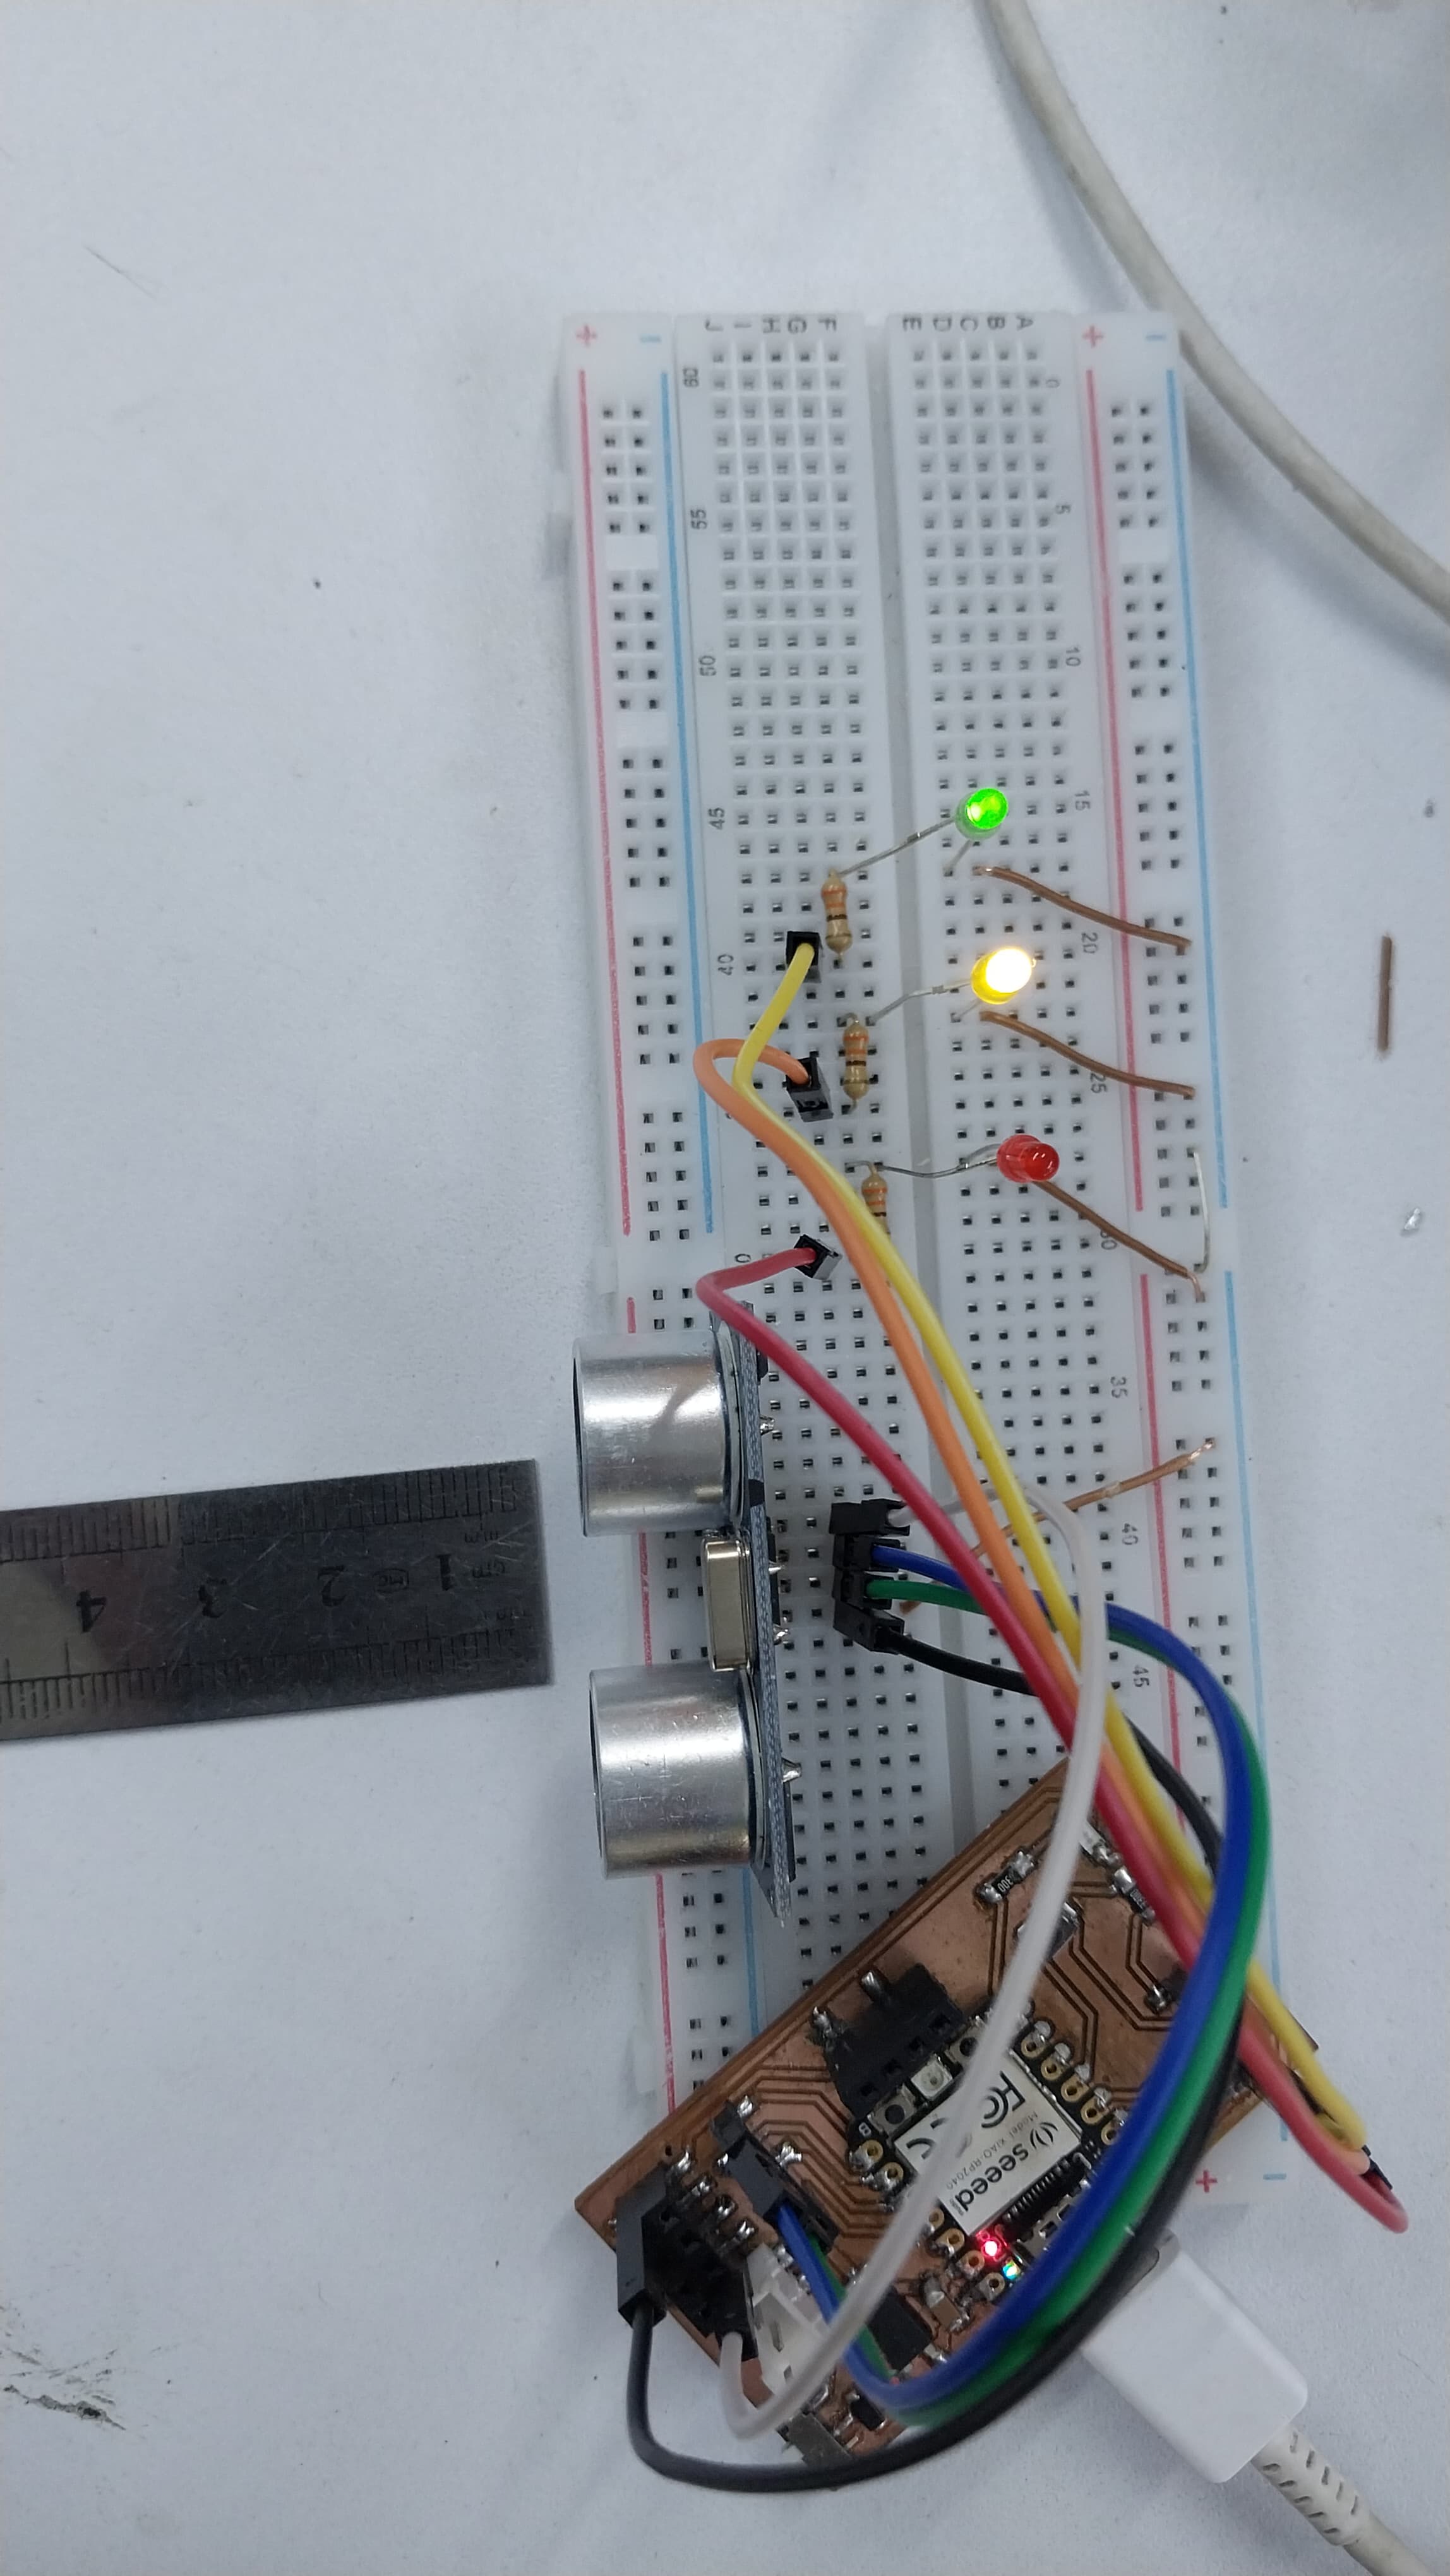
It was great but it was simple, let's go up a little bit this time let's do some programming but getting readings for it we will use an ultrasound sensor.
First, an example of how the ultrasonic sensor works.
This is the code:
            const int Trigger = D7;   //Pin digital 2 para el Trigger del sensor
            const int Echo = D8;   //Pin digital 3 para el Echo del sensor
            const int led1 = D0;
            const int led2 = D1;
            const int led3 = D2;

            void setup() {
              Serial.begin(9600);//iniciailzamos la comunicación
              pinMode(Trigger, OUTPUT); //pin como salida
              pinMode(Echo, INPUT);  //pin como entrada
              digitalWrite(Trigger, LOW);//Inicializamos el pin con 0
              pinMode(led1, OUTPUT);
              pinMode(led2, OUTPUT);
              pinMode(led3, OUTPUT);
            }

            void loop()
            {

              long t; //timepo que demora en llegar el eco
              long d; //distancia en centimetros

              digitalWrite(Trigger, HIGH);
              delayMicroseconds(10);          //Enviamos un pulso de 10us
              digitalWrite(Trigger, LOW);

              t = pulseIn(Echo, HIGH); //obtenemos el ancho del pulso
              d = t/59;             //escalamos el tiempo a una distancia en cm

              Serial.print("Distancia: ");
              Serial.print(d);      //Enviamos serialmente el valor de la distancia
              Serial.print("cm");
              Serial.println();
              delay(100);          //Hacemos una pausa de 100ms

              if(d>16){
                digitalWrite(led1 , HIGH);
                digitalWrite(led2 , HIGH);
                digitalWrite(led3 , HIGH);
              }

              if(d<10){
                digitalWrite(led1 , HIGH);
                digitalWrite(led2 , HIGH);
                digitalWrite(led3 , LOW);
              }

              if(d<5){
                digitalWrite(led1 , HIGH);
                digitalWrite(led2 , LOW);
                digitalWrite(led3 , LOW);
              }


            }
This code is self-created.
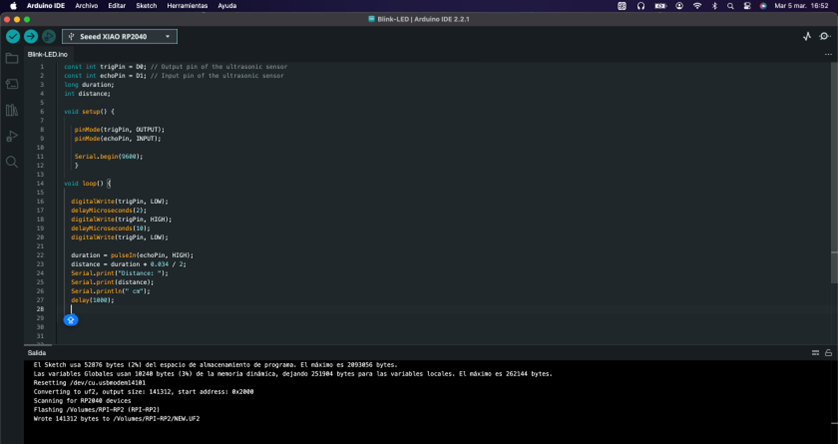
I made a code to test our Seeed XIAO:
          const int trigPin = D0; // Output pin of the ultrasonic sensor
          const int echoPin = D1; // Input pin of the ultrasonic sensor
          long duration;
          int distance;

          void setup() {

            pinMode(trigPin, OUTPUT);
            pinMode(echoPin, INPUT);

            Serial.begin(9600);
            }

          void loop() {

            digitalWrite(trigPin, LOW);
            delayMicroseconds(2);
            digitalWrite(trigPin, HIGH);
            delayMicroseconds(10);
            digitalWrite(trigPin, LOW);

            duration = pulseIn(echoPin, HIGH);
            distance = duration * 0.034 / 2;
            Serial.print("Distance: ");
            Serial.print(distance);
            Serial.println(" cm");
            delay(1000);

            }
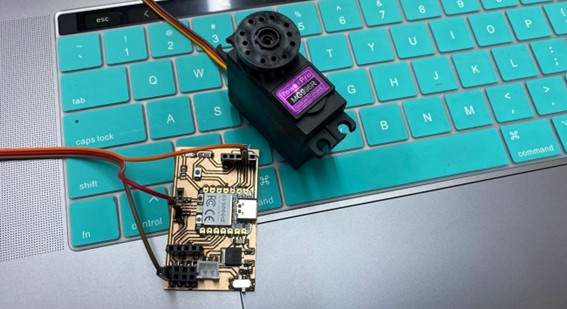
It was good, we learned to obtain distance readings through this sensor, it is time to draw power through our shield and apply the output with a servomotor.
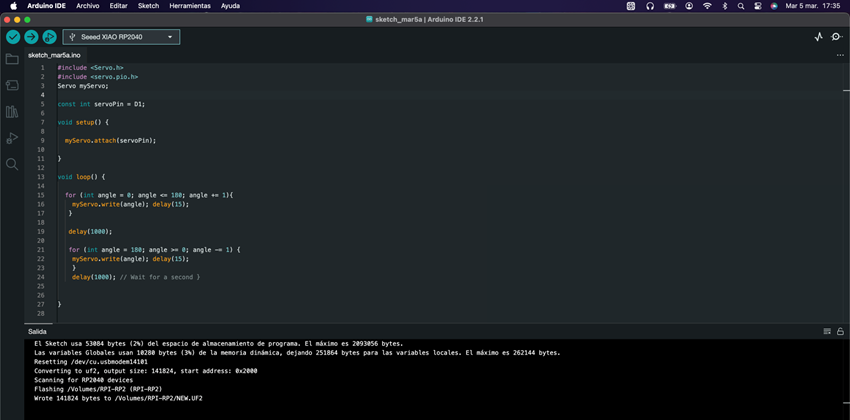
I made a code to test our Seeed XIAO:
            #include
            #include
            Servo myServo;

            const int servoPin = D1;

            void setup() {

            myServo.attach(servoPin);

            }

            void loop() {

            for (int angle = 0; angle <= 180; angle += 1){
            myServo.write(angle); delay(15);
            }

            delay(1000);

            for (int angle = 180; angle >= 0; angle -= 1) {
            myServo.write(angle); delay(15);
            }
            delay(1000); // Wait for a second }
Learning
Well we finished the assignment and we definitely did not take away important learnings:
o The comparison highlights the importance of familiarization with a variety of microcontrollers, as well as the need to learn how to optimize performance, adapt to different development environments, and select the right platform for each project.
o The Xiao RP2040 offers a combination of power, flexibility, ease of use, and affordable price that makes it an excellent choice for a wide range of embedded development projects.
That`s All my friends, see you later.
See you next week.