Programming
The programming logic are as follows

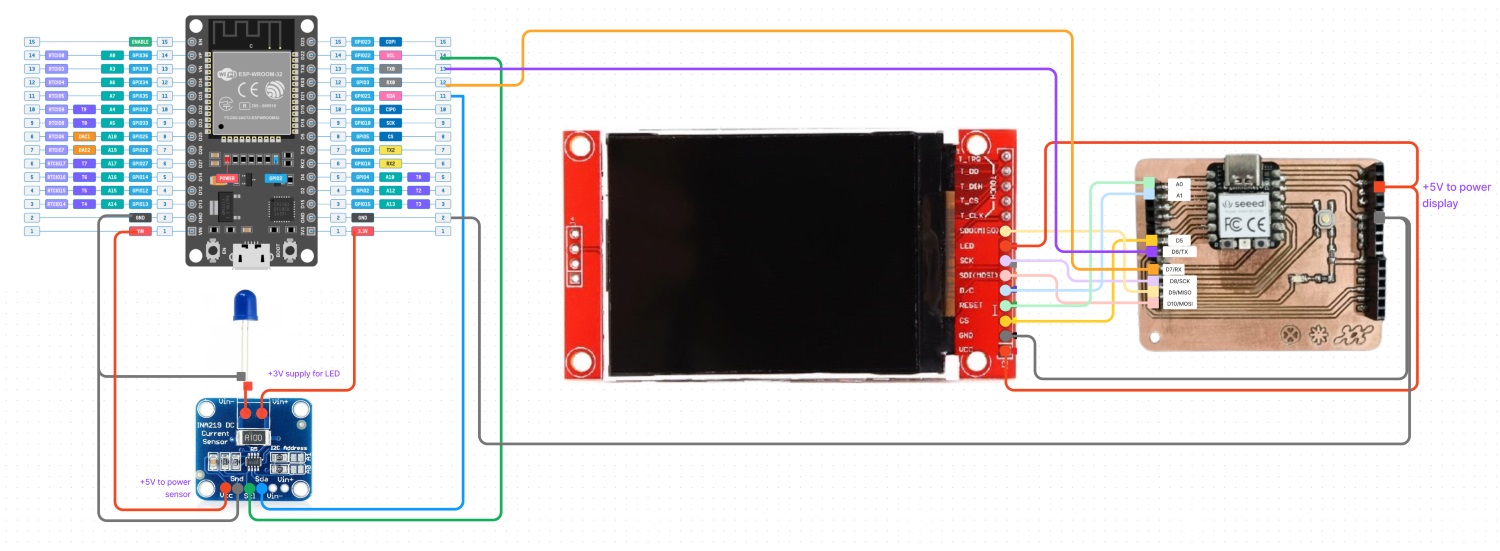
- Transmitter device with the current sensor INA219 measures power, voltage and current on a load.
- The transmitter board will be sending data throught the ESP Now communication protocol to the receiver device
- The receiver device (H2 Power Meter) receives data and turn that data into graphics
- Graphics are displayed with the TFT ILI93441 2.8” Display.
We have covered Input & Output in great detail and also covered their programs and what happened when we program them in one board. Link to documentation here. Now let us embed communication and networking protocol to the mix
Networking & Communications: ESP-NOW
ESP-NOW is a wireless communication protocol defined by Espressif, which enables the direct, quick and low-power control of smart devices, without the need of a router. ESP-NOW can work with Wi-Fi and Bluetooth LE, and supports the ESP8266, ESP32, ESP32-S and ESP32-C series of SoCs. ESP-NOW offers faster transmission with lower latency compared to traditional WiFi and is ideal for trasmitting small data readings (up to 250bytes). Hencewhy it’s widely used in smart-home appliances, remote controlling, sensors, etc.
Souce

Transmitter Code
Rico sent me his ESP-NOW code to start (ESP-NOW Communication Protocol breakdown here).
I followed the same logic and appropriated the Tx code with INA219 code. In the setup and loop function, input INA219 code that measures electrical property of the load.
//Elaine FP
//Current Sensor + ESP32 data > TX via ESP NOW
//Elaine Regina + Rico Kanthatham, Fablab Bali/Skylabworkshop, Fabacademy June 2024
//refactored from code by...Adafruit (INA219), Ruis Santos (ESP NOW),
//Transmitter code
//sends current sensor data wirelessly to a receiver board

//all required libraries
#include <Wire.h> //i2c library...check address? default hex40
#include <Adafruit_INA219.h> //current sensor library
#include <esp_now.h> //ESP NOW library
#include <WiFi.h> //WiFi library

//instance of ina219 current sensor object
Adafruit_INA219 myCurrentSensor;

//ESP NOW parameters
#define Channel 1 //Specify ESP NOW communication channel
esp_now_peer_info_t slave; // stores info about slave, incl MAC Address
//float data = 0; // initial data sent...unsigned integer...250 bytes or less

//create a struct variable to contain all data to be sent wirelessly
struct SensorData {
  float loadV;
  float currA;
  float pwrW;
};

struct SensorData sensorData;

void setup() {
  Serial.begin(115200); // Initialize serial communication
  //myCurrentSensor.begin(); //Initialize current sensor

  //current sensor error checking
  if (!myCurrentSensor.begin()) {
    Serial.println("Failed to find INA219 chip");
    while (1) {
      delay(10);
    }
  }

  //WiFi Communication initialization protocol
  WiFi.mode(WIFI_STA); // set TX mode as Wifi Station
  esp_now_init();
  esp_now_register_send_cb(OnDataSent); // run Call-back function called OnDataSent
  ScanForSlave(); // find slave MAC address at specific SSID
  esp_now_add_peer(&slave); // point to stored slave data...based on discovered MAC address
}

void loop(void) {

  //measure various electrical properties
  float shuntvoltage = myCurrentSensor.getShuntVoltage_mV(); //shunt voltage
  float busvoltage = myCurrentSensor.getBusVoltage_V(); //bus voltage
  float current_mA = myCurrentSensor.getCurrent_mA(); //current
  float power_mW = myCurrentSensor.getPower_mW(); //power

  //calculate Load Voltage using Bus Voltage and Shunt Voltage
  float loadvoltage = busvoltage + (shuntvoltage / 1000);

  //display electrical measurements
  Serial.print(loadvoltage); //load voltage
  Serial.print(",");
  Serial.print(current_mA); //current
  Serial.print(",");
  Serial.print(power_mW); //power
  Serial.println("");

  //send measured data to receiver MCU
  sensorData.loadV = loadvoltage;
  sensorData.currA = current_mA;
  sensorData.pwrW = power_mW;;
  esp_now_send(slave.peer_addr, (uint8_t *)&sensorData, sizeof(sensorData)); // send to slave address, data, data length

  //set measureme & send interval
  delay(3000); //every 2 seconds
}

//function to automatically get MAC address of RX-MCU
void ScanForSlave(){
  int8_t scanResults = WiFi.scanNetworks(); //scan for all WiFi networks

  for (int i = 0; i < scanResults; ++i){
    String SSID = WiFi.SSID(i);
    String BSSIDstr = WiFi.BSSIDstr(i);

  if (SSID.indexOf("RX") == 0){ // Looks for specific network name of RX-MCU and grab MAC Address
    int mac[6];
    if (6 == sscanf(BSSIDstr.c_str(), "%x:%x:%x:%x:%x:%x", &mac[0], &mac[1], &mac[2], &mac[3], &mac[4], &mac[5])){
      for (int ii = 0; ii < 6; ++ii){
        slave.peer_addr[ii] = (uint8_t) mac[ii];
      }
    }

    slave.channel = Channel;
    slave.encrypt = 0;
    break;
  }
 }
}

void OnDataSent(const uint8_t *mac_addr, esp_now_send_status_t status){
  Serial.print("I sent my data >  ");
  //Serial.println(sensorData); //adjust variable name?
}
Receiver Code
The same goes with the receiver code - integrate the TFT ILI9341 Display with ESP-NOW protocol
#include <esp_now.h>
#include <WiFi.h>
#include <SPI.h>
#include <Adafruit_GFX.h>
#include <Adafruit_ILI9341.h>

#define Channel 1 // same channel as TX

// Define pins for the ILI9341 display
#define TFT_RST D4
#define TFT_DC  D5
#define TFT_CS  D3  // SS
#define TFT_MOSI D10  // MOSI
#define TFT_MISO D9
#define TFT_CLK D8  // SCK
Adafruit_ILI9341 tft = Adafruit_ILI9341(TFT_CS, TFT_DC, TFT_RST);

// Structure to receive data
typedef struct struct_message {
    float voltage;
    float current;
    float power;
} struct_message;

struct_message incomingData; // Create a struct_message to hold the incoming data

// Callback function when data is received
void OnDataRecv(const uint8_t *mac_addr, const uint8_t *data, int data_len) {
    memcpy(&incomingData, data, sizeof(incomingData));
    Serial.println("Data received");

    // Print received values to Serial Monitor
    Serial.print("Voltage: "); Serial.print(incomingData.voltage); Serial.println(" V");
    Serial.print("Current: "); Serial.print(incomingData.current); Serial.println(" mA");
    Serial.print("Power: "); Serial.print(incomingData.power); Serial.println(" mW");

    // Display data on TFT screen
    tft.fillScreen(ILI9341_BLACK);
    displayVoltageCurrent(incomingData.voltage, incomingData.current);
    delay(2000);
    tft.fillScreen(ILI9341_BLACK);
    displayPower(incomingData.power);
    delay(2000);
}

void setup() {
  // Initialize Serial Monitor
  Serial.begin(115200);

  // Initialize TFT screen
    tft.begin();
    tft.setRotation(3); // Adjust based on your display orientation
    tft.fillScreen(ILI9341_BLACK);

  // Set device as a Wi-Fi Access Point
  WiFi.mode(WIFI_AP); // set wifi to AP mode
  WiFi.softAP("RX_1", "RX_1_Password", Channel, 0); // SSID that TX can recognize

  // Initialize ESP-NOW
  if (esp_now_init() != ESP_OK) {
      Serial.println("Error initializing ESP-NOW");
      return;

  // Register receive callback function
  esp_now_register_recv_cb(OnDataRecv);
}

void loop() {
  // Nothing to do here, all action happens in the callback function
}

void displayVoltageCurrent(float voltage, float current) {
    tft.setTextSize(2); // Draw 2X-scale text
    tft.setTextColor(ILI9341_WHITE);
    tft.setCursor(0, 0); // Start at top-left corner
    tft.print(voltage);
    tft.print(" V");
    tft.setCursor(0, 40); // Adjust cursor position based on text size
    tft.print(current);
    tft.print(" mA");
}

void displayPower(float power) {
    tft.setTextSize(2); // Draw 2X-scale text
    tft.setTextColor(ILI9341_WHITE);
    tft.setCursor(0, 60); // Adjust cursor position based on text size
    tft.print(power);
    tft.print(" mW");
}
Outcome
As seen in the video below - the Transmitter board has successfully send data to the Receiver board. Now onto designing the interface for the receiver board!
Other Exploration: UART
Originally I wanted to make a wired connection through UART communication protocol as my first sprial. ESP-Now protocol was meant to be my second spiral. For more details on UART Protocol you can check out our Network & Communication group assignment page.
This was the system diagram using an ESP32 Dev Kit with my custom board.
Transmitter Code
Original Code from here. Adapted for UART Interface between ESP32 Dev Kit and Xiao ESP32S3 with the help of ChatGPT.
#include <Wire.h>
#include <Adafruit_INA219.h>

Adafruit_INA219 ina219;

void setup(void) {
  Serial.begin(115200); // Initialize UART communication
  while (!Serial) {
    delay(1);
  }

  if (!ina219.begin()) {
    Serial.println("Failed to find INA219 chip");
    while (1) {
      delay(10);
    }
  }

  Serial.println("Measuring voltage and current with INA219 ...");
}

void loop(void) {
  float shuntvoltage = ina219.getShuntVoltage_mV();
  float busvoltage = ina219.getBusVoltage_V();
  float current_mA = ina219.getCurrent_mA();
  float power_mW = ina219.getPower_mW();
  float loadvoltage = busvoltage + (shuntvoltage / 1000);

  // Send data over UART
  Serial.print(loadvoltage);
  Serial.print(",");
  Serial.print(current_mA);
  Serial.print(",");
  Serial.print(power_mW);
  Serial.println("");

   // Debug print to Serial Monitor
  Serial.print("Sent: ");
  Serial.print(loadvoltage);
  Serial.print(",");
  Serial.print(current_mA);
  Serial.print(",");
  Serial.print(power_mW);
  Serial.println("");

  delay(2000); // Wait for 2 seconds before sending the next data
}
Receiver Code
Original Code from here. Adapted for UART Interface between ESP32 Dev Kit and Xiao ESP32S3 with the help of ChatGPT.
#include <SPI.h>
#include <Adafruit_GFX.h>
#include <Adafruit_ILI9341.h>
// Define pins for the ILI9341 display
#define TFT_RST A0
#define TFT_DC A1
#define TFT_CS D5 // SS
#define TFT_MOSI D10 // MOSI
#define TFT_MISO D9
#define TFT_CLK D8 // SCK
Adafruit_ILI9341 tft = Adafruit_ILI9341(TFT_CS, TFT_DC, TFT_RST);
// Define pins for Serial2
#define RX2_PIN 44 // Change to your RX2 pin
#define TX2_PIN 43 // Change to your TX2 pin
void setup(void) {
Serial.begin(115200); // Initialize UART0 for debugging
Serial2.begin(115200, SERIAL_8N1, RX2_PIN, TX2_PIN); // Initialize UART2
tft.begin();
tft.setRotation(3); // Adjust based on your display orientation
tft.fillScreen(ILI9341_BLACK);
Serial.println("Waiting for data from the sender...");
}
void loop(void) {
if (Serial2.available() > 0) {
String data = Serial2.readStringUntil('\n');
float loadvoltage = 0;
float current_mA = 0;
float power_mW = 0;
sscanf(data.c_str(), "%f,%f,%f", &loadvoltage, ¤t_mA, &power_mW);
tft.fillScreen(ILI9341_BLACK);
displayVoltageCurrent(loadvoltage, current_mA);
delay(2000);
tft.fillScreen(ILI9341_BLACK);
displayPower(power_mW);
delay(2000);
}
}
void displayVoltageCurrent(float voltage, float current) {
tft.setTextSize(2); // Draw 2X-scale text
tft.setTextColor(ILI9341_WHITE);
tft.setCursor(0, 0); // Start at top-left corner
tft.print(voltage);
tft.print("V");
tft.setCursor(0, 40); // Adjust cursor position based on text size
tft.print(current);
tft.print("mA");
}
void displayPower(float power) {
tft.setTextSize(2); // Draw 2X-scale text
tft.setTextColor(ILI9341_WHITE);
tft.setCursor(0, 60); // Adjust cursor position based on text size
tft.print(power);
tft.print("mW");
}
Outcome
Why ESP-NOW instead of UART?
Unfortunately I quickly found out that connecting two XIAOs with UART is a real hassle. I couldn’t get it to work… at all… no matter how hard I tried. So with the only limited time I have I decided to quickly switch to ESP-Now protocol and it worked wonderfully.
Interface Application & Programming
Design
My go-to quick application for designing an application interface would be Figma. I covered briefly in Week 2 how to use Figma. Always create a mock-up first as your guide
This is how I envisioned the dashboard for my application to look like. I designed it as simple as possible with user-friendliness and accessibility in mind. Hence I categorised the data into groups (Current, Pressure, Hydrogen Storage) and any incomind data related to those groups are assigned under one compartment.

I set the canvas size to 240px x 320px, the display dimension for the 2.8” TFT ILI9341 Screen.
For programming purposes, an important thing to check out is the panel on the right hand side.

This panel will tell us the properties for each component - which will help us alot when programming our design.

Now that we cover the basics, let us translate this design to the preferred programming library. Since the TFT Displays utilises mainly Adafruit_GFX Library, I would be programming the design we made in Figma manually.
Programming - Adafruit GFX Library
 Check the complete function of [Adafruit.gfx] (https://github.com/adafruit/Adafruit-GFX-Library/blob/master/Adafruit_GFX.h)
Libraries, Constants, & Variables
#include <esp_now.h>
#include <WiFi.h>
#include "SPI.h"
#include "Adafruit_GFX.h"
#include "Adafruit_ILI9341.h"


// For the Adafruit shield, these are the default.
#define TFT_RST D4
#define TFT_DC  D5
#define TFT_CS  D3  // SS
#define TFT_MOSI D10  // MOSI
#define TFT_MISO D9
#define TFT_CLK D8  // SCK

Adafruit_ILI9341 tft(TFT_CS, TFT_DC, TFT_MOSI, TFT_CLK, TFT_RST, TFT_MISO);

#define Channel 1 // same channel as TX

struct SensorData {
  float loadV;
  float currA;
  float pwrW;
};

SensorData newData;
- Firstly input the necessary libraries and pin-outs
- Since this is our Rx Board - remember that the Tx and Rx board has to be in the same
channel - Define the data type. Our data from the Current Sensor INA219 will be float data as they represent single-precision floating-point numbers, which are numbers that can have decimal points. Group them into one structure/struct called
SensorData - Declare the incoming value of
SensorDataas the variablenewData
Setup
void setup() {
  //initialize serial monitor
  Serial.begin(115200);

   // initialize TFT display
  tft.begin();
  tft.setRotation(4); // Set display orientation if needed
  tft.fillScreen(ILI9341_BLACK); // Fill screen with black color
  UI ();

  //initialize WiFi communication
  WiFi.mode(WIFI_AP); // set wifi to AP mode
  WiFi.softAP("RX_1", "RX_1_Password", Channel, 0); // provide SSID that TX can recognize
  esp_now_init();
  esp_now_register_recv_cb(OnDataRecv);
}

In the initialize TFT Display code.
- Always start with
tft.begin() - To set orientation, (1) & (3) are landscape, meanwhile (2) & (4) are portrait
- Next we have to create our own
UI()function
UI()
Here is a an example how to draw with Adafruit GFX and translate our design to the interface. Let us look at our reference again.

- Firstly our rectangle is rounded. I looked into the GFX library and found the function
tft.fillRoundRect(int16_t x0, int16_t y0, int16_t w, int16_t h, int16_t radius, uint16_t color); - Follow our reference and input the numbers which in our case is
tft.fillRoundRect(7, 7, 225, 112, 7, ILI9341_WHITE); - Before we put text, make sure that we set the text’s position first with
tft.setCursor(int16_t x0, int16_t y0); - Input the text we want to display with
tft.println(" "); - Follow the same principle for other components
void UI () {
  //Rectangle 1 - Current Meter
  tft.fillRoundRect(7, 7, 225, 112,
                     7, ILI9341_WHITE);
  tft.setCursor(13, 12);
  tft.setTextSize (2);
  tft.setTextColor(ILI9341_BLACK);
  tft.println("Current");
  tft.setTextSize (1);
  tft.setCursor(13, 55);
  tft.println("Current: ");

  // Draw graph area
  tft.drawRect(97, 22, 135, 85, ILI9341_BLACK);

  //Rectangle 2 - Voltage
  tft.fillRoundRect(7,126, 110, 105,
                     7, ILI9341_WHITE);
  tft.setCursor(13, 128);
  tft.setTextSize (2);
  tft.setTextColor(ILI9341_BLACK);
  tft.println("Voltage");

  // Draw Gauge
  drawSemiCircleGauge(62, 160, 45, 0, 180);
  // tft.setCursor(43, 190);
  // tft.setTextSize (1);
  // tft.println("COMING");
  // tft.setCursor(48, 200);
  // tft.println("SOON");

    //Rectangle 3 - Power
  tft.fillRoundRect(122,126, 110, 105,
                     7, ILI9341_WHITE);
  //tft.fillCircle(175, 180, 40, ILI9341_YELLOW);
  tft.setCursor(128, 128);
  tft.setTextSize (2);
  tft.setTextColor(ILI9341_BLACK);
  tft.println("Power");
 // tft.setCursor(128, 146);
  //tft.println("Storage");
  // tft.setCursor(157, 190);
  // tft.setTextSize (1);
  // tft.println("COMING");
  // tft.setCursor(162, 200);
  // tft.println("SOON");

  // Line
  tft.drawFastHLine(7, 238, 225, ILI9341_WHITE);

  //Clock
  tft.setCursor(9, 255);
  tft.setTextSize (4);
  tft.setTextColor(ILI9341_WHITE);
  tft.println("14:14");

  //Location
  tft.setCursor(13, 300);
  tft.setTextSize (1);
  tft.setTextColor(ILI9341_WHITE);
  tft.println("Serangan, Bali");

  //Menu Button
  tft.fillRoundRect(138,248, 90, 25,
                     25, ILI9341_WHITE);
  tft.setCursor(158, 255);
  tft.setTextSize (2);
  tft.setTextColor(ILI9341_BLACK);
  tft.println("Menu");

  //Help Button
  tft.fillRoundRect(138,280, 90, 25,
                     25, ILI9341_WHITE);
  tft.setCursor(158, 289);
  tft.setTextSize (2);
  tft.setTextColor(ILI9341_BLACK);
  tft.println("Help");

}
Loop
In the loop function - we want to map the electrical values we receive from the Tx board into a graphical representation that can be easily understood.
void loop() {
  Serial.print("Load Voltage: ");
  Serial.println(newData.loadV); // display load voltage
  Serial.print("Current: ");
  Serial.println(newData.currA); // display current
  Serial.print("Power: ");
  Serial.println(newData.pwrW); // display power

  //CURRENT BAR GRAPH

  // Scale the current value; With the LED Diode as a load, I would do a *-100 multiplier, with the fan *-1
  int currValScaled = (newData.currA * -1);

  // Map the Value of the current data into a targeted range to be displayed (min value reading, max value reading, min target range, max target range)
  int currVal = map(currValScaled, 230, 330, 0, 100);
  Serial.println(currVal);

  //There are alot of fill rectangle function here to cover up TFT Display's refreshing limitation.
  tft.fillRect(0,40,7,50,ILI9341_BLACK);
  tft.fillRect(7,40,97,45,ILI9341_WHITE);
  tft.fillRect(98,40,133,50,ILI9341_WHITE);

  //I couldn't figure out how to draw a sinewave - so the representation becomes a Blue bar graph instead
  tft.fillRect(97, 50, currVal, 35, ILI9341_BLUE);

  //Fill rectangle function here to cover up TFT Display's refreshing limitation on the Text area
  tft.fillRect(30,65,60,30,ILI9341_WHITE);

  //Text - current value
  tft.setTextSize(1);
  tft.setTextColor(ILI9341_BLACK);
  tft.setCursor(13, 55);
  tft.println("Current: ");
  tft.setCursor(30, 65);
  tft.printf("%.2f mA\n", -newData.currA);

  //POWER CIRCLE GRAPH

  //Fill rectangle function here to cover up TFT Display's refreshing limitation on the Power area
  tft.fillCircle(175,180, 45, ILI9341_WHITE);

  // Yellow Circle Graph with values
  tft.fillCircle(175, 180, newData.pwrW/10, ILI9341_YELLOW);
  tft.setCursor(150, 200);
  tft.setTextSize(1);
  tft.setTextColor(ILI9341_BLACK);
  tft.printf("%.2f mW\n", newData.pwrW);
  tft.setCursor(128, 128);
  tft.setTextSize (2);
  tft.setTextColor(ILI9341_BLACK);
  tft.println("Power");

  // VOLTAGE GAUGE GRAPH
  drawNeedleGauge();

  // // tft.printf("Load Voltage: %.2f V\n", newData.loadV);
  // // // specify data receipt interval
  delay(1000);  // every 3 seconds
}
To draw the Voltage Gauge Graph - I asked the help of ChatGPT

void drawSemiCircleGauge(int x, int y, int radius, int minAngle, int maxAngle) {
  int center_x = x;
  int center_y = y + radius; // Center of the semi-circle is shifted downwards

  // Draw semi-circle
  int startAngle = minAngle;
  int endAngle = maxAngle;
  int segments = 30; // Number of line segments to approximate the arc
  float angleIncrement = (endAngle - startAngle) / (float)segments;
  for (int i = 0; i <= segments; i++) {
    float angle = startAngle + angleIncrement * i;
    int x1 = center_x + cos(angle * PI / 180) * radius;
    int y1 = center_y - sin(angle * PI / 180) * radius;
    int x2 = center_x + cos(angle * PI / 180) * (radius - 5); // Reduce the inner radius for a clearer gauge
    int y2 = center_y - sin(angle * PI / 180) * (radius - 5);
    tft.drawLine(x1, y1, x2, y2, ILI9341_BLACK);
  }
}

void drawNeedleGauge() {
  static float previousValue = 0;
  float currentValue = newData.loadV;

  // Clear the previous needle
  drawNeedle(62, 160 + 45, 45, previousValue, 0, 180, ILI9341_BLACK);

  // Draw the new needle
  drawNeedle(62, 160 + 45, 45, currentValue, 0, 180, ILI9341_RED);

  // Display the voltage value
  tft.setCursor(43, 210);
  tft.setTextSize(1);
  tft.setTextColor(ILI9341_BLACK);
  tft.fillRect(43, 207, 70, 24, ILI9341_WHITE); // Clear the previous value area
  tft.printf("%.2f V", currentValue);

  // Save the current value as the previous value for the next update
  previousValue = currentValue;
}

void drawNeedle(int x, int y, int radius, float value, int minAngle, int maxAngle, uint16_t color) {
 // Map the voltage range to the angle range
  float minValue = 1.0; // Minimum voltage
  float maxValue = 5.0; // Maximum voltage
  int angle = map(value, minValue, maxValue, maxAngle, minAngle); // Map the value within the desired range

  int needleLength = radius * 0.8;
  int x_end = x + cos(angle * PI / 180) * needleLength;
  int y_end = y - sin(angle * PI / 180) * needleLength;

  // Draw thicker needle by drawing multiple lines with a slight offset
  for (int i = -2; i <= 2; i++) {
    tft.drawLine(x + i, y, x_end + i, y_end, color);
  }
}
Finalised Code
//Elaine FP
//Xiao ESP32C3 + TFT Display
//by Elaine Regina & Rico Kanthatham, Fablab Bali/Skylabworkshop, June 2024
//refactored from original code by...Ruis Santos,
//Receiver Code
//Receives data and displays it on a TFT screen

#include <esp_now.h>
#include <WiFi.h>
#include "SPI.h"
#include "Adafruit_GFX.h"
#include "Adafruit_ILI9341.h"

// For the Adafruit shield, these are the default.
#define TFT_RST D4
#define TFT_DC  D5
#define TFT_CS  D3  // SS
#define TFT_MOSI D10  // MOSI
#define TFT_MISO D9
#define TFT_CLK D8  // SCK

Adafruit_ILI9341 tft(TFT_CS, TFT_DC, TFT_MOSI, TFT_CLK, TFT_RST, TFT_MISO);

#define Channel 1 // same channel as TX

struct SensorData {
  float loadV;
  float currA;
  float pwrW;
};

SensorData newData;


void setup() {
  //initialize serial monitor
  Serial.begin(115200);

   // initialize TFT display
  tft.begin();
  tft.setRotation(4); // Set display orientation if needed
  tft.fillScreen(ILI9341_BLACK); // Fill screen with black color
  UI ();

  //initialize WiFi communication
  WiFi.mode(WIFI_AP); // set wifi to AP mode
  WiFi.softAP("RX_1", "RX_1_Password", Channel, 0); // provide SSID that TX can recognize
  esp_now_init();
  esp_now_register_recv_cb(OnDataRecv);
}

void loop() {
  Serial.print("Load Voltage: ");
  Serial.println(newData.loadV); // display load voltage
  Serial.print("Current: ");
  Serial.println(newData.currA); // display current
  Serial.print("Power: ");
  Serial.println(newData.pwrW); // display power

  //current bar graph
  int currValScaled = (newData.currA * -1); // Scale the current value;
  int currVal = map(currValScaled, 230, 330, 0, 100);
  Serial.println(currVal);
  tft.fillRect(0,40,7,50,ILI9341_BLACK);
  tft.fillRect(7,40,97,45,ILI9341_WHITE);
  tft.fillRect(98,40,133,50,ILI9341_WHITE);
  tft.fillRect(97, 50, currVal, 35, ILI9341_BLUE);
  tft.fillRect(30,65,60,30,ILI9341_WHITE);
  tft.setTextSize(1);
  tft.setTextColor(ILI9341_BLACK);
  tft.setCursor(13, 55);
  tft.println("Current: ");
  tft.setCursor(30, 65);
  tft.printf("%.2f mA\n", -newData.currA);

  //Power circle graph
  tft.fillCircle(175,180, 45, ILI9341_WHITE);
  tft.fillCircle(175, 180, newData.pwrW/10, ILI9341_YELLOW);
  tft.setCursor(150, 200);
  tft.setTextSize(1);
  tft.setTextColor(ILI9341_BLACK);
  tft.printf("%.2f mW\n", newData.pwrW);
  tft.setCursor(128, 128);
  tft.setTextSize (2);
  tft.setTextColor(ILI9341_BLACK);
  tft.println("Power");

  drawNeedleGauge();

  // // tft.printf("Load Voltage: %.2f V\n", newData.loadV);
  // // // specify data receipt interval
  delay(1000);  // every 3 seconds

  void OnDataRecv(const uint8_t *mac_addr, const uint8_t *data, int data_len){
  //Serial.print("I just received >> ");
  // Serial.println(*sensorData);
  memcpy(&newData, data, sizeof(newData)); //copy data from membory (memory copy) for use in loop
}
}

void OnDataRecv(const uint8_t *mac_addr, const uint8_t *data, int data_len){
  //Serial.print("I just received >> ");
  // Serial.println(*sensorData);
  memcpy(&newData, data, sizeof(newData)); //copy data from membory (memory copy) for use in loop
}

void UI () {
  //Rectangle 1 - Current Meter
  tft.fillRoundRect(7, 7, 225, 112,
                     7, ILI9341_WHITE);
  tft.setCursor(13, 12);
  tft.setTextSize (2);
  tft.setTextColor(ILI9341_BLACK);
  tft.println("Current");
  tft.setTextSize (1);
  tft.setCursor(13, 55);
  tft.println("Current: ");

  // Draw graph area
  tft.drawRect(97, 22, 135, 85, ILI9341_BLACK);

  //Rectangle 2 - Voltage
  tft.fillRoundRect(7,126, 110, 105,
                     7, ILI9341_WHITE);
  tft.setCursor(13, 128);
  tft.setTextSize (2);
  tft.setTextColor(ILI9341_BLACK);
  tft.println("Voltage");
  // Draw Gauge
  drawSemiCircleGauge(62, 160, 45, 0, 180);
  // tft.setCursor(43, 190);
  // tft.setTextSize (1);
  // tft.println("COMING");
  // tft.setCursor(48, 200);
  // tft.println("SOON");

    //Rectangle 3 - Hydrogen Storage
  tft.fillRoundRect(122,126, 110, 105,
                     7, ILI9341_WHITE);
  //tft.fillCircle(175, 180, 40, ILI9341_YELLOW);
  tft.setCursor(128, 128);
  tft.setTextSize (2);
  tft.setTextColor(ILI9341_BLACK);
  tft.println("Power");
 // tft.setCursor(128, 146);
  //tft.println("Storage");
  // tft.setCursor(157, 190);
  // tft.setTextSize (1);
  // tft.println("COMING");
  // tft.setCursor(162, 200);
  // tft.println("SOON");

  // Line
  tft.drawFastHLine(7, 238, 225, ILI9341_WHITE);

  //Clock
  tft.setCursor(9, 255);
  tft.setTextSize (4);
  tft.setTextColor(ILI9341_WHITE);
  tft.println("14:14");

  //Location
  tft.setCursor(13, 300);
  tft.setTextSize (1);
  tft.setTextColor(ILI9341_WHITE);
  tft.println("Serangan, Bali");

  //Menu
  tft.fillRoundRect(138,248, 90, 25,
                     25, ILI9341_WHITE);
  tft.setCursor(158, 255);
  tft.setTextSize (2);
  tft.setTextColor(ILI9341_BLACK);
  tft.println("Menu");

  //Help
  tft.fillRoundRect(138,280, 90, 25,
                     25, ILI9341_WHITE);
  tft.setCursor(158, 289);
  tft.setTextSize (2);
  tft.setTextColor(ILI9341_BLACK);
  tft.println("Help");

}


void drawSemiCircleGauge(int x, int y, int radius, int minAngle, int maxAngle) {
  int center_x = x;
  int center_y = y + radius; // Center of the semi-circle is shifted downwards

  // Draw semi-circle
  int startAngle = minAngle;
  int endAngle = maxAngle;
  int segments = 30; // Number of line segments to approximate the arc
  float angleIncrement = (endAngle - startAngle) / (float)segments;
  for (int i = 0; i <= segments; i++) {
    float angle = startAngle + angleIncrement * i;
    int x1 = center_x + cos(angle * PI / 180) * radius;
    int y1 = center_y - sin(angle * PI / 180) * radius;
    int x2 = center_x + cos(angle * PI / 180) * (radius - 5); // Reduce the inner radius for a clearer gauge
    int y2 = center_y - sin(angle * PI / 180) * (radius - 5);
    tft.drawLine(x1, y1, x2, y2, ILI9341_BLACK);
  }
}

void drawNeedleGauge() {
  static float previousValue = 0;
  float currentValue = newData.loadV;

  // Clear the previous needle
  drawNeedle(62, 160 + 45, 45, previousValue, 0, 180, ILI9341_BLACK);

  // Draw the new needle
  drawNeedle(62, 160 + 45, 45, currentValue, 0, 180, ILI9341_RED);

  // Display the voltage value
  tft.setCursor(43, 210);
  tft.setTextSize(1);
  tft.setTextColor(ILI9341_BLACK);
  tft.fillRect(43, 207, 70, 24, ILI9341_WHITE); // Clear the previous value area
  tft.printf("%.2f V", currentValue);

  // Save the current value as the previous value for the next update
  previousValue = currentValue;
}

void drawNeedle(int x, int y, int radius, float value, int minAngle, int maxAngle, uint16_t color) {
 // Map the voltage range to the angle range
  float minValue = 1.0; // Minimum voltage
  float maxValue = 5.0; // Maximum voltage
  int angle = map(value, minValue, maxValue, maxAngle, minAngle); // Map the value within the desired range

  int needleLength = radius * 0.8;
  int x_end = x + cos(angle * PI / 180) * needleLength;
  int y_end = y - sin(angle * PI / 180) * needleLength;

  // Draw thicker needle by drawing multiple lines with a slight offset
  for (int i = -2; i <= 2; i++) {
    tft.drawLine(x + i, y, x_end + i, y_end, color);
  }
}
Outcome
Overall, everything is working, data transmitted into the Rx board shows values and is displayed within the graphics. However I still need to figure out mapping values with screen refresh mechanism and make the whole interface more refined. The loop function was where it all got very tricky. Remember that in the loop - the code runs in order from top to bottom. Anytime that the values were out of range and messed up the graphical mapping, I couldn’t really figure out how to make the the TFT Display / Adafruit GFX Library refresh in the unintended areas. Here is a video displaying the problem.
