Week 11: Input devices
This week was completed based in what I learned during the week lesson I occupide a sensor in order to achive the first task of input devices For this week I will be using a sensor as an input for my XIAO RP2040 PCB
Grupal Assigment
This week, our focus was on testing analog and digital input devices, specifically the Sparkfun AD8232 Heart Rate Monitor and the MAX30102 Blood Oxygen Sensor Pulse.
Sparkfun AD8232 Heart Rate Monitor (Analog Input):
- Wiring Configuration: Connected VCC and GND to a 3.3V power supply. AIN and GND were connected to an oscilloscope probe.
- Positioning: Applied the sensor according to the Einthoven Triangle, using Lead II on the wrists and ankle of the subject.
- Data Analysis: Utilized an oscilloscope to visualize the signal, observing a noisy version compared to reference examples.
MAX30102 Blood Oxygen Sensor Pulse (Digital Input):
- Wiring Configuration: Used the I2C protocol with connections: GND to GND, Vin to 3.3V, SCL to SCL, and SDA to SDA.
- Microcontroller Integration: Integrated with a XIAO RP2040 microcontroller, uploading a provided code to collect data.
- Signal Analysis: Analyzed the SCL (clock) and SDA (data) signals using an oscilloscope, observing the decode function and the presence of No acks for data larger than 8 bits.
Types of Sensors
The sensors are input devices that provides an output with relation of a physical quantity.
Device that converts signals from one energy domain to electrical.
There are a lot of different sensors depending on the application you want.
Temperature
Pressure
Proximity
Motion
Force Sensors (Strain and Weight Sensor)
Environmental Sensors (humidity, gas Air Pressure)
Light
Distance
Humidity
Touch
Color
Speed
Radiation
Types of Sensors: Classified by Applications
Understanding Sensor Dynamics
First I had to look at different tutorials to completly understand this weeks assigmet
Delve into the intricacies of the MPU-6050 module, where the gyroscope captures rotational velocity across the X, Y, and Z-axis, aiding in precise orientation determination. Meanwhile, the accelerometer detects acceleration variations along these axes, distinguishing between static forces such as gravity and dynamic movements like vibrations.
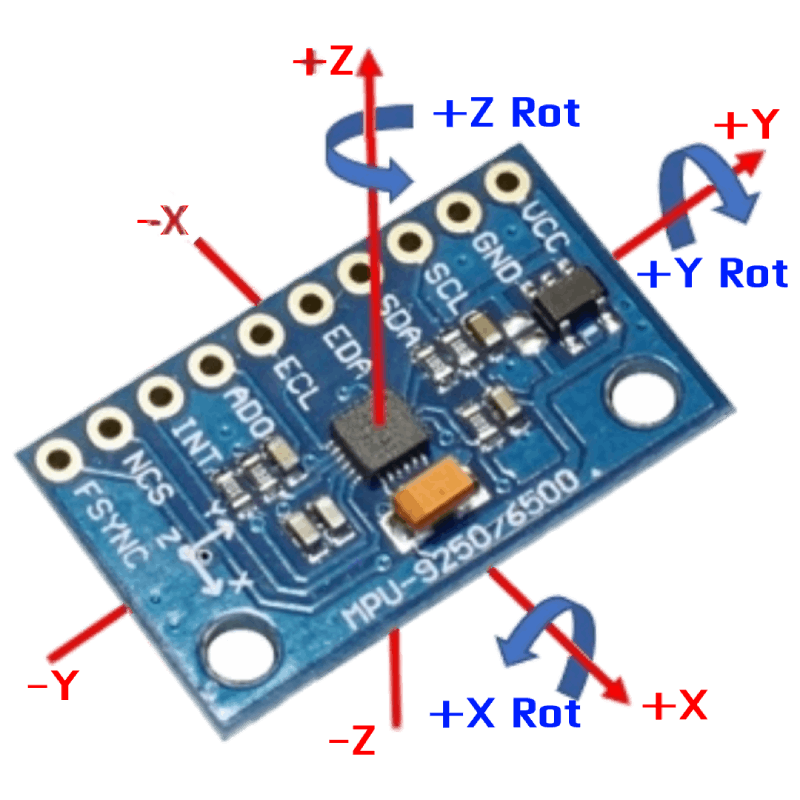
Sensor Fusion to Enhanced Precision (OLED and Xiao RP2040)
Combine the data from both sensors to refine the accuracy of object orientation assessment. By leveraging the insights from both the accelerometer and gyroscope, achieve a comprehensive understanding of an object's motion and position.
Navigate through the pinout configuration of the MPU-6050 sensor module, carefully connecting power, ground, and communication pins to facilitate seamless integration with the Arduino platform.
PCB Creation
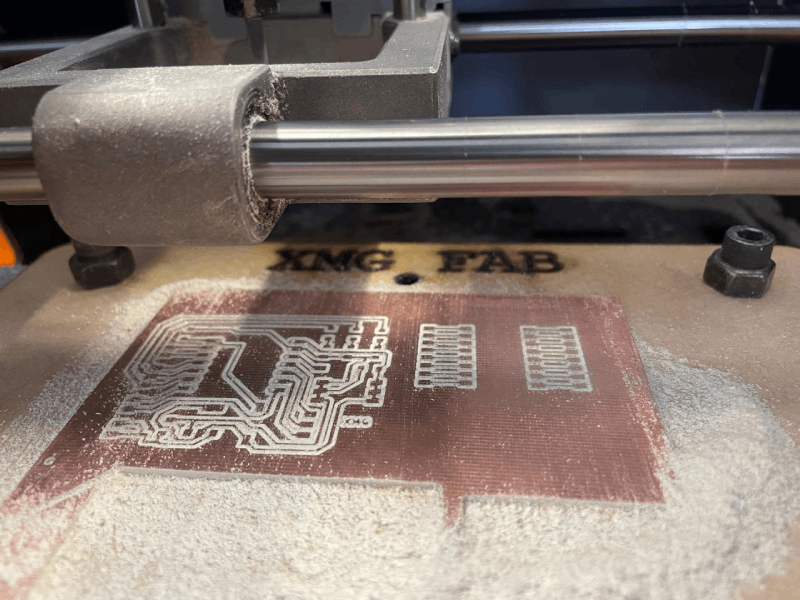
First I added al the components to Kikad inclouding the microcontroller I needed, then I design the diagram to then cut it in the ROLAND using the same tools previous weeks. Also I added an aditional pin stand to help me insert any other sensor.
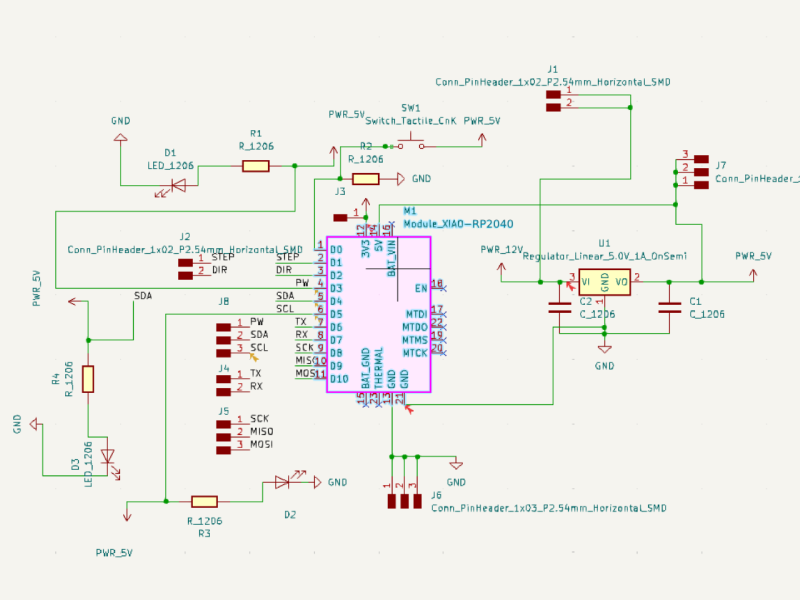
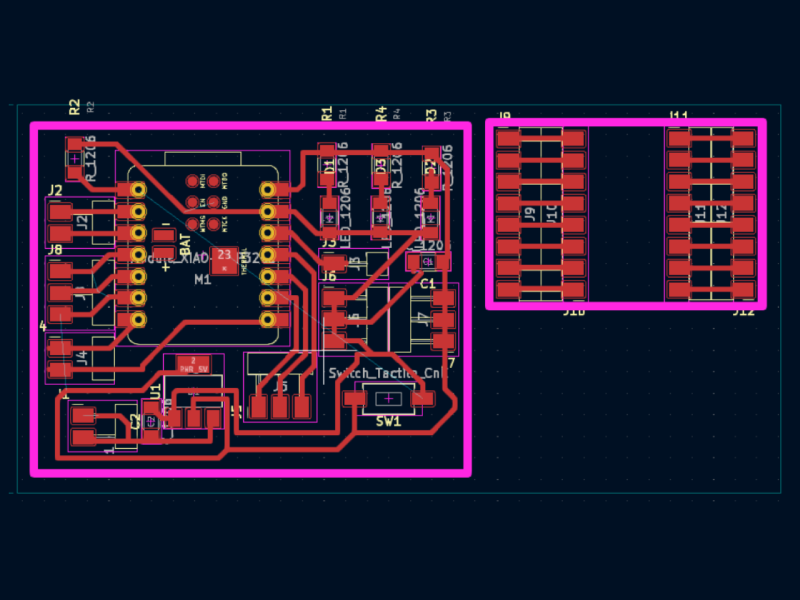
Components:
- Xiao RP2040
- Voltage Regulator
- Button
- 1k Resistor
- LEDs
- Capacitor
| Material | Quiantity |
|---|---|
| Xiao RP2040 | 1 |
| Arduino UNO | 1 |
| Voltage Regulator | 1 |
| 1k Reisitor | 4 |
| Push button | 1 |
| LED | 3 |
| Capacitor 5V | 2 |
| Pin headers | 8 |
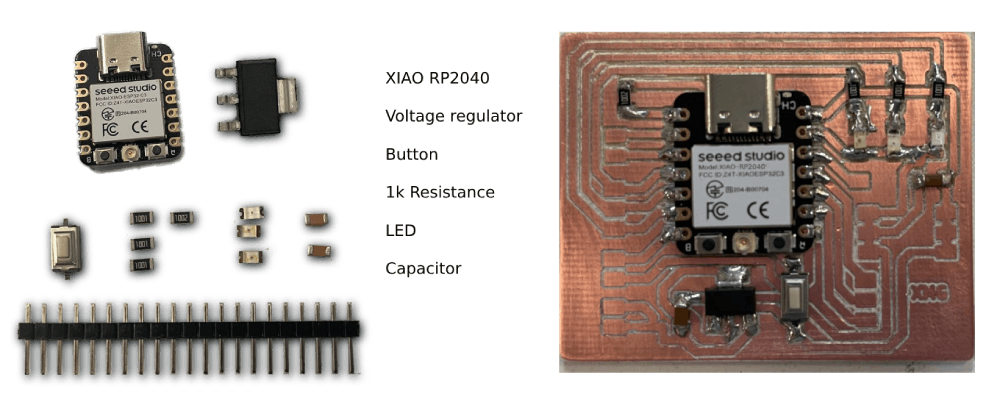
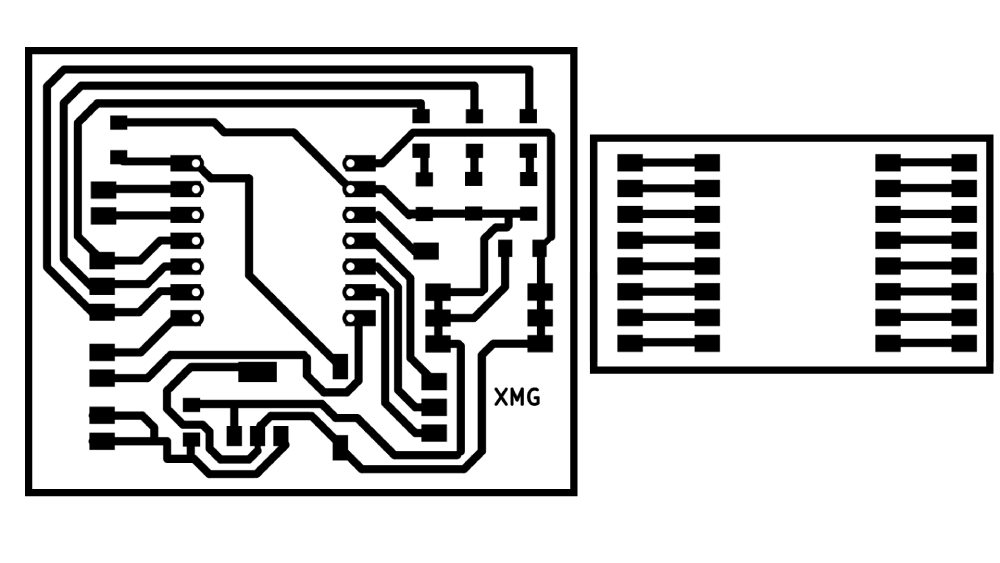
PCB Needed for the excercise
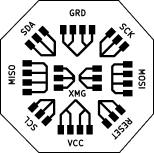
These are the images of the final PCBs I'm using. Please note that they are inverted. You can use these images for cutting a PCB instead of using the SVG.
Programming
Because we were only trying to receive the data that we get from the Accelerometer with our Arduino uing Serial Monitor, we only have to include 2 libraries. I looked for example code to determine where my accelerometer was moving, and I found this site that helped me recreate this exercise with simple explanations and how it could help the data for further exercises: U8g2 Arduino Library.
Steps:
- Install the Libraries: Sketch -> Include Library -> Manage Libraries.
- Install Sensor. Install all.
- Install MPU-6050. Install all.
- Open the examples to see what you can do with them.
Testing with Arduino
Follow the example at Accelerometer tutorial. Although the tutorials were for Arduino, I first tried the Arduino tutorial to see if it was effective, and then I modified the code to specify the new pins where the data was coming from. You need to conect the arduino this exact same way.
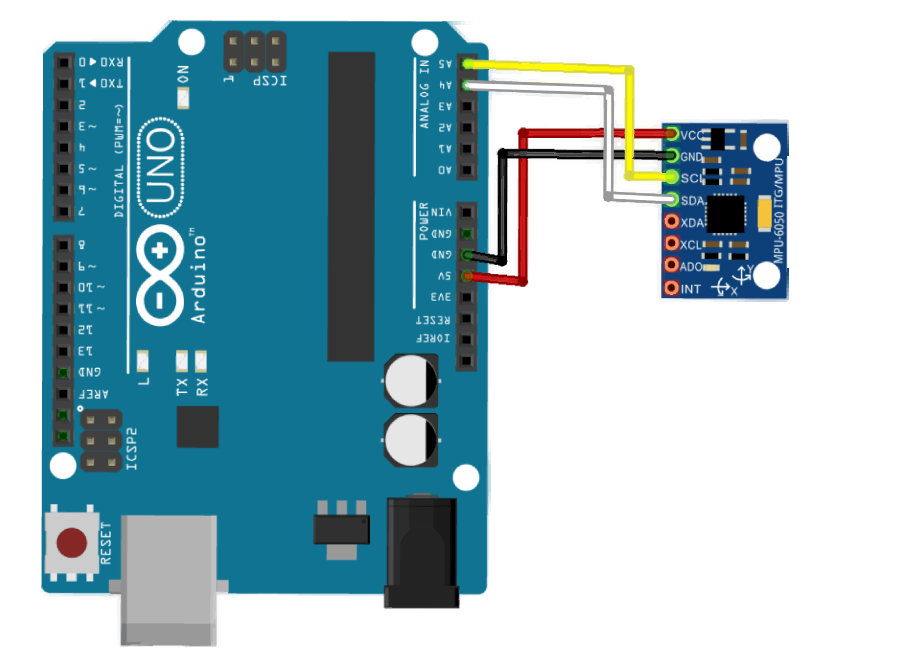
This code is from Arduino Guide for MPU-6050 Accelerometer and Gyroscope Sensor. If you want, you can simply copy this code and edit.
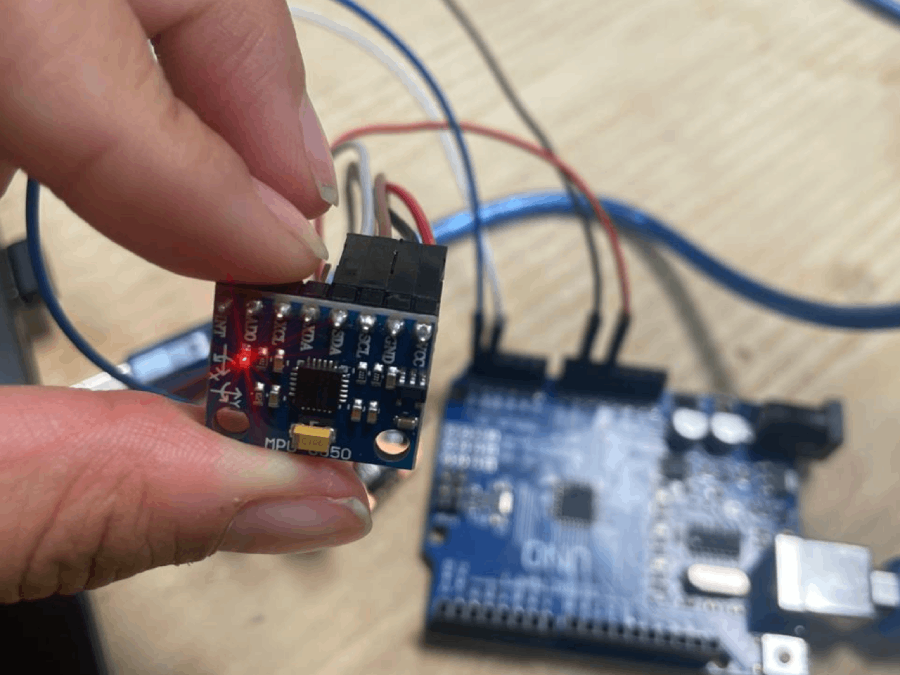
Reading Data with Accelerometer and OLED
Now to project the data that we get from the Accelerometer, we have to include 3 libraries that we previously installed.
Steps:
- Include SSD1306. Install all, including the GFX library.
- Include Sensor. Install all.
- Include MPU-6050. Install all.
- Open the examples to see what you can do with them.
I2C Communication to Connect Devices
The Accelerometer works with I2C communication like the OLED in the previous exercise, so we need to connect the microcontroller using these exact diagrams.
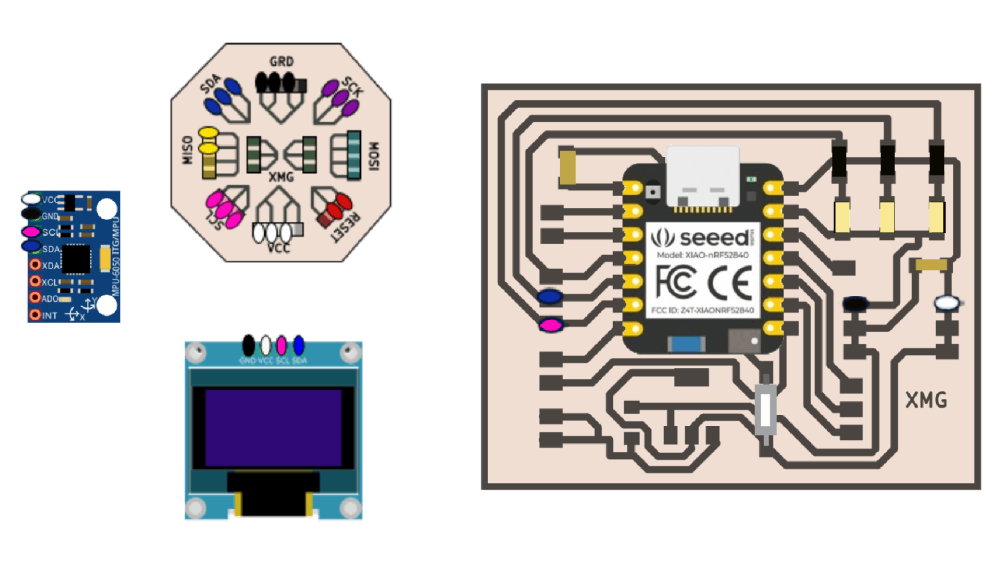
This code allows us to see where our accelerometer is moving in x, y, and z, and to display the data on the OLED display instead of on our computer. You can add delays to adjust the speed of the text display.
Final Result
Files
Links
Tutorial how to do an acelerometer into a mouse
Arduino and MPU6050 Accelerometer and Gyroscope Tutorial
Sensor datasheet: used in this escercise
Reflection Summary
This week, I focused on sensors and their applications, specifically working with the MPU-6050 accelerometer and gyroscope module. My tasks included PCB creation, sensor integration, and programming to visualize accelerometer data on an OLED display.
Challenges and Solutions
Understanding the dynamics of the MPU-6050 module, including the gyroscope and accelerometer, posed challenges in correctly interpreting the sensor data. To overcome this, I studied tutorials and examples to grasp the sensor's functionalities and how to use them effectively.
Creating the PCB and integrating components like the Xiao RP2040 and MPU-6050 required careful planning and attention to detail. By using KiCad for PCB design and following the necessary steps for milling, I ensured the PCB was ready for sensor integration.
Programming the Arduino to read and display accelerometer data on an OLED display also presented challenges in understanding I2C communication and data visualization. I referred to example codes and libraries to simplify the process and ensure accurate data representation.
Future Applications
The knowledge gained in working with sensors, PCB design, and Arduino programming will be instrumental in future projects involving motion sensing and sensor data visualization. Understanding sensor fusion and data integration will enable more accurate and precise orientation assessments in future projects.
Mastering the use of sensors like the MPU-6050 and integrating them into custom PCB designs will streamline the prototyping process for future projects, allowing for faster iterations and improved project outcomes.

