Interface and Application Programming
Here its our group assigment: Week 14For this week...
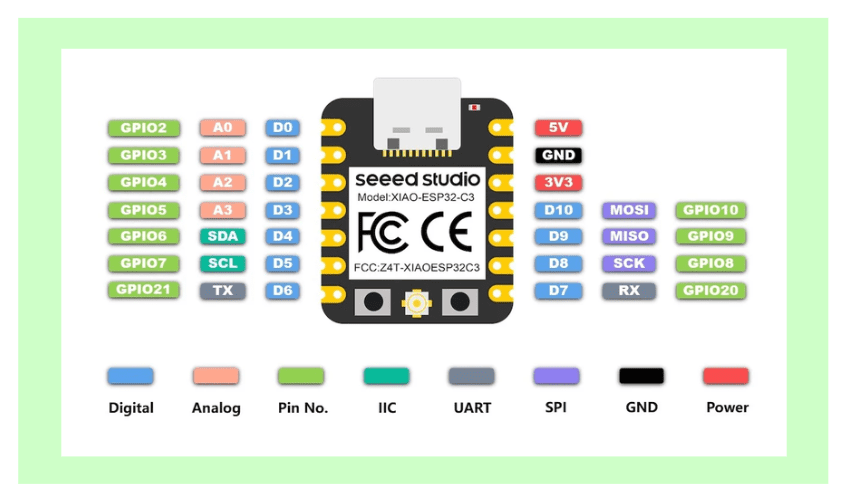
The Xiao ESP32C3 microcontroller board is a powerful yet compact development platform renowned for its versatility and efficiency. At its core lies the ESP32-C3 chip, which boasts a 32-bit RISC-V CPU operating at up to 160 MHz, ensuring robust performance for a wide range of applications. This board offers ample flexibility with its rich set of features, including built-in WiFi connectivity, enabling seamless integration into IoT projects and networked applications. Furthermore, its compact form factor makes it ideal for projects where space is limited, without compromising on functionality.
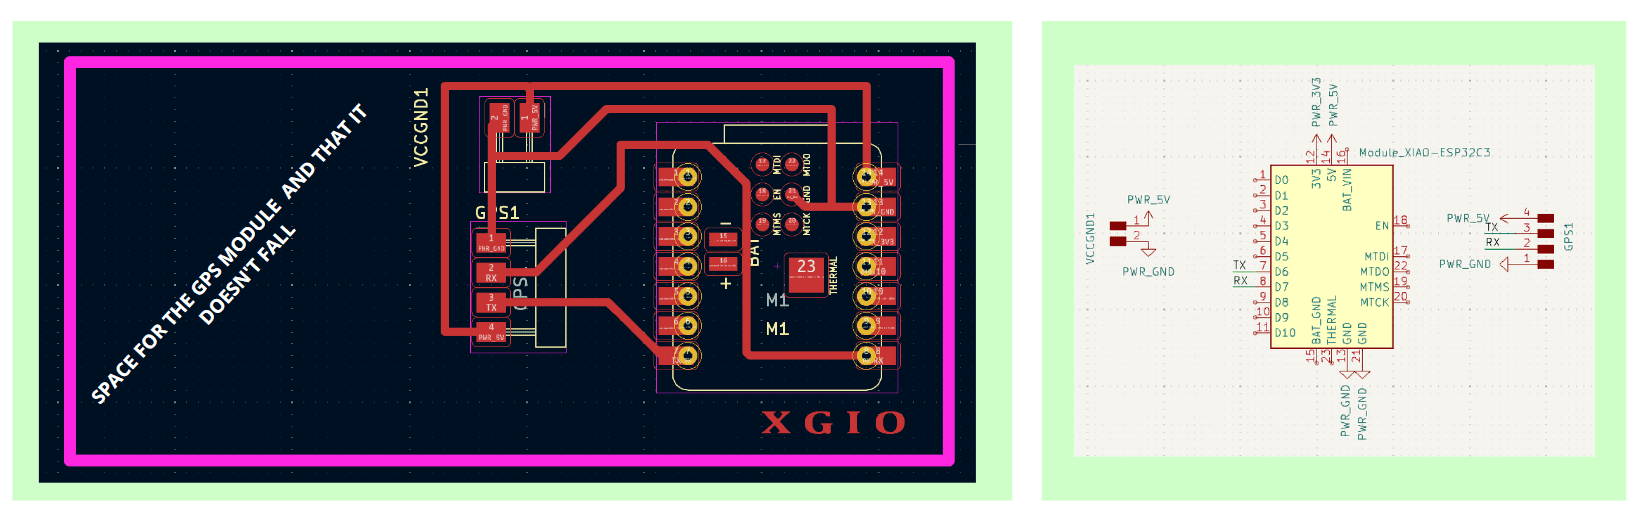
This week holds significant importance for my final project because I've successfully designed a new circuit board using a Xiao ESP32C3 microcontroller. The key aspect of this board is its integration with a GPS module, allowing me to track a person's location in real-time. Additionally, the board is equipped with both Bluetooth and WiFi capabilities, which enable seamless communication in real-time. This combination of features enhances the functionality and effectiveness of the project, making this week particularly critical for its development and implementation.
The Internet of Things (IoT) refers to the interconnection of everyday devices and objects through the Internet, enabling them to communicate with each other and with users to offer advanced functions and automation. These devices can range from household appliances and sensors to vehicles, healthcare systems, and smart cities.
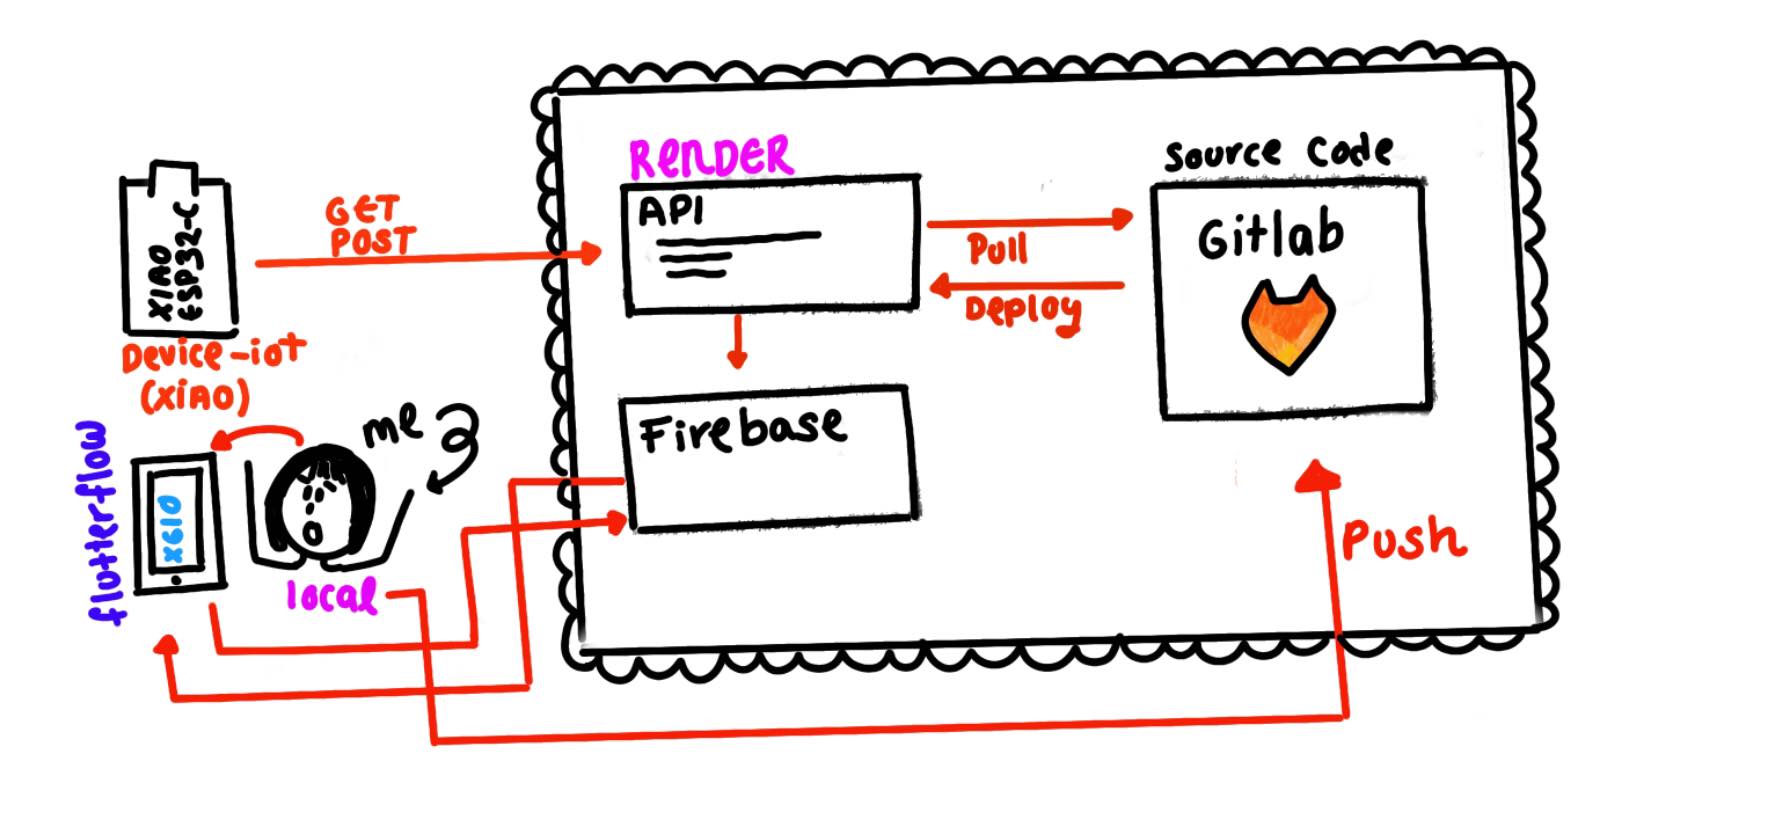
The Xiao ESP32 sends location data to the API, which processes it and sends it to Firestore for storage. Render hosts the API in the cloud to make it available for receiving requests. GitLab manages the project's source code, and FlutterFlow communicates with the API to fetch and display the data in the mobile application's user interface.
- Xiao ESP32 with GPS module: Sends location data to the API through HTTP POST requests.
- API: Sends location data received from Xiao ESP32 to Firestore for storage and rocesses HTTP requests and responses with Xiao ESP32 and the mobile application.
- Firestore: Receives location data from the API and stores it in the database.
- Render Cloud Application Hosting: Receives HTTP requests from Xiao ESP32 sent to the API and provides a cloud hosting environment for the API.
- GitLab: Stores the source code of the API and manages collaborative development of the project.
- FlutterFlow:Communicates with the API to fetch location data stored in Firestore and display it in the mobile application's user interface.
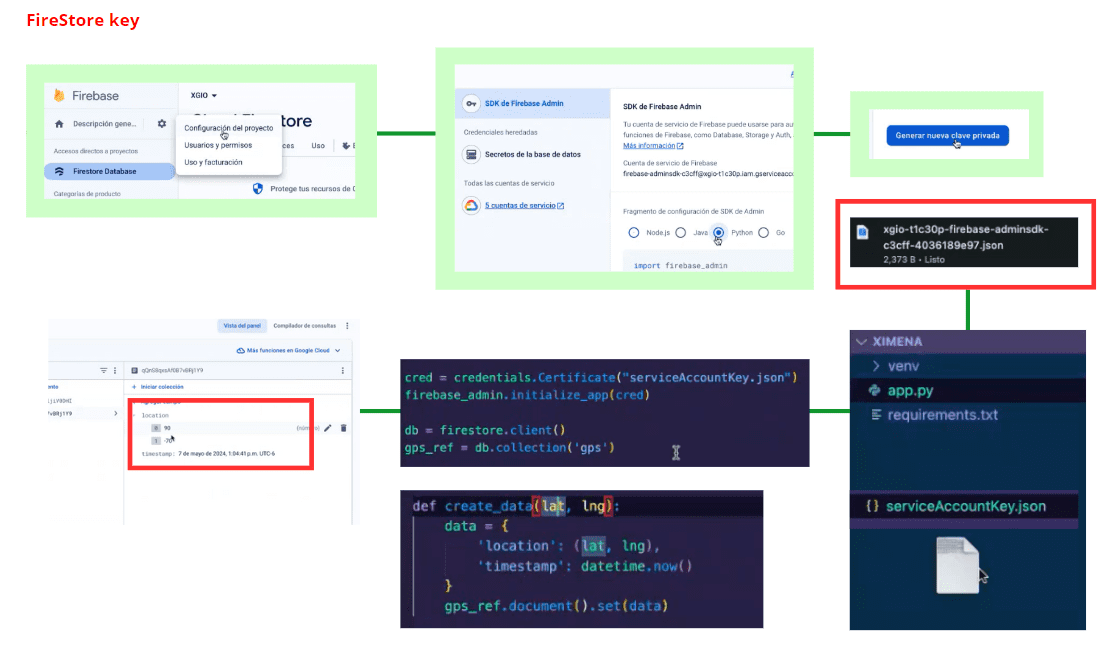
Firestore key
The Firestore key is used for authentication and authorization purposes when accessing the Firestore database. It acts as a security measure to ensure that only authorized users or services can read from or write to the database.
In the context of the described architecture, the Firestore key would likely be used by the API to authenticate itself when interacting with the Firestore database. This ensures that only the API, and not unauthorized users or services, can access and manipulate the data stored in Firestore.
Firestore collection
For creating one, here are the steps I followed:
- In the Firestore console, click on "Start collection" or "Add collection" to create a new collection.
- Give your collection a name, for example, "Locations".
- Click "Next" to proceed to create the collection.
- Inside the "Locations" collection, you can add documents to store individual location data.
- Click on "Auto-ID" to generate a unique document ID, or specify your own document ID.
- Add fields to the document to store location data. Typically, you would have fields for latitude and longitude.
- For example, you can add fields named "latitude" and "longitude" of type double to store the latitude and longitude values respectively.
- Once you have defined the structure of your collection and documents, you can start adding location data.
- Click on "Add document" to add a new document to the collection.
- Enter the values for the latitude and longitude fields for each location.

Sure, here's how you can explain the process of cloning and creating a repository on GitLab, similar to what was done to upload all the data from the previously created API, so that everything is stored.
First, we clone the repository from GitLab to our local machine. This involves copying the repository's URL from GitLab and using Git commands to clone it. For example, we use the git clone command followed by the repository URL to clone the repository to our local directory.

Virtual environment
Creating a virtual environment allows you to manage dependencies and isolate project-specific libraries in Python.
To create a new virtual environment, use the -m venv command followed by the name you want to give to your virtual environment. For example: python -m venv myenv.
After creating the virtual environment, you need to activate it. On Windows, you can do this with the command: myenv\Scripts\activate. On macOS and Linux, you would use: source myenv/bin/activate. Once activated, you'll notice that the command prompt changes, indicating that you're now working within the virtual environment.
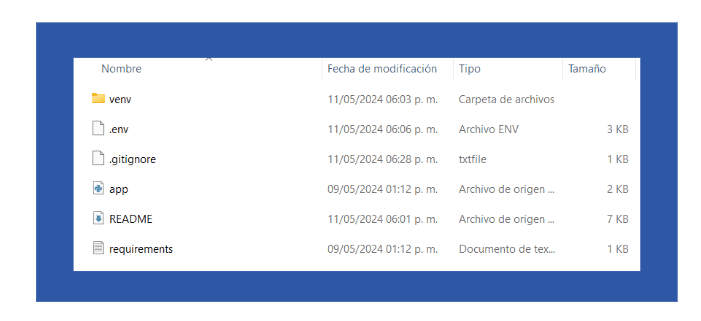

Once we've confirmed that the API is functioning correctly and everything is in order, it's time to upload the documents to GitLab. If you're unsure of the steps, here's a detailed guide. It's important to note that we don't want others to view the .env file because it contains our credentials. To address this, we create a .gitignore file and place the document in it.
Within this file, we add the filename or pattern of the files we want Git to ignore, such as .env, to prevent Git from tracking and uploading sensitive files to the repository. After creating the .gitignore file, we add the files we want to upload to the staging area using the git add command. We ensure that the .gitignore file is included in the staging area.

RENDER
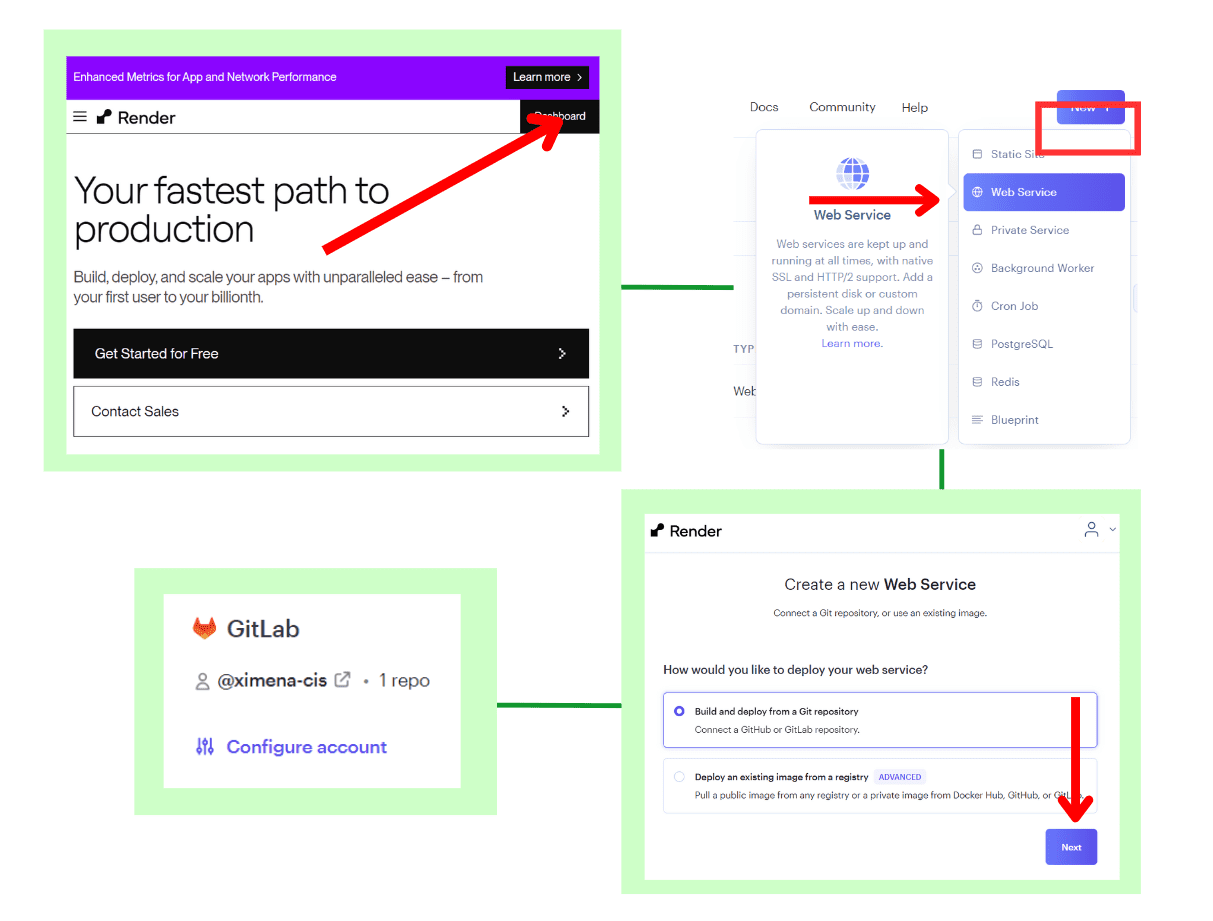
To set up a web service on RENDER connected to GitLab, follow these steps:
- Log in to your RENDER account or sign up if you haven't already. Navigate to the dashboard.
- Click on "Create new" and select "Web Service".
- Choose "GitLab" as your Git provider and authenticate with your GitLab account.
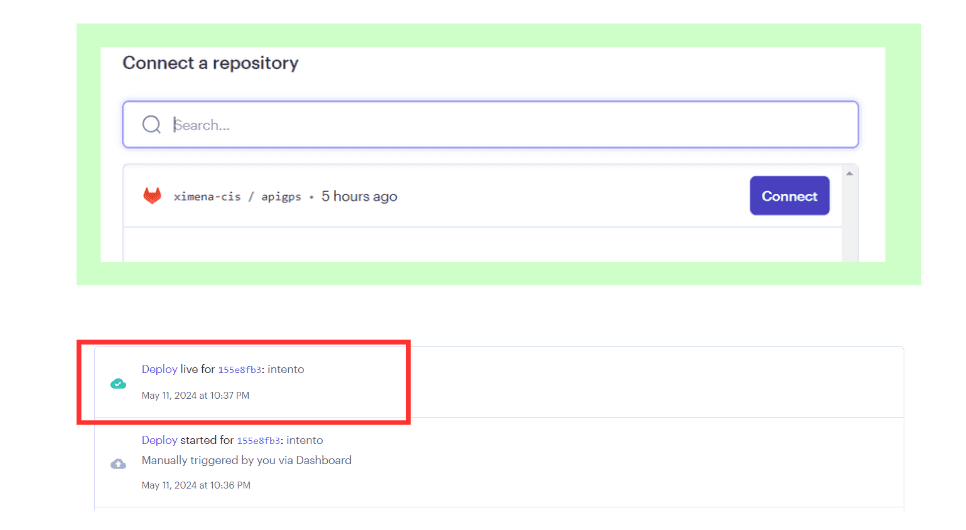
- Select the repository you created earlier from the list of repositories.
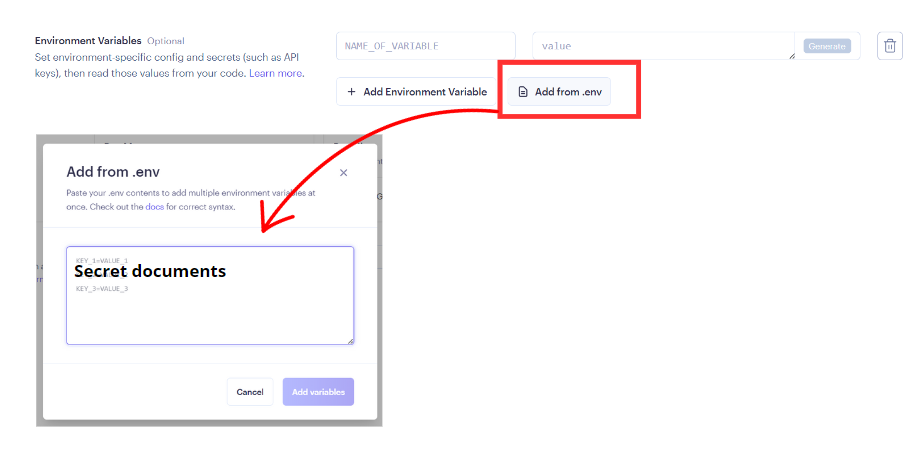
- Choose the branch you want to deploy (e.g., main) and configure any additional settings such as environment variables or build commands.
- Click on "Create Web Service" to deploy your web service to RENDER.
- RENDER will automatically build and deploy your web service based on your configuration. You can monitor the deployment process and view logs from the RENDER dashboard.
FLUTTERFLOW
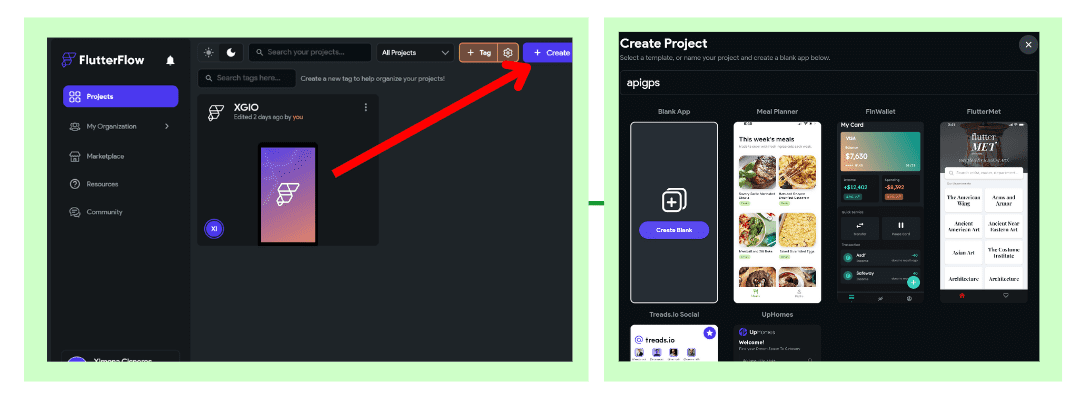
FlutterFlow is a visual app builder for Flutter, a popular open-source UI software development kit created by Google for building natively compiled applications for mobile, web, and desktop from a single codebase. FlutterFlow simplifies the app development process by providing a drag-and-drop interface for designing user interfaces (UIs) without writing code. It allows users to visually design screens, add widgets, and define interactions using a canvas-based editor. Additionally, FlutterFlow generates Flutter code in real-time as users design their app, enabling them to preview and test their app's functionality instantly.
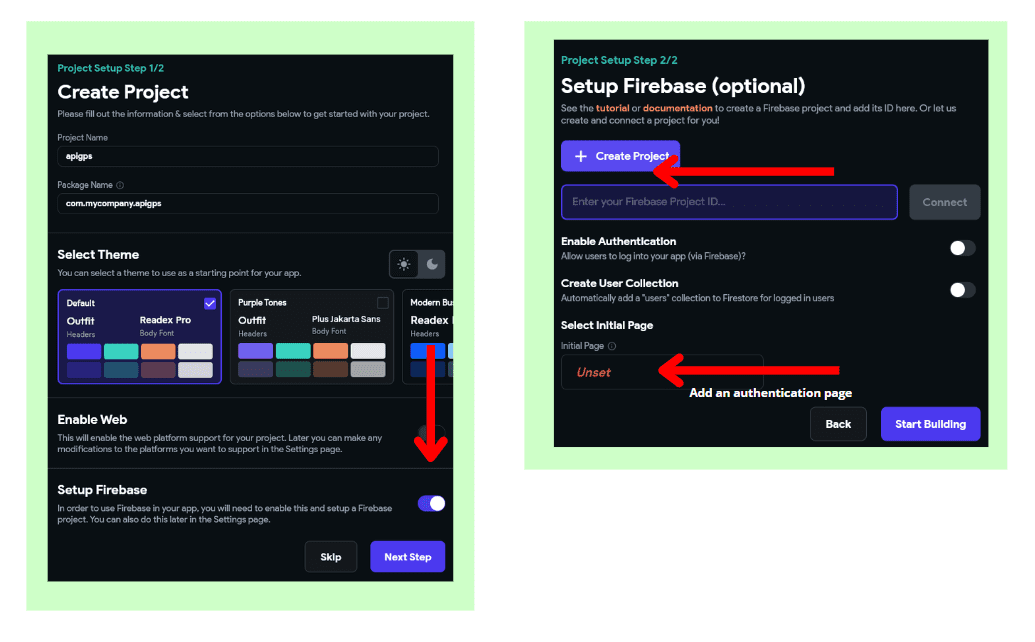
You can choose to start with a pre-designed template or begin with a blank canvas. Templates provide a starting point with pre-built UI components.
Look for an option to add Firebase integration. FlutterFlow may provide a built-in feature or guide you through the process of adding Firebase to your project.
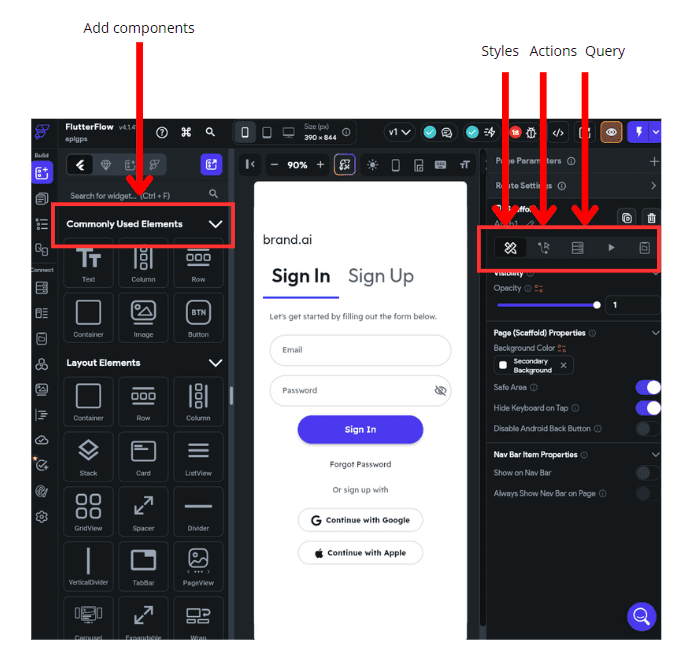
FlutterFlow tools
- Query: Queries in FlutterFlow are used to fetch data from a data source, such as a database or an API. You can define queries to retrieve specific data based on criteria you specify. Queries can be used to populate UI components with dynamic data, enabling real-time updates based on changes in the data source.
- Actions: Actions represent user interactions or events that trigger specific behaviors or functionality in your app. Examples of actions include button clicks, form submissions, screen navigations, and data submissions. Actions allow you to define the behavior of your app in response to user input, enabling interactivity and functionality.
- Styles: Styles in FlutterFlow define the visual appearance of UI components, such as text styles, colors, spacing, and borders. You can create and customize styles to maintain consistency and branding throughout your app. Styles can be applied to individual components or shared across multiple components to ensure a cohesive design.
- Components: Components are building blocks of your app's user interface (UI) that you can visually design and customize using FlutterFlow's drag-and-drop editor. Examples of components include buttons, text fields, images, lists, cards, and containers. Components encapsulate both the visual appearance and functionality of UI elements, making it easy to create complex layouts and interactions without writing code.
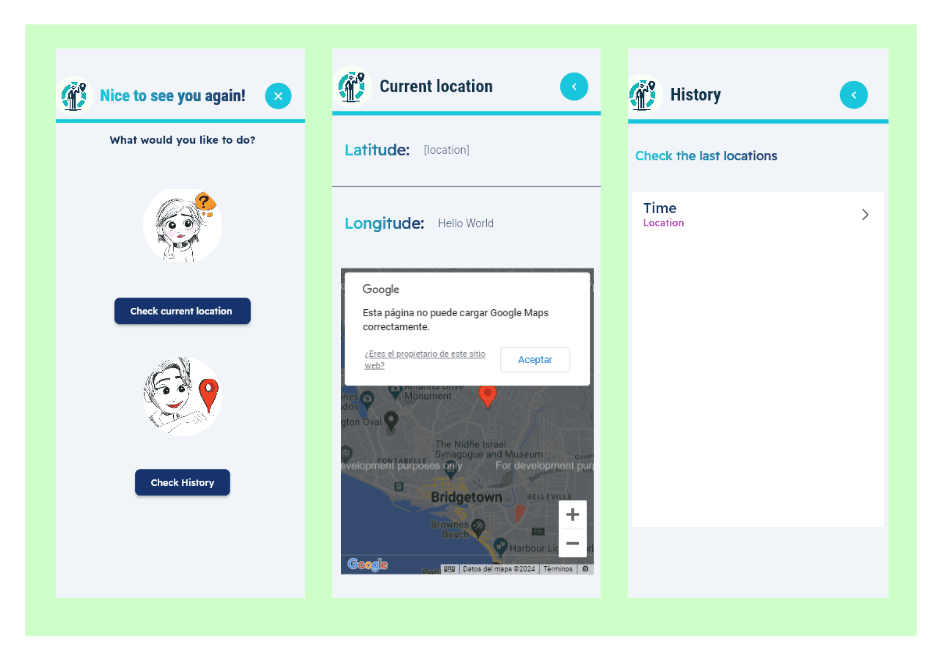
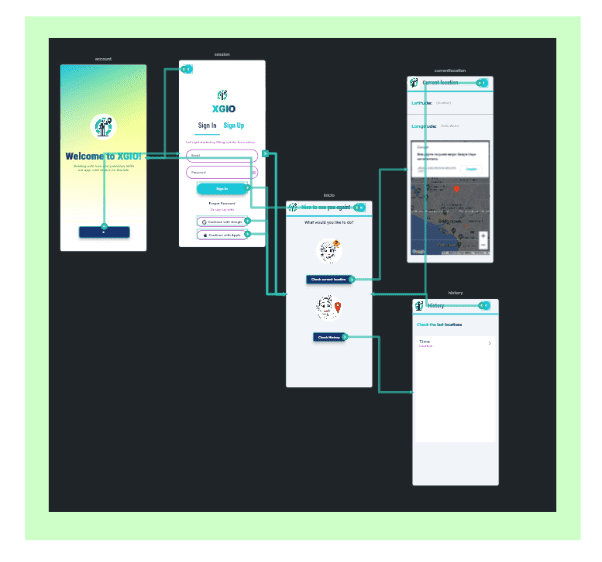
My interface
The main screens when joining the app:
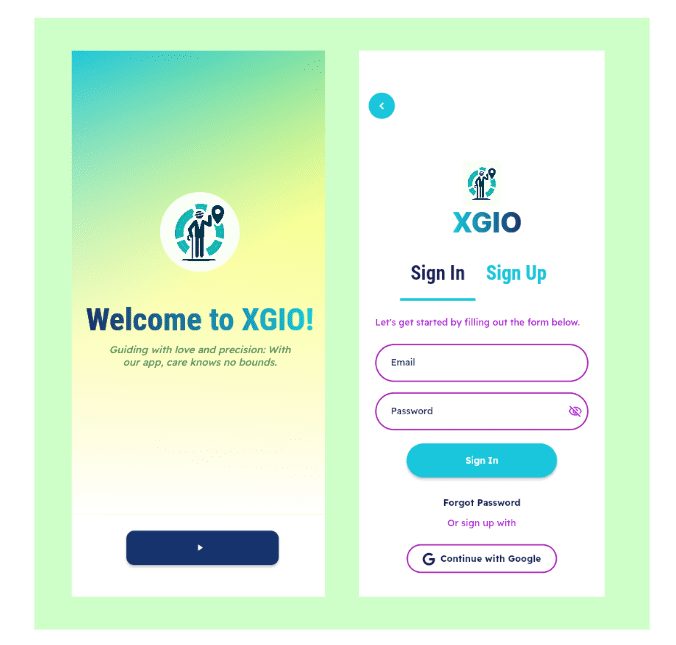
The interactive screens.
How each screen is connected to each other:
Connecting the XIAO ESP32C3 with the interface
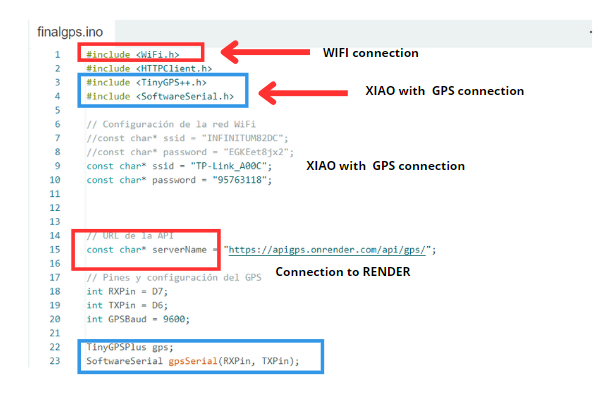
This code connects an Arduino device to a WiFi network and uses a GPS module to read and send location data to a specified API endpoint. The necessary libraries for WiFi, HTTP requests, GPS handling, and serial communication are included. The code defines the WiFi credentials and the API URL, sets up the GPS pins and baud rate, and initializes variables for storing latitude and longitude. In the setup() function, the device connects to the specified WiFi network, printing a confirmation message once connected. The loop() function continuously reads data from the GPS module, and if valid data is obtained, the saveCoordinates() function is called. This function checks if the GPS data is valid, updates the coordinates, and sends the data to the server at regular intervals defined by printInterval. The printCoordinates() function prints the coordinates to the serial monitor, while the sendGPSData() function sends the coordinates to the server via an HTTP POST request, handling the server's response and printing the result to the serial monitor.
Result
In this video, you can see how the GPS sends location information to the Arduino's serial monitor. By comparing the coordinates received with my home's location, I confirmed they matched correctly. Each time the GPS sent data, a blue LED lit up and displayed the information. I also tested it at my aunt's house, and it worked perfectly, providing her coordinates accurately.
In this video, we can observe how the app displays the location data that we send to Firestore. The Arduino sends information, and we can see a "success: 200" message, which indicates that the data is being successfully transmitted to Firestore. This confirmation message assures us that the location data is being correctly received and stored in the database.
For the final project, the main task was downloading the APK of the app using FlutterFlow. This allowed us to test the app on the final project webpage.
As I didn't know anything related to API, Render and everything related to all I explained before, i want to give special thanks to teacher Rafa, who's been helping me a lot with it.

Mistakes and how I solve them
| Problem | How we solve it | One of the challenges I faced was difficulty connecting my API with my Xiao device. | The solution I found was to switch to a Xiao device that supports both Wi-Fi and Bluetooth connectivity. This change enabled seamless communication between my API and the Xiao device, allowing for smoother integration and operation of the system. |
|---|---|
| However, as the project progressed, a more nuanced challenge emerged, stemming from the utilization of two distinct types of microcontrollers. This divergence led to a significant time investment during the programming phase. Any minor missteps in programming necessitated a complete reset of my Xiao board to accommodate the programming of the ATtiny microcontroller, followed by a switch back to the original configuration. | In hindsight, it's evident that employing microcontrollers from the same family could have mitigated this issue, streamlining the programming process and ultimately reducing time expenditure. |