14. Interface and application programming
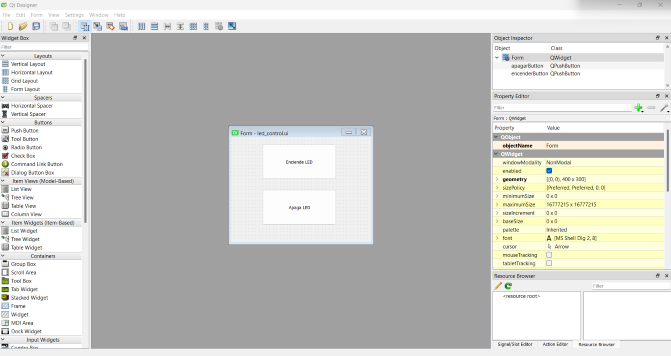
My plan is to utilize the built-in LED of the Xiao RP2040 microcontroller. The goal is to have one button that turns the LED on and another button that turns it off. To achieve this, I will develop a user interface with QtDesigner.
I have designed a straightforward user interface featuring only two buttons labeled "Turn On" and "Turn Off." This minimalistic design ensures ease of use and clarity for controlling the LED. Once the design was completed, I saved the interface file with a .ui extension. This file is now located in the root directory of my repository

I used VS Codium to open my git repository and proceeded to install Python and PyQt5 via the terminal. These installations were necessary to convert the .ui file designed in QtDesigner into a Python script. To accomplish this conversion, I executed the following command in the terminal:
pyuic5 -o led_control.py led_control.ui
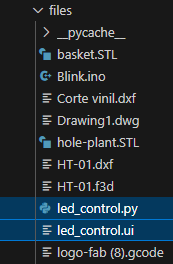
After successfully converting the .ui file to a .py file, I organized my project files by moving both the original .ui file and the newly generated .py file to a designated folder named "files" within my repository.

I created a new file named main.py to serve as the central script for my project. This script will handle the communication with the Xiao RP2040, enabling the control of the built-in LED through the user interface.
import sys
import serial
from PyQt5 import QtWidgets
from led_control import Ui_Form  # Asegúrate de que el archivo generado por pyuic5 se llama led_control.py

class LEDControlApp(QtWidgets.QWidget, Ui_Form):
	def __init__(self):
		super().__init__()
		self.setupUi(self)

		# Configurar el puerto serie (ajusta el puerto según sea necesario)
		self.serial_port = serial.Serial('COM10', 9600)  # Cambia 'COM3' por el puerto correcto

		# Conectar botones a funciones
		self.encenderButton.clicked.connect(self.encender_led)
		self.apagarButton.clicked.connect(self.apagar_led)

	def encender_led(self):
		self.serial_port.write(b'H')  # Enviar 'H' para encender el LED

	def apagar_led(self):
		self.serial_port.write(b'L')  # Enviar 'L' para apagar el LED

if __name__ == '__main__':
	app = QtWidgets.QApplication(sys.argv)
	window = LEDControlApp()
	window.show()
	sys.exit(app.exec_())
To ensure that the Xiao RP2040 would respond correctly to commands from the main.py script, I programmed the microcontroller with the following code:
// Configuración inicial
void setup() {
  // Inicia la comunicación serie a 9600 baudios
  Serial.begin(9600);
  // Configura el pin 25 como salida (LED integrado en Xiao RP2040)
  pinMode(25, OUTPUT);
}

// Bucle principal
void loop() {
  // Comprueba si hay datos disponibles en el puerto serie
  if (Serial.available() > 0) {
	// Lee el primer byte de datos recibidos
	char command = Serial.read();
	// Si el comando es 'H', enciende el LED
	if (command == 'H') {
	  digitalWrite(25, HIGH);
	}
	// Si el comando es 'L', apaga el LED
	else if (command == 'L') {
	  digitalWrite(25, LOW);
	}
  }
}
Here is a video demonstrating the functioning.
