Week 6 Embedded Programming
My previous experience
In this week i will experimented with the programming bases,i will be using the PCB i have made on week 3 only using the 3 leds before added on it. Also i will try to get the final assigment using both programming language (C++ on arduino and Circuit Python). I had already been in touch with different languages for programming different things, i remember some with which i have worked, such as Assembly language, C++ (which is the basis of Arduino), Python, and despite currently programming in HTML, i continue learning from it.
Which languages are?
- C - The most widely used programming language for embedded systems, ideal for low-level programming in constrained environments.
- C++ - Used for applications that require complex data processing, object-oriented programming, or real-time performance in embedded systems.
- Assembly Language - Offers unparalleled control over hardware for the most resource-constrained and performance-critical applications, though it's complex and processor-specific.
- Python - Increasingly used for embedded applications, especially in prototyping on platforms like Raspberry Pi and MicroPython, and popular for IoT devices.
- A da - Designed for use in environments where safety, security, and reliability are critical, such as aerospace, transportation, and military applications.
What are architectures in embeded programming?
I've learned that the term "architecture" in this context refers to the specific design and structure of microprocessors or microcontrollers, which are the brains behind embedded systems. These architectures determine how these devices process instructions, manage memory, and interact with other components.
There are various families of microcontrollers, each with its unique instruction sets (the basic commands they can execute) and capabilities. Some of the notable ones include:
- ARM: Known for its power efficiency, ARM architecture is everywhere, from smartphones to IoT devices.
- AVR: These are simple to use, making them great for beginners and hobbyist projects, like those involving Arduino boards.
- PIC: Offers a wide range of options and is used across various applications due to its adaptability.
XIAO RP2040
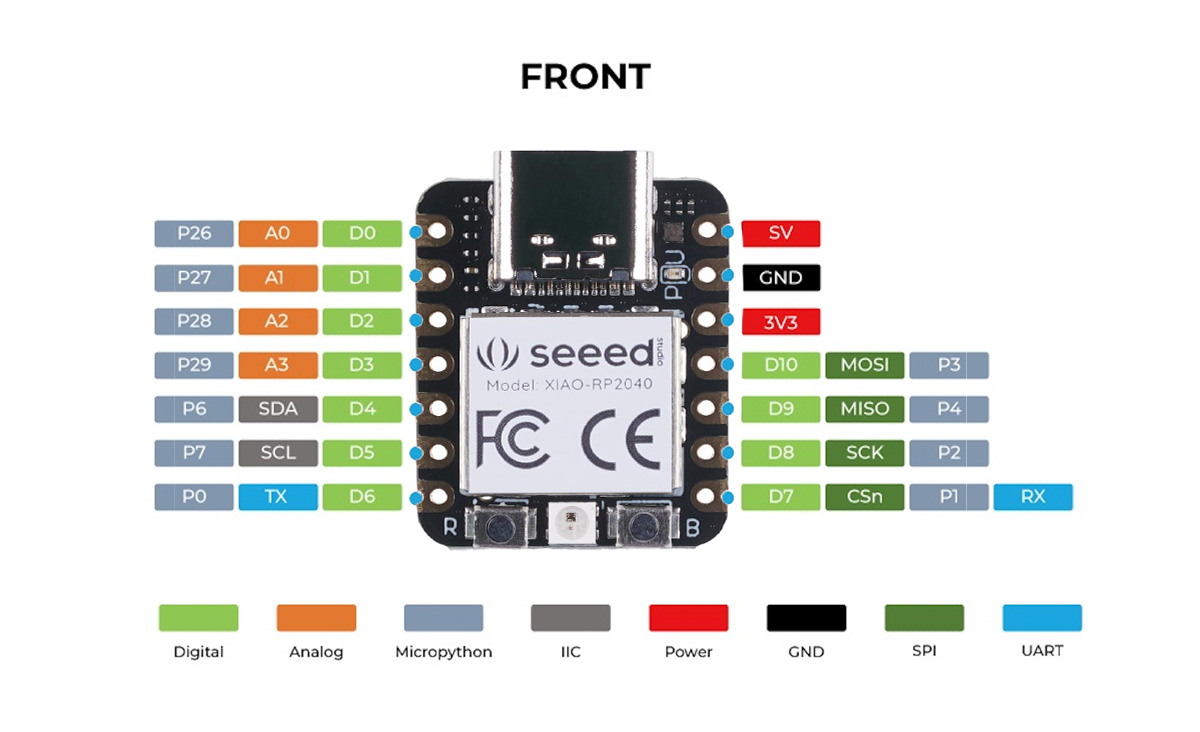
For this assigment we worked with the previous board we made, so in that board we solder a XIAO RP240 microcontroller. Therefore i will give you the following image, and explain basics things to know of this microcontroller.
| Features | RP2040 |
|---|---|
| CPU | Dual-core ARM Cortex-M0+ |
| Clock speed | Up to 133 MHz |
| Bit depth | 32-bit |
| Storage | 264KB of SRAM, and 2MB of on-board Flash memory |
| I/O pins | 30 GPIO pins |
| Power | 1.8V - 5.5V |
| Dimensions | 20x17.5x3.5 mm |
| Bluetooth | No |
| WiFi | No |
| How to program | USB mass-storage boot mode, drag-and-drop programming |
| Special Functions | USB 1.1 Host/Device, 8 Programmable I/O (PIO) state machines |
Neopixel
I take a pause at this part to explain a LED that is integrated into our board, since this NeoPixel can be configured to display RGB colors, and it is indicated in the following image, plus we will use it to conduct some tests and the final task. I read, to activate this led you need declare PIN 12 where is internal located also you need to define another power pin to control de powerup of these neopixel.
Assigments
Individual Assignment
Write a program for a microcontroller development board that you made, to:
- Interact with local input and/or output devices.
- Communicate with remote wired or wireless devices.
Extra Credit
- Use different languages and/or development environments.
- Connect external components to the board.
Group Assignment
- Browse through the datasheet for your microcontroller.
- Compare the performance and development workflows for other architectures.
Group recap
Here i left you our group assigment if you want to see it
- Arduino
1 bit adder calculator
Arduino IDE
What is a Variable?
A variable is a storage location paired with an associated symbolic name (an identifier), which contains some known or unknown quantity of information referred to as a value. You can think of variables as containers that hold information. Their value can be changed during program execution.
Why Use Variables?
Variables are used for:
- Storing data to be manipulated by the program.
- Making code more readable and maintainable.
- Reusing code with different data.
Declaring Variables in Arduino
When you declare a variable, you must specify the type of data it will hold ( integer, floating-point, character) and give it a name. Here’s a simple format:
type variableName = value;Type: This tells the Arduino what kind of data the variable will store. Common types include int for integers, float for floating-point numbers, char for characters, and String for text.
VariableName: This is the name you give to the variable. It should be descriptive enough to make the code understandable to someone reading it. Variable names are case-sensitive.
Value: This is the initial value assigned to the variable. Assigning a value is optional at the point of declaration; however, it's often a good practice to initialize a variable.
Examples
Integer Variable:
Used to store whole numbers.
int ledPin = 13; // Declares an integer variable named ledPin and initializes it to 13Float Variable:
Used to store decimal numbers.
float temperature = 25.3; // Declares a float variable to store decimal numbers, like temperatureCharacter Variable:
Used to store a single character.
char grade = 'A'; // Declares a character variable that stores a single letter or characterString Variable:
Used to store sequences of characters (text).
String message = "Hello, World!"; // Declares a String variable to store textBoolean Variable:
Used to store true or false values.
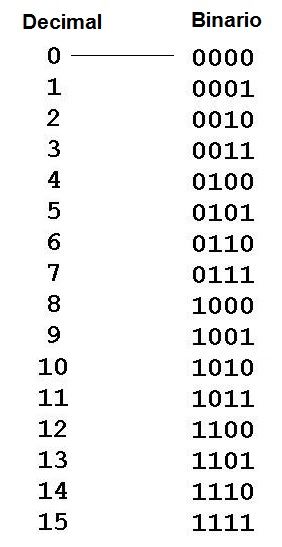
bool isOn = true; // Declares a boolean variable to store a true or false valueIn arduino i decided to work with the integrated neopixel, i made a 1 bit adder calculator, this works adding 1 decimal number, in order to 15 showing the combination in binary.
You can use the following image as a referance
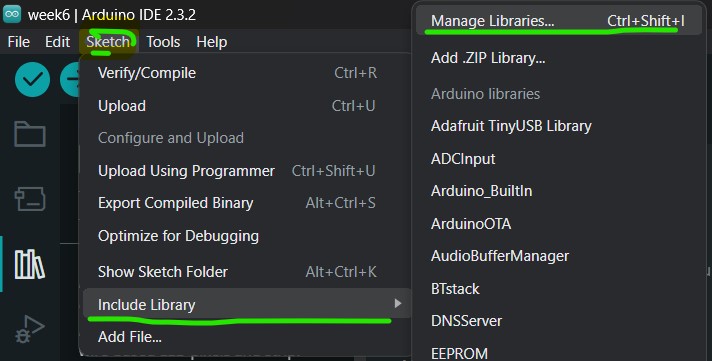
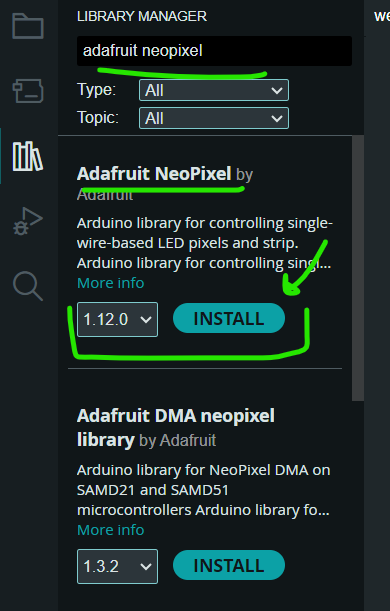
It's important to download a library to use the integrated neopixel so i left you these images to use as guide to download it