11. Input Devices
On this week, I learned to use a Seeed Studio XIAO ESP32S3. I chose this board because my final project will use a cam like the one this ESP32 has. My plan is to use this board on my final project, so I started making tests on how the cam works and what I can do with this little board. For this week I needed three things: Python, Thonny and Visual Studio Code.
ESP32S3
ESP32S3 is built with a high-performance microcontroller from Espressif Systems, which uses a dual-core processor with Wi-Fi and Bluetooth 5 support. This powerful device finds applications in the field of IoT (Internet of Things), considering advanced security features, many connectivity options, and various devices useful in different applications. Its characteristics make them especially recommendable for signal processing, AI inference, and multimedia tasks that the projects contain, while their energy efficiency supports even the most complex IoT solutions.
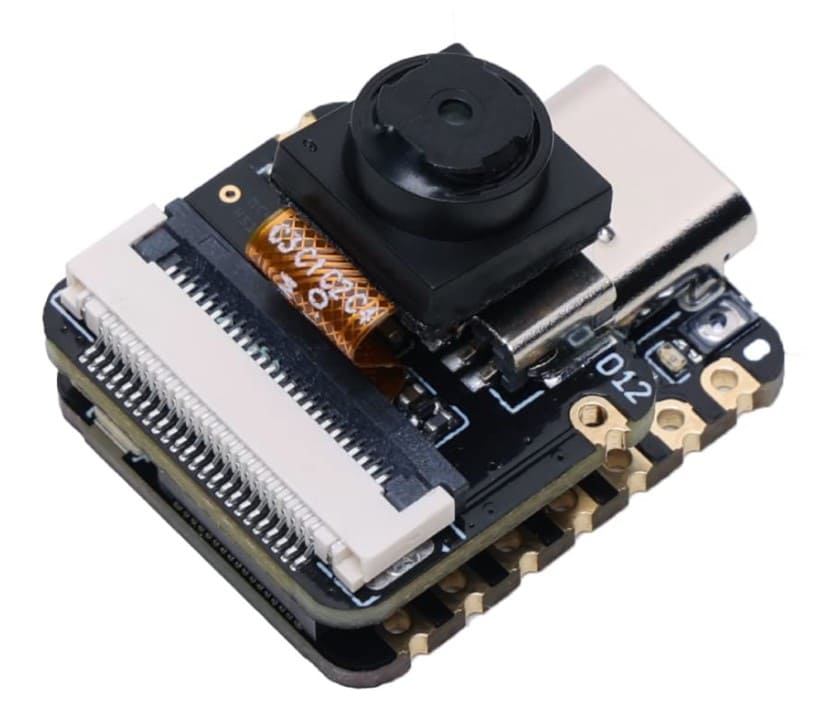
Thanks to the compatibility of the ESP32S3 with its camera, it was not necessary for me to manufacture a PCB for this week. In the videos at the end, you can see a protoboard, however, it has nothing connected and was only used as a support so as not to leave the ESP32S3 pins exposed.
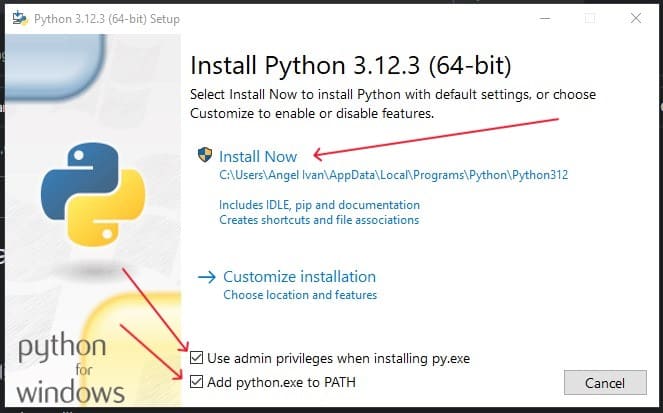
Installing Python
On this little section, I will explain how to install Python in the way the practice needed. This looks quite easy, but I failed to install it the first time, so it is important to specify how to intall it.
After going to the Python site, we should download the latest version of Python. When the download finishes, we should open the Python Setup and it is here where we should change the common installation process. To install Python on the correct way, we should mark both squares below the installation options. After that, we can continue installing it, I used the "Install Now" option and waited until the installing process finished.
We also need to add the extension to our VSC, you can do this by clicking the "Extensions" button on the left panel and searching python. We need to install the normal version of Python by Microsoft.

Streaming the ESP32 video
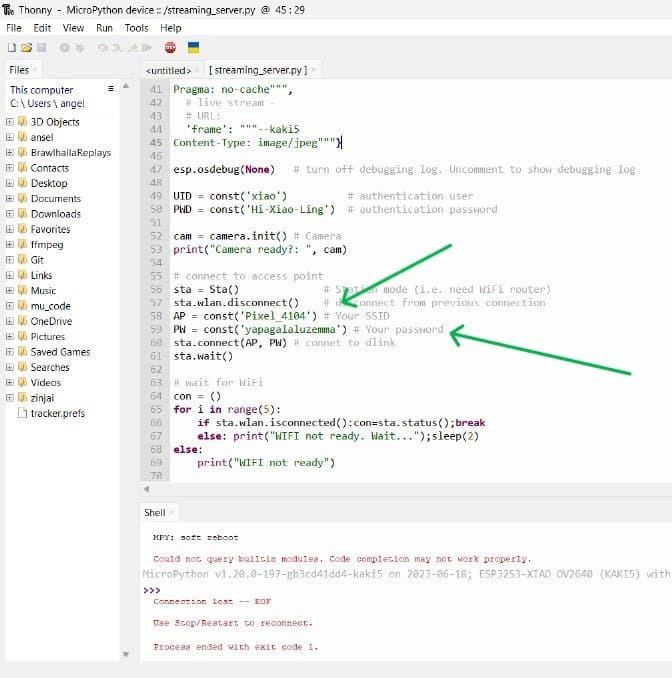
Now that we have python, and after installing Thonny, I used one of the ESP32 example codes to stream the cam video. We should paste this code on Thonny and select the port where we have our ESP32. The example code is this one:
Now that we have the code, it is time to use a Hotspot. A hotspot is a location that offers Wi-Fi access to the internet. The most common hotspot everyone has is the one from the cell phone, so I turned it on to give the ESP32 a way to stream the video. To connect the ESP32 to the hotspot, I changed only two lines of the code, this lines contain the hotspot name and its password. You can see this changes on the images below:
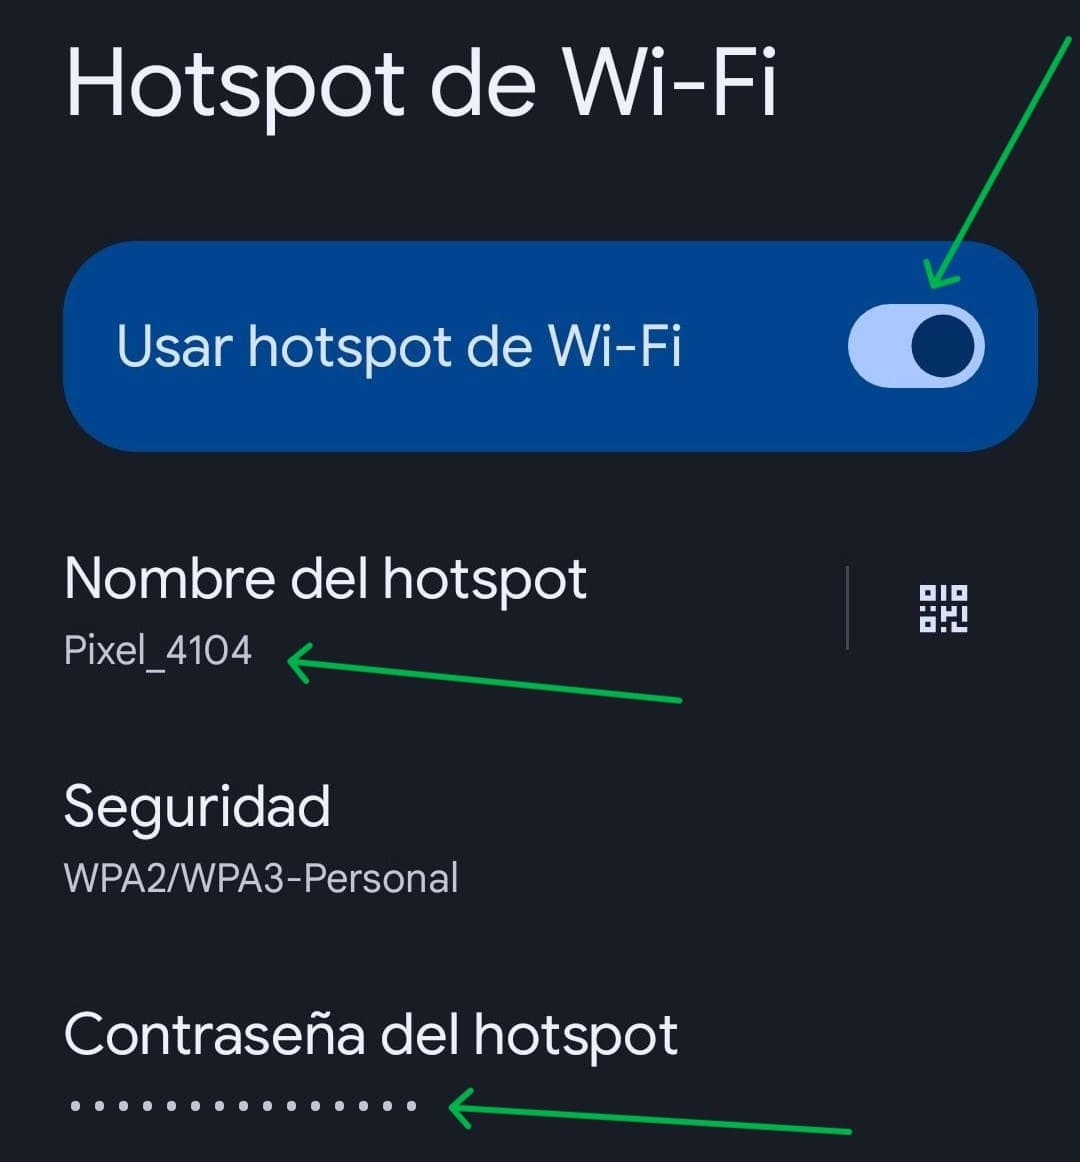
If the ESP32 is connected, you will see a confirmation message on the terminal. With this message, you will see an IP adress, this adress is going to be very important for the next steps. My IP adress was this one: 192.168.163.110
Using the Cam
Now that the ESP32 is streaming the video, it was time to create a code (or codes) able to use the cam and make interesting things with it. For this week, I have 3 different codes that make 3 different things. The first code, recognizes movement on the camera. The second one, recognizes a specific range of colors. And the last one, recognizes the borders of the objects on the camera.
Now I am going to explain step by step the first code:
import cv2

cap = cv2.VideoCapture('http://192.168.163.110/xiao/Hi-Xiao-Ling')
_, frame = cap.read()
old_gray = cv2.cvtColor(frame, cv2.COLOR_BGR2GRAY)
while True:
    ret, frame = cap.read()#leer un cuadro, devuelve ret y frame
    if not ret:
        break

    gray_frame = cv2.cvtColor(frame, cv2.COLOR_BGR2GRAY)

    # Compute difference between current frame and the previous frame
    diff_frame = cv2.absdiff(old_gray, gray_frame)

    _, diff_frame = cv2.threshold(diff_frame, 25, 255, cv2.THRESH_BINARY)#binario para que toda la diferencia se marque en blanco

    cv2.imshow("Original", frame)#cuadro original
    cv2.imshow("Object Tracking", diff_frame)#cuadro ya diferenciado

    if cv2.waitKey(1) & 0xFF == ord('q'):#con q se sale
        break

    old_gray = gray_frame.copy()#cuadro nuevo se convierte al viejo

cap.release()
cv2.destroyAllWindows()
This is the full code:
This is a video of the working code:
This is the explanation of the second code
import cv2
import numpy as np

# Change this URL to your ESP32 video stream URL
cap = cv2.VideoCapture('http://192.168.163.110/xiao/Hi-Xiao-Ling')
while True:
    ret, frame = cap.read()
    if not ret:
        break

    # Convert BGR to HSV
    hsv = cv2.cvtColor(frame, cv2.COLOR_BGR2HSV)

    # Define the range of blue color in HSV
    lower_blue = np.array([110, 50, 50])#rango bajo de azul
    upper_blue = np.array([130, 255, 255])

    # Threshold the HSV image to get only blue colors
    mask = cv2.inRange(hsv, lower_blue, upper_blue)

    # Bitwise-AND mask and original image
    result = cv2.bitwise_and(frame, frame, mask=mask)

    cv2.imshow('Original', frame)
    cv2.imshow('Mask', mask)
    cv2.imshow('Detected Blue Color', result)

    if cv2.waitKey(1) & 0xFF == ord('q'):
        break

cap.release()
cv2.destroyAllWindows()
This is the full code:
This is a video of the working code:
This is the explanation of the last code:
import cv2

cap = cv2.VideoCapture('http://192.168.163.110/xiao/Hi-Xiao-Ling')
while True:
    ret, frame = cap.read()
    if not ret:
        break

    # Convert to grayscale
    gray = cv2.cvtColor(frame, cv2.COLOR_BGR2GRAY)

    # Apply Canny edge detection
    edges = cv2.Canny(gray, 100, 200)#canny algoritmo para detectar cambio drastico de pixeles

    # Find contours
    contours, _ = cv2.findContours(edges, cv2.RETR_TREE, cv2.CHAIN_APPROX_SIMPLE)

    # Draw all contours
    cv2.drawContours(frame, contours, -1, (0, 255, 0), 3)#configuracion de contornos

    cv2.imshow('Regular', frame)
    cv2.imshow('Edges', edges)
    cv2.imshow('Frame with Contours', frame)

    if cv2.waitKey(1) & 0xFF == ord('q'):
        break

cap.release()
cv2.destroyAllWindows()
This is the full code:
This is a video of the working code:
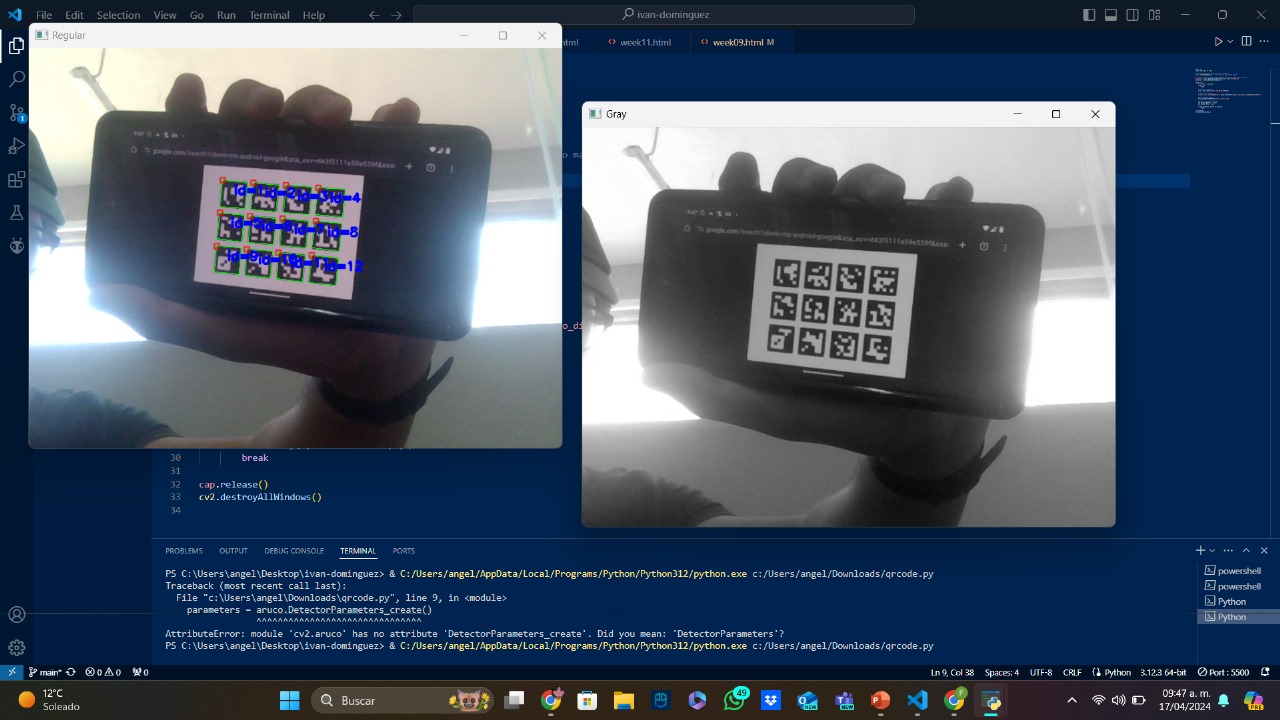
Now, as an addition to this week, I made a new code that recognizes the aruco's QR codes 6x6:
import cv2
import cv2.aruco as aruco

# Use the first camera connected to your computer
cap = cv2.VideoCapture(0)  # 0 is typically the default camera

# Create an ArUco dictionary and parameters (select the type of ArUco markers)
aruco_dict = aruco.getPredefinedDictionary(cv2.aruco.DICT_6X6_50)
parameters = aruco.DetectorParameters()
	while True:
    ret, frame = cap.read()
    if not ret:
        break

    # Convert to grayscale
    gray = cv2.cvtColor(frame, cv2.COLOR_BGR2GRAY)

    # Detect ArUco markers
    corners, ids, rejectedImgPoints = aruco.detectMarkers(gray, aruco_dict, parameters=parameters)

    # Draw detected markers
    aruco.drawDetectedMarkers(frame, corners, ids)

    # Display the resulting frame
    cv2.imshow('Regular', frame)
    cv2.imshow('Gray', gray)

    if cv2.waitKey(1) & 0xFF == ord('q'):
        break

cap.release()
cv2.destroyAllWindows()
This is the full code:
This is a photo of the working code:
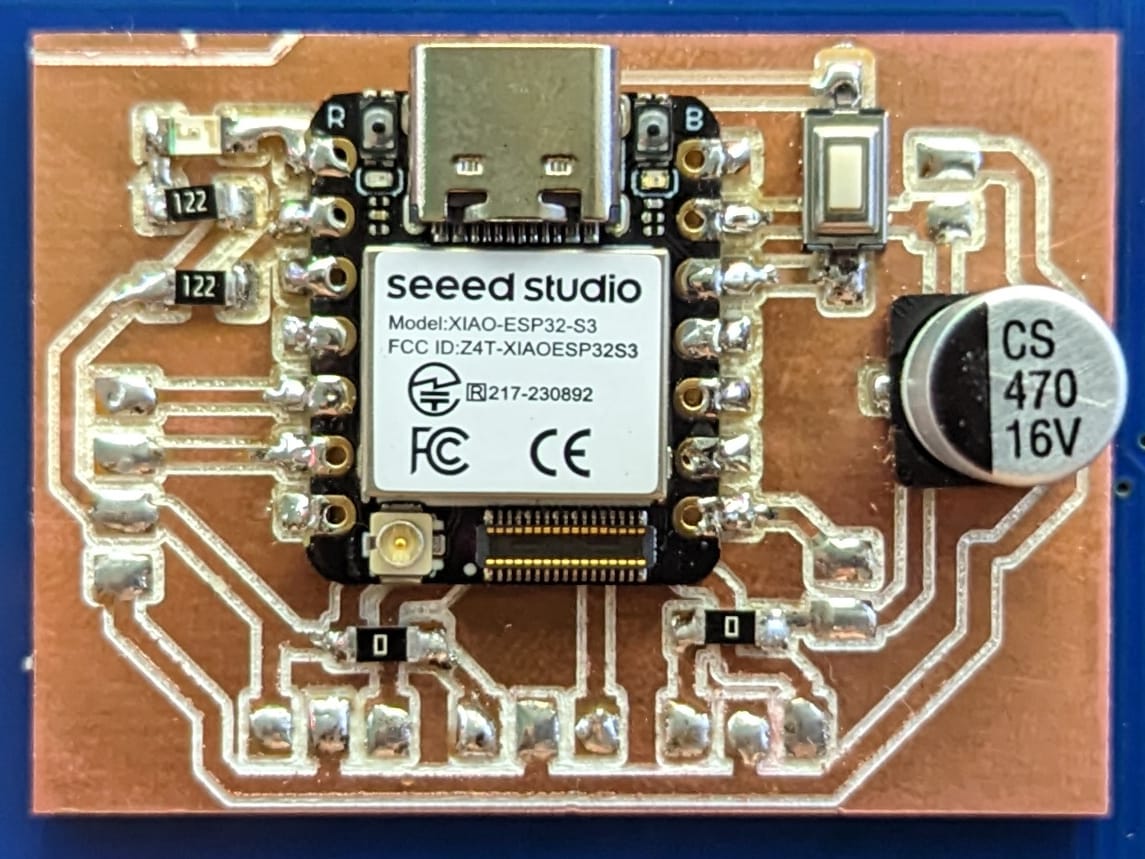
This week was useful because I learned some interesting features using the ESP32 cam that will be useful for my final project. I've made the PCB for my final project that includes the servomotors signals, sonme testing components, a capacitor to avoid wrong voltages and the output for the laser. Here is an image of this PCB:
PN532 SENSOR
Before I included the RFID sensor on my final project, I tested it using the PCB. Here is the code I used:
#include
#include

#define SDA_PIN 4
#define SCL_PIN 5

Adafruit_PN532 nfc(SDA_PIN, SCL_PIN);
void setup(void) {
  Serial.begin(115200);
  Serial.println("Hello!");

  nfc.begin();

  uint32_t versiondata = nfc.getFirmwareVersion();
  if (!versiondata) {
    Serial.print("Didn't find PN53x board");
    while (1); // Detener el programa si no se encuentra el sensor
  }

  Serial.print("Found chip PN5"); Serial.println((versiondata >> 24) & 0xFF, HEX);
  Serial.print("Firmware ver. "); Serial.print((versiondata >> 16) & 0xFF, DEC);
  Serial.print('.'); Serial.println((versiondata >> 8) & 0xFF, DEC);

  nfc.SAMConfig();

  Serial.println("Waiting for an NFC card ...");
}
void loop(void) {
  uint8_t success;
  uint8_t uid[] = { 0, 0, 0, 0, 0, 0, 0 }; // Buffer para guardar el UID
  uint8_t uidLength;                      // Tamaño del UID

  // Esperar a que se presente una tarjeta
  success = nfc.readPassiveTargetID(PN532_MIFARE_ISO14443A, uid, &uidLength);

  if (success) {
    Serial.println("Found an NFC card!");

    // Imprimir el UID de la tarjeta
    Serial.print("UID Length: ");Serial.print(uidLength, DEC);Serial.println(" bytes");
    Serial.print("UID Value: ");
    for (uint8_t i = 0; i < uidLength; i++) {
      Serial.print(" 0x");Serial.print(uid[i], HEX);
    }
    Serial.println("");

    // Esperar un momento para evitar lecturas repetidas
    delay(1000);
  }
}
This is a video of the working code: