6. Embedded Programming
On this week I worked on using the circuit I made weeks before to program a new "circuit" that needed to interact with local devices and communicate with devices. In my case, I created a program that uses 2 buzzers at the same time to play 3 different songs using 3 different buttons and printing the song's name on the serial monitor. For learning the basics about Arduino, MicroPython and CircuitPython (CircuitPython wasn't used on this task) programming, you can visit the group task webiste.
Arduino
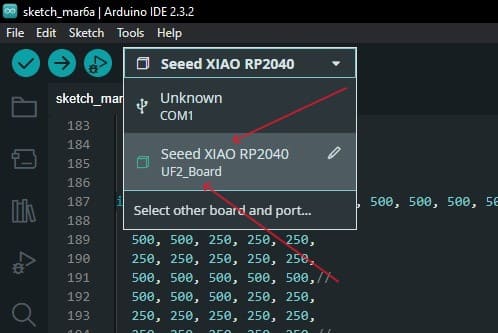
For the first part of this task, I program my idea using the Arduino IDE. This is an open software that has a lot of different libraries that theorically, makes programming much easier. You can download the Arduino IDE here. It is important to specify that this software is based on C language, so preferably you should have worked with C before. To use the SEEED XIAO RP2040 with Arduino, I connected it to my computer while pushing the "reset" button. After installing the SEEED XIAO library using this tutorial, I selected the "UF2_board" port with the "Seeed XIAO RP2040" board. Once you upload an Arduino code, you can use the XIAO RP2040 as an Arduino board.
Now I am going to explain step by step my code:
#include "pitches.h"

const int buzzerMelodiaPin = 28;
const int buzzerAcompanamientoPin = 29;

#define pr 2
#define dbz 4
#define sonic 3

unsigned long previousMillis = 0;
bool isPlaying = false;
int noteIndex = 0;
int* currentMelody = nullptr;
int* currentHarmony = nullptr;
int* currentDurationsMelody = nullptr;
int* currentDurationsHarmony = nullptr;
int currentLength = 0;
int melodyPR[] = {NOTE_E4, NOTE_E4, NOTE_B4, NOTE_E4, NOTE_E4, ...};
int harmonyPR[] = {NOTE_E3, NOTE_E3, NOTE_E3, NOTE_E3, NOTE_E3, ...};
int durationsMelodyPR[] = {125, 125, 125, 125, 125, ...};
int durationsHarmonyPR[] = {500, 500, 500, 500, 500, ...};


int melodySonic[] = {0, 0, 0, 0, NOTE_C6, ...};
int harmonySonic[] = {NOTE_F3, NOTE_F3, NOTE_F3, NOTE_F3, NOTE_F3, ...};
int durationsMelodySonic[] = {125, 125, 125, 125, 125, ...};
int durationsHarmonySonic[] = {125, 125, 125, 125, 125, ...};


int melodyDBZ[] = {0, NOTE_A5, 0, NOTE_GS5, NOTE_E5, ...};
int harmonyDBZ[] = {NOTE_E3, NOTE_E3, NOTE_D3, NOTE_D3, NOTE_E3,
  NOTE_E3, NOTE_D3, NOTE_D3, NOTE_C3, NOTE_C3, 0};
int durationsMelodyDBZ[] = {250, 125, 125, 125, 125, ...};
int durationsHarmonyDBZ[] = {1000, 1000, 1000, 1000, 1000,
	1000, 1000, 1000, 1000, 1000, 500};
void setup() {
    pinMode(buzzerMelodiaPin, OUTPUT);
    pinMode(buzzerAcompanamientoPin, OUTPUT);

    pinMode(pr, INPUT);
    pinMode(dbz, INPUT);
    pinMode(sonic, INPUT);

    Serial.begin(9600);
}
void playNotes() {
  if (isPlaying && noteIndex < currentLength) {
    unsigned long currentMillis = millis();
    if (currentMillis - previousMillis >= currentDurationsMelody[noteIndex]) {
      if (currentMelody[noteIndex] != 0) {
        tone(buzzerMelodiaPin, currentMelody[noteIndex], currentDurationsMelody[noteIndex]);
      } else {
        noTone(buzzerMelodiaPin);
      }
      if (currentHarmony[noteIndex] != 0) {
        tone(buzzerAcompanamientoPin, currentHarmony[noteIndex], currentDurationsHarmony[noteIndex]);
      } else {
        noTone(buzzerAcompanamientoPin);
      }
      previousMillis = currentMillis;
      noteIndex++;
    }
  } else if (noteIndex >= currentLength && isPlaying) {
    noTone(buzzerMelodiaPin);
    noTone(buzzerAcompanamientoPin);
    isPlaying = false;
    noteIndex = 0;
  }
}
void loop() {
  if (!isPlaying) {
    if (digitalRead(pr) == HIGH) {
      Serial.print("Power Rangers Theme!!");
      currentMelody = melodyPR;
      currentHarmony = harmonyPR;
      currentDurationsMelody = durationsMelodyPR;
      currentDurationsHarmony = durationsHarmonyPR;
      currentLength = sizeof(melodyPR) / sizeof(int);
      isPlaying = true;
      noteIndex = 0;
      previousMillis = millis();
    } else if (digitalRead(dbz) == HIGH) {
      Serial.print("Dragon Ball Z Theme!!");
      currentMelody = melodyDBZ;
      currentHarmony = harmonyDBZ;
      currentDurationsMelody = durationsMelodyDBZ;
      currentDurationsHarmony = durationsHarmonyDBZ;
      currentLength = sizeof(melodyDBZ) / sizeof(int);
      isPlaying = true;
      noteIndex = 0;
      previousMillis = millis();
    } else if (digitalRead(sonic) == HIGH) {
      Serial.print("Sonic Theme!!");
      currentMelody = melodySonic;
      currentHarmony = harmonySonic;
      currentDurationsMelody = durationsMelodySonic;
      currentDurationsHarmony = durationsHarmonySonic;
      currentLength = sizeof(melodySonic) / sizeof(int);
      isPlaying = true;
      noteIndex = 0;
      previousMillis = millis();
    }
  }

  playNotes();
}
This is a video of the working code on Arduino:
MicroPython
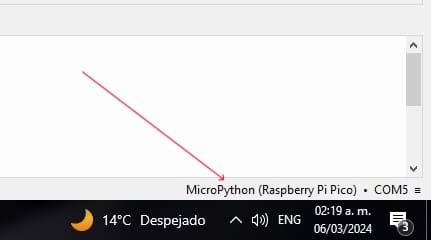
To use MicroPython, I need some essential things. First, I downloaded a software called "Thonny", the link to this software is this one. After downloading the software, I connected the XIAO RP2040 to my computer while I was pushing the "reset" button. I did this to paste the UF file needed for MicroPython. You can find this file in the last part of the group task webiste group task webiste. After pasting the file on the Seeed XIAO location, you can use Thonny to program your board. To select your board on Thonny, you should check the right bottom corner of the main page and select thhe "MicroPython (Raspberry Pi Pico)" option.

Now, I am going to explain my MicroPython code.
from machine import PWM
from machine import Timer
import time
from machine import Pin

B0 = 31
C1 = 33
CS1 = 35
D1 = 37
DS1 = 39
...

pwm = PWM(28)  # create a PWM object on a pin
pwm2 = PWM(29)
pr = Pin(2, Pin.IN, Pin.PULL_DOWN)
dbz = Pin(4, Pin.IN, Pin.PULL_DOWN)
sonic = Pin(3, Pin.IN, Pin.PULL_DOWN)
def ms125(melodia, harmonia):
    if melodia > 10:
        pwm.freq(melodia)
        pwm.duty_u16(65000)

    else:
        pwm.duty_u16(0)
    if harmonia > 10:
        pwm2.freq(harmonia)
        pwm2.duty_u16(65000)
    else:
        pwm2.duty_u16(0)

    time.sleep(.125)
    pwm.duty_u16(0)
    pwm2.duty_u16(0)
    time.sleep(0.05)

def ms250(melodia, harmonia)
...
while True:
    pr_value = pr.value()
    dbz_value = dbz.value()
    sonic_value = sonic.value()

    if pr_value==1:
        print("Power Rangers Theme!!")
        ms125(E3, E4)
        ms125(E3, E4)
        ms125(E3, B4)
        ms125(E3, E4)
        ms125(E3, E4)
        ms125(E3, B4)
        ms125(E3, E4)
        ms125(E3, E4)
	...
Now, here is a video of the MicroPython code working:
Advantages And Disadvantages
Depending on your needs and level of programming experience, you can choose between using Arduino or MicroPython for projects using buzzers. MicroPython is an easy-to-use programming language that is ideal for novices or for quickly creating prototypes. It functions nicely with hardware and has simple coding. Because of its accurate timing and abundance of libraries, Arduino offers you more control and efficiency, which makes it a better choice for large projects requiring precision operation. Whichever option you choose, will depend on your preferences. In my particular case, I prefer using Arduino because I have more experience using it, but to be honest, and thanks to some university classes, the MicroPython code was easier and simpler to program and better for checking errors.
After that conclusion, if you want to download the Arduino and MicroPython codes, click here.