WEEK 9
OUTPUT DEVICES
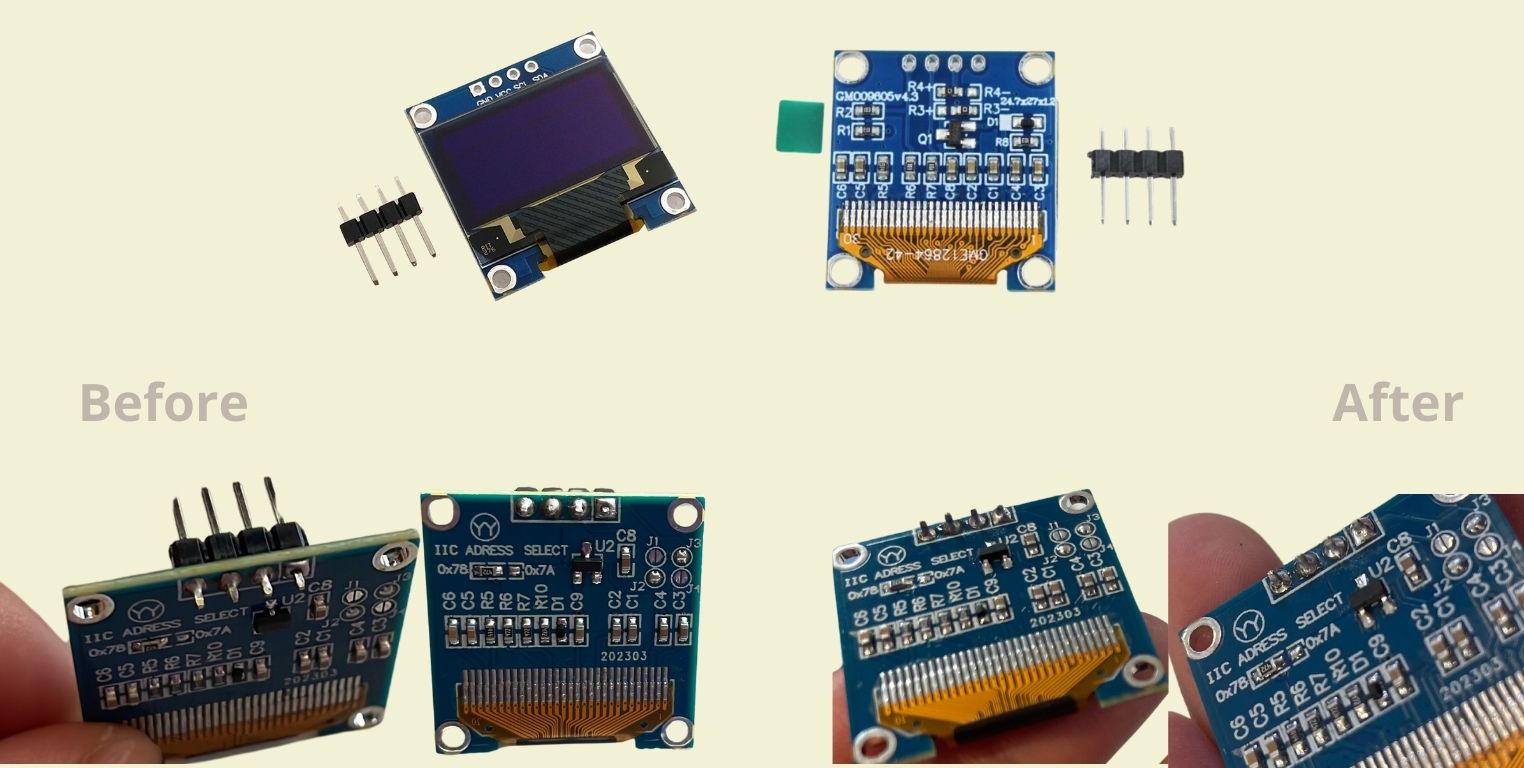
For this week of outputs I used a 96'' OLED screen, I remember that previously in high school I had done a practice with an LCD... Now, a few years later it seems that this has been replaced by this screen that uses organic light emitting diodes to produce a bright and clear image. The truth for the practice has pleased me a lot because it is very easy to connect and start working with it, you only need a good soldering iron and solder to solder the parts that are connected, as seen in the photos below, the OLED screen comes with pins that must be soldered before starting to work with it.
It is very important to make sure that it is well soldered, as you can see in my first attempt, there were pins that, despite being soldered, lacked a little more solder in the middle part, and something as simple as that can be the reason why it does not turn on (as it happened to me at the beginning).
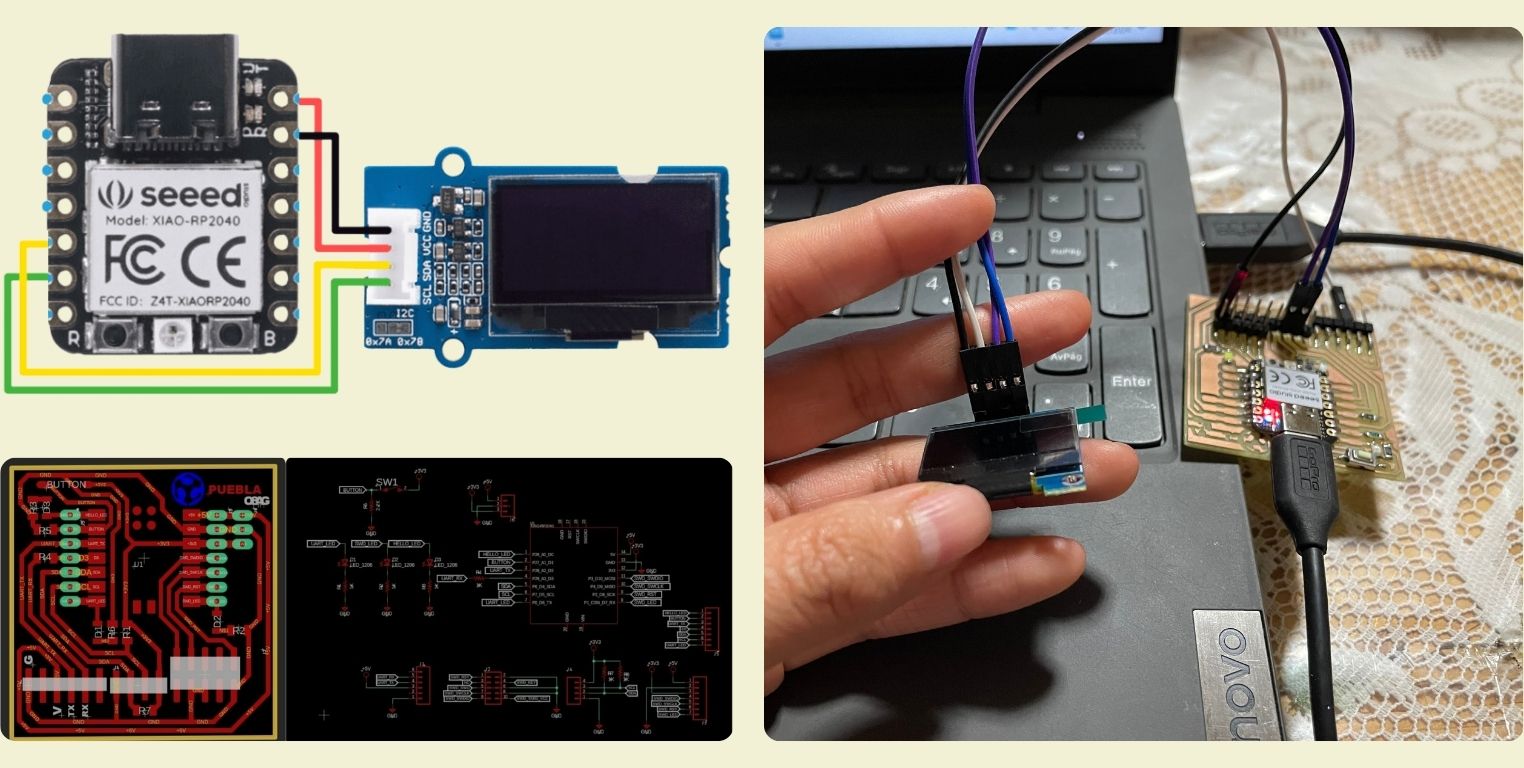
Once ready to use, it can be connected to verify that it works. This week I wanted to go back to the first board we made, so I made sure to connect SLC, SDA, VCC and GND to the corresponding pins on the XIAO RP 2040.
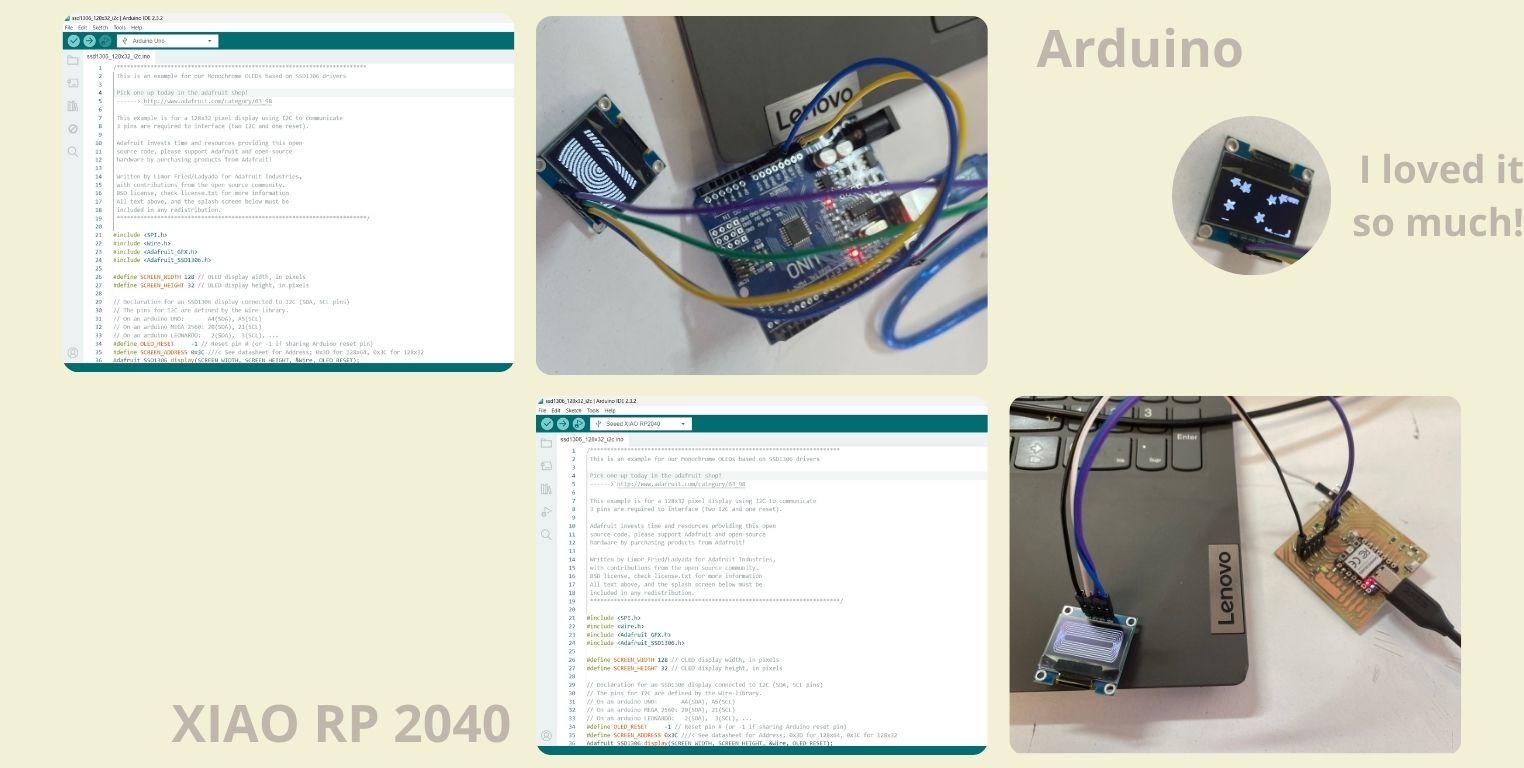
For the operation of the OLED the SDD1306 controller is incorporated, so it is necessary to install the library in the program that will be used to program. In this occasion I did it in C++ in Arduino. After installing the library, inside the File menu are the Examples, there I looked for the previously installed library and selected "ssd1306_128x64_i2c".
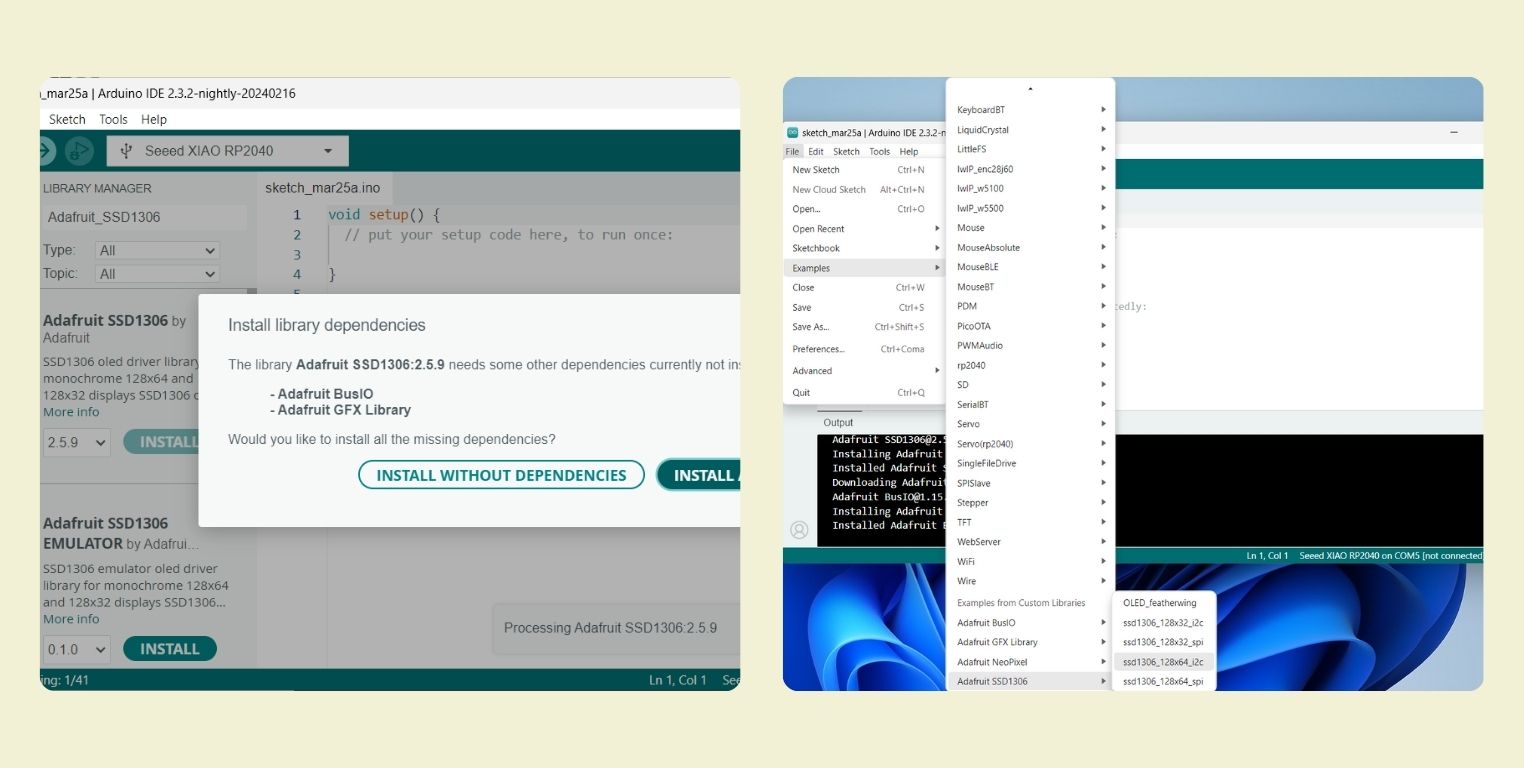
When selected opens an example that can be loaded automatically to the OLED, either connected to an Arduino UNO, such as the XIAO, the only thing you have to change is the controller to which it is connected. At the end of this example stars are shown simulating a rain, I really loved that.
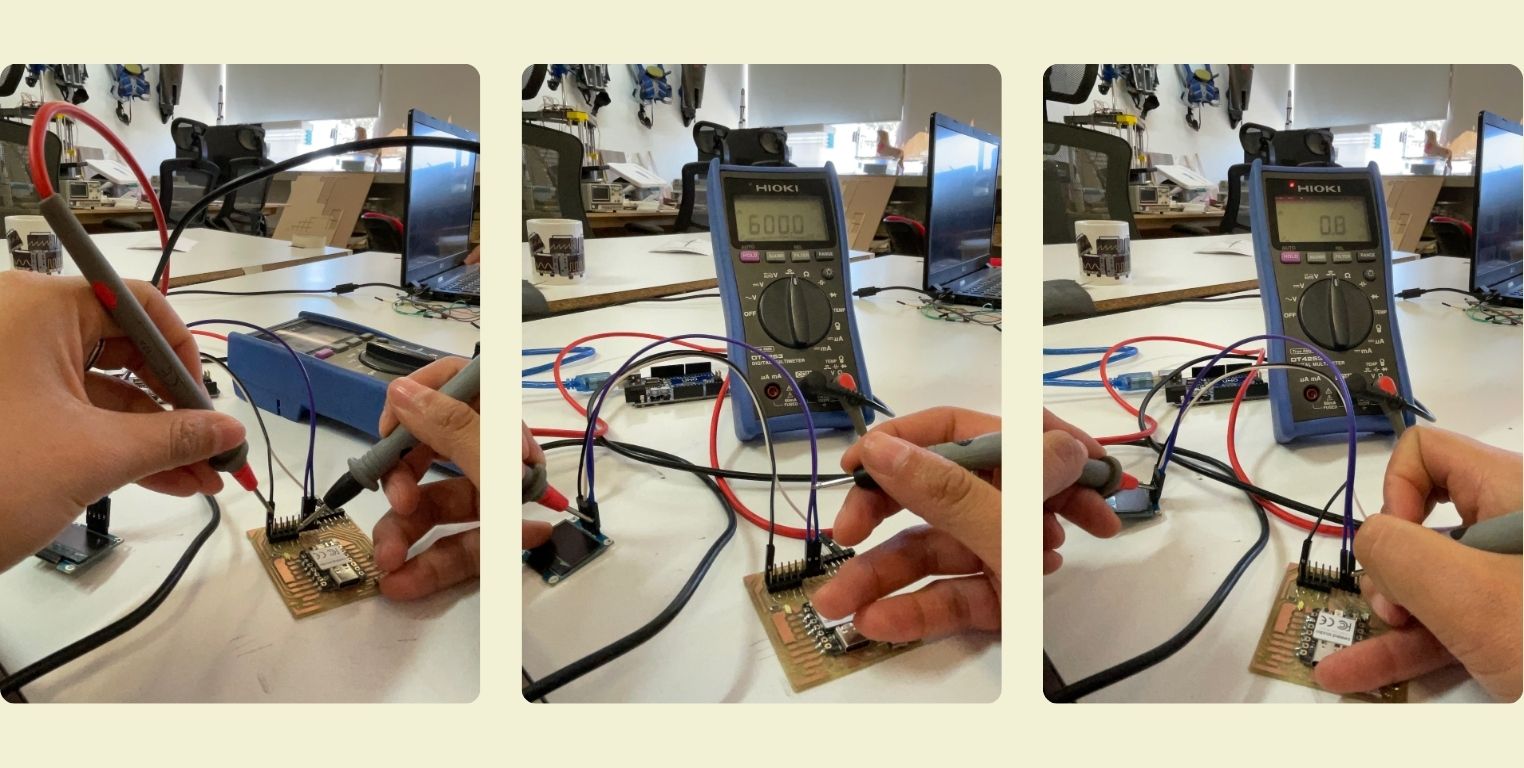
The following pictures were the beginning of the end, and I didn't know it. I started to have false contact, and I realized it because I wanted to load my tests on the OLED, but it seemed that the code could not be loaded, so with the help of a multimeter I checked that the signal from the XIAO was reaching the OLED.
I then looked for a GIF that I could play on the OLED, and found this page called Wokwi Animator that even gives you the code to use it on the Arduino. So this test was very easy. I also found within the page this simulator that allows you to visualize what it would look like on the OLED. I find it quite useful, especially when you don't yet have an OLED to test the codes on, but you want to get started. To use it you just need to make the connections between the Arduino UNO and the OLED, put in the code and install the libraries you need.
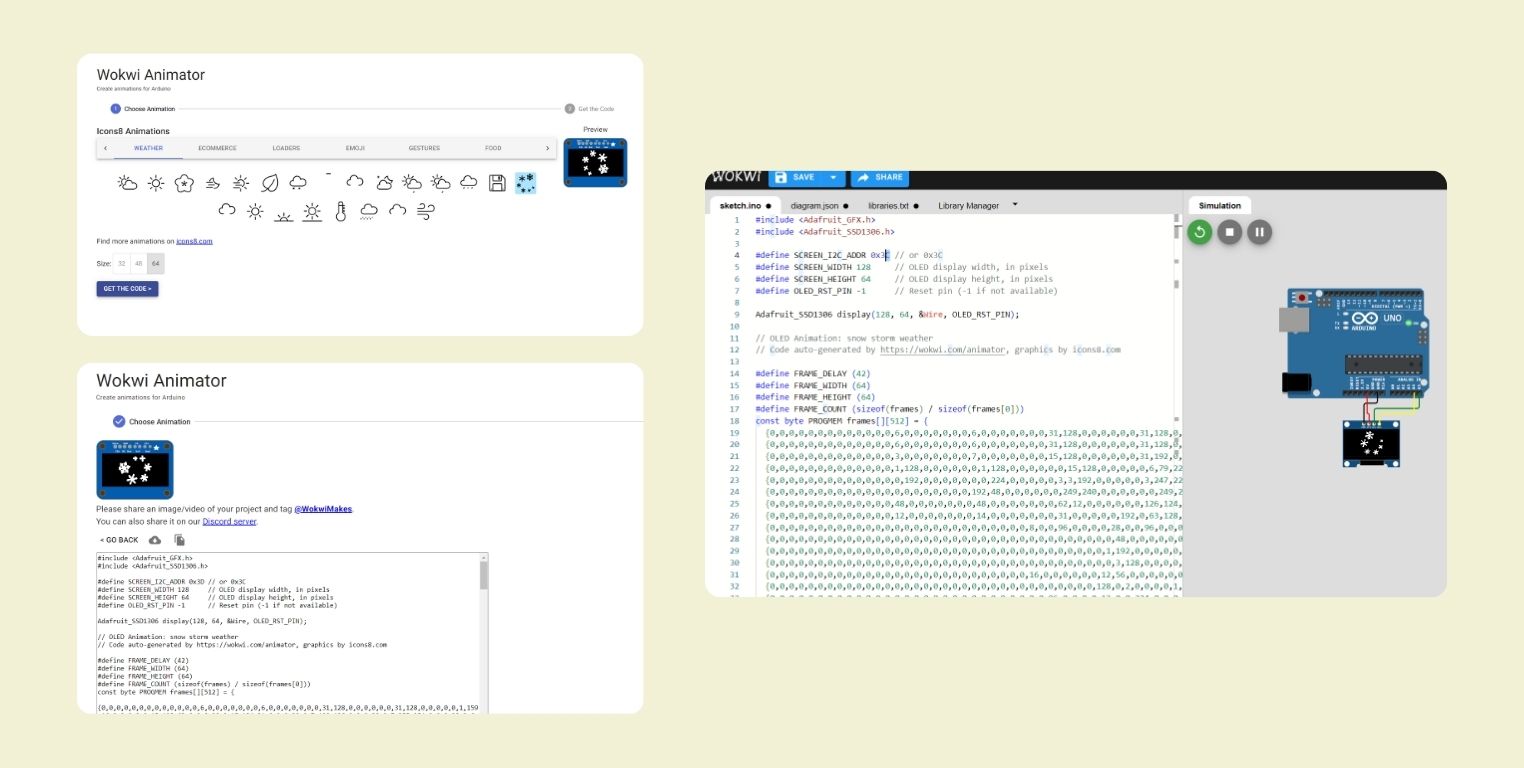
Then I uploaded it to Arduino to load it onto my board, and indeed, it worked without any issues.
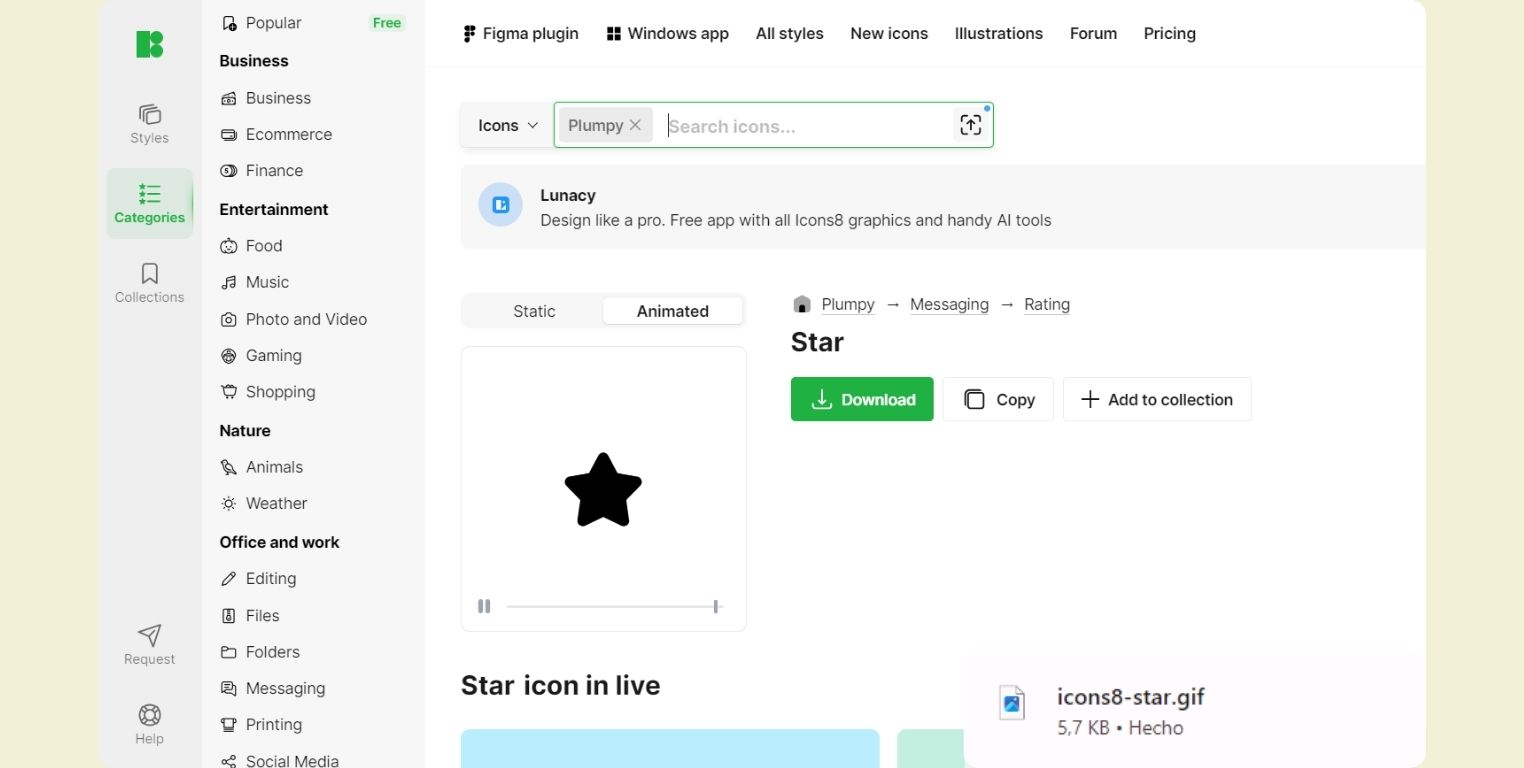
The previous resource is great, but you have the limitation that if it's not within the page, you can't do it. I tried to do it "from scratch" with a GIF of Star I downloaded from Icons8.
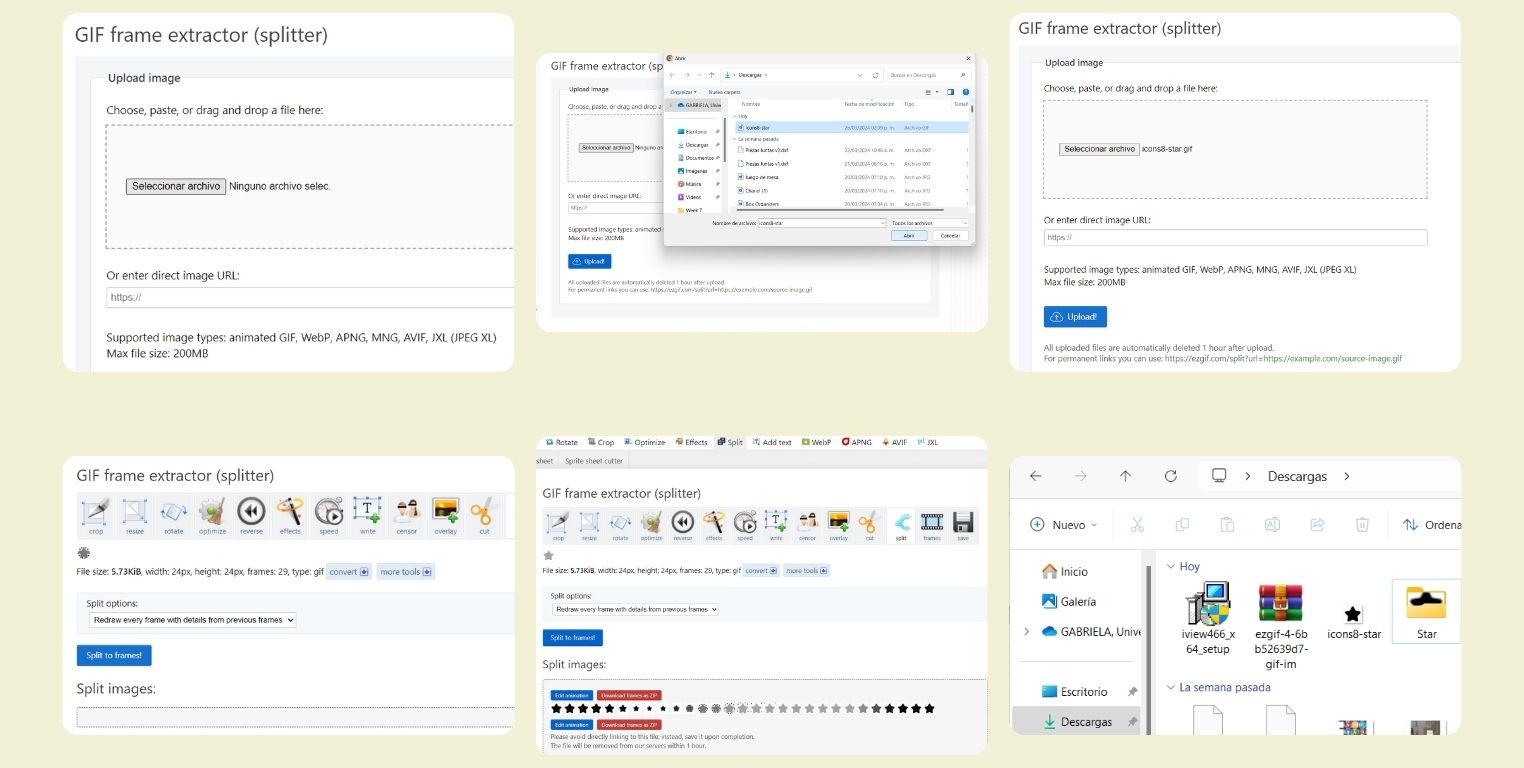
What I did was upload it to a page to split into frames and finally download each one.
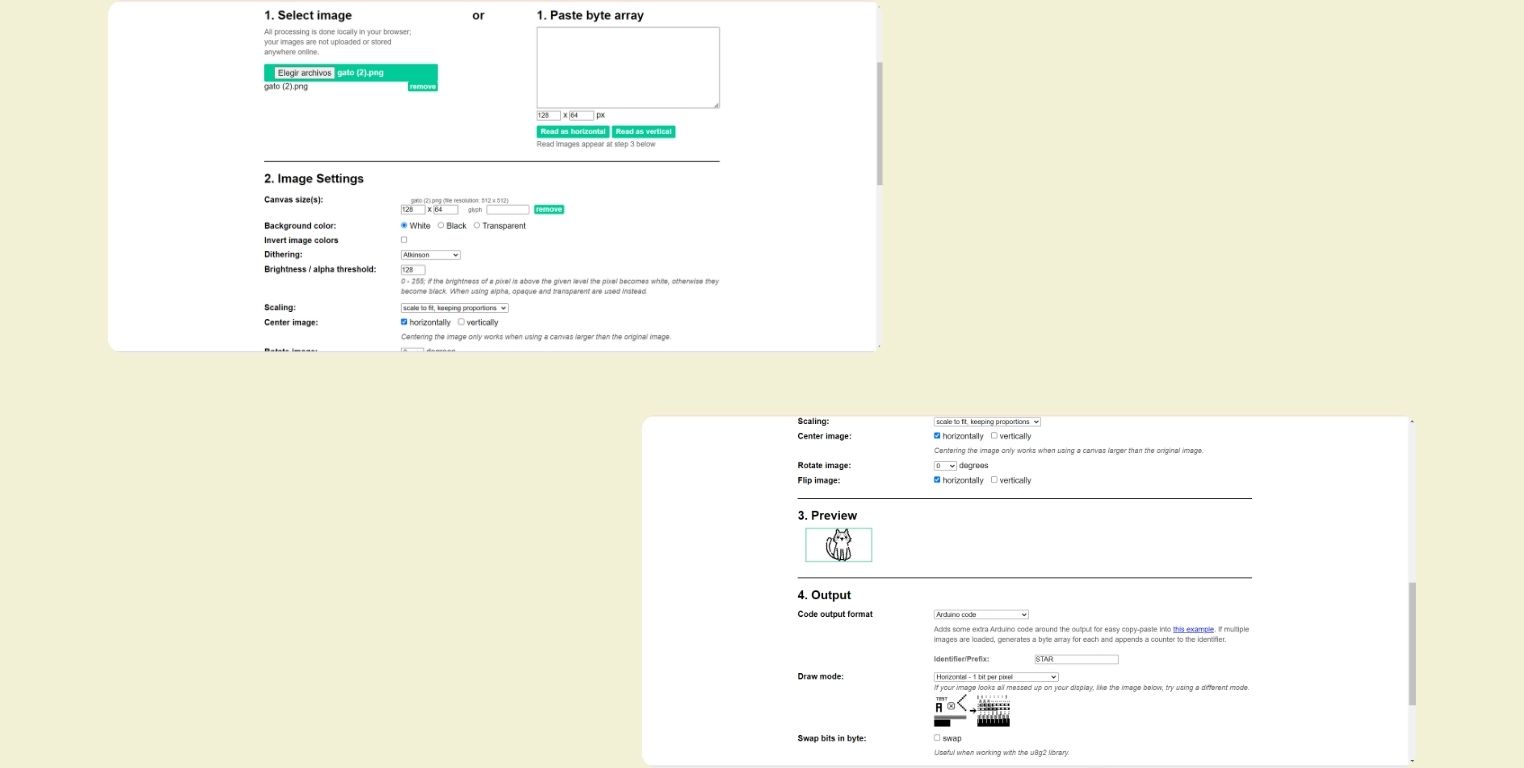
After that, I found a page that converts any file to C++ code, so I wanted to try converting the original GIF. I chose the code format 'Hex (0x00)', the palette Mod '1-bit linear art', and resized it to 128 px, according to my OLED screen. I also selected Little-endian and the constant option, finally choosing 'uint8_t' as the data type. After it generates the code, a preview of it is displayed. That's when I realized it was no longer a GIF but a static image. This is the final configuration.
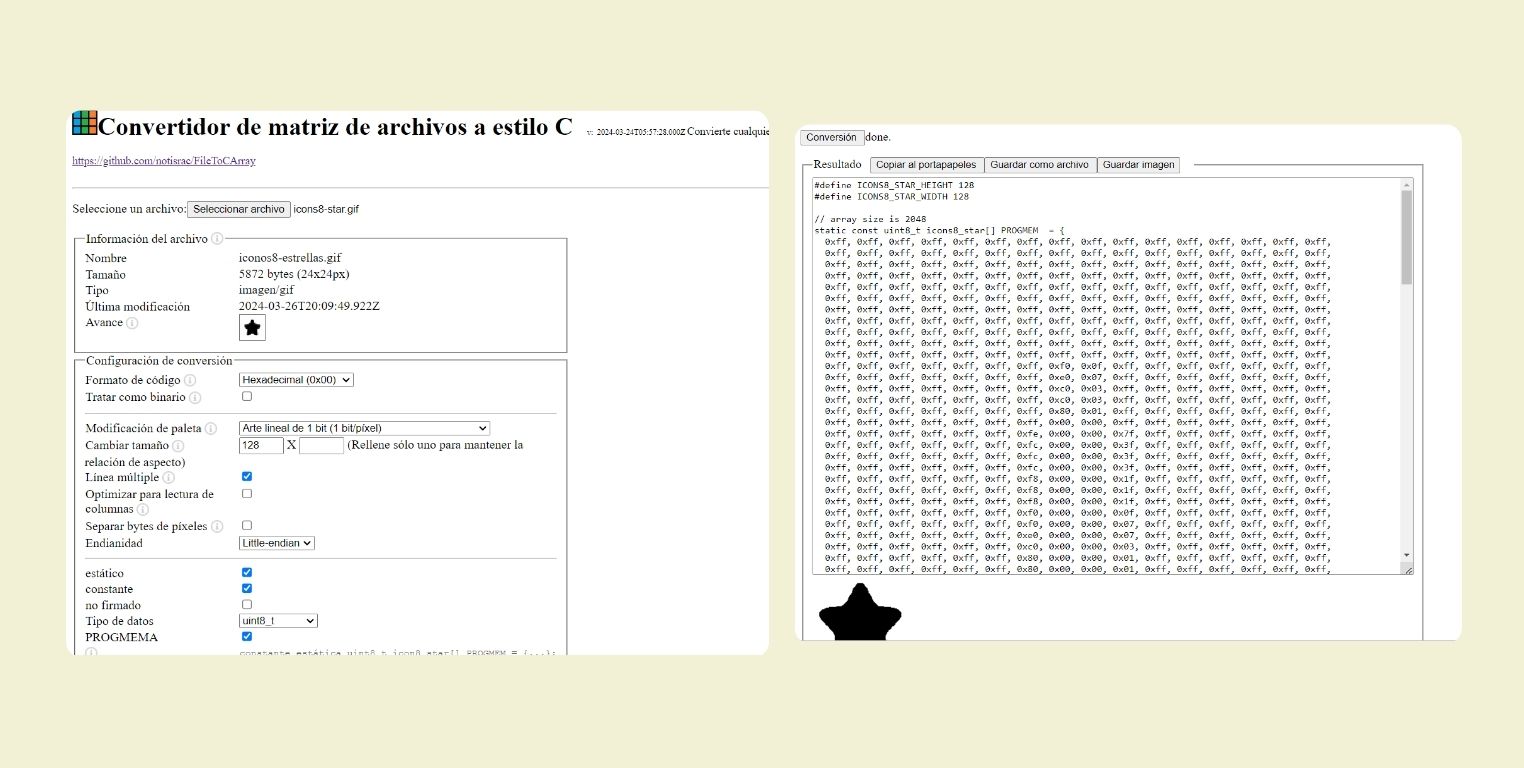
Then I passed it to the simulator with the structure that the previous code had, however, it looked like a TV with no signal... The truth is that I modified this code a lot because I could not get it to be seen, until I did it with the configuration that is above, before that I tried many others.
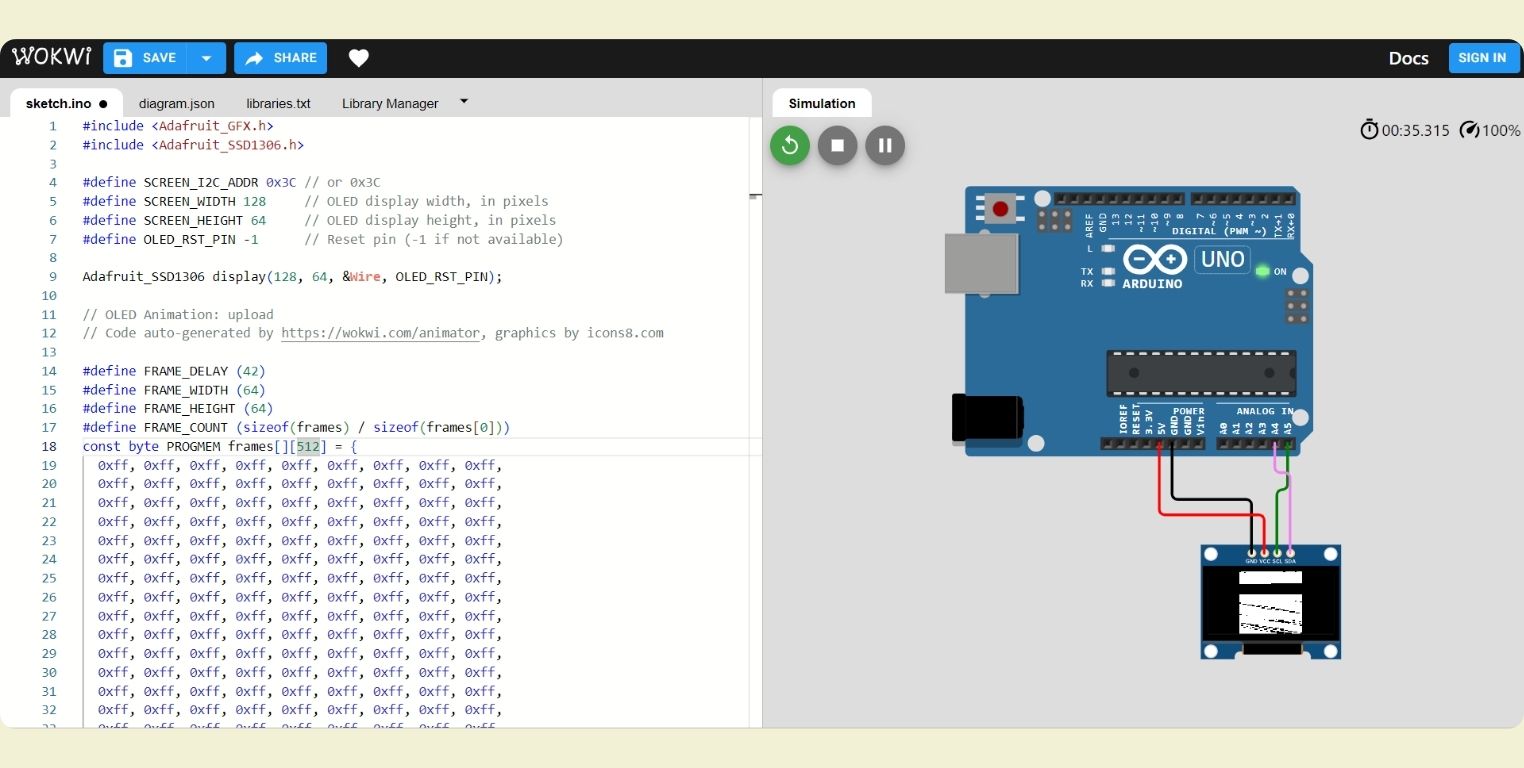
That's how I finally moved it to Arduino and loaded the code, although only half of my star was visible. Now looking at it, I think it could be solved if in the configuration instead of 128px I had put 64px.

Then I found this website that allows you to select more than one file to convert to C code. So I was able to load all the frames I had previously downloaded from this same GIF in BMP format. I sized it to 48 x 48px, with a black background. The center of the image horizontally and I selected the "Arduino code" format, finally the draw mode was horizontal 1 bit per pixel.
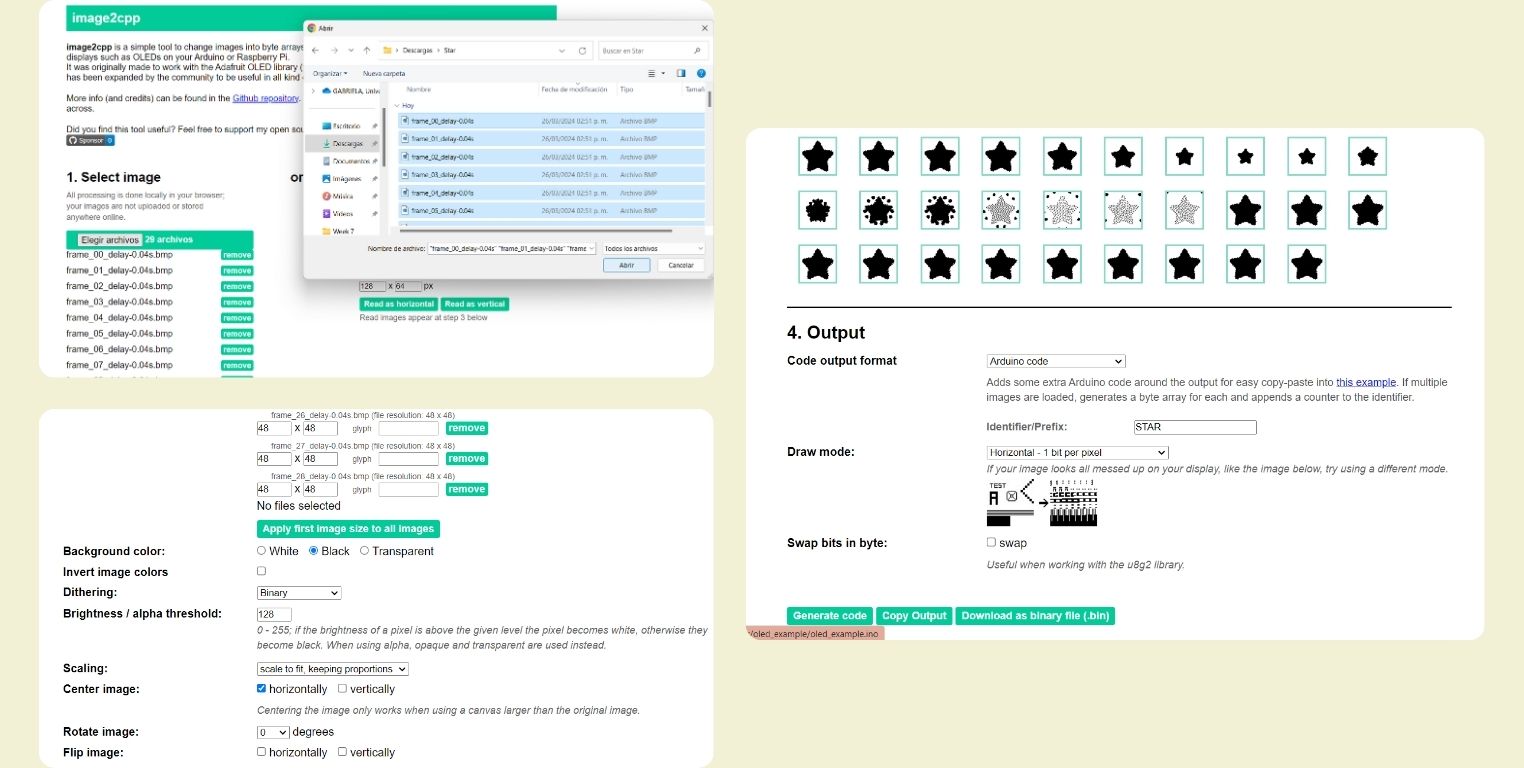
I generated the code and uploaded it to Arduino. It worked partially; I uploaded it twice, making a modification to the position of the drawBitmap, although it starts where it was originally positioned and then changes. Another issue was that from frame 9 onwards, the subsequent ones showed errors, so out of the 28 I had, I could only reproduce 9. That's a problem I haven't been able to solve yet, but I hope to do so soon and update the page when I do.
For my next test, I looked for an icon of a kitten on the following page . I first passed it through the file converter to C++, where I used the same configuration as before, but now I did make the change to 64px. Everything went well until the code generation and preview; however, when I passed it to the simulator, two kittens appeared in the middle of the screen and strange things on the other half. So I thought it was because I had changed the size, so I resized it to 128 x 32 px, but I still didn't like the result.
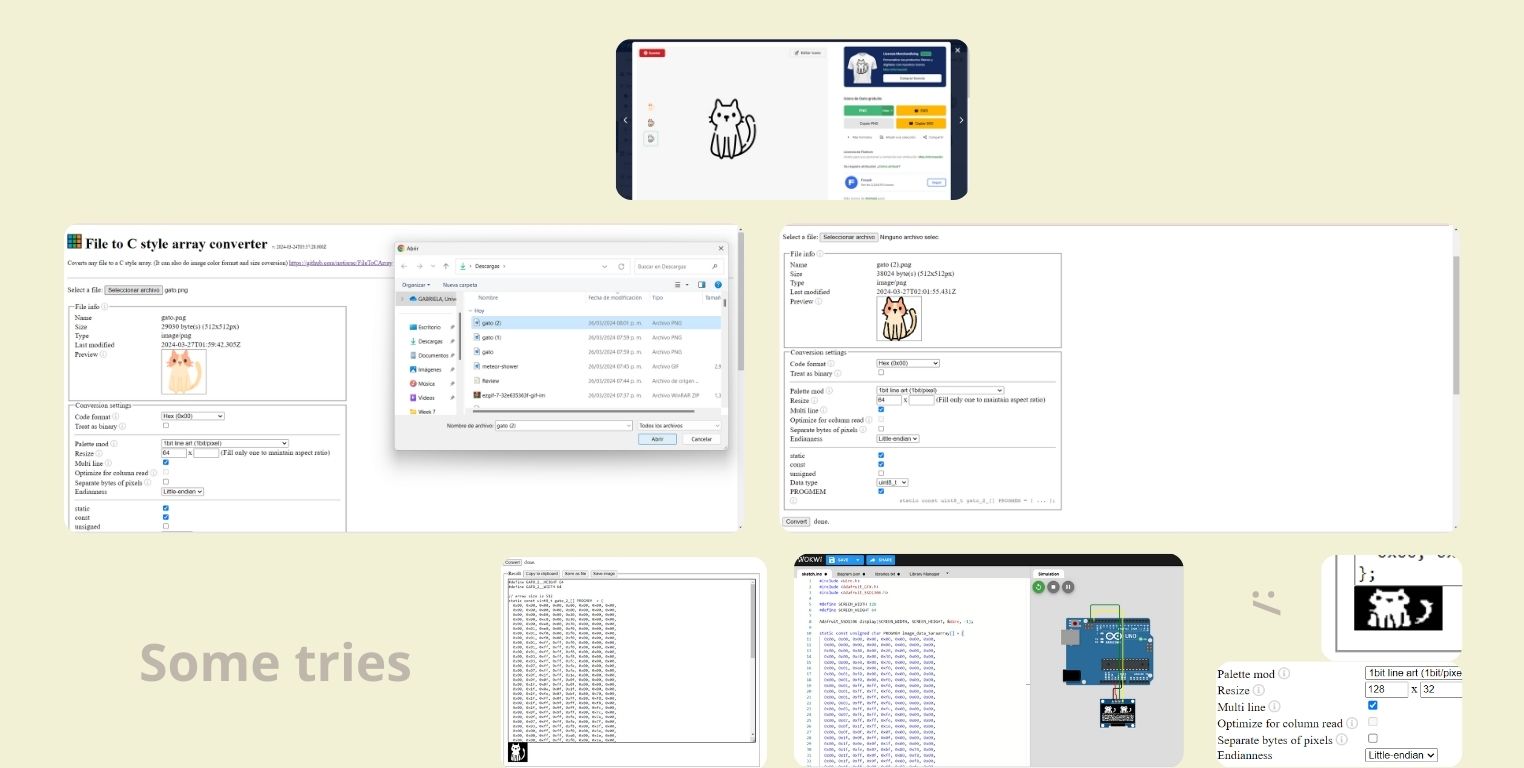
So what I did was change the size and only put 128px. Although only half was displayed. For some reason, in the photo, it seemed like the whole kitten's face wasn't visible, but in person, it looked just like the simulation.
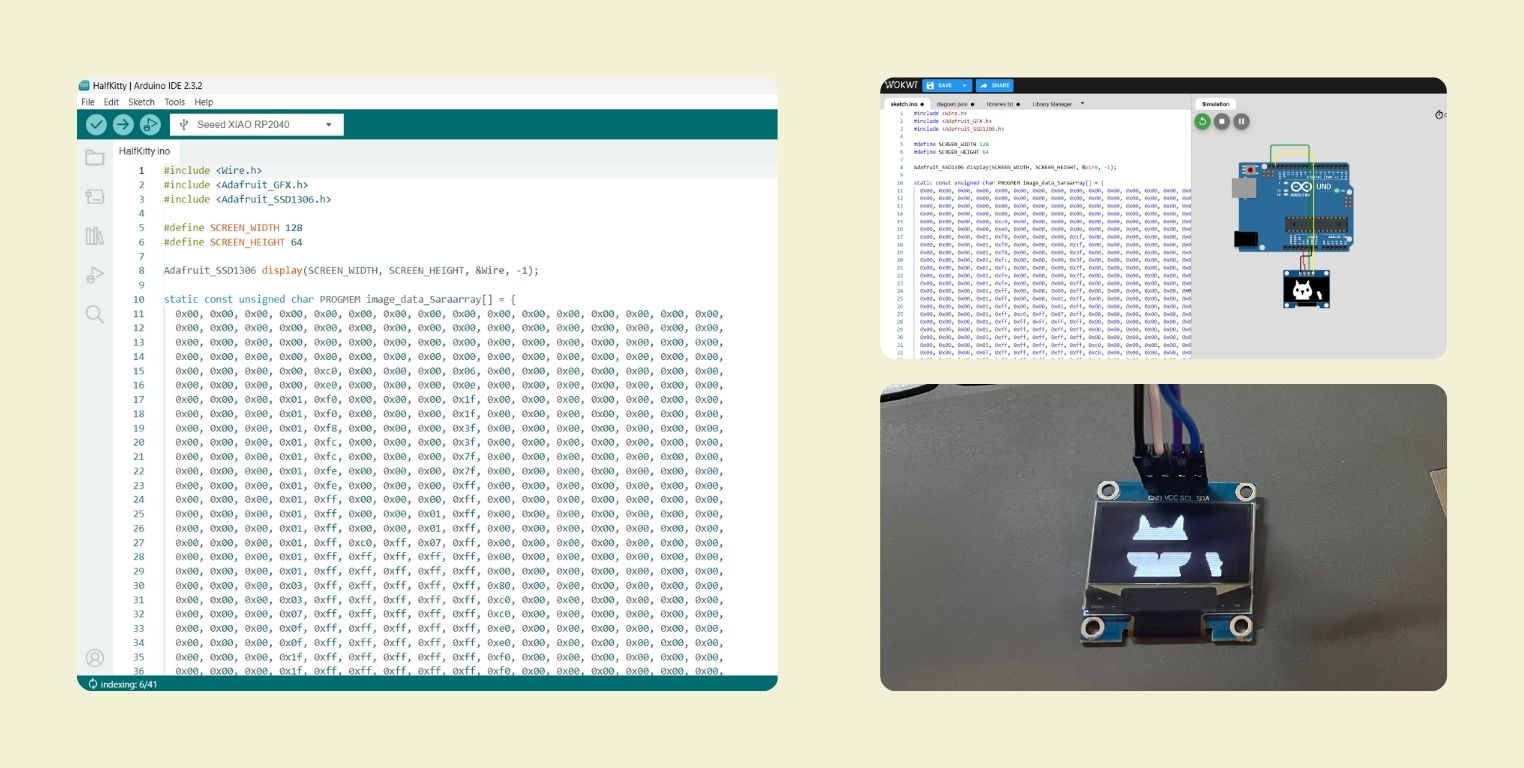
I decided to do another test with the other page; below is all the configuration. Here, I was able to change the size without it looking disproportionate.
Finally, I uploaded it to Arduino, and here you can see the result!
For my next test, I wanted to try something similar to the dinosaur game that appears when there's no internet. Since I have a button on the XIAO, I wanted to make it so that pressing it would make the first square jump. It's a bit rudimentary because they are only squares, but I had already struggled enough with icons and GIFs before. Here is the simulation so you can see how it works so far. What I missed was adding the button, but my button is connected to a single PIN, and I didn't find a button like that on the page.
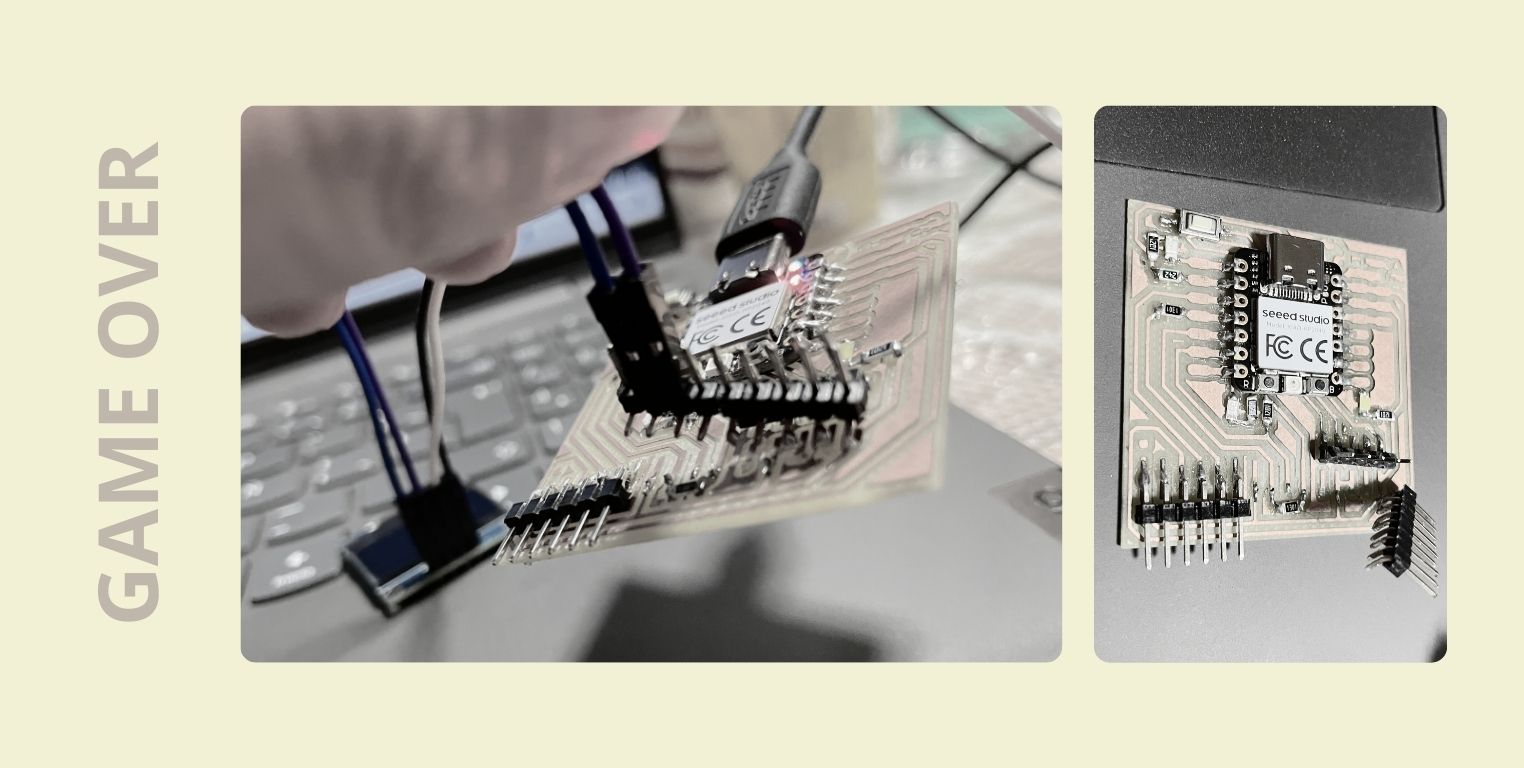
I hope to be able to test it soon... I was left unable to because my XIAO pins became unsoldered, and I no longer had the Arduino UNO to test it physically, and since I don't have a soldering iron at home... I can only wait until the holidays are over (in Mexico, there are Easter holidays) and I can go back to university to resolder the pins.
Conclusion
I should buy a soldering iron... And also a multimeter.
Really, I would have loved to do more tests with my OLED screen this week. I didn't get to try the text part, although I did write a code for that, nor did I link it to my final project. So expect an update this week as I'm sure I'll continue doing more tests in the future.
RUNNING THE CODES ON A BOARD DESIGNED BY ME
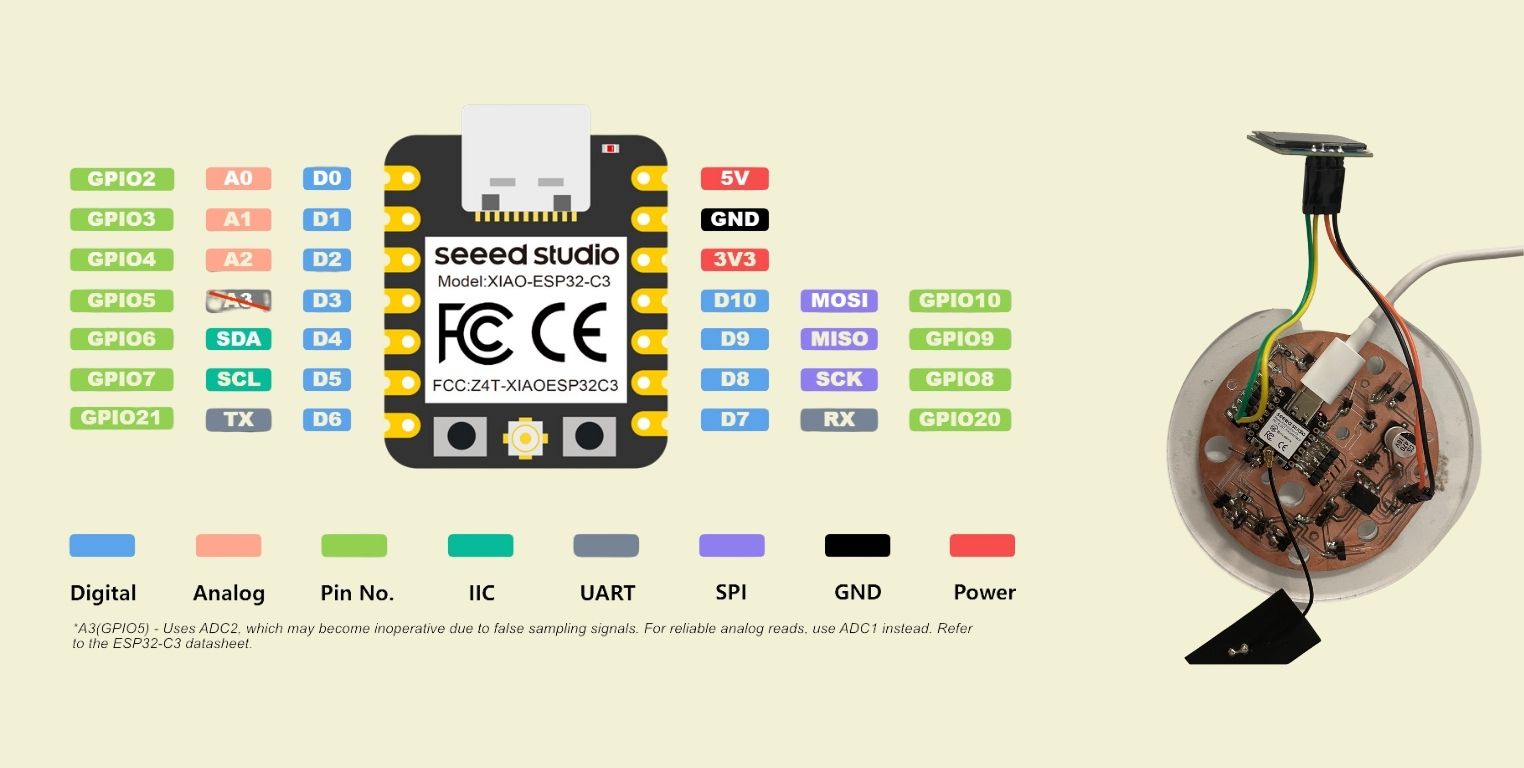
Previously I tested everything with a PCB I made, but based on someone else's design, so now I will test the same codes as before, but with my own PCB. This new board I made for my final project, you can find more about it in the corresponding section of the final project, for now it only remains to say that I connected the OLED, ground, voltage, SCL and SDA in the XIAO ESP32C3, and for that I used the microcontroller schematic.
What I did was to send the codes to the new PCB, so it was very simple after having tested them before. The first one to be ready was the snowflake gif.
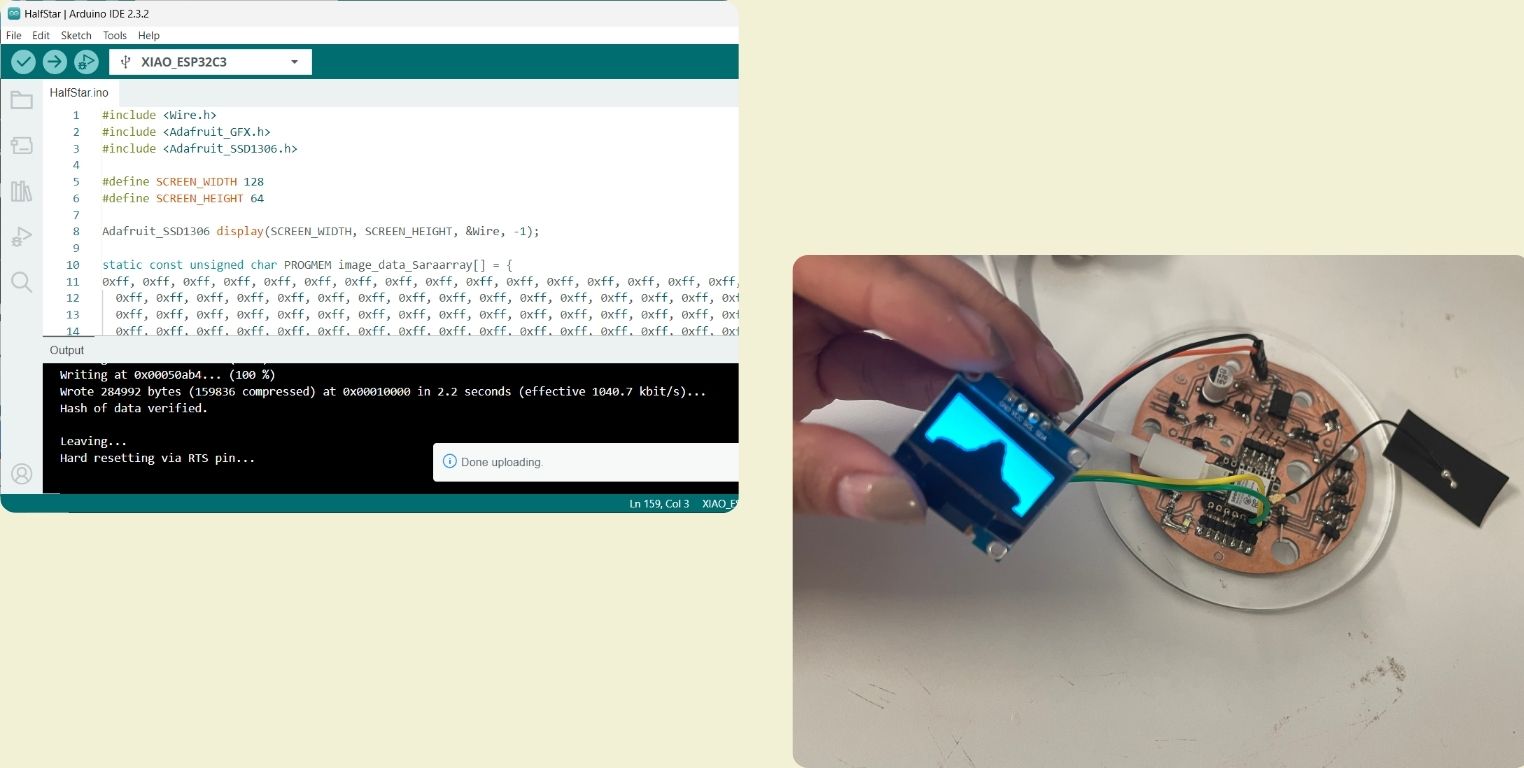
Then I tried also the code where you see half star, I wasn't sure about doing it, because I don't think it was a code success, but I still wanted to try it.
The next gif I populated was the one where the star goes from the center to the corner and gets bigger.
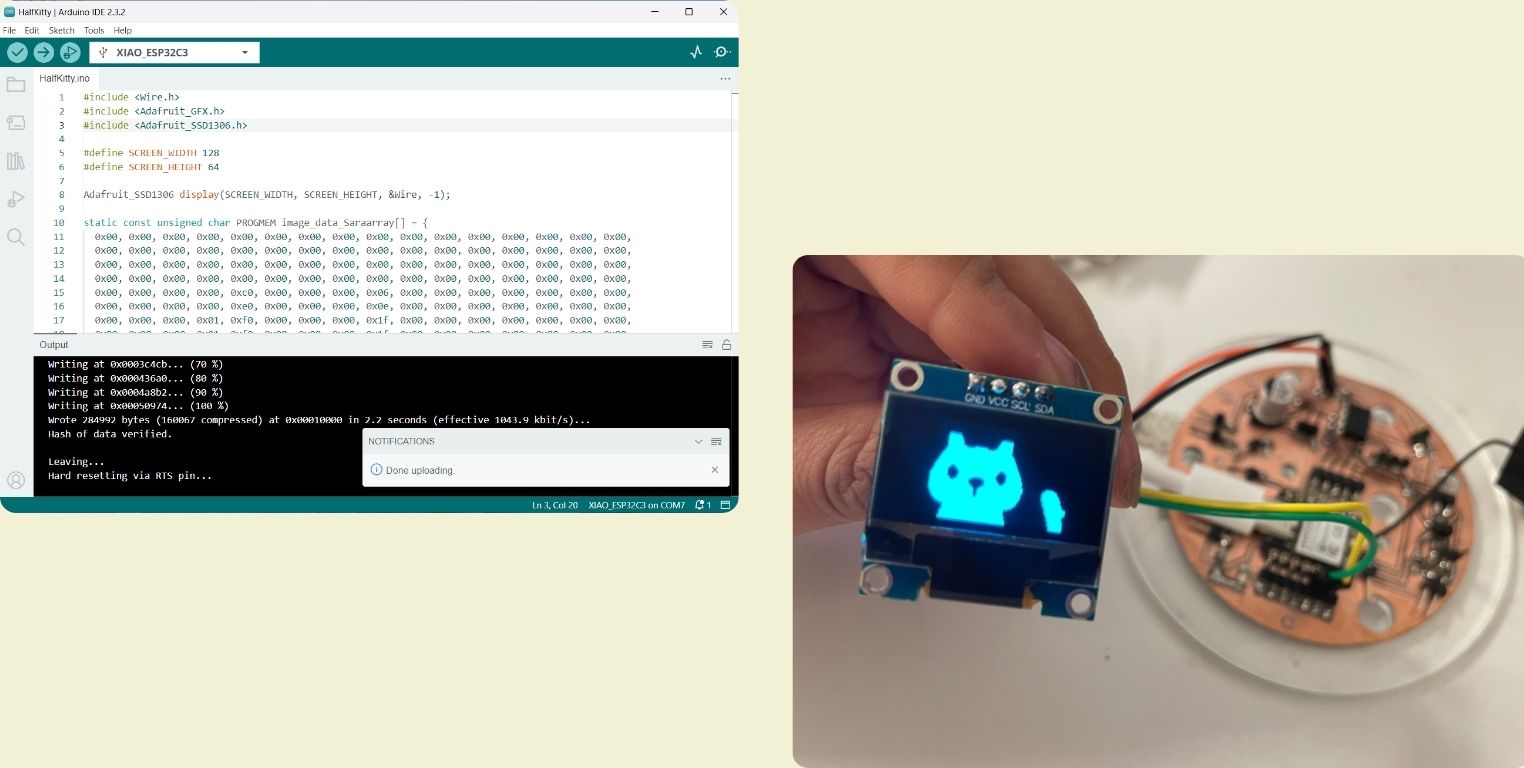
Again I tried to test one of the codes that didn't fit, and it was the kitty's turn.
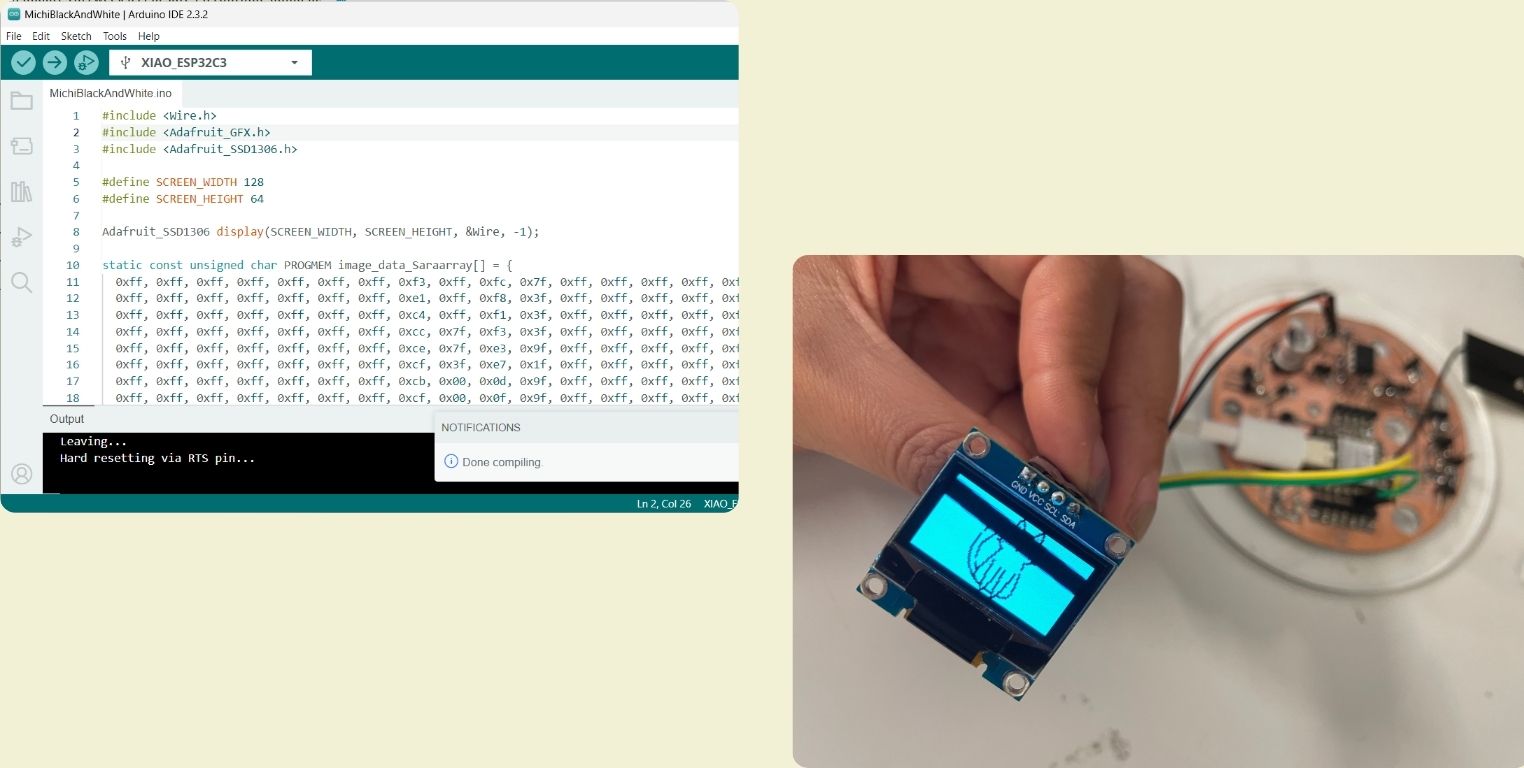
Then I tried the code where the kitty looks complete, sadly it happened the same as last time, that when I took the picture a line appears that doesn't allow to see the kitty at all, problems of the camera when trying to capture the screen.
I tried again also the looping game code, however, I didn't have a button to try it at the same time.
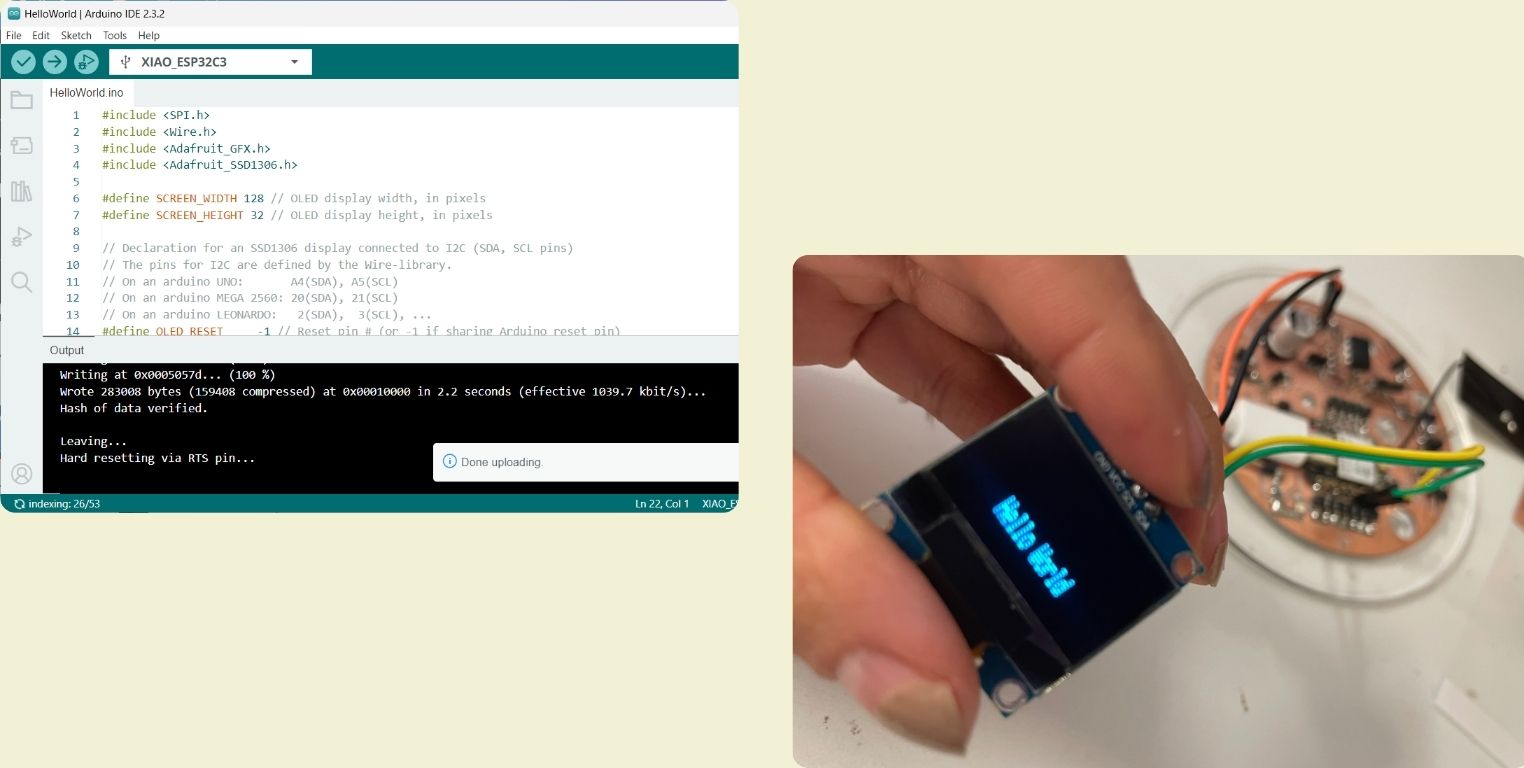
And lastly I sent a text code that I couldn't test in the end last time, so it was the first time I tried it, I think it went well.
The purpose of repeating this was that in the requirements of this assignment it asked to be done with a self designed board, however, as far as code functionality it seems to be all correct as far as what can be shown in the pictures ^^