Git and web page
This week was all about getting to known Git, wich is a real lifesaver for keeping track of my work and
avoiding any accidental deletes, and it's very easy to use an acess.
On a diferent note, HTML has proven to be an invaluable tool for my programing repertoire. With the
versatility of HTML and the help of professor Rafa I was able to develop this website. I really look
forward to learn more about HTML and all it has to offer.
What is Git?
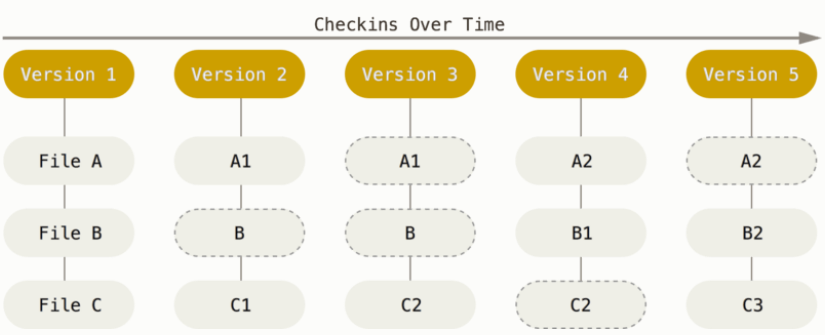
Git as a tool helps you keep track of changes in your project over time, instead of saving the entire
copies of your project every time you make a change, Git captures snapshots of what your files look like
at that moment.
This means Git creates a timeline of versions, allowing you to see how your project looks like in each
change and the cool thing about Git is if you make a mistake or lose some work, Git allows you to go back
in time an retrive a previous snapshot, meaning you restore your project in a previous state.
What makes Git a really efficiente tool is that it doesn't save complete snapshots of all the file each
time you make a commit, instead it only records the changes you've made, so you probably wondering what
happens to the files that remains unchange, Git simply links to the previous version, creating
a stream of interconnected snapshots. This feature make Git a really eficient both in terms of storage
and speed when dealing with all the versions of your project. You can see the image form Git documentation
below for further understanding.
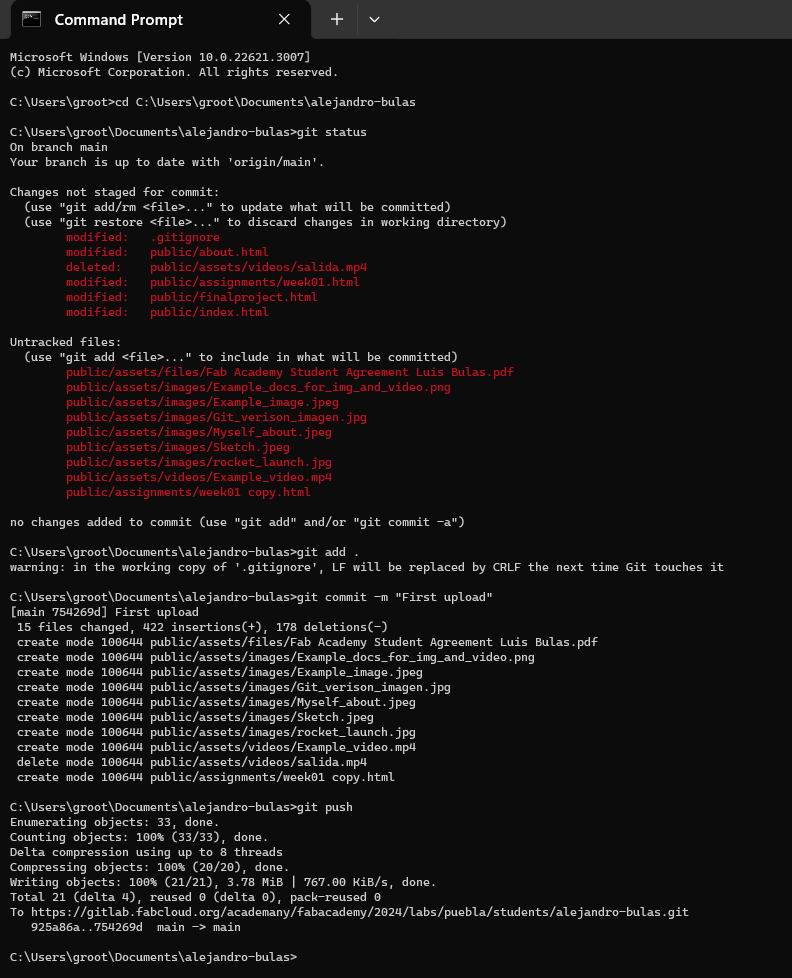
Installing and using git
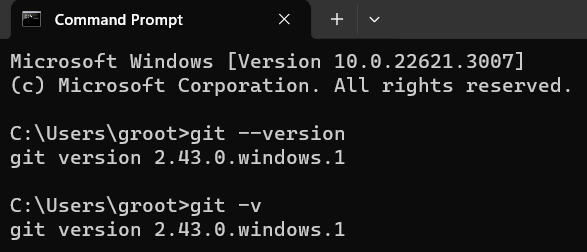
The first thing i did is installing the git program and check if the version installed is the most recent
one, it can be checked by using the following command git --version or git -v,
this only works with windows cmd.
Before i keep explaning there's a few commands that it's essential to familiarize, there are 6 of them:
Git clone
Git init
Git status
Git add
Git commit
Git push
Clone a repository into a new directory.
Create an empty Git repository or reinitialize an exiting one.
Show the working tree status.
Add file contents to the index.
Note: The "." means you can upload all the files
Record changes to the repository.
Note: The "-m" means you can write a comment when commited.
Update remote refs along with associated objects.
Web page
I created my web page using the template that professor Rafa provide us, as you can see it's really useful and practical. But before i even edit the template, we saw in class the basic principals of how a web page works using html and ccs. This really helped me to understand how it works a webpage, because in my personal experience i've never work with html.
First steps
The things we saw in class was how to write diferent types of headers, how to write a parragraph, how to make a list with numbers
and dots, how inserts images and videos, how to make a button and finaly how to append a link. Now this might be easy but if
you have never use html o css it would be a little bit more challenging than you expect. But i'm gonna explain step by step how
I made my first page.
Note: Before the explanation it's really important to download a proper text editor, like Visual Studio, Notepad++, Sublime text, etc.
This would be really useful for creating anything not just a web page like we see here, but thats a diferent story, so lets move
on with the explanation.
Write diferent type of headers
Write a paragraph
Make a list
- Item 1
- Item 2
- Item 3
- Item 1
- Item 2
- Item 3
Insert images and videos
Make a button
Append links
The first thing to do is to create a html using the basic syntax like shown in the code below, for writing the header it uses the word "h#" and depending on the number from 1 to 6 is the diferent type of title. You can see the output below the code.
Output:
First header
Second header
Third header
Fourth header
Fith header
Sext header
The first thing to do is to create a html using the basic syntax like shown in the code below, in this case to be able to write a paragraph it's important to use the word "p" like shown in the code below. You can see the output below the code.
Output:
This is a paragraph
The first thing to do is to create a html using the basic syntax like shown in the code below, there's two type of lists one with dots that uses the word "ul" and the one with numbers uses the word "ol". You can see the output below the code.
Output:
The first thing to do is to create a html using the basic syntax like shown in the code below, for inserting an image and a video the first thing is to download the image and the video you want in the folder like shown in the image below, it's very important to do this step because when using the words "img" and "video" it needs a source and this is going to be the image and video that was download before. You can see the output below the code.

Output:

The first thing to do is to create a html using the basic syntax like shown in the code below, making a button is really simple, all you need to do is use the word "button" and write whatever you want. You can see the output below the code.
Output:
The first thing to do is to create a html using the basic syntax like shown in the code below, there's two types of appended links, the first one will open on the same page, wich uses the word "a:link", and the other will open in a diferent page, wich uses the word "a:blank". You can see the output below the code.
Output:
First click!Second click!
Pushing it to GitLab
After all this, I was able to successfully customizing this template to align with my preferences. Furthermore, I share this modified files on GitLab, so everyone can see it can learn from this. This is the first week and the starting point for my final project, and I look forward on learning new things in the upcoming weeks.