Inteface & Application Programming
Tasks for this week
- Individual Assignment : Write an application that interfaces a user with an input and/or output device that I made
- Group Assignment:
- Compare as many tool options as possible
Webserial Communication
While web serial communication is still evolving, it holds immense potential for the future of web development. Imagine a world where you can control a robot arm through a user-friendly web interface, eliminating the need for complex software installations. Web serial communication could empower makers and hobbyists to create interactive web dashboards for their projects, allowing them to visualize sensor data or control various aspects remotely. Furthermore, educational institutions could leverage this technology to develop interactive learning experiences, enabling students to program and control hardware directly from their web browsers. This could revolutionize STEM education by making hardware interaction more accessible and engaging. Overall, web serial communication paves the way for a future where the web seamlessly interacts with the physical world, fostering creativity and innovation across various fields.
This week's project involves the creation of a web interface intended to communicate with the master board via web serial, which will subsequently transmit data to the slave boards. Refer to the documentation for my previous week's assignment.
Engaging in this process has provided me with a better understanding of the core concepts required for this week's task.
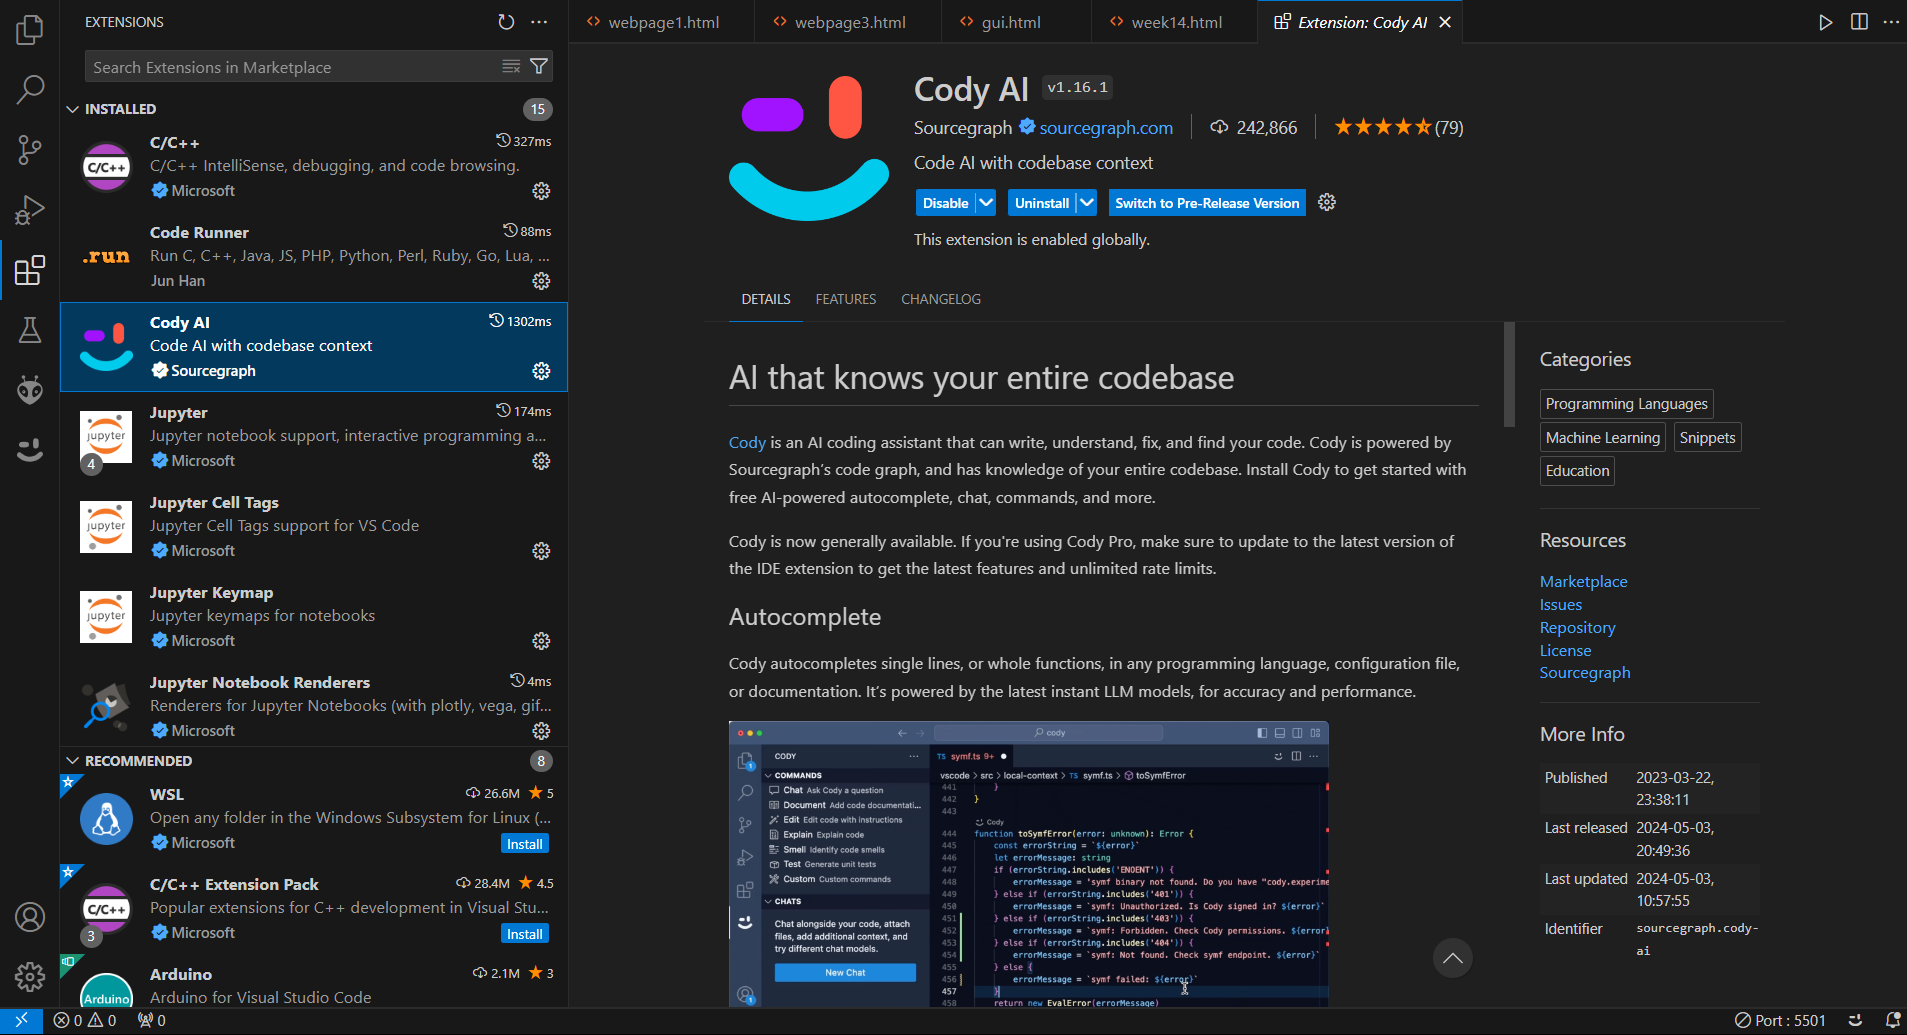
Given my limited expertise in web development and programming, I opted to seek support from "CODY AI" for assistance. Cody is an AI coding assistant proficient in writing, understanding, fixing, and locating code. Powered by Sourcegraph’s code graph, Cody possesses knowledge of your entire codebase. Install Cody to access free AI-powered autocomplete, chat, commands, and more.
I reached out to the Cody AI extension in Visual Studio Code for assistance in generating the code. I discovered the extension to be extremely beneficial in aiding my task.
Web Serial Communication-Servo
We can control servo motors using a web interface. This means we can make the motors move just by clicking on a website.
How does it work? Well, the board talks to the web interface through something called web serial communication. It's like a language that lets them understand each other.
Why is this cool? Because it lets us control the motors from anywhere, using any device with a web browser. Plus, we can see what's happening in real-time, which helps us make precise adjustments.
Overall, using web serial communication for servo motor control makes our project easy to use and opens up lots of possibilities for fun experiments and projects.
I have used the Week 8 PCB as Main PCB for this week
_(2).jpeg)
I opted for the Web Serial API to design the interface. It's a web standard that lets websites communicate with serial devices. This feature comes in handy for applications that need to interact with custom hardware, scientific instruments, or any devices that use serial communication. The Web Serial API is part of the Web APIs found in modern browsers, enabling web applications to connect to serial ports, including USB-connected devices, for direct communication within the browser.
Key Features of the Web Serial API:
- Bidirectional Communication: Allows both sending data to and receiving data from a serial device.
- Asynchronous Interaction: Utilizes Promises to manage asynchronous reading and writing operations.
- Security and Permissions: Users must grant permission for a web page to access serial ports, ensuring security against unauthorized access.
With assistance from Cody AI in Visual Studio Code, I crafted HTML code for the webpage. I designed a simple page featuring necessary buttons and required port access.
Since i was done my Electronics Design week using servo i palnned to create an interface for the same
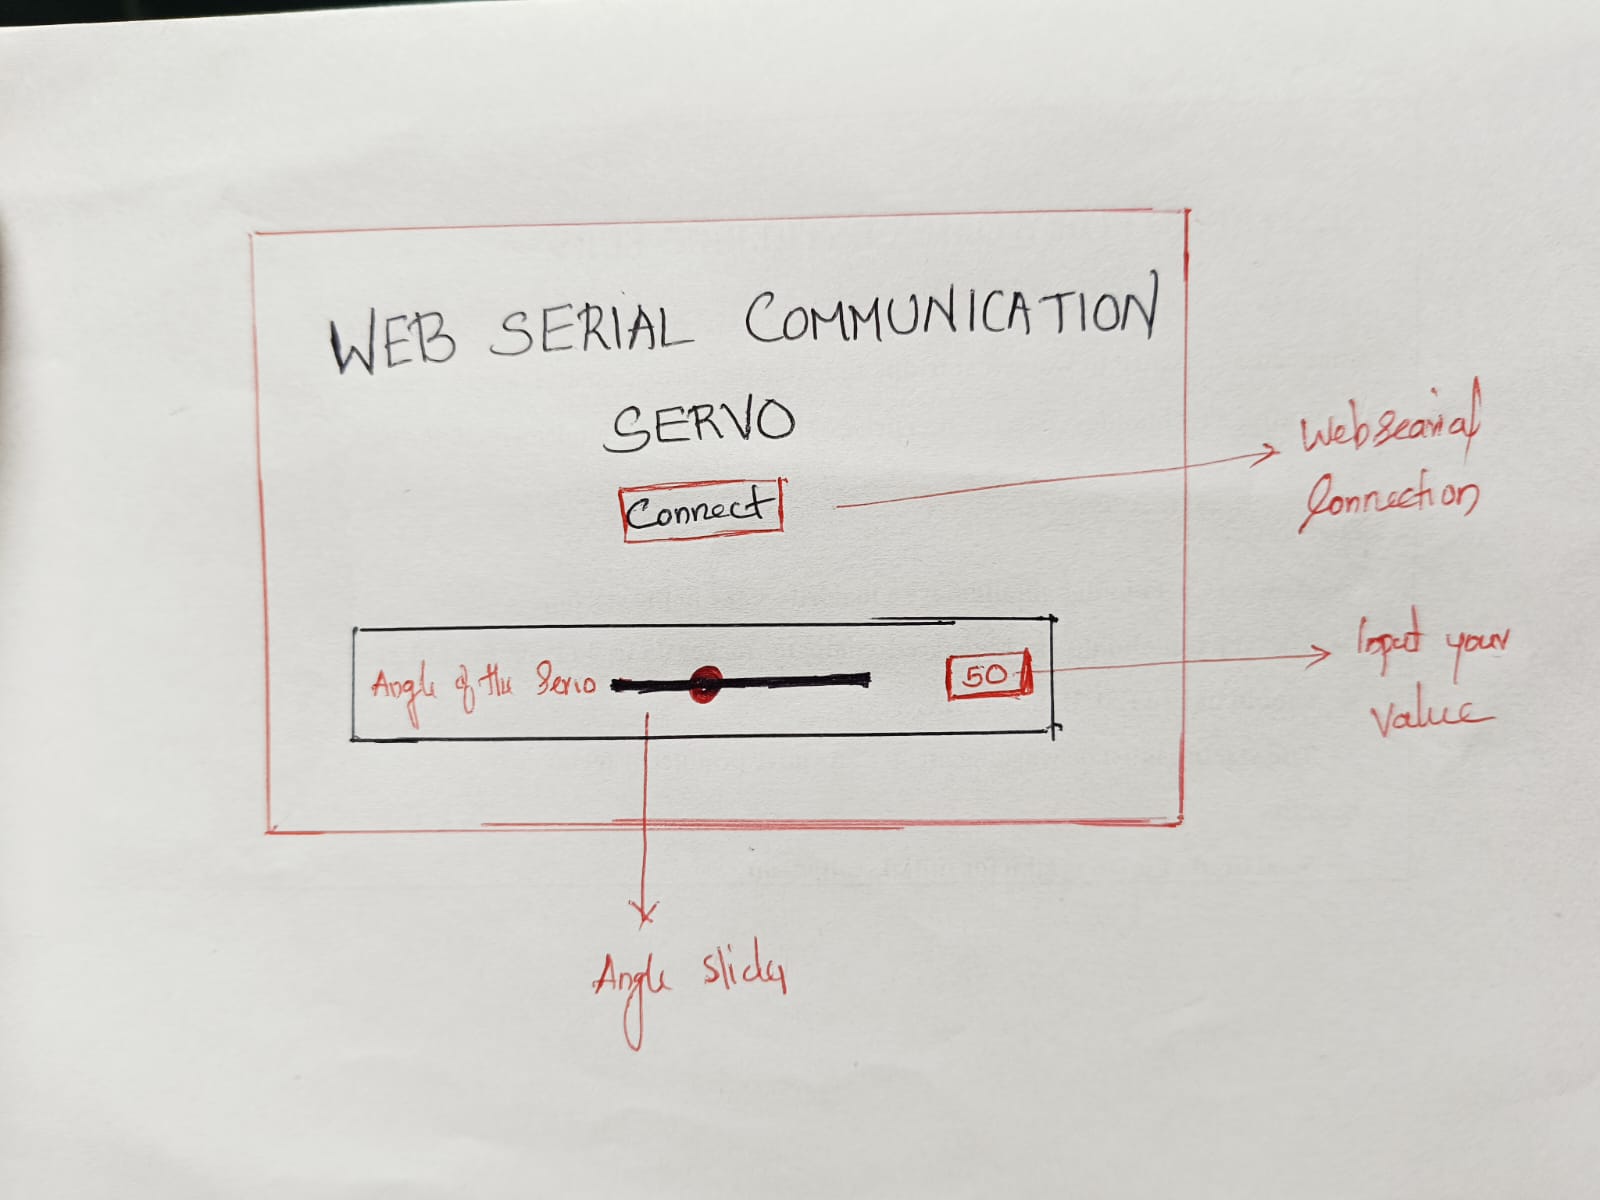
I Was given the below prompt for getting my html for my design
“I need a web-based interface that can communicate with a servo motor connected to an SAMD11 microcontroller through a serial port. The interface should allow users to connect and disconnect from the serial port, and control the angle of the servo motor using a slider and an input field. Here are the specific requirements:
- Title: The webpage title should be "Web Serial Communication-Servo" and the heading should be styled with a specific font and color.
- Connect Button:
- A button to connect and disconnect from the serial port.
- The button should display "Connect" initially, and change to "Disconnect" when connected.
- Control Panel:
- A section with a slider and an input field to control the angle of the servo motor.
- The slider should range from 0 to 180 degrees.
- The input field should allow users to enter the angle directly and should be synchronized with the slider.
- Styles:
- The page should be centered with a dark background.
- The control panel should have a white background, rounded corners, and a shadow for a modern look.
- The label and input elements should be styled for better readability.
- JavaScript function
- Implement connection and disconnection logic for the serial port.
- Sync the slider and input field so that changes in one reflect in the other.
- Send the angle value to the micro controller over the serial port whenever it changes.
- Properly encode the angle value as a 3-digit string followed by a newline character.
<!DOCTYPE html> <html> <head> <title style="color: brown;">Serial Port Communication</title> <style> #connectButton { background-color: green; color: white; padding: 10px 20px; border: none; cursor: pointer; transition: background-color 0.3s ease; } #connectButton.connected { background-color: red; } body { display: flex; flex-direction: column; justify-content: center; align-items: center; height: 100vh; margin: 0; background-color: #1a1818; font-family: Arial, sans-serif; } h1 { color: rgb(180, 15, 15); text-align: center; margin-bottom: 30px; } .control-panel { background-color: white; padding: 20px; border-radius: 10px; box-shadow: 0 0 10px rgba(0, 0, 0, 0.1); display: flex; flex-direction: column; align-items: center; gap: 20px; } label { font-weight: bold; margin-bottom: 10px; display: block; } #dataSlider { width: 300px; } </style> </head> <body> <h1 style=" text-align: center; color: #d11f1f; font-family: 'Segoe UI', Tahoma, Geneva, Verdana, sans-serif; "> Web Serial Communication-Servo </h1> <button id="connectButton" style=" display: block; margin: 0 auto 20px; padding: 10px 20px; font-size: 16px; background-color: #0d55db; color: white; border: none; border-radius: 4px; cursor: pointer; "> Connect </button> <div class="control-panel" style=" max-width: 600px; margin: 0 auto; padding: 20px; background-color: #f5f5f5; border-radius: 5px; box-shadow: 0 0 10px rgba(0, 0, 0, 0.1); "> <div style="display: flex; align-items: center"> <label for="dataSlider" style="font-weight: bold; margin-right: 10px">Angle of Servo Motor</label> <input type="range" id="dataSlider" min="0" max="180" value="0" style="flex-grow: 1" /> <!-- <span id="currentAngleDisplay" style="padding: 5px; background-color: #e0e0e0; border-radius: 3px">000</span> --> <input type="number" id="dataInput" style="padding: 5px; background-color: #e0e0e0; border-radius: 3px; width: 50px;" step="5" value="000" /> </div> </div> <script> const connectButton = document.getElementById("connectButton"); const dataSlider = document.getElementById("dataSlider"); const dataInput = document.getElementById('dataInput'); // const currentAngleDisplay = document.getElementById("currentAngleDisplay"); let serialPort; let writer; let reader; connectButton.addEventListener("click", async () => { if (connectButton.classList.contains("connected")) { try { await writer.releaseLock(); // Release the writer lock before closing the port await reader.releaseLock(); // Release the reader lock before closing the port await serialPort.close(); writer = null; reader = null; serialPort = null; // Set serialPort to null after closing connectButton.classList.remove("connected"); connectButton.textContent = "Connect"; } catch (error) { console.error("Error closing serial port:", error); } } else { try { serialPort = await navigator.serial.requestPort(); await serialPort.open({ baudRate: 115200 }); writer = serialPort.writable.getWriter(); reader = serialPort.readable.getReader(); connectButton.classList.add("connected"); connectButton.textContent = "Disconnect"; sendData(); // readData(); } catch (error) { console.error("Error opening serial port:", error); } } }); dataSlider.addEventListener("input", () => { sendData(dataSlider.value); // currentAngleDisplay.textContent = dataSlider.value.padStart(3, "0"); dataInput.value = dataSlider.value.padStart(3, "0"); }); dataInput.addEventListener("input", () => { sendData(dataInput.value); // currentAngleDisplay.textContent = dataInput.value.padStart(3, "0"); dataSlider.value = dataInput.value.padStart(3, "0"); }); function sendData(value = dataSlider.value) { const encoder = new TextEncoder() if (writer) { value = value.toString().padStart(3, "0"); writer .write(encoder.encode(value)) .then(() => { console.log("Sent: " + value); }); const end = '\n'; writer.write(encoder.encode(end)); ; } } </script> </body> </html>.png)
Afterward, I transferred the code to the SAMD11 board that I assembled during the Electronics Design week.
#define SERVO_PIN 4  // Pin for the servo motor
String data = ""; // String to store incoming serial data

void setup() {
  Serial.begin(115200);        // Initialize serial communication with a baud rate of 115200
  pinMode(SERVO_PIN, OUTPUT);  // Set the servo pin as an output
}

void loop() {
  if (Serial.available()) {
    char digit = Serial.read();  // Read the incoming byte from the serial port

    if (digit == '\n') { // Check if the incoming byte is a newline character
      Serial.println("Data: " + data); // Print the received data to serial monitor
      // Convert the received data (which represents the servo angle) to an integer
      // Serial.println( ( (data[0]-48) * 100 ) + ( (data[1]-48) * 10 ) );
      int servoAngle = (data[0] - 48) * 100 + (data[1] - 48) * 10 + (data[2] - 48);
      Serial.println("Angle: " + servoAngle); // Print the servo angle to serial monitor
      servoPulse(SERVO_PIN, servoAngle); // Call the function to control the servo motor

      data = ""; // Clear the data string for the next input
    } else {
      data = data + digit; // Append the incoming byte to the data string
    }
  }
}

// Function to control the servo motor
void servoPulse(int servo, int angle) {
  int pwm = (angle * 11) + 500;  // Convert angle to microseconds
  digitalWrite(servo, HIGH); // Set servo pin high
  delayMicroseconds(pwm); // Wait for the calculated pulse width
  digitalWrite(servo, LOW); // Set servo pin low
  delay(15);  // Wait for the refresh cycle of the servo
}
Explanation of the code
1. Setting Up:
#define SERVO_PIN 4: This line defines a constant namedSERVO_PINwith the value4, which specifies the pin connected to the servo motor.
String data = "";: Initializes a string variabledatato store incoming data from the serial port.
void setup()function:Serial.begin(115200);: Starts serial communication on the Arduino board at a baud rate of 115200. This allows communication with a computer program.
pinMode(SERVO_PIN, OUTPUT);: Sets the pin connected to the servo motor (defined bySERVO_PIN) as an output pin.
2. Main Loop:
void loop()function: This function runs repeatedly.if (Serial.available()) { ... }: Checks if there's any data available on the serial port.char digit = Serial.read();: Reads a single byte of data from the serial port and stores it in thedigitvariable.
-
if (digit == '\n') { ... }: Checks if the received byte is a newline character (\n), indicating the end of a data string.-
Serial.println("Data: " + data);: Prints the received data string (representing the servo angle) to the serial monitor for debugging.
- Converts the string data to an integer representing the servo angle:
-
int servoAngle = (data[0] - 48) * 100 + (data[1] - 48) * 10 + (data[2] - 48);: This line performs a mathematical conversion to convert the ASCII values of the characters in the stringdatato an actual angle value.-
data[0] - 48: Subtracts 48 from the ASCII value of the first character in the string to convert it from an ASCII digit to a numerical value (e.g., '5' - 48 = 5). Similar operations are done for the second and third characters.
- Multiplication and addition account for the position of each digit (hundreds, tens, and units) in the final angle value.
-
-
-
Serial.println("Angle: " + servoAngle);: Prints the calculated servo angle to the serial monitor.
-
servoPulse(SERVO_PIN, servoAngle);: Calls theservoPulsefunction to control the servo motor using the calculated angle.
data = "";: Clears thedatastring to prepare for receiving the next data string.
-
else { data = data + digit; }: If the received byte is not a newline, it's appended to thedatastring, building the complete data string representing the angle.
3. Controlling the Servo:
-
void servoPulse(int servo, int angle)function:int pwm = (angle * 11) + 500;: This line converts the desired angle (angle) into a pulse width value (PWM) in microseconds.- The calculation (
angle * 11 + 500) is specific to certain servo motors and may need adjustments based on the servo's specifications. It essentially translates the angle range (often 0-180 degrees) to a corresponding pulse width range that the servo understands.
- The calculation (
digitalWrite(servo, HIGH);: Sets the servo pin (specified byservo) to high voltage.
delayMicroseconds(pwm);: Waits for the calculated pulse width duration to allow the servo to move to the desired position.
digitalWrite(servo, LOW);: Sets the servo pin back to low voltage.
delay(15);: Adds a short delay (15 milliseconds) to account for the servo's refresh cycle.
Setup:

Hurray …..! I got the results
Group assignment:
Compare as many tool options as possible click here for group assignment