Interface and Application Programming

Assignments
- Group Assignment
- compare as many tool options as possible
- Individual Assignment
- write an application that interfaces a user with an input &/or output device that you made
Hero Shot
Start with Python
I decided to use python to program a GUI. Therefore, I needed extension for Visual Studio Code. First step was to install python to my computer and th create the right program path.

Before starting to use python, download python from python.org (v. 3.12.3)
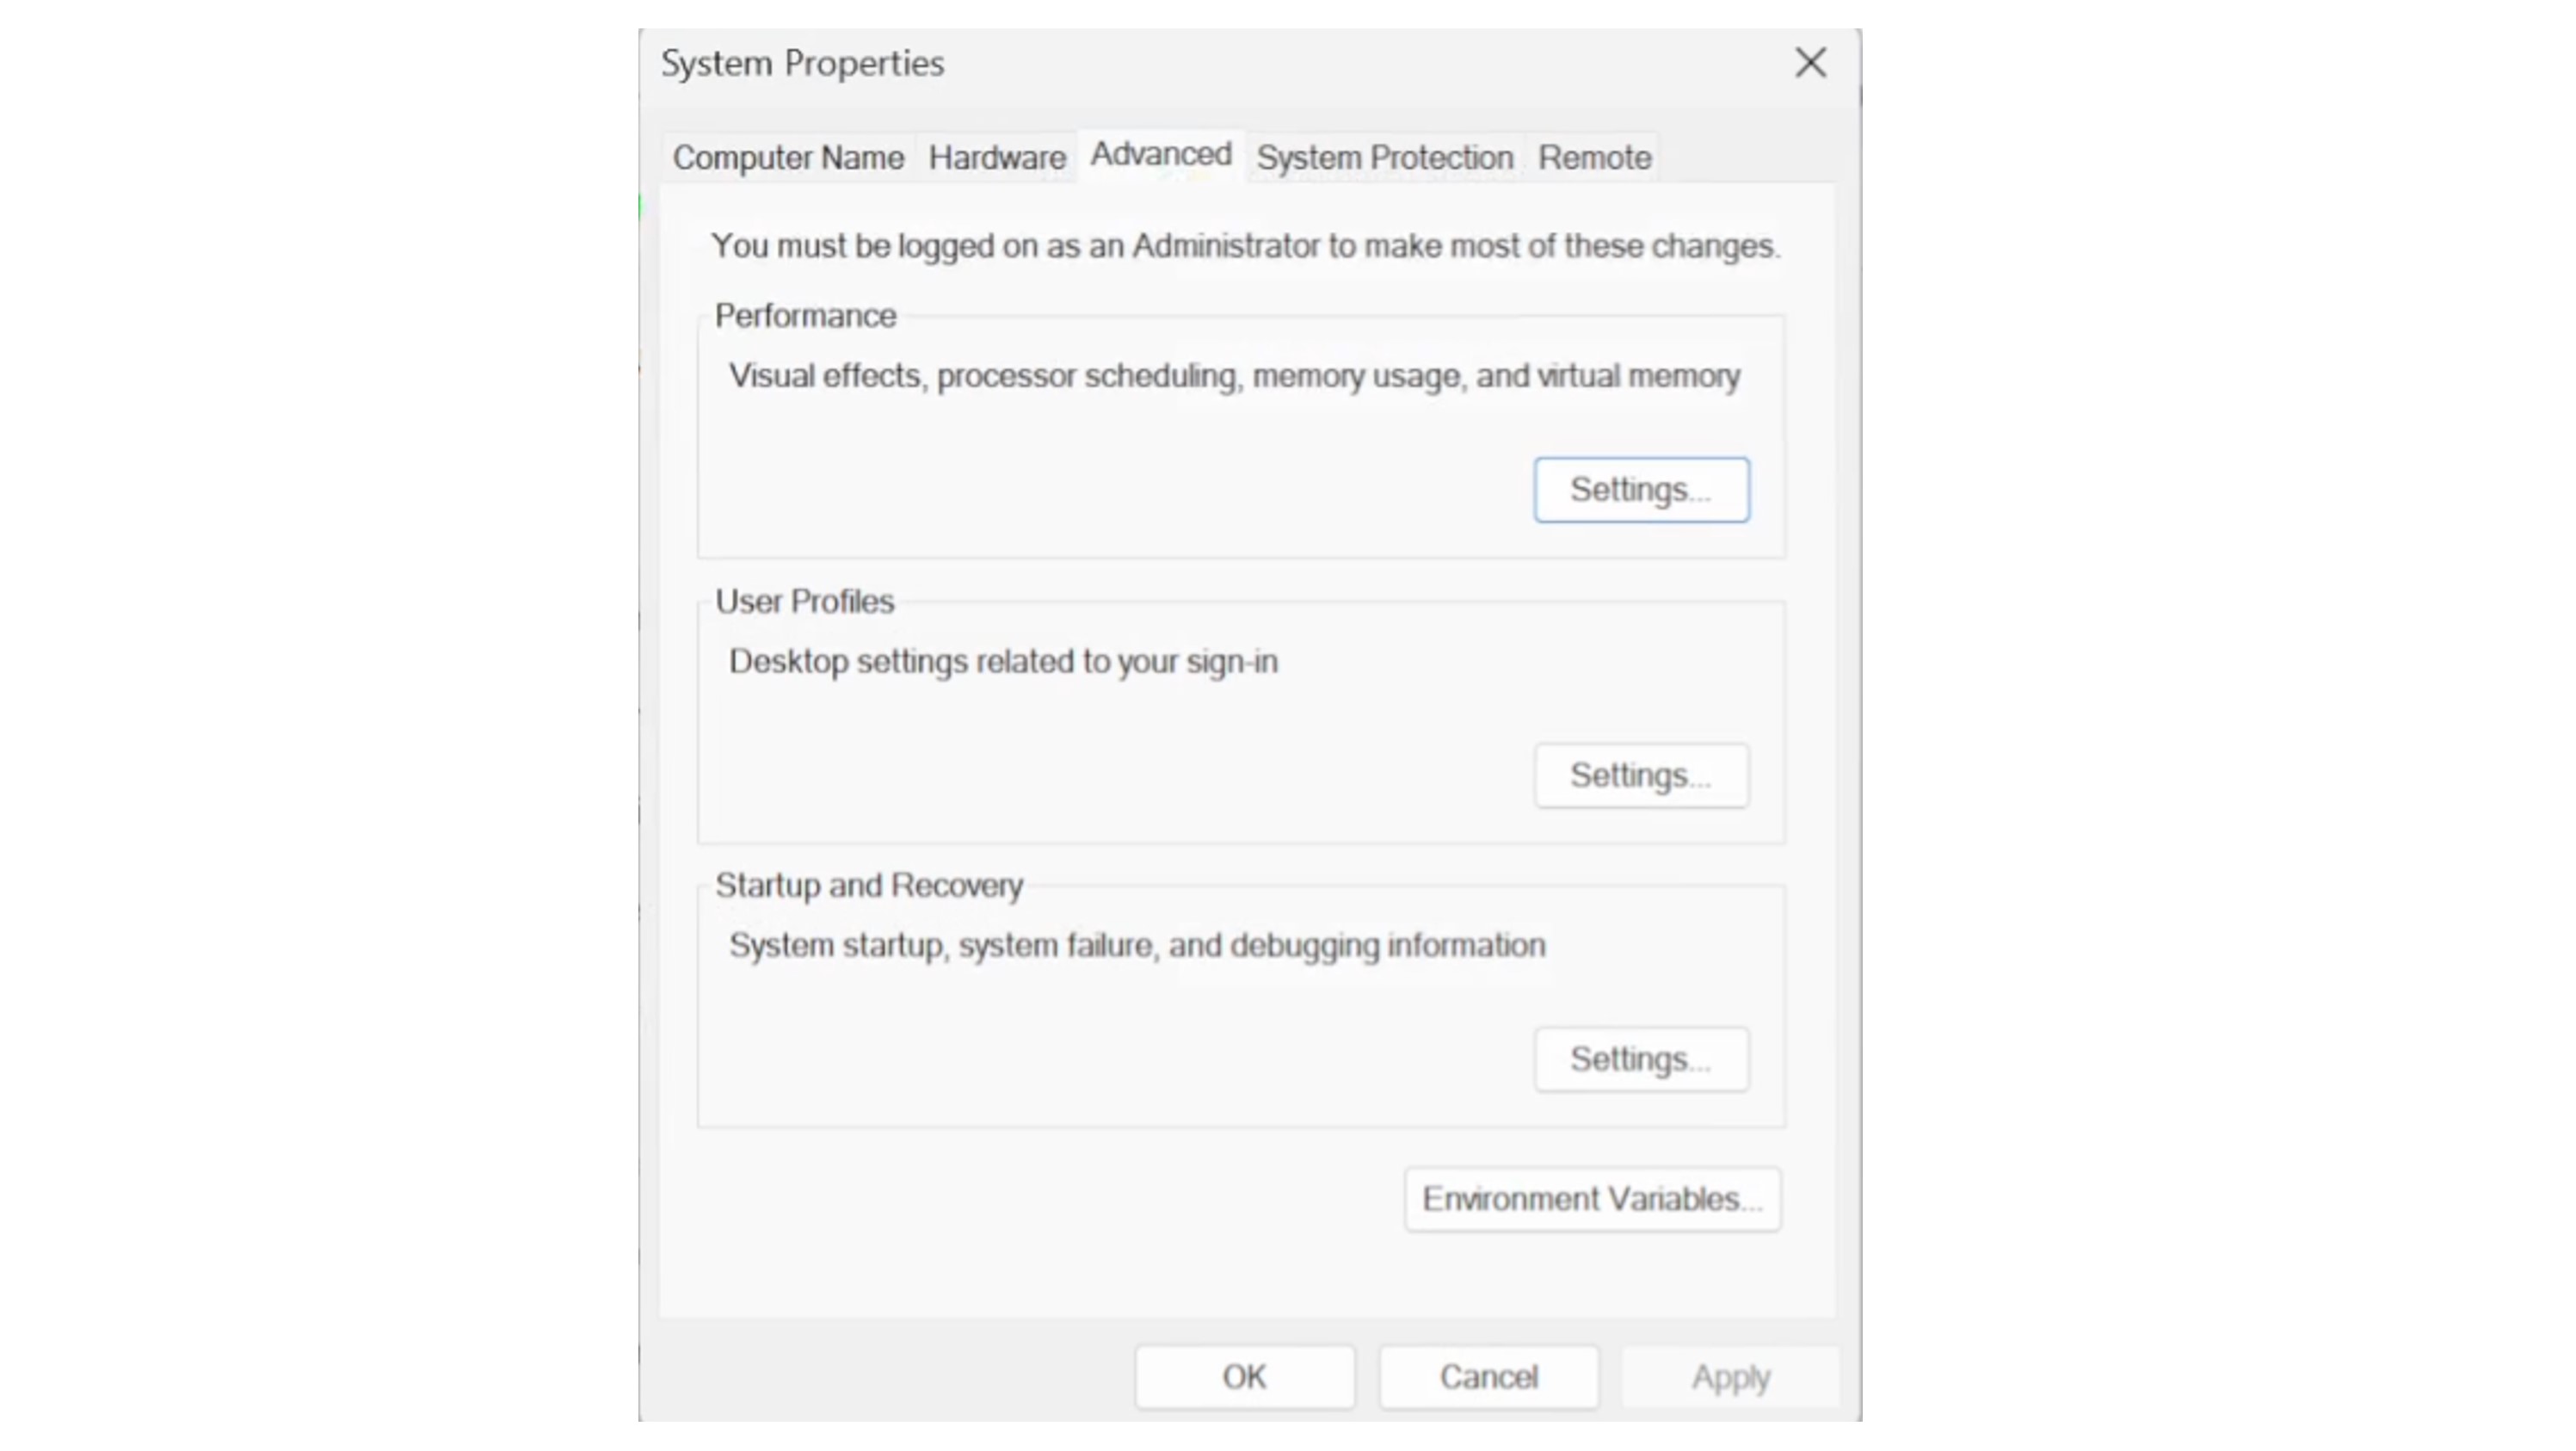
After installing python. Go to "Advanced System Settings" and Click on "Environment Variables...".
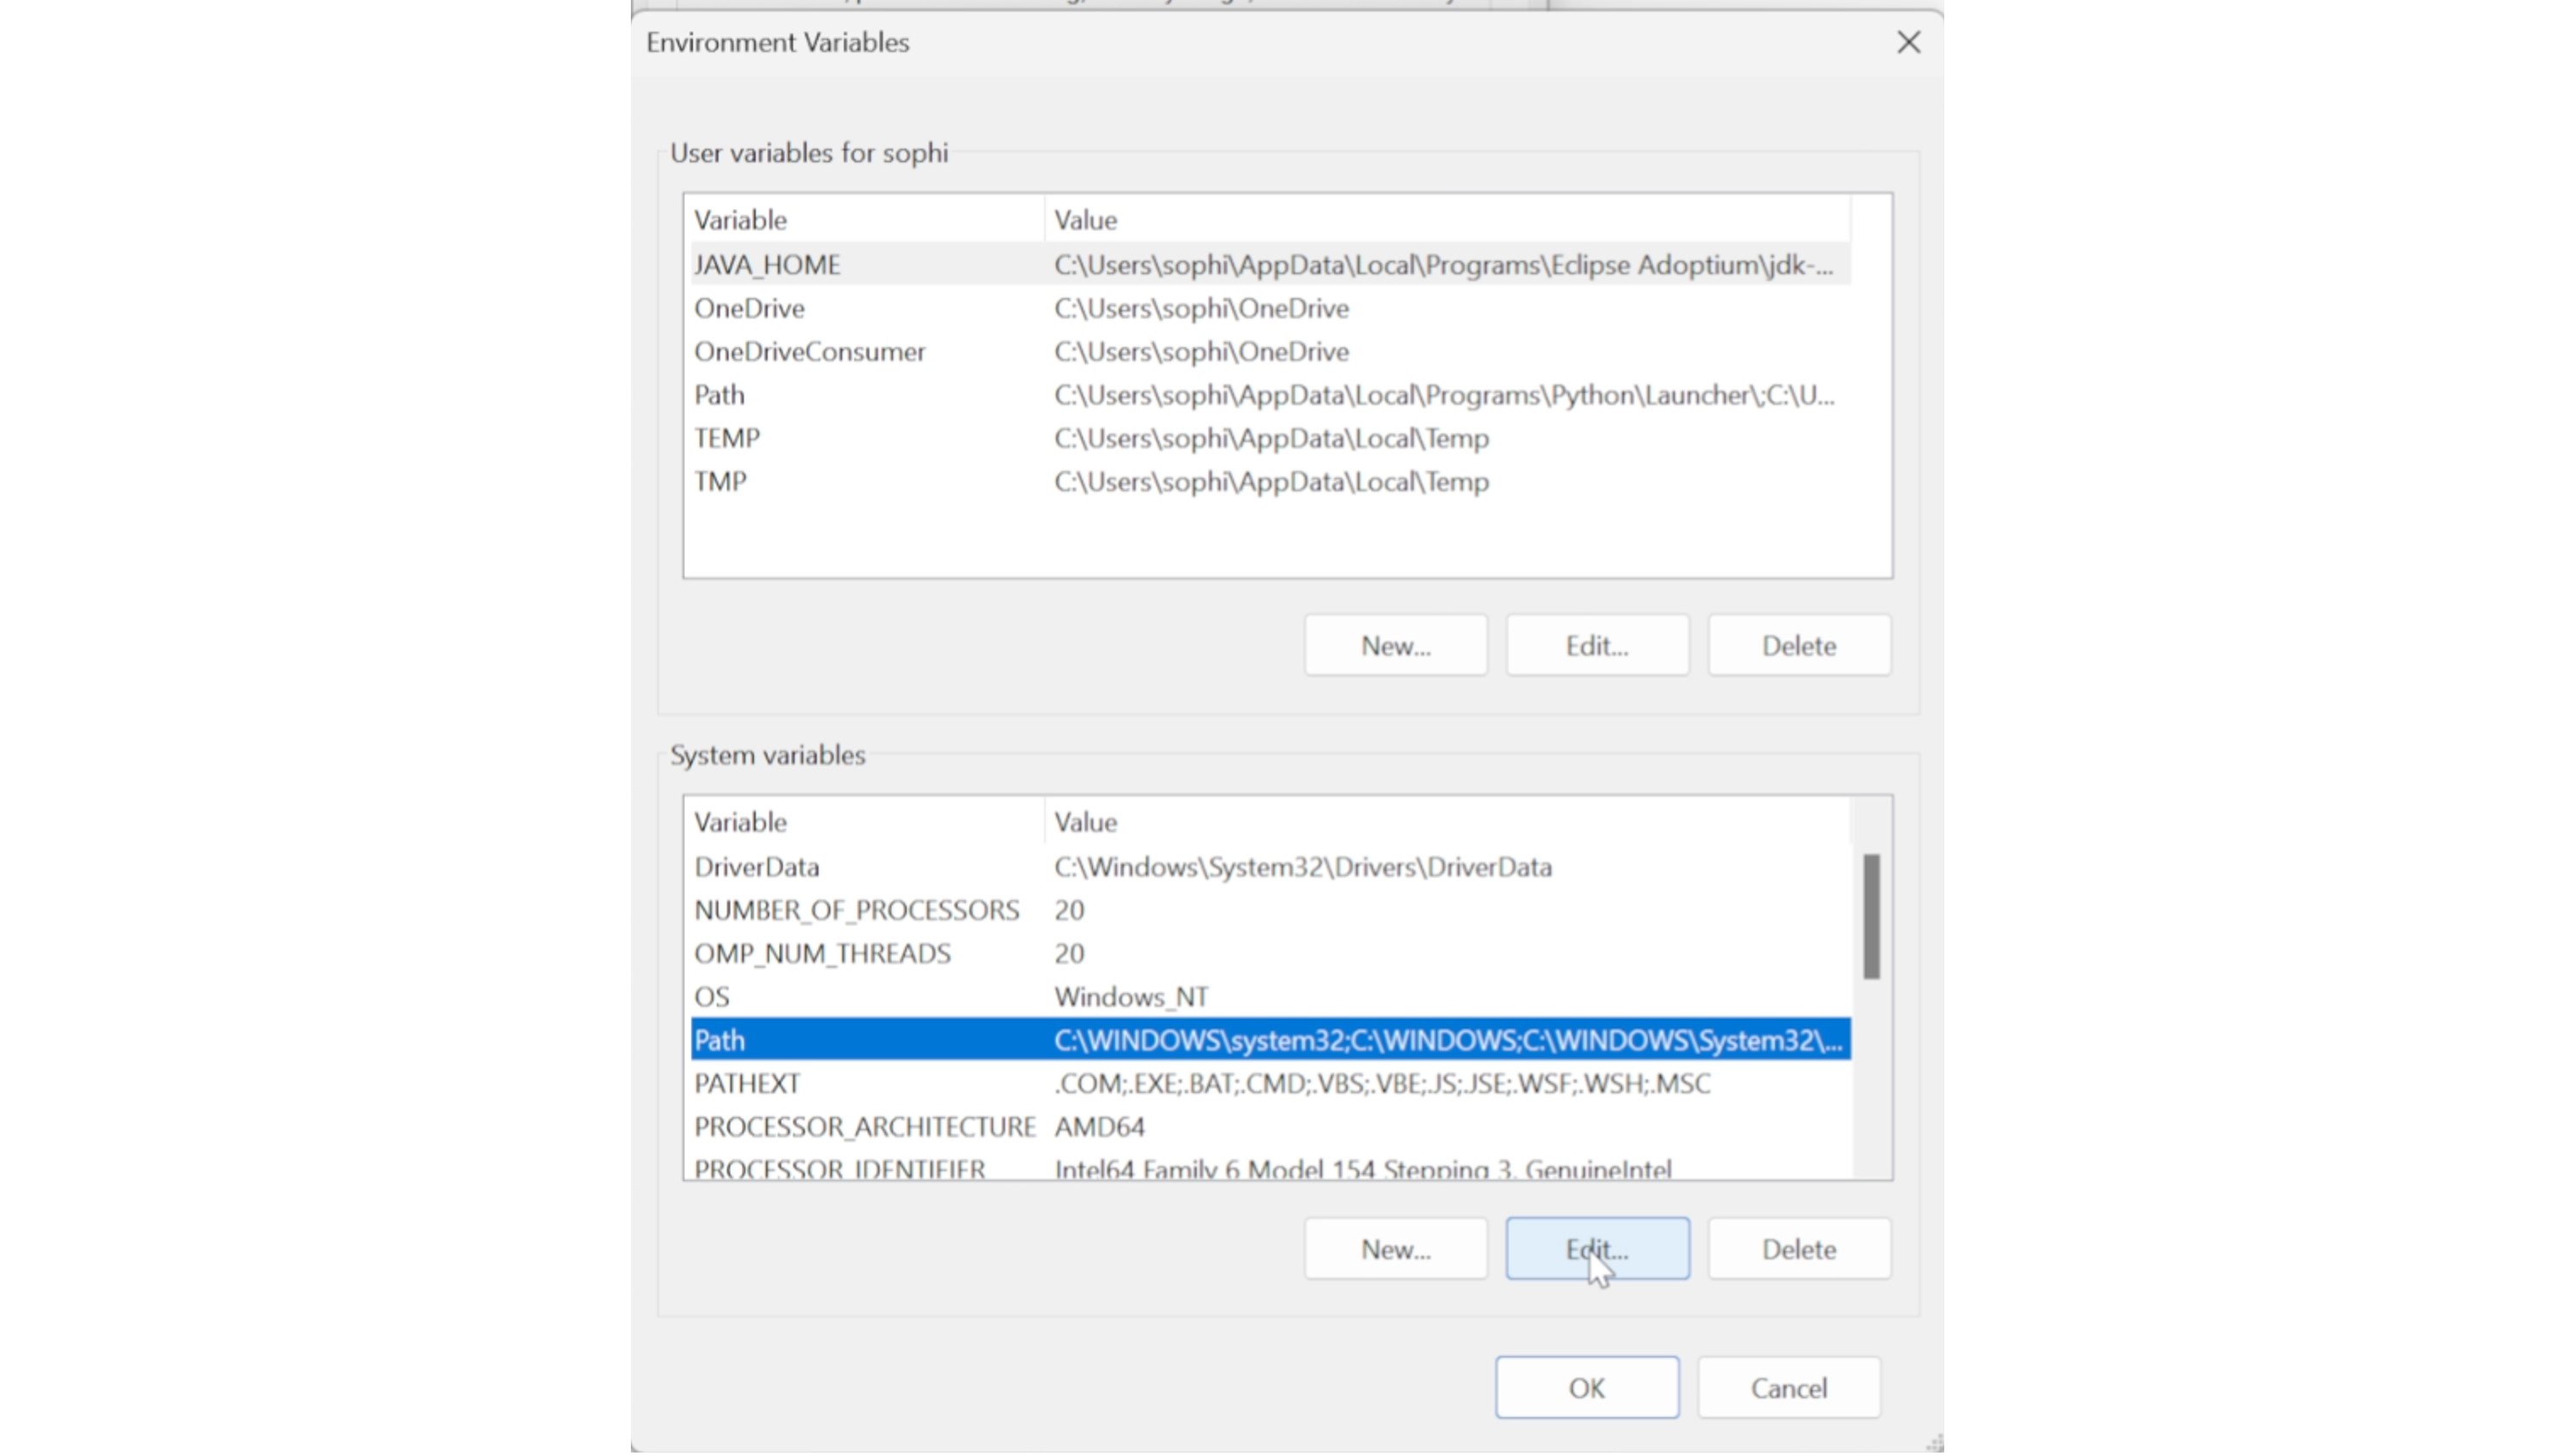
Search for "Path" in the System variables and click on "Edit..."
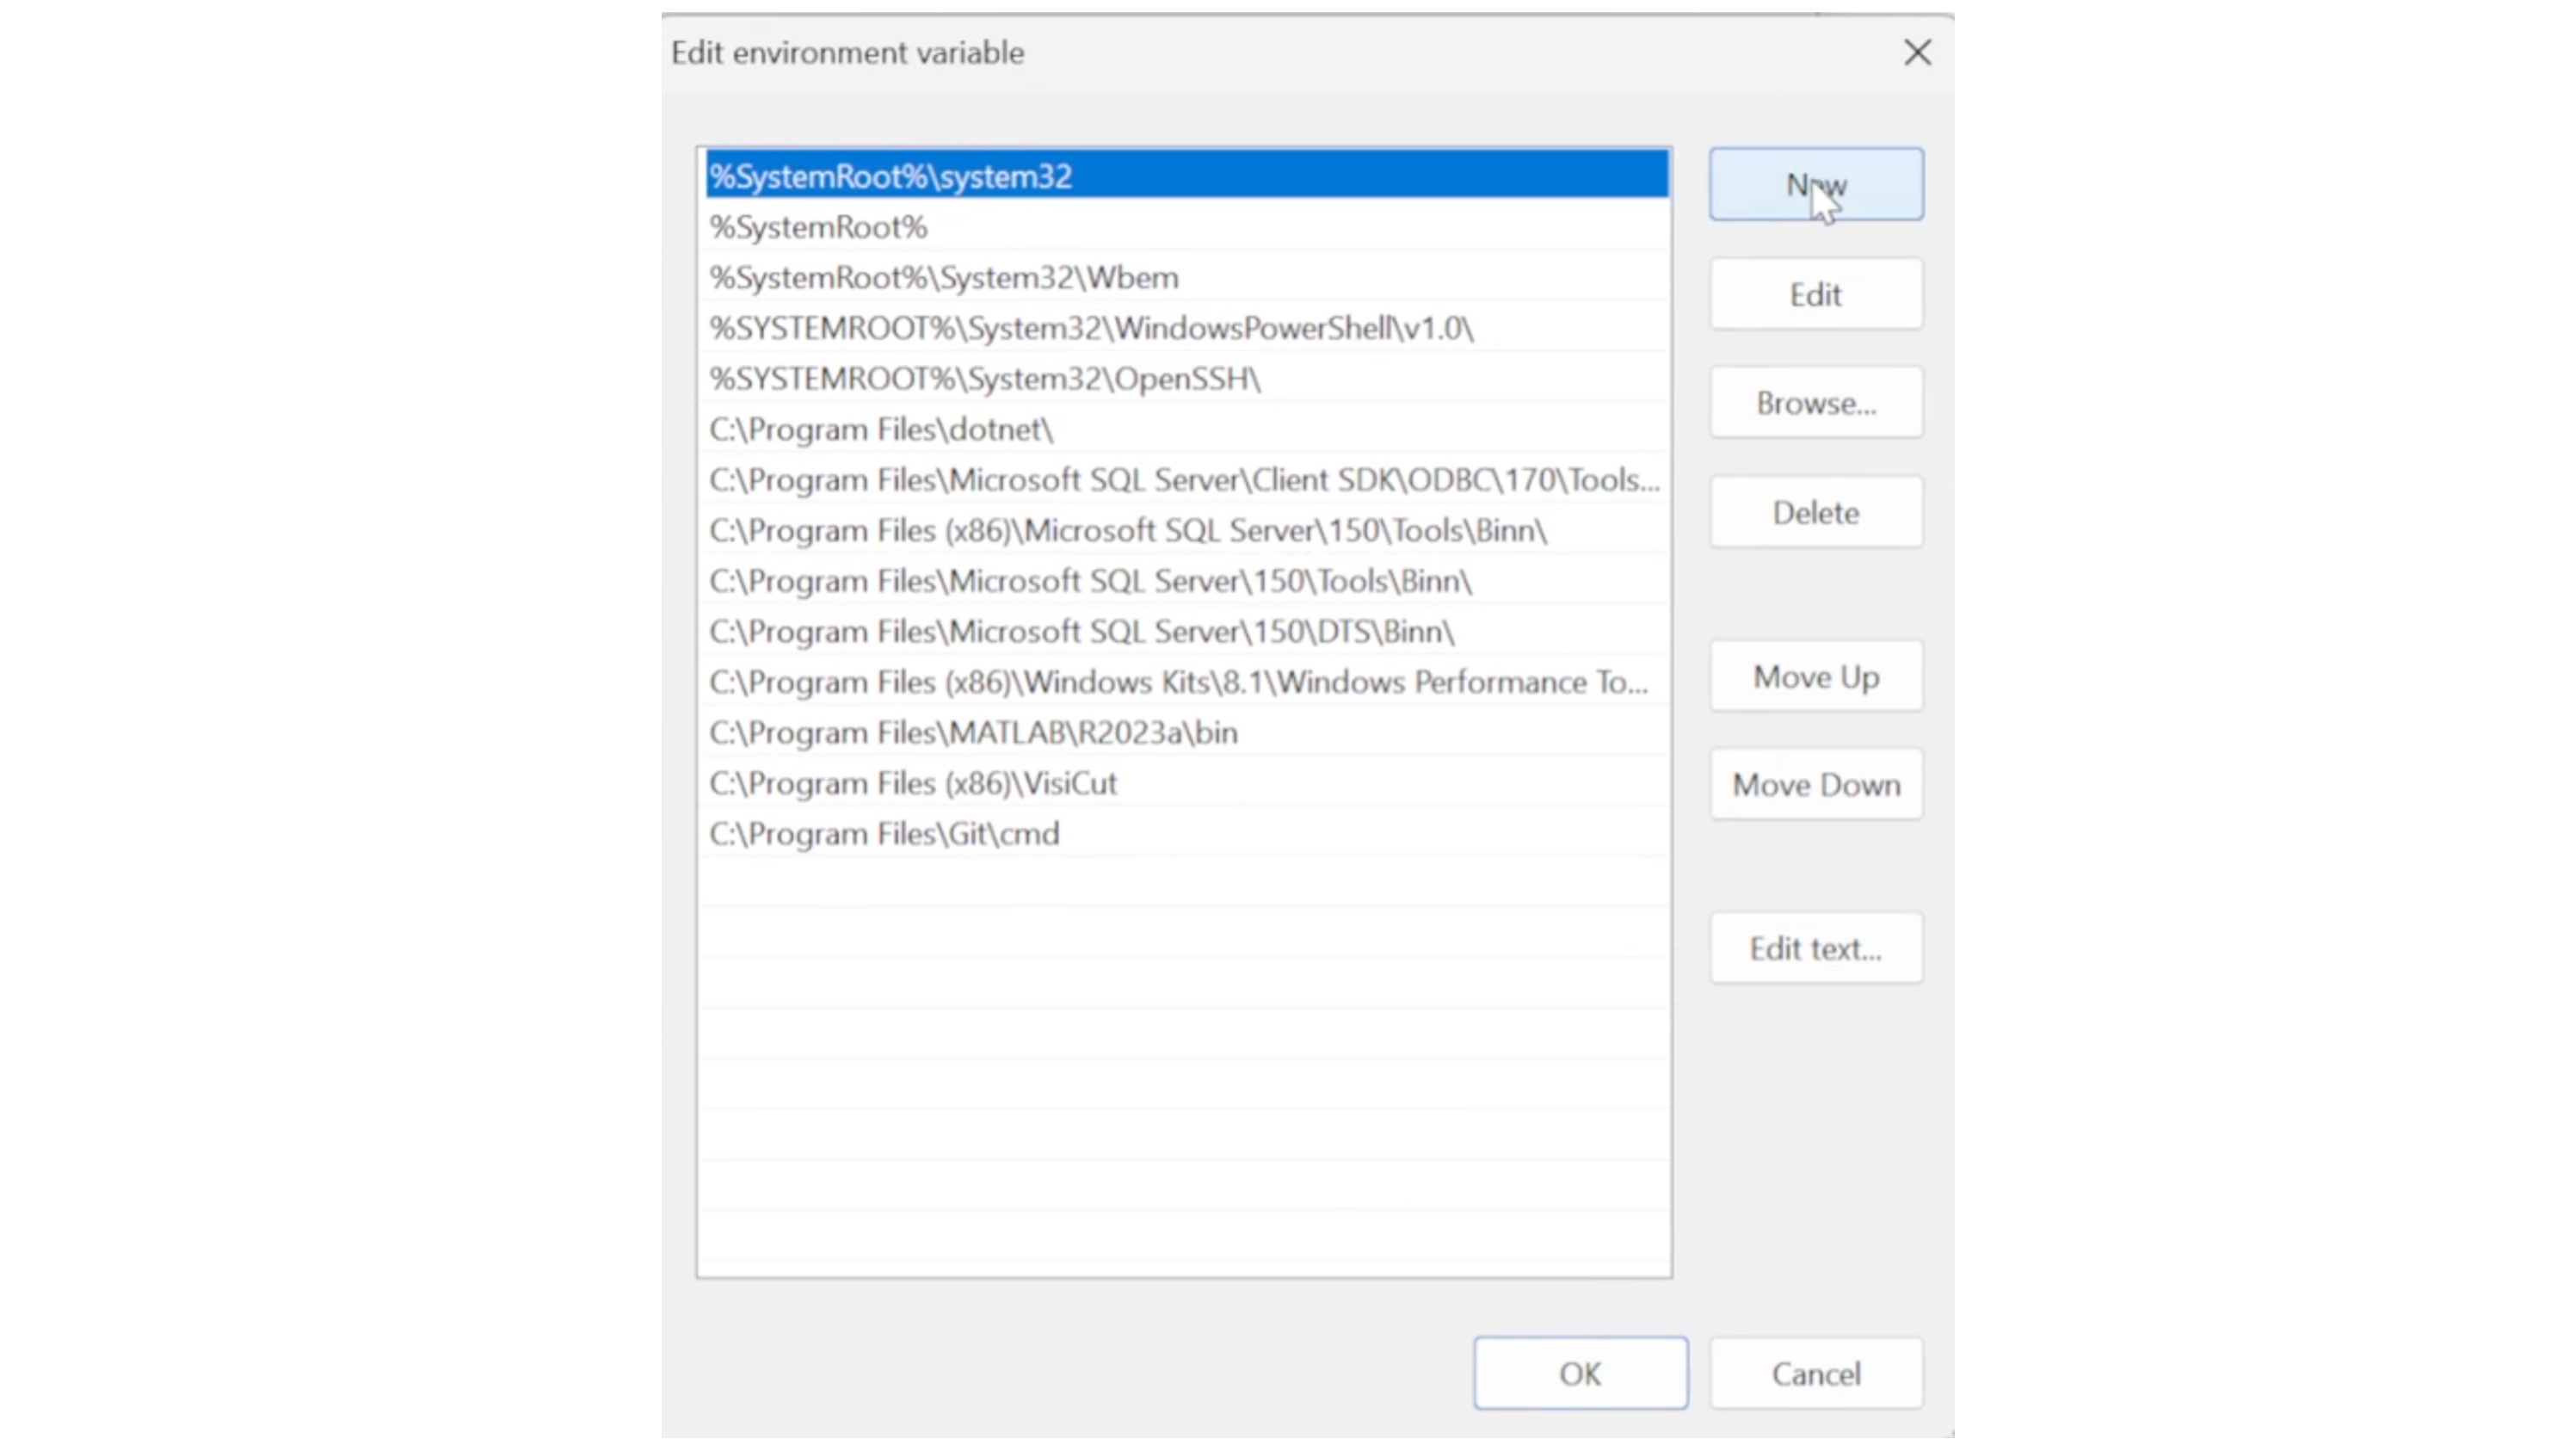
You can click on "New" to create a new path.
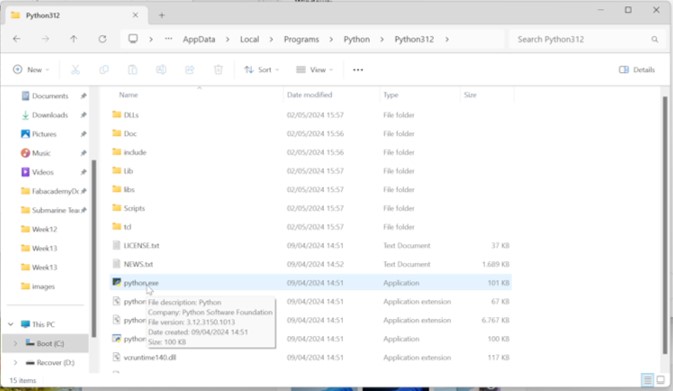
Search for the folder in your "AppData" with the "python.exe" file and copy the file path.
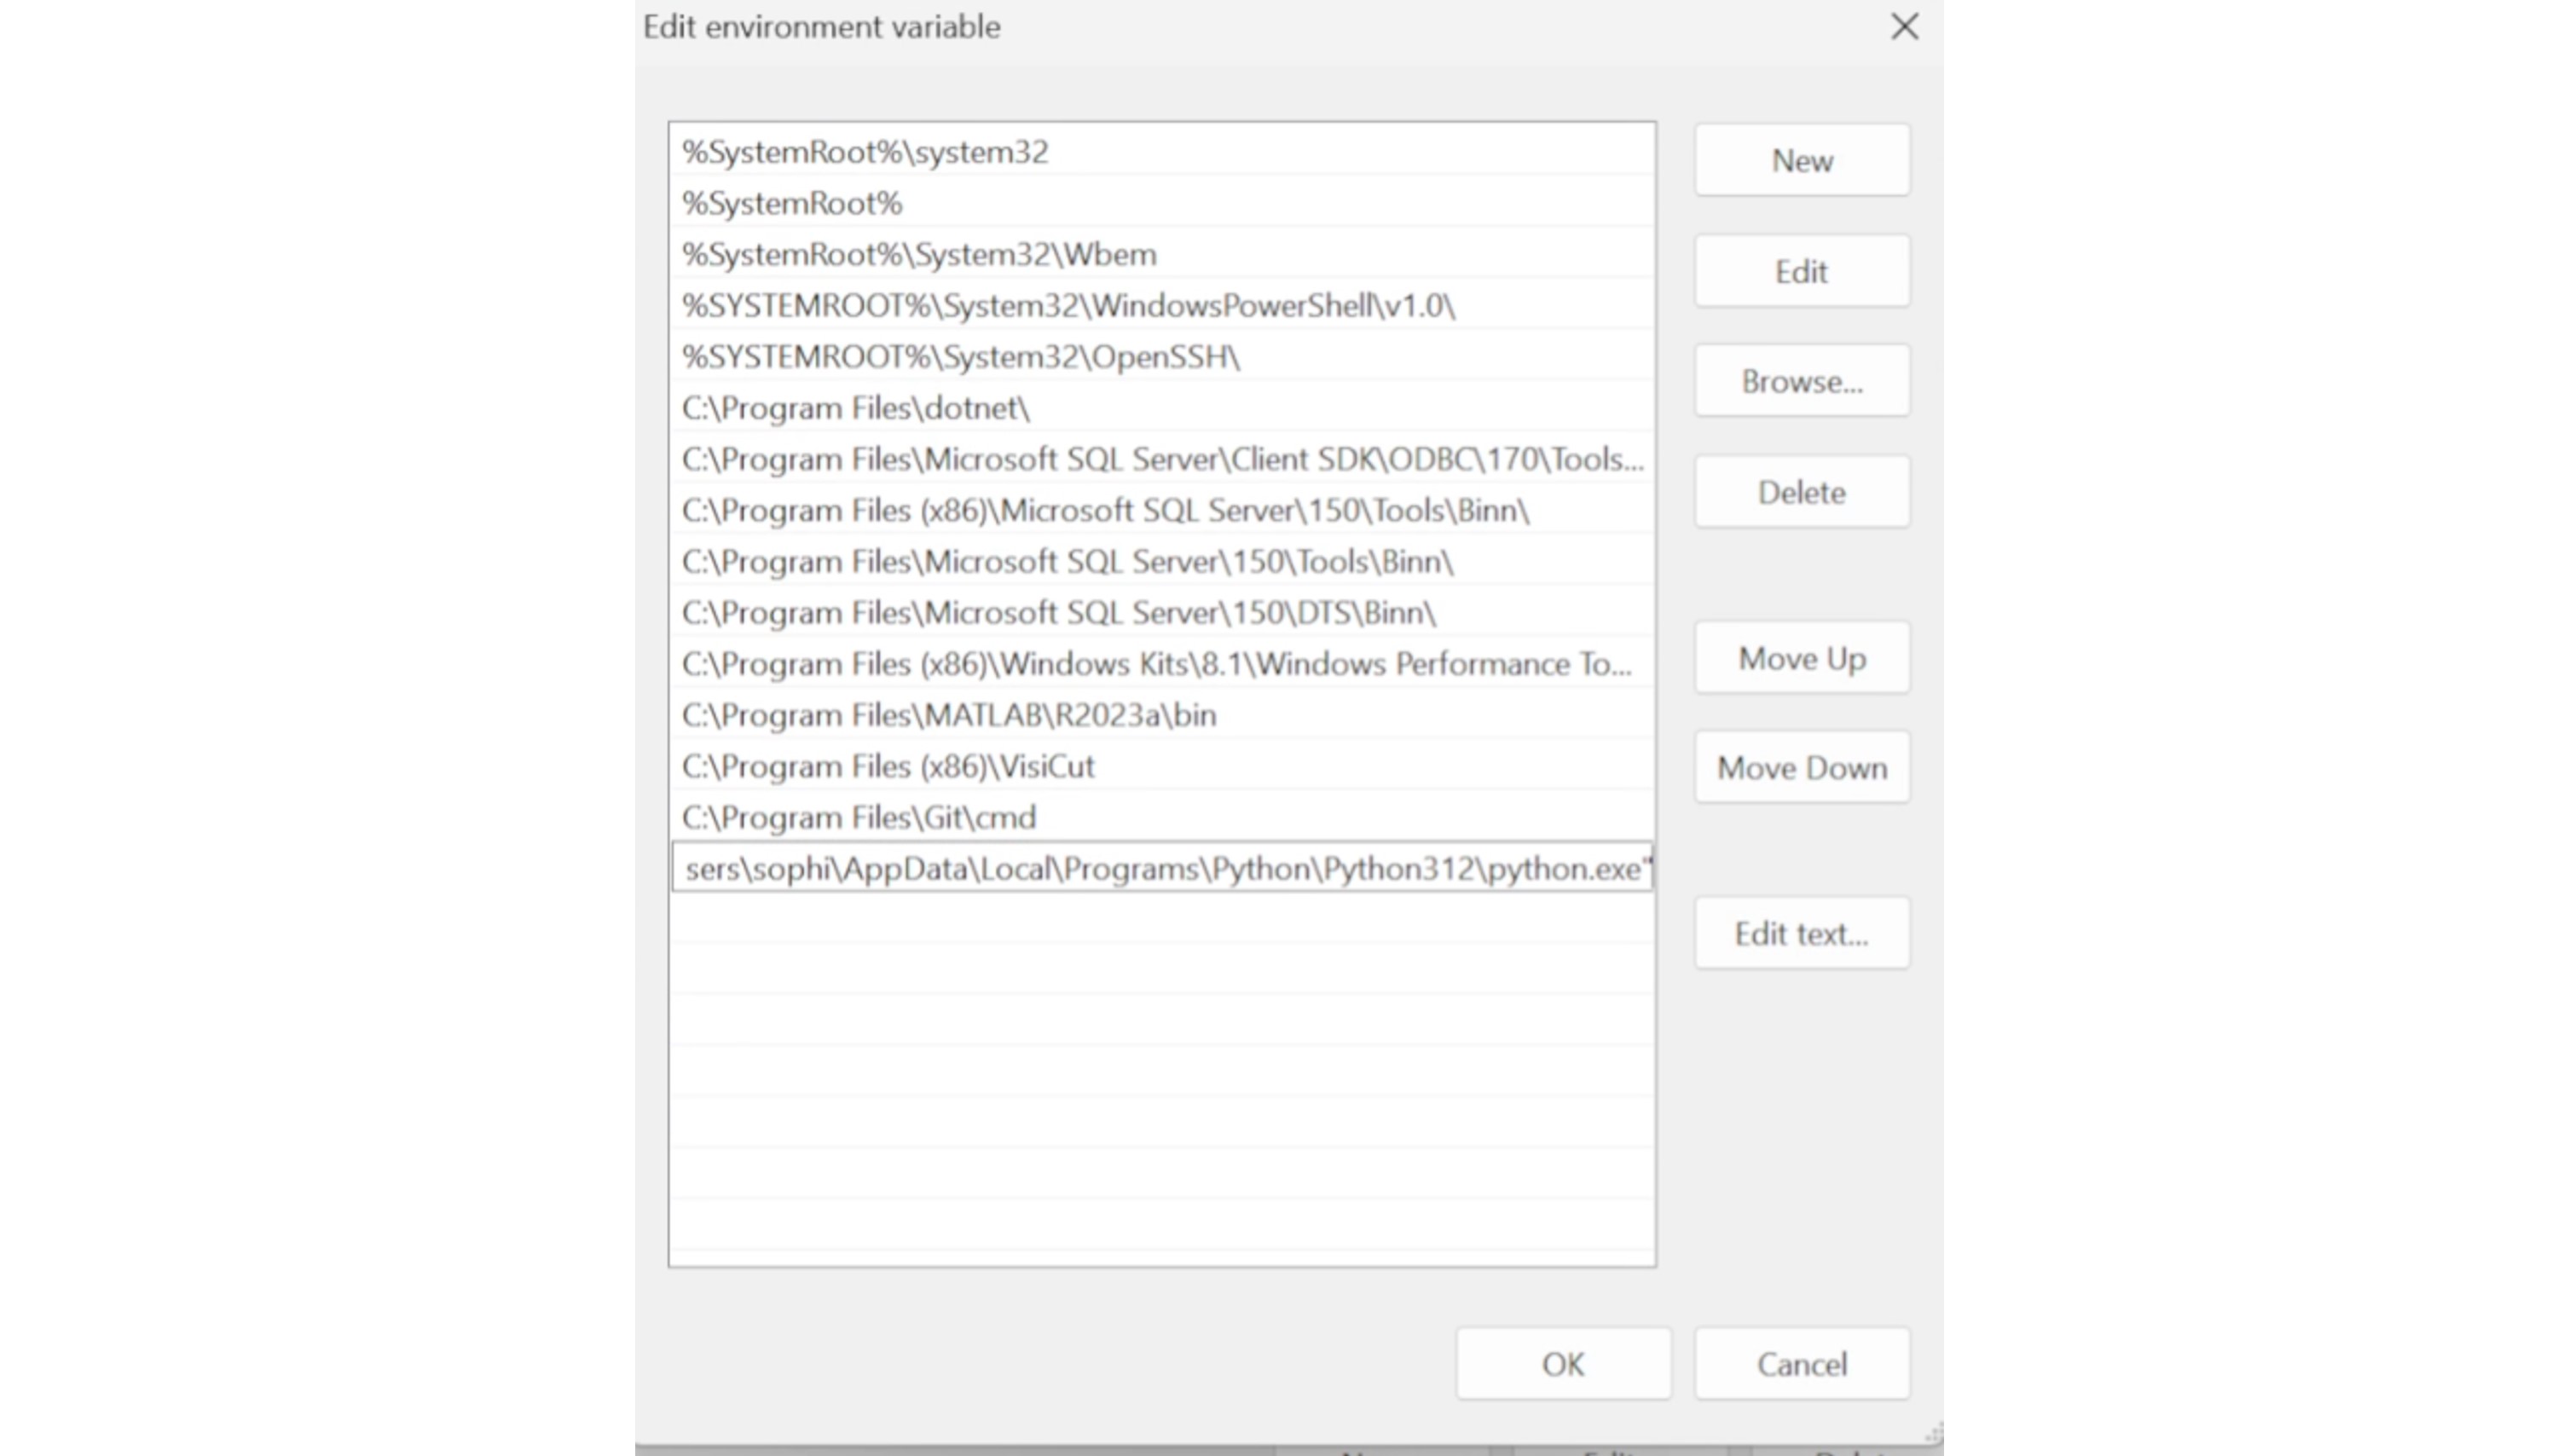
Paste the file path to the new Path and click on "OK" to save the settings.
After creating the right path, the next step is to start python in VsCode. Therefore, some extensions are useful to install in VSCode.

The Python extension from "Microsoft" is essencial for getting python code to work in VSCode.

Python Extension Pack from "Don Jayamanne".

Python Debugger form "Microsoft".

Python Environment Manager from "Don Jayamanne".
Sometimes (Like in my case) there can be still problems with the Path for python programming.

Follow these steps to get rid of the error:
- Press "Ctrl+Shift+P" for opening the editor commands
- Search for Python: Select Interpreter and click on "enter interpreter path..." and enter the source of the path you were entering in the Adavanced system settings.
- Press "Ctrl+Shift+P" for opening the editor command
- Search for "Python: Create Environment" and Click on and click on "Venv"
The next error occurred was when trying to install a new library. I opened a python terminal to enter:
pip install pyserial
Unfortunately, I got the error:

this could have still be an error in the path, but I am not enterily sure. The solution is to use this command:
python -m pip install pyserial
Thereafter, I was able to install any library and run the code I wanted.
Creating a GUI
The next step is creating a simple GUI. My plan is to start the GUI needed for my final project. In this instance I created a GUI, to move the stepper motor up and down to be able to clamp in and fit in the artificial muscles for the tests. The requirement including:
- Buttons to move the fixture up and down by moving the stepper motor
- Be able to set the z-leveling with a button
- To press ok to keep the exact position
- Select the right port and also update ports for serial communication
Start a GUI in Python
Initially, it is essential to under stand the basic function for creating a GUI in Python. I used the tkinter library to create the GUI.
First, I started to create a simple window.
import tkinter as tk

window = tk.Tk()
greeting = tk.Label(text="Hello, Tkinter")
greeting.pack()
window.mainloop()
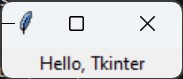
This small window is generated by the code
window = tk.Tk(): This line creates the main window of the GUI application. It initializes an instance of the Tk class, which represents the main window.greeting = tk.Label(text="Hello, Tkinter"): This line creates a label widget (an area used to display text or images) with the text "Hello, Tkinter". The Label class is used for this purpose, and text is a parameter specifying the text to display.-
greeting.pack(): This line packs the label widget into the main window. Packing a widget essentially means placing it within the window and arranging it according to a default or specified layout. -
window.mainloop(): This line starts the Tkinter event loop, which listens for events such as button clicks, keypresses, etc. It's essentially the main loop of the GUI application, responsible for keeping the window open and responsive to user interactions until the user closes the window.
Include Buttons
The next step was to include some buttons + events when the buttons are clicked.
import tkinter as tk

class NumberSelector:
	def __init__(self, master):
		self.master = master
		self.number = 0

		self.label = tk.Label(master, text="Current Number: 0")
		self.label.pack()

		self.up_button = tk.Button(master, text="Up", command=self.increment)
		self.up_button.pack()

		self.down_button = tk.Button(master, text="Down", command=self.decrement)
		self.down_button.pack()

		self.ok_button = tk.Button(master, text="OK", command=self.okay)
		self.ok_button.pack()

	def update_label(self):
		self.label.config(text="Current Number: {}".format(self.number))

	def increment(self):
		self.number += 1
		self.update_label()

	def decrement(self):
		self.number -= 1
		self.update_label()

	def okay(self):
		print("Selected number:", self.number)
		# Add your logic here for what to do when OK is clicked

def main():
	root = tk.Tk()
	root.title("Number Selector")
	app = NumberSelector(root)
	root.mainloop()

if __name__ == "__main__":
	main()
-
class NumberSelector:: This defines a new class called NumberSelector. This class will serve as a blueprint for creating number selection widgets. -
def __init__(self, master):: This is the constructor method of the NumberSelector class. It initializes new instances of the class. -
self.master = master: This line stores a reference to the master (main) window passed as an argument to the constructor. -
self.number = 0: This initializes an attribute number to 0, representing the current selected number. -
self.label = tk.Label(master, text="Current Number: 0"): This creates a label widget displaying the current number. -
self.label.pack(): This packs the label widget into the master window, making it visible. -
self.up_button = tk.Button(master, text="Up", command=self.increment): This creates a button labeled "Up" that, when clicked, calls the increment method. -
self.down_button = tk.Button(master, text="Down", command=self.decrement): This creates a button labeled "Down" that, when clicked, calls the decrement method. -
self.ok_button = tk.Button(master, text="OK", command=self.okay): This creates a button labeled "OK" that, when clicked, calls the okay method. -
def update_label(self):: This method updates the label to display the current number. -
self.label.config(text="Current Number: {}".format(self.number)): This updates the text of the label with the current number. -
def increment(self):: This method increments the current number by 1 and updates the label. -
def decrement(self):: This method decrements the current number by 1 and updates the label. -
def okay(self):: This method is called when the "OK" button is clicked. It prints the selected number to the console and can be extended with additional logic. -
def main():: This is the main function of the program. -
root = tk.Tk():This creates the main Tkinter window. -
root.title("Number Selector"): This sets the title of the main window. -
app = NumberSelector(root): This creates an instance of the NumberSelector class, passing the main window as the master. -
root.mainloop(): This starts the Tkinter event loop, allowing the GUI to handle user interactions and events. -
if __name__ == "__main__": main(): This line ensures that the main function is executed only if the script is run directly, not if it's imported as a module into another script.
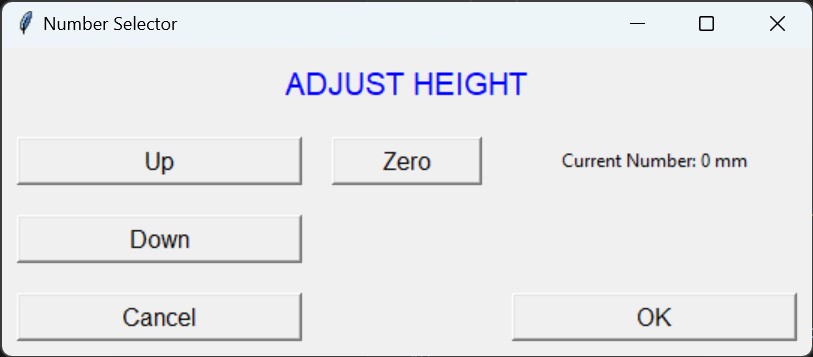
Create a Grid
In the next step I organized my Buttons and Labels in a grid to create a better overview and additionally included the button for leveling and cancel. Additionally, I played a little bit with the style options of tkinter.
import tkinter as tk


class NumberSelector:
	def __init__(self, master):
		self.master = master
		self.number = 0
		font_style = ('Arial', 16)  # Font family and size
		font_style_Buttons = ('Arial', 12)  # Font family and size

		self.title = tk.Label(master, text="ADJUST HEIGHT", font=font_style, fg="blue")
		self.title.grid(row=1, column=1, columnspan=3, padx=10, pady=10)

		self.zero_button = tk.Button(master, text="Zero", command=self.zero, font=font_style_Buttons, fg="black", width=10)
		self.zero_button.grid(row=2, column=2, padx=10, pady=10)

		self.label = tk.Label(master, text="Current Number: 0 mm")
		self.label.grid(row=2, column=3, padx=10, pady=10)

		self.up_button = tk.Button(master, text="Up", command=self.increment, font=font_style_Buttons, fg="black", width=20)
		self.up_button.grid(row=2, column=1, padx=10, pady=10)

		self.down_button = tk.Button(master, text="Down", command=self.decrement, font=font_style_Buttons, fg="black", width=20)
		self.down_button.grid(row=3, column=1, padx=10, pady=10)

		self.cancel_button = tk.Button(master, text="Cancel", command=self.okay, font=font_style_Buttons, fg="black", width=20)
		self.cancel_button.grid(row=4, column=1, padx=10, pady=10)

		self.ok_button = tk.Button(master, text="OK", command=self.okay, font=font_style_Buttons, fg="black", width=20)
		self.ok_button.grid(row=4, column=3, padx=10, pady=10)

	def update_label(self):
		self.label.config(text="Current Number: {} mm".format(self.number))

	def increment(self):
		self.number += 1
		self.update_label()

	def decrement(self):
		self.number -= 1
		self.update_label()

	def okay(self):
		print("Selected number:", self.number)
		# Add your logic here for what to do when OK is clicked

	def zero(self):
		self.label.config(text="Current Number: 0 mm")


def main():
	root = tk.Tk()
	root.title("Number Selector")
	app = NumberSelector(root)
	root.mainloop()

if __name__ == "__main__":
	main()
- Grid-Based Layout: Widgets are arranged based on the row and column positions specified in the grid method calls. Widgets are placed in cells, and cells are automatically resized to fit the largest widget in the row or column.
- Assigning Widgets to Grid Positions: When you create a widget using grid, you specify the row and column where you want the widget to appear. For example, widget.grid(row=1, column=2) will place the widget in the second column of the first row.
- Spanning Cells: You can make a widget span multiple rows or columns using the rowspan and columnspan parameters. For example, widget.grid(row=1, column=1, columnspan=2) will make the widget span two columns starting from the first column of the first row.
- Padding: Padding can be added around each cell using the padx and pady parameters. For example, widget.grid(row=1, column=1, padx=5, pady=5) will add 5 pixels of padding on the left and top sides of the cell.
Serial Communication with the Program
Program for the Board
To start the serial communication I programmed the board. This Arduino code is meant to control a stepper motor using serial input commands 'w' (for forward) and 's' (for backward).
#define stepPin 1
#define dirPin 2
#define enablePin 3


const int stepsPerRevolution = 200;  // change this to fit the number of steps per revolution of your motor
String incomingState;

void setup() {
	Serial.begin(9600);  // initialize serial communication at 9600 baud
	pinMode(stepPin, OUTPUT);
	pinMode(dirPin, OUTPUT);
	pinMode(enablePin, OUTPUT);
	digitalWrite(enablePin, LOW); // Enable the stepper motor
}

void loop() {
	while (Serial.available()) {
	delay(3);  //delay to allow buffer to fill
	if (Serial.available() > 0) {
		char c = Serial.read();  //gets one byte from serial buffer
		incomingState += c; //makes the string readString

	}
	}
	if (incomingState != ""){
		if (incomingState == "w") {
		digitalWrite(dirPin, HIGH); // Set direction to move forward
		stepMotor(); // Step the motor
	} else if (incomingState == "s") {
		digitalWrite(dirPin, LOW); // Set direction to move backward
		stepMotor(); // Step the motor
	} else {
		if (incomingState != " " && incomingState != "\r") {
		Serial.print("Unknown message '");
		Serial.print(incomingState);
		Serial.println("'. Use 'w' or 's' to control direction.");
		}
	}
	incomingState="";

}


	}


void stepMotor() {
	for(int x = 0;x < 200*4 ; x++){
	digitalWrite(stepPin, HIGH);
	delayMicroseconds(100); // Adjust this delay as needed
	digitalWrite(stepPin, LOW);
	delay(5); // Adjust this delay as needed
}}
- Variable Declarations: stepPin, dirPin, and enablePin are defined to specify the pins connected to the stepper motor for step, direction, and enable signals respectively. stepsPerRevolution is set to 200, indicating the number of steps per revolution of the stepper motor.
- Setup Function: Serial.begin(9600): Initializes serial communication with a baud rate of 9600. Pin modes are set for stepPin, dirPin, and enablePin using pinMode() function. enablePin is set to LOW to enable the stepper motor.
- Loop Function: It continuously checks for incoming serial data using Serial.available() in a loop. When serial data is available, it reads the incoming characters and stores them in the string variable incomingState. It then checks the value of incomingState: If it's 'w', it sets the direction pin (dirPin) high for forward motion and calls the stepMotor() function. If it's 's', it sets the direction pin (dirPin) low for backward motion and calls the stepMotor() function. If it's neither 'w' nor 's', it prints an error message indicating an unknown command. After processing the incoming command, it clears the incomingState variable to prepare for the next command.
- stepMotor Function: This function is responsible for stepping the motor. It iterates 200*4 times (for 4 complete revolutions of the stepper motor). In each iteration, it sets the stepPin high, waits for a short duration (delayMicroseconds(100)), then sets the stepPin low, and waits again for another short duration (delay(5)).
Program in Python
To enable serial communication the serial library is needed. Additionally the computer has to search for connective ports and with the refresh button the port can be updated.
import serial
from serial.tools.list_ports import comports
ser = serial.Serial(port=None, baudrate=9600)

...

self.port_label = tk.CTkLabel(master, text="Select Port:", font=font_style )
self.port_label.grid(row=2, column=1, padx=10, pady=10)

# Get available COM ports
self.available_ports = [port.device for port in comports()]
if not self.available_ports:
	self.available_ports = ["No COM Port Available"]
self.selected_port = tk.StringVar(self.master)
self.selected_port.set(self.available_ports[0])  # Set default port

self.refresh_button = tk.CTkButton(master, text="Refresh", command=self.refresh_ports, fg_color="#9A6AC8")
self.refresh_button.grid(row=2, column=3, padx=10, pady=10)

self.port_menu = tk.CTkOptionMenu(master, variable = self.selected_port, values = self.available_ports,command = connectToBoard, font=font_style)
self.port_menu.configure(font=font_style_Buttons, fg_color="#9A6AC8")
self.port_menu.grid(row=2, column=2, padx=10, pady=10)

...

def refresh_ports(self):

print("Before refresh - selected port:", self.selected_port.get())
print("Before refresh - available ports:", self.available_ports)
self.available_ports = [port.device for port in comports()]
if not self.available_ports:
	self.available_ports = ["No COM Port Available"]
self.port_menu.configure(variable=self.selected_port, values=self.available_ports)  # refreshes list
print("After refresh - selected port:", self.selected_port.get())
print("After refresh - available ports:", self.available_ports)

def connectToBoard(port):
ser.port = port
ser.close()
ser.open()
ser.flush()

...
- Import Statements: import serial: Imports the serial module, which provides access to serial ports. from serial.tools.list_ports import comports: Imports the comports function from the list_ports module within the serial.tools package. This function is used to list all available COM ports.
- Serial Port Initialization: ser = serial.Serial(port=None, baudrate=9600): Initializes a Serial object named ser. The port parameter is set to None initially, and the baudrate is set to 9600.
- GUI Setup: Various Tkinter widgets (labels, buttons, option menu) are created and positioned using the grid layout manager. These widgets are used to display information about available COM ports, select a port, and refresh the list of available ports.
- Refresh Ports Function (refresh_ports): This function is called when the "Refresh" button is clicked. It retrieves a list of available COM ports using the comports() function and updates the available_ports list. If no COM ports are available, it sets the available_ports list to ["No COM Port Available"]. It updates the options in the port menu (port_menu) to reflect the new list of available ports. Prints the selected port and available ports before and after refreshing for debugging purposes.
- Connect to Board Function (connectToBoard): This function is called when a COM port is selected from the port menu. It takes the selected port as an argument. It sets the port attribute of the ser object to the selected port. It closes the serial connection (ser.close()) if it's already open. It opens the serial connection (ser.open()). It flushes the input and output buffers (ser.flush()).
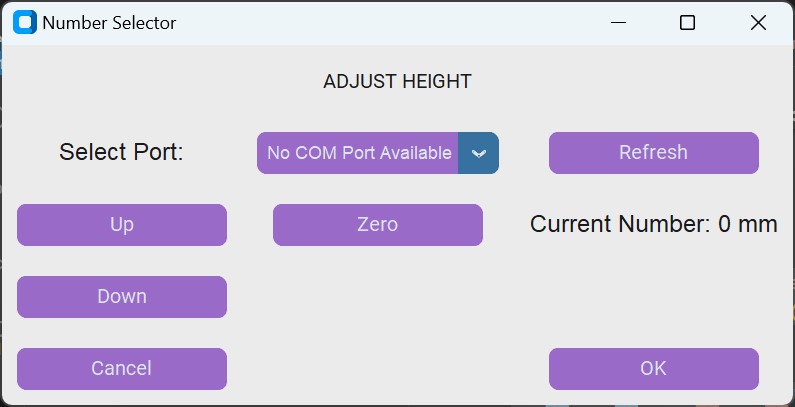
Adjustment with CustomTkinkter
For a better astetics of the GUI I used CustomTkinter as a replacement for Tkinter. The onnly difference are the names of the functions (e.g. Button = CTkButton).
import customtkinter as tk
import serial
from serial.tools.list_ports import comports
ser = serial.Serial(port=None, baudrate=9600)

class NumberSelector:
	def __init__(self, master):
		self.master = master
		self.number = 0
		font_style = ('Arial', 16)  # Font family and size
		font_style_Buttons = ('Arial', 12)  # Font family and size

		self.title = tk.CTkLabel(master, text="ADJUST HEIGHT")
		self.title.grid(row=1, column=1, columnspan=3, padx=10, pady=10)

		self.port_label = tk.CTkLabel(master, text="Select Port:", font=font_style )
		self.port_label.grid(row=2, column=1, padx=10, pady=10)


		self.available_ports = [port.device for port in comports()]
		if not self.available_ports:
			self.available_ports = ["No COM Port Available"]
		self.selected_port = tk.StringVar(self.master)
		self.selected_port.set(self.available_ports[0])  # Set default port

		self.refresh_button = tk.CTkButton(master, text="Refresh", command=self.refresh_ports, fg_color="#9A6AC8")
		self.refresh_button.grid(row=2, column=3, padx=10, pady=10)

		self.port_menu = tk.CTkOptionMenu(master, variable = self.selected_port, values = self.available_ports,command = connectToBoard, font=font_style)
		self.port_menu.configure(font=font_style_Buttons, fg_color="#9A6AC8")
		self.port_menu.grid(row=2, column=2, padx=10, pady=10)

		self.zero_button = tk.CTkButton(master, text="Zero", command=self.zero, fg_color="#9A6AC8")
		self.zero_button.grid(row=3, column=2, padx=10, pady=10)

		self.label = tk.CTkLabel(master, text="Current Number: 0 mm",font=font_style)
		self.label.grid(row=3, column=3, padx=10, pady=10)

		self.up_button = tk.CTkButton(master, text="Up", command=self.increment, fg_color="#9A6AC8")
		self.up_button.grid(row=3, column=1, padx=10, pady=10)

		self.down_button = tk.CTkButton(master, text="Down", command=self.decrement, fg_color="#9A6AC8")
		self.down_button.grid(row=4, column=1, padx=10, pady=10)

		self.cancel_button = tk.CTkButton(master, text="Cancel", command=self.cancel, fg_color="#9A6AC8")
		self.cancel_button.grid(row=5, column=1, padx=10, pady=10)

		self.ok_button = tk.CTkButton(master, text="OK", command=self.okay, fg_color="#9A6AC8")
		self.ok_button.grid(row=5, column=3, padx=10, pady=10)

	def update_label(self):
		self.label.configure(text="Current Number: {} mm".format(self.number))

	def increment(self):
		self.number += 1
		self.update_label()
		ser.close()
		ser.open()
		ser.write(str.encode("w"))

	def decrement(self):
		self.number -= 1
		self.update_label()
		ser.close()
		ser.open()
		ser.write(str.encode("s"))

	def okay(self):
		selected_port = self.selected_port.get()
		print("Selected COM Port:", selected_port)
		# Add your logic here for what to do when OK is clicked

	def zero(self):
		self.number = 0
		self.update_label()

	def cancel(self):
			self.master.destroy()  # Close the window

	def refresh_ports(self):

		print("Before refresh - selected port:", self.selected_port.get())
		print("Before refresh - available ports:", self.available_ports)
		self.available_ports = [port.device for port in comports()]
		if not self.available_ports:
			self.available_ports = ["No COM Port Available"]
		self.port_menu.configure(variable=self.selected_port, values=self.available_ports)  # refreshes list
		print("After refresh - selected port:", self.selected_port.get())
		print("After refresh - available ports:", self.available_ports)

def connectToBoard(port):
	ser.port = port
	ser.close()
	ser.open()
	ser.flush()

def main():
	root = tk.CTk()
	root.title("Number Selector")
	app = NumberSelector(root)
	root.mainloop()

if __name__ == "__main__":
	main()
Finished Program connected with Board
Evaluation
Group Assignment
In the group assignment we compared different tool options. We compared Flutter, MIT App Inventor, Processing, And Python. (see here)
MIT App Inventor is tailored for Android app creation, offering a user-friendly interface suitable for beginners. It facilitates app development through a visual, drag-and-drop approach, eliminating the need for extensive coding knowledge.
In contrast, Processing, built on a simplified version of Java, targets creative coding and visual arts projects. It excels in generating graphics, animations, and interactive media, making it popular among artists and designers for digital art and interactive installations.
Python, a highly versatile programming language, boasts numerous GUI toolkits for building desktop applications. It is widely utilized across various domains, including web development, data science, and automation. Python's flexibility and extensive libraries make it suitable for both novice programmers and seasoned professionals seeking robust and scalable solutions.
Flutter, developed by Google, stands out as a cross-platform framework for modern app development. It allows developers to create native-quality applications for multiple platforms, including Android, iOS, web, and desktop, using a single codebase. Flutter accelerates development with features like hot reload, ensuring rapid iteration and efficient UI design. Its focus on performance and aesthetics makes it a preferred choice for creating visually appealing and responsive applications.
Individual Assignment
I utilized Python to create a graphical user interface (GUI) for controlling a stepper motor connected to an Arduino board. The GUI allows users to adjust the height of a fixture and perform other related tasks such as setting z-leveling and selecting communication ports.
Overall, the week was successful in achieving its objectives:- The GUI provides a user-friendly interface for controlling the stepper motor and performing other actions. Buttons are clearly labeled, and the layout is organized for easy navigation.
- The GUI effectively communicates with the Arduino board via serial communication, allowing users to send commands to control the stepper motor. The inclusion of features like port selection and refreshing enhances the functionality of the application.
- The program includes error handling mechanisms, such as printing messages for unknown commands and handling situations where no COM ports are available.
- The use of CustomTkinter library allowed for customization of the GUI's appearance, enhancing its aesthetic appeal and user experience.
- The program can be easily extended to include additional features or functionalities as needed. For example, it could be modified to control multiple stepper motors or integrate with other hardware components.
In conclusion, the Python GUI for controlling the stepper motor is a versatile and effective tool for its intended purpose. With its user-friendly interface and robust functionality, it serves as a valuable asset for projects requiring precise motor control and automation.