Project Management - Principles and Practices
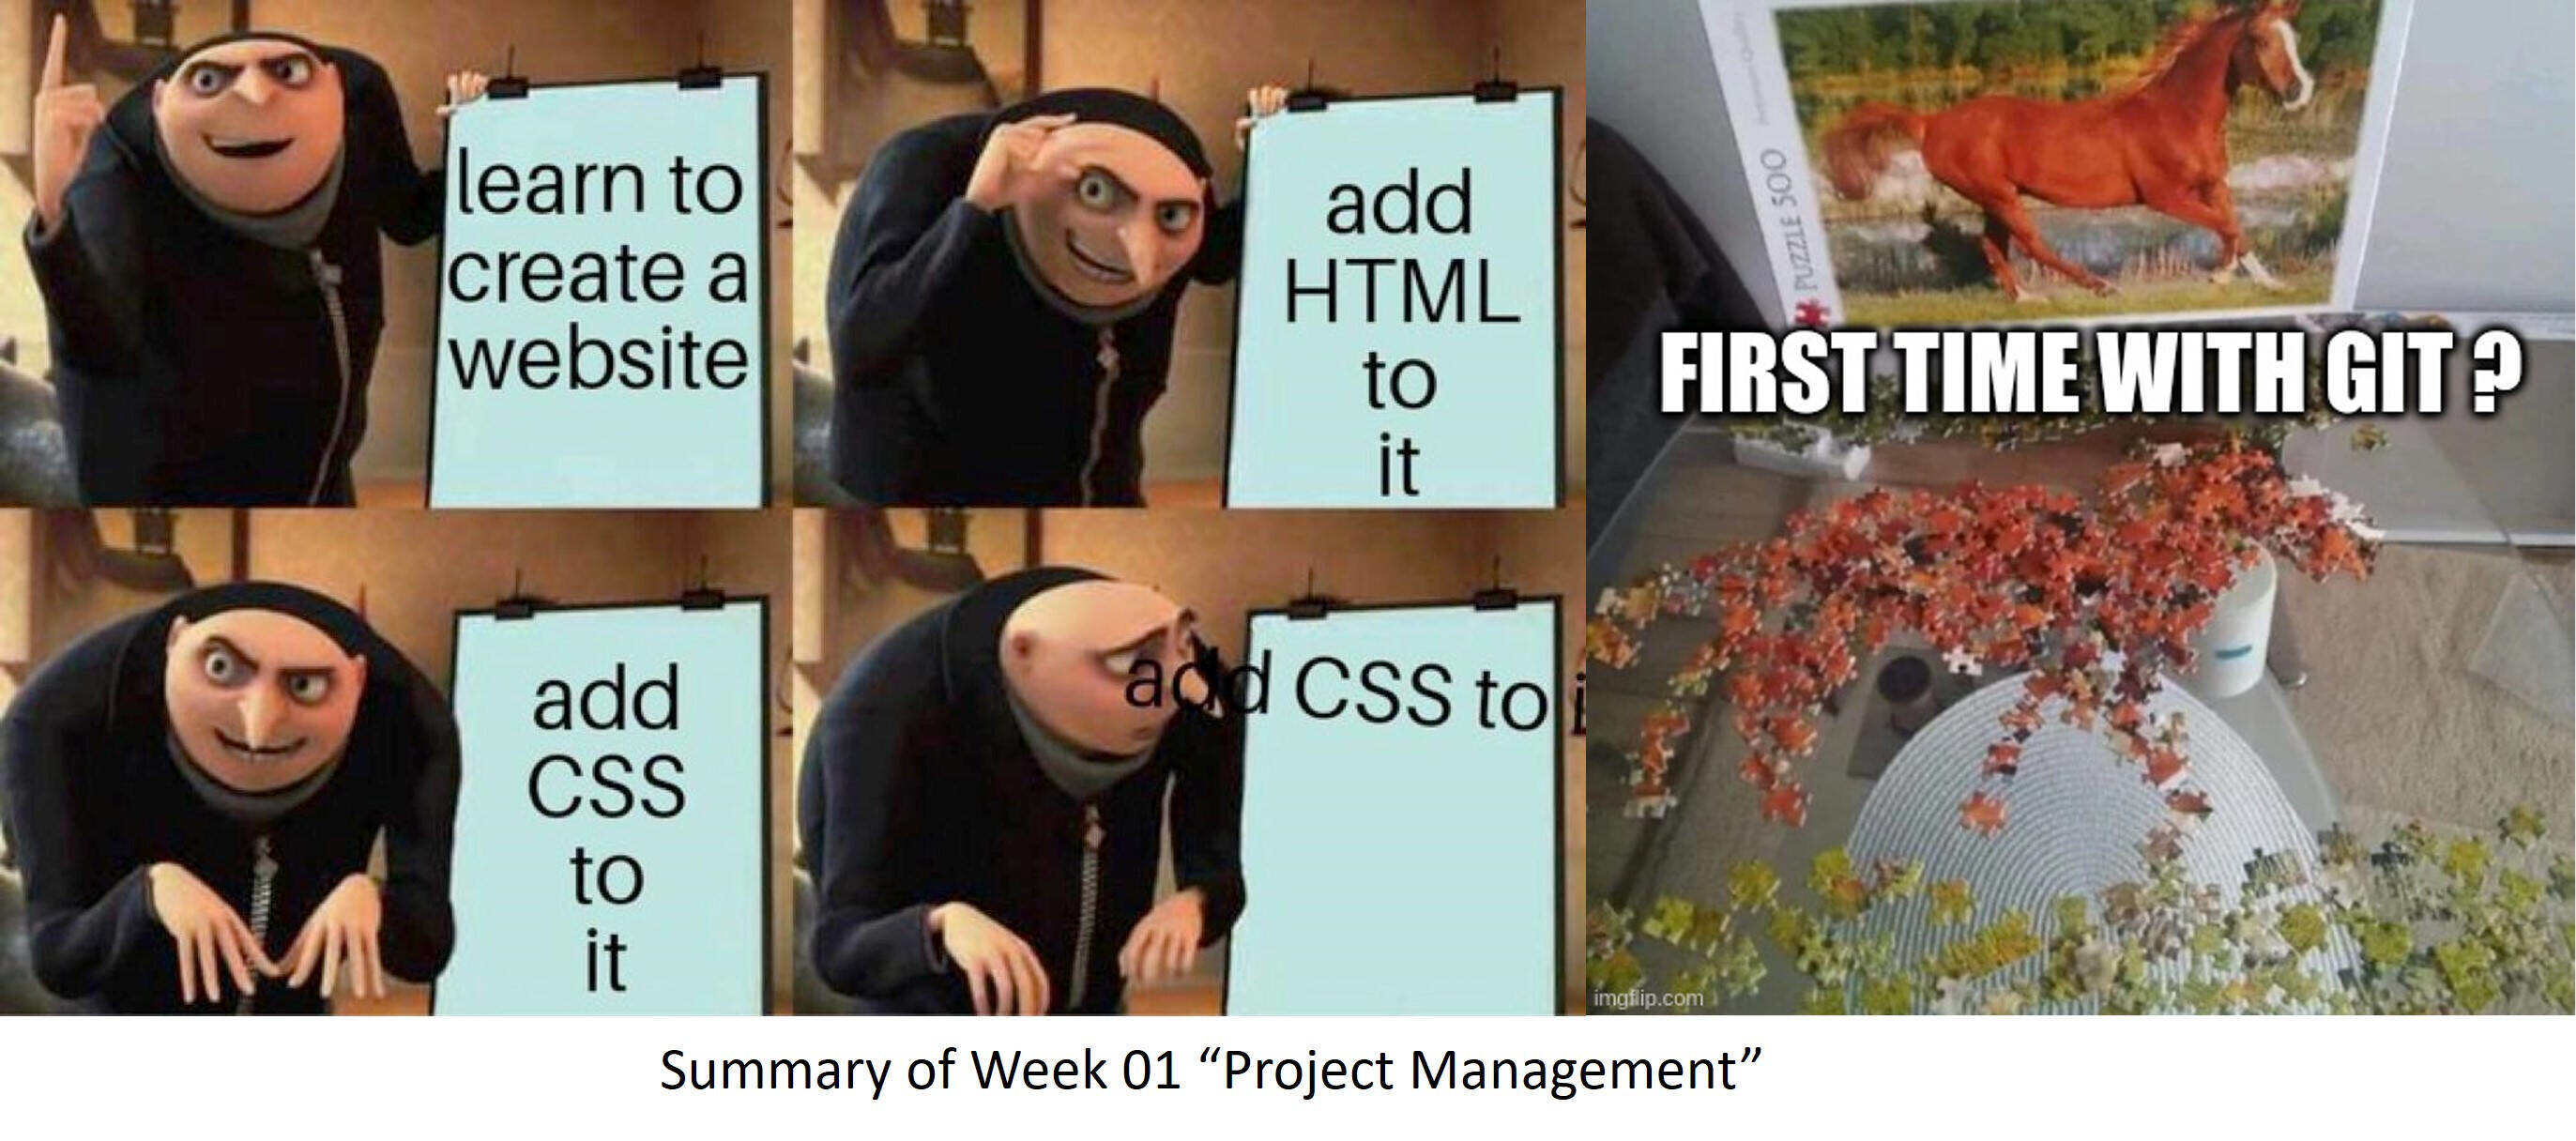
Finally first week of Fabacademy! Before the start of Fabacademy I have been following the student's boot camp, which opened interesting perspectives on Fabacademy from the former graduates and gave a good introduction on what to expect from Fabacademy. I am excited for the experience but also a little bit terrified. In this week, we learned the importance of time and project management, tools to archive a good management, as well as the value of good and comprehensible documentation. Additionally, git as a version control system for documentation and projects was introduced.
Assignments
- Work through a git tutorial
- Build your own website and document the process of your work
- Introduce yourself in the About Me webpage
- Sketch and plan a final project
Git and GitLab
Git was always a struggle of mine. I have never really become friends with it even though I have used it for three times now, I am still not very confortable to
use it. To change that and understand it better I watched a video tutorial (see here), which helped a lot and I understand the purpose and the function better, but I still have
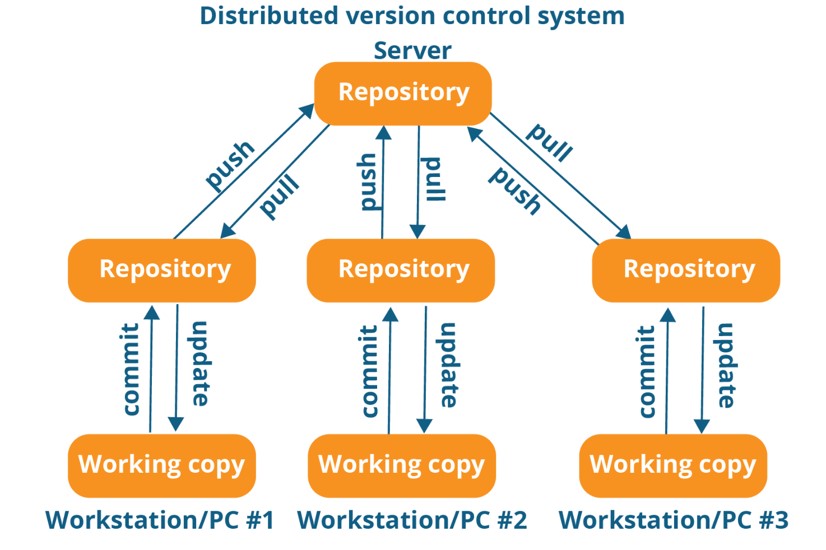
to learn so many things. Git is a distributed version control system and enables collaborating on project and keeping track of changes made to the source code.
git config --global user.name "SopfiDino"
git config --global user.email "sophia-doering@web.de"
ssh-keygen -t rsa -C "sophia-doering@web.de"
cat ~/.ssh/id_rsa.pub
After that the git repository needed to be cloned. Therefore, it is necessary to go to the correct directory (To go to the right directory put it in to the "your directory").
cd "your directory"
git clone "your HTTPS"
git add *
git commit "Add My Website"
git push
In the second week I did something really dumb: I exceeded the data for my git repository with a GIMP-file with large history and a Fusion file with the same problem (both were zip compressed). To be able to push something again I needed the help from my local instructor: he helped me to reset my git repository with going back to my last valid and working commit:
git reset --soft HEAD^
git status
My Website
I've made significant strides in establishing my Fabacademy documentation website. Opting for
Visual Studio Code as my
code editor was a natural choice due to its versatility and helpful addons across various coding environments,
including HTML and CSS.
To kickstart the website, I chose the Phantom template from HTML5UP
for its sleek HTML5 and CSS design.

	nav {
		text-align: center;
		position: -webkit-sticky;
		position: sticky;
		top: 0;
		padding: 1em 0em 1em 0;
		background: #ffffff;
		z-index: 9999;
		border-bottom: solid 1px #ccc;
	}

...

	nav ul li.logolink a {
		background-image: url("..\images\logo.svg");
		background-size: cover;
		background-repeat: no-repeat;
		width: 50px;
		height: 50px;
		font-weight: 700;
		max-width: 100%;
	}
...
	.container {
		display: flex;
		text-align: left;


	}

	.sidebar-left,
	.sidebar-right {
		width: 300px;
    	flex-shrink: 0;
		height: 100%;
		position: sticky;
		top: 0em;
		bottom: 0em;
		background-color: #8e92ef!important;
		padding: 10px;

	}
	.sidebar-content {
		background-color: #8e92ef !important;

		height: 100%;
	}


	.sidebar-left {
		left: 0;
		flex-direction: column;
		align-items: center;
		text-align: center;
		padding-top: -40em;

	}


	.sidebar-left .header.logolink {
	 background-image: url(logo.svg) !important;
	 background-size: cover;
	 display: flex;
	 background-position: center;
	 background-repeat: no-repeat;
	 height: 400px;
	 align-items: center;
	 margin-top: 20px;
	}

	.sidebar-right {
		right: 0;
		padding-top: 2em;

	}

	.contenttext {
		flex: 1;
		padding: 20px;
		text-align: left;
		background-color: #ffffff;
		margin-bottom: 10em;
		margin-top: 1em;

	}
...
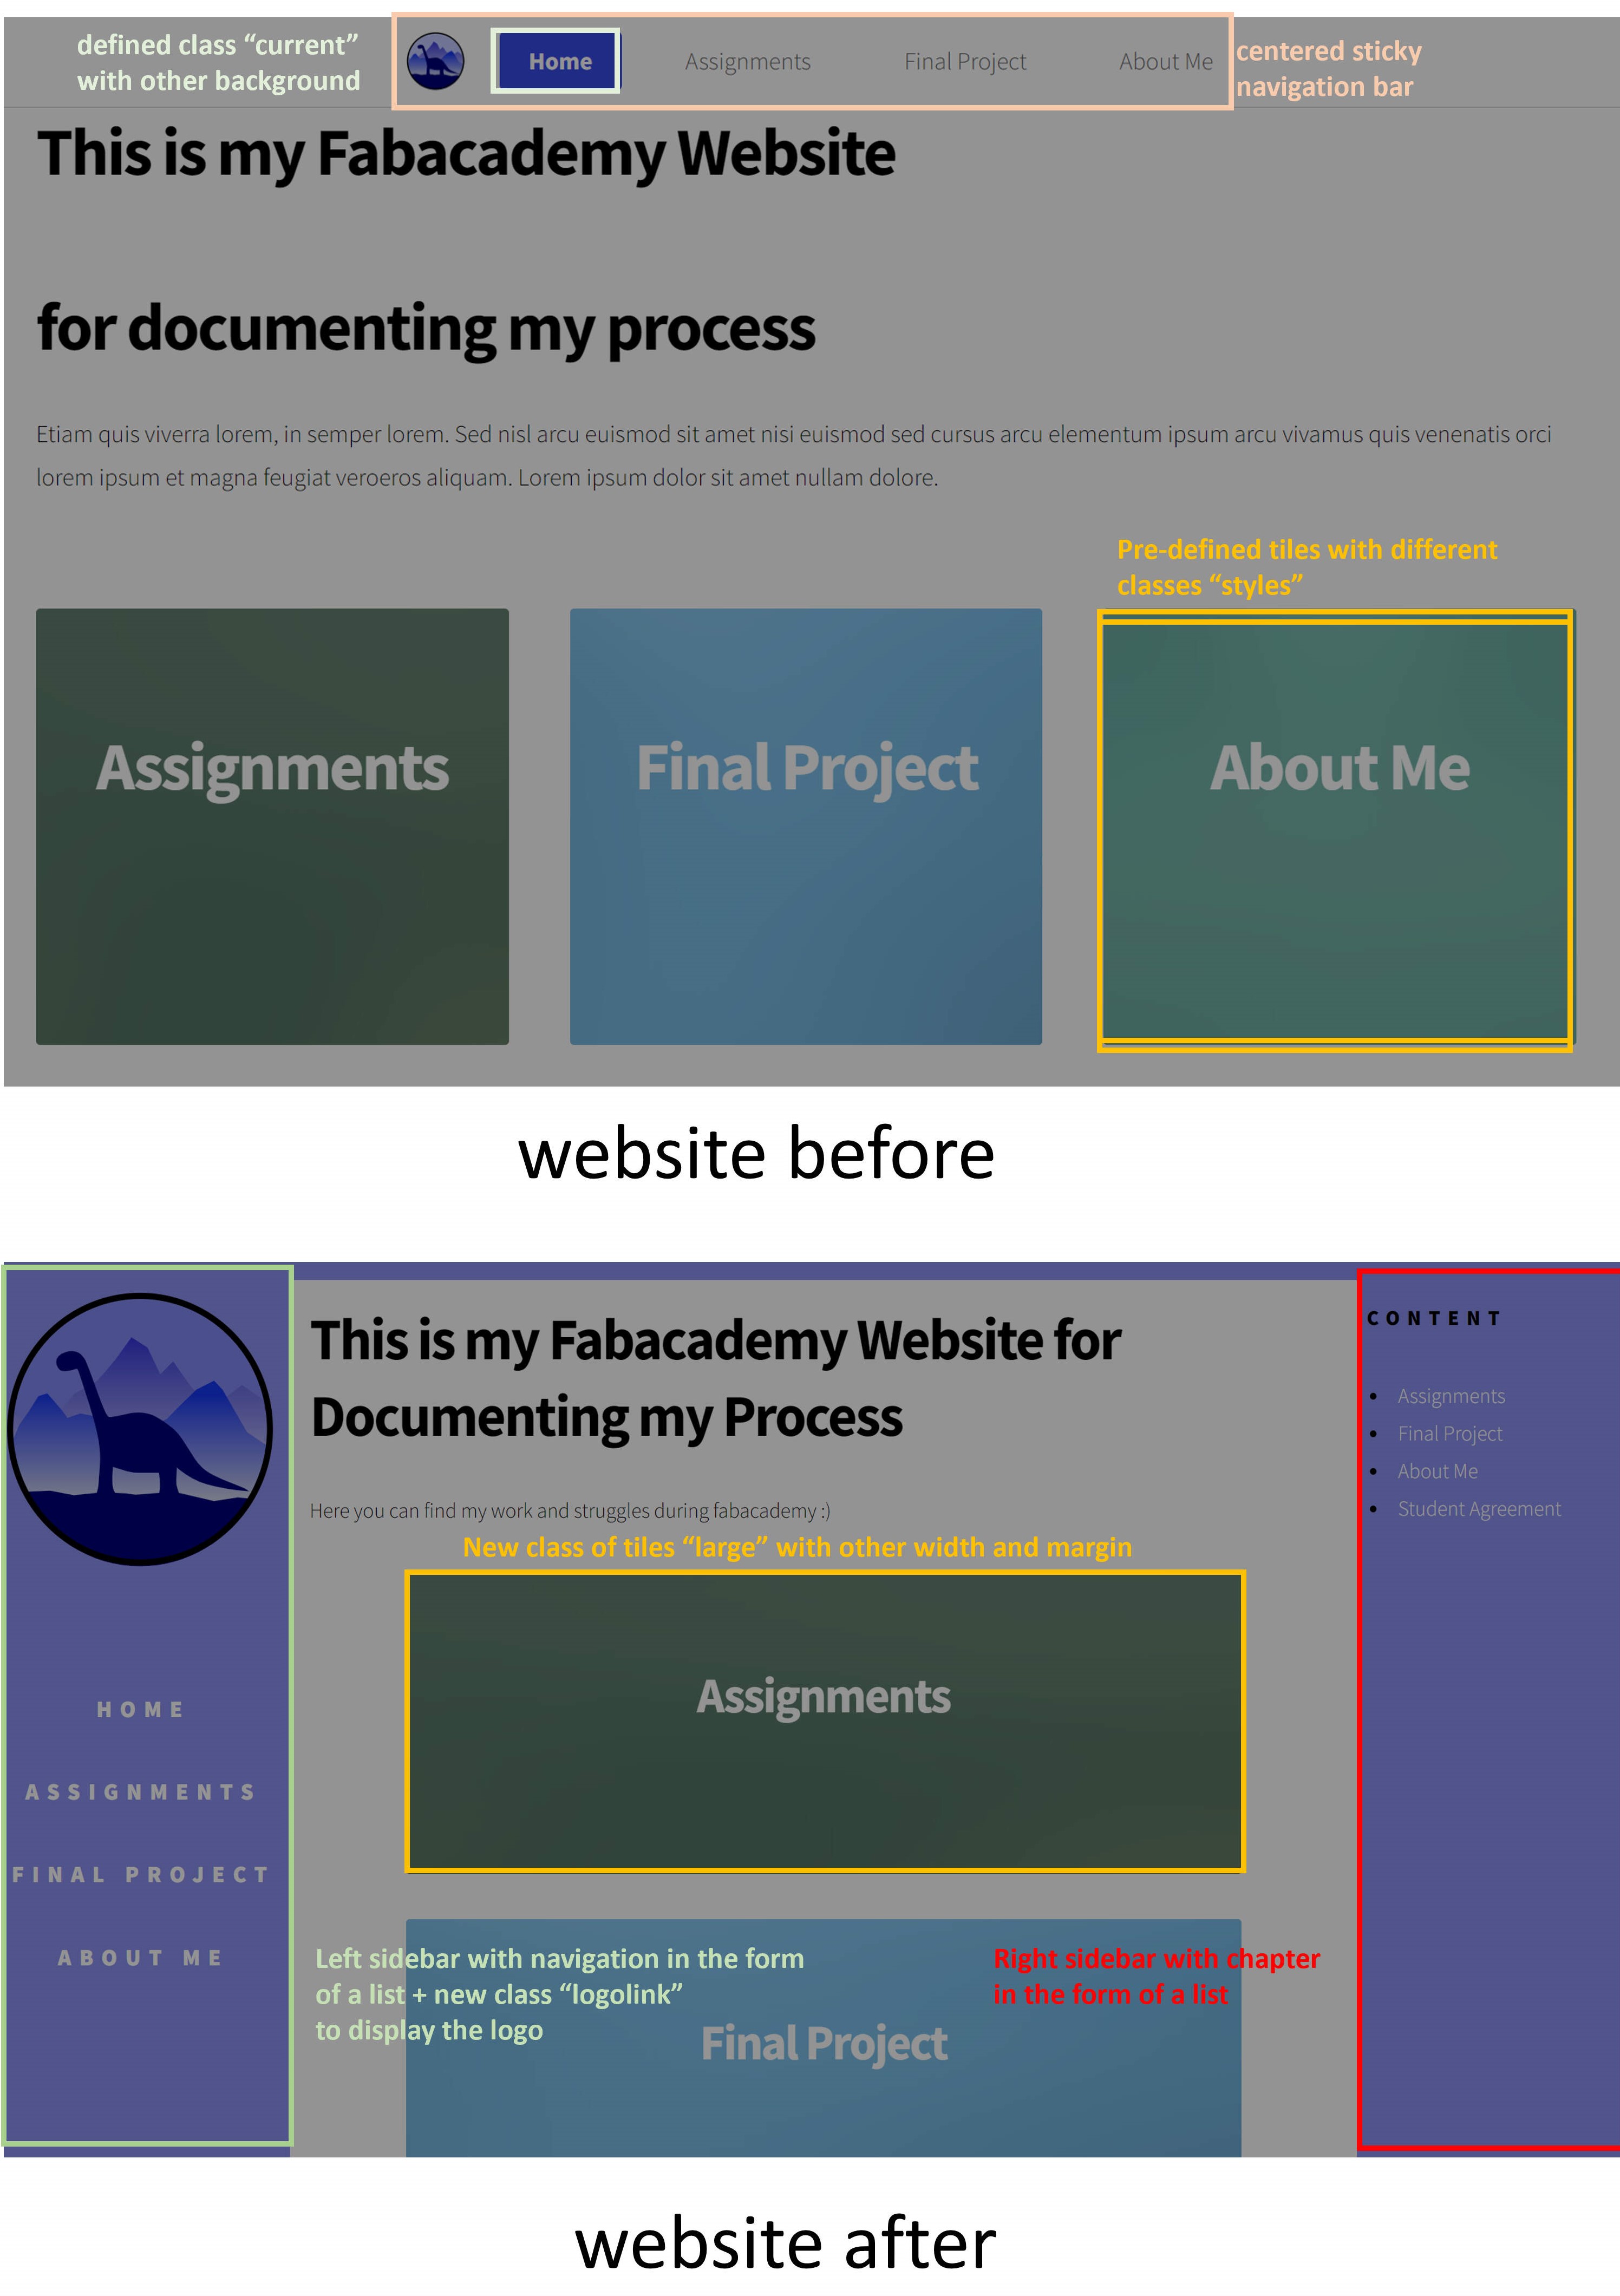
As there where some definition issues with "content" as class nme I changed it to "contenttext", as the class was already defined in the CSS code provided b HTML5Up. Furthermore, I revamped the footer by removing social media icons and the contact bar, replacing them with copyright claims and my name for design attribution. I also included the footer in the container, as the footer seemed to hover in the center of the website otherwise. Despite initially using a design from HTML5Up, I believe the alterations have transformed it uniquely.
To ensure optimal user experience, I meticulously checked the design's responsiveness
on both phones and tablets using the Chrome addon, Mobile Simulator. I fine-tuned the CSS code
to enhance the layout for smaller screens, prioritizing a seamless display on various devices. In this image you can see a rough description
of changed design parts in the css and how they are displayed on my website:
For the logo, I turned to Inkscape, leveraging its powerful features to merge my love for Brontosaurus dinosaurs and mountains into a design. Although I didn't document the design process this time, I've now incorporated OBS Studio into my toolkit to capture and share future design sessions. This enhancement ensures a more thorough documentation of my creative processes. For designing the logo used these steps:
- Using the "Circle" tool (press E) for the outer circle
- creating the Dinosaur and the mountains with the "Draw Bezier Curves" tool (press B) and customize the knots (double click on the object)
- colorize the objects with the "Fill and Stroke" bar
Image Compression
So far, not one of my images had a file size over 10 kB, but to be safe and for the future, I tried to compress my images further with Gimp and the addon Bimp. This compression tool was also used by my fellow Fabacademy participant Bianca Guimaraes and she recommended it. Gimp itself is an open source image processing tool such as Inkscape. For using the addon follow these steps:
- Go to "File" and click "Batch image manipulation"
- Click on "Add image" and choose your image folder
- Choose the correct output folder
- Add a Manipulation set by clicking on the plus sign
- Choose "Change format and compression"
- Choose "The file format ".jpeg" and Quality to 70
- Apply
First Ideas for the Final Project
I had several Ideas for my Final Project:
- Material Testing for Artificial Muscles (See here)
- Gelatine Printer for creating Artificial Muscles in different shapes (See here)
- A PLA filament recycler or PET-Bottle to filament recycler
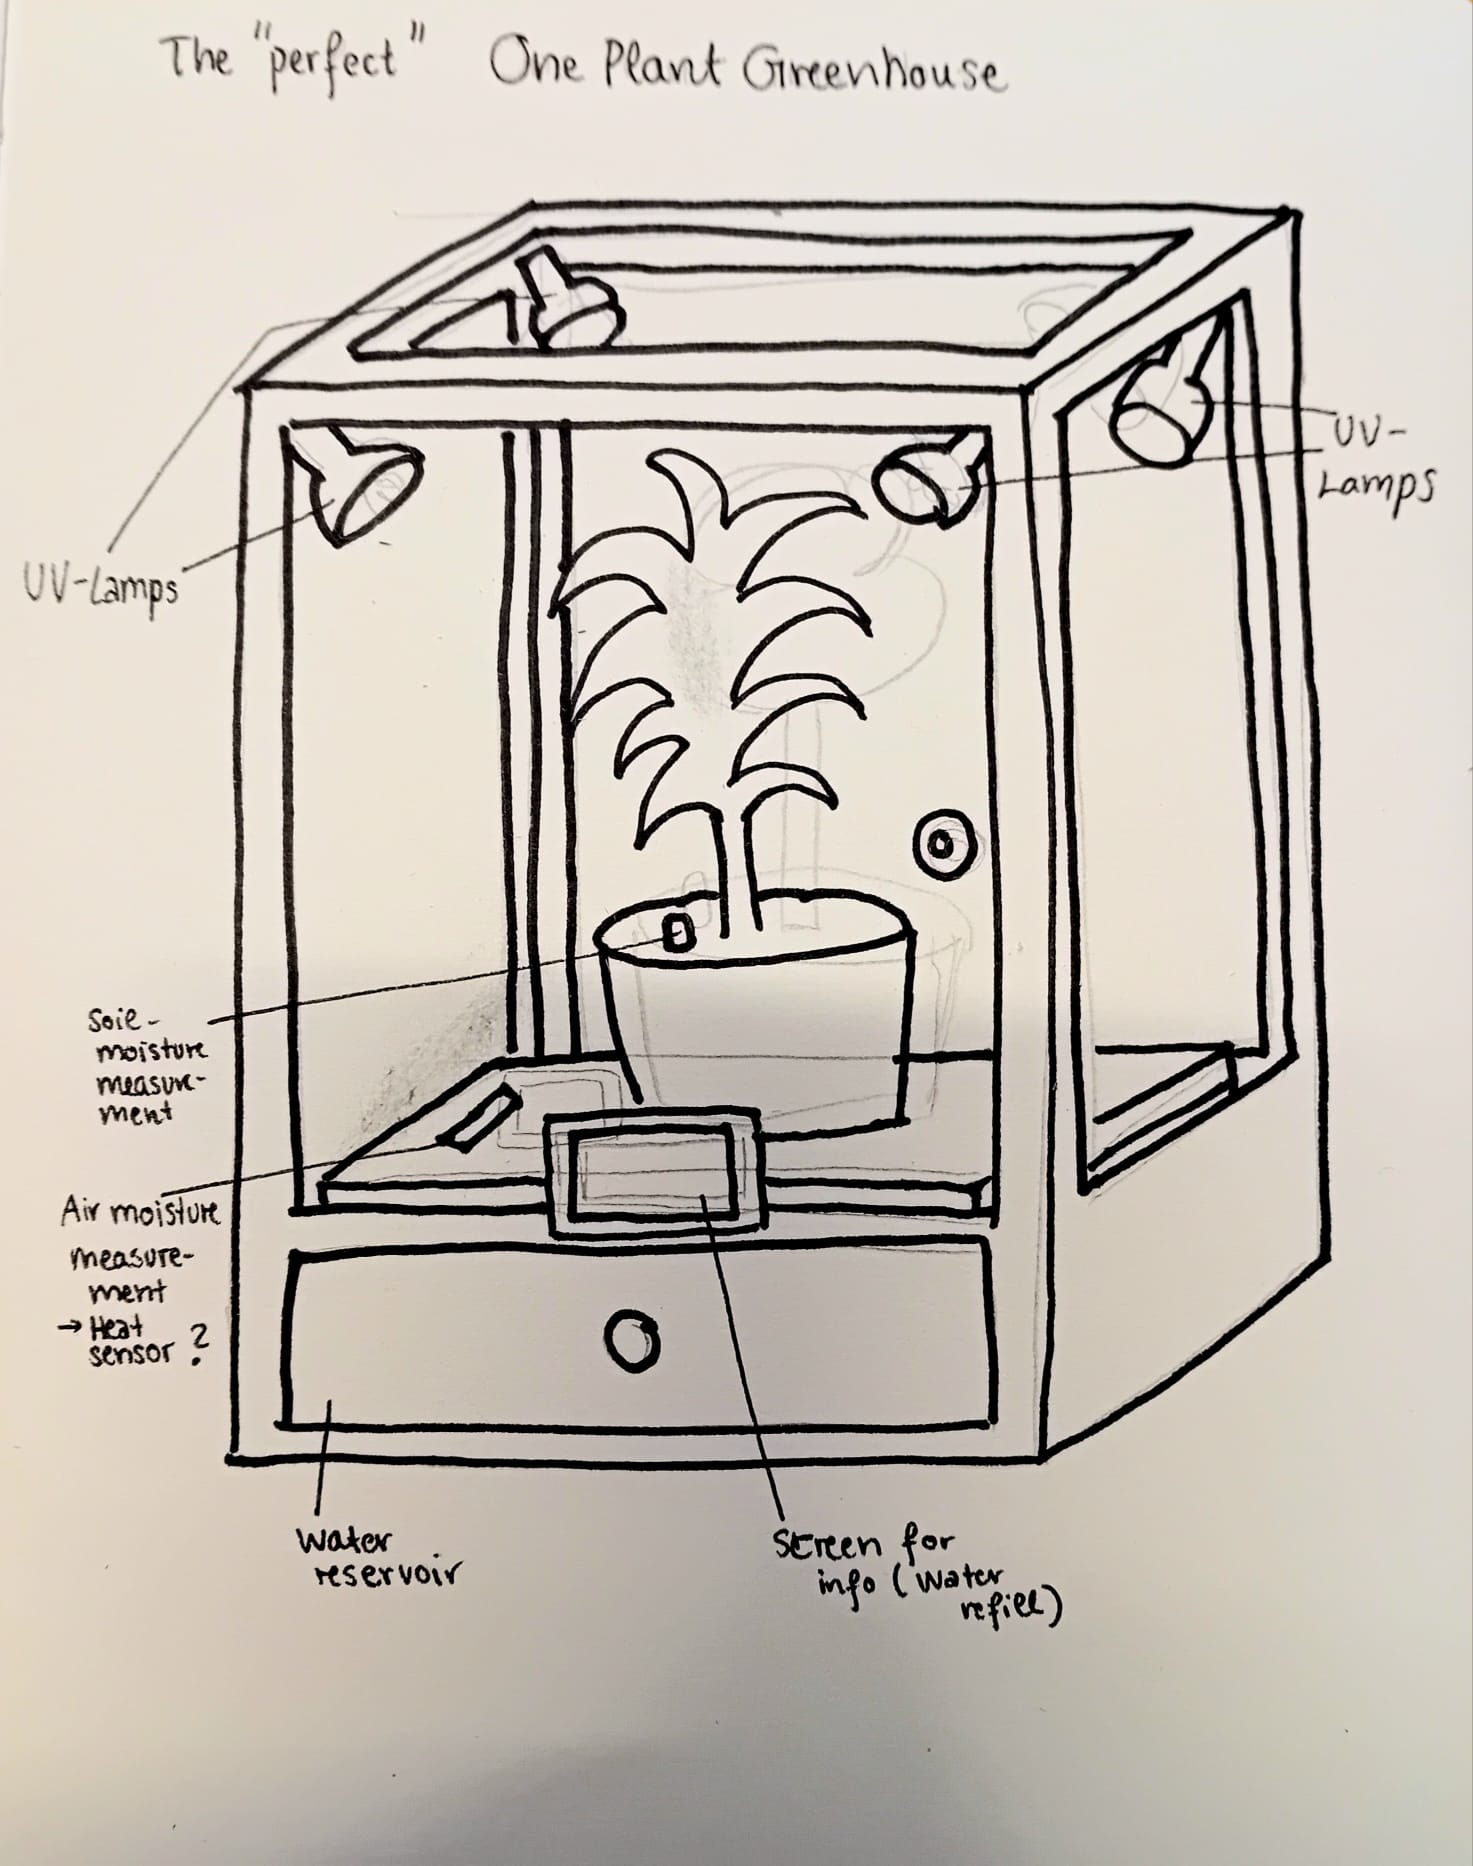
- A "perfect" environment for a plant (automated greenhouse)
So I started my first design of the "perfect" One Plant Greenhouse. The height should be at least fittable for a 1.5 m plant The perfect environment for the plant should be monitored by moisture and maybe a heat sensor. To provide water resource a reservoir should be beneath the plant. A pump should take out water when needed and a sensor should notice when water is needed. The reservoir should be big enough to be able to leave the plant alone for a least 2 months. Additionally, UV-lamps would be installed on the "ceiling" of the box for increasing the growth rate. As a feedback for the user a screen in the front should show the well being of the plant and the amount of water in the reservoir. It would be nice to find a way to measure stress or problems for the plant like nutrition, pH-level, and pests. Which in my opinion, would be a nice addon, but probably not possible in the 20 week time frame.
Changes
After reviewing several final project videos and exploring Fabacademy resources related to greenhouse and growing environments for plants, I noticed a recurring theme of similar projects already being undertaken. In my pursuit to create something innovative and unique, I decided to revisit the idea of using recycled filament from bottles. I discussed the feasibility of this concept with my instructor, who gave the green light. To better prepare for the project and gain a comprehensive understanding of its requirements, I delved into YouTube videos showcasing individuals constructing and presenting their versions of similar projects. With this knowledge, I initiated the design and planning phase of my project. I searched for similar project in the final projects of past Fabacademy participants and found a similar project from Abhinav Grag from 2018 where he planned to create a filament feeder with PET Bottles, but changed it into a Filament PLA recycler. It would have been interesting, to have any information about the reasons af the project change but they are not provided in his documentation website.
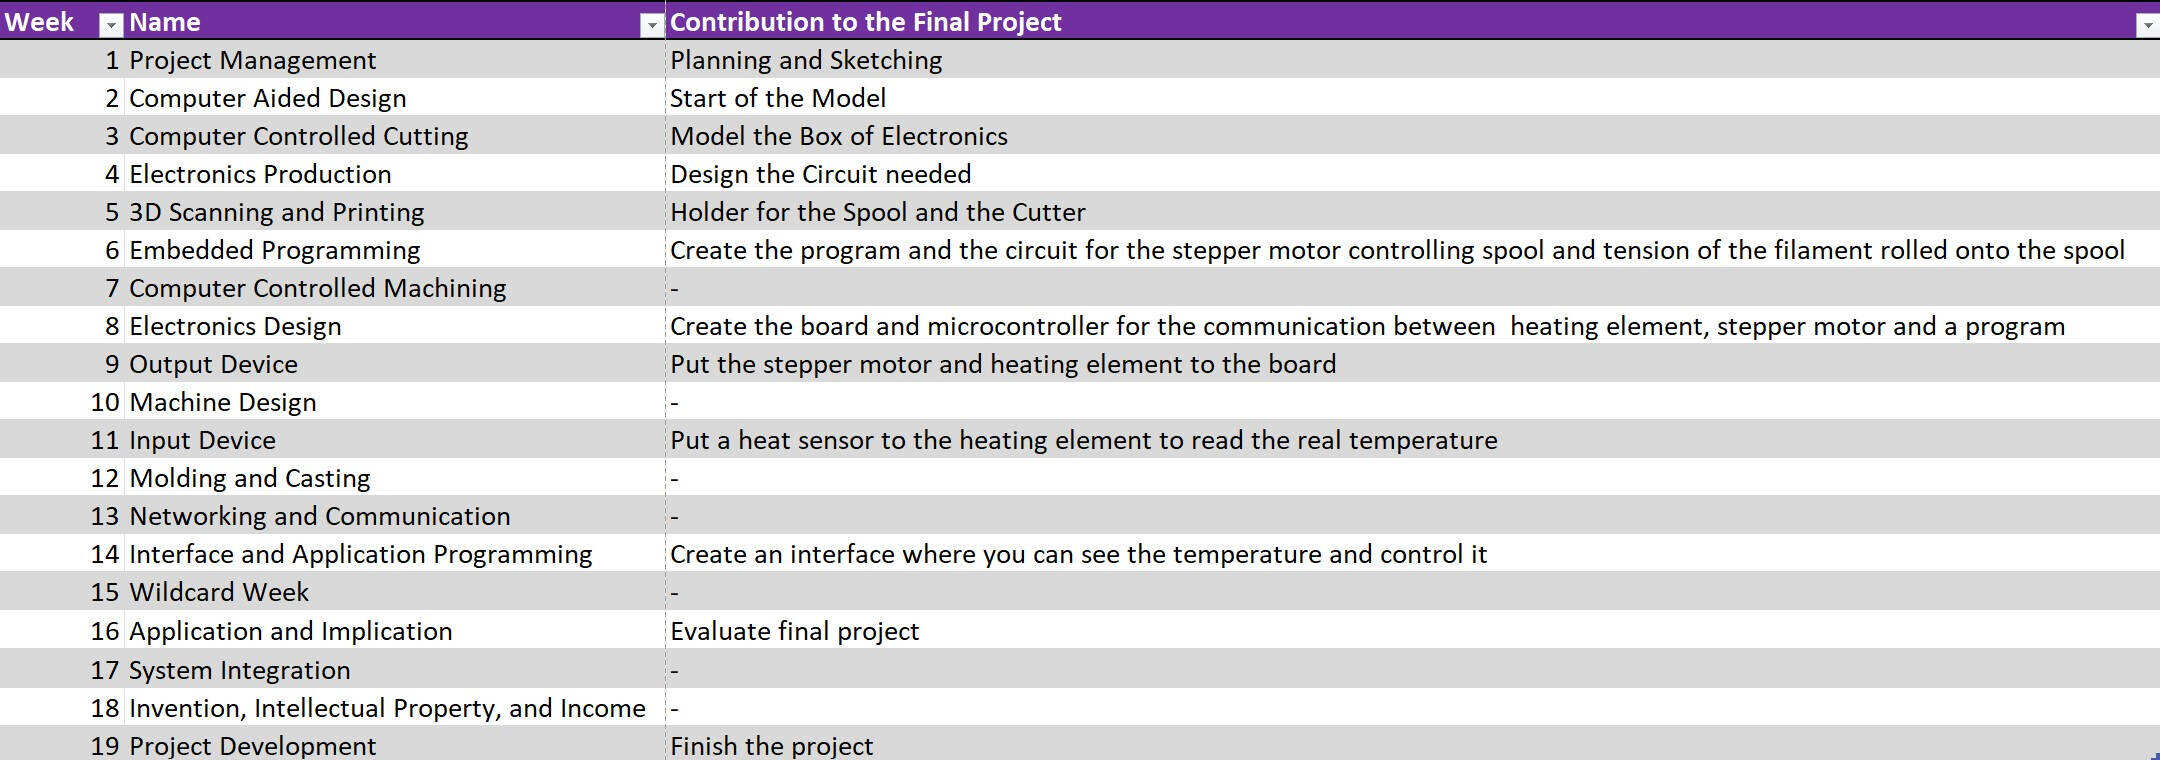
The first sketch of the final project includes the main components needed for the realization.
 The project can be separated in three parts:
- The cutting of the bottle in a long stripe
- The heating of the pet stripe and reshaping into a 1.75 mm filament
- The spooling of the filament onto an old 3D Printer filament spool
Changes 2.0? Seriously?
After a discussion with a friend, I've identified several issues with my second choice for a final project. The main issue I realized was, that it is not necessary to recycle bottles in this way in Germany, as there is a "Pfandsystem," where plastic bottles are recycled and individuals receive a refund when they return these bottles to designated depots. My somewhat ambitious goal is to create something genuinely useful that extends beyond the scope of the Fab Academy (and I am also a little bit of a perfectionist). I know, some of the people who are reading this just think, screw that just decide for a project an stick with it. But the usefulness of a project is strongly effecting my motivation to do it. However, I also discovered because of the global lecture and the feedback I received, that a comparable project had been executed two years ago in Bhutan during the machine week. While I'm keen on enhancing this initiative, I feel apprehensive about my ability to significantly improve upon it.
Initially, I believed my challenges stemmed from deficiencies in my project management and organizational skills. To address this, I invested time in thoroughly studying a lecture series from the University of Bremen on project management, which let me question my time management... only to realize that the crux of the issue lay in the very first and fundamental step – CHOOSING A PROJECT! (Why am I so stubborn and it took me so long to realize that? Who knows...). So here is my final decision and I will not change it again: The material tester for artificial muscles. The documentation and progress of the material tester is on the webpage Final Project.