3D Scanning and Printing
Scheduling
I started off my week by creating my schedule and trying my best to stick to it 😭

Individual Assignment
My individual assignment for this week was to design and 3D print an object that could not be easily made subtractively. So before I get into my design process, I think it’d be useful to be clear on the difference between subtractive manufacturing, and additive manufacturing.
Additive Manufacturing
Additive manufacturing is basically a process of creating 3D objects by adding layer by layer of a material based on a digital model. This allows for complex geometries and customization.
Subtractive Manufacturing
Subtractive manufacturing involves removing material from a solid block to achieve the desired shape, usually through processes like milling, turning, or grinding. But it can create a lot more waste than the additive manufacturing process.
This picture pretty much sums it it up:

So now that we’ve cleared that, let’s get to designing.
Tinkercad
For this week, I decided to try out something new. So I used Tinkercad to create my design. I already had an account, but if you don’t, you can sign up here.
(Once you’ve made an account, press on “Create”, and then “3D Design” to get to the main sandbox screen.)
I started off by placing a star on the workspace. You can find it on the panel on the right of the screen.

I then changed the amount of vertices that it had, the radius size, and then I set the height to 50mm. This is what it looked like:

After that, I duplicated the star (CTRL+D) and then I changed the material to “hole”. This will make the star hollow once we group the stars together.

I copy and pasted the 2 stars 5 times, and changed the sizes like so:

After that, select the stars that are next to each other, and then click on CTRL+L, this opens the align tool. Then, align the shapes vertically and horizontally by clicking the black circles that are directly under, and next to the stars.

Then, I selected all of the stars, and then aligned them.

Now, I needed to remove the top of the star, so I dragged a block onto the screen, made it a “hole”, and then elevated it 10mm above the XY axis. Then I grouped the 2 components together.


Now that I had my component, I elevated it by 10mm (again), and then duplicated it. After duplicating, I rotated the duplicated component by 190 degrees, and grouped everything together.
 
Here’s a render of the final result.
Printing
After I was done with the designing, I sliced it using PrusaSlicer and tried to print my design, but it didn’t work. The base wouldn’t stick to the print bed, and I didn’t know what to do.
 -This is a simple explanation of the Prusa Slicer UI, and how to set your parameters based on what you’re printing !!!
I tried changing the temperature, but the problem persisted. Then I realized that my design was a bit tilted. So I went back to my design and then I decided to make some other changes. All I did was reduce the amount of star points to 6.
After uploading the file to the printers SD card, I printed it on standard PLA settings, and this is how it came out:
 -hero shot !!!
Why can’t it be made subtractively?
Simply put, this object can’t be made subtractively because there’s material that is required that’s vertically below another part of the design. This means that the end mill physically cannot work on creating that part of the design without also destroying the material above it.
3D Scanning
Polycam
I used Polycam for the 3D scanning parts of this week. If you’d like to follow along, you can download it on the App Store or the Playstore.
I decided to scan the keychain that Ngawang uses for the Fab Lab. The app is very user-friendly and you can definitely navigate your way around the app once you open it.
Here’s a simple user interface of the application that I’m borrowing from Yangtshel.
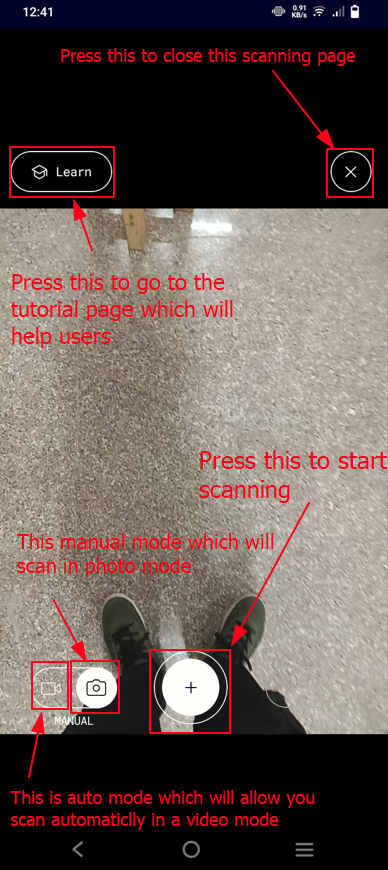
How to scan?
You basically just capture your object from multiple angles, and the software will compile and render them into a 3D model for you.
Here’s a render of my scan.
The Mentioned Files
This website was created using a template provided by Mr. Anith Ghalley and was used with his permission.*