14. Interface and application programming
This week, we discovered interfaces and how to create a visual input and physical output (and the other way around). As i plan on using a servo motor in my final project, i thought it would be an interesting path to explore.
The test i did was very simple: when i hoover over a square on my computer, the servo starts turning. When the mouse is no longer over the square, the servo stops turning.
Software
To create the visuals, it is important to work with serial.
To start, you have to open arduino, make sure that the serial is enables (CDC stuff), and write a code.
Once the code is uploaded to the board, you can open the Processing program.Download it here
Processing is a free tool that is mostly used to create art installations.
With the processing program you can create a "button" that will talk in serial with the board.
Code in arduino:
I realized that the higher the delay, the longer it takes to make the servo stop turning. The reaction time is very slow. So with a low delay, the reaction is faster.
        #include < ESP32Servo.h >

          Servo myservo;      // create servo object to control a servo
          int servoPin = 1;   // pin number for the servo

          void setup() {
            myservo.setPeriodHertz(50); // Set the PWM frequency to 50Hz (standard for servos)
            myservo.attach(servoPin);   // attaches the servo on pin 1 to the servo object
            myservo.write(90);          // set initial position of the servo to 90 degrees
            Serial.begin(9600);         // Start serial communication at 9600 bps
          }

          void loop() {
            if (Serial.available() > 0) {
              char command = Serial.read(); // read command from serial port
              if (command == 'H') { // 'H' indicates mouse is hovering over the square
                turnServoClockwise();
              } else if (command == 'L') { // 'L' indicates mouse is not hovering over the square
                stopServo();
              }
            }
          }

          void turnServoClockwise() {
            for (int angle = 0; angle <= 1; angle++) {
              myservo.write(angle); // move servo to current angle
              delay(5); // delay for smooth motion
            }
          }

          void stopServo() {
            myservo.write(90); // Stop the servo by setting it to the center position
          }
Code in Processing
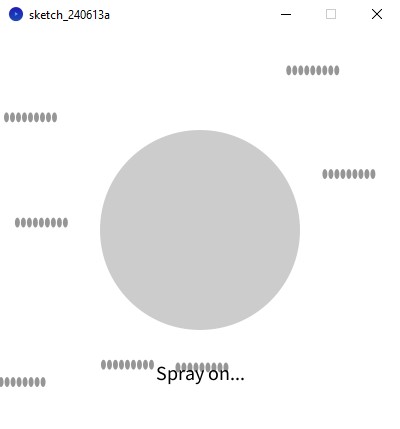
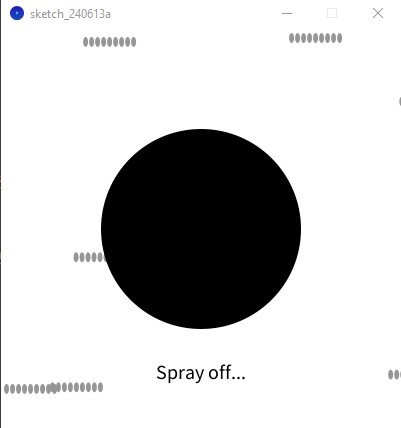
This Processing sketch uses serial communication and interactive elements to create a dynamic visual experience. It includes a central circle that changes color based on mouse interaction—turning light gray when the mouse hovers over it and black otherwise. The sketch also features a moving background of worm-like shapes that animate smoothly across the screen. Each worm's position and speed are randomly initialized in the setup phase, and they wrap around to the left side of the screen when they move off the right edge. The sketch communicates with an external device through serial signals ('H' for hover and 'L' for no hover), allowing for interactive control of external components like servo motors. Messages indicating servo activity ('Spray on...' and 'Spray off...') are displayed at the bottom of the sketch window based on user interaction.


      import processing.serial.*;

      Serial myPort;  // Create object from Serial class
      boolean servoActive = false;  // Flag to track servo activity
      String message = "";  // Variable to display messages

      int numWorms = 10;  // Number of worms
      float[] wormX = new float[numWorms];  // X positions of worms
      float[] wormY = new float[numWorms];  // Y positions of worms
      float[] wormSpeed = new float[numWorms];  // Speeds of worms
      float wormLength = 50;  // Length of worms

      void setup() {
        size(400, 400);  // Increase sketch size for better interaction
        String portName = "COM14"; // Replace with your serial port name
        myPort = new Serial(this, portName, 9600);

        // Initialize worms
        for (int i = 0; i < numWorms; i++) {
          wormX[i] = random(width);
          wormY[i] = random(height);
          wormSpeed[i] = random(1, 3);
        }

        // No initial fill needed here, as the worms will start black
      }

      void draw() {
        // Draw moving background visuals
        drawBackground();

        // Test if mouse is over the circle
        boolean mouseOver = mouseOverCircle();
        if (mouseOver) {
          fill(204);  // Change color to light gray
          if (!servoActive) {
            myPort.write('H');  // Send 'H' to indicate mouse is over circle
            servoActive = true;  // Set servo activity flag
            message = "Spray on...";
          }
        } else {
          fill(0);  // Change color to black
          if (servoActive) {
            myPort.write('L');  // Send 'L' to indicate mouse is not over circle
            servoActive = false;  // Clear servo activity flag
            message = "Spray off...";
          }
        }

        // Draw the circle in the center
        ellipse(width/2, height/2, 200, 200);  // Circle in the center

        // Display message
        textAlign(CENTER);
        textSize(20);
        fill(0);
        text(message, width/2, height - 50);
      }

      void drawBackground() {
        // Clear background
        background(255);

        // Draw moving worms
        fill(150);  // Grey color for worms
        noStroke();
        for (int i = 0; i < numWorms; i++) {
          drawWorm(wormX[i], wormY[i], wormLength);  // Draw worm
          wormX[i] += wormSpeed[i];  // Update worm's X position
          if (wormX[i] > width + wormLength) {  // Wrap around if the worm goes off screen
            wormX[i] = -wormLength;
            wormY[i] = random(height);
          }
        }
      }

      void drawWorm(float x, float y, float length) {
        // Draw a worm (elongated ellipse)
        float segments = 10;  // Number of segments in the worm
        float segmentLength = length / segments;
        float segmentGap = segmentLength * 0.2;  // Gap between segments

        float startX = x - length / 2;
        float endX = x + length / 2;

        for (float xPos = startX; xPos < endX; xPos += segmentLength + segmentGap) {
          ellipse(xPos, y, segmentLength, 10);  // Draw segment of worm
        }
      }

      boolean mouseOverCircle() {
        // Calculate distance from mouse to circle center
        float d = dist(mouseX, mouseY, width/2, height/2);
        // If the distance is less than the circle's radius, mouse is over it
        return d < 100;  // Radius of the circle is 100 (diameter is 200)
      }
Video
This is the previous code
This is the new code!