14. Networking and Communications
This week the assignment is to design, build and connect wired or wireless node with network or bus addresses and local input and/or output devices.
My final project involves two XIAO ESP32C3 communicating and adjusting their speed in relation to each other and input potentiometers.
Our aim this week is to do a simpler version but using the same microcontrollers. I will crate two idential boards will have headers for the XIAO ESP32C3, button, analogue input and a LED as the output.
Edit - I ended up using I2C in my final project. Read more here.
Background Information
Reasons for networking:
Parts of a radio:
Antennas are tuned to a specific frequency to limit the range of signals they pick up. You can have a directionless antenna or a directional with greater gain (strength).
Designing the board
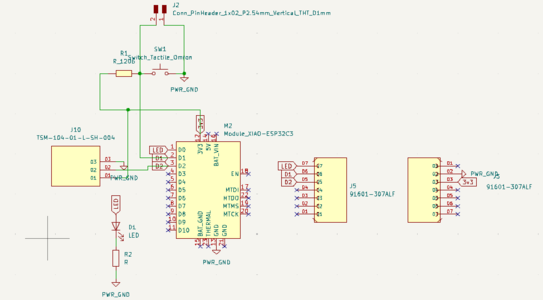
I started with the motordriver board that i made in electronics design week. as it had most of the parts I needed already. I just needed to delete some components and add a led and its resistor. I also needeed to switch the headers and the xiao to the correct one.
Here is the schemeatic
Here is the PCB layout
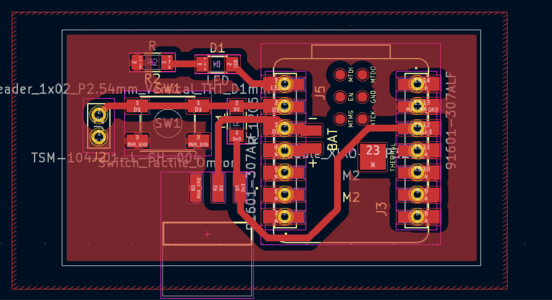
I then opened it in Inkscape and edited certain sections. The main point was deleating the battery connector pods which wasnt neccessary and caused shorts with the pinheaders.

I made a mistake making the cutline too close to the edge of the board this caused it to seperate the different ground planes. I unfortunatly only noticed after soldering all the components.
I decided to remake the files, the ones linked on the page should be fixed.

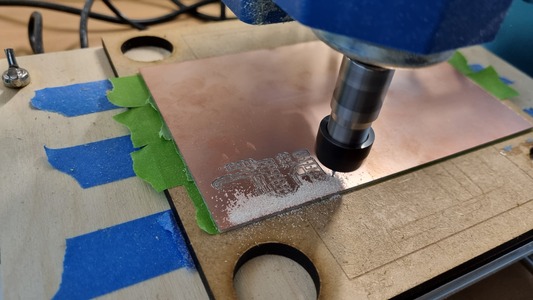
Milling & Soldering
Used modsproject to generate the tool paths and milled the two boards out on the proVER 3018 using vbits.
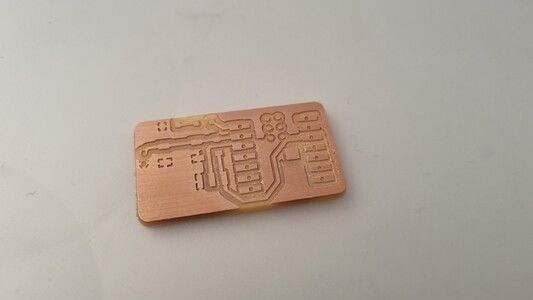
I soldered on the headers to the board then the led. The resistor I used for the led was 510 ohms. The resistor for the button was 10k. I then soldered on the button and analogue pin headers.
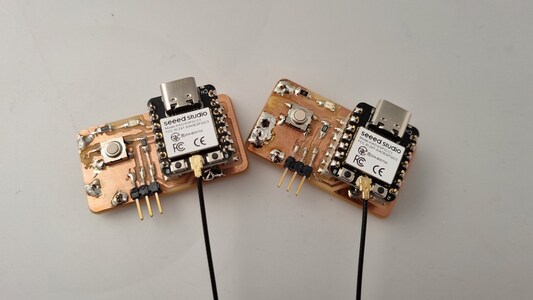
As i disscussed previously we then noticed the grounds were not connected which meant drilling holes in the beard and using jumper cables to connect between them. The solder was being a pain and it caused the board to look very messy but it did end up working.
Xiao ESP32C3
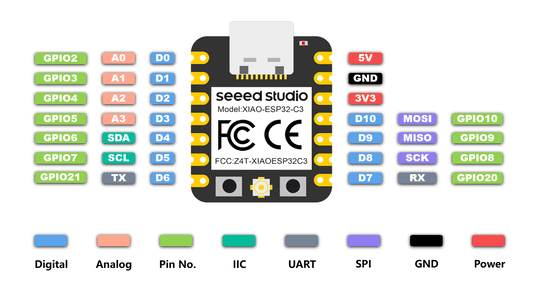
The LED is on pin 2, the button on pin 3.
ESP32C3 is an IoT mini development board based on the Espressif ESP32-C3 WiFi/Bluetooth dual-mode chip.
It supports IEEE 802.11 b/g/n WiFi, and Bluetooth 5 (LE) protocols.
It has has 11 digital I/O that can be used as PWM pins and 4 analog I/O that can be used as ADC pins.
It has a battery charging chip: Supports lithium battery charge and discharge management
Micropython Setup
The basic set up to load micropython onto the chip we will use Thonny.
Plug in the ESP32C3 and go to Run > Configure Interpreter. In the dropdown select Micropython (ESP32) and select the port the xiao is plugged into. The select 'Install or update Micropython (esptool) (UF2)'. You then need to choose the Micropython family as ESP32-C3, the variant as Espressif ESP32-C3 and click install. If if come up with area try reset the XIAO or put into bootloader mode.
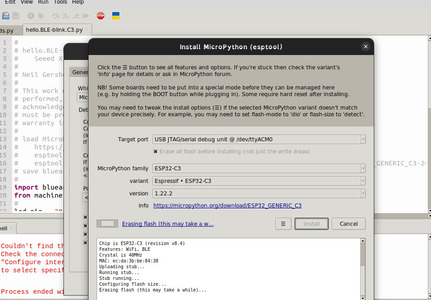
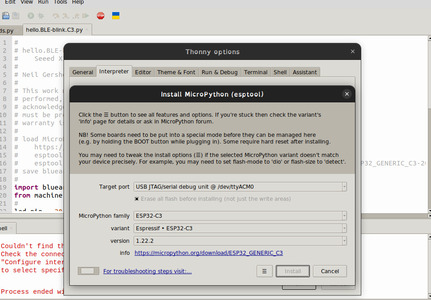
When you back out of the interpreter it should show the ESP32 connected in the shell. Sometimes you need to stop/restart the background to refresh.
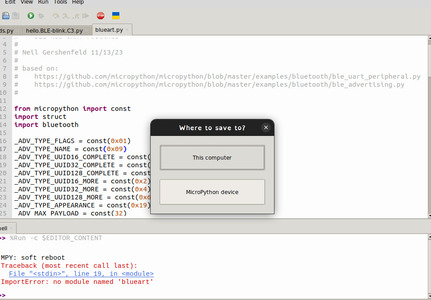
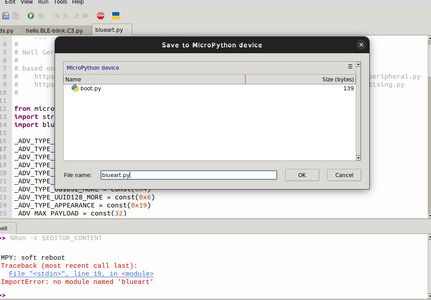
Coding - ESP32 and Blueart
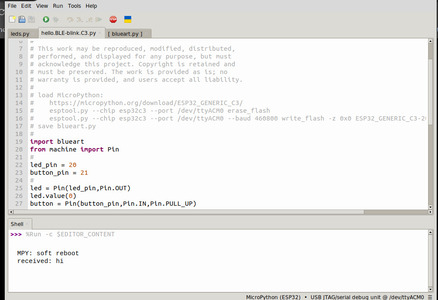
I started with Niel's example code for using the ESP32 over bluetooth.
You save blueart onto the micropython device then run the hello blink code. It is neccessary to connect the antenna for this to work.
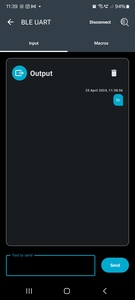
The app Neil uses is nRF Toolbox. You need to scroll down to 'Universal Asynchronous Receiver/Transmittr (UART)' then connect to the BLE UART device.
Now you can send and recive messages.
We did look at trying to finding example code to then expand this to include two devices talking to each other however we decided to try the wifi example instead.
Coding - ESP32 and wifi
We start with Niels example.
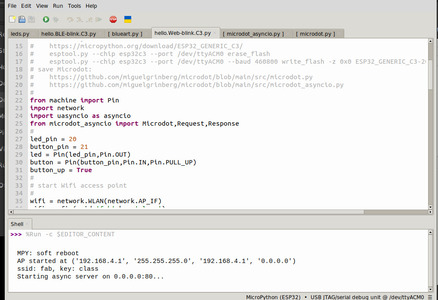
We start by saving the microdot.py and microdot_asyncio.py files onto the device. These have the code that is needed to set up servers.
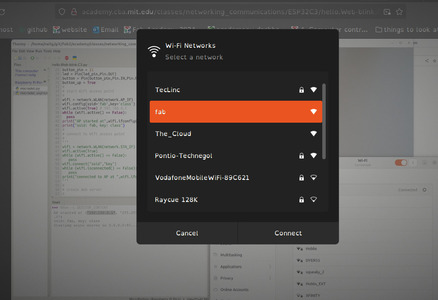
You then run the hello.Web-blink.C3.py code and it should spit out in the shell a address. This seems to be standard as 192.168.4.1. You can then look in wifi settings and find the fab wifi which is being transmitted by the ESP32.
Then navigating to the 192.168.4.1. address in the browser it will provide the website with the led buttons. This is just some basic html in the code which can be edited.
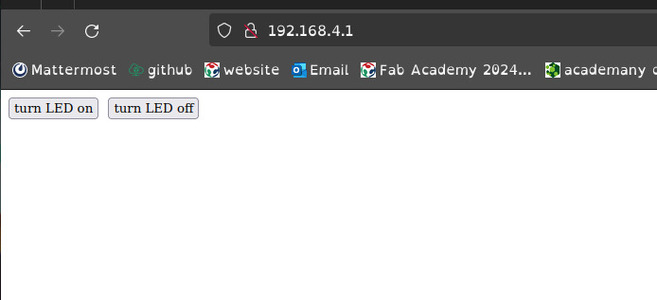
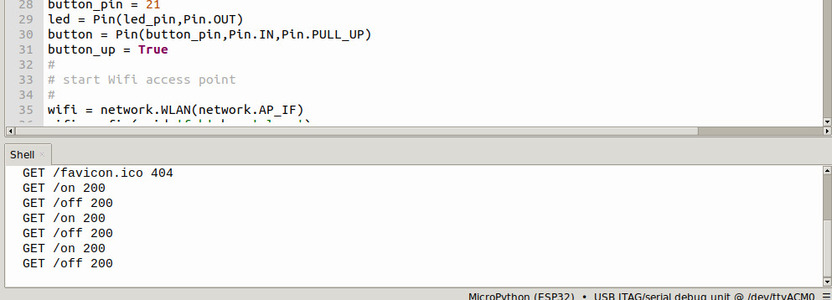
This then allows the led to be turned on and off remotly.
Updates are spat out into the shell.
Setting up a socket
We then started looking at how you would connect a seperate XIAO to this network so we could control the button through this XIAO insted of clicking buttons on the website.
We referd to this micropython socket code along with the Socket information and Network information in the micropython documentation.
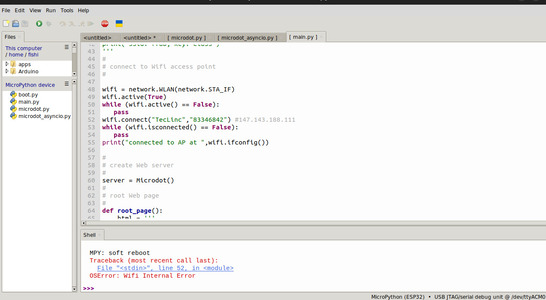
There was also an important piece of code commentated out of Niel's example code that was how to connect to a network.
wifi = network.WLAN(network.STA_IF)
wifi.active(True)
while (wifi.active() == False):
    pass
wifi.connect("ssid","key")
while (wifi.isconnected() == False):
    pass
print("connected to AP at ",wifi.ifconfig())
We ended up with the following code.
import network
import socket

wifi = network.WLAN(network.STA_IF)
wifi.active(True)
while (wifi.active() == False):
    pass
print("trying to connect...")
wifi.connect("ffab", "class")
while (wifi.isconnected() == False):
    pass
print("connected to AP at ",wifi.ifconfig())

s = socket.socket()
s.connect(('192.168.4.1', 80))
s.send(b"GET /off HTTP/1.0\r\n\r\n")
However we were getting a 'OSError: Wifi Internal Error' issue.
Wireshark
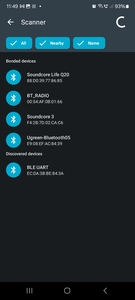
I had a look in wireshark briefly to check that the ap could be seen.
Installing wireshark instructions. I used 'sudo apt install wireshark'.
When I initially opened up wireshark it did not work as i was not running it as root so I opened it in the terminal using 'sudo wireshark'.

When I connected to the ap and changed the led status using the website I could see packets being sent back and forth.
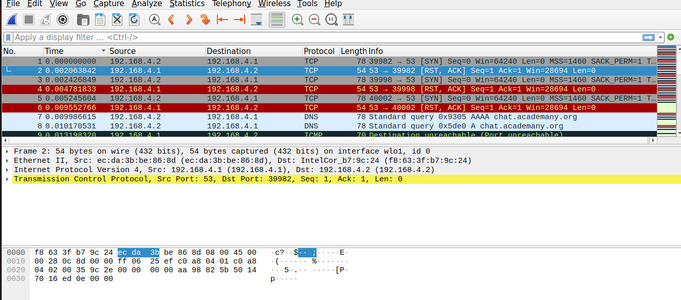
I was out of my depth here so I couldn't do much with that knowledge and go further unfortunatly.
We tried using the connecting to a network code to connect to TecLinc. This is a subnetwork set up by the IT Services in the University that has much limited traffic and designed for communicating across using small devices. We managed to connect and do a tml request for the google website. Therefore the server works as we can connect using laptops and the other XIAO is abble to connect successfully but they wont talk to each other.
There has been a few posts with suggested fixes but they did not work for me.Suggested fix 1 Suggested fix 2. Árni Björnsson suggested trying out Circuit python.
Circuitpython attempt
Circuit python .bin for ESP32C3
Followed the installation instructions to install using the esptool command line.
Depending on what port it is attached to you need to substitute the port to match yours. Mine was '/dev/ttyACM0'.
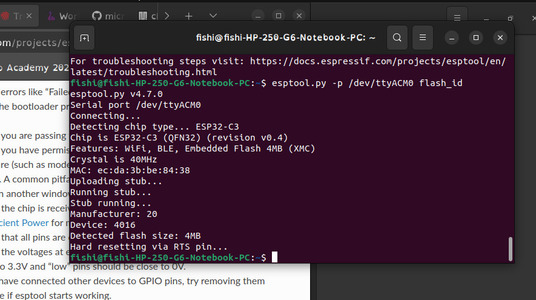
pip install esptool
esptool.py -p /dev/ttyACM0 flash_id
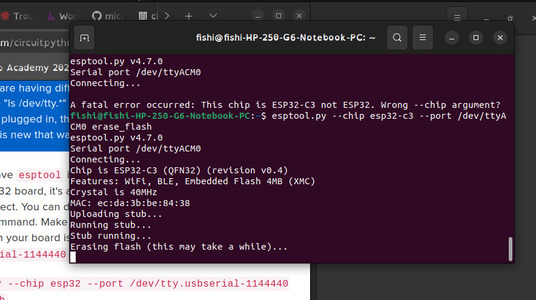
esptool.py --chip esp32 --port /dev/ttyACM0 erase_flash
I used cd to chnage to the downloads directory where the .bin file downloaded to then ran the following.
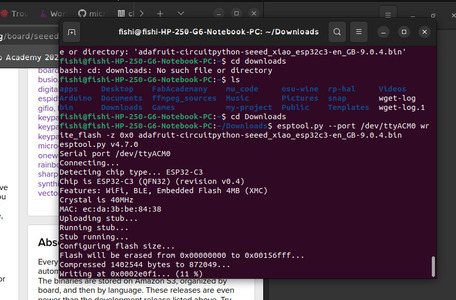
esptool.py --port /dev/ttyACM0 write_flash -z 0x0 adafruit-circuitpython-seeed_xiao_esp32c3-en_GB-9.0.4.bin
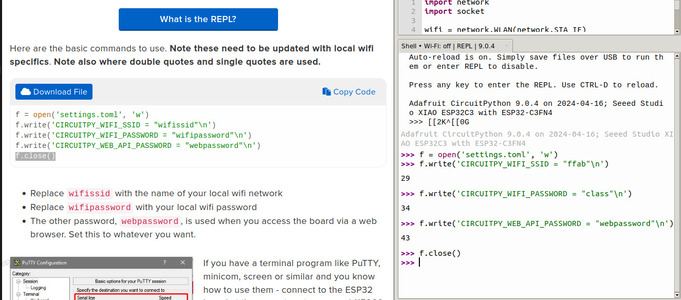
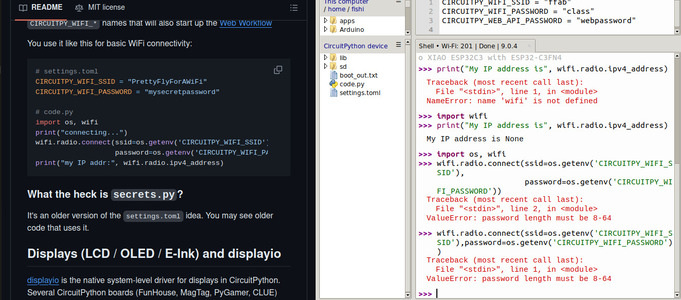
Next step is to set up web workflow. I created and edited the settings.toml file to match the other xiao's details using the shell commands.
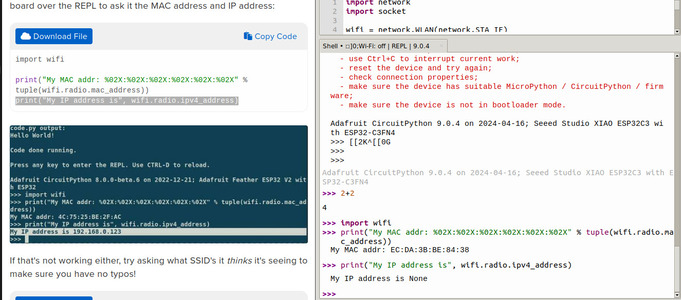
However when it reconnected it did not have a ip address.
I found another guide with some code which I tried live coding with in the shell to test if the settings.toml was geing used properly.
import os, wifi
wifi.radio.connect(ssid=os.getenv('CIRCUITPY_WIFI_SSID'),
                   password=os.getenv('CIRCUITPY_WIFI_PASSWORD'))
It came up with an error that the password was not long enough.
This was basically the last straw before I switched to another option.
Arduino Attempt - ESP-NOW
I saw ESP-NOW in one of my searches to find example code connecting the esp32's together. IT is a contectionless communication proticol developed by espressif and should allow multiple devices to talk. Although not specifically for the XIAO ESP32-C3 I wanted to try following this guide to set it up.ESP-NOW.
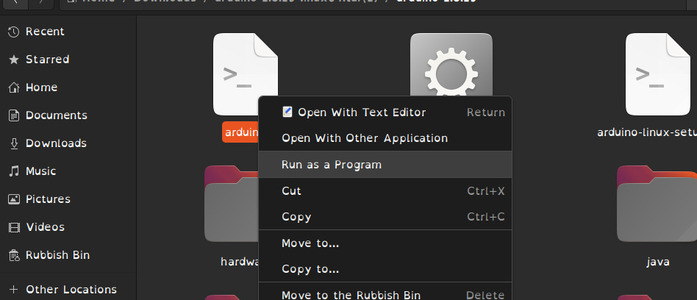
The guide suggested using the Legacy Arduino IDE
I downloaded, unziped and used the 'run as program' option on the arduino shell script.
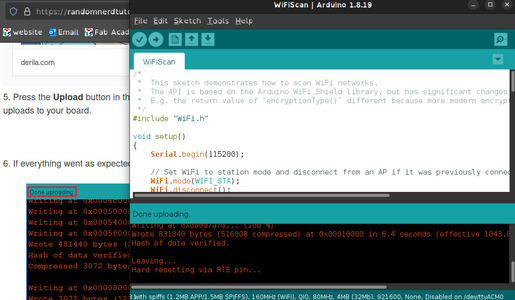
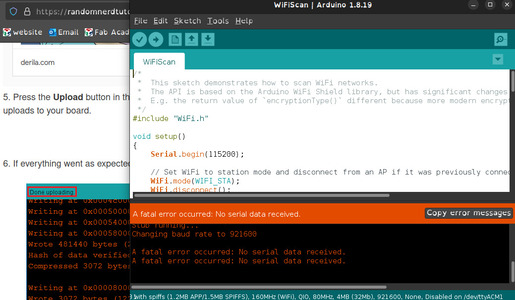
I followed these step-by-step instructions for a Wifi Scan piece of example code.
This did initially not work with a 'A fatal error occurred: No Serial data recived' and I decided to go back to the micropython code which we know semi-worked.
It did however run successfully when I next plugged it in to reinstall micropython in thonny.

Back to Micropython - Going through TecLinc
We knew the server worked and we knew the xiao could connect to a ap using teclinc so we decided to do it through this, not directly between the devices as I would be a lot of work to figure out why everyone was having issues.
We started by editing the wificode on the server XIAO so it no longer created its own ap but just hosted the web server on the TecLinc network.
# hello.Web-blink.C3.editted.py
#
# Seeed XIAO ESP32C3 Web hello-world
#
# Neil Gershenfeld 11/9/23
# Megan Round
#
# This work may be reproduced, modified, distributed,
# performed, and displayed for any purpose, but must
# acknowledge this project. Copyright is retained and
# must be preserved. The work is provided as is; no
# warranty is provided, and users accept all liability.
#
# load MicroPython
# https://micropython.org/download/ESP32_GENERIC_C3/
# esptool.py --chip esp32c3 --port /dev/ttyACM0 erase_flash
# esptool.py --chip esp32c3 --port /dev/ttyACM0 --baud 460800 write_flash -z 0x0 ESP32_GENERIC_C3-20231005-v1.21.0.bin
# save Microdot:
# https://github.com/miguelgrinberg/microdot/blob/main/src/microdot.py
# https://github.com/miguelgrinberg/microdot/blob/main/src/microdot_asyncio.py
#
from machine import Pin
import network
import uasyncio as asyncio
from microdot_asyncio import Microdot,Request,Response
#
led_pin = 2
button_pin = 3
led = Pin(led_pin,Pin.OUT)
button = Pin(button_pin,Pin.IN,Pin.PULL_UP)
button_up = True
#
# start Wifi access point
#
'''
wifi = network.WLAN(network.AP_IF)
wifi.config(ssid='ffab',key='class')
wifi.active(True) # 192.168.4.1
while (wifi.active() == False):
pass
print("AP started at",wifi.ifconfig())
print("ssid: ffab, key: class")
'''
#
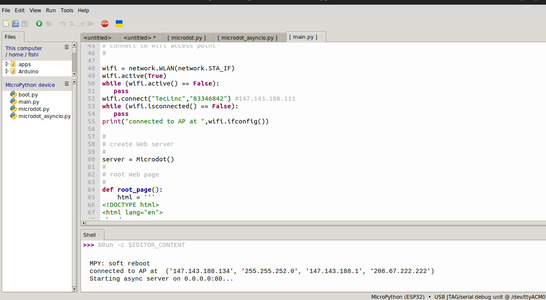
# connect to Wifi access point
#
wifi = network.WLAN(network.STA_IF)
wifi.active(True)
while (wifi.active() == False):
pass
wifi.connect("TecLinc","83346842") #147.143.188.111
while (wifi.isconnected() == False):
pass
print("connected to AP at ",wifi.ifconfig())
#
# create Web server
#
server = Microdot()
#
# root Web page
#
def root_page():
html = '''
'''
return html
#
# server routes
#
@server.get('/')
async def get_root(request):
return root_page(),200,{'Content-Type':'text/html'}
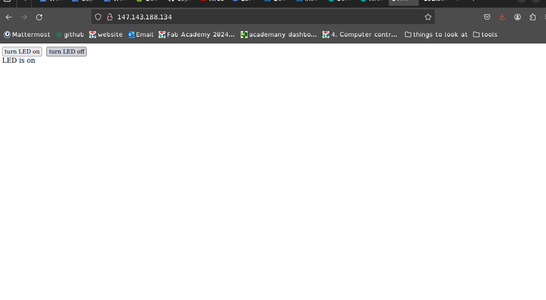
@server.get('/on')
async def get_on(request):
led.value(1)
return "LED is on",200,{'Content-Type':'text/html'}
@server.get('/off')
async def get_off(request):
led.value(0)
return "LED is off",200,{'Content-Type':'text/html'}
#
# local task
#
async def local():
global button_up
while True:
if ((button.value() == 0) and button_up):
led.value(1)
print('button down')
button_up = False
elif ((button.value() == 1) and (not button_up)):
led.value(0)
print('button up')
button_up = True
await asyncio.sleep(0)
#
# main tasks
#
async def main():
local_task = asyncio.create_task(local())
server_task = asyncio.create_task(server.start_server(port=80,debug=True))
await asyncio.gather(local_task,server_task)
#
# run main tasks
#
asyncio.run(main())
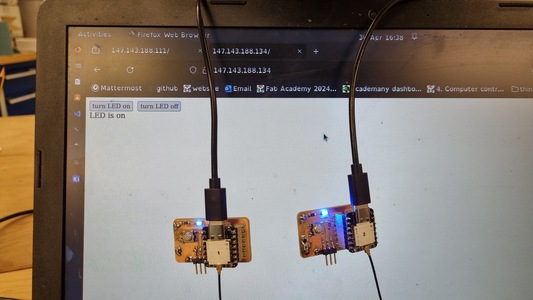
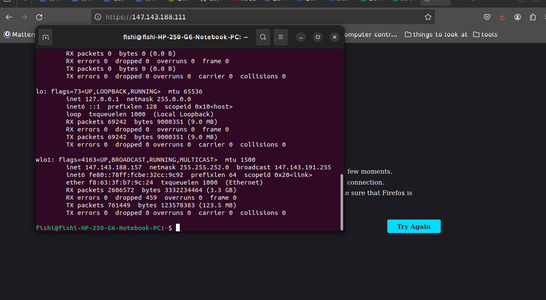
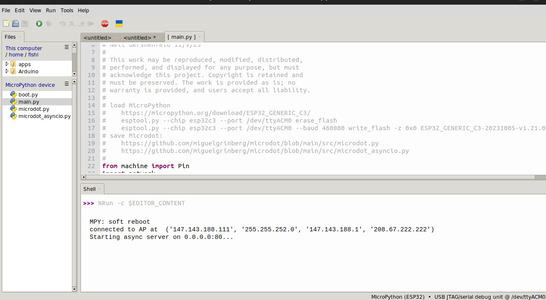
We then save this onto the XIAO and name it 'main.py' so that it can run from just a power source. We made note of the new address the XIAO now had on this new network: 147.143.188.111
I did the same with the other XIAO and its address was 147.143.188.134
I could then go to both their pages ans controll them.
Then we started on the other XIAO that connects to TecLinc and then connects to the web address produced by the server XIAO and switches on the LED. Socket documentation
To turn off the LED you need to manually change the 'on' line to 's.send(b"GET /off HTTP/1.0\r\n\r\n")'
import network
import socket

wifi = network.WLAN(network.STA_IF)
wifi.active(True)
while (wifi.active() == False):
   pass
print("trying to connect...")
wifi.connect("TecLinc", "83346842")
while (wifi.isconnected() == False):
   pass
print("connected to AP at ",wifi.ifconfig())

s = socket.socket()
s.connect(('147.143.188.111', 80))
s.send(b"GET /on HTTP/1.0\r\n\r\n")
The system just seems very tempermental although this way of going through a seperate ap seems more consistent now its set up.
Sending commands between ESP32s
We have this semi-working code which we now want to tie to a button press on the second XIAO.
I started pieceing together some code and going back and usign some of the button code from the original example.
However this did not work successfully.
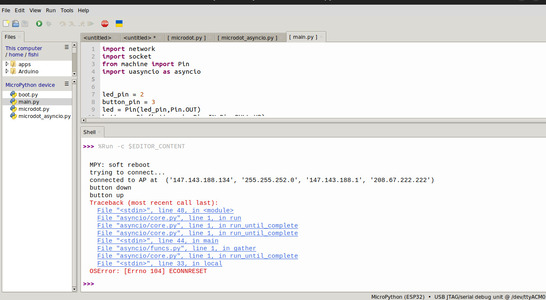
  import network
import socket
from machine import Pin
import uasyncio as asyncio

led_pin = 2
button_pin = 3
led = Pin(led_pin,Pin.OUT)
button = Pin(button_pin,Pin.IN,Pin.PULL_UP)
button_up = True

wifi = network.WLAN(network.STA_IF)
wifi.active(True)
while (wifi.active() == False):
   pass
print("trying to connect...")
wifi.connect("TecLinc", "83346842")
while (wifi.isconnected() == False):
   pass
print("connected to AP at ",wifi.ifconfig())

s = socket.socket()
s.connect(('147.143.188.111', 80))
#s.send(b"GET /off HTTP/1.0\r\n\r\n")

# local task
#
async def local():
    global button_up
    while True:
        if ((button.value() == 0) and button_up):
            s.send(b"GET /off HTTP/1.0\r\n\r\n")
            print('button down')
            button_up = False
        elif ((button.value() == 1) and (not button_up)):
            s.send(b"GET /on HTTP/1.0\r\n\r\n")
            print('button up')
            button_up = True
        await asyncio.sleep(0)

async def main():
    local_task = asyncio.create_task(local())
    await asyncio.gather(local_task)
#
# run main tasks
#
asyncio.run(main())
We tried just running the code once with a pause inbetween. It printed to the shell then we got a new error: OSError:[Errno 104] ECONNRESET.
import network
import socket
import time
from machine import Pin
import uasyncio as asyncio


led_pin = 2
button_pin = 3
led = Pin(led_pin,Pin.OUT)
button = Pin(button_pin,Pin.IN,Pin.PULL_UP)
button_up = True

wifi = network.WLAN(network.STA_IF)
wifi.active(True)
while (wifi.active() == False):
  pass
print("trying to connect...")
wifi.connect("TecLinc", "83346842")
while (wifi.isconnected() == False):
  pass
print("connected to AP at ",wifi.ifconfig())

s = socket.socket()
s.connect(('147.143.188.111', 80))
#s.send(b"GET /off HTTP/1.0\r\n\r\n")

#while True:
s.send(b"GET /on HTTP/1.0\r\n\r\n")
print("sent on")
time.sleep_ms(5000)
s.close()
s.connect(('147.143.188.111', 80))
s.send(b"GET /off HTTP/1.0\r\n\r\n")
print("sent off")
time.sleep_ms(5000)
Heroshot
This week was very convoluted with lots of different attempts. Here is the best result we could achieve.
Xiao one connecting to and hosting a server on TecLinc ap which could be connected to wirelessly. Xiao 2 also connecting to TecLinc and acting as a socket to chnage the status of the led. This had to be run using thonny each time to chnage the led status.
Both Xiaos on a custom PCB I designed and milled.