Using gitlab for Fab Academy Group Work
Can you relate to this story?It's Tuesday night, and your group is trying to complete your documentation for the group work you did this week. Tensions are high because everyone would rather be working on their individual assignment.
"I guess I'll write some text for the introduction, Boris can you make a table for our data?"
"Okay, and Clara can fix up the HTML, she's got a great style sheet. But I can't add my table until you send me the file!"
"Okay I'll email it to you when it's done, you'll have to wait."
"Dev says he added some image links to the HTML file you sent him earlier."
"Wait, but that's the old file! Now I'll have to figure out what he changed and put it into my version."
"What about the image files?"
"Shoot, they're all on Dev's computer."
"Okay, Clara sent me the stylesheet. But she sent me style-version-2.css, style-final.css, and style-final-final.css. Which does she want me to use?"
"Uh-oh! I think I messed up. I saved Dev's version of the HTML file over mine, and now all my new work is gone."
This problem has a solution, and you already know how to use it: it's git. git isn't just the annoying extra steps you have to do to update your website so Neil can see it, it's a system for collaborating on documents, keeping track of revisions and changes as you work together in a group. Here's how to use it for group work.
Creating a New gitlab Project
Anyone can create a new project on gitlab.fabcloud.org and invite people to collaborate on it. One member of a group can create the project for everyone to add to. A Fab Academy instructor could also create an overall project for all of their node's group work.- Log in to https://gitlab.fabcloud.org/. You'll see a list of all the projects you're part of. Notice that some seem random and irrelevant to you: that's because some other Fab Academy user didn't do Step 5 below.
- Click "New Project" in the top right corner.
- Click "Create blank project".
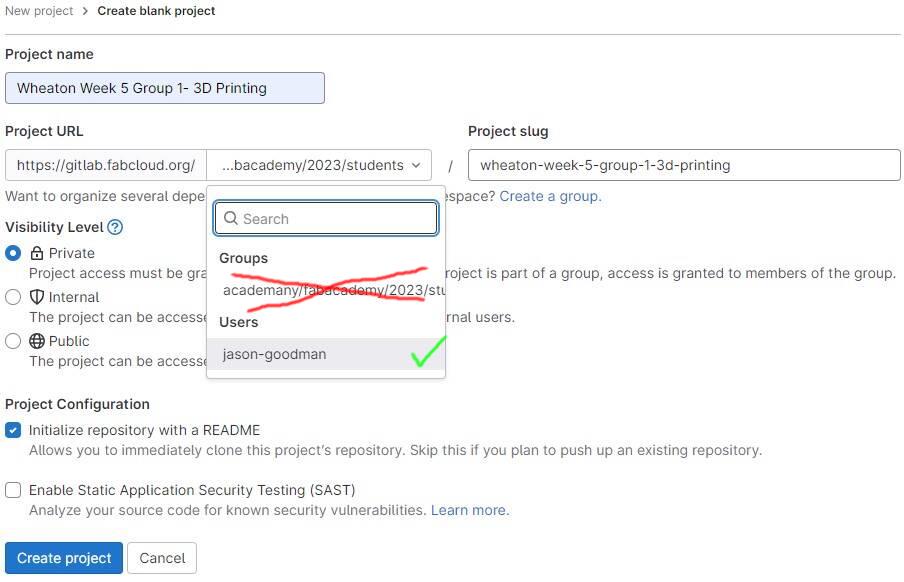
- Give your project a helpful name.
- IMPORTANT: For the Project URL, make sure the namespace is set to your user name, not the whole Fab Academy student group. If you don't do this, you won't be able to invite your group members to help out with the project, every Fab Academy student around the world will be able to see your useless project on their Projects page, and you won't be able to delete it without an administrator's help!
- Set "Visibility Level" to Private.
- Click "Create Project"
- The project should now appear in your Projects page, with you as the Owner.
- Click to go to your new project, if the New Project page didn't take you there already.
- From Project Information on the right side, choose "Members". You'll see a list of everyone who can contribute to the project. It should be lonely: just you as Owner.
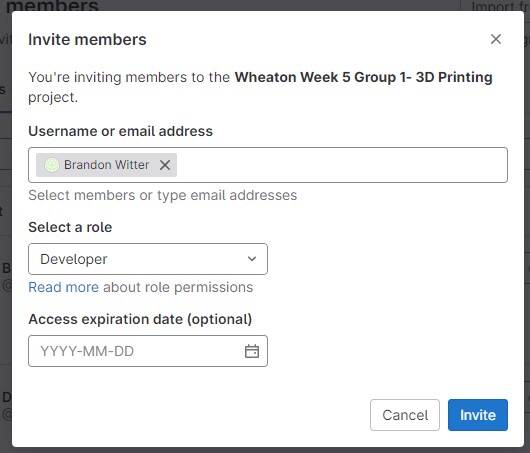
- Choose "Invite Members" from the top right.
- Type the names of the Fab Academy people you'd like to invite to add them to the list
- Select "Developer" as their role. This will let them clone, push, and pull from the project repo, but they can't add new members or delete the project. Hit "Invite" to send the invitation and add them to the project.
Contributing to the Project
Every project member can add to the project, working together in parallel. This new project works just like your personal repository: all the commands in the Fab Academy Git Tutorial should work the same way.- Clone the repo to make a copy on your local computer. Click on the "Clone" button on the main repo page and copy the link under "Clone with SSH" On your computer, using Git Bash (Windows) or Terminal (Mac or Linux), navigate to the location where you want the new project to go and type
git clone [paste the repo url here]
- You'll get a copy of the current state of the project. Make whatever changes you need, and then follow the same steps as you usually do with your website repo, to push the change to the group project repo:
- Suggestions:
- Clone this repo into a different directory on your computer, don't put it inside your student website. Having one git project inside another can get weird.
- Get into the habit of doing
git pullfrequently when working with others, so you always have their latest work on your computer. - Only
git pushwhen you've made significant changes you want other people to see.
git add .
git commit -m "A helpful message"
git push
Resolving Merge Conflicts
What happens if someone else pushes a change to the same file you're working on? You'll see this when you git push:
$ git push
To gitlab.fabcloud.org:academany/fabacademy/2023/labs/wheaton/students/jason-goodman.git
 ! [rejected]        main -> main (fetch first)
error: failed to push some refs to
  'gitlab.fabcloud.org:academany/fabacademy/2023/labs/wheaton/students/jason-goodman.git'
hint: Updates were rejected because the remote contains work that you do
hint: not have locally. This is usually caused by another repository pushing
hint: to the same ref. You may want to first integrate the remote changes
hint: (e.g., 'git pull ...') before pushing again.
As it says, what you need to do is
git pull to bring in their changes to your local repo. Often git will smoothly combine their work with yours. But if you've made changes to the same thing, and git doesn't know which one is correct, you'll see this:
$ git pull
remote: Enumerating objects: 9, done.
remote: Counting objects: 100% (9/9), done.
remote: Compressing objects: 100% (5/5), done.
remote: Total 5 (delta 4), reused 0 (delta 0), pack-reused 0
Unpacking objects: 100% (5/5), 438 bytes | 11.00 KiB/s, done.
From gitlab.fabcloud.org:academany/fabacademy/2023/labs/wheaton/students/jason-goodman
   d8642bd..dc7b56e  main       -> origin/main
Auto-merging public/assignments/week05.html
CONFLICT (content): Merge conflict in public/assignments/week05.html
Automatic merge failed; fix conflicts and then commit the result.
This is a "merge conflict": git needs a smart human like you to decide what to do. Open the conflicting file in your editor. You'll see that git has added lines like this:
<<<<<<< HEAD
My group's work for this week is documented <a href="week-05-group-1/index.html">here<a>.
=======
My group's work for this week is documented <a href="groupwork.html">here<a>.
>>>>>>> dc7b56ef1826d89b9e48ada92881b51042b3faa9
The first one is the current version on gitlab, the second is your local changes. Decide which to keep and which to discard, or edit it as you see fit. Delete the lines with angle brackets, equals, everything except what you want to keep.
My group's work for this week is documented <a href="week-05-group-1/index.html">here<a>.
Now, stage, commit, and push your changes just like any other change. Make sure you use a helpful commit message.
$ git add .
$ git commit -m "Resolved conflict, using previous version."
$ git push
The conflict is resolved, and next time your partner does
git pull, they'll get your changes.