Final project design
My final project is a rotating moss garden with an LED strip. Functionally it’s more like a kinetic sculpture with moss that you could keep on your desk.
This week I further developed my final project and looked online for parts that I couldn’t easily make myself.
My final project is a rotating moss garden with an LED strip. Functionally it’s more like a kinetic sculpture with moss that you could keep on your desk.
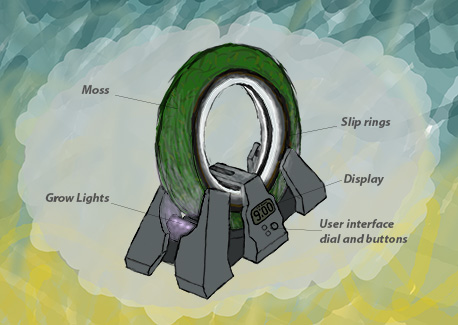
The core functionality of my project includes 4 separate systems. The first is the motor control that rotates the ring with the moss growing on it. The second is the LED strips on the inside of the wheel. The third is the pump that can supply water to the soil on the inside of the ring. The fourth is the user interface and LCD screen that makes it easy to change the settings, such as brightness, rotation speed, and watering frequency.
The entire concept of the rotating moss ring is original, and as far as I can tell, nobody has made anything like it before. The idea of kinetic sculptures centered around a plant is not wholly original. Levitating bonsai and moss has been documented elsewhere on the internet. I have designed all components of the chassis and the wiring. Parts of the code were adapted from examples created by other people.
The entire concept of the rotating moss ring is original, and as far as I can tell, nobody has made anything like it before. The idea of kinetic sculptures centered around a plant is not wholly original. Levitating bonsai and moss has been documented elsewhere on the internet. I have designed all components of the chassis and the wiring. Parts of the code were adapted from examples created by other people.
Most of the components I used to make the project are stocked in the lab. Here is a list of the major materials and components used in the project.
Name
Cost estimate
Source
The wheel itself is cut out with a cnc router, and a table router, then finished with a hand saw and sand paper. The two halves are held together with wood screws. Holes are then drilled to allow wires to pass through.
The base of the wheel mechanism is entirely 3D printed and held together with bolts. The wheel must be put into place before all the support wheels are in place.
The ribbing and the felt are laser cut.
The PCB board is milled.
All of the electronic components are soldered into place by hand.
The contact pins are turned on a lathe.
The slip rings are cut with metal scissors and a drill press, then affixed to the wall of the channel with a nail gun.
The gear track is printed out of TPU and stays in the wheel with friction.
Slip rings. The ring will not be held in place in a very secure way so figuring out how to maintain stable electrical contact is going to be difficult.
Watering. I don’t know yet if there is a risk of the water overflowing and not being absorbed fast enough into the felt. I also don’t know how frequently and for how long the water should be flowing.