- Assignments of the week
- Git
- Connecting to Gitlab
- Jekyll & Git
- File size management
- Some thoughts and errors
Project Management
Week 1 is all about getting started: setting up your documentation website and getting some first ideas on paper about your final project.
Here are some relevant links:
Assignments of the week
This is an overview of the tasks for this week.
| Progress | Task |
|---|---|
| Done | Sketched your final project idea(s) |
| Done | Described briefly what it will do and who will use it |
| Done | Made a website and described how you did it |
| Done | Created a section about yourself on that website |
| Done | Added a page with a sketch and description of your final project idea(s) |
| Done | Documented steps for setting up your Git repository and adding files to it |
| Done | Pushed to your class GitLab repository |
| Done | Signed and uploaded Student Agreement |
Git
Git is an open source distributed version control system used to keep track of all kinds of projects. It’s used extensively in collaborative software development projects because of its branching model. This allows users to work together on projects simultaneously. This branching principle won’t really be used during Fabacademy, since as a student you work individually on your own documentation. The image on the left below is a representation of this branching model.
Git has three main states that your work can be in:
- modified: changed locally but not commited
- staged: marked to be committed, a commit is made but not pushed to the remote repository
- committed: pushed and committed to the remote repository
The image on the right from this Git introduction sums it up well.


Getting started
Since I have been using Git for a couple of years already I didn’t need to install anything new to get it up and running. I use Git (in the terminal and with Github Desktop) with Github Pages for my personal portfolio website as well as my documentation blog and Gitlab for the documentation blog of the Waag Fablab.
Because I am pretty familiar with it, I wanted to keep my documentation of Git simple and stick to a Git and command line (Powershell) cheatsheet of commands that I use often. I also use Github Desktop to stage and commit, because I find it easier to click and select the changes I want to add to a specific commit, instead of having to type which files I want. This way I can keep my commit history legible.
Git commands
| Command | Description |
|---|---|
| git clone [link-to-repo] | Clone the Git repository found at the url to the current directory |
| git add [file] | Add the file to your next commit |
| git add . | Add all changed files to your next commit |
| git commit -m “[message]” | Commit all the staged files |
| git push | Push all new commits to the remote repository |
| git pull | Pull all new commits from the remote repository |
| git log | Prints out the history of commits |
| git status | Show the status of any changed/removed/new files |
Powershell commands
Not an exhaustive list at all, but these are the commands I use regularly:
| Command | Description | Example |
|---|---|---|
| cd | Change directory | cd C:\Users\mvoss\Pictures\temp\ |
| pwd | Get current directory | |
| ls | List all files and folders in current directory | |
| copy, cp | Copies an item from one location to another | cp *.jpg* -Destination "~/Documents\Gitlab\fabacademy\michelle-vossen\assets\images\weeks\week1" |
| mkdir | Make a new directory | mkdir week2 |
Connecting to Gitlab
1. Add public ssh key to Gitlab
To set up the connection between my remote repository on Gitlab and my computer, I’m following along with this tutorial. I started by checking if I already had an ssh key pair which I had, so I’m continuing from the part “Add an SSH key to your GitLab account”. I copied my public key via Git Bash with this command: cat ~/.ssh/id_rsa.pub | clip (on my new laptop in 2024 I used the more secure ED25519 instead) and pasted it into the Key field, gave it a nickname and removed the expiration date (User settings > SSH Keys). Then I went to Git Bash and typed ssh -T git@gitlab.fabcloud.org to make a connection with the Fabacademy Gitlab via ssh.

2. Clone repository
I went to the Gitlab folder I already had on my computer and tried to clone my repository, but I got an error because I already had a folder with the exact same name in there (it’s the documentation blog I have on the Waag Gitlab). I made a new folder called fabacademy and cloned it in there. The fatal error I got in the screenshot was because I shouldn’t have put ssh:// in front of it (I didn’t read this right). Using git clone git@gitlab.fabcloud.org:academany/fabacademy/2023/labs/waag/students/michelle-vossen.git did the trick.

3. First commit (Github Desktop)
I then used code . to open the folder in which I cloned the repository with Visual Studio Code (also already installed on my computer, just like the VSC command line tools which allow you to open VSC from the terminal). I made a new file called students.md in which I pasted the student agreement we had to sign for this week. Then I went to Github Desktop and went to File > Add Local Repository, navigated to the Fabacademy repo and clicked ‘Add repository’. I then selected the students.md file, staged and committed it from Github Desktop which went without issue.


Committing using Powershell
To also demonstrate that I know how to push from the terminal here are the steps I used to push the table of content gem plugin (more on that later):
git add Gemfile Gemfile.lock _config.ymlgit commit -m "Add table of content gem"git push
Jekyll & Git
Jekyll
When everything was set up, it was time to make my website look good. For this I’m using a static website generator that converts Markdown files into HTML that the browser can interpret. When I did my internship at Waag 3 years ago I tried out MKDocs, Hugo and Jekyll and I settled on Jekyll because of the ease of customisation and the amount of themes to choose from. For my personal portfolio website I’ve used an existing theme and completely customized it to my liking, so that’s what I want to do for my Fabacademy documentation as well.
Some of my wishes:
- Responsive (and good at it so I don’t have to deal with it)
- Easy to read code (with includes and lay-outs that I can change)
- Not too complicated (easy to navigate)
- Table of content within each week (I always appreciate if a blog post has this)
- Tags (future referencing made easy)
- Fun (but the fun I can add myself)
Some themes that I liked:
However, after browsing through many of the themes I couldn’t find anything that I wouldn’t want to do a complete overhaul of anyway. I decided to just take the theme I modified for my portfolio website and strip that of everything I didn’t need, and work from there. That way most of my wishes are already taken care of. This theme is built upon the Pineapple theme by arnolds. The steps I followed to build a skeleton from my existing custom Jekyll theme & get it to work in my Fabacademy repository were as follows:
- Copy entire repository content of portfolio website into Fabacademy repository
- Remove all images and custom pages, but keep a few pages to test with and rename those
- Remove unnecessary scss code (specific code that I added for my portfolio site) and strip includes and lay-outs of portfolio-specific Liquid code
- See if it worked locally by moving to this directory in the terminal and start a local server with
jekyll s(builds the static website locally while listening to changes and updating the site upon refresh). It worked fine, just some links that went nowhere - Add url and baseurl to _config.yml and fix all broken links to images & pages
- See again if it worked locally, which it did after fixing some more broken Liquid links
- Play around with SCSS to make it look nicer
- See if it worked remotely by pushing the local changes to remote. That didn’t, because I hadn’t set up a CI workflow for Jekyll yet
- Configure CI workflow and create Gemfile
Step 9 will be explained below.
Configuring a CI workflow
First: what is CI/CD? CI/CD stands for continuous integration (CI) and continuous delivery/deployment (CD). CI is the practice of merging all developers’ working copies to a shared mainline several times a day that triggers automated build with testing. This is done so errors in code are detected early and are easier to find. If you commit a large amount of code at once and suddenly nothing works anymore, you’re going to have a hard time figuring out where it went wrong. Continuous delivery is the practice of frequent committing code that could be deployed, but not necessarily is; continuous deployment means it’s also deployed automatically.
On the Gitlab documentation page I found this tutorial on how to get started with a CI/CD template.
I pushed everything I had to the repository excluding the .gitlab-ci.yml. This made the pipeline fail which I expected because Git didn’t have the right instructions to build my fresh Jekyll website.
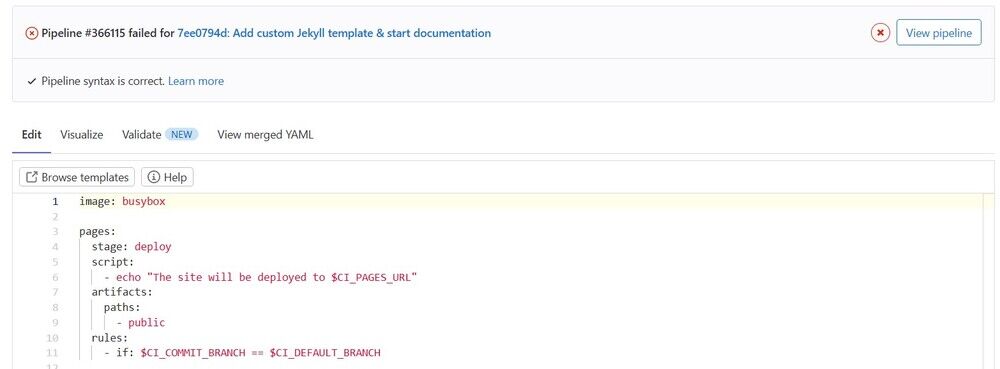
in the repository in the browser I clicked on the existing .gitlab-ci.yml file and went to ‘Browse Templates’. From there I went to Pages to find the Jekyll.gitlab-ci.yml template (here). I copied and pasted the following code into my .gitlab-ci.yml file and committed the changes.
image: ruby:2.6

variables:
  JEKYLL_ENV: production
  LC_ALL: C.UTF-8

before_script:
  - gem install bundler
  - bundle install

test:
  stage: test
  script:
    - bundle exec jekyll build -d test
  artifacts:
    paths:
      - test
  except:
    variables:
      - $CI_COMMIT_BRANCH == $CI_DEFAULT_BRANCH

pages:
  stage: deploy
  script:
    - bundle exec jekyll build -d public
  artifacts:
    paths:
      - public
  only:
    variables:
      - $CI_COMMIT_BRANCH == $CI_DEFAULT_BRANCH
  environment: production
New laptop issues
When I got a new laptop after Fabacademy, I had to set everything up again, so I ran into some issues. The first issue was a stupid one: I apparently set up a passphrase for my new ssh key but I forgot it. I did a lot of googling, trial and error and at some point I finally tried the most obvious answer, and that was indeed the answer.
After that I tried to commit with Github Desktop but that didn’t work, because I’m prompted for my passphrase every time I want to commit (need to fix that later). Via Powershell I can commit just fine, but then I ran into an issue with my CI workflow since the ruby image I was using was too old. I tried to change the version by changing the first line from image: ruby:2.6 to image: ruby 3.2.2 but that resulted in the following error:
Running with gitlab-runner 16.7.0 (102c81ba)
  on gitlab-aws-autoscaler xgvG6etH, system ID: s_0059b56165fa
Preparing the "docker+machine" executor 00:07
Using Docker executor with image ruby 3.2.2 ...
Pulling docker image ruby 3.2.2 ...
WARNING: Failed to pull image with policy "always": invalid reference format (manager.go:250:0s)
ERROR: Job failed: failed to pull image "ruby 3.2.2" with specified policies [always]: invalid reference format (manager.go:250:0s)
After googling it I saw the issue quickly: it had to be image: ruby:3.2.2. After that my job passed, so now I can keep on documenting on my new laptop.
Gemfile
Since I already knew I didn’t have a Gemfile in my repository, I assumed it would fail, which it did. On line 24 you can read the message ‘Could not locate Gemfile’.

So it’s time to make a Gemfile. To do this, I followed the steps here starting after the installation of Ruby & Jekyll since I already had those.
- I ran
bundle initin Powershell in the local repository. This creates a Gemfile and Gemfile.lock in the repo - I then added
gem "jekyll"to the new Gemfile - Then I ran
bundleto install jekyll in my project


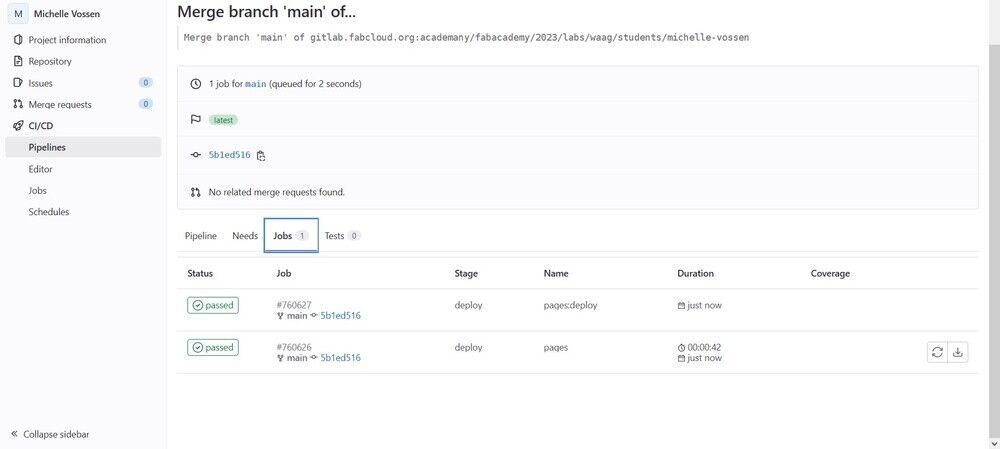
After generating the Gemfile and updating the .gitlab-ci.yml I committed the updates and then my pipeline passed. I double checked by going to the website location of the repo and there it was in all its glory.
Liquid
Liquid is the templating language that Jekyll uses. I’ve dabbled in it while making small changes to the template that my documentation blog uses to make better use of tags and categories, and I’ve done some more last summer while building my new portfolio website, but I mostly modified existing Liquid code with trial and error (and not really reading the documentation). The Liquid docs and the Liquid docs on the Jekyll documentation site are a good starting point. You can insert all kinds of if/else statements, modify strings and links and sort files by date, tag, title, et cetera with the use of filters.
Liquid Lessons
In this template, you can add cover images by adding a link to an image in the head of the Markdown file like this:
Project:
  logo: "./../assets/images/about-thumb.jpg".
Because of the relative location of my images and the way my template looks for cover images for pages, this way of linking to my images only works a folder down. Since I missed the most obvious solution of just removing the first “./.” manually which fixes the issue immediately, I went to look for a solution with Liquid to remove the first “./.” which I found here. I changed the header.html include to link to the cover image like this:
<img src="{ { item.project.logo | remove_first: "./."} }" alt="{ { item.project.title } }" />
When I was describing this process I suddenly realized how stupid this was so now I just remove the first “./.” by not typing them which makes way more sense, and reverting the image link to just link to the item.project.logo.
Another thing I ran into with Liquid was that I had only one head.html include in which I refered to the stylesheet, to which I linked relatively. This only works if all web pages are in the same folder or in another folder at the same level, which my pages are not: there are currently four pages on the main page, while the weekly assignments are in a folder down called weeks. My first solution was to just add another reference to the same stylesheet like this:
<link rel="stylesheet" href="./assets/css/style.css">
<link rel="stylesheet" href="./../assets/css/style.css">
However, this is a lazy solution, and it throws an error on every page because it can only find one of the two stylesheets. My first thought was ‘it works so who cares’, but after a few days I decided to change it to a more elegant solution. I figured that an absolute link to the stylesheet would be the solution, so I first tried <link rel="stylesheet" href="/assets/css/style.css"> but that didn’t work because I needed to put the relative url of my repository in there as well. I checked how it was done in my old documentation blog’s head.html, where I found a very simple solution with a relative_url filter which prepends the baseurl specified in the _config.yml file. I replaced my two lines linking to the same stylesheet with <link rel="stylesheet" href="/2023/labs/waag/students/michelle-vossen/assets/css/style.css"> and my errors were gone.
Adding gems
I wanted to add a table of content for the weekly assignment pages and after a quick online search on how to do that with Jekyll I found this pure Liquid solution and [this gem]https://morioh.com/p/6a44258244f4. I first tried the Liquid solution but I got this Liquid exception error:

Placing this error between three back tabs broke Jekyll with the same Liquid Exception. I tried meddling with the code a little but didn’t get further so I tried the gem solution.
Steps:
- Add
gem 'jekyll-toc'to Gemfile - Run
bundle install - Add jekyll-toc to the plugin list in _config.yml
- Add
'toc: true'to the head of the Markdown page where you want the table of content - Add
{ { content | toc } }in the lay-out fileproject.html - Find out after way too long that you need
{ % toc % }because apparently reading is hard (the above is content + toc, this one is separate toc which I wanted)
Note: I added spaces between the brackets and the bracket and %, because otherwise it gets converted to html.
HTML in Markdown
It’s really easy to add HTML in Markdown and style it with CSS. One of the first things I like to add to any website are image & video wrappers so I can place two or three images/videos next to each other and have them scale automatically. For this I use the following HTML & SCSS:
HTML:
<div markdown="1" class="row-2">


</div>
CSS:
.row-2 p,
.row-2--divs {
	width: 100%;
	display: flex;
	flex-flow: row wrap;
	justify-content: space-between;
	align-items: flex-start;
	margin-bottom: 2rem;

	img,
	div {
		width: 100%;
		&:not(:last-of-type) {
			margin-bottom: 2rem;
		}
	}

	@media (min-width: $breakpoint-medium) {
		flex-flow: row nowrap;
		img,
		div {
			width: 49%;
		}
	}
}
File size management
Since the maximum repo size is 100mb and maximum commit size 10mb, it’s important to compress all bulky files like images and videos before committing.
ImgMagick workflow
ImgMagick is a free open source command line tool to resize, flip, mirror, rotate, distort, shear and transform images, adjust image colors, apply various special effects, or draw text, lines, polygons, ellipses and Bézier curves. I’ve been using ImgMagick since my internship in 2019, so I didn’t have to install it anymore but if you have a Windows computer like me you can download it here. I double-checked my documentation and apparently I installed it using Chocolatey by running it in Powershell as administrator with choco install imagemagick.app.
Mogrify overwrites the current image and is used for all kinds of resizing & editing operations. In the link you can find all of the options, but here are some that I like to use:
| What it does | Command |
|---|---|
| adjust extension | magick convert img.jpg img.png |
| resize | magick mogrify -resize “800>” .jpg |
| quality | magick mogrify -quality 75% .jpg |
| convert all images from one extension to another (jpg to png) | magick mogrify -format jpg .png |
My workflow is usually as follows:
- Copy and paste images to be compressed into an empty temporary folder (I do this so if I dislike the result I still have my files somewhere, and I don’t accidentally compress images I don’t want to compress)
- Run
magick mogrify -format jpg *.png*if there’s png’s in there (they tend to be a lot larger than jpg’s). Note that it’s case sensitive: if there’s image extensions written in capslock, it’s probably best to change them here to all lowercase. - Run
magick mogrify -resize "800>" *.jpg*to resize images wider than 800px to be 800px wide. The height is calculated automatically. - If the size is too large, run ```magick mogrify -quality 75% .jpg`` to lower the quality. The lower the percentage, the smaller the file but also the lower the image quality.
FFMPEG
How to set it up
FFMPEG is used to compress video files. I haven’t used it before so I first have to install it. I went to the FFMPEG website to look for an installer, but FFMPEG only provides source code. I went for a compiled Windows version that I downloaded here instead. Then I didn’t know how to continue so I looked for a tutorial and continued from there.
Steps:
- Download the .7z file
- Extract it with 7-zip
- Copy the bin folder
- Move to C: and paste
- ‘Edit the system environment variables’ in the Windows search bar and click on the result; this opens de System Properties
- Click ‘Environment Variables’
- Click the Path variable then click ‘Edit…’ under User Variables
- Click New and paste the location of the bin folder (in my case
C:\bin) and click Ok - Test by opening up a terminal window and typing
ffmpeg -version. This should show the version of ffmpeg (which it did)
How to use it
For this week’s assigment I don’t have any videos, so I’m going to try it out with a random video I have on my computer. I went to Nadieh’s documentation to check her list of commands. I tried out ffmpeg -i testvideo.mp4 -vf scale=1280:-1 testvideo-res.mp4 which set the width of the video to 1280 pixels and the height automatically proportionally. The file size went from 56.6mb to 25.4mb. I also tried ffmpeg -i testvideo.mp4 -vcodec libx264 -crf 25 -preset medium -vf scale=-2:1080 -acodec libmp3lame -q:a 4 -ar 48000 -ac 2 testvideo-2.mp4 from Neils list of commands which compressed the video to 37.6mb. Once I actually have videos to add to my repository I’ll update it with more commands.

OBS Studio and ShareX
I used to record screencaptures with the integrated game bar in Windows, however since a couple of months it doesn’t want to save my recordings anymore. I tried fixing it without luck in the past, so I figured I would just download OBS studio as I heard Neil talk about it. I downloaded it here, but I canceled it during the setup because it needed 650mb and my computer really can’t handle much more (I’m constantly on less than 10gb space left). I asked during Global Open Time for recommendations for lightweight screen recording software and Adrian mentioned ShareX so I downloaded that instead; it needed less than 20mb. Then I got an error when I wanted to record the screen because it needs ffmpeg.exe, so I tried automatically downloading it, which failed. Then I looked for it on my computer (I’ve already installed it before), copied ffmpeg.exe and pasted it in the Tools folder after which it worked.

Some thoughts and errors
I first thought about just pushing the _site directory since that’s where the static website is being generated locally. However Pieter mentioned that it should be the other way around: everything except for the static website should be in the repository. It also makes sense since in previous projects I had the _site directory in the .gitignore anyway. Gitlab generates the website based on the CI/CD specified in the .gitlab-ci.yml.