As I said in about I born and raised in Rwanda as my mother country,the large Percentage of people ranges on the same level of living, we usually get used in Agriculture and farming, As days goes many of people who consumes the industry finished products that are mostly composed of fats are facing the problem of having excessive body Fats in their bodies (Being Over weight or Obesed), and it's dangerous thing to the lives of many because it has bad effects human well being and it may lead to other Body destruction diseases (chronic diseases), It can be also counted as the threat to individuals and the nation at Large, my idea to implement The BMI Machine is to overcome that challenge in the lives of people starting in my family, close Community and nation also I live in through Consistent Checking to their Body Status, many people suffers some diseases because of because of being Overweight or Obessed, Since when I was young I thought of the different things that could come as the solution to the current problem, and then After realising the case I think od what I can do as the solution and I thought of making Automated BMI Machine that could be used in Homes and Public Place to check the Life Status.
Firstly the meaning of BMI (Body Mass Index) machine: is a device that measures a person's weight and height to calculate their BMI. BMI is a measure of body fat based on height and weight, and is commonly used as an indicator of a person's overall health and fitness in the whole body ,this can be useful for anybody's health.
The Body Mass Index (BMI) was created as a way to assess the health risks associated with being overweight or underweight. Prior to the development of BMI, there were a variety of different ways that health professionals measured weight and body composition, but there was no standardized method for determining whether someone was at a healthy weight. This led to confusion and inconsistency in health recommendations.
The problem that BMI was created to solve was the need for a standardized and objective way to assess whether someone was at a healthy weight. The BMI formula, which calculates a person's weight in kilograms divided by their height in meters squared, was first introduced in the early 19th century as a way to measure obesity. Over time, the BMI formula became more widely used as a way to assess whether someone was at a healthy weight, and it is now considered the standard method for measuring weight and body fat.
The BMI machine, which is a scale that calculates a person's BMI based on their weight and height, is a solution to the problem of measuring BMI quickly and easily. The machine eliminates the need for manual calculations and provides an objective measure of a person's weight and body fat percentage. This makes it a useful tool for healthcare professionals, fitness centers, and other organizations that are concerned with weight management and health.
Where the results are based on These conditions;A BMI of less than 18.5 is considered underweight(Undernutrition), a BMI of 18.5 to 24.9 is considered a healthy weight(Normalnutrition), a BMI of 25 to 29.9 is considered overweight(Overnutrition), and a BMI of 30 or higher is considered obese.
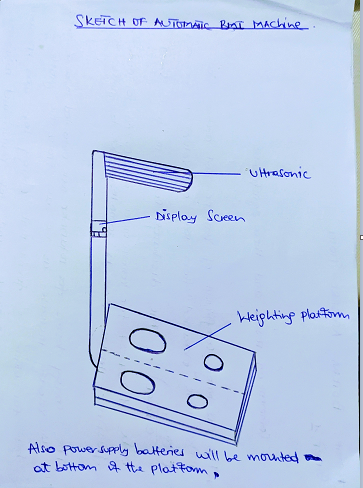
For this typical BMI machine consists of a platform on which the user stands, a digital display that shows the user's weight and height, and a BMI calculator that uses these measurements to calculate the person's BMI. Some machines may also include additional features, such as body fat percentage measurement, and may be equipped with wireless connectivity for data transfer and tracking.
During This section of Project development I will show the whole Journey of implementing BMI machine the way I used till the end of it
Because I developed it in critical time I arranged the way and How I follow the steps to reach to my final project due time though it was not really simple.

Below the Progress I took to this journey of making the Automated BMI Machine.
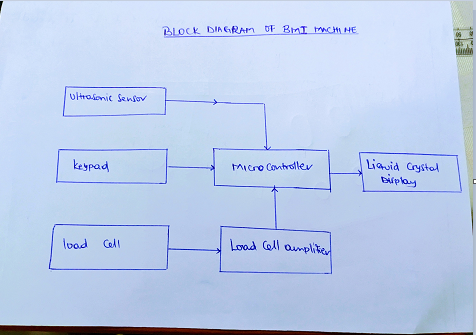
Firstly my Project is BMI Machine it will be composed of the different components such as:(Ultrasonic Sensor,Load cell,LCD Screen Display,Microcontroller,Power supply,Platform).
And After the the brainstorming the next thing I followed i the design of needed devices and I putted that design into reality.
In The Electronic Week I started thinking of what I had to use in the final Project and I realised that though there are not many devices to use but I had to pay attention in Circcuit diagram.
Electronic Components I used are:
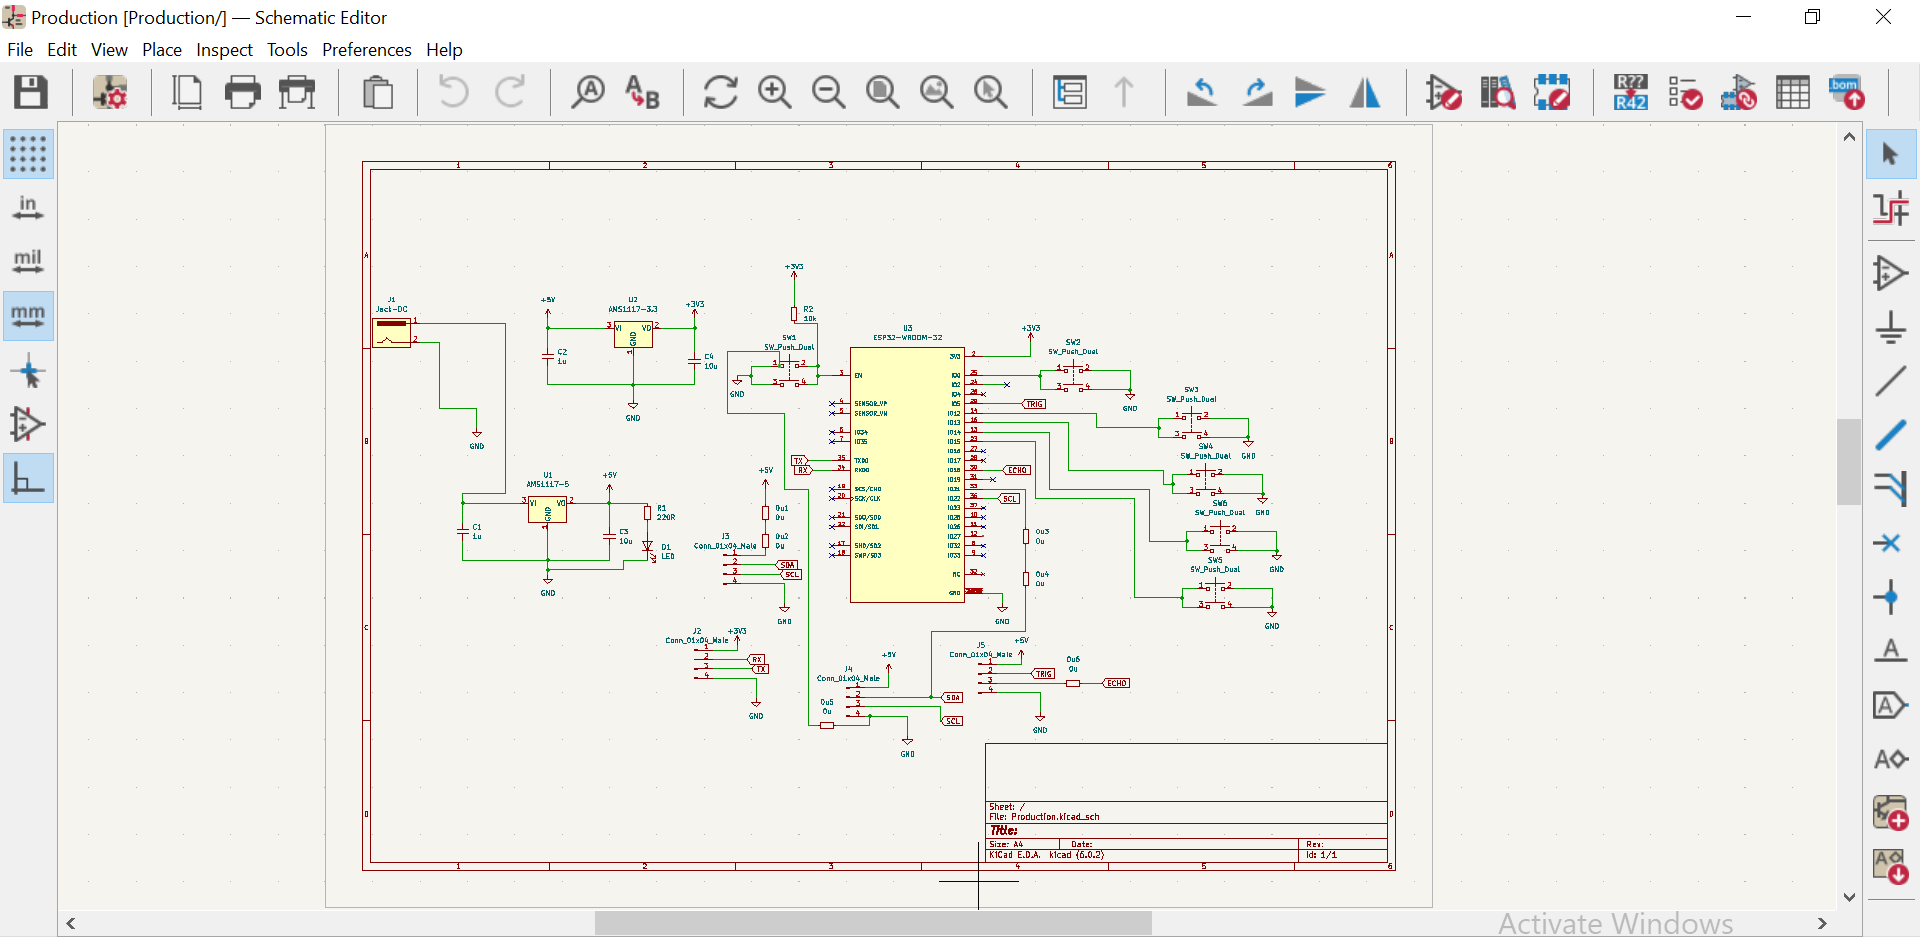
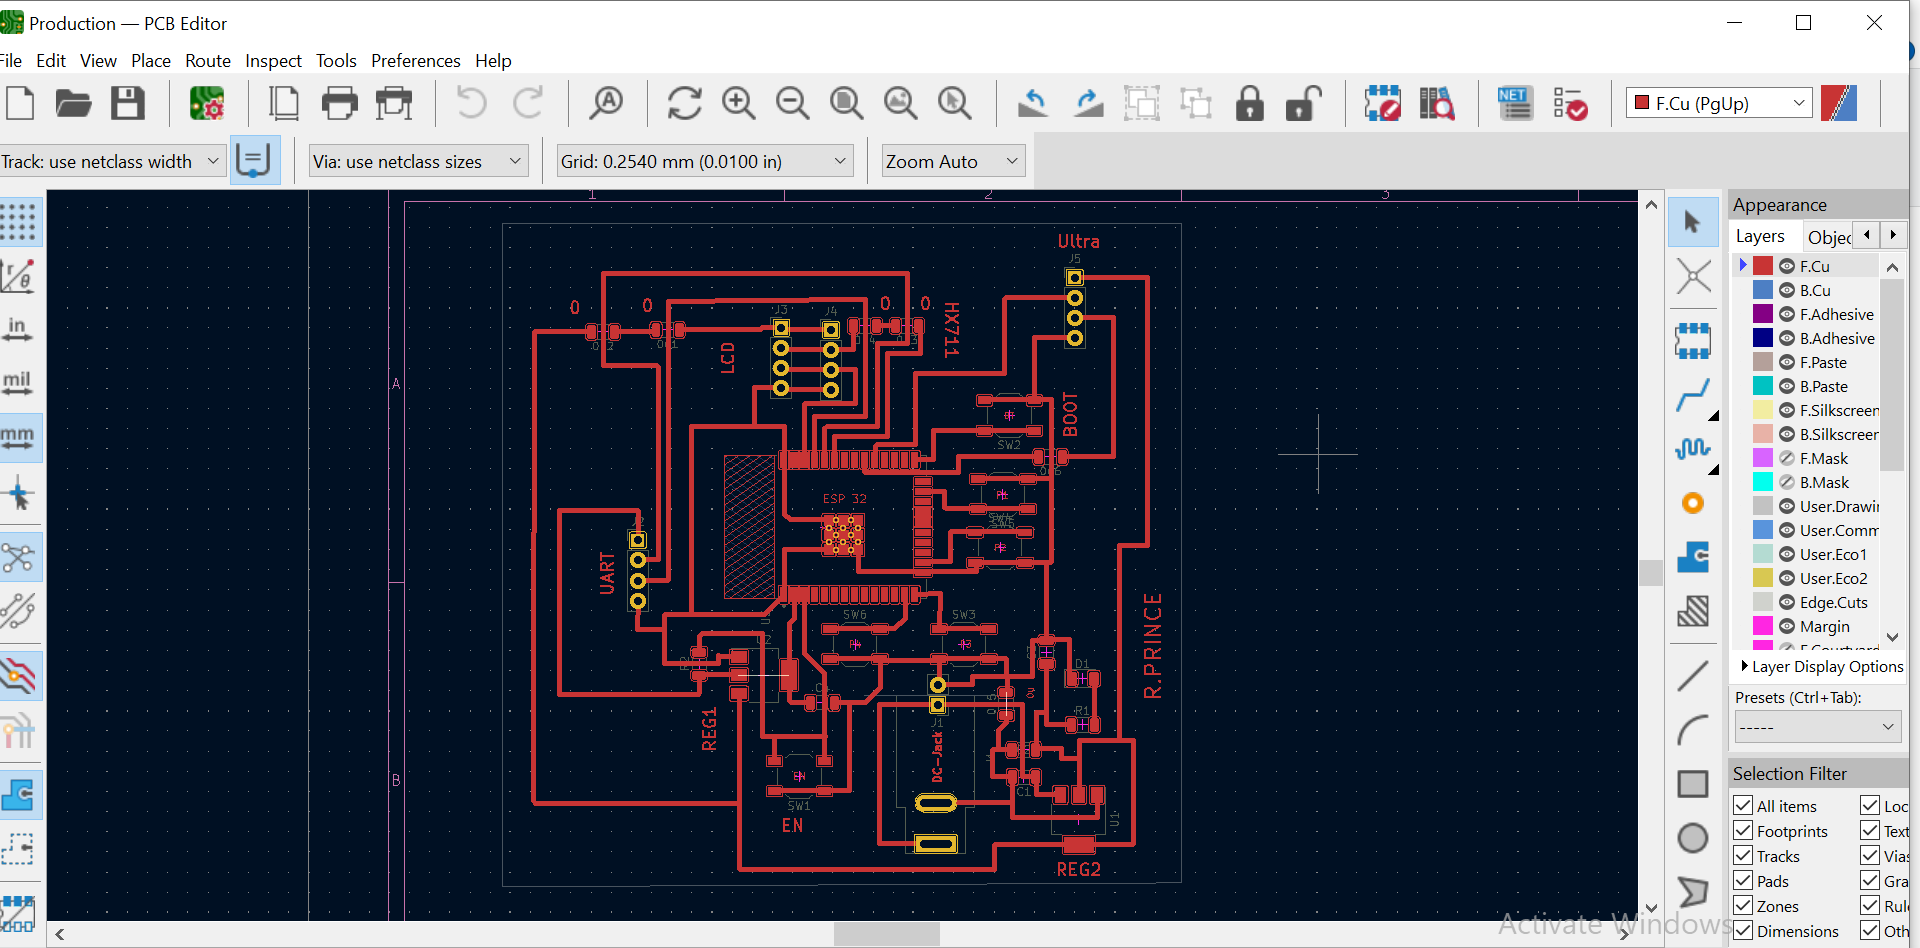
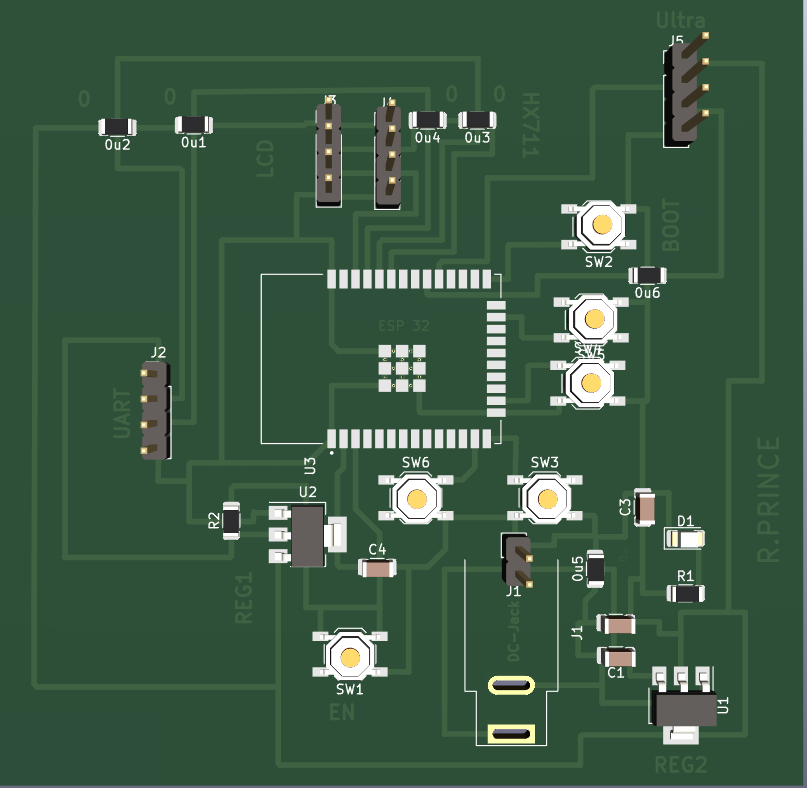
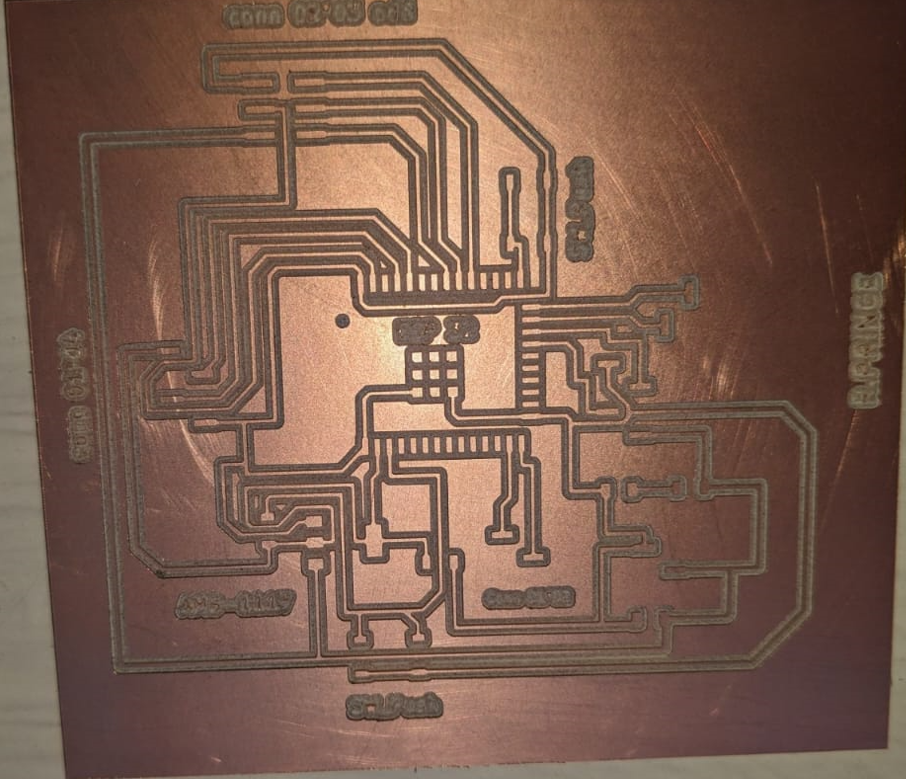
In designing my PCB Board I used KICAD Software for All Schematic, PCB editor and 3D View,though I started to use KICAD Software in Electronics Weeks but now I get used to it and it's really nice for me to reach that level.
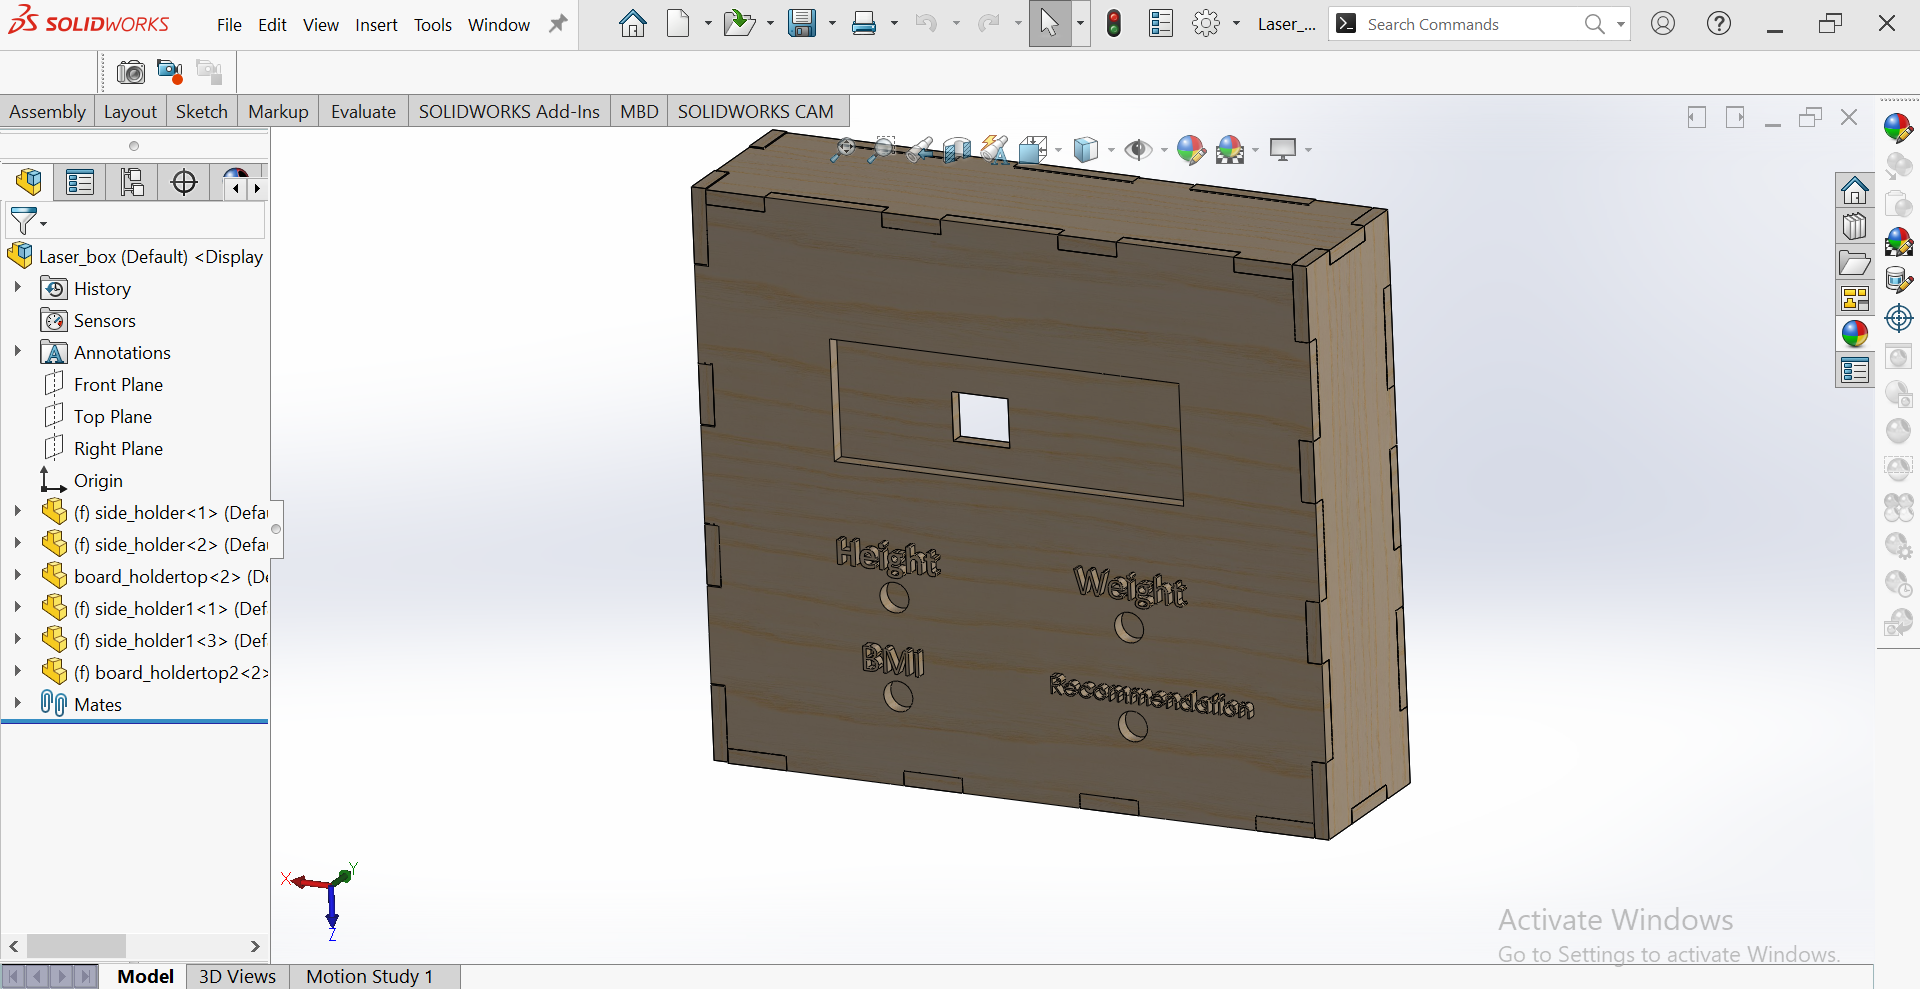
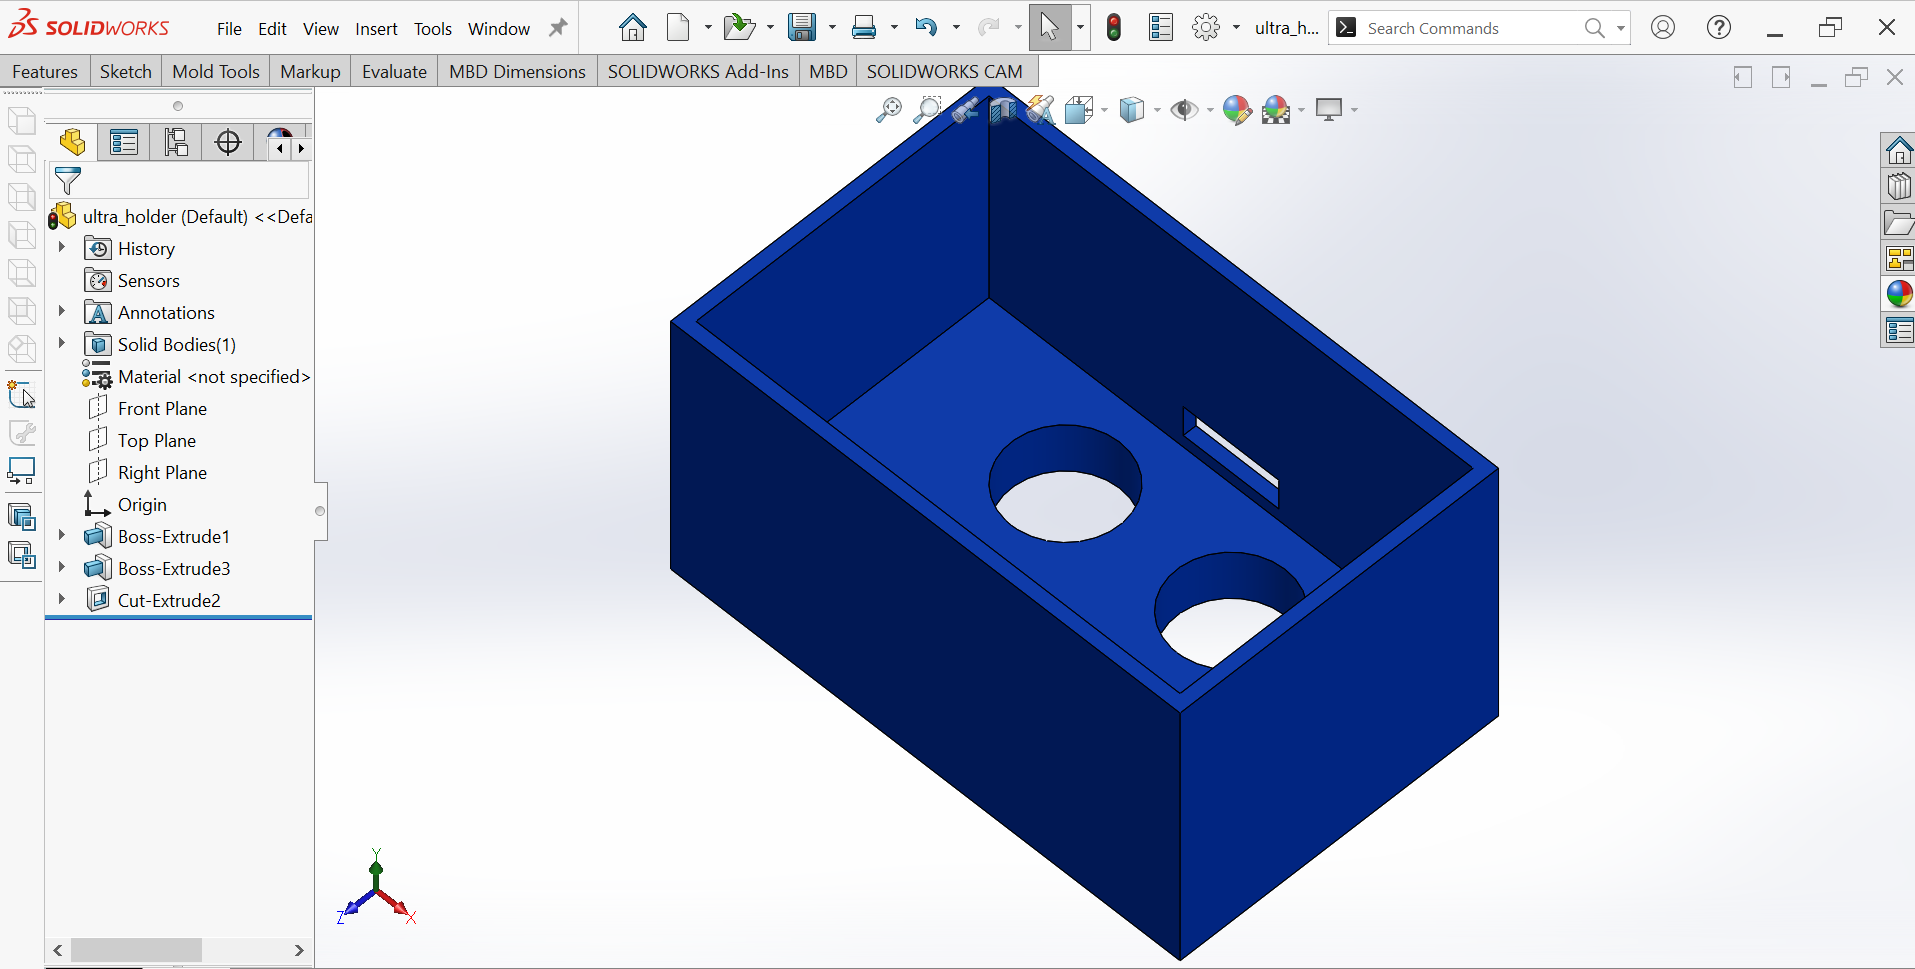
For the mechanical part of the BMI Machine I have designed it using Solidworks Software which is among the CAD(Computer Aided Design ) Softwares.
I have designed All the Parts and I Assembled them After For 3D model OF BMI.
Mechanical Parts I used are:
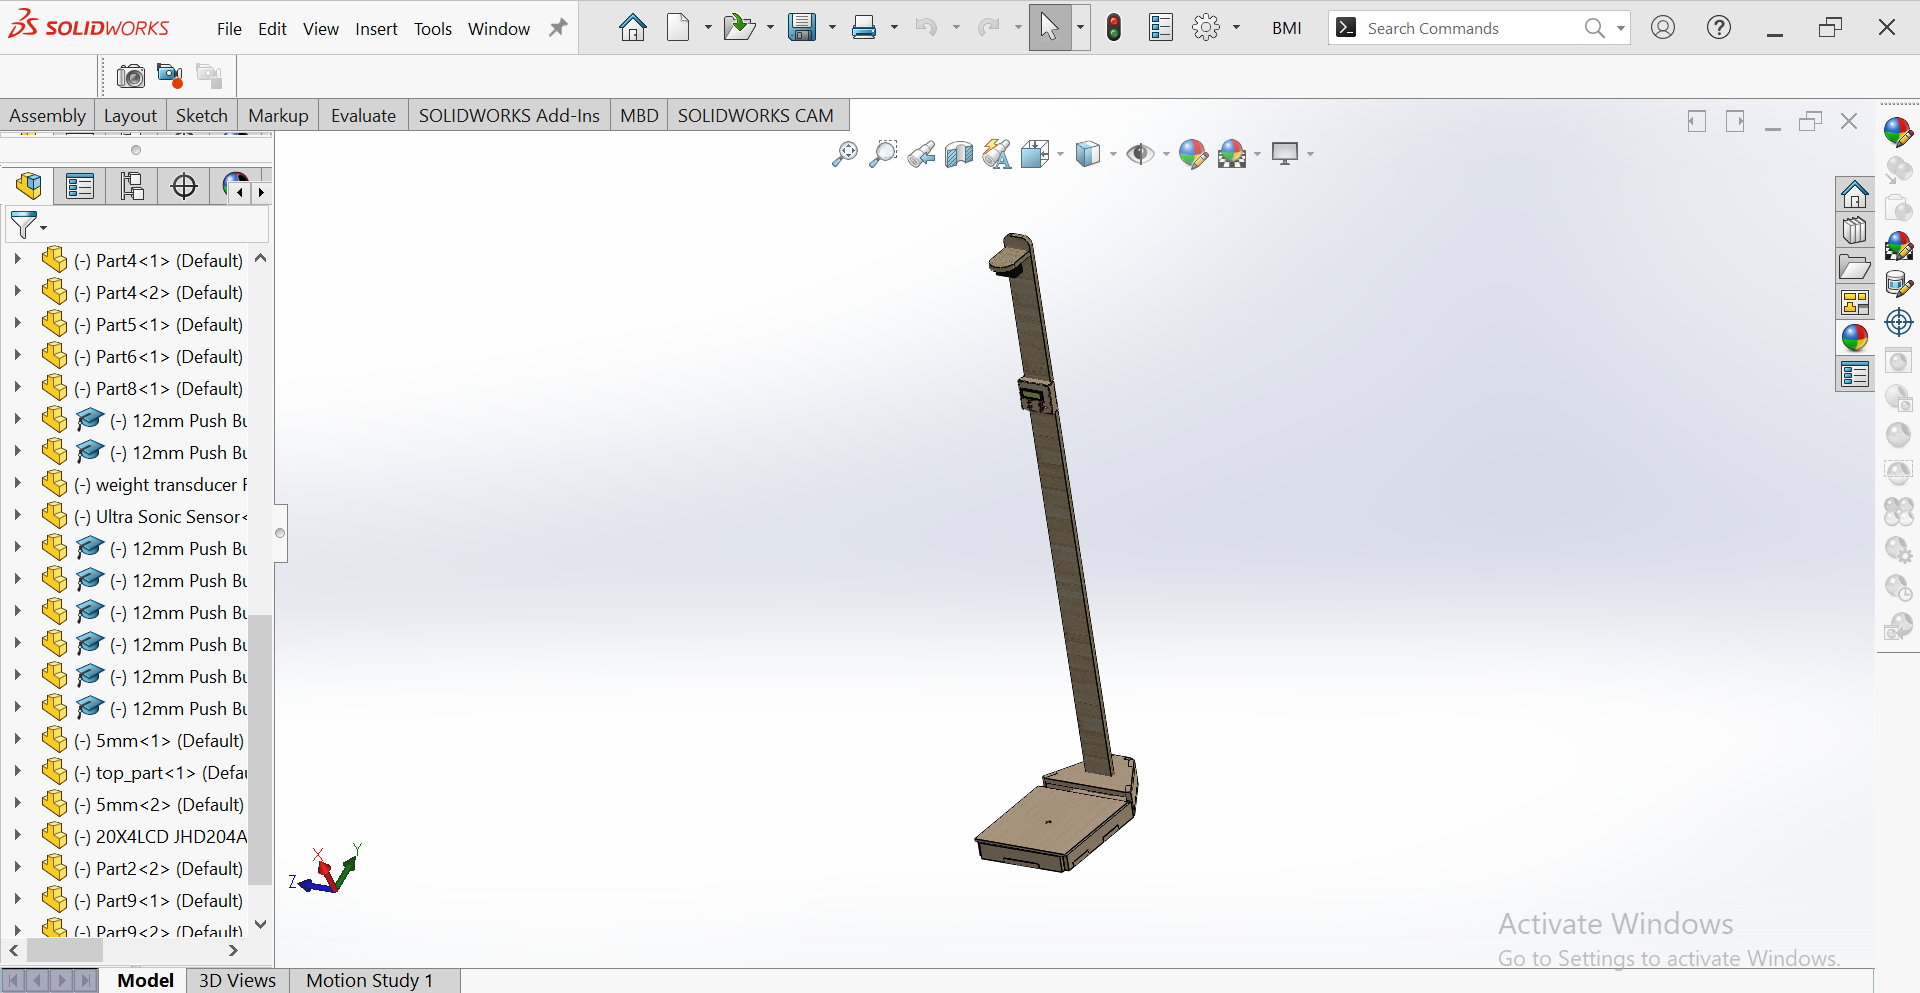
Below is the Animation of BMI in Solidworks showing the Parts.
On this Part I took the time to mill the PCB well and I soldered the components on the PCB Board,Though for the first time I made mistake in soldering and it failed to upload but after correcting that issue I progressed Smoothly.
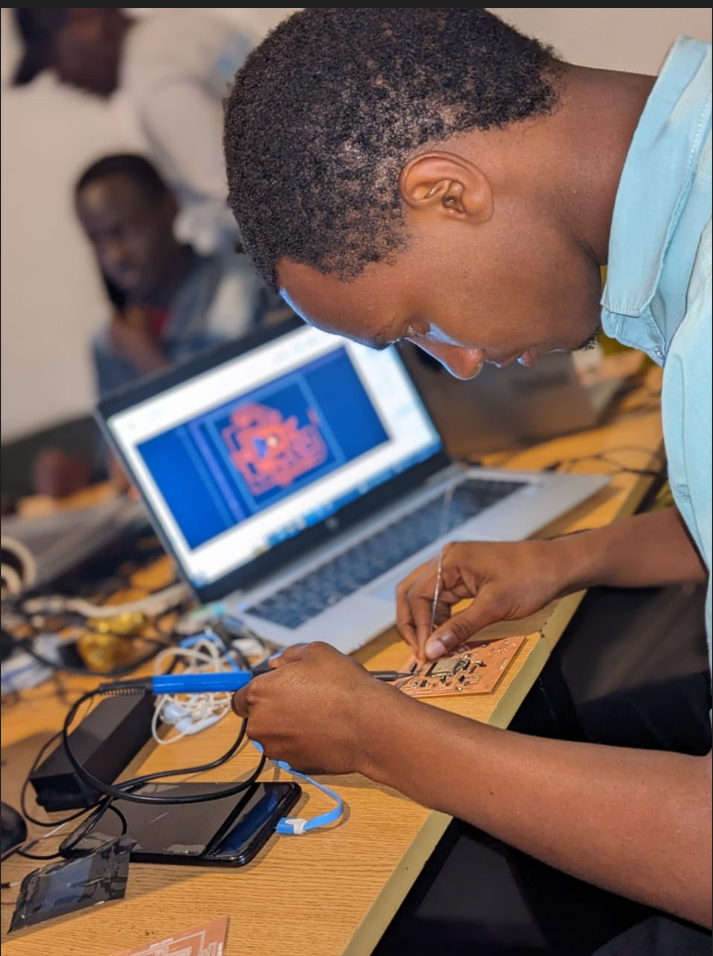
Below is the Video of milling and Soldering.
The Critical Part for the electronic Part was this for me, to code and build my own way of looking was really hard for me,I spent alot of time debugging the codes and Finally it worked but it was really tiresome though it went well later.
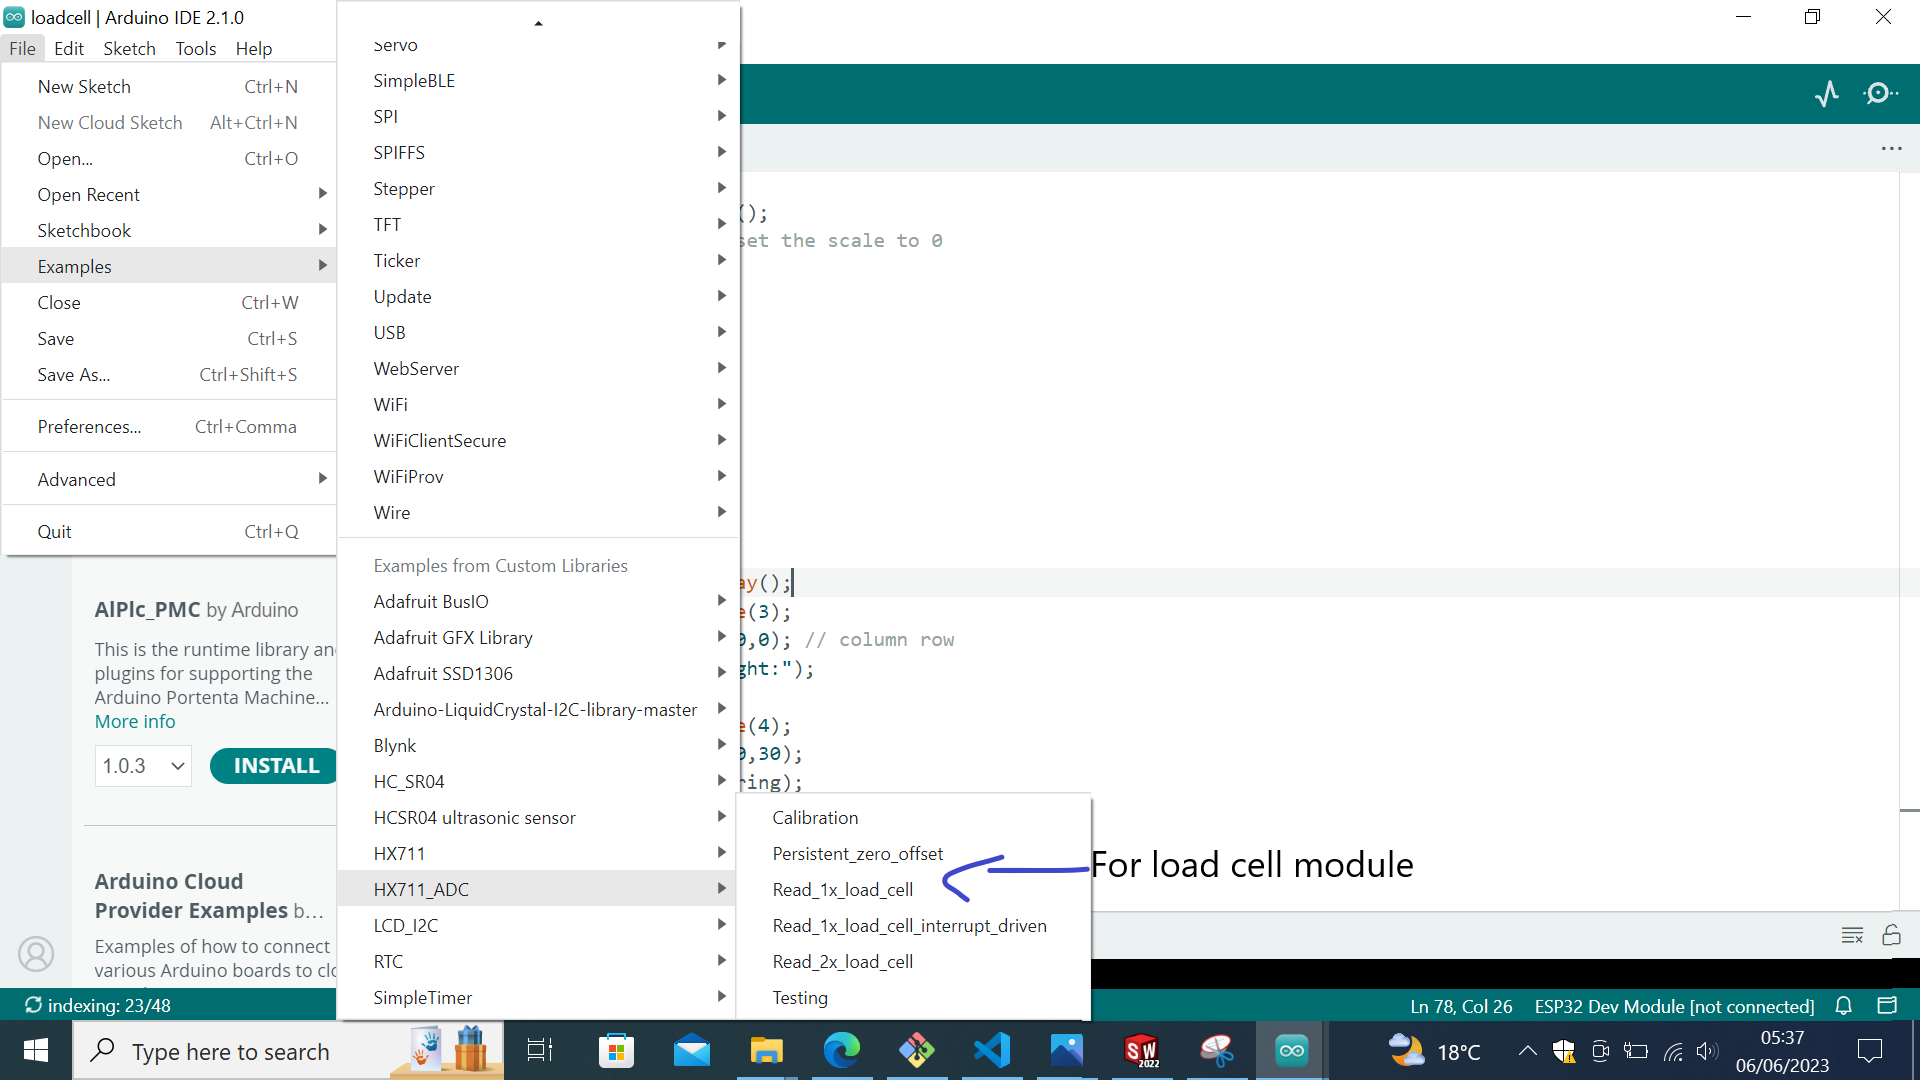
Before Starting Programming I first downloaded the required libraries for the input and output devices that I will use.
some of the libraties I downloaded them in Arduino manage libraries others I got it on the internet.
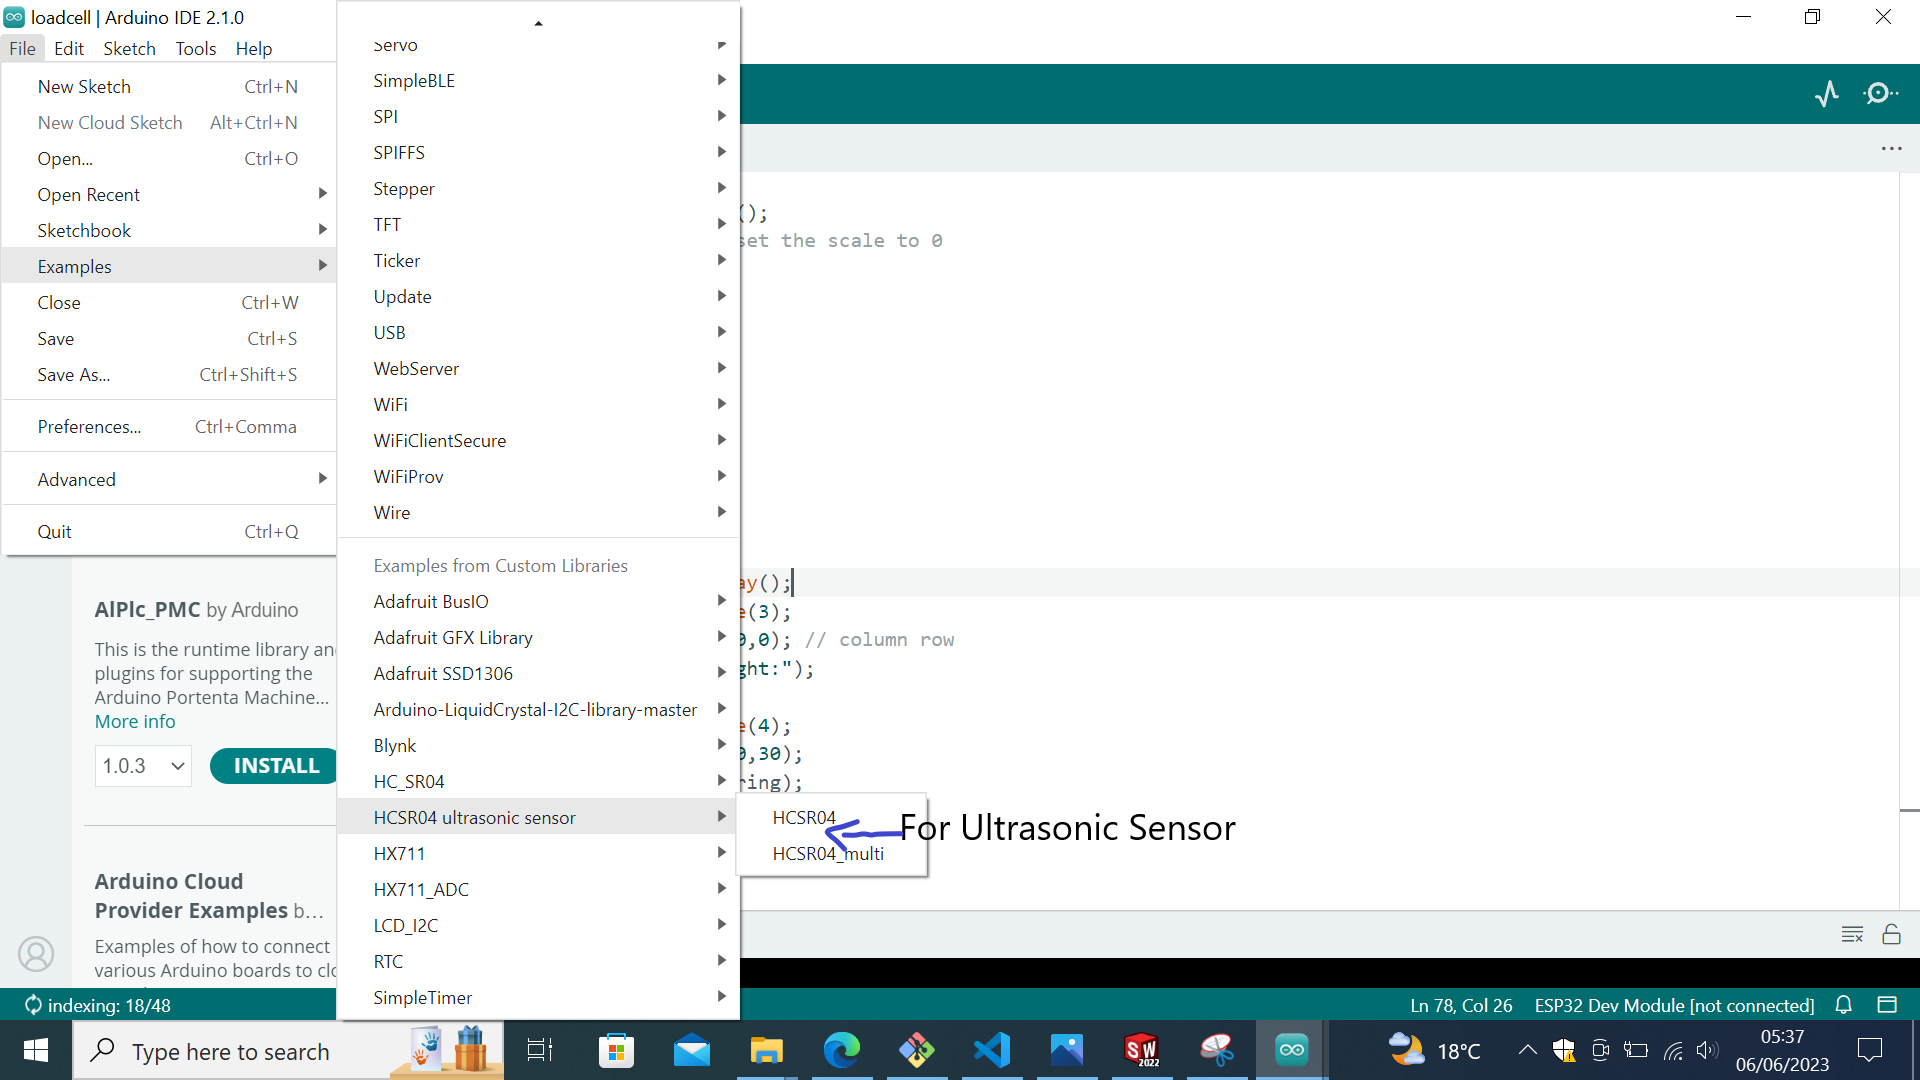
Then After Downloading The Libraries of all devices, then I started to code and Testing if it works, but for the first time I runned each device separately,It was like test of each device.
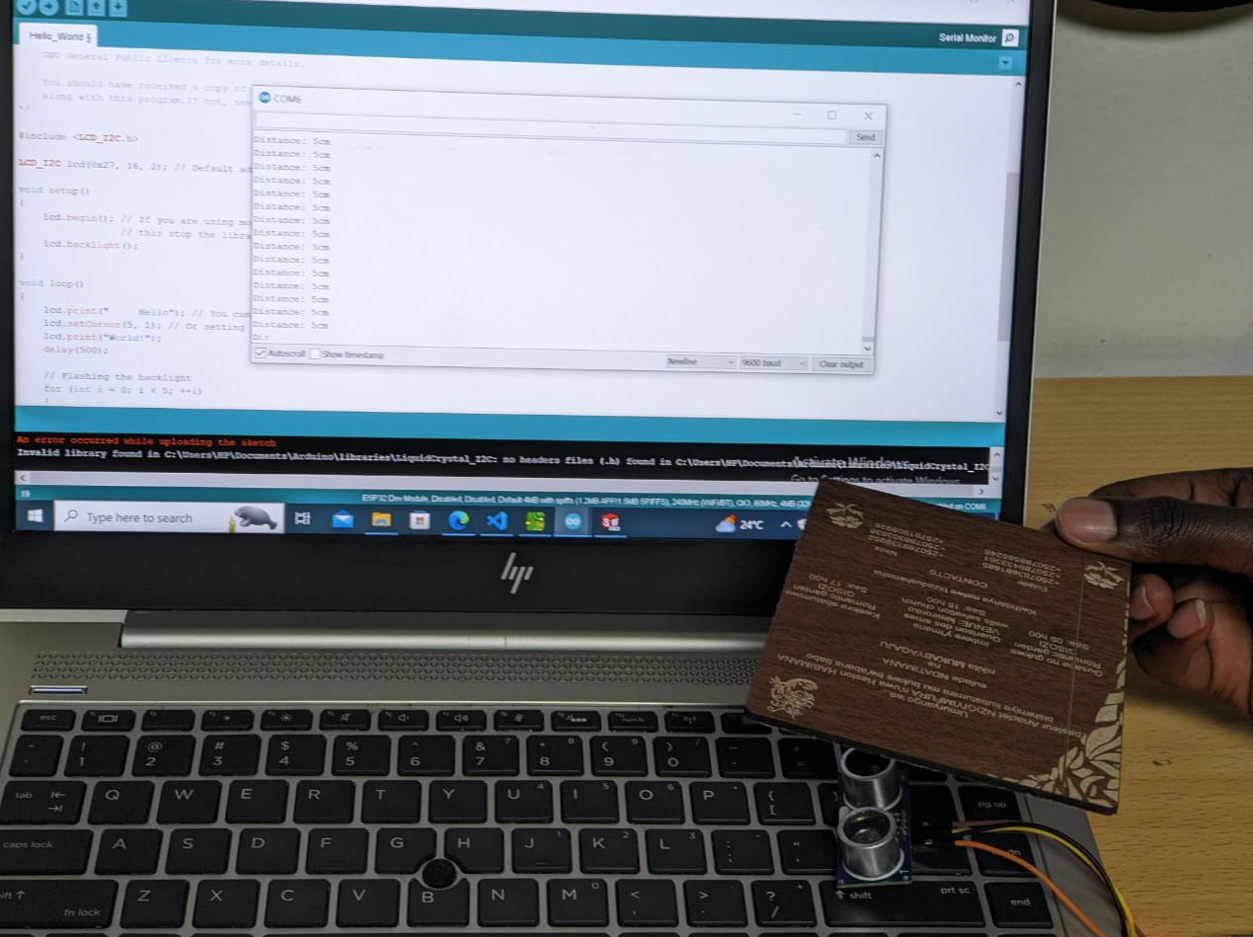
The Codes I used to run this ultrasonic Sensor.
  #include

    HCSR04 hc(5, 18); //initialisation class HCSR04 (trig pin , echo pin)

    void setup()
    {
        Serial.begin(9600);
    }

    void loop()
    {
        Serial.println(hc.dist()); // return curent distance in serial
        delay(60);                 // we suggest to use over 60ms measurement cycle, in order to prevent trigger signal to the echo signal.
    }
This is the video While Testing Ultrasonic Sensor.
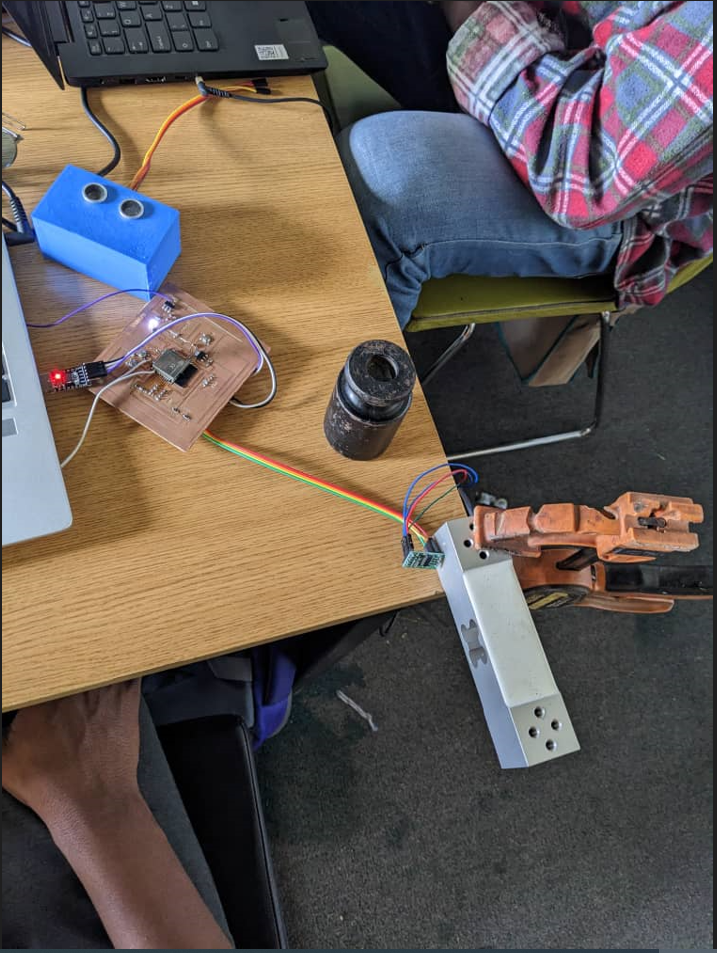
The Codes I used to calibrate the Load cell.
#include
  #if defined(ESP8266)|| defined(ESP32) || defined(AVR)
  #include
  #endif

  //pins:
  const int HX711_dout = 16; //mcu > HX711 dout pin
  const int HX711_sck = 17; //mcu > HX711 sck pin

  //HX711 constructor:
  HX711_ADC LoadCell(HX711_dout, HX711_sck);

  const int calVal_calVal_eepromAdress = 0;
  unsigned long t = 0;

  void setup() {
    Serial.begin(57600); delay(10);
    Serial.println();
    Serial.println("Starting...");

    float calibrationValue; // calibration value
    calibrationValue = 22.29; // uncomment this if you want to set this value in the sketch
  #if defined(ESP8266) || defined(ESP32)
    //EEPROM.begin(512); // uncomment this if you use ESP8266 and want to fetch this value from eeprom
  #endif
    //EEPROM.get(calVal_eepromAdress, calibrationValue); // uncomment this if you want to fetch this value from eeprom

    LoadCell.begin();
    //LoadCell.setReverseOutput();
    unsigned long stabilizingtime = 2000; // tare preciscion can be improved by adding a few seconds of stabilizing time
    boolean _tare = true; //set this to false if you don't want tare to be performed in the next step
    LoadCell.start(stabilizingtime, _tare);
    if (LoadCell.getTareTimeoutFlag()) {
      Serial.println("Timeout, check MCU>HX711 wiring and pin designations");
    }
    else {
      LoadCell.setCalFactor(calibrationValue); // set calibration factor (float)
      Serial.println("Startup is complete");
    }
    while (!LoadCell.update());
    Serial.print("Calibration value: ");
    Serial.println(LoadCell.getCalFactor());
    Serial.print("HX711 measured conversion time ms: ");
    Serial.println(LoadCell.getConversionTime());
    Serial.print("HX711 measured sampling rate HZ: ");
    Serial.println(LoadCell.getSPS());
    Serial.print("HX711 measured settlingtime ms: ");
    Serial.println(LoadCell.getSettlingTime());
    Serial.println("Note that the settling time may increase significantly if you use delay() in your sketch!");
    if (LoadCell.getSPS() < 7) {
      Serial.println("!!Sampling rate is lower than specification, check MCU>HX711 wiring and pin designations");
    }
    else if (LoadCell.getSPS() > 100) {
      Serial.println("!!Sampling rate is higher than specification, check MCU>HX711 wiring and pin designations");
    }
  }

  void loop() {
    static boolean newDataReady = 0;
    const int serialPrintInterval = 500; //increase value to slow down serial print activity

    // check for new data/start next conversion:
    if (LoadCell.update()) newDataReady = true;

    // get smoothed value from the dataset:
    if (newDataReady) {
      if (millis() > t + serialPrintInterval) {
        float i = LoadCell.getData();
        Serial.print("Load_cell output val: ");
        Serial.println(i);
        newDataReady = 0;
        t = millis();
      }
    }

    // receive command from serial terminal, send 't' to initiate tare operation:
    if (Serial.available() > 0) {
      char inByte = Serial.read();
      if (inByte == 't') LoadCell.tareNoDelay();
    }

    // check if last tare operation is complete:
    if (LoadCell.getTareStatus() == true) {
      Serial.println("Tare complete");
    }

  }
This is the video While Testing
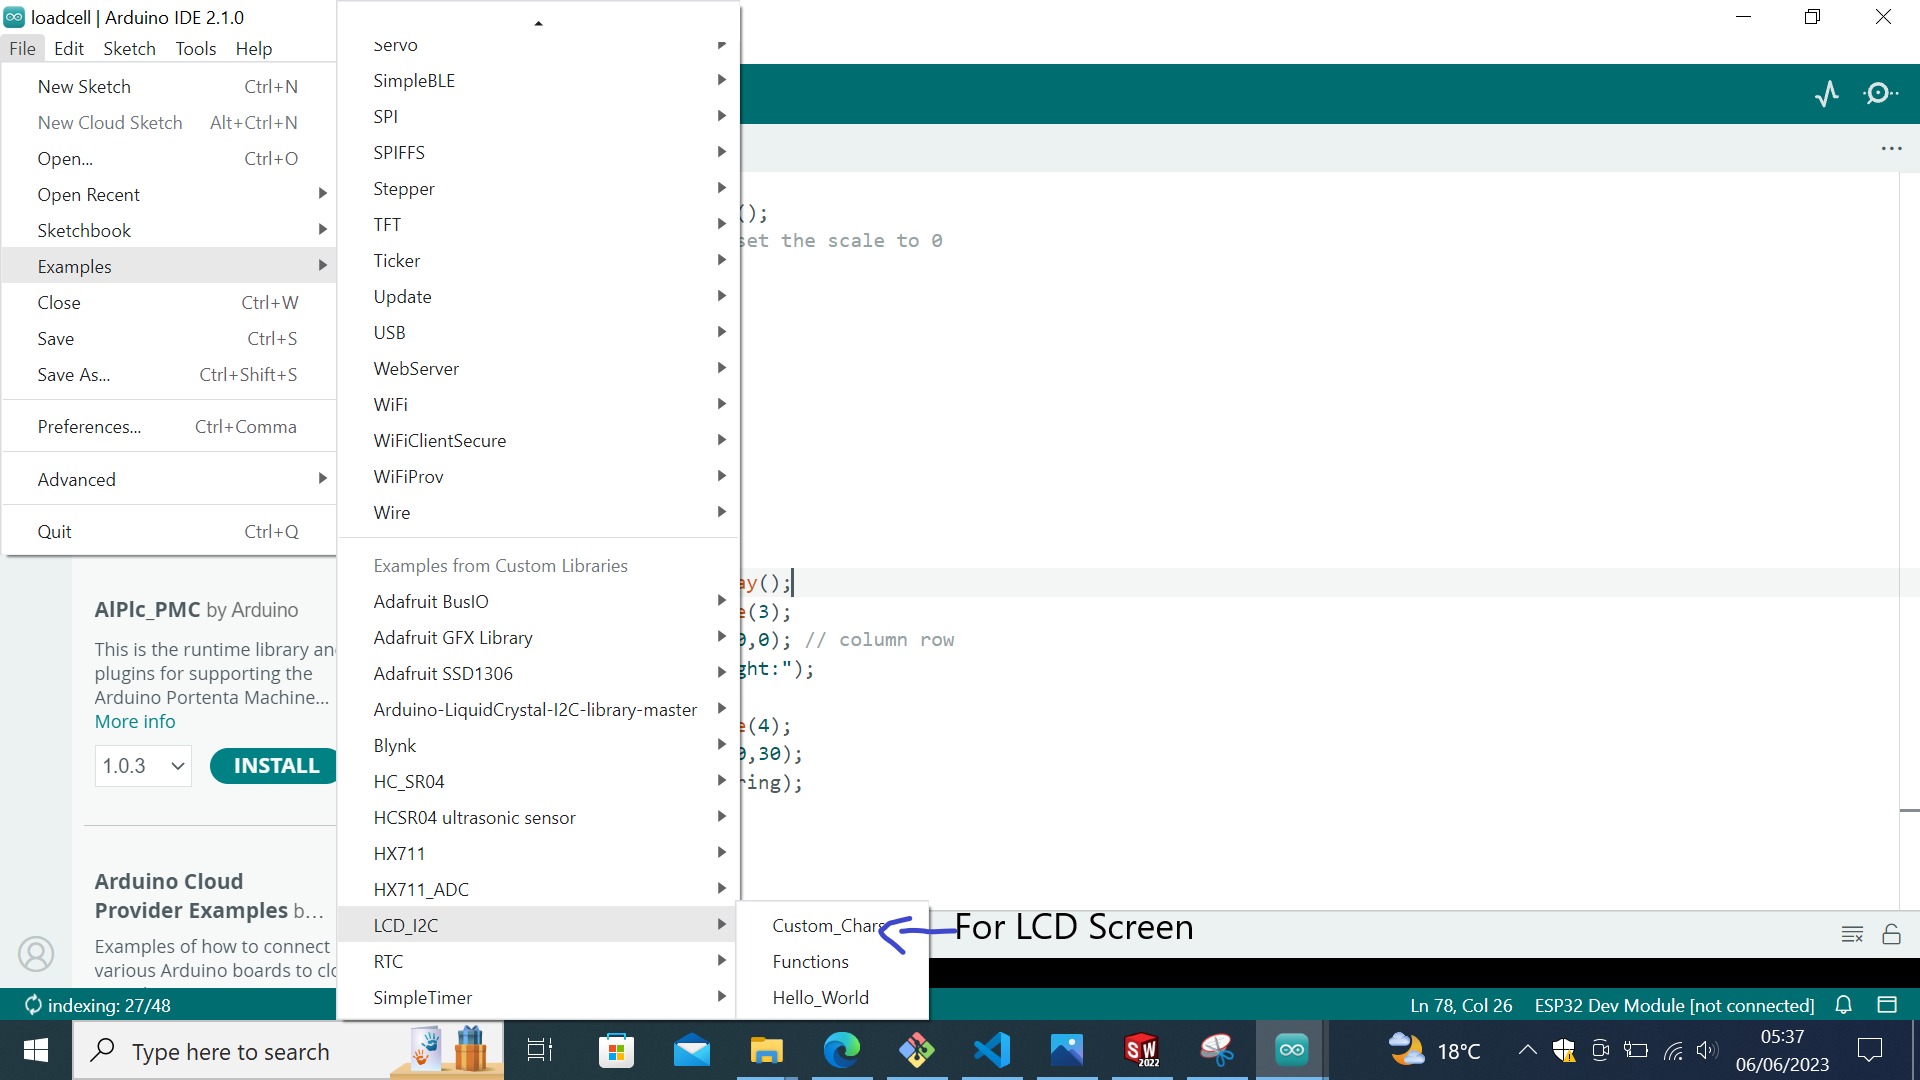
The Codes I used to run LCD Screen.
 #include

LCD_I2C lcd(0x27, 20, 4); // Default address of most PCF8574 modules, change according

void setup()
{
  lcd.begin(); // If you are using more I2C devices using the Wire library use lcd.begin(false)
               // this stop the library(LCD_I2C) from calling Wire.begin()
  lcd.backlight();
}

void loop()
{
  lcd.print(" Fabacademy 2023"); // You can make spaces using well... spaces
  lcd.setCursor(5, 1); // Or setting the cursor in the desired position.
  lcd.print("");
  delay(500);

  // Flashing the backlight
  for (int i = 0; i < 5; ++i)
  {
      lcd.backlight();
      delay(50);
      lcd.noBacklight();
      delay(50);
  }

  lcd.backlight();
  lcd.clear();
  delay(500);
}
This is the video While Testing
For the feet stickers I used Cut Studio software to cut the blue paper work piece for the sake of dimensional Accuracy I used feet vetcors from the internet and then I inserted it in the cut studio.
Feet Vectors in Cut Studio
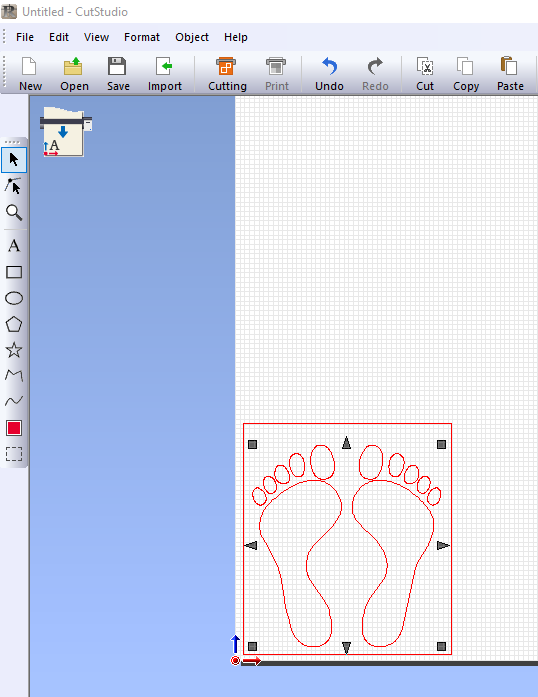
Zoomed Vectors of the feet

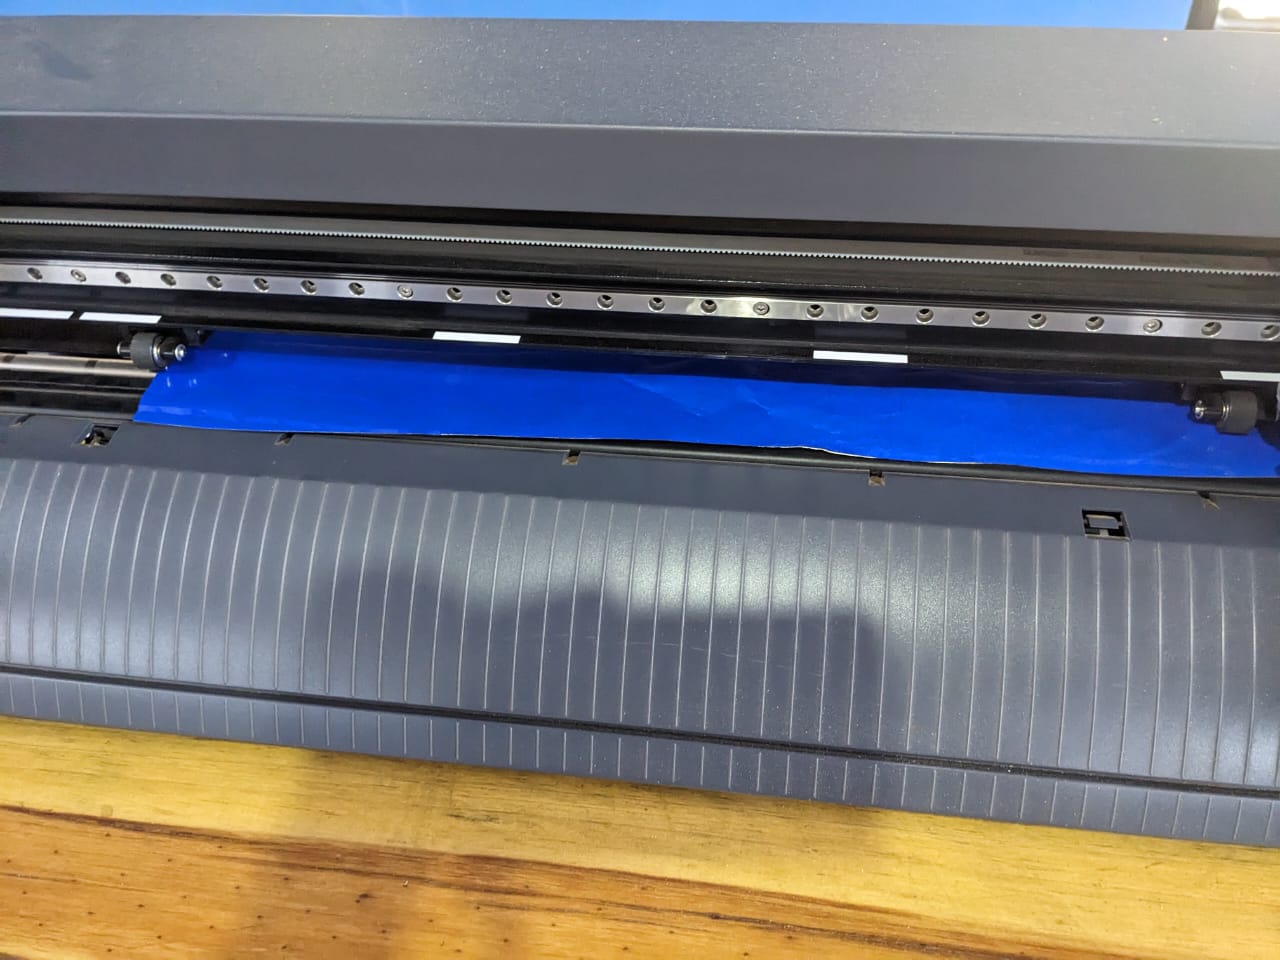
Setting the Paper on Vinyl cutter machine.
Final output after cutting the paper.
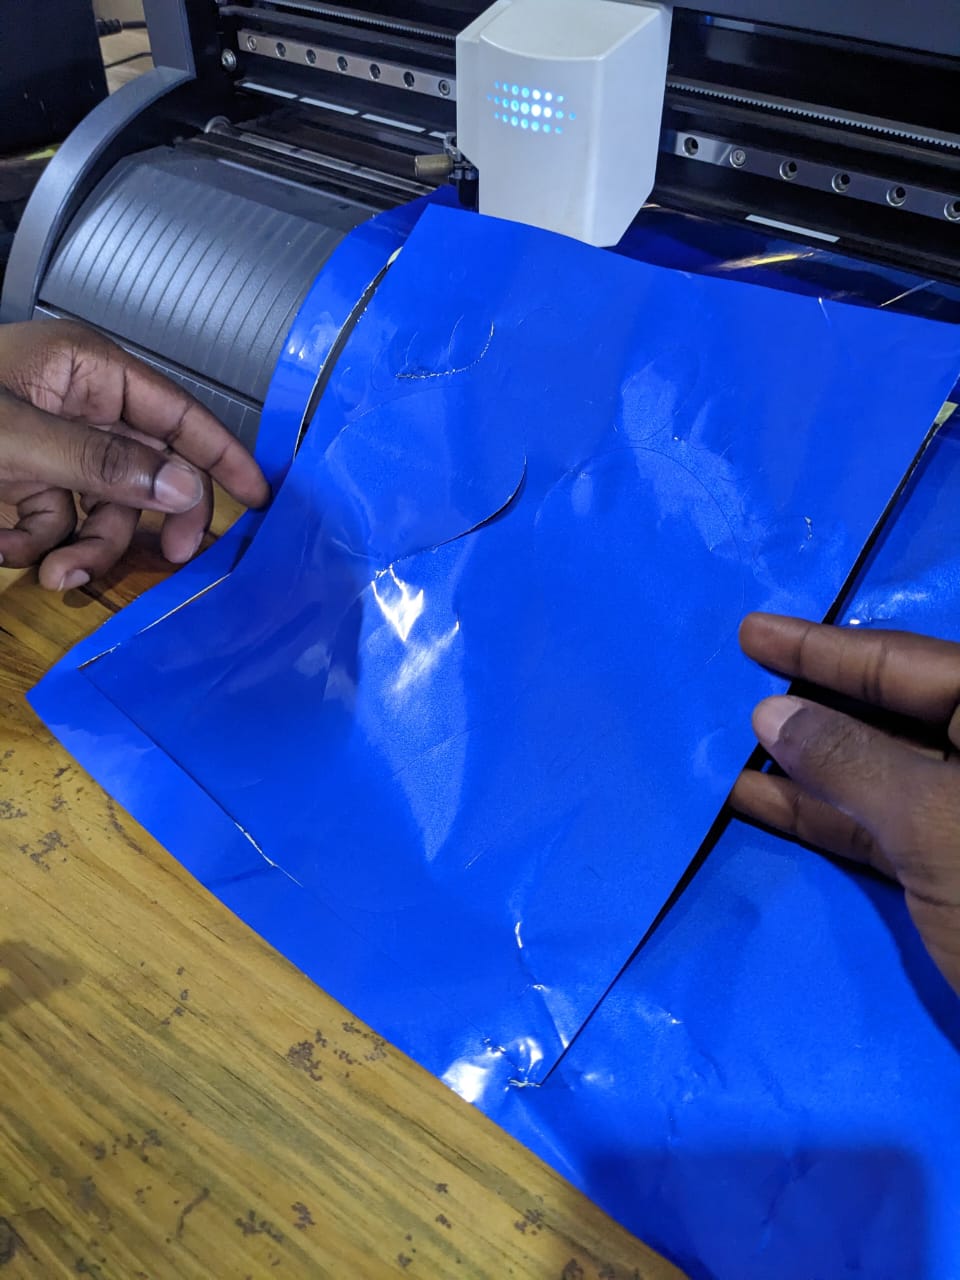

This is the video For the vinyl Cutter cutting the sticker.
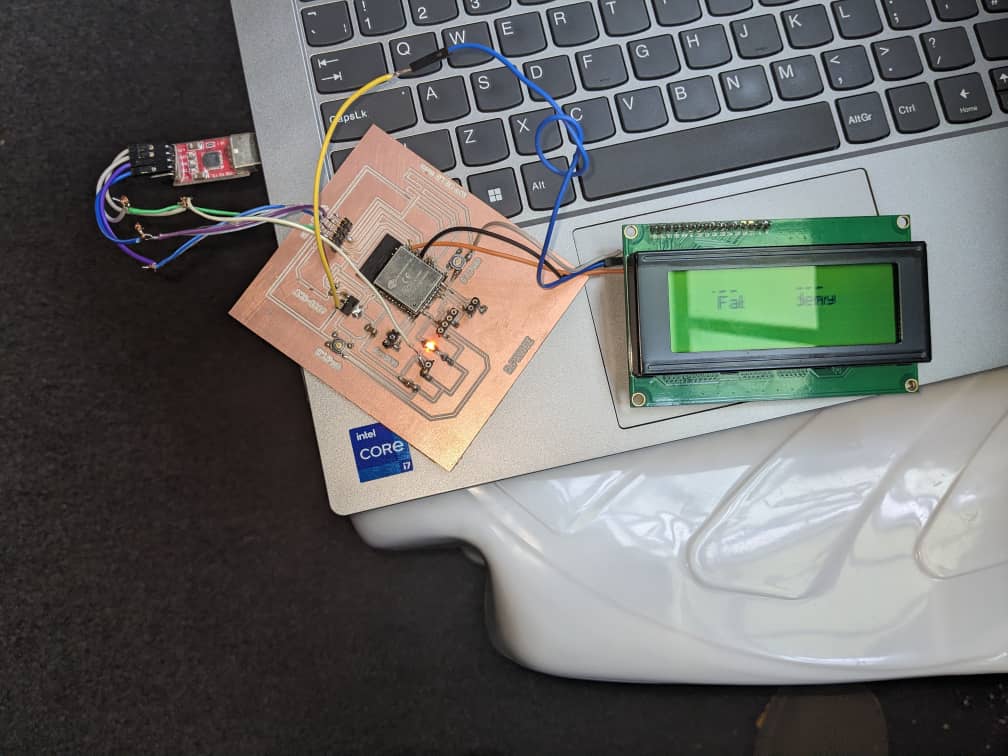
Here I Took LCD Screen, Ultrasonic Sensor and Load cell,Then I tested the codes if it could work As I wished to be.
These Are First arduino Codes while combining all libraries for each device and Merge them in order to be linked in all.
    /*
    -------------------------------------------------------------------------------------
    HX711_ADC
    Arduino library for HX711 24-Bit Analog-to-Digital Converter for Weight Scales
    Olav Kallhovd sept2017
    -------------------------------------------------------------------------------------
 */

 /*
    Settling time (number of samples) and data filtering can be adjusted in the config.h file
    For calibration and storing the calibration value in eeprom, see example file "Calibration.ino"

    The update() function checks for new data and starts the next conversion. In order to acheive maximum effective
    sample rate, update() should be called at least as often as the HX711 sample rate; >10Hz@10SPS, >80Hz@80SPS.
    If you have other time consuming code running (i.e. a graphical LCD), consider calling update() from an interrupt routine,
    see example file "Read_1x_load_cell_interrupt_driven.ino".

    This is an example sketch on how to use this library
 */
 #include
 #include
 #include
 #if defined(ESP8266)|| defined(ESP32) || defined(AVR)
 #include
 #endif
   // int hc.dist();

 float Height;
 int Mass;
 float BMI;
 int screenstage=0;
 int buttonstate=0, prev=0;
 float i;
 const int buttonPin1 = 12;
 const int buttonPin2 = 13;
 const int buttonPin3 = 15;


 //pins:
  //initialisation class HCSR04 (trig pin , echo pin)
 const int HX711_dout = 16; //mcu > HX711 dout pin
 const int HX711_sck = 17; //mcu > HX711 sck pin
 LCD_I2C lcd(0x27, 20, 4);
 //HX711 constructor:HCSR04 hc(5, 18);
 HX711_ADC LoadCell(HX711_dout, HX711_sck);

 const int calVal_calVal_eepromAdress = 0;
 unsigned long t = 0;
 unsigned int distance = 0;

 HCSR04 hc(5, 18);
 void setup()

  {
   lcd.begin();
   lcd.backlight();
   pinMode(buttonPin1, INPUT_PULLUP);
   pinMode(buttonPin2, INPUT_PULLUP);
   pinMode(buttonPin3, INPUT_PULLUP);


   // pinMode(buttonPin, INPUT_PULLUP);
   Serial.begin(57600);
   Serial.println();
   Serial.println("Starting...");
   //  pinMode(buttonPin, INPUT_PULLUP);

   // Display initial message on the LCD
 //   lcd.print("Press any button For:");
 //   lcd.setCursor(0, 1);

 //   lcd.print("Weight");
 //  lcd.setCursor(0, 2);
 //  lcd.print("Height");
 //  lcd.setCursor(0, 3);
 //  lcd.print("BMI");
 //  lcd.setCursor(0, 4);


   float calibrationValue; // calibration value
   calibrationValue = 22.22; // uncomment this if you want to set this value in the sketch
 #if defined(ESP8266) || defined(ESP32)
   //EEPROM.begin(512); // uncomment this if you use ESP8266 and want to fetch this value from eeprom
 #endif
   //EEPROM.get(calVal_eepromAdress, calibrationValue); // uncomment this if you want to fetch this value from eeprom

   LoadCell.begin();
   //LoadCell.setReverseOutput();
   unsigned long stabilizingtime = 2000; // tare preciscion can be improved by adding a few seconds of stabilizing time
   boolean _tare = true; //set this to false if you don't want tare to be performed in the next step
   LoadCell.start(stabilizingtime, _tare);
   if (LoadCell.getTareTimeoutFlag()) {
     // Serial.println("Timeout, check MCU>HX711 wiring and pin designations");
   }
   else {
     LoadCell.setCalFactor(calibrationValue); // set calibration factor (float)
     Serial.println("Startup is complete");
   }
   while (!LoadCell.update());
   // Serial.print("Calibration value: ");
   // Serial.println(LoadCell.getCalFactor());
   // Serial.print("HX711 measured conversion time ms: ");
   // Serial.println(LoadCell.getConversionTime());
   // Serial.print("HX711 measured sampling rate HZ: ");
   // Serial.println(LoadCell.getSPS());
   // Serial.print("HX711 measured settlingtime ms: ");
   // Serial.println(LoadCell.getSettlingTime());
   // Serial.println("Note that the settling time may increase significantly if you use delay() in your sketch!");
   if (LoadCell.getSPS() < 7) {
     // Serial.println("!!Sampling rate is lower than specification, check MCU>HX711 wiring and pin designations");
   }
   else if (LoadCell.getSPS() > 100) {
     // Serial.println("!!Sampling rate is higher than specification, check MCU>HX711 wiring and pin designations");
   }
 }

 void loop(){


  int dis = hc.dist();
    distance = dis/100;

    Serial.print("Height output value in Metres: ");
     Serial.println(Height); // return curent distance in serial
                     // we suggest to use over 60ms measurement cycle, in order to prevent trigger signal to the echo signal.


   static boolean newDataReady = 0;
   const int serialPrintInterval = 500; //increase value to slow down serial print activity

   // check for new data/start next conversion:
   if (LoadCell.update()) {newDataReady = true;

     if (newDataReady) {
     if (millis() > t + serialPrintInterval) {
        i = LoadCell.getData();
       Mass = i/1000;
       Serial.print("Load_cell output value in Kilograms: ");
       Serial.println(Mass);
       BMI = (Mass)/(Height*Height);
       newDataReady = 0;
       t = millis();
     }


    }

   }

   // receive command from serial terminal, send 't' to initiate tare operation:
   // if (Serial.available() > 0) {
   //   char inByte = Serial.read();
   //   if (inByte == 't') LoadCell.tareNoDelay();
   // }

   // // check if last tare operation is complete:
   // if (LoadCell.getTareStatus() == true) {
   //   Serial.println("Tare complete");
   // }
 // delay(500);


   Serial.print(Mass);

 while(screenstage==0){

   homepage_screen();
   buttonkeys();

 }

 while(screenstage==1){

   buttonkeys();
   weight_screen();


 }
 while(screenstage==2){

   height_screen();
   buttonkeys();
  }
  while(screenstage==3){
   BMI_screen();
   buttonkeys();
  }

 }


 void buttonkeys()
 {

     if(digitalRead(buttonPin1)== LOW || digitalRead(buttonPin2) == LOW|| digitalRead(buttonPin3)== LOW ){

     buttonstate=1;

   }
   else{buttonstate=0;
   prev=0;}


  if (digitalRead(buttonPin1) == LOW && buttonstate==1 && prev==0 ){
   Serial.println("button one");
   lcd.clear();
  screenstage=1;
    prev=1;
  }
   if (digitalRead(buttonPin2) == LOW && buttonstate==1 && prev==0 ){
   Serial.println("button two");
   lcd.clear();
  screenstage=2;
   prev=1;
  }

   if (digitalRead(buttonPin3) == LOW  && buttonstate==1 && prev==0 ){
    Serial.println("button 3");
    lcd.clear();
   screenstage=3;
       prev=1;
  }

 }


 void weight_screen(){
   lcd.setCursor(5, 1);
   lcd.print("Weight");
   lcd.setCursor(5, 2);
   lcd.print(Mass);


   }

 void height_screen(){

   lcd.setCursor(5, 1);
   lcd.print("Height");
   lcd.setCursor(5, 2);
   lcd.print(distance);

 }
 void BMI_screen(){
     lcd.setCursor(5, 1);
   lcd.print("BMI");
   lcd.setCursor(5, 2);
   lcd.print(BMI);
 }

 void homepage_screen(){
    lcd.setCursor(0, 0);
    lcd.print("Press button For");
    lcd.setCursor(0, 1);
   lcd.print("Weight");
   lcd.setCursor(0, 2);
   lcd.print("Height");
   lcd.setCursor(0, 3);
  lcd.print("BMI");

 }
This is the Video While Testing Combination of all electronic devices.
In This Part I cutted the mechanical Part of BMI machine,Which were Stand and Base Platform.
Here is the video of cutted parts on Shopbot CNC Machine.
During the manufacturing process I thought that I had to use the plywood as my base Part but unfortunately it failed because of it's strength it can't resist the Weight of the Person and I ended up Welding the Base Part because the metal hard and has Higher strength than Wood, And I'm thankful that it ends up Running.
In This Part I cutted for the Control Box on the Laser_cutter Machine.
Here is The Video While cutting The parts.
In This Part I Printed Ultrasonic Holder.
Here is The Video While cutting The parts.
In This Part I Welded the Load cell metalic Holder.
Here is The Video While Welding the Metal Parts.
After finishing the electronic Part and Mechanical Part, The next Thing Was to Assemble them As it should be,and I was thinking like I finished 90% but it was lie I found the the 80*20 rule real it happened to me after few minutes running and I said "Ohhh nonono", I thought It couldn't happen but I found that ELectronics it's kind of magic if I can say,something was running and after few seconds it failed it's tiresome moment but I'm thankful it ends working.
This is the final Codes I used to run my BMI Machine
                #include
                  #include
                  #include
                  LCD_I2C lcd(0x27,20,4);  // set the LCD address to 0x27 for a 16 chars and 2 line display
                  #define TRIG_PIN 5 // ESP32 pin GIOP23 connected to Ultrasonic Sensor's TRIG pin
                  #define ECHO_PIN 18 // ESP32 pin GIOP22 connected to Ultrasonic Sensor's ECHO pin
                  unsigned long t = 0;
                   int i = 0;
                  float duration_us, distance_cm;
                  const int HX711_dout = 16; //mcu > HX711 dout pin
                  const int HX711_sck = 17; //mcu > HX711 sck pin
                  long current_time=0;
                  long interval=5000;
                  String Group="";
                  int screen_stage=0;
                  float height;
                  float weight;
                  float BMI;
                  HX711_ADC LoadCell(HX711_dout, HX711_sck);

                  float calibrationValue= 22.27;

                  void setup() {
                    // put your setup code here, to run once:
                      Serial.begin(115200);
                    lcd.begin();
                    lcd.backlight();
                    pinMode(TRIG_PIN, OUTPUT);
                    pinMode(ECHO_PIN, INPUT);
                    boot_screen();

                    LoadCell.begin();
                    //LoadCell.setReverseOutput();
                    unsigned long stabilizingtime = 2000; // tare preciscion can be improved by adding a few seconds of stabilizing time
                    boolean _tare = true; //set this to false if you don't want tare to be performed in the next step
                    LoadCell.start(stabilizingtime, _tare);
                    if (LoadCell.getTareTimeoutFlag()) {
                      Serial.println("Timeout, check MCU>HX711 wiring and pin designations");
                    }
                    else {
                      LoadCell.setCalFactor(calibrationValue); // set calibration factor (float)
                      Serial.println("Startup is complete");
                    }
                    while (!LoadCell.update());
                    Serial.print("Calibration value: ");
                    Serial.println(LoadCell.getCalFactor());
                    Serial.print("HX711 measured conversion time ms: ");
                    Serial.println(LoadCell.getConversionTime());
                    Serial.print("HX711 measured sampling rate HZ: ");
                    Serial.println(LoadCell.getSPS());
                    Serial.print("HX711 measured settlingtime ms: ");
                    Serial.println(LoadCell.getSettlingTime());
                    Serial.println("Note that the settling time may increase significantly if you use delay() in your sketch!");
                    if (LoadCell.getSPS() < 7) {
                      Serial.println("!!Sampling rate is lower than specification, check MCU>HX711 wiring and pin designations");
                    }
                    else if (LoadCell.getSPS() > 100) {
                      Serial.println("!!Sampling rate is higher than specification, check MCU>HX711 wiring and pin designations");
                    }
                      lcd.clear();

                  machine_ready();

                  }

                  void loop() {
                    current_time=millis();

                    /////////Check weight first///////
                    while(screen_stage==0){
                      if(millis()-current_time<=interval){
                        check_weight();
                        display_weight();
                      }
                      else{
                        current_time=millis();
                        screen_stage=1;
                        lcd.clear();
                      }
                    }


                   /////////Check Height Second///////
                    while(screen_stage==1){
                      if(millis()-current_time<=interval){
                        check_height();
                        display_height();
                      }
                      else{
                        current_time=millis();
                        screen_stage=2;
                        lcd.clear();
                      }
                    }

                     /////////Check BMI last///////
                    while(screen_stage==2){
                      if(millis()-current_time<=interval){
                        display_waiting();
                        check_BMI();
                      }
                      else{
                        current_time=millis();
                        screen_stage=3;
                        BMI_screen();
                      }
                    }
                  }


                  void BMI_screen(){
                    lcd.clear();
                    lcd.setCursor(0,0);
                    lcd.print("Height="+String(height)+"M");
                    lcd.setCursor(0,1);
                    lcd.print("Weight="+String(weight)+"Kg");
                    lcd.setCursor(0,2);
                    lcd.print("BMI="+String(BMI));
                    lcd.setCursor(0,3);
                    lcd.print("Group="+String(Group));
                  }


                  void boot_screen(){
                    lcd.clear();
                    lcd.setCursor(3,1);
                    lcd.print("Welcome to");
                    lcd.setCursor(2,2);
                    lcd.print("BMI Machine");
                    delay(3000);
                  }
                  void machine_ready(){
                    lcd.clear();
                    lcd.setCursor(5,1);
                    lcd.print("Stand on");
                    lcd.setCursor(2,2);
                    lcd.print("BMI Machine");
                    delay(10000);
                  }

                  void display_weight(){

                    lcd.setCursor(3,0);
                    lcd.print("Checking Weight");
                    lcd.setCursor(3,2);
                    lcd.print("Weight="+String(weight)+"Kg");
                  }

                  void display_height(){

                    lcd.setCursor(3,0);
                    lcd.print("Checking Height");
                    lcd.setCursor(0,2);
                   lcd.print("Height="+String(height)+"M");
                  }

                  void display_waiting(){

                    lcd.setCursor(3,1);
                    lcd.print("Wait for your");
                    lcd.setCursor(3,2);
                    lcd.print("Result...");
                  }


                  //////////////////////////////////////////////////////////////////////////////////////
                      ////////////////////         CHECKING HEIGHT       ///////////////////////////////
                  //////////////////////////////////////////////////////////////////////////////////////

                  void check_height(){
                     digitalWrite(TRIG_PIN, HIGH);
                    delayMicroseconds(10);
                    digitalWrite(TRIG_PIN, LOW);
                    duration_us = pulseIn(ECHO_PIN, HIGH);
                    distance_cm = 0.017 * duration_us;
                    float dis=distance_cm/100;
                    height = 2.03-(dis);

                  }

                  //////////////////////////////////////////////////////////////////////////////////////
                      ////////////////////         CHECKING WEIGHT       ///////////////////////////////
                  //////////////////////////////////////////////////////////////////////////////////////
                  void check_weight(){
                      static boolean newDataReady = 0;
                    const int serialPrintInterval = 500; //increase value to slow down serial print activity

                    // check for new data/start next conversion:
                    if (LoadCell.update()) newDataReady = true;

                    // get smoothed value from the dataset:
                    if (newDataReady) {
                      if (millis() > t + serialPrintInterval) {
                        weight = (LoadCell.getData())/1000;
                        if(weight<=5){weight=0;}
                        newDataReady = 0;
                        t = millis();
                      }
                    }

                    // receive command from serial terminal, send 't' to initiate tare operation:
                    if (Serial.available() > 0) {
                      char inByte = Serial.read();
                      if (inByte == 't') LoadCell.tareNoDelay();
                    }

                    // check if last tare operation is complete:
                    if (LoadCell.getTareStatus() == true) {
                      Serial.println("Tare complete");
                    }

                  }

                  //////////////////////////////////////////////////////////////////////////////////////
                      ////////////////////         CHECKING BMI       ///////////////////////////////
                  //////////////////////////////////////////////////////////////////////////////////////
                  void check_BMI(){
                        BMI= BMI = (weight)/(height*height);
                        if(BMI<18.5){
                          Group="Under Weight";
                        }else if(BMI>=18.5 && BMI<=24.9){
                          Group="Healthy";
                        }else if(BMI>25 && BMI<=29.9){
                          Group="Over weight";
                        }
                        else{
                          Group="Obesity";
                        }
                  }
1.Healthcare: BMI machines are commonly used in healthcare settings such as doctor's offices, hospitals, and clinics to assess patients' weight and body fat. Healthcare professionals can use BMI machines to identify patients who may be at risk for obesity-related health problems, and to monitor changes in patients' weight over time.
2.Fitness centers:Many fitness centers and gyms use BMI machines to provide members with a quick and easy way to track their weight and body fat percentage. This can be a useful tool for people who are trying to lose weight or gain muscle mass, as it allows them to monitor their progress after certain period of time.
3.Corporate wellness programs:ome companies have wellness programs that include BMI screenings for employees. This can help to identify employees who may be at risk for health problems related to obesity, and can encourage employees to make healthier choices and adopt healthier lifestyles.
4.Public health:BMI machines are sometimes used in public health initiatives, such as community health fairs or weight loss programs. These initiatives can help to raise awareness about the importance of healthy weight and can provide people with access to tools and resources for weight management.
5.Research:BMI machines are used in research studies to measure participants' weight and body fat, and to assess the impact of interventions such as diet and exercise on weight and health outcomes.
To sum up, BMI machines are a useful tool for monitoring weight and body fat in a variety of settings and mainly it will play a big role to the growth of children in preventing Malnutrion or Overnutrition,they can provide a quick and easy way to assess overall weight and health.
I take this Opportunity to thank Firstly Proffessor Neil Gershenfeld for the core Course like this He Conducted it really changed my Understanding of things and It boosts my desire to invent and Innovate in a way that brings Solutions to those near(Around) me And Also far from it shows me that everything can be possible to do it with the Fab Slogan "How To Make Almost Anything."As it's True,Secondly I thank my Local Instructor Rulindana Lambert For unceasing Effort and Attention he gave me in order to build me to this Level with also my colleagues it was really tremendous Journey of Discovery and I wish to continue working with Fab in different Courses they offer as Improove my understanding of everything and becoming the Problem solver in many sectors., And I can't forget our Global evaluators and even Coordination Team in Fabacademy may God Bless you So much.