- C programming
- C++
- python
- micro python
- java
- java script
- rust comparison between these programming languages download
- it is 32bit microcontroller
- 448kb of RAM
- 520kb of SRAM
- 16kb SRAM in RTC advanced programmable periferals
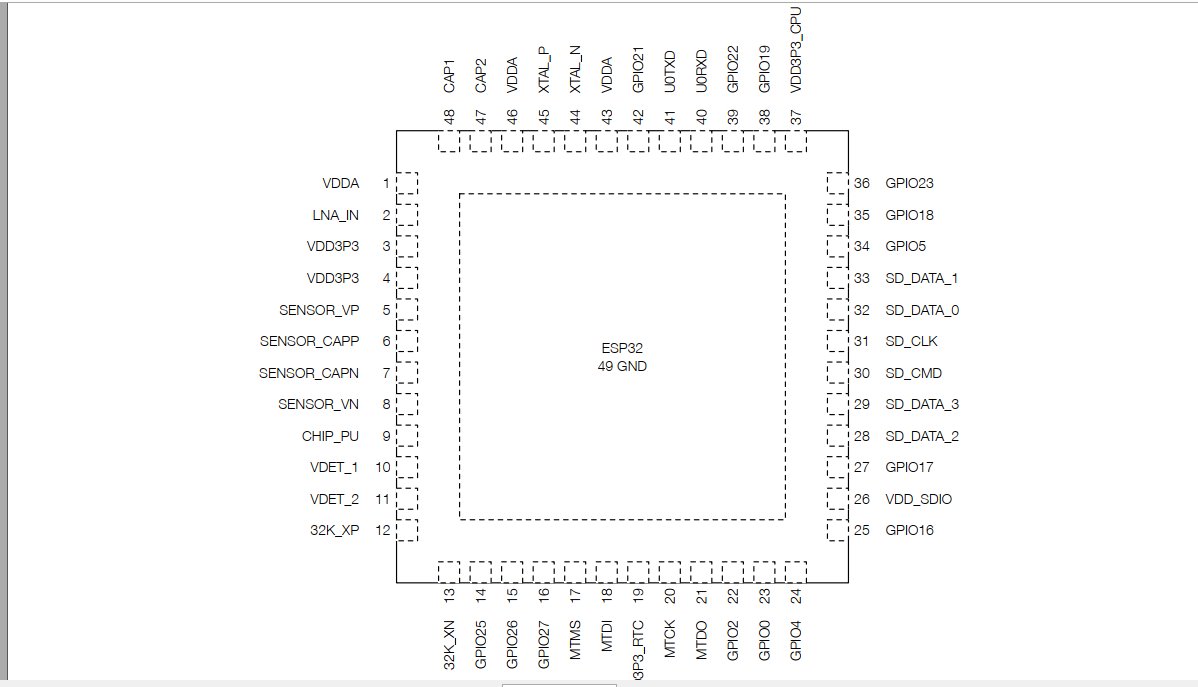
- 34x programmable GPIO
- 12-bit SAR ADC up to 18 channels
- 2 x 8-bit DAC
- 10 x touch sensors
- 4 x SPI
- 2 x I²S
- 2 x I²C
- 3 x UART
- 1 host (SD/eMMC/SDIO)
- 1 slave (SDIO/SPI)
- Ethernet MAC interface with dedicated DMA and IEEE 1588 support
- CAN 2.0
- IR (TX/RX)
- Motor PWM
- LED PWM up to 16 channels
- Hall sensor CPU clock Upon reset, an external crystal clock source is selected as the default CPU clock. The external crystal clock source
- WIFI
- BLUETOOTH WIFI
EMBEDDED-PROGRAMMING
assignment focus on embedded programming
in group assignment we have focused on different microntrollers and there architectures behaviours follow this linkfor more from group page
about assignment what is embedded programming An embedded programming language is a programming language that developers use in embedded systems.
In general, the languages offer low-level access to the device hardware. Developers use several common programming languages for embedded systems.
embedded programming languages
useful links open here link1
open here link2
esp32 dev kit v1 development board
esp32 dev kit v1 is one in series of microcontroller chip base on esp32 board developed by espressif the esp32 microcontroller is found in xtensa family specifications of esp32
ESP32 is a single 2.4 GHz Wi-Fi-and-Bluetooth combo chip designed with the TSMC ultra-low-power 40 nm
technology. It is designed to achieve the best power and RF performance, showing robustness, versatility and
reliability in a wide variety of applications and power scenarios
the microcontroller memory features
also connects to a PLL to generate a high-frequency clock (typically 160 MHz).
In addition, ESP32 has an internal 8 MHz oscillator. The application can select the clock source from the external
crystal clock source, the PLL clock or the internal 8 MHz oscillator. The selected clock source drives the CPU
clock directly, or after division, depending on the application.
-the esp esp32 supports radio communication
ESP32 implements a TCP/IP and full 802.11 b/g/n Wi-Fi MAC protocol. It supports the Basic Service Set (BSS)
STA and SoftAP operations under the Distributed Control Function (DCF). Power management is handled with
minimal host interaction to minimize the active-duty period.
BLUETOOTH
ESP32 integrates a Bluetooth link controller and Bluetooth baseband, which carry out the baseband protocols
and other low-level link routines, such as modulation/demodulation, packet processing, bit stream processing,
frequency hopping, etc
esp electrical characteristics
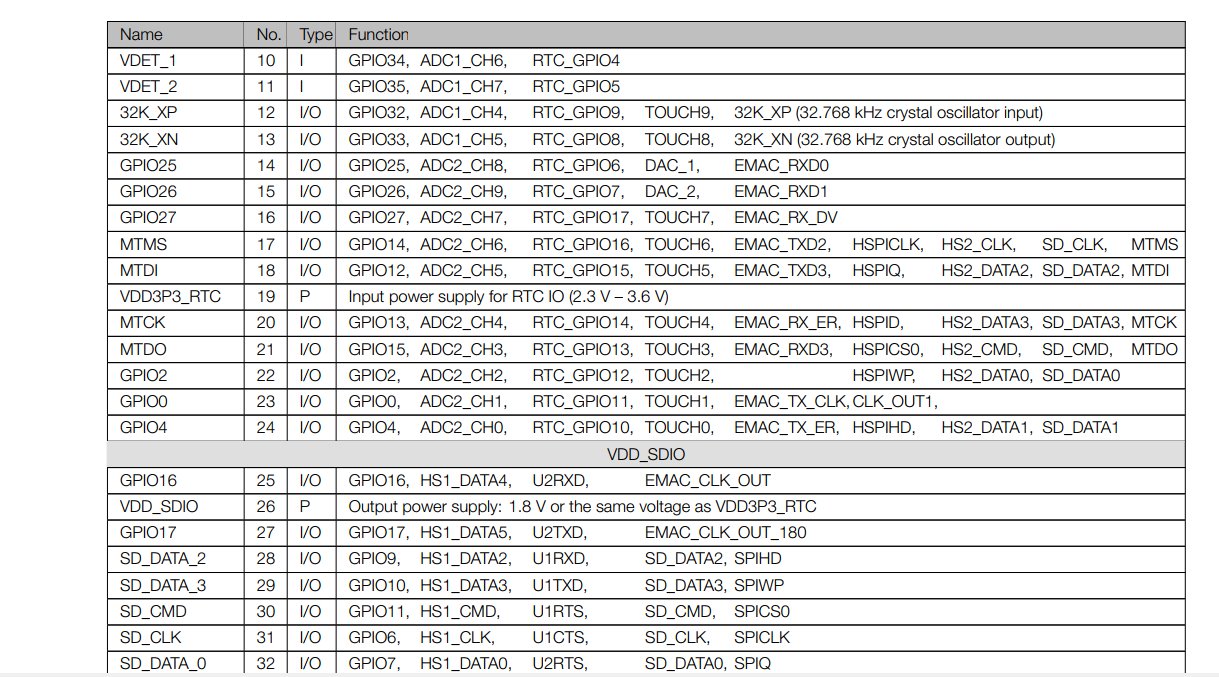
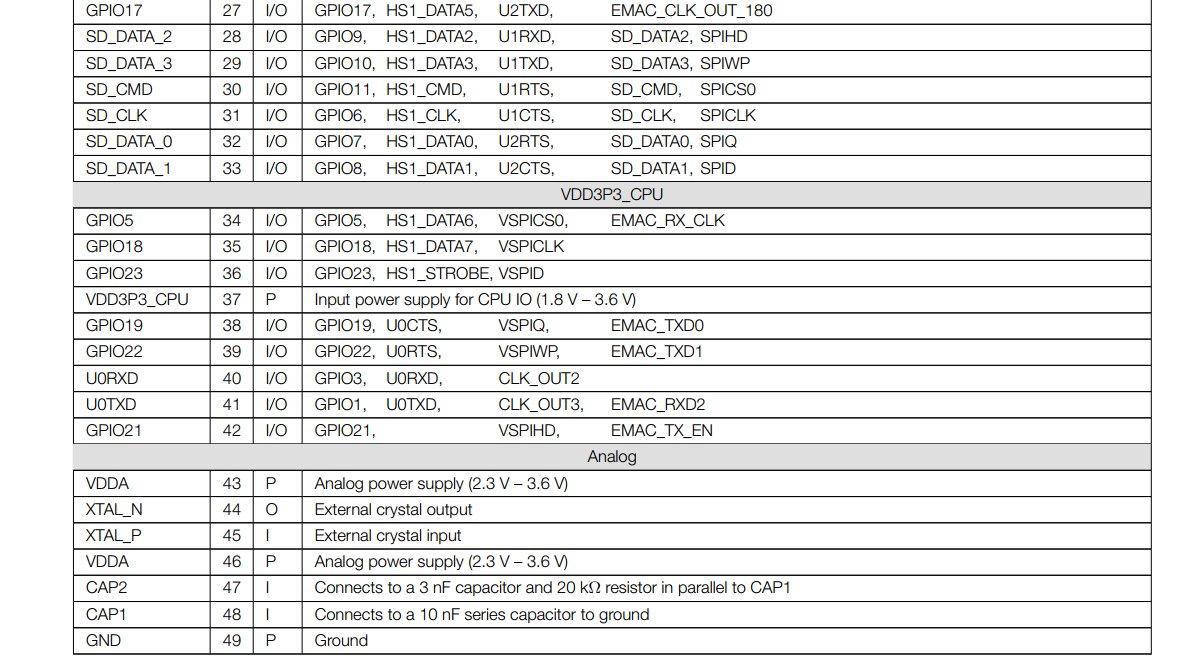
esp32 has VDDA, VDD3P3, VDD3P3_RTC, VDD3P3_CPU, VDD_SDIO. these are power pins needs to be powered.
in order for the microcontroller to operate in better power controlls
diagram below shows the maximum and minimum rating operations
visit there article HERE for more about esp32

the rating values shown in the diagram are provide bya manufacturers
the next layout of the internal of IC shown in the diagram below

more about the datasheet of the device download here
functional description esp32 DEVKIT V1

for the esp32 i have chose to use arduino IDE to be able use it and programm with the its firmware
first i have downloaded arduino IDE and installed it, to download arduino software follow this link https://www.arduino.cc/en/software
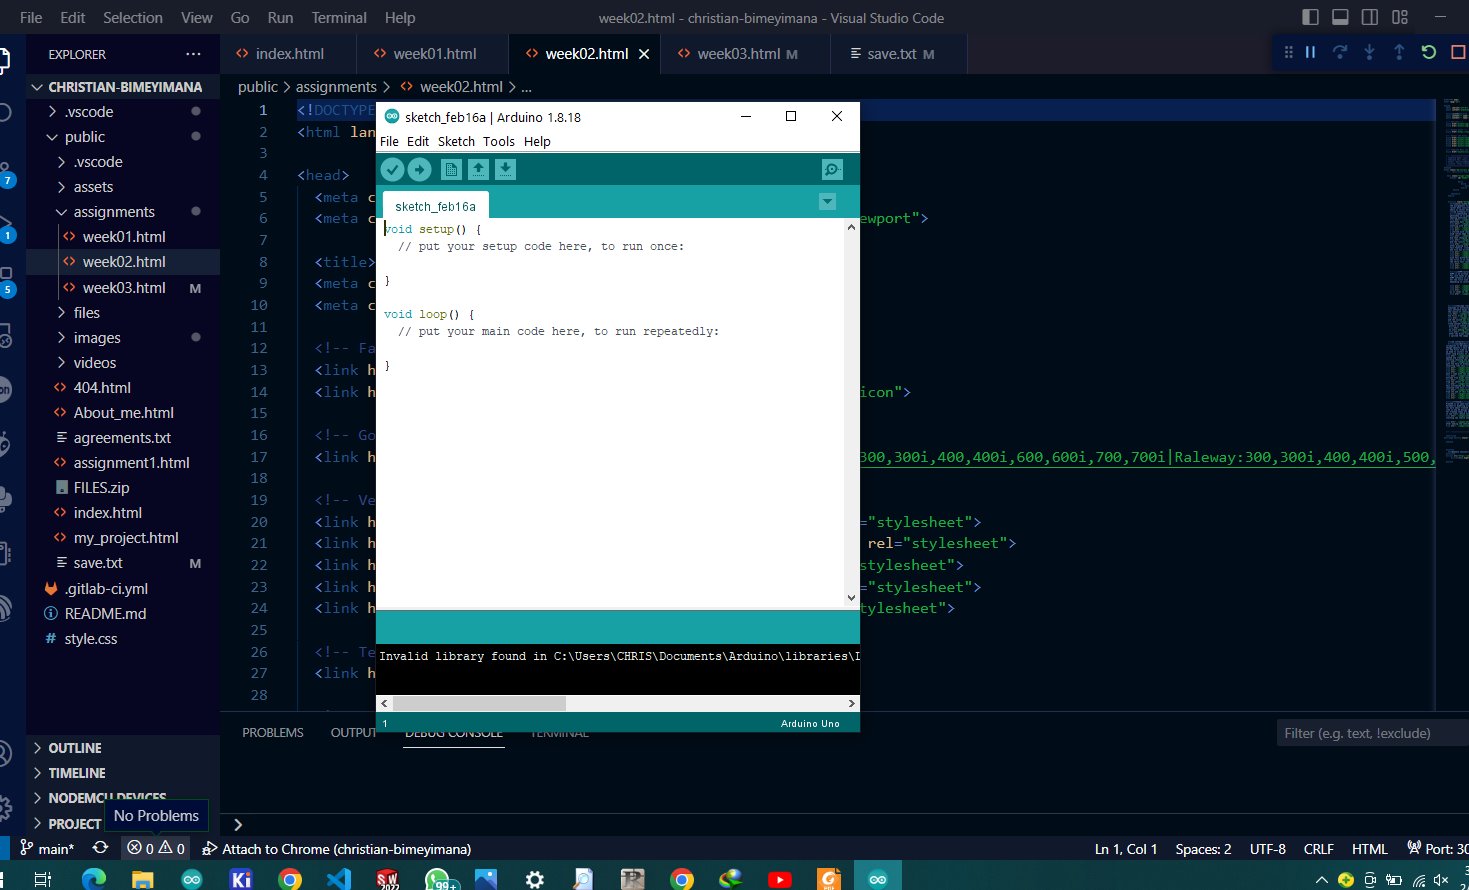
after installing the arduino ide it is opened view like this
for the esp32 to operate we need to install esp32 bootloader in arduino IDE this bootloader enables all features needed to access it such as loading codes
i have installed the bootloader by copying the following link in the the section shown in the image, first click to file>>preferences then paste this link in shown box-->
https://dl.espressif.com/dl/package_esp32_index.json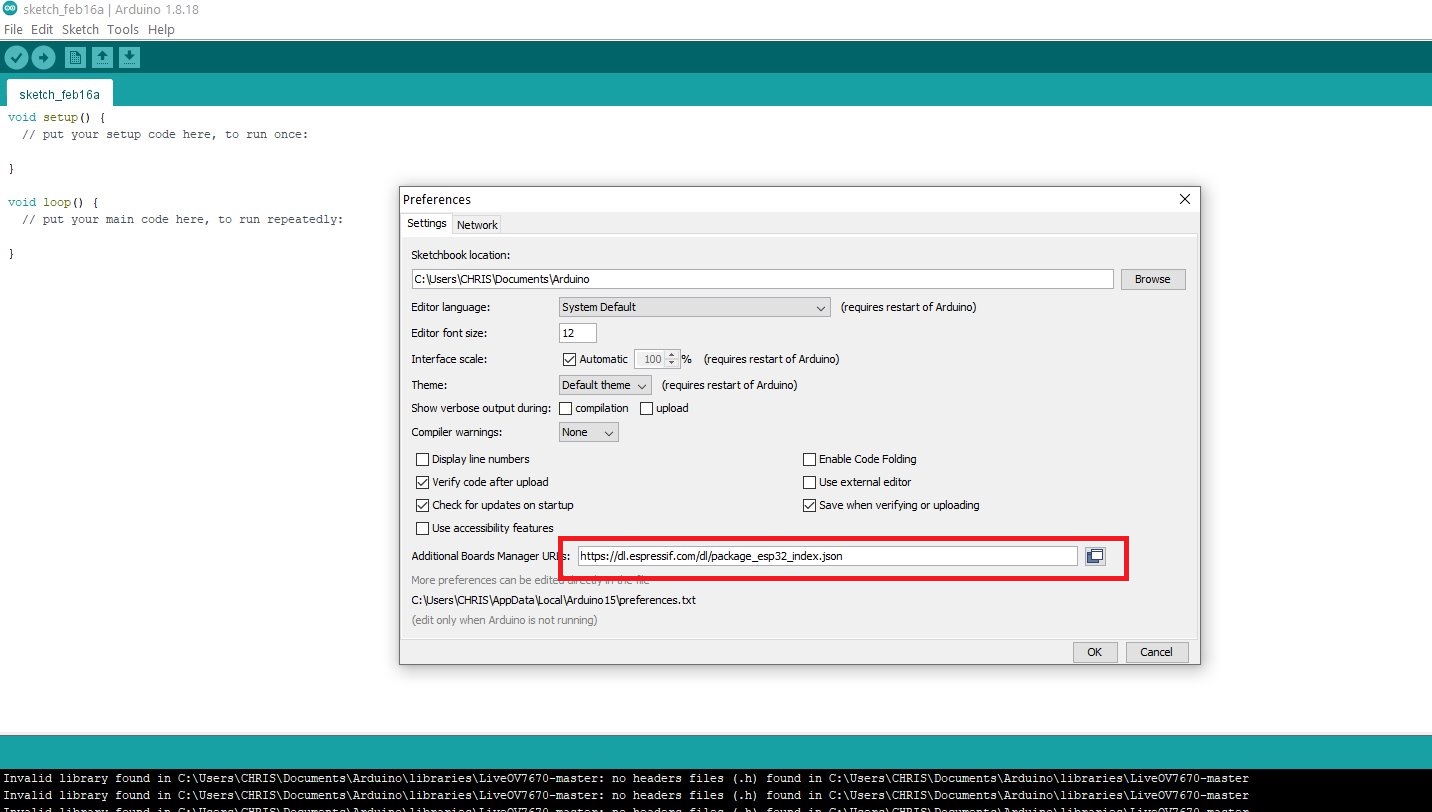
after that navigate to tools>> boards>> board manager
in search box search for "esp32" and click install
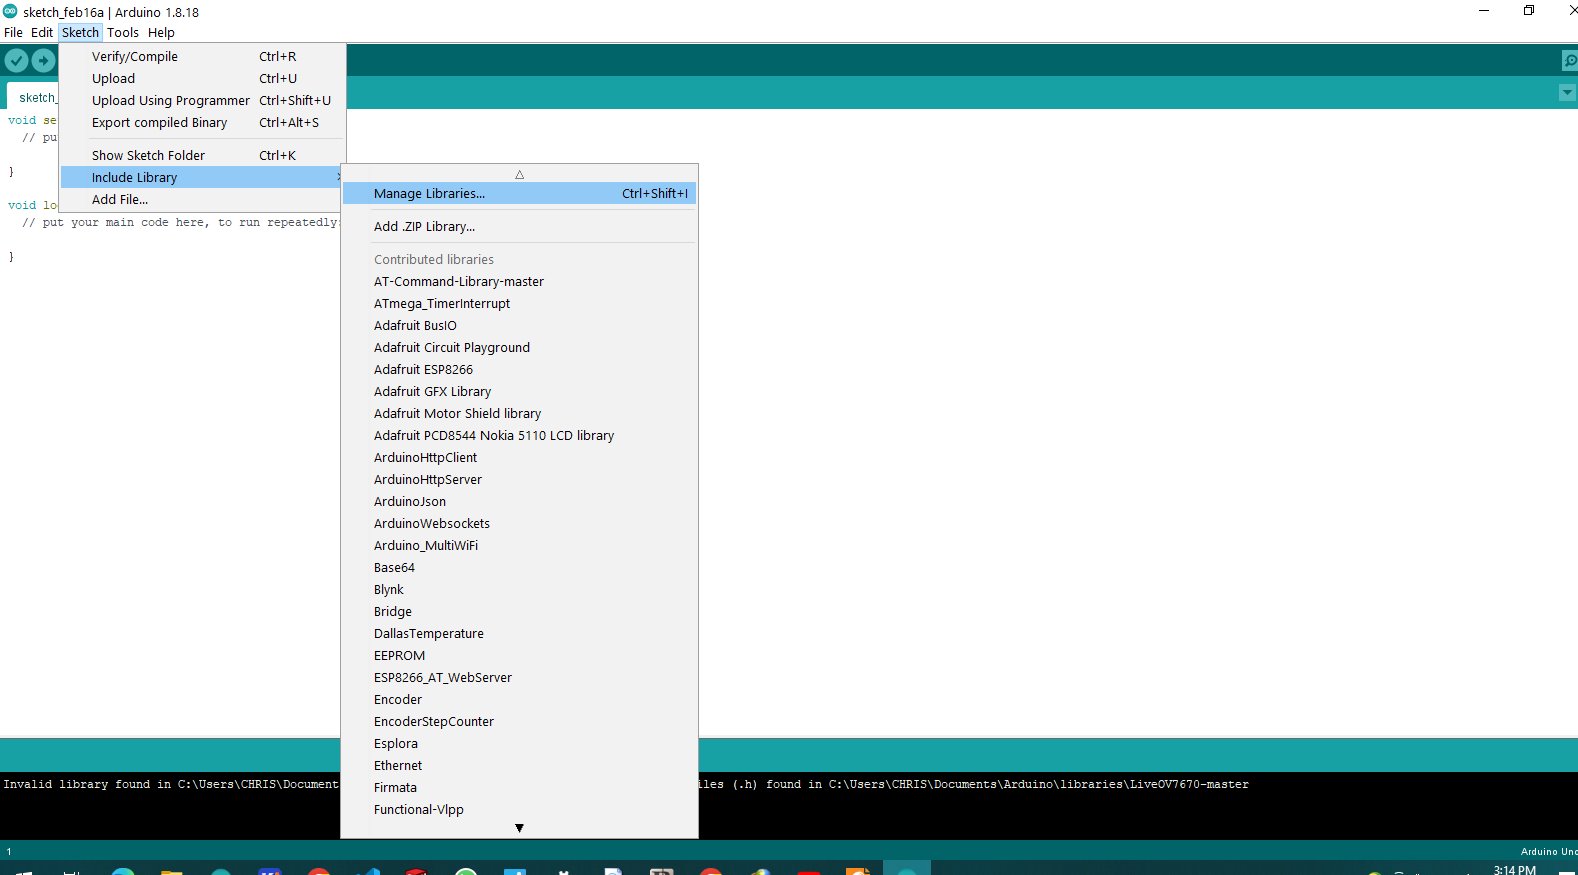
wait for a while for the bootloader to be installed after installion is finnished
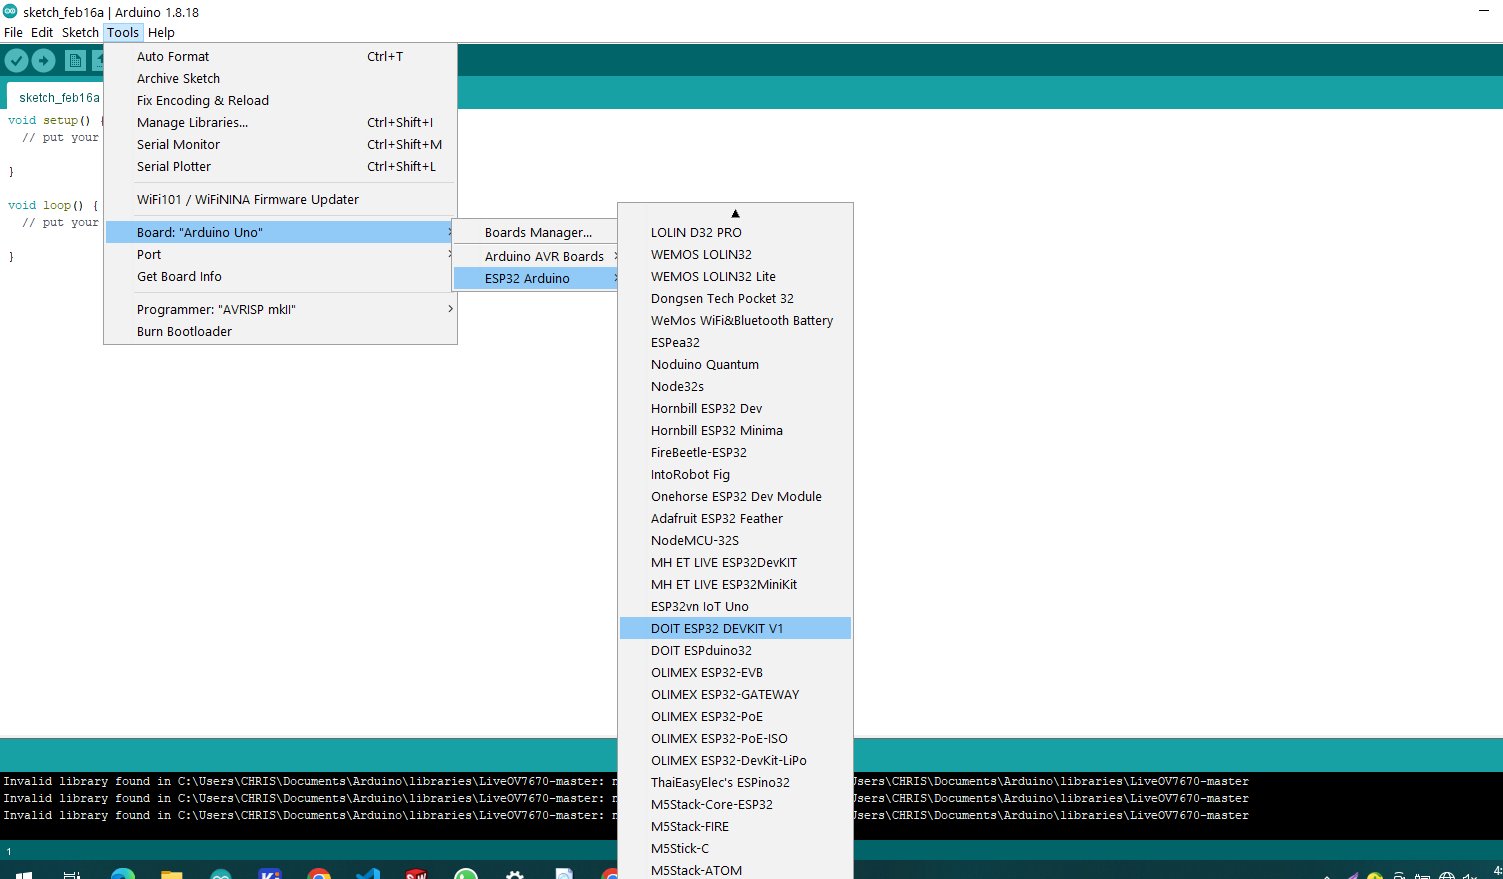
navigate to the tools>>board>>esp 32 arduino>> DOIT ESP32 DEVKIT V1
then we have selected the board
after selecting the code example select port for connecting esp 32 to computer my case i have COM4
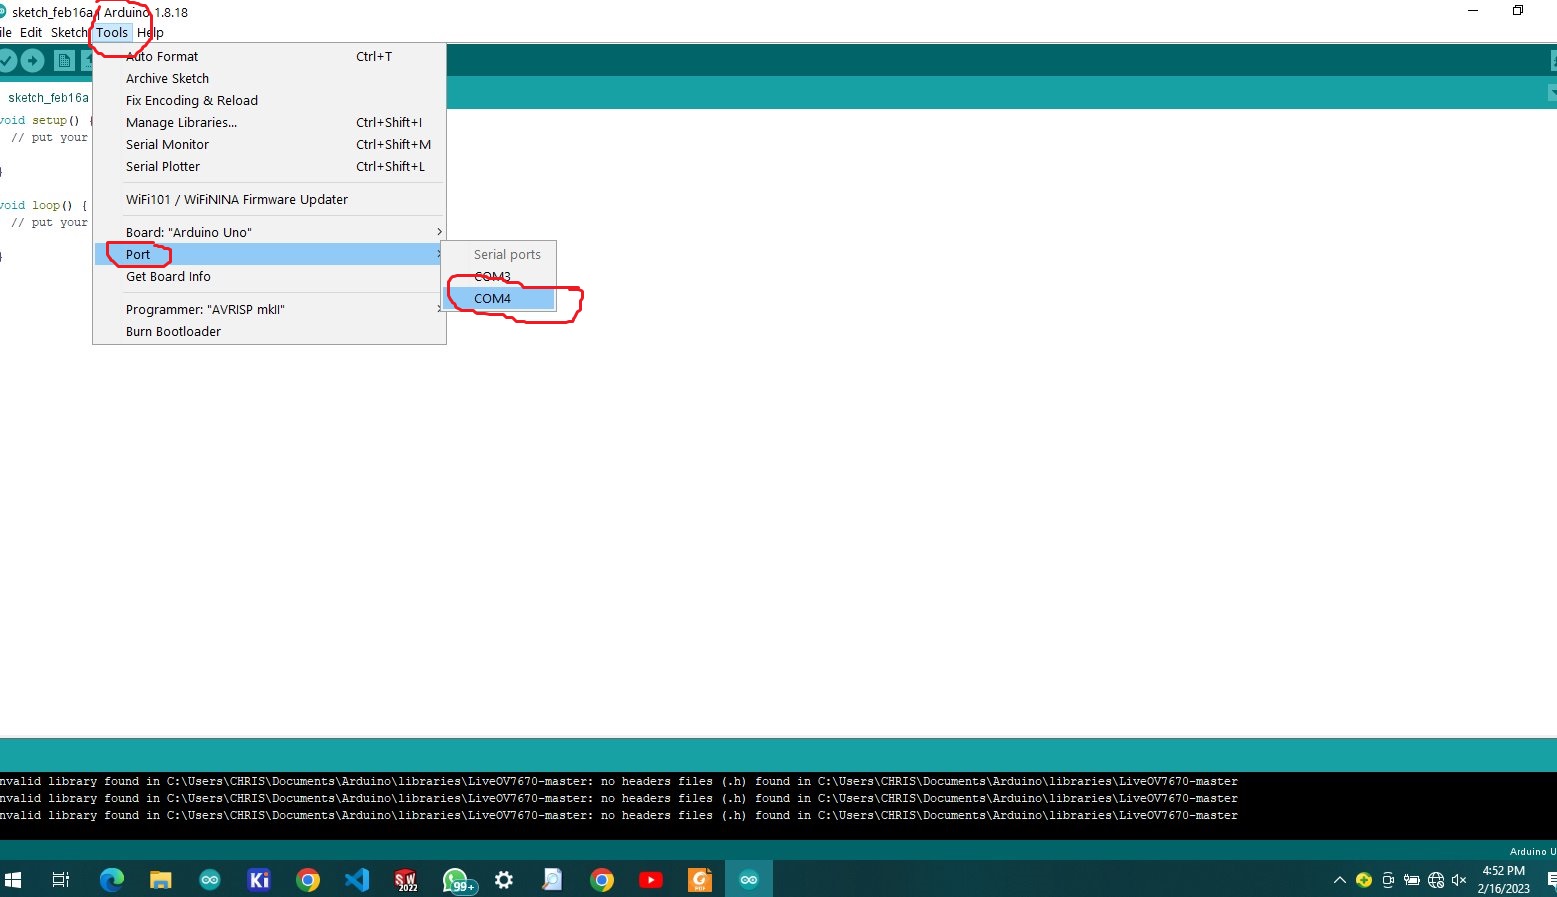
and click upload
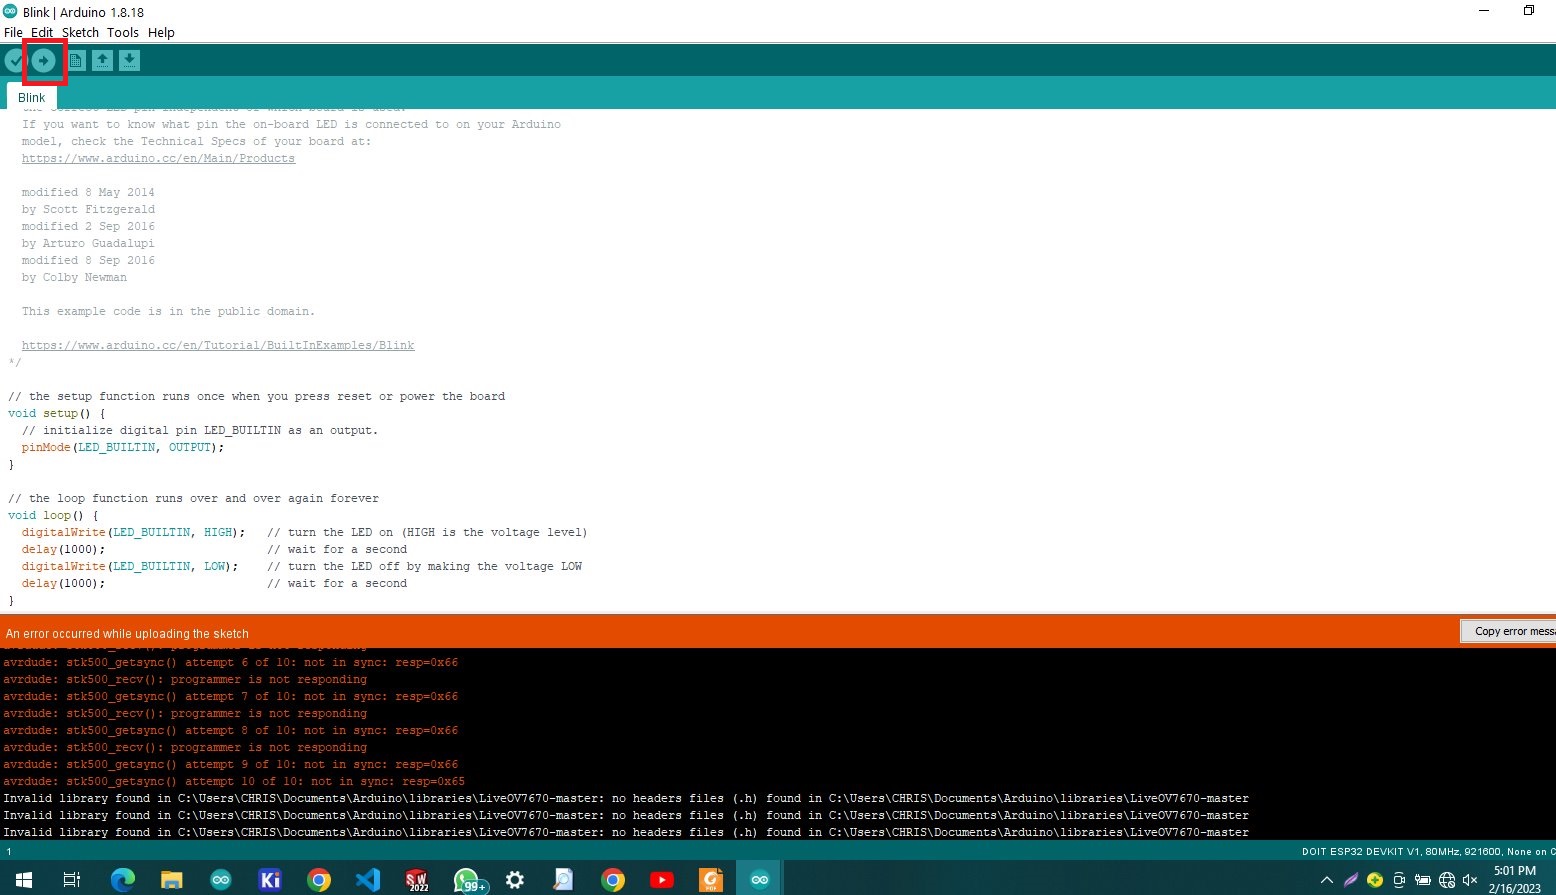
when its start uploading for my case of the esp32 it shows error that "an error accured while uploading the sketh" so this issue is caused by the microcontroller
is not in boot mode so they are different ways to put it in boot mode 1st hold the shown button indicates "boot" and the plugin the device it will boot in flash mode
other way is to hold boot button and then press reset while holding boot button then release reset button first then boot after
onther way is to press boot when it starts showing uploading
hence the boot button enables flash mode of the esp32

the first program to be uploaded is controlling and led with button, when we push button the led turns on accordingly off when released and here is the codes i have used below
          int led=19;
          int button=21;
          int button_bit;
          void setup() {
            Serial.begin (9600);
            pinMode(led,OUTPUT);
            pinMode (button, INPUT);
            // put your setup code here, to run once:

          }

          void loop() {
            button_bit = digitalRead(button);
            Serial.print(button_bit);
            delay (100);
            if (button_bit == 1)
            {
              digitalWrite(led,HIGH);

            }

            else {
              digitalWrite (led,LOW);
            }

            // put your main code here, to run repeatedly:

            }
the second program is to connect remotely through bluetooth the codes used also shown below
            #include "BluetoothSerial.h"
            #if !defined(CONFIG_BT_ENABLED) || !defined(CONFIG_BLUEDROID_ENABLED)
            #error Bluetooth is not enabled! Please run `make menuconfig` to and enable it
            #endif
            byte light;
            BluetoothSerial SerialBT;

            void setup() {
              Serial.begin(115200);
              SerialBT.begin("espCHRIS"); //Bluetooth device name
              Serial.println("The device started, now you can pair it with bluetooth!");
              pinMode(19, OUTPUT);
            }

            void loop() {
              if (SerialBT.available()) {
                light = SerialBT.read();
                delay(20);
              }

            if (light == 'ON'){
              digitalWrite(19, HIGH);
            }
            else if (light == '0'){
              digitalWrite(19, LOW);
            }

            }
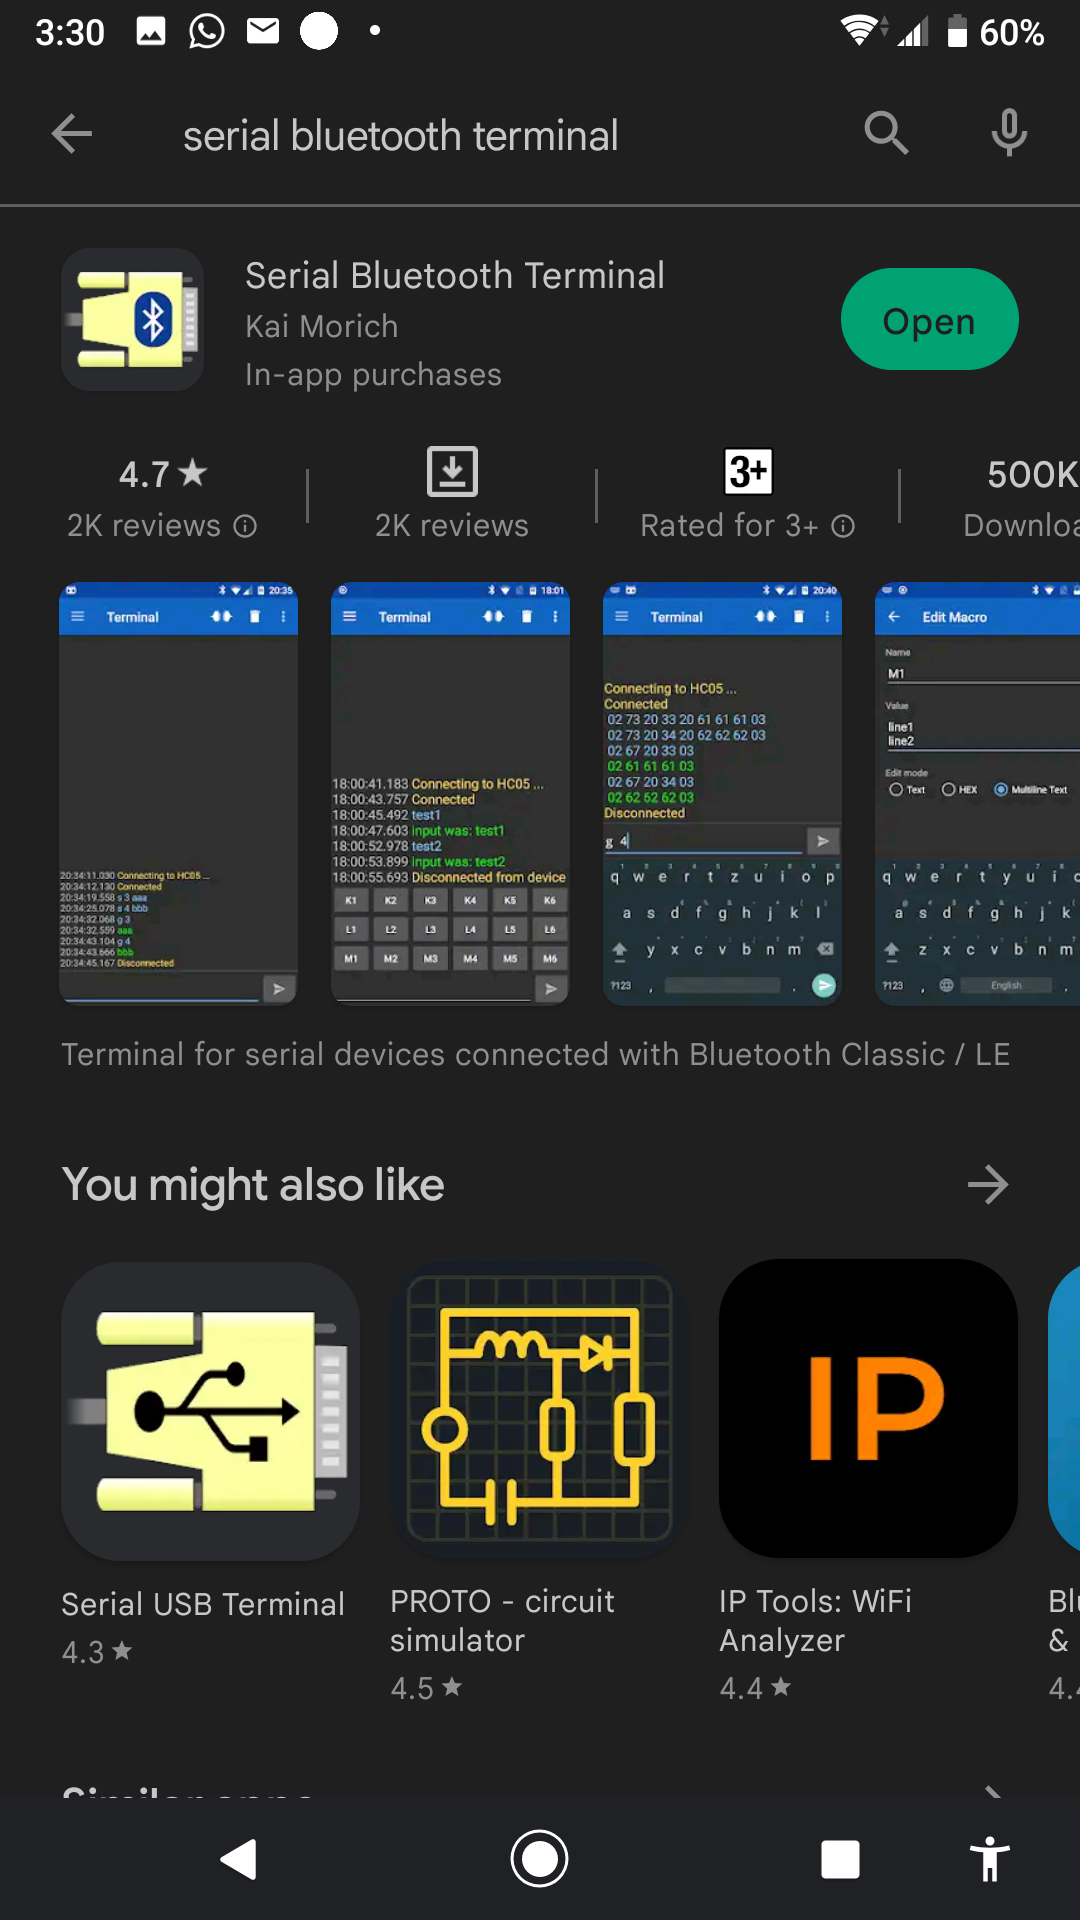
after uploading codes to my esp 32 i first configured an android application used to communicate with microcontrollerfor my case as an android user go for google play store search for "serial bluetooth terminal" and install then open.
first open the phone and open settings then bluetooth and select device name and connect my device i have named it as "espCHRIS"
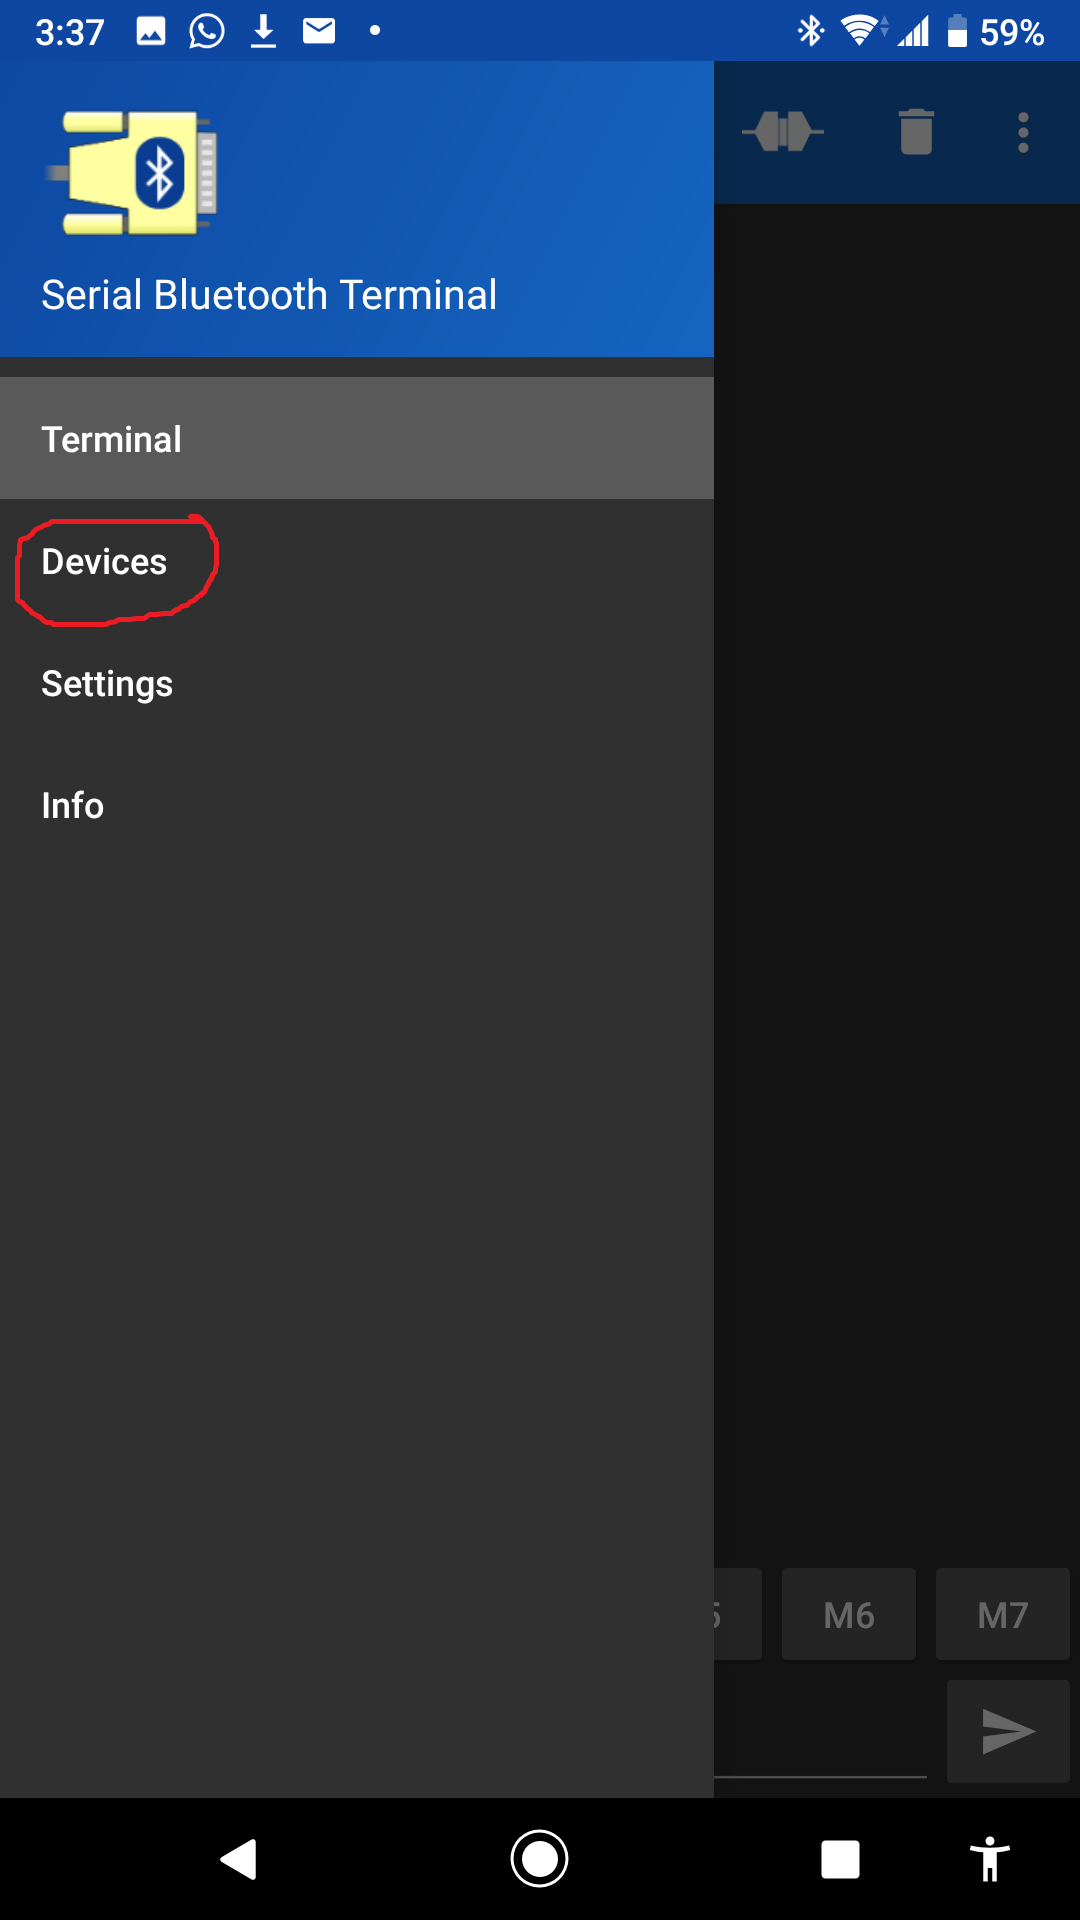
then open the application and click on 3 lines on up left corner choose devices and select connected device configured

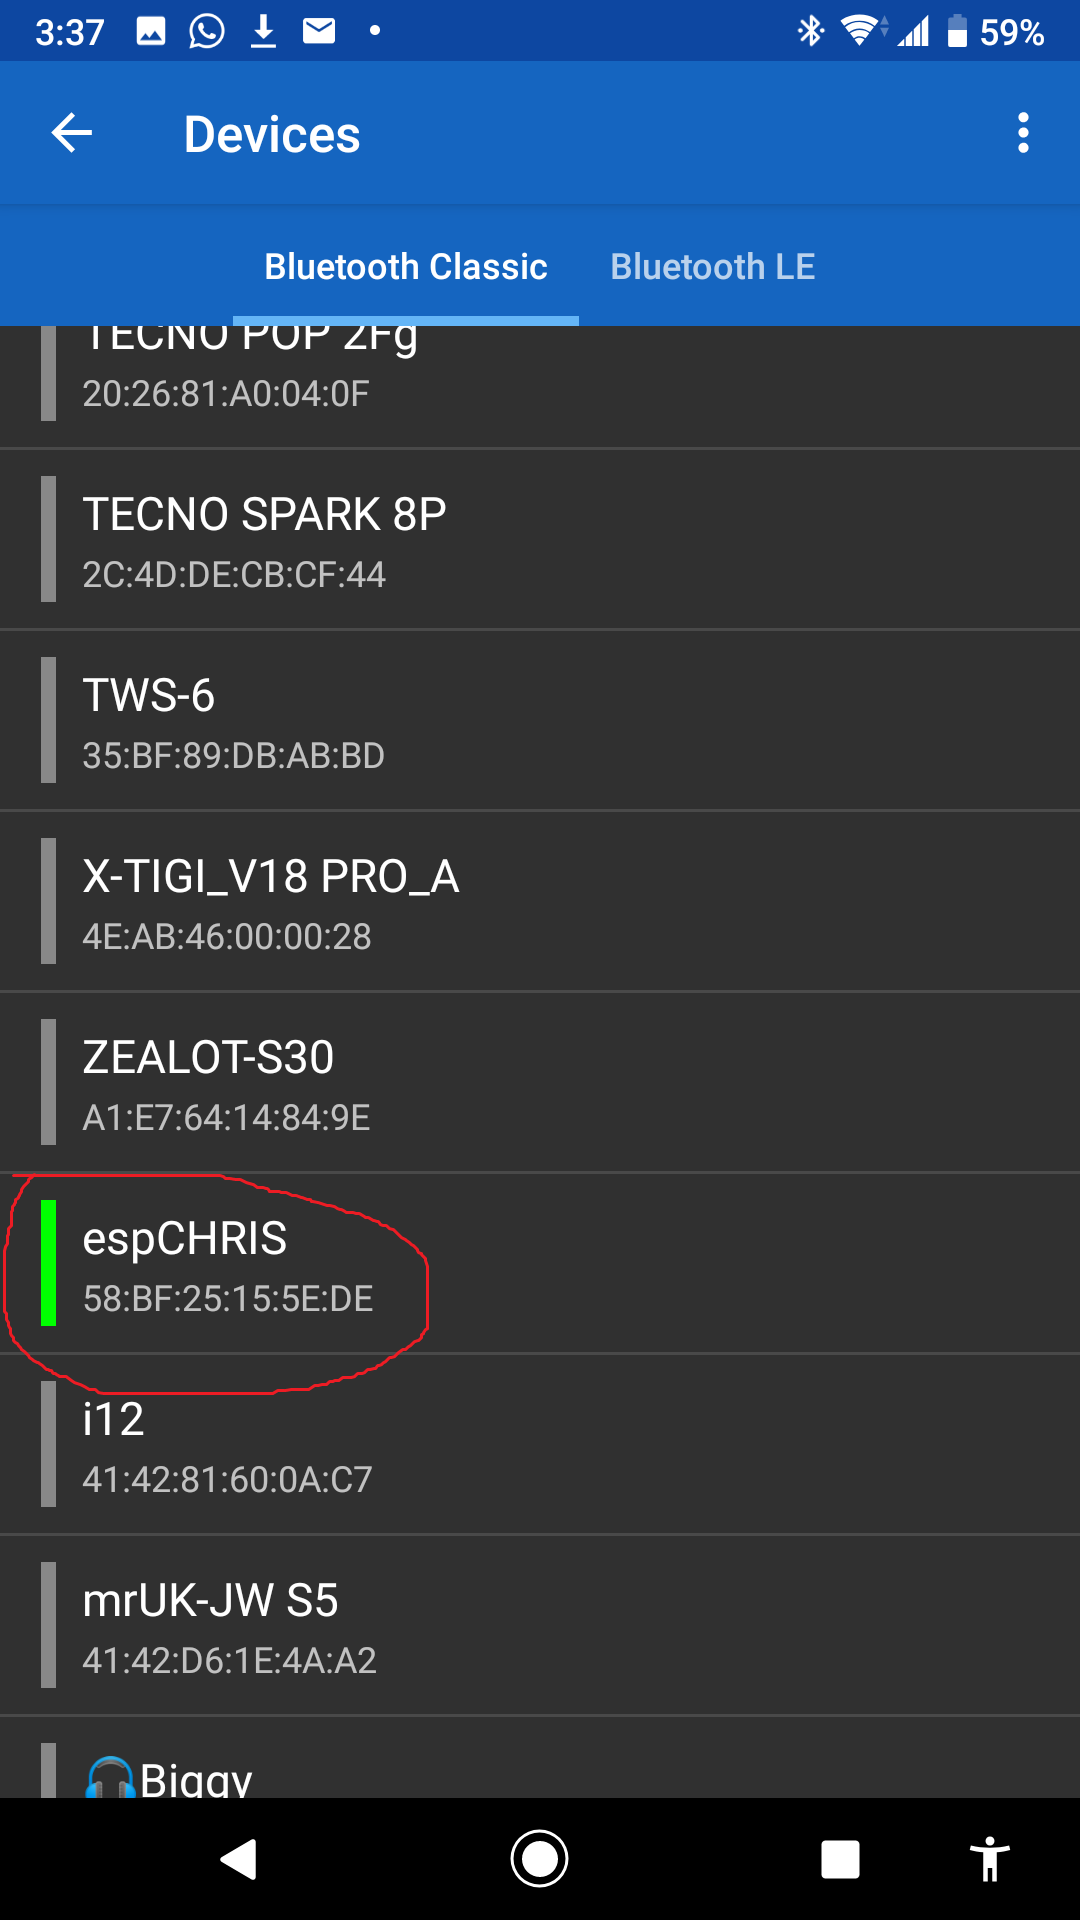
after being configured the device shows it has been connected as it is shown in the image below
for my program i set LED to turn on when i send "1" and when i send "0" it turns off
it is shown in the video

for my assigment i have tried different tools, which is different laguage in arduino was using C-prohramming then next i am going to try python
using python requires few tools, first we need micropython firmware to flash on esp32 to be able to run on python language,
and also i needed a program as an interpreter and compiler. the program i make uses python language.
python
Python is a high-level, general-purpose programming language. open the LINK
micropython
MicroPython is a lean and efficient implementation of the Python 3 programming language that includes
a small subset of the Python standard library and is optimised to run on microcontrollers and in constrained environments. open the LINK for more
first of all i flashed micropython firmware into my esp32 board as it is shawn below
for the firmware of micropython download it from this page https://micropython.org/download/esp32/
after getting he esp 32 firmware then download thonny from this site https://thonny.org/
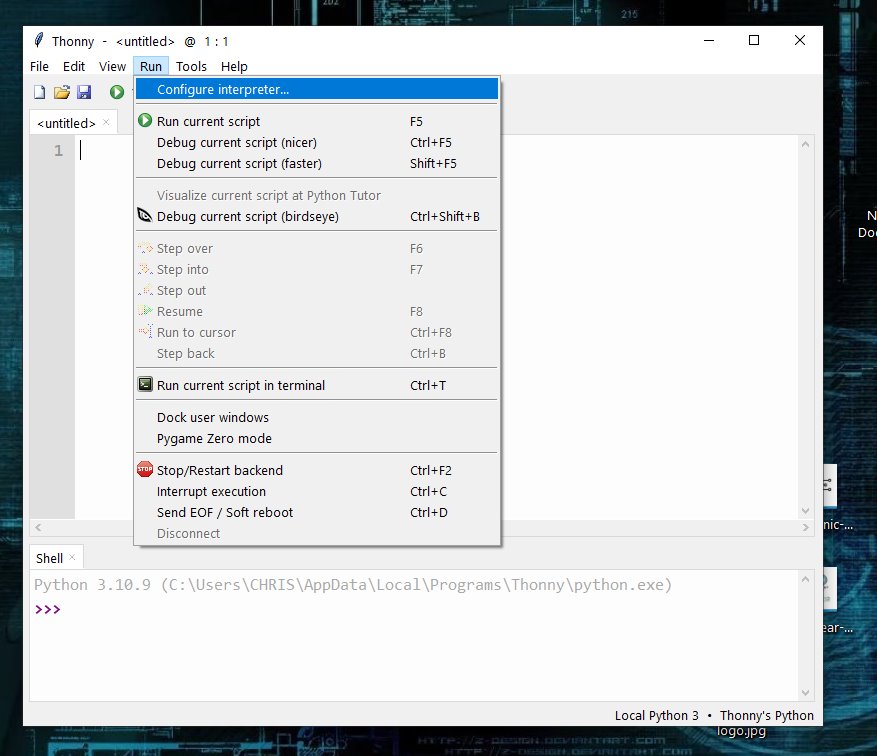
the i installed thony and easily launched from tabs click run>>configure interpreter as shown
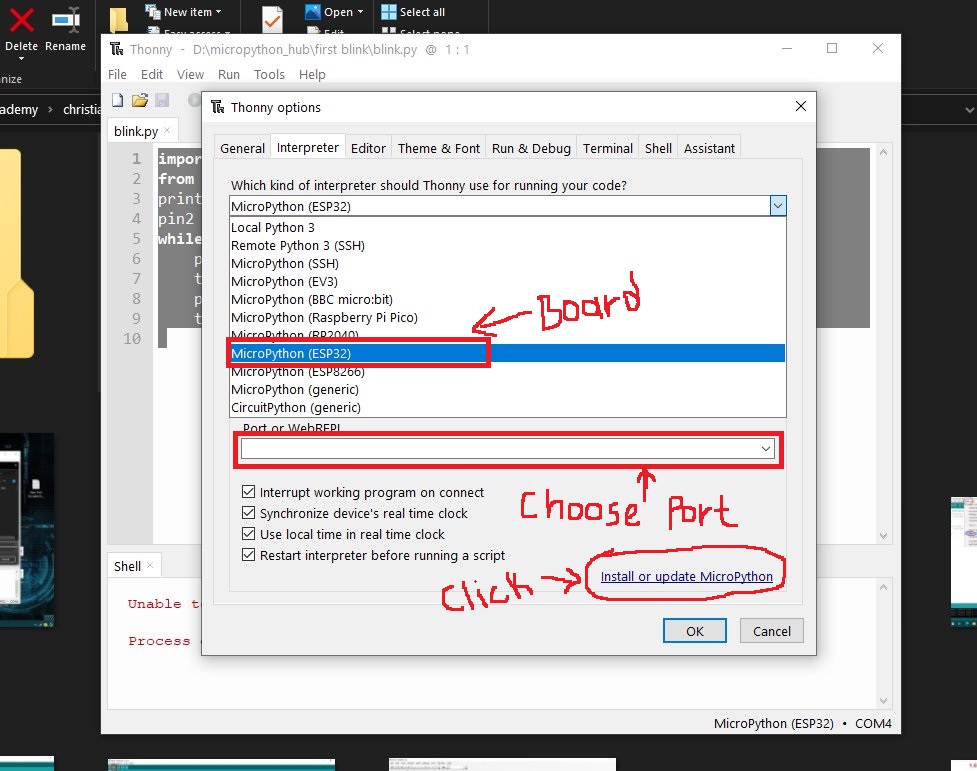
then for new window opened in interpreter tab click on dropdown menu and choose board esp32 and choose the board port at bottom from dropdown box.
the click on "install or update micropython"
as i have esp32 after clicking on "install or update micropython" i directly pushed the boot button to enable flash mode

after flashing firmware is done then i started writing codes this codes blinks the builtin led on board
            import time
            from machine import Pin
            print ("hello chris")
            pin2 = Pin(2, Pin.OUT)
            while True:
            pin2.on()
            time.sleep_ms(800)
            pin2.off()
            time.sleep_ms(700)
codes used download below