FAB DIGITAL SHELF EDGE CLOCK
Meaning and introduction of shelf
Meaning of shelf:
A shelf is a flat, horizontal surface used for storing or displaying items such as books, pictures, vases, and other decorative objects. In other words, a shelf is a piece of furniture that can be mounted on walls or free-standing, which provides a surface for holding and organizing items in a space. The term "shelf" can also be used to refer to a particular level or tier in a storage structure, such as a bookshelf or a pantry shelf.
Introduction:
A shelf is a flat, horizontal surface used for storing or displaying items such as books, pictures, vases, and other decorative objects. Shelves come in a variety of materials including wood, metal, plastic, and glass, and they can be mounted on walls or free-standing. Shelves are an essential piece of furniture in most homes and are commonly found in living rooms, bedrooms, offices, and kitchens. They can be used to organize and display a variety of items, from books and knick-knacks to kitchenware and pantry staples. Shelves can also be used to add a decorative touch to a room. They can be painted or stained to match the decor of a space, and items displayed on them can add color and texture to a room. Overall, shelves are a versatile and functional addition to any home or office space.
Types of shelf:
There are many types of shelves available, each with its own unique design and function. Here are some of the most common types of shelves:
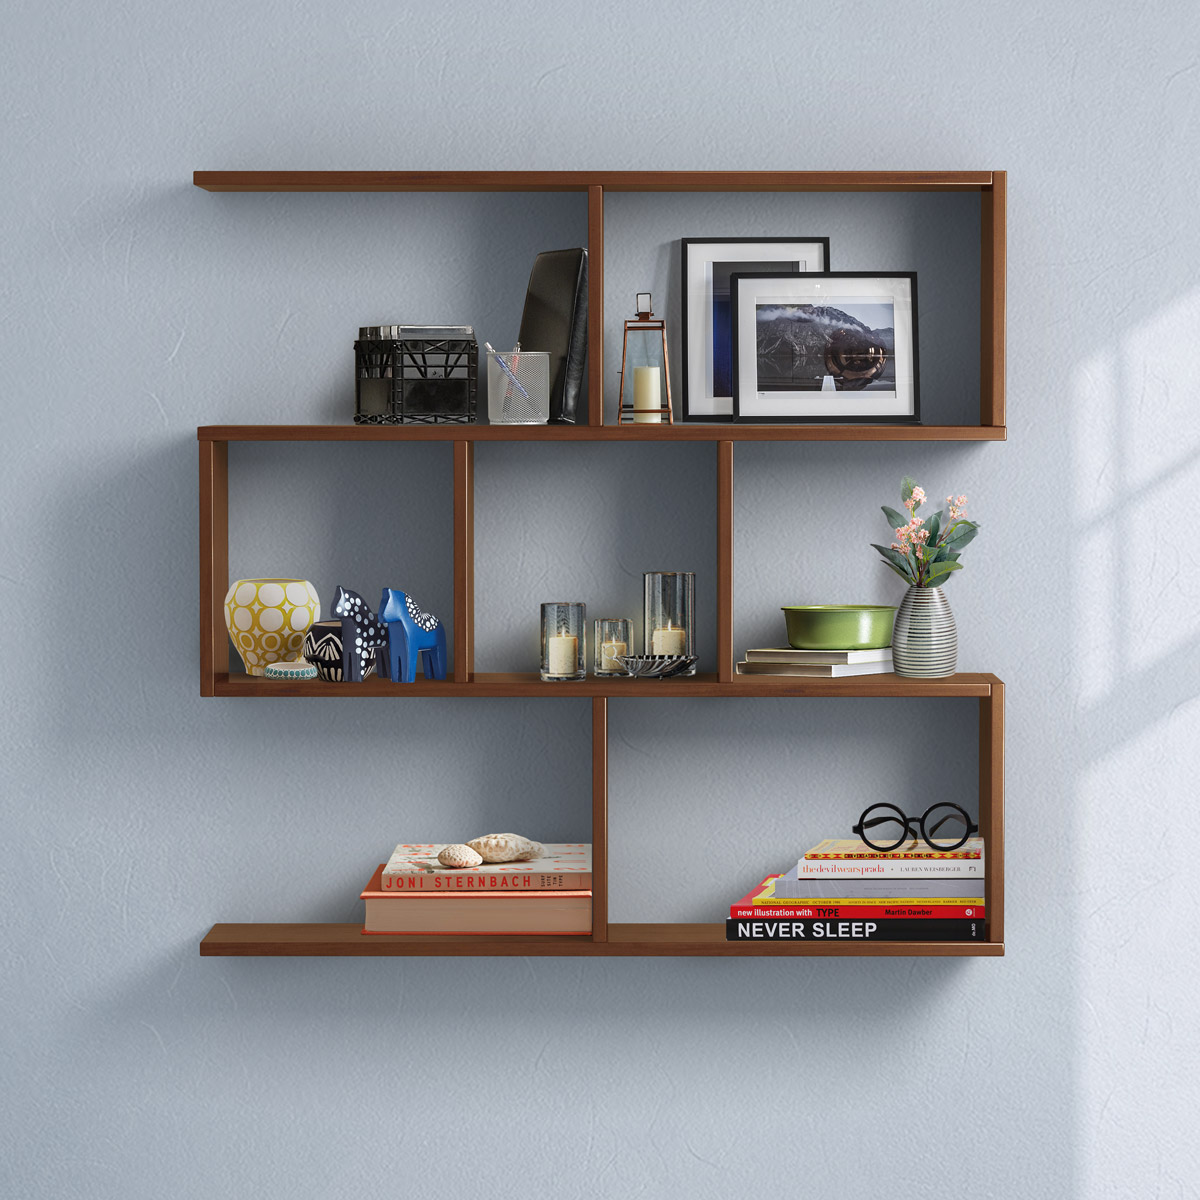
1.Wall shelves: Wall shelves are mounted on the wall and can be used for a variety of purposes, such as displaying decorative items, storing books, or organizing kitchen utensils. They come in a variety of materials and styles, including wood, metal, glass, and floating shelves.
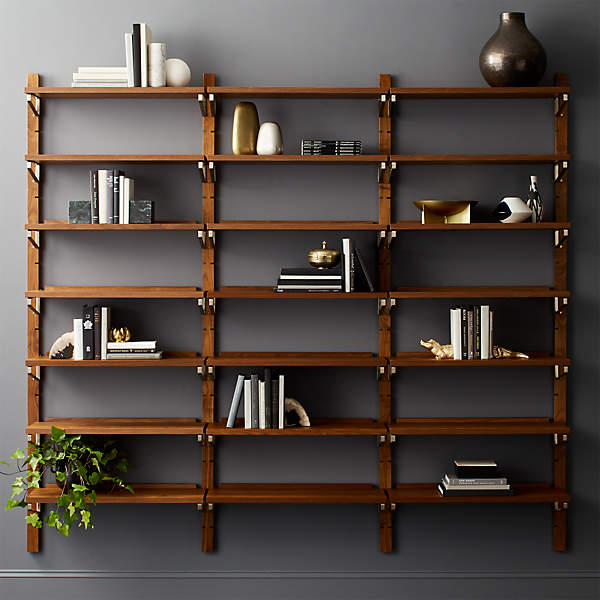
2.Bookshelves: Bookshelves are designed specifically for storing books and are often found in libraries or home offices. They can be freestanding or mounted to the wall and come in a range of sizes and styles, from tall and narrow to short and wide.
3.Corner shelves: Corner shelves are designed to fit into the corner of a room, maximizing space and providing additional storage. They can be freestanding or mounted to the wall and come in a variety of materials and styles.
4.Pantry shelves: Pantry shelves are typically found in kitchens and are used for storing food items. They can be freestanding or built into the pantry itself and are designed to maximize storage space.
5.Floating shelves: Floating shelves are mounted on the wall using hidden brackets, giving the appearance of floating in mid-air. They are often used for decorative purposes, displaying items such as picture frames or small plants.
6.Freestanding shelves: Freestanding shelves are not mounted to the wall and can be moved around a room as needed. They are often used for storing items such as clothing or shoes and come in a variety of materials and styles.
#Think to know These are just a few examples of the types of shelves available. When choosing a shelf, it's important to consider the intended use, available space, and overall design aesthetic of the room.
Research
Certainly, here's some information about shelves based on research:
History of Shelves: The use of shelves dates back to ancient civilizations, where they were used to store and display valuable items such as manuscripts, scrolls, and precious objects. The first recorded use of shelves was in the Library of Alexandria in Egypt, where wooden shelves were used to store papyrus scrolls. Types of Shelves: Shelves come in a variety of shapes, sizes, and materials. Common types of shelves include bookshelves, floating shelves, corner shelves, wall shelves, pantry shelves, and closet shelves. They can be made of wood, metal, glass, plastic, or other materials, and can be designed for specific uses and spaces. Benefits of Shelves: Shelves can provide many benefits to a space. They can help to organize and declutter a room, increase storage space, and add a decorative touch to a space. Shelves can also be used to display and showcase personal items such as books, photographs, and decorative objects. Tips for Organizing Shelves: Effective shelf organization involves considering the specific needs of the space and the items being stored. Some tips for organizing shelves include grouping similar items together, using containers or baskets to corral smaller items, and utilizing vertical space by stacking items or using tiered shelving. Future of Shelves: With the rise of smart homes and connected devices, there is a growing trend towards incorporating technology into furniture, including shelves. Some examples of this include smart shelves with built-in sensors to monitor inventory levels, and shelves with integrated charging stations for electronic devices.
There are many sources where you can find information on shelves. Here are some websites and resources that can be helpful:
1.Houzz.com: This website offers a wide variety of articles and resources on home design and decorating, including tips and inspiration for using shelves in your home. here
2.Pinterest.com: Pinterest is a social media platform that allows users to search for and save ideas on a wide variety of topics, including home decorating and organization. You can search for shelves on Pinterest and find inspiration for using them in your home.
After taking and taking same notes about the shelf that i will use in my final project i also take a notes and reseach on clock in order to run my final project with more imformation
Clock
Introduction on clock
A clock is a device that is used to measure and display time. It has been an important tool for humans for thousands of years, allowing us to keep track of the passage of time and organize our daily lives. Clocks come in many different forms, from traditional analog clocks with moving hands to digital clocks found in electronic devices such as smartphones and computers. The earliest known timekeeping devices were sundials, which were used by the ancient Egyptians and Greeks to measure time based on the position of the sun. Later, mechanical clocks were developed in medieval Europe, and over time, clocks became more accurate and complex. Today, atomic clocks are used to keep the most precise time and are used in scientific research and industries such as telecommunications and satellite navigation. Clocks have played an important role in human history, from keeping track of the passage of time during the day to coordinating travel and commerce across different time zones. They are also an important element of home decor, with a wide range of designs and styles available to suit any taste or interior design scheme.
Means of clock
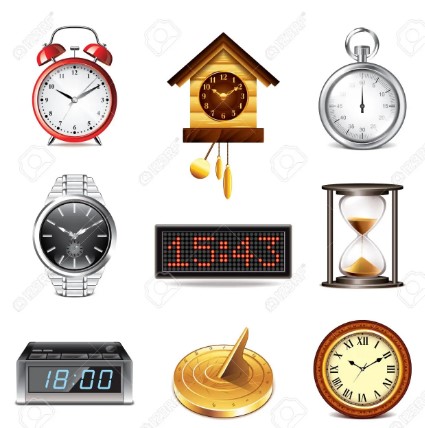
A clock is a timekeeping device that is used to measure and display the time. There are many different types of clocks, including:
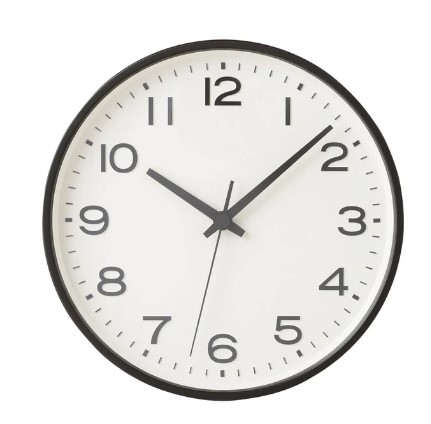
1.Analog clocks: Analog clocks are the most traditional type of clock and use hands to display the time. They typically have a circular face with numbers or Roman numerals representing the hours, and smaller markings to represent the minutes.
2.Digital clocks: Digital clocks use numbers to display the time, typically on an LED or LCD screen. They are often used in electronic devices such as alarm clocks, watches, and smartphones.
3.Atomic clocks: Atomic clocks are highly accurate timekeeping devices that use the vibrations of atoms to measure time. They are often used in scientific research and in industries such as telecommunications and satellite navigation.
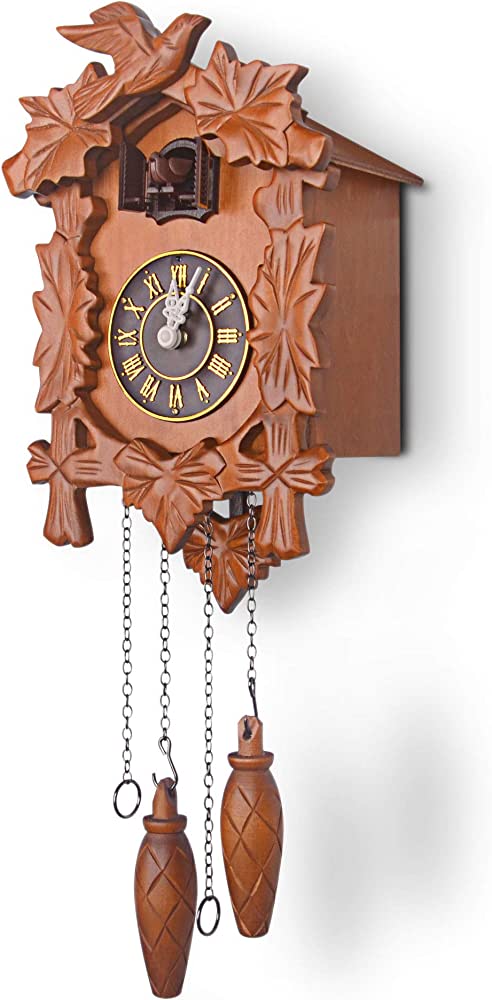
4.Cuckoo clocks: Cuckoo clocks are a type of clock that originated in Germany and feature a small bird that pops out of the clock at regular intervals to announce the time with a " cuckoo " sound .
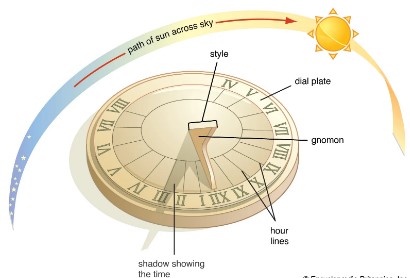
5.Sundials: Sundials are ancient timekeeping devices that use the position of the sun to measure time. They consist of a flat surface with markings that indicate the hours and a vertical piece called a gnomon, that casts a shadow on the surface.
Introduction on shelf edge digital clock
A shelf edge digital clock is a timekeeping device that is designed to be mounted on the edge of a shelf or similar surface. It typically has a slim and compact design, making it easy to fit into small spaces. These clocks are popular in retail settings, where they are used to display the time and help customers keep track of the time they spend in the store. They are often used in conjunction with digital signage displays to provide a complete digital advertising and information solution. Shelf edge digital clocks are available in a range of styles and designs, including LED and LCD displays, and can be powered by batteries or mains electricity. Some models include additional features such as alarms, timers, and temperature displays. Overall, shelf edge digital clocks are a useful and practical tool for any retail or commercial environment where accurate timekeeping is important, and where space is at a premium. They provide a cost-effective way to display the time and can help to enhance the overall shopping experience for customers.
Meaning of shelf edge digital clock:
A shelf edge digital clock is a clock designed to be mounted on the edge of a shelf or display unit. It is typically a small, compact clock that can fit easily on a shelf or other narrow surface. These clocks are often used in retail environments, particularly in supermarkets and other stores where customers need to keep track of time while shopping. By displaying the time prominently on the edge of a shelf or display unit, customers can quickly and easily check the time without having to pull out their own devices. Shelf edge digital clocks typically have digital displays, which can show the time in a variety of formats, including 12-hour or 24-hour time, as well as additional information such as the date and temperature. Some models also feature alarms and timers, which can be useful for managing stock rotation or other time-sensitive tasks. Overall, shelf edge digital clocks are a useful tool for retailers looking to improve the customer experience and streamline their operations. They are compact, easy to use, and can help to keep customers on schedule while shopping.
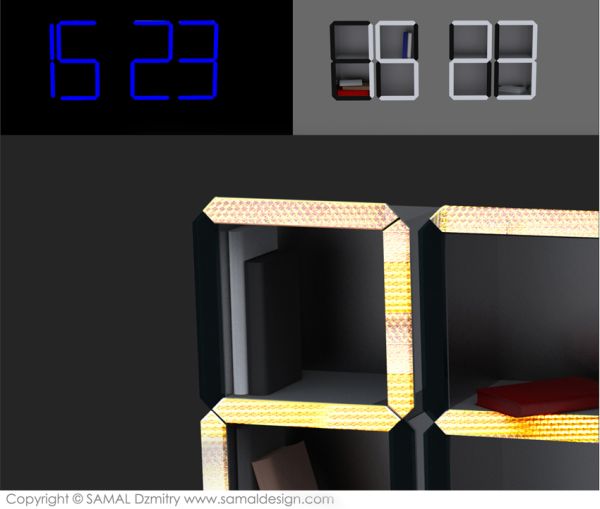
digital shelf edge clock
Explaining and introduction of my final project
Here is the overview of my project and it's aims to achieve, on this planet on innovations,
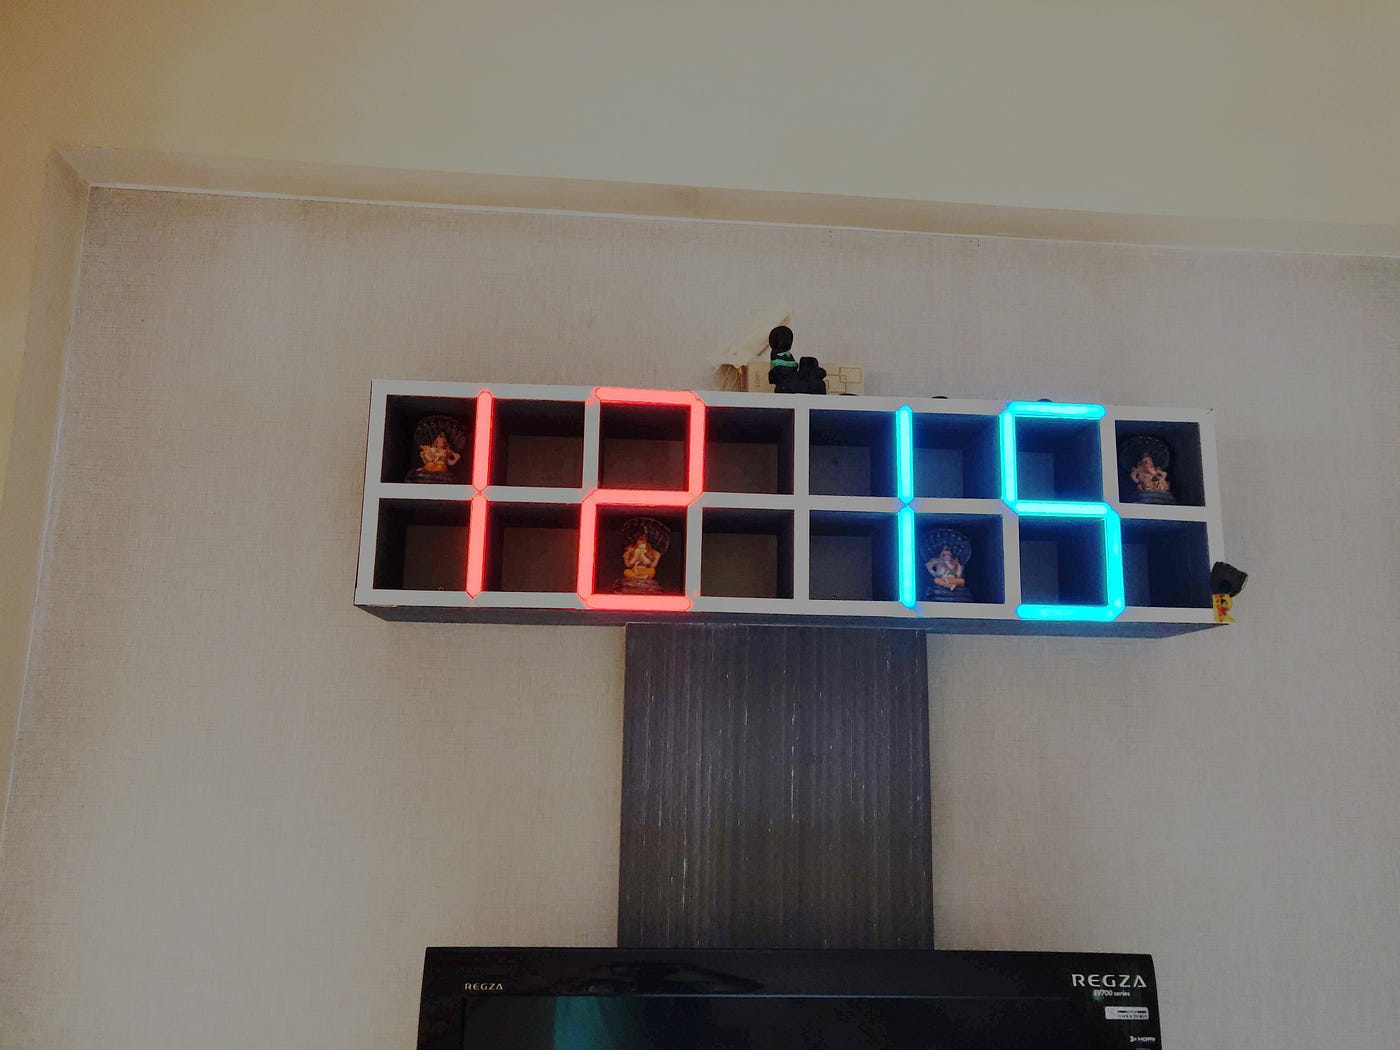
The Digital Shelf Edge Clock is a project aimed at developing a small, compact digital clock that can be mounted on the edge of retail shelves or display units. The clock is designed to provide accurate timekeeping and improve the customer experience by making it easier for shoppers to keep track of the time while they are in the store.
Here are more detail about the features and functionality of the digital shelf edge clock:
1.The clock features a bright, easy-to-read digital display that can be customized to show the time in a variety of formats, including 12-hour or 24-hour time.
2.In addition to displaying the time, the clock can also show the date and temperature, providing shoppers with even more useful information.
3.The clock is designed to be compact and unobtrusive, with a slim profile that fits easily on the edge of a shelf or display unit.
4.The clock can be powered by batteries or mains electricity, making it a versatile option for different store layouts and setups.
5.The clock is durable and long-lasting, designed to withstand the wear and tear of a retail environment.
Here are same of the potential benefits of the Digital Shelf Edge Clock, both for retailers and for shoppers.
1.The clock can help to improve the overall shopping experience by making it easier for customers to keep track of time and stay on schedule.
2.By providing accurate timekeeping, the clock can help to improve the efficiency of store operations and reduce the risk of errors or delays.
3.The clock is a cost-effective solution for retailers looking to enhance their in-store technology and provide customers with even more value.
Here are a few possibilities of how my project will help in society:
1.Improved customer experience: By providing an easy-to-read and highly visible clock display, the Digital Shelf Edge Clock can help shoppers keep track of time while they are in a store. This can improve the overall shopping experience and make it easier for people to plan their time efficiently.
2.Increased efficiency: For retailers, having a reliable and accurate timekeeping tool can help to streamline operations and reduce errors. By providing a clock that is specifically designed for use in a retail environment, the Digital Shelf Edge Clock can help stores to optimize their workflows and improve productivity.
3.Enhanced sustainability: By reducing the need for individual shoppers to check their phones or other devices for the time, the Digital Shelf Edge Clock could help to reduce the overall energy consumption of a store. This could be particularly important in large retail environments, where many shoppers may be using their devices to check the time throughout the day.
4.Technological innovation: The Digital Shelf Edge Clock represents a small but important example of how technology can be used to improve everyday experiences. By creating a clock that is specifically designed for use in a retail environment, the project demonstrates how even simple tools can be reimagined and re-engineered to better serve their users.
Overall, the Digital Shelf Edge Clock project has the potential to improve the shopping experience for customers, increase efficiency for retailers, promote sustainability, and showcase the power of technological innovation.
Digital shelf edge clock in the sector of innovation
The Digital Shelf Edge Clock project can contribute to innovation in several ways:
1.Novel Design and Functionality: The project introduces a new and innovative design concept by developing a clock specifically designed to be mounted on the edge of shelves or display units. This unique form factor combines timekeeping functionality with space optimization, catering to the needs of retail environments. It showcases how innovative thinking can lead to practical solutions that enhance user experience and address specific industry requirements.
2.Integration of Technology: By incorporating digital display technology into a shelf-mounted clock, the project demonstrates the integration of technology into everyday objects. This fusion of traditional timekeeping with digital capabilities showcases the potential for technology to enhance and modernize even the simplest of devices.
3.Enhanced User Experience: The Digital Shelf Edge Clock project aims to improve the shopping experience by providing shoppers with a convenient way to keep track of time while in a store. This innovative approach considers the needs and preferences of customers, prioritizing their convenience and ensuring they can efficiently manage their time during their shopping trips.
4.Industry-Specific Solution: The project addresses a specific need within the retail industry by offering a clock tailored to the unique requirements of retail environments. This industry-specific solution demonstrates the potential for innovation to provide targeted solutions for specific sectors, enhancing efficiency, and improving overall operations.
5.Potential for Expansion and Adaptation: The concept of a shelf edge digital clock can extend beyond retail environments. The project's innovation and design can inspire further applications in various contexts, such as libraries, warehouses, offices, or other settings where a compact, shelf-mounted clock could be beneficial.
Overall, the Digital Shelf Edge Clock project showcases innovation through its unique design, integration of technology, focus on user experience, industry-specific solution, and the potential for future expansion and adaptation. It highlights the transformative power of innovation in meeting specific needs and enhancing everyday experiences.
Information about the digital shelf edge clock
What does it do?
The Digital Shelf Edge Clock is a clock designed to display the time, date, and other relevant information on a shelf edge. This type of clock is typically used in retail stores, homes,coffe shops, innovation houses.. to provide customers with information about product pricing, promotions, temperature and inventory.
The clock is placed on the shelf edge, facing outwards, and can be programmed to display different types of information. For example, it can show the time, date, and product pricing information. The clock can also be synchronized with other clocks in the store, ensuring accurate timekeeping across the entire location. In addition to displaying information, the Digital Shelf Edge Clock can also be used to capture data. For example, it can be equipped with sensors to track customer traffic and measure the effectiveness of marketing campaigns.
Who's done this beforehand?
I got the inspiration from
What i design
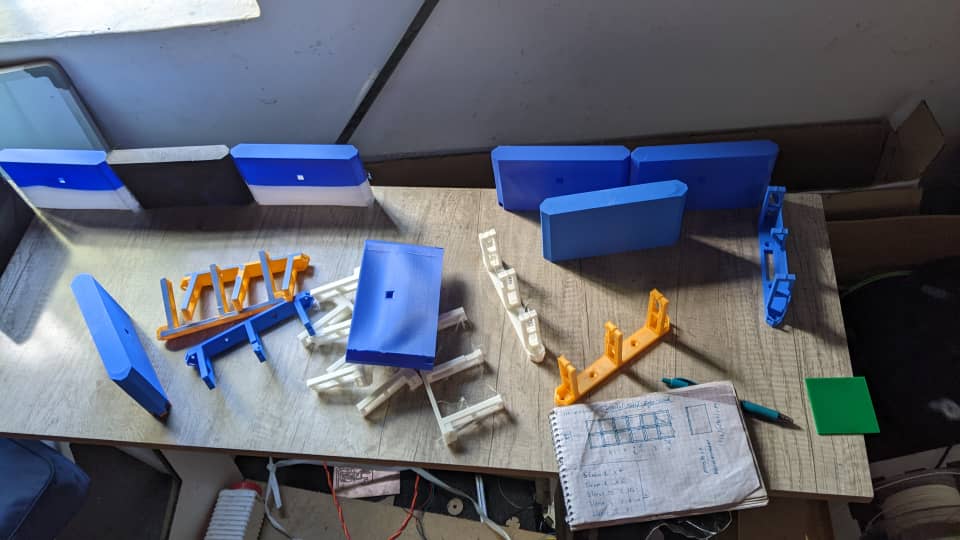
I designed a digital shelf edge clock, here same parts to be used i will use 3d printer and cnc machines
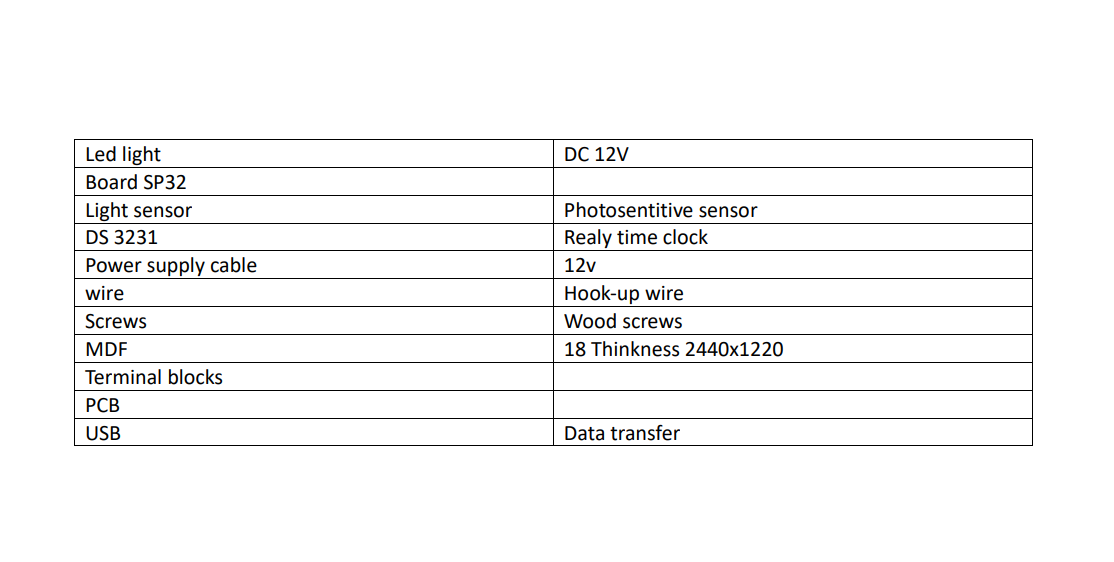
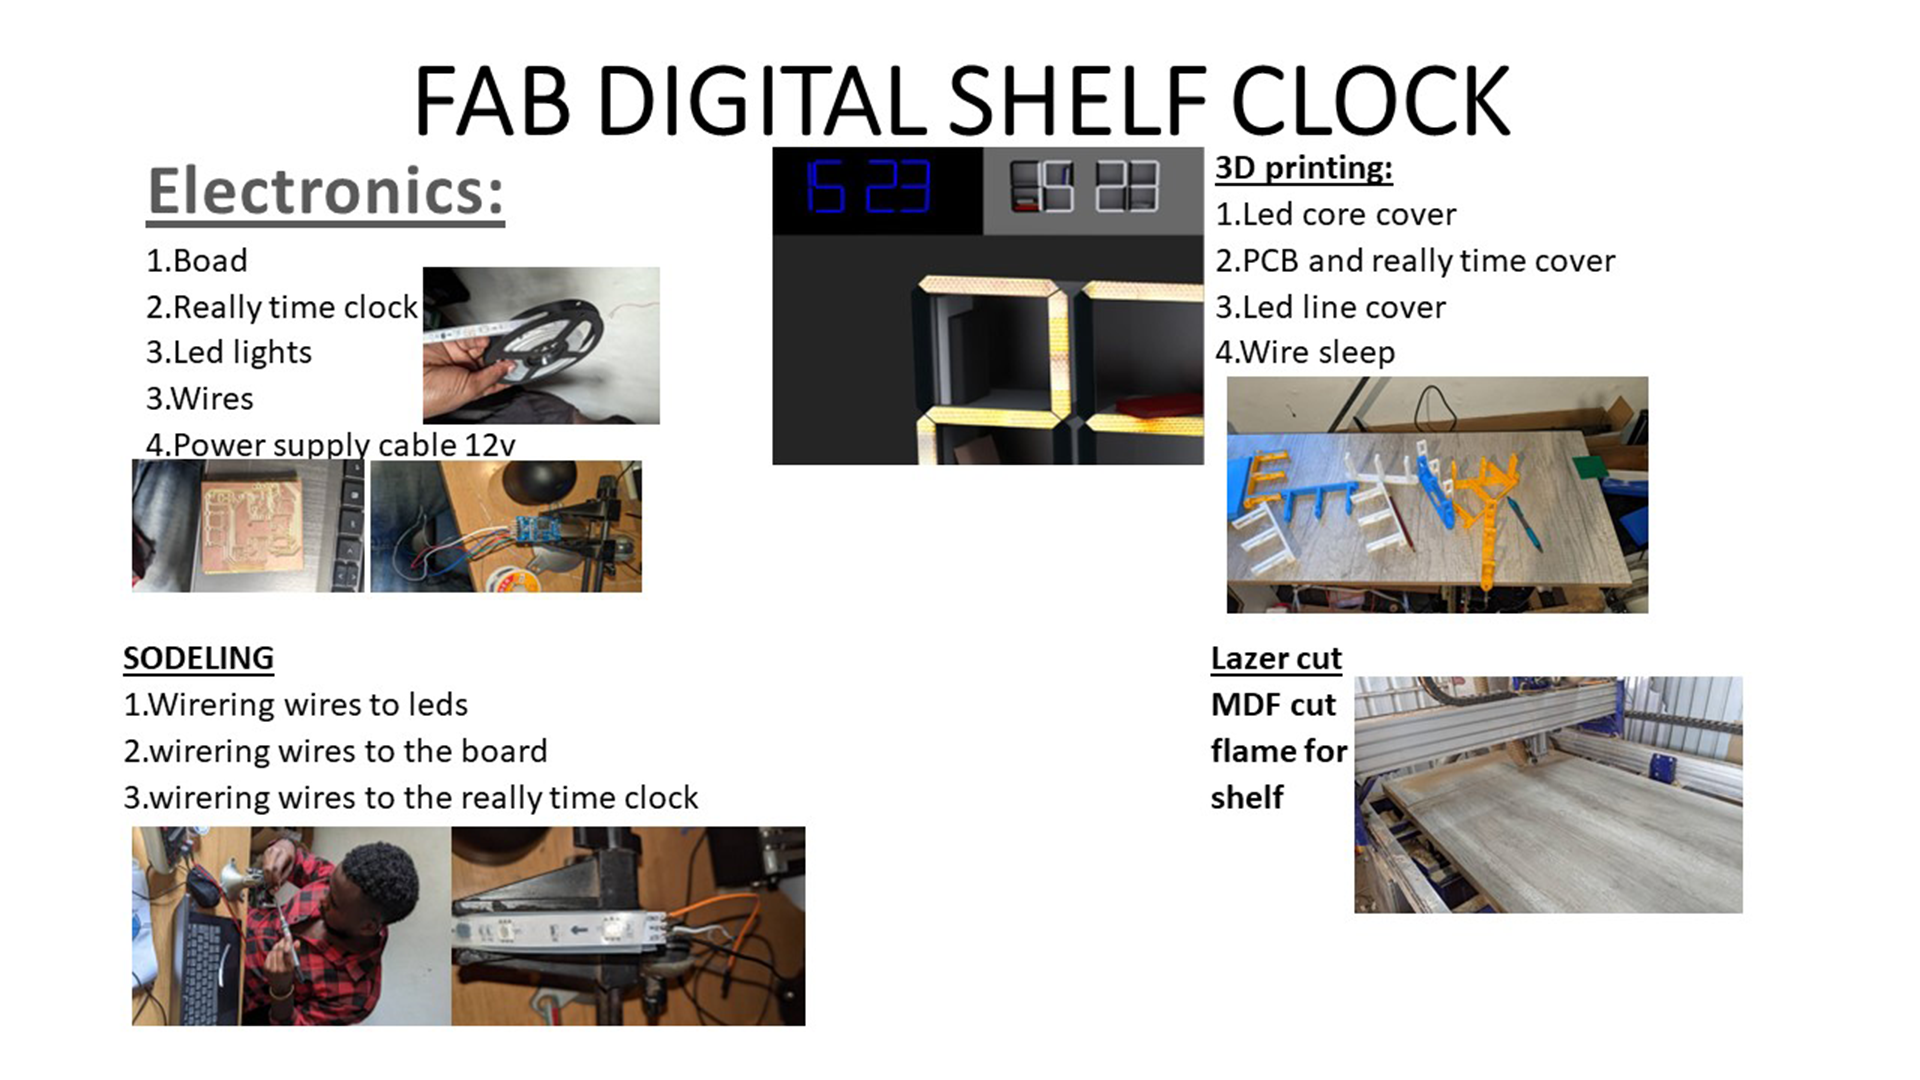
What materials and components were used?
Here is the image that shows the components and materials used in in my project.
Where did they come from?
I got all the components i used in my project in Fablab
How much did they cost?
What parts and systems were made?
2D & 3D Design
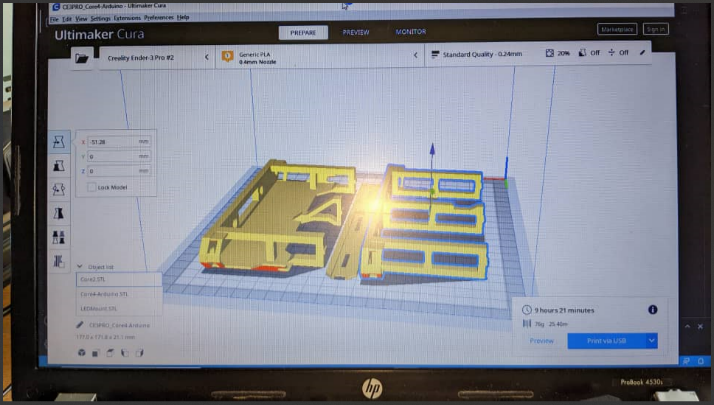
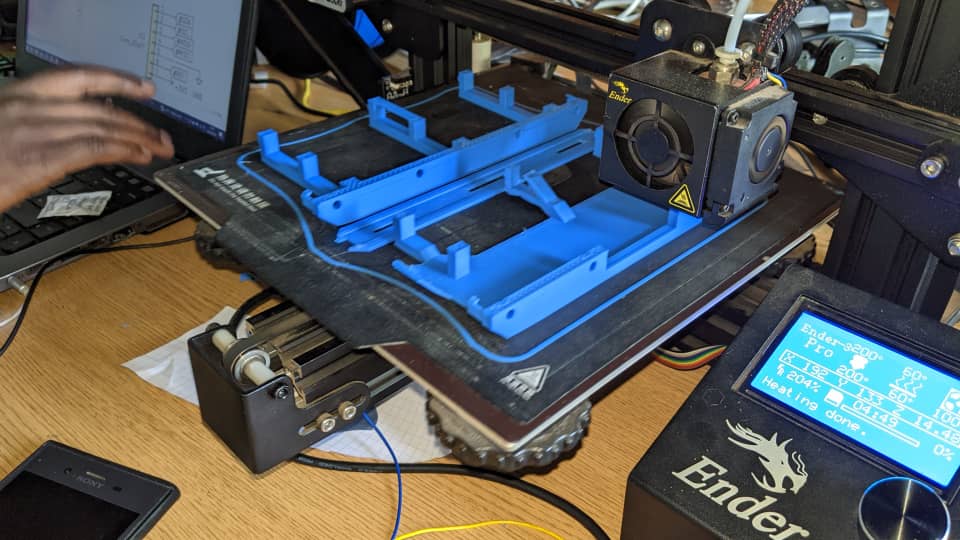
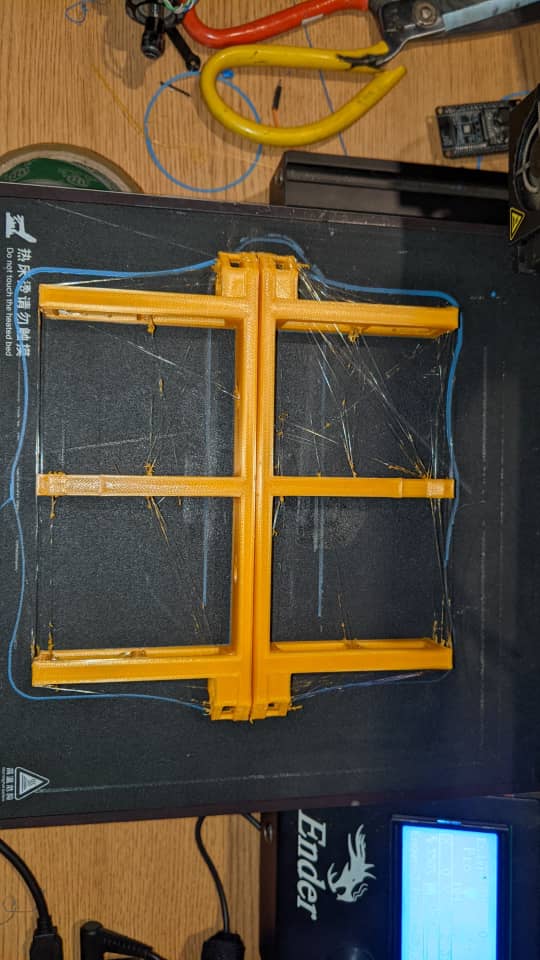
3D print the casing
3d print the horders
cnc machine cut the MDF parts
Laser cut the cover of the leds
Here below are same of 3d printed material to be used in my project
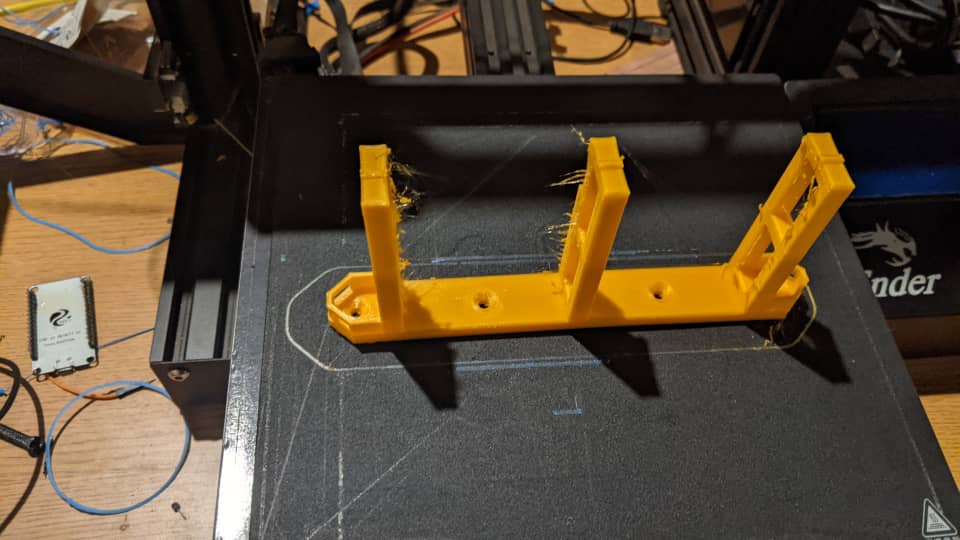

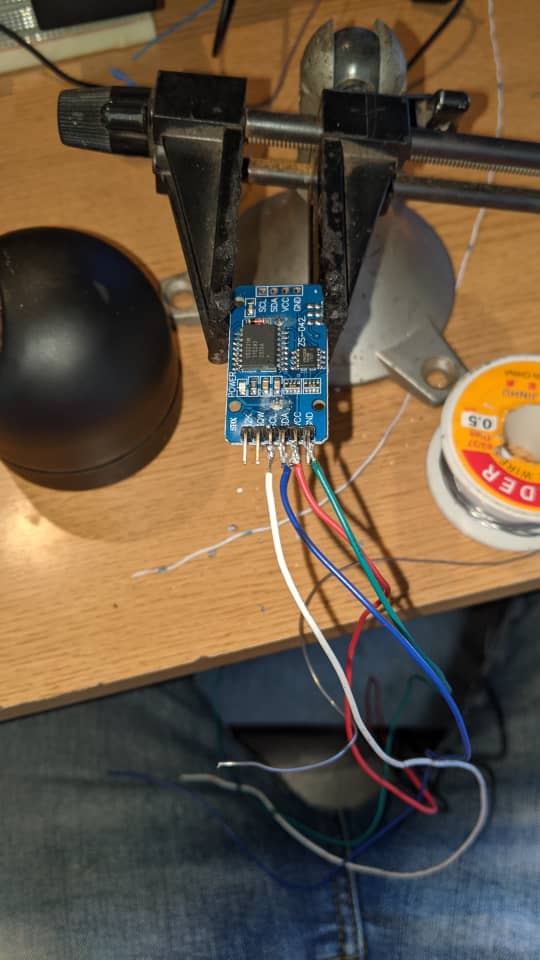
Input & Output Device
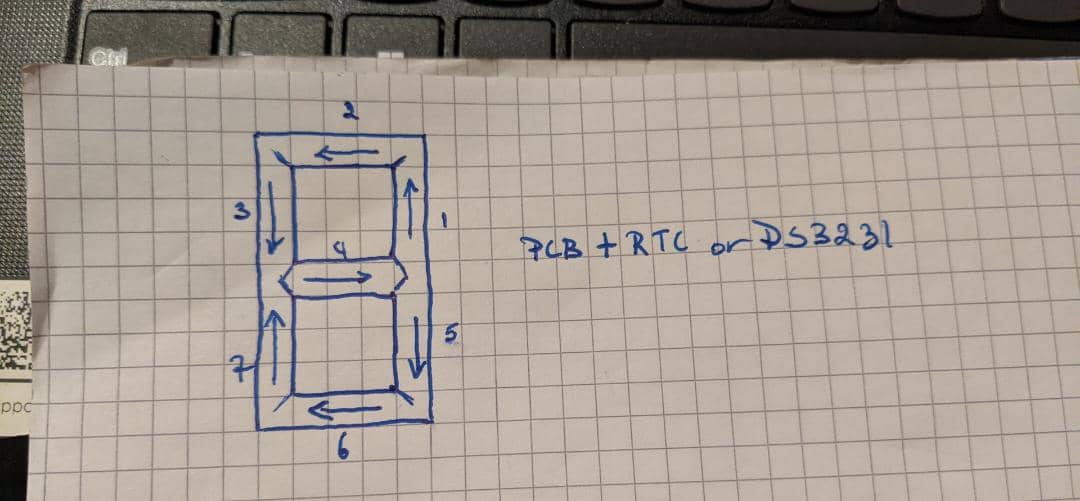
Light sensor and really time clock
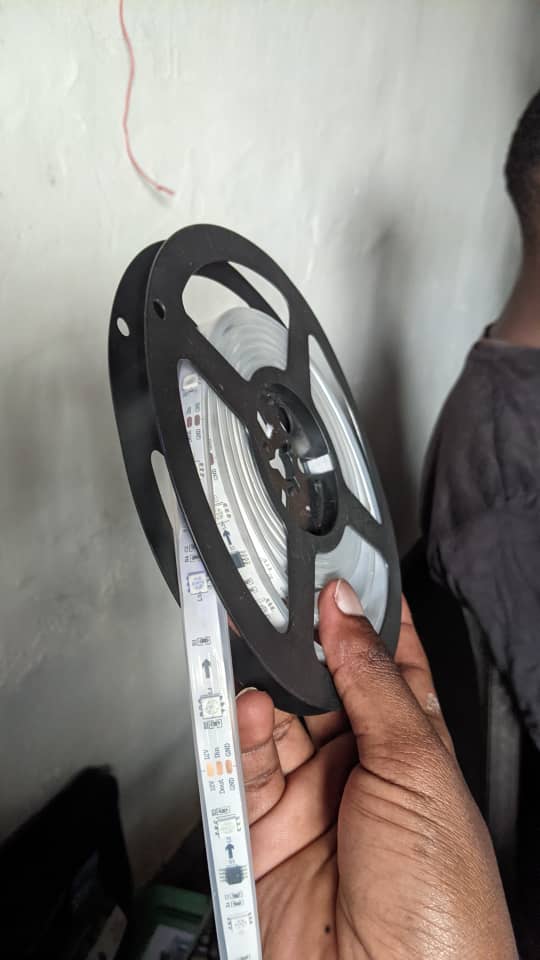
LEDS
Circuit Design

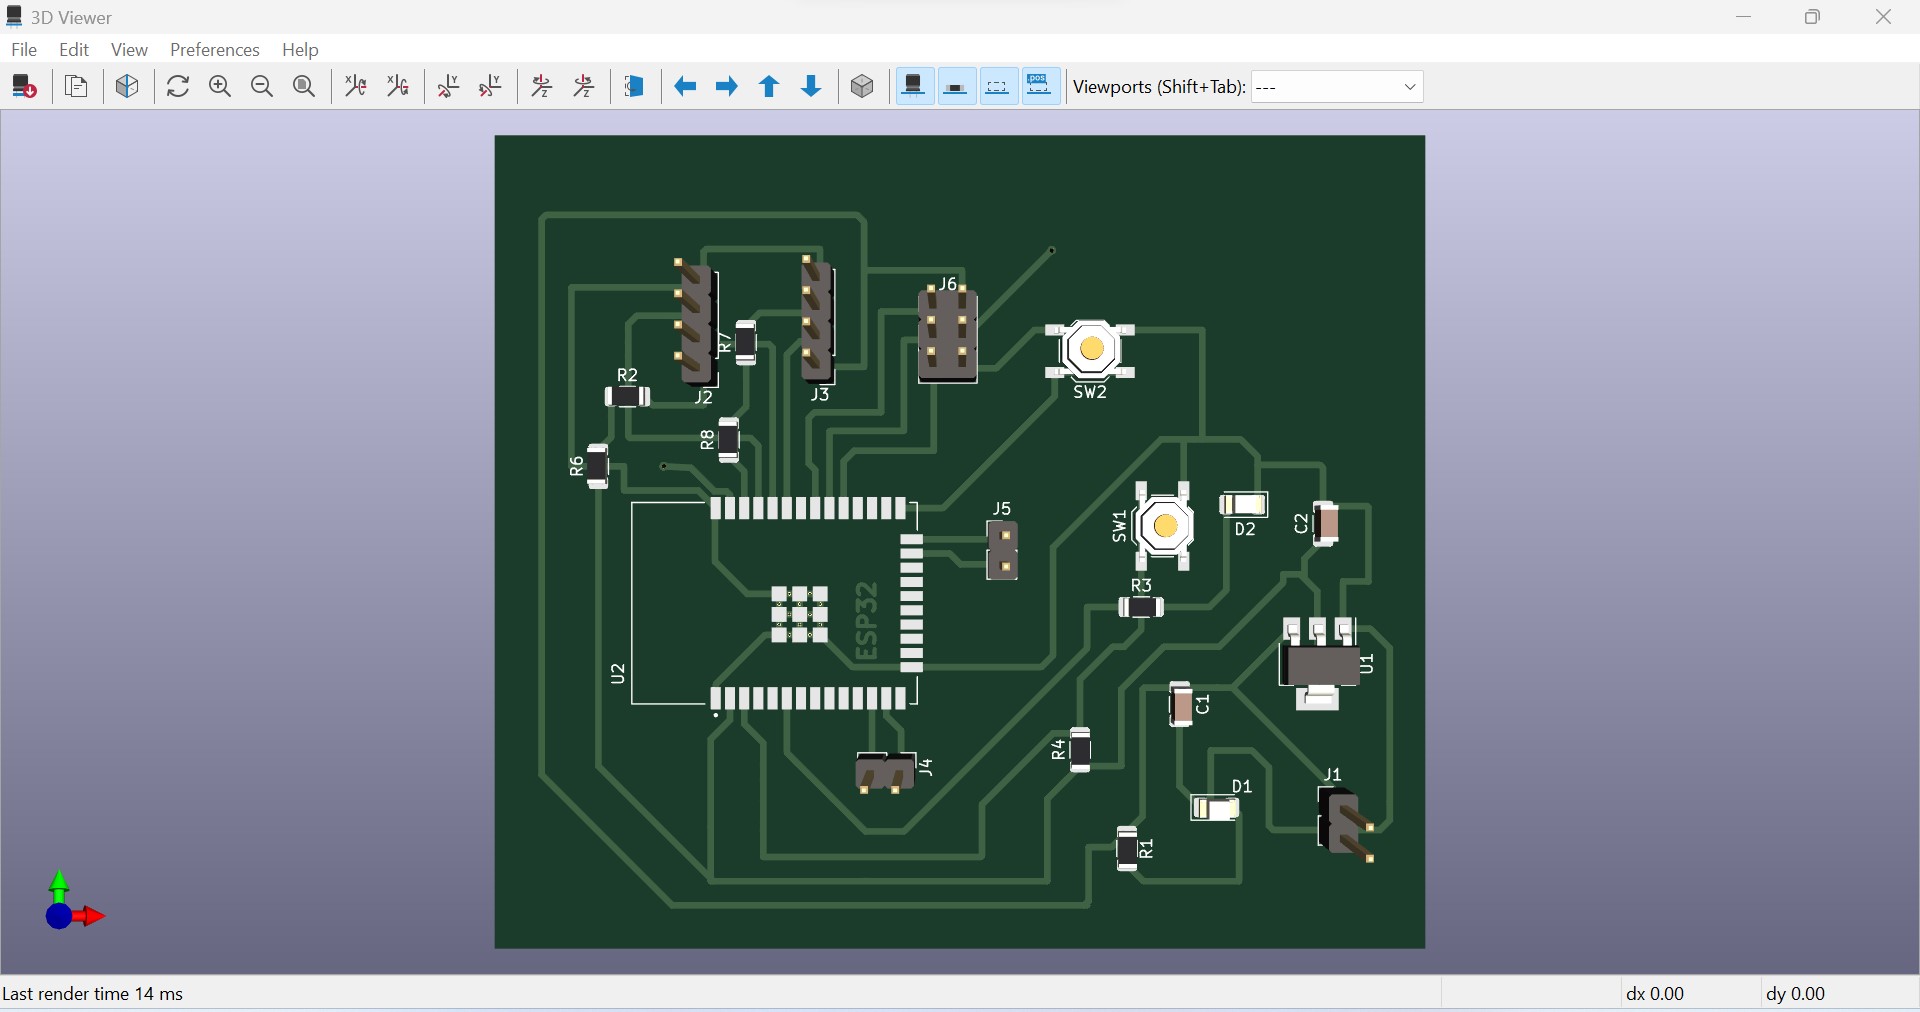
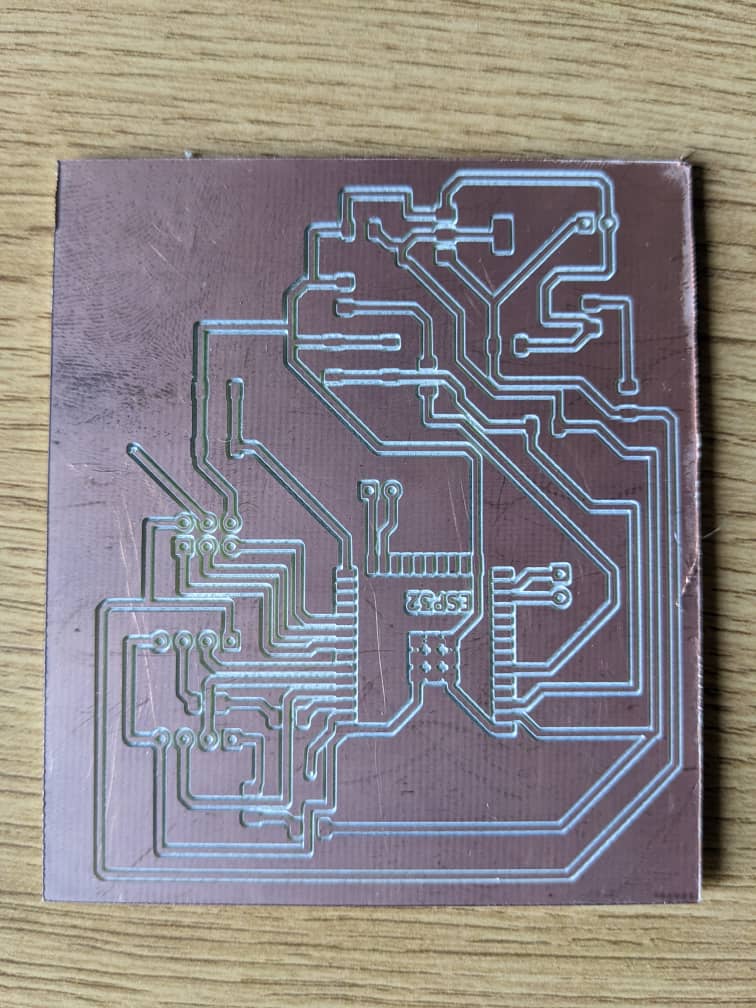
PCB Milling
.png)
PCB
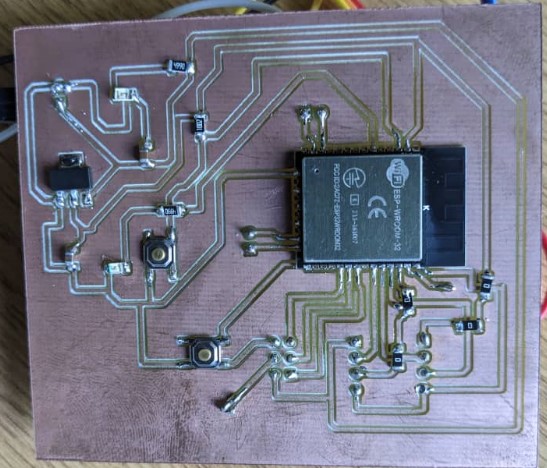
Embedded Programming
Here below is my codes i used in debugging
                            #include
                              #ifdef _AVR_
                              #endif

                              #include
                              DS3231_Simple Clock;

                              // Create a variable to hold the time data
                              DateTime MyDateAndTime;

                              // Which pin on the Arduino is connected to the NeoPixels?
                              #define LEDCLOCK_PIN    6


                              // How many NeoPixels are attached to the Arduino?
                              #define LEDCLOCK_COUNT 69

                              uint32_t clockMinutecolourToUse = 0xceed00; // pure red
                              uint32_t clockHourcolourToUse = 0x008000;   // pure green

                              int clockFaceBrightness = 0;

                              // Declare our NeoPixel objects:
                              Adafruit_NeoPixel stripClock(LEDCLOCK_COUNT, LEDCLOCK_PIN, NEO_GRB + NEO_KHZ800);
                              // Argument 1 = Number of pixels in NeoPixel strip
                              // Argument 2 = Arduino pin number (most are valid)
                              // Argument 3 = Pixel type flags, add together as needed:
                              //   NEO_KHZ800  800 KHz bitstream (most NeoPixel products w/WS2812 LEDs)
                              //   NEO_KHZ400  400 KHz (classic 'v1' (not v2) FLORA pixels, WS2811 drivers)
                              //   NEO_GRB     Pixels are wired for GRB bitstream (most NeoPixel products)
                              //   NEO_RGB     Pixels are wired for RGB bitstream (v1 FLORA pixels, not v2)
                              //   NEO_RGBW    Pixels are wired for RGBW bitstream (NeoPixel RGBW products)


                              //Smoothing of the readings from the light sensor so it is not too twitchy
                              const int numReadings = 12;

                              int readings[numReadings];      // the readings from the analog input
                              int readIndex = 0;              // the index of the current reading
                              long total = 0;                  // the running total
                              long average = 0;                // the average


                              void setup() {

                                Serial.begin(9600);
                                Clock.begin();

                                stripClock.begin();           // INITIALIZE NeoPixel stripClock object (REQUIRED)
                                stripClock.show();            // Turn OFF all pixels ASAP
                                stripClock.setBrightness(255); // Set inital BRIGHTNESS (max = 255)


                                //smoothing
                                  // initialize all the readings to 0:
                                for (int thisReading = 0; thisReading < numReadings; thisReading++) {
                                  readings[thisReading] = 0;
                                }

                              }

                              void loop() {

                                //read the time
                                readTheTime();

                                //display the time on the LEDs
                                displayTheTime();


                                stripClock.setBrightness(255); // Set brightness value of the LEDs
                                 stripClock.show();
                                delay(1000);   //this 5 second delay to slow things down during testing

                              }


                              void readTheTime(){

                                // Ask the clock for the data.
                                MyDateAndTime = Clock.read();

                                // And use it
                                Serial.println("");
                                Serial.print("Time is: ");   Serial.print(MyDateAndTime.Hour);
                                Serial.print(":"); Serial.print(MyDateAndTime.Minute);
                                Serial.print(":"); Serial.println(MyDateAndTime.Second);
                                Serial.print("Date is: 20");   Serial.print(MyDateAndTime.Year);
                                Serial.print(":");  Serial.print(MyDateAndTime.Month);
                                Serial.print(":");    Serial.println(MyDateAndTime.Day);
                              }

                              void displayTheTime(){

                                stripClock.clear(); //clear the clock face


                                int firstMinuteDigit = MyDateAndTime.Minute % 10; //work out the value of the first digit and then display it
                                displayNumber(firstMinuteDigit, 0, clockMinutecolourToUse);


                                int secondMinuteDigit = floor(MyDateAndTime.Minute / 10); //work out the value for the second digit and then display it
                                displayNumber(secondMinuteDigit, 7, clockMinutecolourToUse);


                                int firstHourDigit = MyDateAndTime.Hour; //work out the value for the third digit and then display it
                                if (firstHourDigit > 12){
                                  firstHourDigit = firstHourDigit - 12;
                                }

                               // Comment out the following three lines if you want midnight to be shown as 12:00 instead of 0:00
                              //  if (firstHourDigit == 0){
                              //    firstHourDigit = 12;
                              //  }

                                firstHourDigit = firstHourDigit % 10;
                                displayNumber(firstHourDigit, 14, clockHourcolourToUse);


                                int secondHourDigit = MyDateAndTime.Hour; //work out the value for the fourth digit and then display it

                              // Comment out the following three lines if you want midnight to be shwon as 12:00 instead of 0:00
                              //  if (secondHourDigit == 0){
                              //    secondHourDigit = 12;
                              //  }

                               if (secondHourDigit > 12){
                                  secondHourDigit = secondHourDigit - 12;
                                }
                                  if (secondHourDigit > 9){
                                    stripClock.fill(clockHourcolourToUse,21, 2);
                                  }

                                }


                              void displayNumber(int digitToDisplay, int offsetBy, uint32_t colourToUse){
                                uint32_t colour=colourToUse;
                                int offset=offsetBy;
                                  switch (digitToDisplay){
                                  case 0:
                                  stripClock.fill(colour, (0 + offset), 3);
                                  stripClock.fill(colour, (4 + offset), 3);
                                    break;
                                  case 1:
                                    stripClock.fill(colour, (0+ offset), 1);
                                  stripClock.fill(colour, (4+ offset), 1);
                                    break;
                                  case 2:
                                  stripClock.fill(colour, (0+ offset), 2);
                                  stripClock.fill(colour, (3+ offset), 1);
                                  stripClock.fill(colour, (5+ offset), 2);
                                    break;
                                  case 3:
                                  stripClock.fill(colour, (0 + offset), 2);
                                  stripClock.fill(colour, (3 + offset), 3);
                                    break;
                                  case 4:
                                   stripClock.fill(colour, (0 + offset), 1);
                                  stripClock.fill(colour, (2 + offset), 3);
                                    break;
                                  case 5:
                                  stripClock.fill(colour, (1 + offset), 5);
                                    break;
                                  case 6:
                                  stripClock.fill(colour, (1 + offset), 6);
                                    break;
                                  case 7:
                                  stripClock.fill(colour, (0 + offset), 2);
                                  stripClock.fill(colour, (4 + offset), 1);
                                    break;
                                  case 8:
                                 stripClock.fill(colour, (0 + offset), 7);
                                    break;
                                  case 9:
                                 stripClock.fill(colour, (0 + offset), 6);
                                    break;
                                  default:
                                   break;
                                }
                              }
wires
What processes were used?
1.PCB designing
2.Milling
3.3D printing
4.CNC cutting
5.Soldering
Here is the Video of my Final project
Here are all details about my project but becouse of time and dates there is same of my projects that i will finish well
Here below are my orginal files