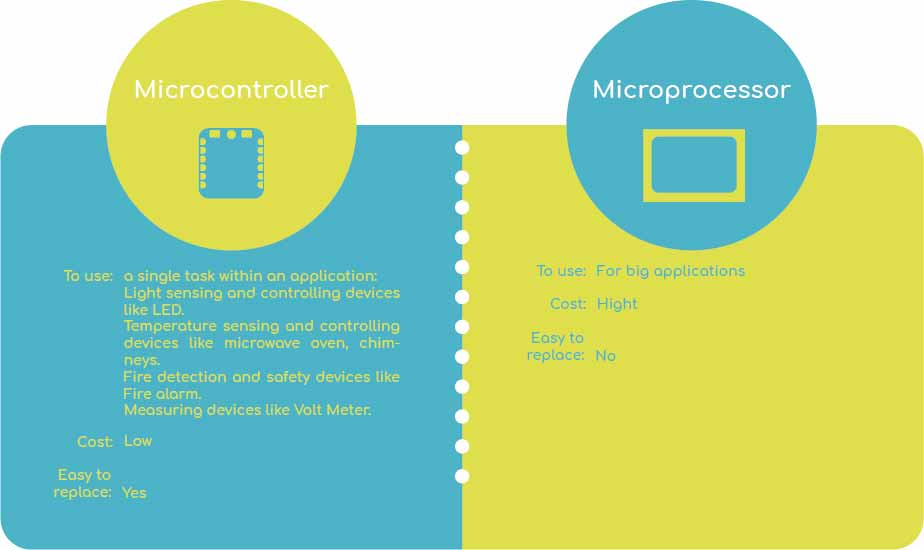
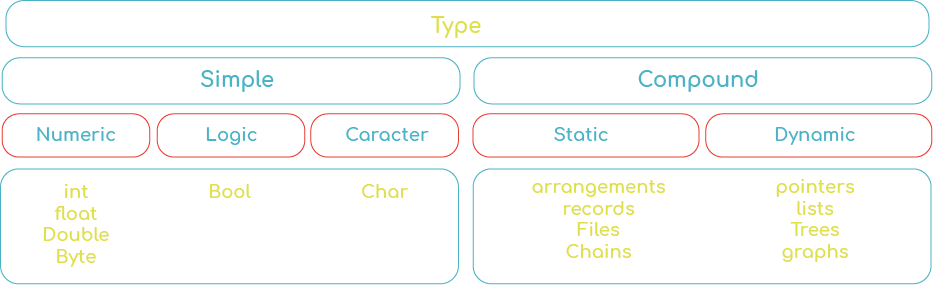
microcontroller
Is a small and low-cost computer.

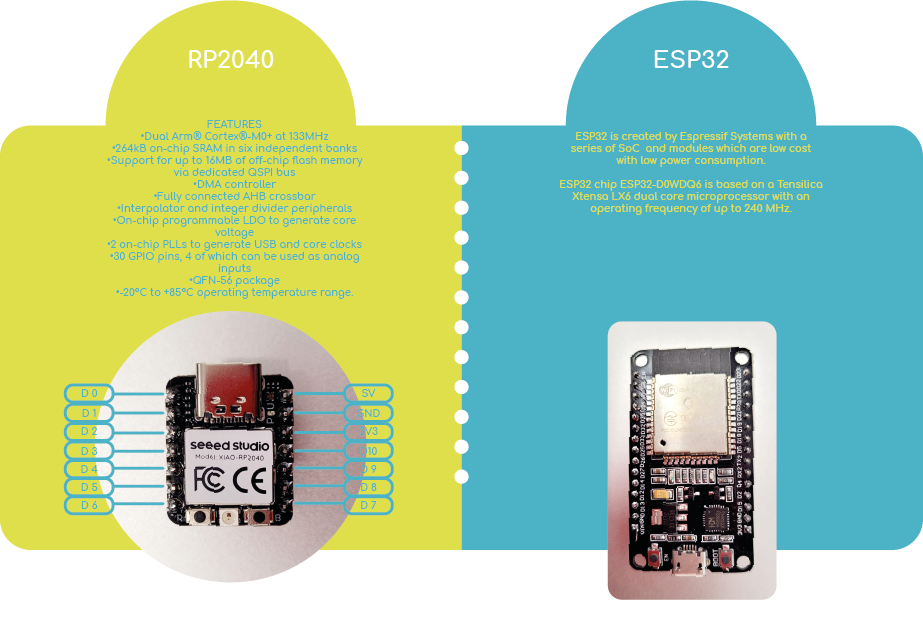
RP2040 & ESP32
I worked with two microcontrollers in a basic way, to understand their language, composition and bases.
| Lenguajes | Support Arduino / Micropython / CircuitPython | languages |
|---|---|---|
| Data Sheet | RP2040 Datasheet | ESP-32 tutorials |
| Microcontroller | XIAO RP2040 | ESP-32 Tensilica Xtensa LX6 |
| Dimensions | 20 x 17.5mm | 51 x 28.5mm |
| Development Interfaces | 2x buttons, 11x digital / 4x analog pins, 1x I2C interface, 1x UART port, 1x SPI port, and 1x SWD Bonding pad interface | RESET and BOOT buttons |
| Lenguages | Arduino, Micropython, CircuitPython. | C/C++, Python, Iua, Javascript |
| Microcontroller | XIAO RP2040 | ESP-32 Tensilica Xtensa LX6 |
|---|---|---|
| CPU | Arm Cortex-M0+ Dual-core @133MHz | Tensilica Xtensa LX6 32 bit Dual-Core @ 160 / 240Mhz |
| RAM | 264 KB | 520 KB |
| WIFI | No | Yes, 802.11b/g/n |
| SPI | Yes | Yes |
| Bluetooth® | No | Yes, 4.2 BR/EDR + BLE |
| USB Host | Yes | No |
| Sensor de efecto Hall | No | Yes |
| Capteur de température | No | Yes |
| I²C | Yes | Yes |
| Dimensions | 21 x 17.5mm | Yes |
| Development Interfaces | 2x buttons, 11x digital / 4x analog pins, 1x I2C interface, 1x UART port, 1x SPI port, and 1x SWD Bonding pad interface | Yes |
Pins
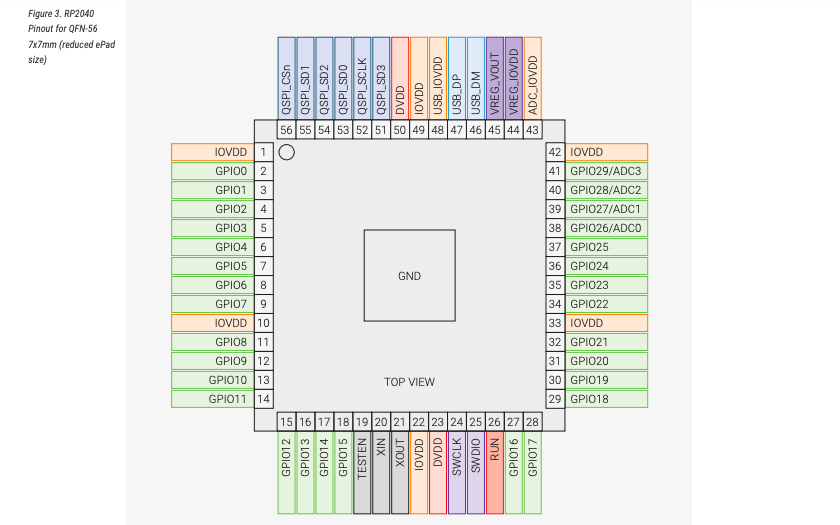
Xiao rp2040 has 11 digital pins, 4 analog pins, 11 PWM pins, 1 I2C interface, 1 UART interface, 1 SPI interface, 1 SWD bonding pad interface.
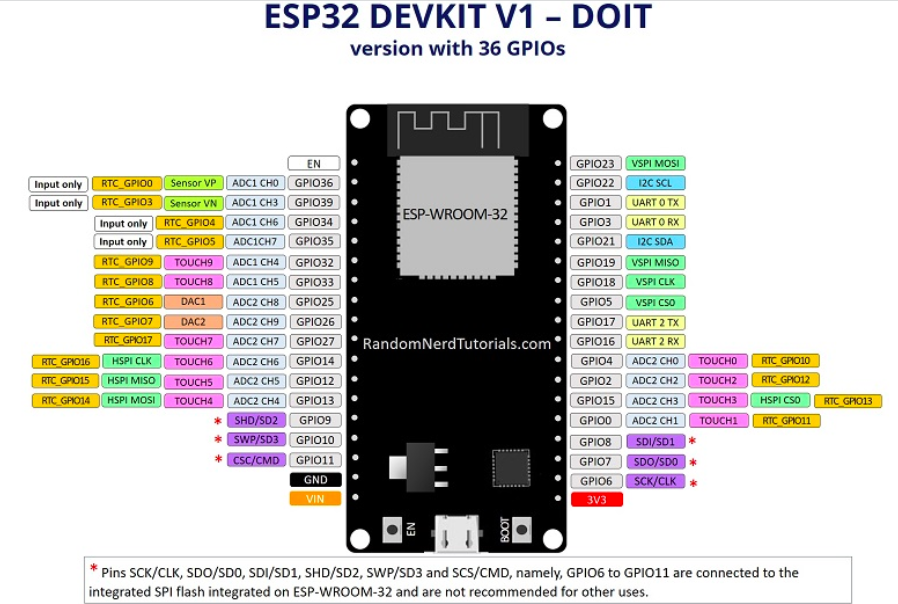
ESP32 has 38 pins, of which 24 are digital GPIO.
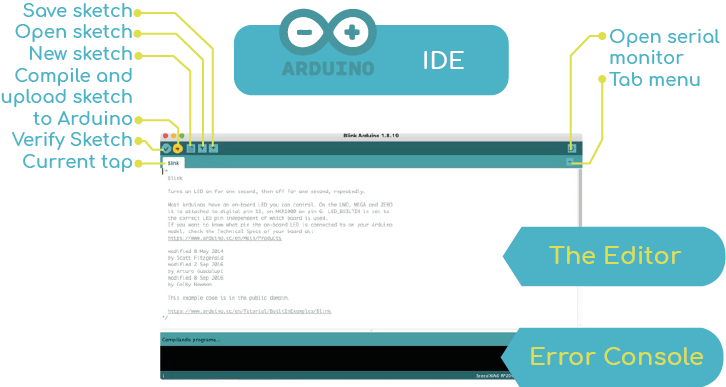
IDE
IDE stands for “Integrated Development Environment” :it is an official software, that is mainly used for editing, compiling and uploading the code in a device.
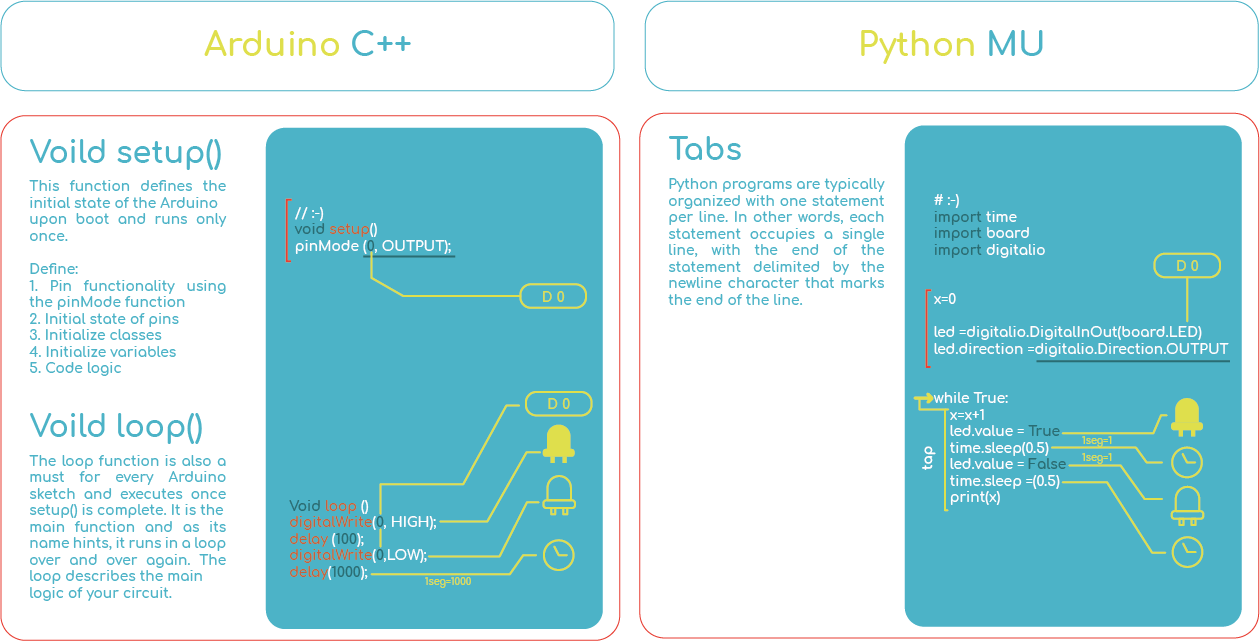
Arduino
The Porgram Structure: Variables
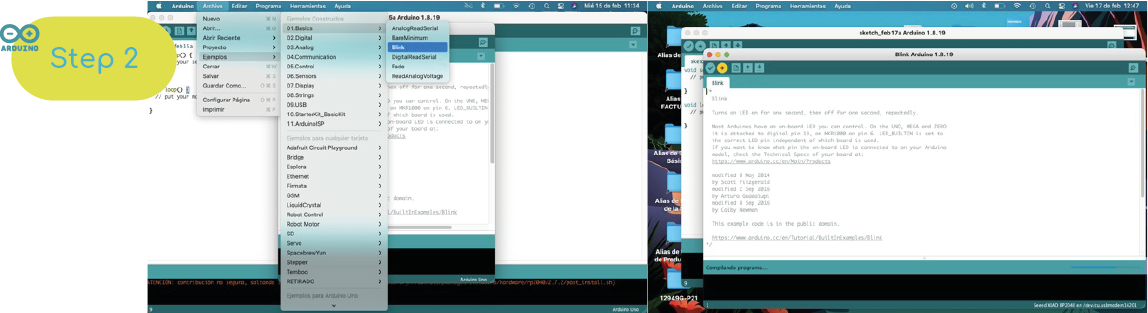
Open my first Arduino program
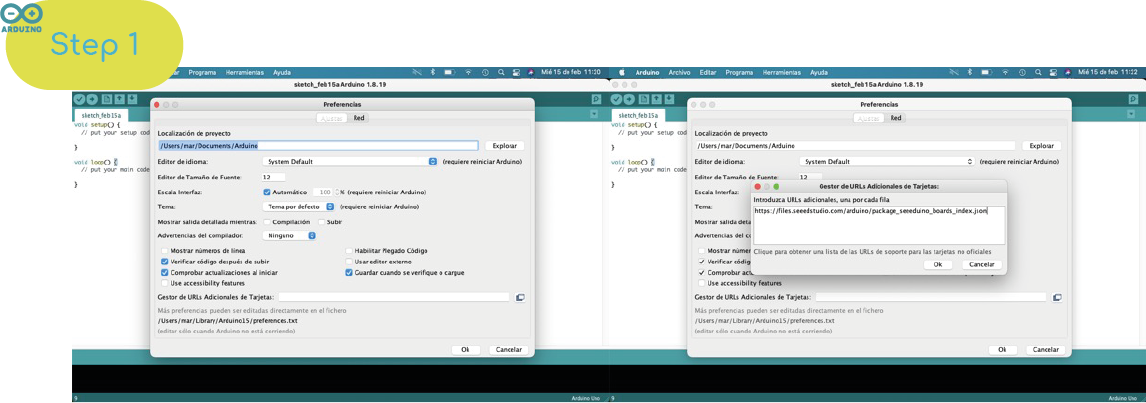
I go to the preference section and i check the compilation section and I click “Additional boards manager URLs” button. Then I add the link: “https://files.seeedstudio.com/arduino/package_seeeduino_boards_index.json”
I select the plate model and download it: Tools>Board>Board Manager:"Xiao rp2040"
I select my board type and port. Tools>Board “Seeed XIAO RP2040”>Seeed XIAO RP2040>Seeed XIAO RP2040 Tools> Port>/dev/cu.usbmodem 1420

I click on “examples” to open the LED blink example sketch, because the examples contains many simple beginner level programs: File > Examples >01.Basics > Blink. Compiling... The following program would have appeared and I use the checkmark appearing in the circular button to verify the code and l click the “Upload” button in the environment. The leds on the board flashing¡


Libraries
Libraries provide extra functionality for use in sketches, working with hardware or manipulating data. To use a library in a sketch, select it from Sketch > Import Library.

                #include
                int boton1 = 0;
                int controlPin =8;
                Adafruit_NeoPixel NP1 = Adafruit_NeoPixel( 1, controlPin + NEO_KHZ800);
                void setup()
                {
                NP1.begin();
                pinMode(1, INPUT);
                pinMode(0, OUTPUT);
                pinMode(9, OUTPUT);
                }


                void loop()
                {
                  boton1 = digitalRead(1);
                  if (boton1 == 1) {
                    digitalWrite(0, HIGH);
                  } else {
                   digitalWrite(0, LOW);
                  }

                  NP1.setPixelColor(0, NP1.Color (56 , 4 , 209));
                  NP1.show();


                  tone(9,130,81);


                  delay(1000);
                  NP1.clear();
                  NP1.show();

                  delay(1000);

                }
ESP32
Open my Second Arduino program. I go to the preference section and check the compilation section and I click “Additional boards manager URLs” button. Then I add the link: “https://raw.githubusercontent.com/espressif/arduino-esp32/gh-pages/package_esp32_index.json”>githubusercontent
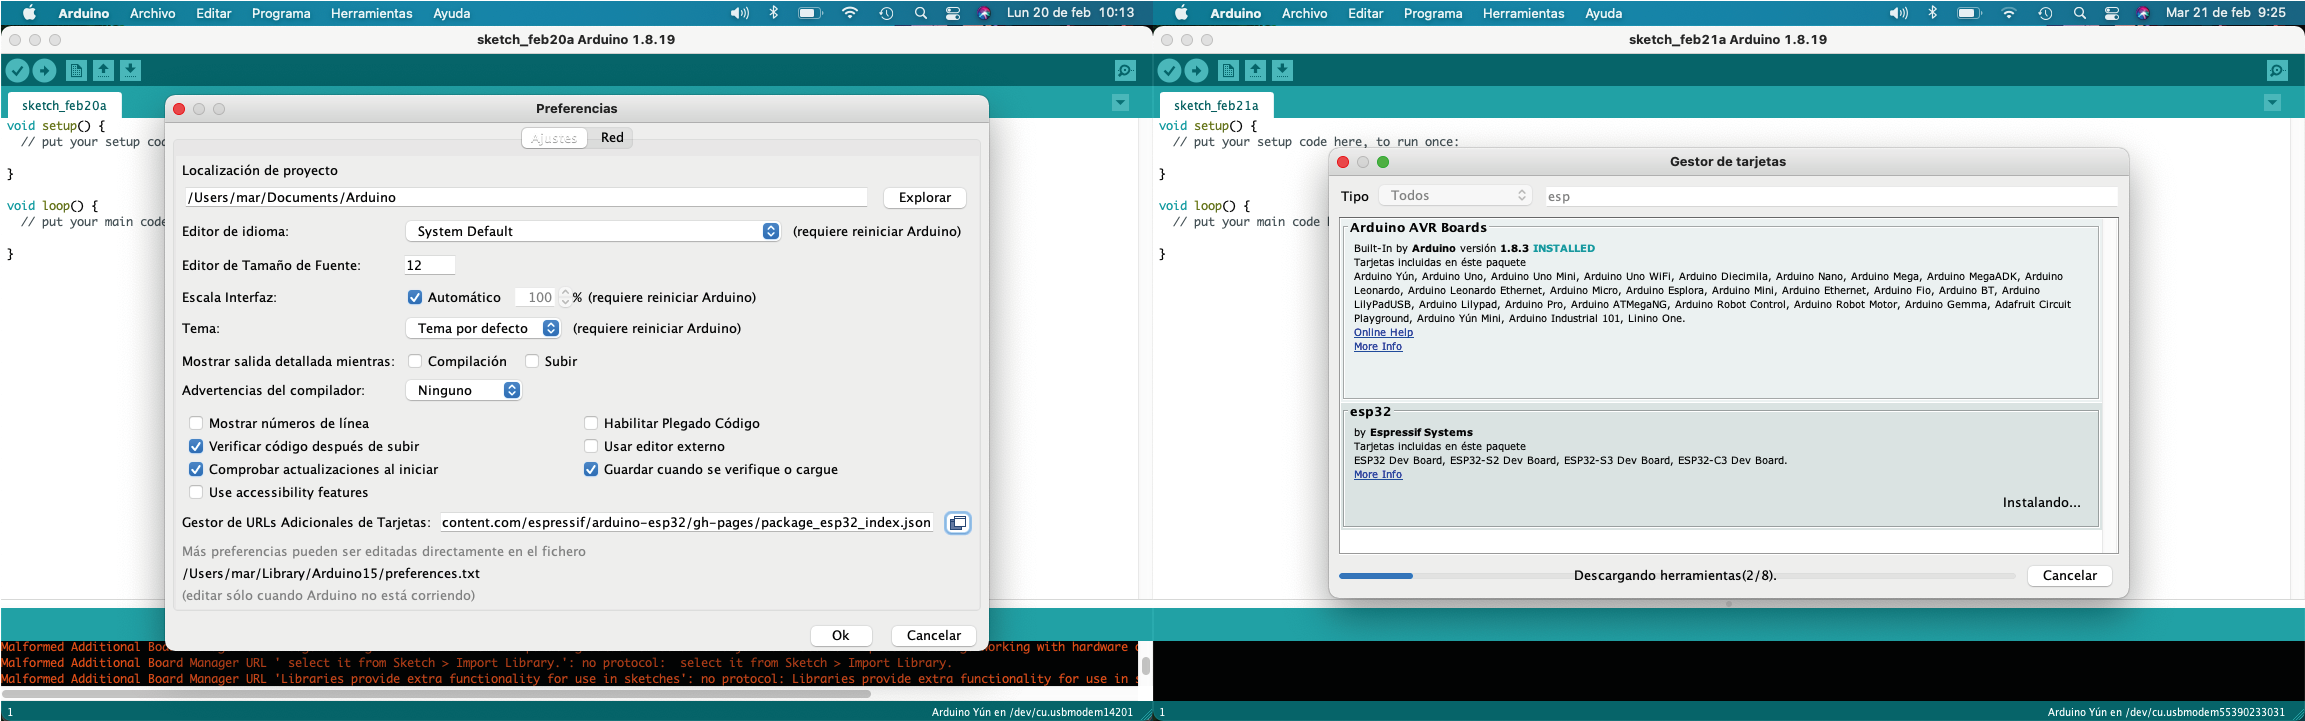
I select the plate model and download it: Tools>Board>Board Manager “ESP32 by Espressif Systems“. And I select my board type and port. Tools>Board>DOIT ESP32 DEVKIT V1 Tools> Port>/dev/port

Serial
This is an example of communication between the board and the computer through the serial monitor, it is a serial communication.
First place "serial.begin" and the speed (vauds) that the ESP32 easily supports. Then you will place the first message with "Serial.print" "Hello word" (it will send it only once because it is in void setup). With Serial.println I print a new line "Hola mundo". In the loop, we will verify that the message is repeated, and we will place a delay so that it is repeated every 2 seconds.
            void setup() {
              // put your setup code here, to run once:
              //inicialize the serial port
              Serial.begin(115200);

              //Greet the word
              Serial.print("Hello world");
              Serial.println("Hola mundo");

            }

            void loop() {
              // put your main code here, to run repeatedly:
              Serial.println("loop");
              delay(2000);

            }
Phyton
In this IDE, I need to experiment more about how it works.

This week I had my first approach with Arduino and Python, the latter was more difficult for me to work with, but I was more comfortable with Arduino.