Appearance
Molding and Casting
This week we have learned a lot about molding and casting. The task involves designing an object using 3D software, which will then need to be exported to be milled by a CNC machine. After that, I need to create a mold and use it to cast the object in the material of we choice.
Group Work 2023 & 2025 - Materials Familiarization
Assignment: Review the safety data sheets for each of your molding and casting materials, then make and compare test casts with each of them / Compare mold making processes The materials we used for molding and casting are Casting Wax, Silicone and Epoxy.
Casting Wax (2023 & 2025)
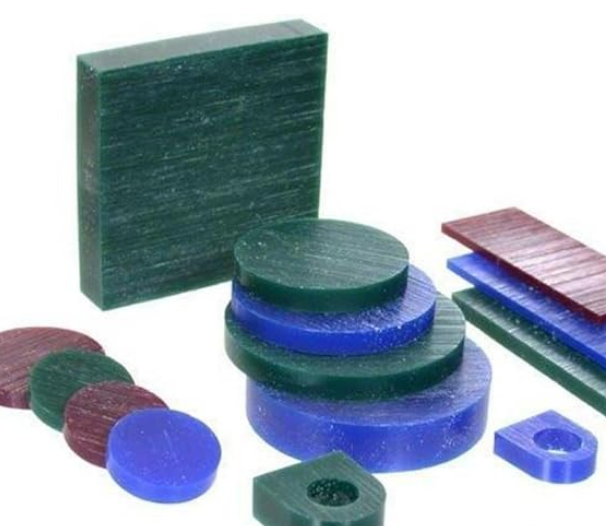
- Physical State: Solid at 25 °C, becomes liquid when melted (melting point: 52–58 °C)
- Release Agent: Not required (self-releasing)
- Melting Ratio: 100% pure wax (no mixing required)
- Heating Time: 30 minutes of indirect heating at 65–70 °C for complete liquefaction
- Setting Time at 25 °C: Surface skin: 8–10 minutes / Full solidification: 40–50 minutes
- Reusability: Reusable 3–5 times
Precautions Using Casting Wax
Use in a Well-Ventilated Area
- Melting wax can release fumes or vapors—especially if overheated. Always use it in a well-ventilated room or under a fume hood to avoid inhalation. Control Heating Temperature
- Never exceed the wax's recommended melting point (typically 65–120 °C). Overheating can lead to decomposition, smoke, or even fire. Avoid Open Flames
- Wax is flammable. Use electric hotplates or controlled heating tools instead of open flames to prevent ignition. Wear Protective Gear
- Use heat-resistant gloves, eye protection, and long sleeves when handling hot wax or molds to prevent burns and splashes. Prevent Spills and Slips
- Spilled wax can be slippery and hard to clean. Work over a protected surface and promptly clean up any drips or splashes. Keep Away from Water
- Introducing water to molten wax can cause dangerous splattering. Always ensure tools and containers are dry before use. Label and Store Properly
- Store casting wax in a cool, dry place away from heat sources. Label containers clearly to avoid confusion with similar-looking materials. Dispose of Waste Responsibly
- Collect and dispose of wax scrap and containers according to local environmental and chemical waste regulations.
Silicone Material
HongYeJie Silicone HY-630:Datasheet. From data sheet it can be seen that : the Mixing Ratio is 100:3 / the Pot Life(Set Time) is 30 mins / the Curing Time is 3-4 hours.
| Model | HY-605 | HY-610 | HY-615 | HY-620 | HY-625 | HY-630 | HY-635 | HY-640 |
|---|---|---|---|---|---|---|---|---|
| Color | White/Semi-transparent | White/Semi-transparent | White/Semi-transparent | White/Semi-transparent | White/Semi-transparent | White/Semi-transparent | White/Semi-transparent | White/Semi-transparent |
| Viscosity (cps) | 11,000 | 13,000 | 11,000 | 15,000 | 22,000 | 24,000 | 24,000 | 12,000 |
| Density (g/cm³) | 1.04 | 1.04 | 1.05 | 1.06 | 1.06 | 1.06 | 1.08 | 1.05 |
| Hardness (Shore A) | 5 | 10 | 15 | 20 | 25 | 30 | 35 | 40 |
| Tensile Strength (MPa) | 2.2 | 2.3 | 3.2 | 3.7 | 4.3 | 4.8 | 4.8 | 4.2 |
| Tear Strength (kN/m) | 9 | 10 | 18 | 21 | 27 | 29 | 27 | 20 |
| Elongation (%) | 320 | 320 | 350 | 420 | 420 | 400 | 200 | 150 |
| Linear Shrinkage (%) | ≤ 0.5 | ≤ 0.4 | ≤ 0.3 | ≤ 0.3 | ≤ 0.3 | ≤ 0.3 | ≤ 0.3 | ≤ 0.3 |
| Curing Agent Ratio (%) | 2–5 | 2–5 | 2–5 | 2–5 | 2–5 | 2–5 | 2–5 | 2–5 |
| Working Time (mins) | 30 | 30 | 30 | 30 | 30 | 30 | 30 | 30 |
| Curing Time (hours) | 3–4 | 3–4 | 3–4 | 3–4 | 3–4 | 3–4 | 3–4 | 3–4 |
Hazards & safety precautions with Silicone
Silicone Resin Hazards
- Skin and Eye Irritation: Direct contact with uncured silicone resin can cause irritation to the skin and eyes.
- Respiratory Issues: Inhalation of fumes from uncured silicone resin can lead to respiratory problems, including irritation of the nose, throat, and lungs.
- Chemical Burns: Uncured silicone resin can cause chemical burns if it comes into contact with the skin.
- Fire Hazard: Silicone resin can be flammable, especially in its liquid form.
Safety Measures
- Proper Ventilation: Always work in a well-ventilated area to disperse harmful fumes. Use an exhaust fan or open windows to ensure good airflow.
- Personal Protective Equipment (PPE): Wear gloves, safety goggles, and a respirator mask to protect your skin, eyes, and lungs from exposure.
- Avoid Direct Contact: Handle silicone resin with care to avoid spills and splashes. If contact occurs, wash the affected area immediately with soap and water.
- Safe Storage: Store silicone resin in a cool, dry place away from direct sunlight and heat sources. Keep it out of reach of children and pets.
- Proper Disposal: Dispose of silicone resin waste responsibly. Follow local regulations for disposal of hazardous materials.
Epoxy Material (2023 & 2025)
JIANBANG H80-5:Datasheet.From data sheet it can be seen that : the Mixing Ratio is 3:1 / the Pot Life(Set Time) is 20 mins/ the Curing Time is 24-48 hours.

Hazards & safety precautions with Epoxy
Epoxy Resin Hazards
- Skin and Eye Irritation: Direct contact with uncured epoxy resin can cause irritation to the skin and eyes.
- Respiratory Issues: Inhalation of fumes from uncured epoxy resin can lead to respiratory problems, including irritation of the nose, throat, and lungs.
- Chemical Burns: Uncured epoxy resin can cause chemical burns if it comes into contact with the skin.
- Long-term Health Effects: Prolonged exposure to epoxy resin can lead to liver and kidney damage, as well as respiratory issues.
- Fire Hazard: Epoxy resin can be flammable, especially in its liquid form.
Safety Measures
- Proper Ventilation: Always work in a well-ventilated area to disperse harmful fumes. Use an exhaust fan or open windows to ensure good airflow.
- Personal Protective Equipment (PPE): Wear gloves, safety goggles, and a respirator mask to protect your skin, eyes, and lungs from exposure.
- Avoid Direct Contact: Handle epoxy resin with care to avoid spills and splashes. If contact occurs, wash the affected area immediately with soap and water.
- Safe Storage: Store epoxy resin in a cool, dry place away from direct sunlight and heat sources. Keep it out of reach of children and pets.
- Proper Disposal: Dispose of epoxy resin waste responsibly. Follow local regulations for disposal of hazardous materials.
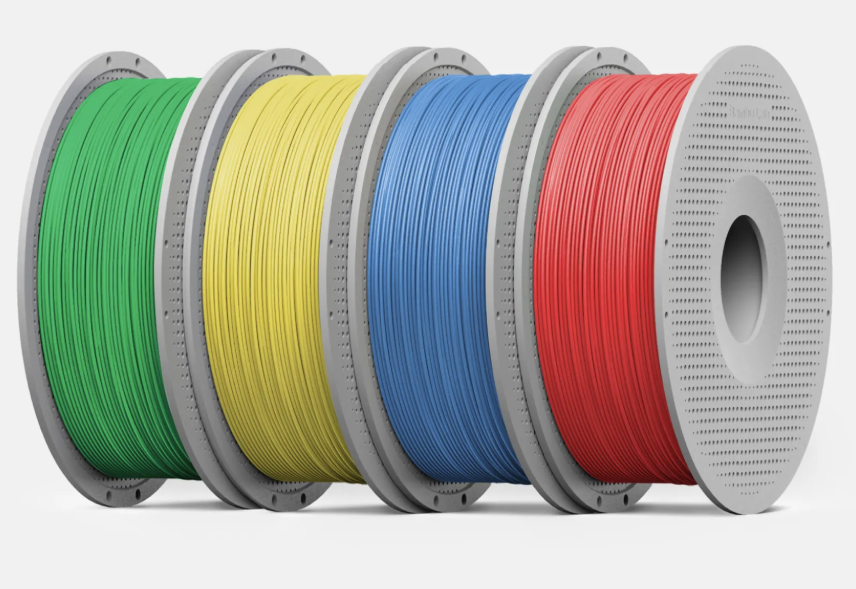
PLA Basic Material (2025)
Bambu PLA Basic See:Datasheet.
- Material Overview
- Type: PLA (Polylactic Acid), biodegradable and bio-based polymer.
- Application: Suitable for general-purpose 3D printing with good dimensional stability and surface quality.
- Physical Properties
- Density: ~1.24 g/cm³
- Melting Temperature: Approx. 150–170 °C (melting begins around 150 °C, full melting near 170 °C)
- Glass Transition Temperature (Tg): Around 60–65 °C (The temperature where PLA softens but not fully melts.)
- Mechanical Properties
- Tensile Strength: ~50 MPa (strong enough for moderate mechanical use)
- Elongation at Break: ~6–10% (brittle compared to flexible filaments)
- Flexural Strength: ~70 MPa
- Flexural Modulus: ~3,200 MPa
- Thermal Properties
- Heat Deflection Temperature: Around 55–60 °C under load, meaning PLA can start to deform under heat close to this range.
- Recommended Printing Temperature: 200–220 °C (extrusion temperature)
- Printability
- Printing Speed: Recommended 40–60 mm/s
- Bed Temperature: 50–60 °C
- Adhesion: Good adhesion on PEI or glass beds with glue stick.
Hazards & safety precautions with PLA 3D Printing
PLA Hazards
- Fume Emissions: Although PLA emits minimal odor, it can still release ultrafine particles (UFPs) and volatile organic compounds (VOCs) when heated—especially at higher extrusion temperatures.
- Overheating Risk: Printing above recommended temperatures (>230 °C) can degrade PLA and release irritants like lactide or small amounts of formaldehyde.
- Burn Hazard: Heated nozzles and print beds (~200–220 °C) can cause serious burns if touched.
- Fire Hazard (Rare): Malfunctioning printers or improper wiring may pose a fire risk in unattended operations.
- Mechanical Risks: Moving parts (gears, belts, fans) can catch fingers, hair, or clothing during operation.
Safety Measures
- Ventilation:Operate printers in well-ventilated areas or use HEPA/charcoal filtration enclosures to reduce exposure to UFPs and VOCs.
- Temperature Control: Use the manufacturer’s recommended temperature settings (200–220 °C for PLA) to avoid thermal degradation.
- Avoid Contact with Hot Parts: Clearly label hot surfaces; allow printer to cool before maintenance.
- Supervised Printing: Avoid leaving printers unattended, especially during long prints.
- Regular Maintenance: Keep firmware and hardware updated to prevent malfunctions or overheating.
- Personal Protection: Use safety glasses when removing prints or working with sharp tools; consider gloves when handling hot beds or cleaning with solvents.
Mold making processes comparison
Comparison of Brick Wax Mold vs. AB Silicone Mold vs. 3D Printed PLA Mold (2025).
🧱 Brick Wax Mold
Best Use: Ideal for master molds made with CNC milling or engraving
✅ Advantages:
- High Precision
- Excellent for CNC processing—surface finish is smooth enough to eliminate post-polishing.
- Time-Efficient
- Much faster than manual sculpting—ideal for rapid prototyping or one-off masters.
- Recyclable
- Waste wax can be melted and reused (3–5 times), minimizing material waste.
- Easy to Machine
- Low tool wear; suitable for both roughing and fine-detail carving.
- Self-Releasing
- No release agent required when casting from wax molds.
❌ Disadvantages:
- Heat Sensitivity
- Low melting point (~52–58 °C); not suitable for high-temperature casting.
- Fragile
- Brittle under mechanical stress; not durable for repeated use.
- Limited Lifespan
- Best for creating single-use or short-term molds.
🧪 AB Silicone Mold
Best Use: Ideal for replicating parts, batch casting, or working with complex shapes
✅ Advantages:
- Flexible and Durable
- Excellent for complex, undercut, or flexible designs—can be reused many times.
- High-Temperature Resistance
- Can withstand temperatures up to 200–250 °C, suitable for resin or low-melt metal casting.
- Captures Fine Detail
- Great surface fidelity, even for tiny textures and patterns.
- Versatile
- Compatible with a wide range of casting materials: resins, waxes, plasters, low-melt alloys, etc.
❌ Disadvantages:
- Longer Process Time
- Requires mixing (Part A + Part B), degassing (if needed), and curing time (can take hours).
- Not CNC Machinable
- Must be poured into a mold—not suitable for subtractive processes like milling.
- Higher Material Cost
- Generally more expensive than wax per unit volume and not recyclable.
🖨️ 3D Printed PLA Mold
Best Use: Ideal for rapid prototyping, complex geometries, or when CNC access is limited
✅ Advantages:
- Complex Geometry
- Easily produce intricate and internal features impossible or expensive to machine.
- Fast Iteration
- Quick design-to-part cycle via CAD and 3D printing—ideal for rapid prototyping.
- Cost-Effective for Small Runs
- Low upfront tooling cost; good for small batch or one-off molds.
- Wide Accessibility
- Desktop 3D printers make mold fabrication accessible without specialized equipment.
❌ Disadvantages:
- Lower Heat Resistance
- PLA melts around 180–220 °C but tends to deform under heat; limited use with hot casting materials.
- Surface Finish
- Layer lines may require post-processing for smoothness, affecting detail fidelity.
- Limited Reusability
- Prone to wear and damage; usually suitable for a few uses depending on casting material.
- Not Self-Releasing
- Often requires release agents to avoid sticking, especially for resin casting.
🔄 Summary Table
| Feature | Brick Wax Mold | AB Silicone Mold | 3D Printed PLA Mold |
|---|---|---|---|
| CNC Machinable | ✅ Yes | ❌ No | ❌ No |
| Precision | ✅ High | ✅ High | ⚠️ Moderate (layer lines) |
| Reusability | ⚠️ 3–5 times | ✅ 10–50+ times | ⚠️ Limited (few uses) |
| Heat Resistance | ❌ Low (~58 °C) | ✅ High (up to 250 °C) | ⚠️ Moderate (180–220 °C, deformation risk) |
| Material Cost | ✅ Low | ❌ Higher | ✅ Low to Moderate |
| Detail Reproduction | ✅ Good (via CNC) | ✅ Excellent (via casting) | ⚠️ Good but may require finishing |
| Time Efficiency | ✅ Fast (if CNC available) | ❌ Slower (due to curing) | ✅ Fast (print time varies) |
| Eco-Friendliness | ✅ Recyclable | ❌ Single-use waste | ⚠️ Depends on filament type; generally low waste |
Mold & Cast 2025
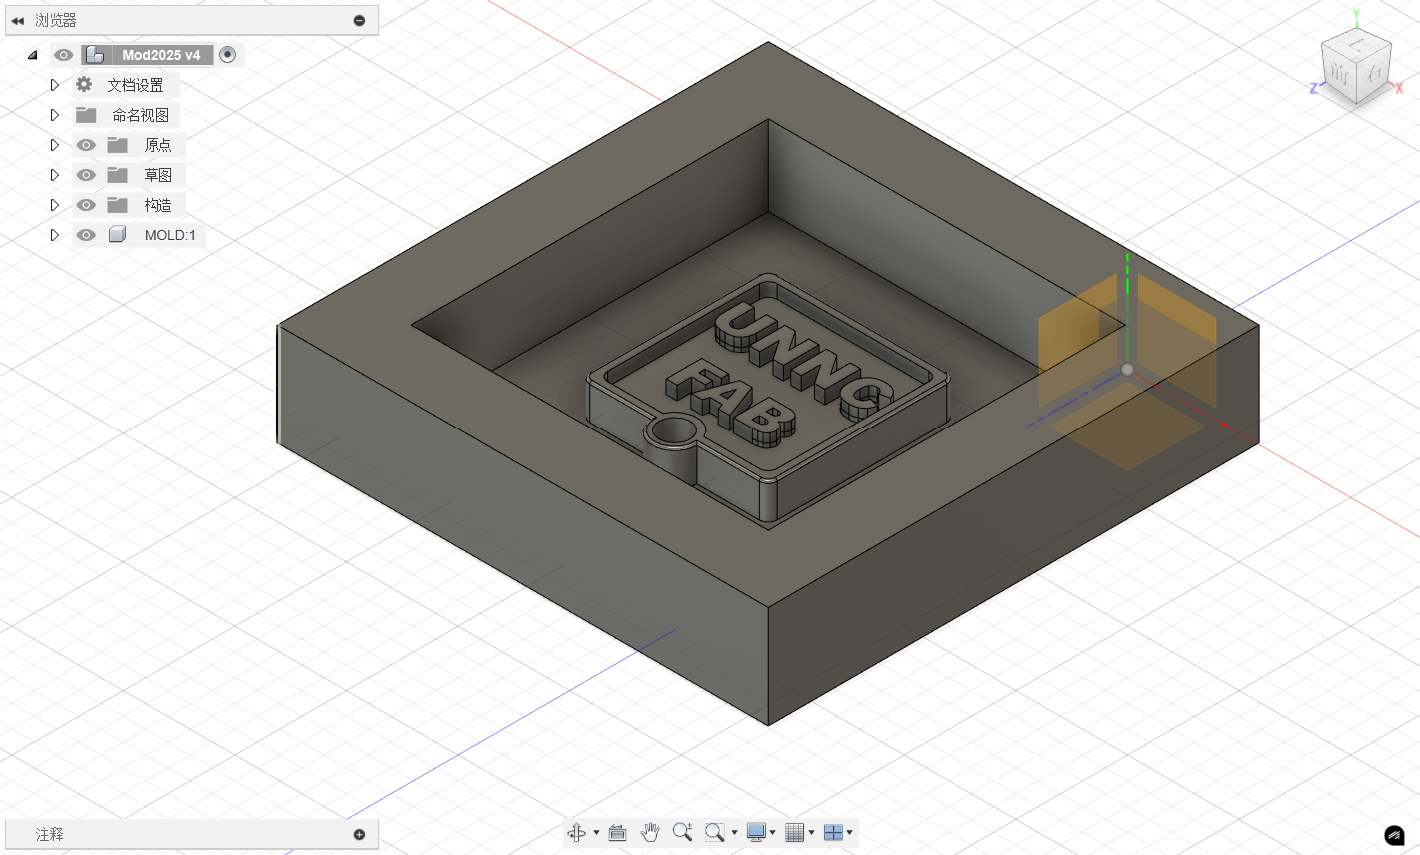
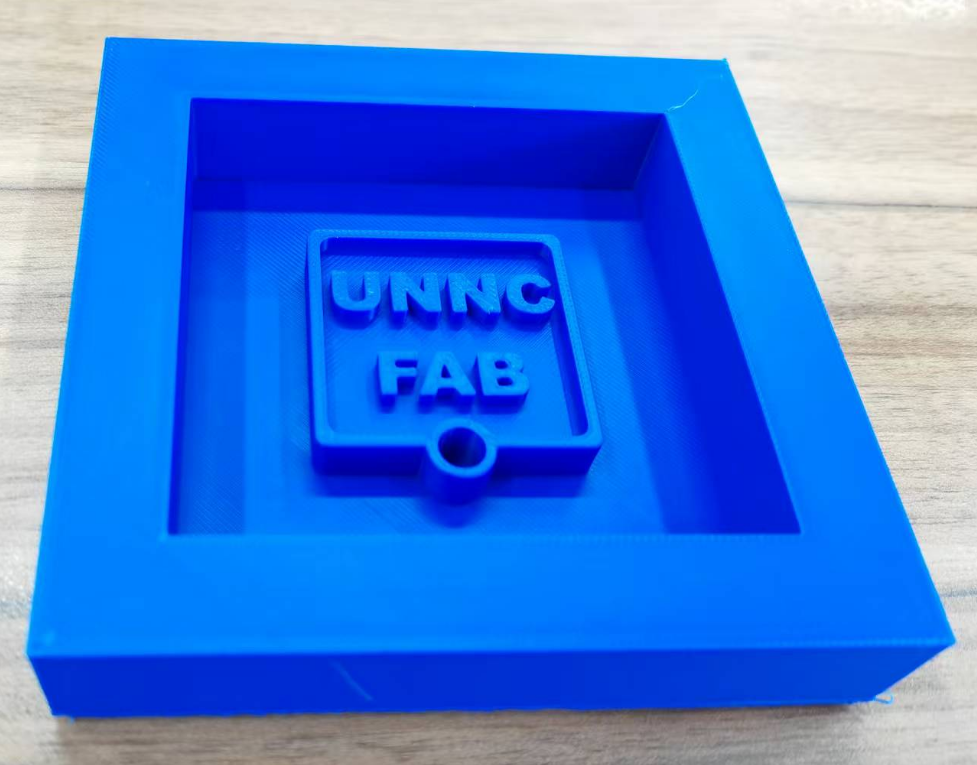
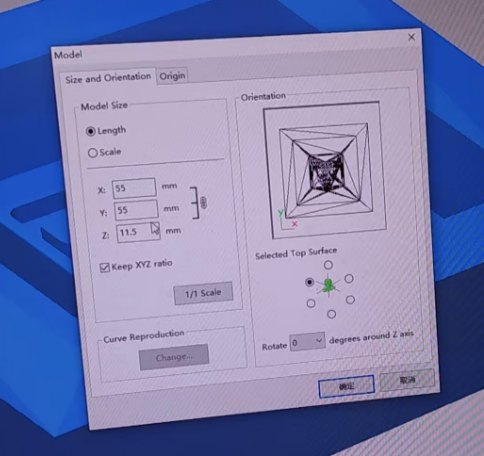
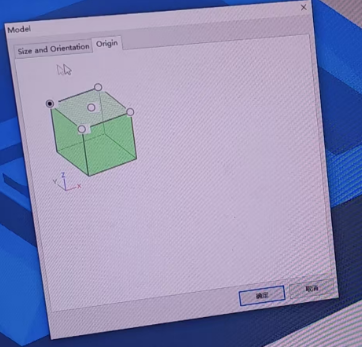
Design a mold with Fusion
Design a key tag mold for our UNNC-FAB lab. The mold can be download at my repo with file name Mold 2025.
Manufacture the mold
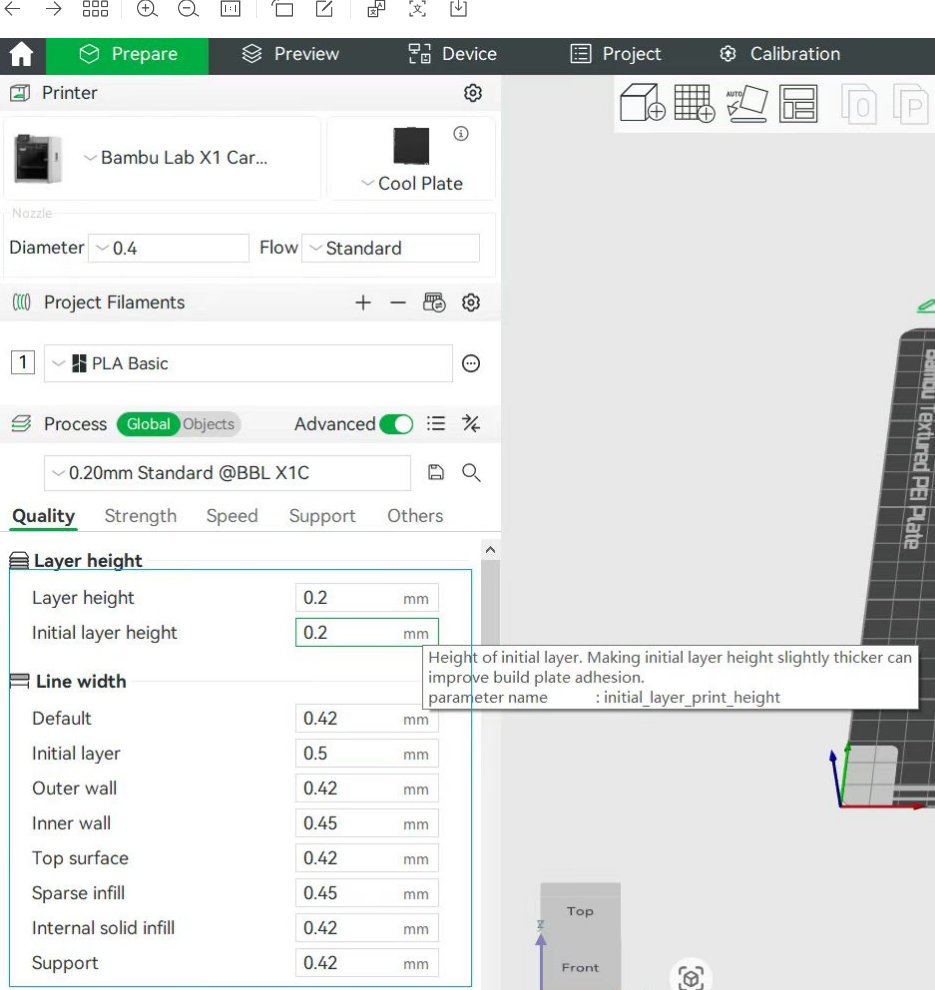
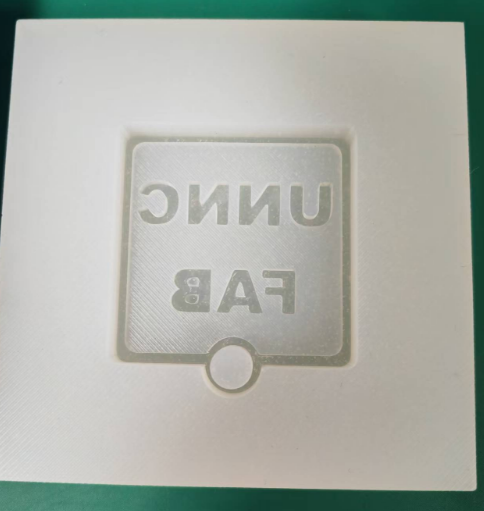
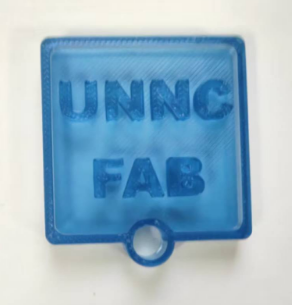
3D Printing PLA
Using the default settings for the printing process. The printer layer height is 0.2mm and default line width is 0.42mm.
Send to our new printer to print the mold.
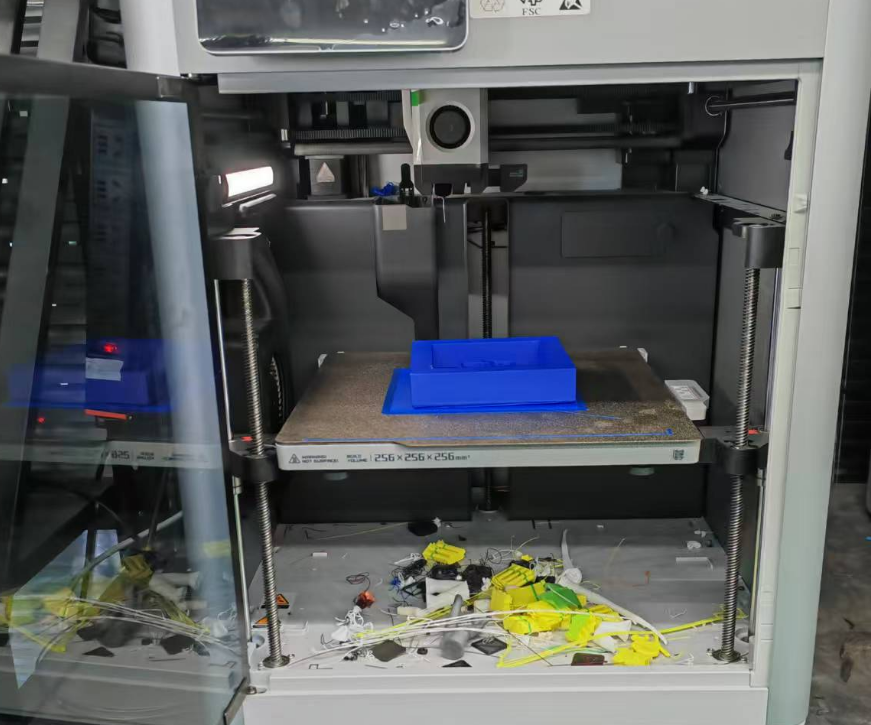
The result is seen as below.
Roland CNC WAX
The basic CAM design setting process is documented as pictures below.
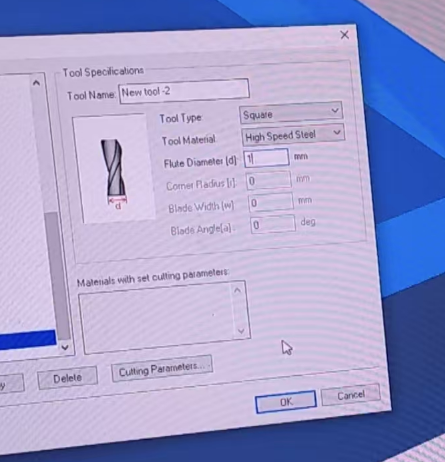
Add new tools.
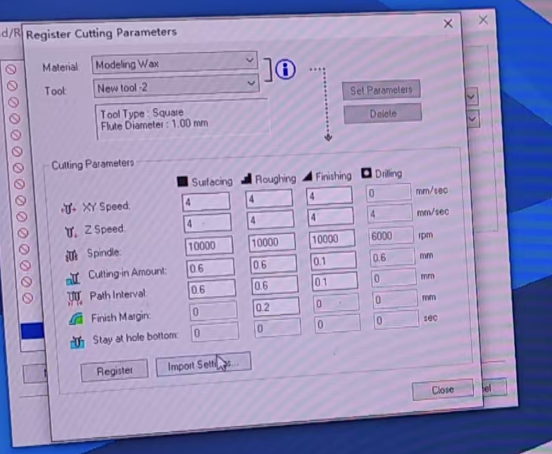
Edit new CAM process.
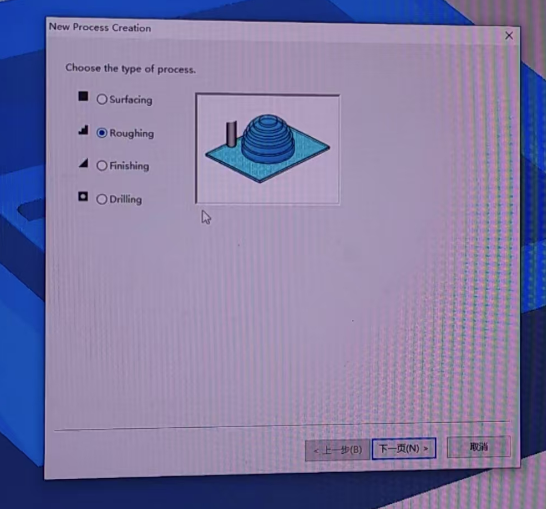
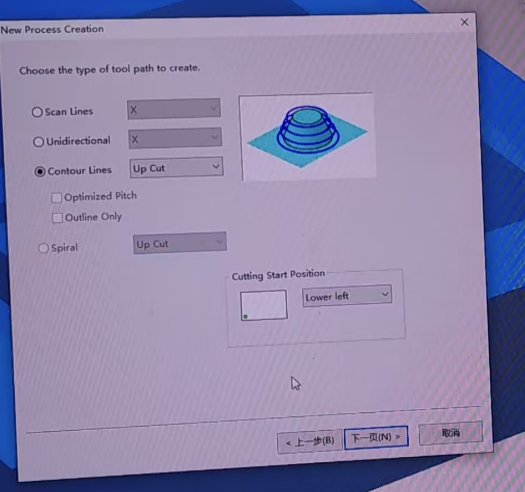
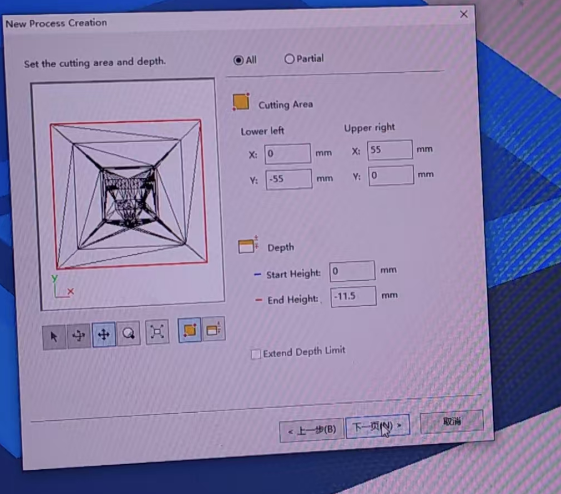
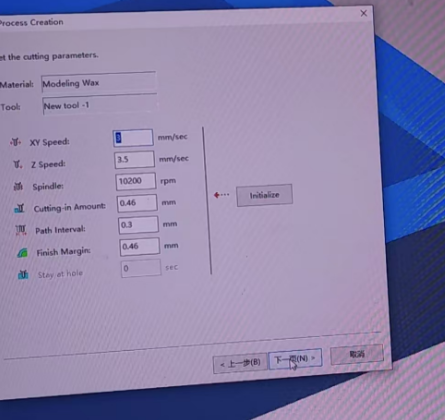
Using a 1mm cutter for a rough cutting first.
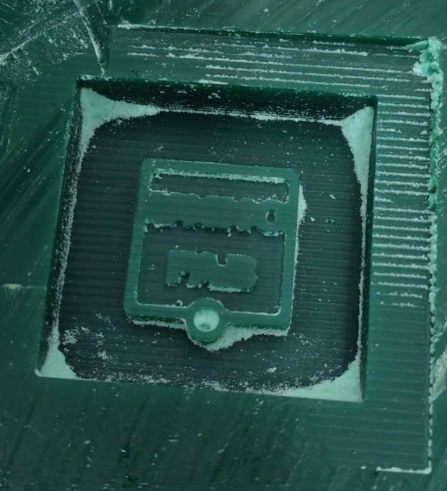
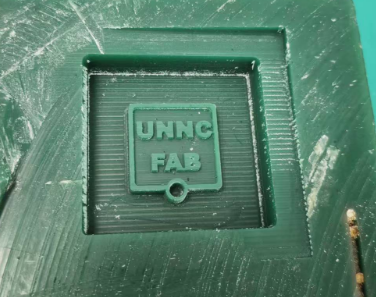
Then change to a 0.5mm cutter for fine finishing cutting for better surface quality.
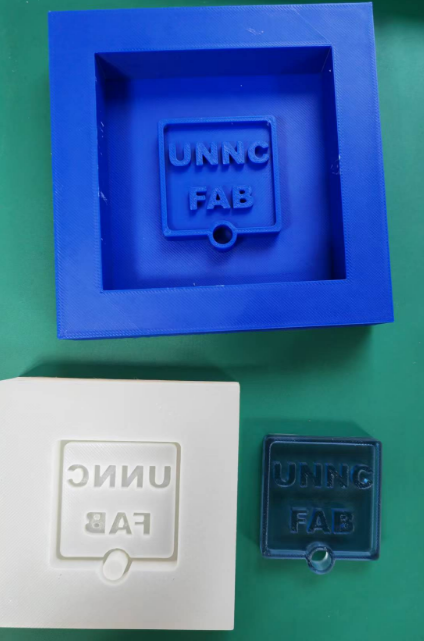
Cast with Silicone & Epoxy
Use the 3D printed mold to cast a silica mold. The proportion of the silicone gel and curing agent need to be accurate 100:3.
Silicone mold.
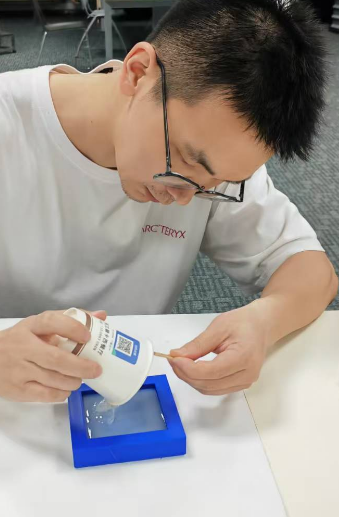
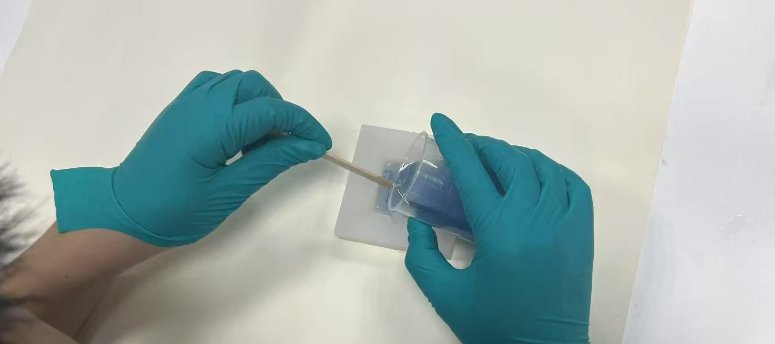
Then using epoxy resin for the casting. Stirring the mixed resin till there is no floccule, pour it into the silica mold then wait 48 hours for solidification.
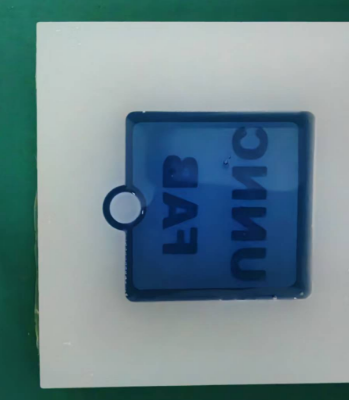
Blue dye is added to the clear resin to achieve the blue effect.
Mold result comparison
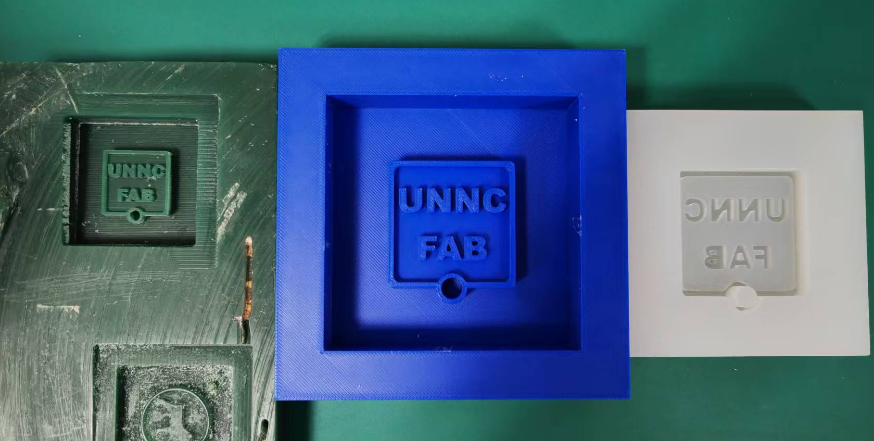
| Mold Type | Surface Finish Description |
|---|---|
| 🧱 Brick Wax Mold | ✅ Very smooth surface (CNC-machined) |
| 🧪 AB Silicone Mold | ✅ Excellent detail reproduction |
| 🖨️ 3D Printed PLA Mold | ⚠️ Visible layer lines due to FDM printing / Post-processing (sanding/polishing) recommended |
Design and manufacture a mold 2023
Design with Fusion360
Fusion 360 was used to design the dog coin mold as below. First I have draw the coin design in 2D.

Four positioning hole were designed for the mold at this stage.

Then I extrude the 2D design to my mold.

Manufacture the mold with ROLAND
Open the stl file with MODELA PlAYER 4.

First select rough milling and roughly mill the wax with a 2mm cutter.

Select the tool parameters used for machining.

Then adjust the milling parameters.

The toolpath can then be generated.

The rough cutting result can be seen as photo below, then change to a 1mm cutter for fine milling.

Repeat the steps above to get a fine finishing wax mold surface.

Casting practice 2023
Use the wax mold to cast a silica mold, first we need to weight the silica gel and curing agent to make sure they are in right proportion(100g:3g).


Stir it for approximately 20 mins and pout it into the wax mold.


After curing a silica mold can be attained.

Using epoxy resin for the casting, remember to make sure the right proportion with electronic scale. Epoxy resin A to epoxy resin B ratio is approximately 75g:25g.


using epoxy resin for the casting The stir the mixed resin till there is no floccule, pour it into the silica mold then wait 48 hours for solidification. The quality of this epoxy resin is too poor as the actual curing time is much longer than expected, Bob suggests we should use the material produced by HeiCast to avoid this problem.

Unfortunately, there is a large bubble in at the edge of this coin after it become hard.
Some Interesting Work 2023 - Make A Table with Molding and Casting Technic
We have an very large natural board in our lab and we plan to make a tea table form it with epoxy.

This board was first polished using a sander, the border mold was made by tape the wood with paperboard on a lager foam board then epoxy resin were fill into the mold.
At one edge of the wood board, there is a big gap between it and the foam base, so we use tape the seal the gap. Foam balls and glue were also used to seal the gap.

Paperboard was used to form a curved boundary.

We have also using laser cutting made some acrylic letters, beside one of the electronic board was placed inside the resin.

At current stage the border is already removed, but the board still need further polishing.

Lesson learned: Don't use tape to make your mold border and make sure there is no leak point, otherwise it will turn into a disaster when you pouring the resin. The epoxy was add layer by layer, unfortunately the resin leak out when we try to add a third layer. Sad news, now our floor is ruined.

Reference
Here is the link for my mold design: https://a360.co/48Wg0ew. The download file can also be found in my repo: https://gitlab.fabcloud.org/academany/fabacademy/2023/labs/ningbo/students/yaorun-zhang/-/tree/main/docs/assignments/week12/week12-design?ref_type=heads.