Week 13: Embedded Networking and Communications
Tasks for This Week
Group assignment
- Send a message between two projects
- Document your work to the group work page and reflect on your individual page what you learned
Individual assignment
- Design, build, and connect wired or wireless node(s) with network or bus addresses
Group Assignment
We managed to send a message between a Raspberry Pi and a Xiao RP2040. Although we had experience with the Raspberry Pi during Machine Building Week we missed the need to enable I2C to make what we were using work.
For me this is something to note down as I had never used I2C with a Raspberry Pi before. I noticed there we a number of other connection options that can be enabled and disabled in the Raspberry Pi config menu, this is also something to keep in mind when doing other things in the future such as SPI.
Plan for This Week
To use this opportunity to work on the radio networking for my final project.
On one side to have a Xiao RP2040 connected to an OLED and radio transceiver.
On the other side to have a Xiso RP2040 connected to an accelerometer and a radio transceiver.
This will allow me to test connection and communication between two Xiao RP2040s with input/output as will be done in my final project between the remote/console and the soft toy.
Transceivers I am Using
![]()
I am using 2x 915MHz radio transceivers made locally to my Fab Lab in Lake Macquarie, Australia. These use I2C to communicate with the board. They do not have breakouts and as such I need a cable to connect them to the board.
We used these in the Group Assignment and I found them to be easy to use. Only down side is you need to use a connector cable as they do not have breakouts you can solder to.
Reading the Core Electronics Guide on this transceiver you are able to isolate groups of them from each other and give each one its own radio address so you can be specific about which one you want to talk to if you have a number of them.
Being able to address like this is useful for more complex deployments of these transceivers.
Images from Core Electronics demonstrating groups and addresses
![]()
![]()
Being radio these transceivers have the ability to communicate over a long distance, up to 100m according to Core Electronics. This is one of the great advantages of using radio over Wi-Fi or bluetooth, you can get those longer distances, however you do sacrifice on the size of the message you can send, for example you can send image/video over Wi-Fi, but not over 915MHz radio.
In my experience using LoRaWAN sensors which also use a 915MHz radio network, you get transmission over a long distance, for a low amount of power, which is useful in applications like long term environmental sensing.
Initial Breadboard Testing
I decided to do an initial test in bread boards before using milled boards.
When the accelerometer detects a movement or "shake", on the other Xiao, the OLED records the number of counts and the LED on the transceiver turns on.
Transmit Code (Micropython)
Original Sample Code from Core Electronics for transmitting
# Demonstrate how to use the send() command
# send() will accept strings, values, and "named values" which
# are string,value pairs.

from PiicoDev_Transceiver import PiicoDev_Transceiver
from PiicoDev_Unified import sleep_ms

radio = PiicoDev_Transceiver()

# Text messages
radio.send("Hello, World!")
sleep_ms(1000)

# Numbers (integer or floating point)
radio.send(123)
sleep_ms(1000)

# Named Values
named_data = ('temperature[degC]', 25.0)
radio.send(named_data)
sleep_ms(100)

named_data = ('humidity[%]', 60.0)
radio.send(named_data)
"""
Shake-detection example
shake() can be called without any arguments, but has the following parameters should you need them:
    shake_threshold = 15 (default. Should not be less than 10)
    avg_count = 40 (default)
    total_delay = 100 (default)

"""
from PiicoDev_LIS3DH import PiicoDev_LIS3DH
from PiicoDev_Unified import sleep_ms

motion = PiicoDev_LIS3DH() # Initialise the accelerometer

while True:
    if motion.shake(threshold=15):
        print("shaken!")
    else:
        print("")
    # shake() is blocking, so can be used instead of sleep_ms() to delay a loop.
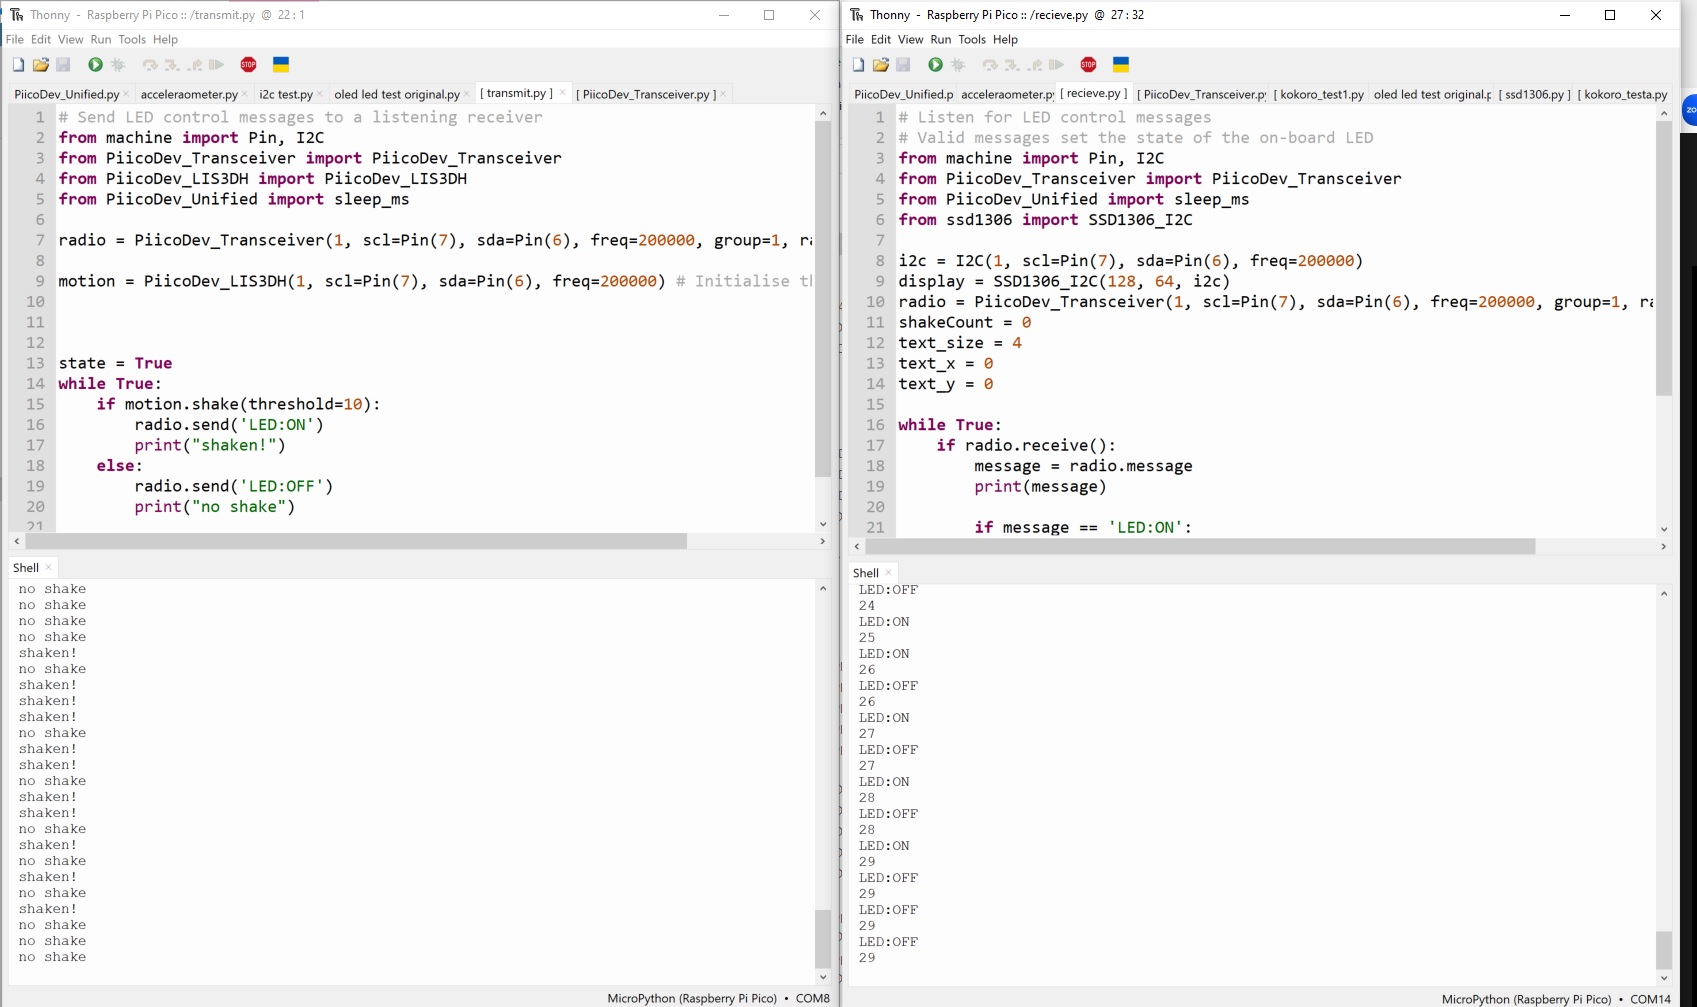
Final combined code - when a shake is detected a message is sent from this board's transceiver to the other board's transceiver, telling it that a shake has occurred.
# Original code by Core Electronics 2023, modified May 2023 by Claire Chaikin-Bryan
# Send LED control messages to a listening receiver
from machine import Pin, I2C
from PiicoDev_Transceiver import PiicoDev_Transceiver
from PiicoDev_LIS3DH import PiicoDev_LIS3DH
from PiicoDev_Unified import sleep_ms

radio = PiicoDev_Transceiver(1, scl=Pin(7), sda=Pin(6), freq=200000, group=1, radio_address=2)

motion = PiicoDev_LIS3DH(1, scl=Pin(7), sda=Pin(6), freq=200000) # Initialise the accelerometer

state = True
while True:
    if motion.shake(threshold=10):
        radio.send('LED:ON')
        print("shaken!")
    else:
        radio.send('LED:OFF')
        print("no shake")

    #state = not state
    sleep_ms(10)
Receive Code (Micropython)
Original Sample Code from Core Electronics for the transceiver
# Listen for LED control messages
# Valid messages set the state of the on-board LED

from PiicoDev_Transceiver import PiicoDev_Transceiver
from PiicoDev_Unified import sleep_ms

radio = PiicoDev_Transceiver()

while True:
    if radio.receive():
        message = radio.message
        print(message)
    sleep_ms(50)
Original Sample Code from Core Electronics for OLED
from PiicoDev_SSD1306 import *
display = create_PiicoDev_SSD1306()

myString = "this is me"
myNumber = 123.4567

display.text("Hello, World!", 0,0, 1) # literal string
display.text(myString, 0,15, 1) # string variable
display.text(str(myNumber), 0,30, 1) # print a variable
display.text("{:.2f}".format(myNumber), 0,45, 1) # use formatted-print
display.show()
For both of the above I also need to add in a declaration of I2C Pins on the Xiao as PiicoDev_Unified.py does not have a built in reference for the Xiao RP2040.
Final combined code - when the transceiver receives a shake message from the other board's transceiver, the OLED will add to the count of number of shakes showing on it.
# Original code by Core Electronics 2023, modified May 2023 by Claire Chaikin-Bryan
# Listen for LED control messages
# Valid messages set the state of the on-board LED
from machine import Pin, I2C
from PiicoDev_Transceiver import PiicoDev_Transceiver
from PiicoDev_Unified import sleep_ms
from ssd1306 import SSD1306_I2C

i2c = I2C(1, scl=Pin(7), sda=Pin(6), freq=200000)
display = SSD1306_I2C(128, 64, i2c)
radio = PiicoDev_Transceiver(1, scl=Pin(7), sda=Pin(6), freq=200000, group=1, radio_address=1)
shakeCount = 0
text_size = 4
text_x = 0
text_y = 0

while True:
    if radio.receive():
        message = radio.message
        print(message)

        if message == 'LED:ON':
            radio.led = True
            shakeCount = shakeCount + 1
        if message == 'LED:OFF': radio.led = False
        # record on oled
        display.fill(0)
        texta = str(shakeCount)
        display.text(texta,0,0)
        print(shakeCount)
        display.show()
    sleep_ms(10)
Test Result
Final Result
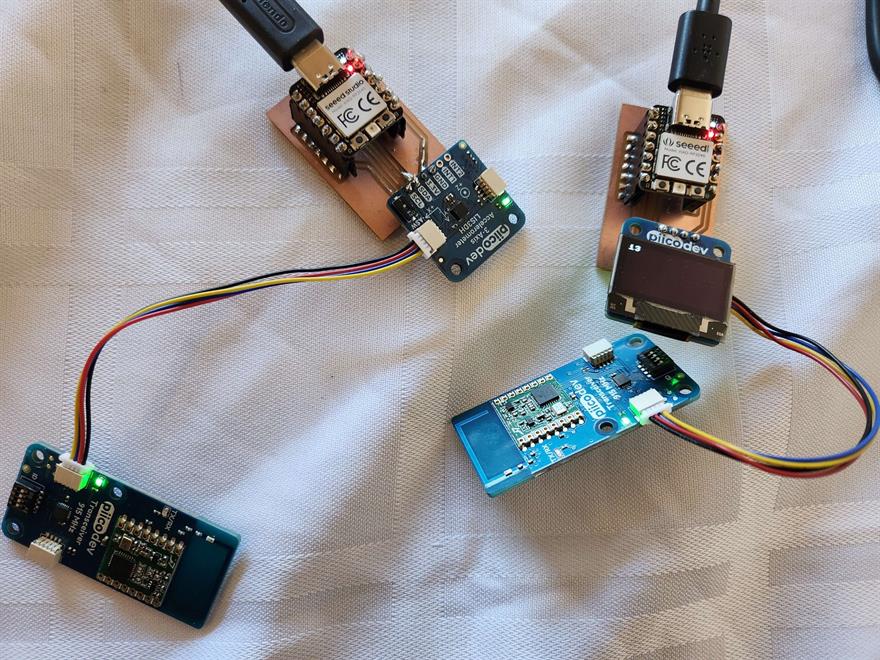
Result with Xiaos in PCBs I made in Output Week and Input Week
![]()
Files
PiicoDev_Unified.py
PiicoDev_Transceiver.py
ssd1306.py
PiicoDev_LIS3DH.py
Transmit.py
Receive.py